Лучшие программы для записи видео с экрана linux
Содержание:
Использование
функциональные комбинации клавиш
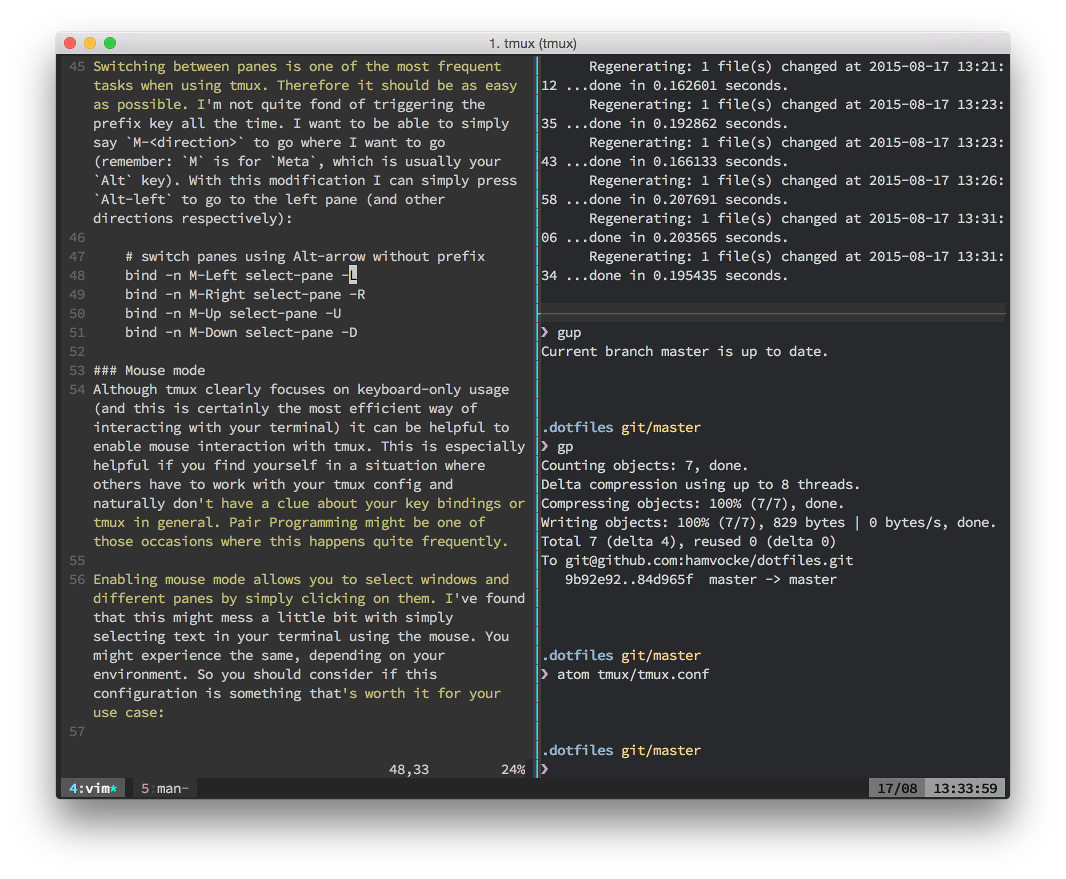
tmux может управляться из присоединенного клиента посредством клавиатурных комбинаций системная кнопка с нажатой клавишей (Ctrl+b по умолчанию) за которой следует нажатие коммандной кнопки.
После нажатия Ctrl+B следующие клавиатурные комбинации могут быть использованы:
Общие комбинации
- ? = Показать все клавиатурные комбинации.
- d = Отсоеденить текущий клиент.
- = Перейти к командной строке tmux
Создание и управление окнами
- c = Создать новое окно
- n = Перейти к следующему окну.
- p = Перейти к предыдущему окну.
- l = Перейти к предыдущему выбранному окну.
- 0-9 = Выбрать окна от 0 до 9.
- ' = Перейти к выбору индекса окна. Потом необходимо ввести номер о название чтобы перейти к соответствующему окну.
- , = Переименовать текущее окно.
- w = Выбрать окно в интерактивном режиме.
- , then type list-windows enter = Display the list of windows.
Создание и управление панелями
- " = Разделить текущую панель на две, верхную и нижнию.
- % = Разделить текущую панель на две, левую и правую.
- o = Выбрать следующую панель отображаемую в данном окне.
- ; = Перейти в предыдущей активной панели
- { = Поменять местами текущую панель с предыдущей
- } = Поменять местами текущую панель со следующей панелью.
- Ctrl+o = Rotate the panes in the current window forwards. * Alt+1 to Alt+5 = Arrange panes in one of the five preset layouts: even-horizontal, even-vertical, main-horizontal, main-vertical, or tiled. * x = Kill the current pane. * ! = Break the current pane out of the window
Операции копирования, вставки и прокрутка
Доступные «горячие клавиши» зависят от того, выбран режим emacs (по умолчанию) или vi. Параметр mode-keys можно задать в .tmux.conf для режима vi.
- = Войти в режим копирования, чтобы скопировать текст или просмотреть историю.
- = Вставить последний скопированный в буфер текст.
- # = Список всех буферов вставки.
- - = Удалить последний скопированный текстовый буфер.
Управление сессией
Запуск сессии
После запуска tmux создает сокет сессии в /tmp/S-<UID>/<Session Name>
tmux может быть запущен следующей командой:
Или, чтобы указать имя сессии при старте, выполните:
Информация о сессиях
Список tmux сессий для просмотра существующей информации о сессии:
0: 1 windows (created Thu Apr 9 09:09:03 2015) (attached)
При перечислении сессий, имя сессии должно отображаться как первый элемент в строке информации о сессии. Из выходных данных выше можно увидеть, что сессия была создана без имени, поэтому на сессию следует ссылаться как на .
Другой способ перечислить сессии — это ввести длинный аргумент .
0: 1 windows (created Thu Apr 9 09:09:03 2015) (attached)
Отобразится тот же результат, что и в предыдущей команде.
Переименование сессии
Простое использование tmux для запуска сеанса не предоставит сессию с удобным и понятным для человека именем.
Если имя сессии по умолчанию недостаточно описательно (, как правило, не описывает много), то её можно переименовать. Предположим, что Ларри-корова запустил tmux без указания имени сессии при запуске. Он начинает работу над компиляцией новой версии Portage и хочет изменить имя сессии в соответствии с текущей задачей. Чтобы изменить имя сессии, он сначала возьмет на себя управление tmux, нажав «магическую клавишу»: Ctrl+b, затем , которая переместит фокус в строку управления tmux. По умолчанию она должна стать желтой. Там он может набрать:
Где действующее (по умолчанию) имя сессии, а — это новое имя сессии. Чтобы переименовать при отсоединении от сессии tmux:
Продолжение сессии
После отсоединения сессии все активные терминалы остаются активными, а также команды, которые еще не завершились. Чтобы возобновить сессию используйте .
Или используйте длинный способ присоединения к существующей сессии:
Демон-подобная операция
Чтобы запустить команду в сессии tmux без присоединения к сессии (как демон), используйте , а затем команду для выполнения в апострофах:
Использование Screen
Запуск программы:
screen
После запуска программы будет показана краткая информация о ней. Для того, чтобы убрать её нажимаем enter или пробел. Вы можете подумать, что ничего не произошло, однако, это не так: вы внутри терминала, запущенного в screen. После этого мы видим привычную нам консоль.
Для подачи команд screen используется сочетание клавишь ctrl+a. Ниже приведён список основных команд, служащих для управления оболочкой:
- c — создание нового окна
- n — переключение к следующему окну
- p — переключение к предыдущему окну
- k — закрытие окна
- d — отключение от скрина
- » — список запущенных в скрине окон
Например, для создания нового окна нужно нажать ctrl+a и нажать клавишу c.
При отключении от скрина все окна и процессы, запущенные в них продолжают выполняться. Для просмотра запущенных скринов используется команда:
screen -ls
Вывод команды будет примерно таким:
There are screens on:
18388.pts-4.asid-ubuntu-vm (23.09.2010 05:05:30) (Detached)
18272.pts-0.asid-ubuntu-vm (23.09.2010 04:54:23) (Detached)
2 Sockets in /var/run/screen/S-root.
Для того, чтобы подключиться к запущенному скрину выполняем команду screen -r <id>. Например, так:
screen -r 18388.pts-4.asid-ubuntu-vm
или короче:
screen -r 18388
Если вы забыли отключиться от скрина с другой машины (в выводе screen -ls рядом с ним будет надпись atached), перехватить его можно с помощью параметра -rd:
screen -rd 18388
Для подключения к последнему скрину можно просто:
screen -r
Ну вот, вроде бы, и всё. Подробнее об этих и других командах, как обычно, в мане.
Как сделать скриншот на Linux
Сложно назвать Linux самостоятельной платформой, скорее она является некой базой для своих дистрибутивов.
В отличие от предыдущих систем, в Linux нет стандартных средств, для получения снимков экрана, для этого используются собственные утилиты.
KDE
При нажатии Print Screen открывается программа KSnapshot, с помощью которой можно сохранить созданный снимок на диске или в буфере.
GNOME
С помощью Gnome-screenshot, после использования Print Screen (для всей области) или Alt+PriScr (для части рабочей области) вы получите необходимый скрин.
Xfce 4
Пользование аналогично двум другим платформам, только используется здесь xfce4-screenshooter. Программы LightShot, Яндекс.Диск и Joxi вполне совместимы со всеми описанными ранее операционными системами.
Terminal
This article or section needs expansion.
Capture with ANSI codes
You can use the command, part of the package.
Just run and from that moment, all the output is going to be saved to the file, including the ANSI codes.
Once you are done, just run and the would ready. The resulting file can be converted to HTML using the AUR package, from the AUR.
To convert the file to , do the following:
$ ansi2html --bg=dark < typescript > typescript.html
Actually, some commands can be piped directly to ansi2html:
$ ls --color|ansi2html --bg=dark >output.html
That does not work on every single case, so in those cases, using is mandatory.
Virtual console
If you merely want to capture the text in the console and not an actual image, you can use , which is part of the package. The following command will dump the textual contents of virtual console 1 to a file in the current directory:
# setterm -dump 1 -file screen.dump
Wayland
Capturing the screen can be done using or AUR for screenshots and (or AUR) for video; AUR is an plugin that allows you to screen capture on wlroots-based compositors. Optionally, can be used to select the part of the screen to capture.
Take a screenshot of the whole screen:
$ grim screenshot.png
Take a screenshot of current window:
$ grim -g "$(swaymsg -t get_tree | jq -r '.. | select(.focused?) | .rect | "\(.x),\(.y) \(.width)x\(.height)"')" screenshot.png
Take a screenshot of a part of the screen:
$ grim -g "$(slurp)" screenshot.png
Capture a video of the whole screen:
$ wf-recorder -o recording.mp4
Capture a video of a part of the screen:
$ wf-recorder -g "$(slurp)"
Example of usage with , and , screenshot directly with Print button to clipboard when running Sway:
~/.config/sway/config
bindsym --release Print exec grim -g \"$(slurp)" - | wl-copy
Tip:
- To use a post-capture screenshot editing and drawing tool such as AUR:
Via a virtual webcam video feed
Install (or AUR) and . Load the kernel module with the following parameters:
# modprobe v4l2loopback exclusive_caps=1 card_label=WfRecorder
Verify that a new virtual video device has been created:
$ v4l2-ctl --list-devices
...
WfRecorder (platform:v4l2loopback-000):
	/dev/video2
...
Start recording the screen with and feed the output to the new virtual video device created by :
$ wf-recorder --muxer=v4l2 --codec=rawvideo --file=/dev/video2 -x yuv420p
You can now select the above virtual video device as your «webcam» in video calling/video conferencing applications (the device is called ). You can use (part of ), , or (part of ) to verify that the virtual video device indeed outputs your screenshare:
$ ffplay /dev/video2
$ mpv av://v4l2:/dev/video2
$ gst-launch-1.0 -v v4l2src device=/dev/video2 ! glimagesink
Sharing individual applications
Warning: This method does not involve a proper implementation of individual application sharing as the region being shared will not change after resizing any windows.
As explained above, is able to record only a portion of the screen by first selecting a region with . To use this functionality for sharing a specific region/application window through a virtual video device, start recording the screen with the following modified command:
$ wf-recorder -g $(slurp) --muxer=v4l2 --codec=rawvideo --file=/dev/video2 -x yuv420p
After selecting a region of the screen, you will be able to access the video feed through the vitual video device as above.
Via the WebRTC protocol
Set the following environment variables before starting your Wayland session:
export XDG_SESSION_TYPE=wayland
export XDG_CURRENT_DESKTOP=sway
Enter the URL into a Chromium tab and enable .
Multiple monitors
/usr/lib/systemd/user/xdg-desktop-portal-wlr.service
Description=Portal service (wlroots implementation)


Type=dbus
BusName=org.freedesktop.impl.portal.desktop.wlr
ExecStart=@libexecdir@/xdg-desktop-portal-wlr --output=eDP-1
Restart=on-failure
Make sure to kill previous instances of for the above change to enter into effect.
History
Screen was originally designed by Oliver Laumann and Carsten Bormann at the Technical University of Berlin and published in 1987.
Design criteria included VT100 emulation (including ANSI X3.64 (ISO 6429) and ISO 2022) and reasonable performance for heavy daily use when character-based terminals were still common. Later, the at-the-time novel feature of disconnection/reattachment was added.
Around 1990, Laumann handed over maintenance of the code to Jürgen Weigert and Michael Schroeder at the University of Erlangen–Nuremberg, who later moved the project to the GNU Project and added features such as scrollback, split-screen, copy-and-paste, and screen sharing.
By 2014, development had slowed to a crawl. Wanting to change this, Amadeusz Sławiński volunteered to help. In response, Laumann granted him maintainership. Sławiński proceeded to put out the first new Screen release in half a decade. Because there were some unofficial «Screen 4.1» releases floating around the Internet, he called this new release «Screen 4.2.0».
In May 2015, on openSUSE Conference, Jürgen Weigert invited Alexander Naumov to help to develop and maintain GNU screen. Two months later with Alex’s help was released.
Features
GNU Screen can be thought of as a text version of graphical window managers, or as a way of putting virtual terminals into any login session. It is a wrapper that allows multiple text programs to run at the same time, and provides features that allow the user to use the programs within a single interface productively. This enables the : persistence, multiple windows, and session sharing.
Screen is often used when a network connection to the terminal is unreliable, as a dropped network connection typically terminates all programs the user was running (child processes of the login session), due to the session ending and sending a «hangup» signal (SIGHUP) to all the child processes. Running the applications under screen means that the session does not terminate – only the now-defunct terminal gets detached – so applications don’t even know the terminal has detached, and allows the user to reattach the session later and continue working from where they left off.
Enable 256 colors
In order for GNU Screen to allow applications or the terminal to use 256 colors, two requisites must be met:
1) The «term screen-256color» line must be specified prior to any ‘screen’ definitions. (ie. «screen -t Mail») The resulting side effect of specifying after ‘screen’ definitions, the $TERM variable will be defined as ‘screen’ instead of the required ‘screen-256color’, and applications will not be able to see the terminal supports 256 colors.
2) Requires both the application and terminal to be compiled with 256 color support.
NotePast the below code prior to any ‘screen’ definitions!
CODE
#
# 256 COLOR SUPPORT
#
# Set terminfo and termcap for nice 256 color terminal
# Allow bold colors - necessary for some reason
#attrcolor b ".I"

# Tell screen how to set colors. AB = background, AF=foreground
#termcapinfo xterm 'Co#256:AB=\E[48;5;%dm:AF=\E[38;5;%dm'
terminfo rxvt-unicode 'Co#256:AB=\E[48;5;%dm:AF=\E[38;5;%dm'

# Erase background with current bg color
#defbce "on"

# By default, screen uses an 8-color terminal emulator. Use the
# following line to enable more colors
term screen-256color
Screen-aware commands[edit | edit source]
If you decided you’d like there to be a variable, you may use it in all sorts of ways.
Say, for instance, you’ve defined a command to play a music file under your cursor:
let s:music_player = 'mplayer'
function PlayTune()
  exe '!'.s:music_player.' "'.expand('<cfile>').'"'
endfunction
If you’re using Screen, you may well want mplayer to open in a different terminal window (but open normally if Screen is not in use). To achieve this, use the following alternative:
let s:music_player = InScreen('mplayer')
function PlayTune()
  exe '!'.s:music_player.' "'.expand('<cfile>').'"'
endfunction
Usage
General usage of screen.
Start session
Screen can be started with the following command:
Once started is will create a socket for the session in /tmp/screen/S-<username> where is the current user running screen.
Any key combination can be used within the session with the exception of Ctrl+a which initiates screen’s Command-Mode.
Give the session a reasonable name on start up:
Start a command in a screen session without attaching to it (similar to a daemon):
Commands
In Command Mode (after pressing Ctrl+a) the following key combinations can be used:
General
- ? — Show quick help information.
- d — Detach from the current session, all windows will continue to run in the background.
Creating and managing windows
- c — create another window
- n or Space — Switch to the next window.
- p or Backspace — Switch to the previous window.
- — Switch to window 0 (similar for 1-9).
- ', then a number or title — switch to window with given number or title, used to reach windows numbered above 9.
- Ctrl+a — Switch to last used window.
- Shift+a — Set title for window.
- " — Display a list of windows, which can be navigated with arrow keys and selected with Enter or Space
- w — Display a non-interactive list of windows at the bottom of screen (see )
-
Esc — Begin «copy mode», which allows scrolling and copying of window contents with following keys.
- Ctrl+B — Scroll up in copy mode.
- Ctrl+F — Scroll down in copy mode.
- arrow keys — Move the cursor in copy mode.
- Space or Enter — Begin or end copying.
- = Paste the text copied in copy mode.
Logging and monitoring
- Shift+h = start/stop logging everything displayed on current window. log will be saved as a file «screenlog.X» under the directory in which screen was run
- h = (disabled in default configuration) dump the current contents of the current window to a file named «hardcopy.X» under the directory in which screen was run
- Shift+m = start/stop monitoring current window for activity, any output produced by a program will cause an alert
- _ = start/stop monitoring for inactivity (i.e. a long and output producing command finishes runnning)
Resume session
After the session is detached, all the active terminals remain active and so do commands that did not finish. To list existing sessions:
There is a screen on:
        30014.pts-1.disi-bigtop (Detached)
1 Socket in /tmp/screen/S-disi.
To resume the session displayed above:
Multiuser
Initiate screen with a human readable session name:
All other clients to view (and act on) the active live terminal can join by running:
Then its like conference call style terminal.
Session within session recursion
You can use a Screen within a Screen session. This occurs when you connect to a another host’s Screen session from within your Screen session.
To signal the secondary (remote) Screen session with the Meta key, you issue the key twice to signal the second (remote) Session.
| Ctrl+a | Your normal meta key usage on your local screen |
| Ctrl+aa | Signals the second (remote) Session |
| Ctrl+aaa | Signals the third (remote) Session |
| Ctrl+aaaa | Signals the fourth (remote) Session, and so on |
Some tend to remap the Meta key on the other terminals so they don’t have to count. However, if you use the console/terminal often, there tends to be a shortage of keys on the keyboard.
Как сделать скриншот на Windows
Скриншот с помощью клавиши Print Screen
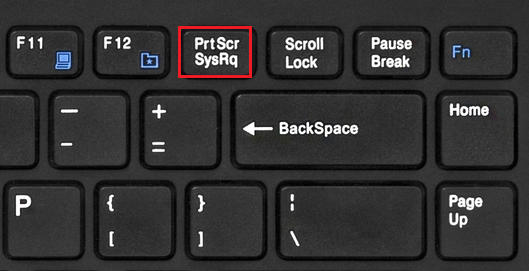
Для этих функций в системе Windows есть кнопка Print Screen. Чаще всего она подписана как PrtScr или PrtSc. Эта неприметная клавиша располагается на клавиатуре справа.
После нажатия кнопки сделанный рисунок автоматически сохраняется в буфере. На некоторых переносных устройствах возможно сочетание клавиш PrtScr и Fn, с дальнейшим выбором папки сохранения.
Еще одно свойство данной операционной системы это сохранение активного окна при нажатии PrtScr и Alt.
«Ножницы»
В меню программ Windows вы найдете инструмент «Ножницы». Он входит в набор Windows Vista, 7, 8, 10.
С его помощью есть возможность сохранить нужную вам часть рабочей зоны в таких форматах как png, jpeg, gif, html, при этом можно воспользоваться функциями «Перо» и «Маркер».
Скачиваемые приложения

Яндекс.Диск — это не только облачное хранилище, но и удобный скриншотер, в котором есть функция моментального сохранения screenshot в хранилище.
LightShot
Это простая в пользовании бесплатная утилита также дает возможность сделать screenshot как всей, так и частичной области экрана. Скачать его можно с официального сайта LightShot.

Joxi
Бесплатное приложение схожее по функциям с LightShot, только имеющее по сравнению с ним одно большое преимущество – возможность делиться снимками в соц. сетях. Скачать его можно с официального сайта Joxi

Настройка разрешения экрана в GUI
Разберём настройку разрешения на примере дистрибутива Ubuntu и окружения рабочего стола Gnome. Откройте утилиту Настройки из главного меню:

Перейдите на вкладку Устройства, а затем выберите пункт Настройка экранов:

Если к компьютеру подключено два монитора Linux или больше, то у вас будет три варианта работы экранов:
- Объединение — все экраны объединяются в одно рабочее пространство;
- Зеркальное отображение — одинаковая картинка на всех экранах;
- Один экран — картинка только на одном экране, другие отключены.
Независимо от того, какой режим вы выбираете, будут доступны настройки Разрешение и Частота обновления, где вы сможете настроить нужные вам параметры:

Так выполняется настройка монитора Linux через графический интерфейс. Если вы хотите объединить экраны, то можно указать разрешение мониторов Linux для каждого из них отдельно:


Но здесь есть один недостаток, вы можете выбрать только то разрешение экрана, которое предлагает система. Если вы захотите установить разрешение выше или ниже тех, что есть, то у вас ничего не выйдет. Для этого надо воспользоваться терминалом.