Обживаемся в консоли: tmux + vim
Содержание:
Customizing tmux
Customizing tmux is as easy as editing a text file. tmux uses a file called to store its configuration. If you store that file as (Note: there’s a period as the first character in the file name. It’s a hidden file) tmux will pick this configuration file for your current user. If you want to share a configuration for multiple users (e.g. if you should feel the urge to start tmux as super user (please think about this carefully!)) you can also put your tmux.conf into a system-wide directory. The location of this directory will be different accross different operating systems. The man page () will tell you the exact location, just have a look at documentation for the parameter.
Less awkward prefix keys
Probably the most common change among tmux users is to change the prefix from the rather awkward to something that’s a little more accessible. Personally I’m using instead but note that this might interfere with bash’s “go to beginning of line” command. On top of the binding I’ve also remapped my Caps Lock key to act as Ctrl since I’m not using Caps Lock anyways. This allows me to nicely trigger my prefix key combo.
To change your prefix from to , simply add following lines to your tmux.conf:
Sane Split Commands
Another thing I personally find quite difficult to remember is the pane splitting commands. I mean, seriously? to split vertically and to split horizontally? Who’s supposed to memorize that? I find it helpful to have the characters as a visual representation of the split, so I chose and for splitting panes:
Easy Config Reloads
Since I’m experimenting quite often with my tmux.conf I want to reload the config easily. This is why I have a command to reload my config on :
Fast Pane-Switching
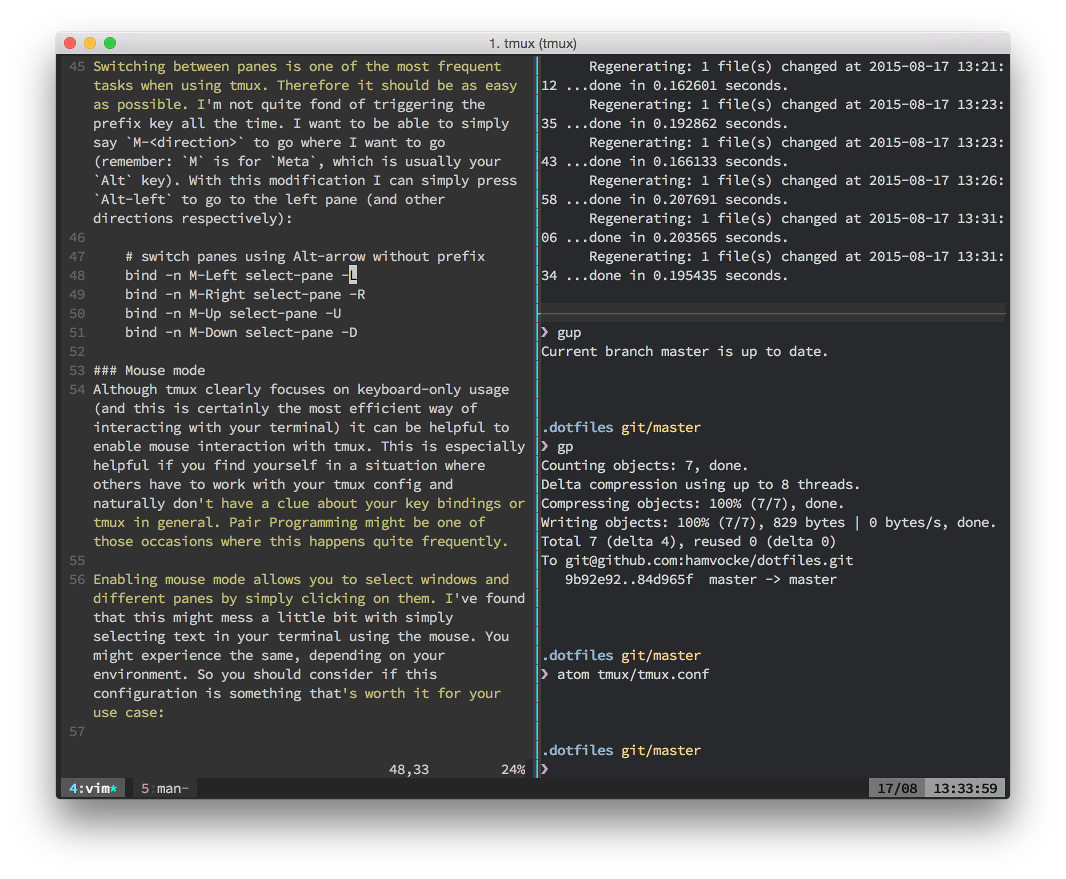
Switching between panes is one of the most frequent tasks when using tmux. Therefore it should be as easy as possible. I’m not quite fond of triggering the prefix key all the time. I want to be able to simply say to go where I want to go (remember: is for , which is usually your key). With this modification I can simply press to go to the left pane (and other directions respectively):
Mouse mode
Although tmux clearly focuses on keyboard-only usage (and this is certainly the most efficient way of interacting with your terminal) it can be helpful to enable mouse interaction with tmux. This is especially helpful if you find yourself in a situation where others have to work with your tmux config and naturally don’t have a clue about your key bindings or tmux in general. Pair Programming might be one of those occasions where this happens quite frequently.
Enabling mouse mode allows you to select windows and different panes by simply clicking on them. I’ve found that this might mess a little bit with simply selecting text in your terminal using the mouse. You might experience the same, depending on your environment. So you should consider if this configuration is something that’s worth it for your use case:
Update for tmux 2.1:
As Jon Lillie pointed out in the comments, mouse mode has been . Once you are on tmux 2.1 (or later) you can activate the new mouse mode with a single command:
The new mode is a combination of all the old mouse options and fixes the text selection issues as well.
Stop renaming windows automatically
I like to give my tmux windows custom names using the key. This helps me naming my windows according to the context they’re focusing on. By default tmux will update the window title automatically depending on the last executed command within that window. In order to prevent tmux from overriding my wisely chosen window names I want to suppress this behavior:
Further resources
As I’ve already told you, there are plenty of resources out there where you can find people presenting their tmux.confs in a similar fashion to what I’ve done here. Feel free to browse and search for inspiration. Personally I love reading other people’s blog posts about their tmux configs.
GitHub is also a great source. Simply search for “tmux.conf” or repos called “dotfiles” to find a vast amount of configurations that are out there.
If you’re especially looking for theming options, I can also recommend having a look at /r/unixporn (SFW, in spite of its title). It’s a great place where people showcase their fine-tuned and heavily themed unix environments. Some stuff is really nice, some other stuff is only pretty but mostly dysfunctional. From time to time you find people sharing their tmux.conf as well, you can also deliberately search for the term “tmux.conf” to find what you’re looking for.
You can also find my complete tmux.conf (along with other configuration files I’m using on my systems) on my personal dotfiles repo on GitHub.
Footnotes
Starting a session
This will fire up tmux with all the tabs and panes you configured, is aliased to .
If you use the optional argument, it will start a new tmux session with the custom name provided. This is to enable reuse of a project without tmux session name collision.
If there is a file in the current working directory but not a named project file in , tmuxinator will use the local file. This is primarily intended to be used for sharing tmux configurations in complex development environments.
You can provide tmuxinator with a project config file using the optional argument (e.g. or ). This option will override a name (if provided) and a local tmuxinator file (if present).
Работа с сеансами
Если вы закончили работу с сеансом, вы можете просто выйти из всех панелей, или же оставить сеанс работать в фоновом режиме для последующего обращения.
Для того, чтобы отключиться от текущего сеанса, используете сочетание Ctrl-b d. Если вы нажмете Ctrl-b D, tmux предложит выбрать сеанс, от которого вы хотите отключиться. Тем самым вы будете отключены от этого сеанса, но он продолжит работать в фоне.
Теперь, когда вы отключились от сеанса, вы можете вернуться к нему в любое время. Для того, чтобы подключиться к сеансу, вам нужно сначала узнать, какие сеансы работают, с помощью команды
В результате вы получите список работающих сеансов, который будет выглядеть примерно так
Для того, чтобы подключиться к этому сеансу, при запуске tmux нужно указать идентификатор сеанса:
Обратите внимание, идентификатор (первая колонка вывода команды ) указывается в параметре. Если вы предпочитаете, чтобы у сеансов были более значимые имена, можно создать следующий сеанс следующим образом
Если вы предпочитаете, чтобы у сеансов были более значимые имена, можно создать следующий сеанс следующим образом
Будет создан новый сеанс под названием “database”.
Можно также переименовать сущестувющий сеанс:
Теперь, когда вам потребуется подключиться к этому сеансу, запустите . Если вы начнете работать с несколькими сеансами, эта функция начнёт иметь значение.
На этом мы закончим знакомство с tmux. Конечно же, мы раскрыли лишь часть функций и возможностей программы, но этого достаточно, чтобы начать работу. Дальше дело за вами!
Panes
Note that if you wish to use panes, make sure that you do not have in your project name. tmux uses to delimit between window and pane indices,
and tmuxinator uses the project name in combination with these indices to target the correct pane or window.
Panes are optional and are children of window entries, but unlike windows, they do not need a name. In the following example, the window has 2 panes, one running vim, the other guard.
windows:
  - editor:
      layout: main-vertical
      panes:
        - vim
        - guard
Note: If you’re noticing inconsistencies when using a custom layout it may
be due #651. See
for a workaround.
Tweaking
The basic tmux install can be configured an extended with plugins.Some of the configuration is necessary to use tmux comfortably.
I’m sharing my .tmux.conf file as template.This uses a sane keybinding layout and various plugins and tweaks.You can try this as your .tmux.conf file after backing up yours.The configuration file is located in ~/.tmux.conf.You can install the plugins after tmux attach with Command + Shift + i.
123456789101112131415161718192021222324252627282930313233343536373839404142434445464748495051525354555657585960616263646566676869707172737475767778798081828384858687888990919293949596979899100101102103104105106107108109110111112113114115116117118119120121122123124125126127128129130131132133134135136137138139140141142143144145146147148149150151152153154155156157158159160161162163164165166167168169170171172173174175176 |
set -g history-limit 10000unbind C-bset -g prefix C-aset -g base-index 1set -g pane-base-index 1set -g xterm-keys onbind-key C-d detach-clientbind-key C-p paste-bufferbind R refresh-client unbind r bind r \ source-file ~/.tmux.conf \;\ display 'Reloaded tmux config.'unbind g unbind C-gbind-key g split-window -hbind-key C-g split-window -hunbind hunbind C-hbind-key h split-windowbind-key C-h split-windowset -g mouse-utf8 onset -g mouse onunbind tunbind C-tbind-key t new-windowbind-key C-t new-windowunbind wunbind C-wbind-key w kill-panebind-key C-w kill-paneunbind qunbind C-qbind-key q kill-sessionbind-key C-q kill-sessionbind -n M-Left select-pane -Lbind -n M-Right select-pane -Rbind -n M-Up select-pane -Ubind -n M-Down select-pane -Dunbind nunbind C-nbind-key n new-sessionbind-key C-n new-sessionunbind Pagedownbind-key Pagedown next-windowunbind Pageupbind-key Pageup previous-windowsetw -g monitor-activity onset -g visual-activity onset -g set-titles onbind D source-file ~/.tmux/devnew-session -n $HOSTbind -t vi-copy y copy-pipe "xclip -sel clip -i"set -g @plugin 'tmux-plugins/tpm'set -g @plugin 'tmux-plugins/tmux-resurrect'set -g @resurrect-strategy-vim 'session'set -g @resurrect-capture-pane-contents 'on'set -g @resurrect-save-bash-history 'on'set -g @plugin 'tmux-plugins/tmux-continuum'set -g @continuum-restore 'on'set -g @continuum-save-interval '5'set -g @plugin 'tmux-plugins/tmux-yank'run '~/.tmux/plugins/tpm/tpm' |
Plugins
- tpm plugin manager
- tmux sensible
- tmux resurrect — Save and restore session after reboot
- tmux-continuum — automatically save and restore tmux sessions
- tmux-yank — Advanced copy mode
Keybindings
| Keybinding | Command |
|---|---|
| Ctrl + a | Command |
| Command + t | New window |
| Command + w | Kill pane |
| Command + q | Kill session |
| Command + r | Reload tmux config |
| Command + z | Zoom to pane |
| Command + $ | Rename session |
| Command + , | Rename window |
| Command + g | Split vertically |
| Command + h | Split horizontally |
| Command + ? | List keyboard shortcuts |
| Command + : | Command prompt |
| Command + s | List sessions |
| Command + Ctrl + r | Reload session |
| Command + Ctrl + s | Save session |
| Command + Shift + i | Install plugins |
Copy and paste in mouse mode
Copy:
- Enter scroll mode with the mouse wheel.
- Select the text and press y.
- This copies the text into the clipboard.
- Exit scroll mode with escape.
Advanced copy:
- Enter scroll mode with the mouse wheel.
- Select the text and press Y.
- This copies the text into the terminal buffer and the clipboard.
- Exit scroll mode with escape.
Changing the look of tmux
Changing the colors and design of tmux is a little more complex than what I’ve presented so far. You’ll want tmux to give a consistent look which is why you most likely have to change the looks of quite a lot of elements tmux displays. This is why changes to the design often result in plenty of lines in your config. I can only recommend to put these into their own identifiable section within your tmux.conf to be able to change this block of config without accidentaly ripping out some of your precious custom key bindings. I’m using comments, starting with a character to make it visible where the design changes start.
Credit where credit is due: I did not create the following design. /u/dothebarbwa was so kind to publish it on /r/unixporn so it’s his effort and all thanks have to go out to him. Thanks!
Depending on your color scheme (I’m using base16-ocean-dark) your resulting tmux will look something like this:
tmux Commands
There are three ways to issue commands to tmux:
- shortcuts: tmux uses what is called a prefix key, which is CTRL+b by default. tmux will interpret the keystroke following the prefix as a tmux shortcut. For example: to detach from your session using a shortcut: press CTRL+b, release both keys and then press d.
- command mode: Enter command mode by pressing Prefix then . This will open a command prompt at the bottom of the screen, which will accept tmux commands.
- command line: Commands can also be entered directly to the command line within a tmux session. Usually these commands are prefaced by . The command used in the previous section was an example of this type of command.
Most tmux tasks can be accomplished using any of these three methods.
Прокрутка в Tmux
Введите следующую команду в сеансе Tmux.
history
Прокрутка отображает последние команды, которые были использованы. Есть два варианта осуществления прокрутки:
- использование метода less;
- стандартные методы Tmux.
Метод less
less – встроенная в Linux утилита, которая считывает первые несколько строк любого файла или вывода из команды, отображает их в терминале для дальнейшего чтения. Можно прокручивать буфер с помощью стрелок на клавиатуре или мыши. Таким образом, эта команда решает проблему чтения.
history | less
С помощью данной команды можно получить вывод истории команд с возможность прокрутки.
Стандартные методы Tmux
Это гораздо более предпочтительный метод и может быть полезен при копировании и вставке. Чтобы прокрутить буфер с помощью Tmux, просто нажмите клавишу префикса ctrl + b + [. Теперь вы можете прокручивать буфер с помощью мыши или клавиш со стрелками.
Working with Tmux Windows and Panes #
When you start a new Tmux session, by default, it creates a single window with a shell in it.
To create a new window with shell type , the first available number from the range will be assigned to it.
A list of all windows is shown on the status line at the bottom of the screen.
Below are some most common commands for managing Tmux windows and panes:
- Create a new window (with shell)
- Choose window from a list
- Switch to window 0 (by number )
- Rename the current window
- Split current pane horizontally into two panes
- Split current pane vertically into two panes
- Go to the next pane
- Toggle between the current and previous pane
- Close the current pane