Mikrotik настройка pppoe
Содержание:
- Настройка точки доступа WiFi MikroTik mAP (RBmAP2nD)
- Overview
- Класс PriorityQueue
- Metrics and Monitoring
- Queue graphing
- Interface graphing
- System Maintenance
- Пиковая скорость Burst
- Запрещаем клиентам гостевой сети доступ к сети администрации
- Transforming queues
- Consumers and Acknowledgements
- Queue Tree
- Temporary Queues
- Names
Настройка точки доступа WiFi MikroTik mAP (RBmAP2nD)
Для настройки точки доступа WiFi MikroTik mAP воспользуйтесь инструкциями:
-
→
- →
- →
- →
- →
- →
- →
- →
- →
- →
- →
- →
- →
- →
- →
- →
- →
- →
- →
- →
Характеристики
| Система | |
|---|---|
| Процессор: | QCA9531 650 MГц |
| RAM: | 64 MB |
| Flash: | 16 MB |
| Разъемы: | 2 × 10/100 Base-TX (Cat. 5, RJ-45) Ethernet 1 × microUSB type B |
| ОС: | MikroTik RouterOS Level4 license |
| Радиомодуль | |
| Стандарты: | 802.11b/g/n |
| Режимы работы: | Access Point Station Point-to-point |
| Пропускная способность: | 300 Мбит/с |
| Частота: | 2,4 ГГц |
| Антенна | |
| Вид: | 2 × встроенные всенаправленные антенны |
| Усиление: | 1,2 дБи |
| Другое | |
| Размеры: | 68 × 68 × 19 мм |
| Вес: | |
| Электропитание: | DC jack 8V – 57V microUSB 5V DC; PoE input 12V – 57V (passive PoE или 802.3af/at) |
| Потребление: | ≤ 5 Вт |
| Рабочая температура: | от -10°C до +70°С |
Характеристики Wi-Fi
|
Результаты теста производительности
| RBmAP2nD | QCA9531 100M two port test | ||||||
|---|---|---|---|---|---|---|---|
| Mode | Configuration | 1518 byte | 512 byte | 64 byte | |||
| kpps | Mbps | kpps | Mbps | kpps | Mbps | ||
| Bridging | none (fast path) | 16.3 | 197.9 | 47.1 | 192.9 | 173.6 | 88.9 |
| Bridging | 25 bridge filter rules | 16.3 | 197.9 | 47.1 | 192.9 | 56.7 | 29.0 |
| Routing | none (fast path) | 16.3 | 197.9 | 47.1 | 192.9 | 160.8 | 82.3 |
| Routing | 25 simple queues | 16.3 | 197.9 | 47.1 | 192.9 | 72.6 | 37.2 |
| Routing | 25 ip filter rules | 16.3 | 197.9 | 33.8 | 138.4 | 34.6 | 17.7 |
Overview
MikroTik RouterOS is designed to be easy to operate in various aspects of network configuration. Therefore creating limitation for individual IP or NATting internal clients to a public address or Hotspot configuration can be done without the knowledge about how the packets are processed in the router — you just go to corresponding menu and create necessary configuration.
However more complicated tasks, such as traffic prioritization, routing policies, where it is necessary to utilize more than one RouterOS facility, requires knowledge: How these facilities work together? What happens when and why?
To address these questions we created a packet flow diagram.
Класс PriorityQueue
PriorityQueue – это класс очереди с приоритетами. По умолчанию очередь с приоритетами размещает элементы согласно естественному порядку сортировки используя Comparable. Элементу с наименьшим значением присваивается наибольший приоритет. Если несколько элементов имеют одинаковый наивысший элемент – связь определяется произвольно. Также можно указать специальный порядок размещения, используя Comparator.
Конструкторы класса PriorityQueue:
- PriorityQueue() — создает очередь с приоритетами начальной емкостью 11, размещающую элементы согласно естественному порядку сортировки (Comparable);
- PriorityQueue(Collection<? extends E> c);
- PriorityQueue(int initialCapacity);
- PriorityQueue(int initialCapacity, Comparator<? super E> comparator);
- PriorityQueue(PriorityQueue<? extends E> c);
- PriorityQueue(SortedSet<? extends E> c).
Metrics and Monitoring
RabbitMQ collects multiple metrics about queues. Most of them are available
via RabbitMQ HTTP API and management UI, which is designed for monitoring.
This includes queue length, ingress and egress rates, number of consumers, number of
messages in various states (e.g. ready for delivery or unacknowledged),
number of messages in RAM vs. on disk, and so on.
rabbitmqctl can list queues and some basic metrics.
Runtime metrics such as VM scheduler usage, queue (Erlang) process GC activity, amount of
RAM used by the queue process, queue process mailbox length can be accessed
using the rabbitmq-top plugin and
individual queue pages in the management UI.
Queue graphing
Sub-menu
Sub-menu allows to configure about which simple queues graphing will collect bandwidth usage data.
Properties
| Property | Description |
|---|---|
| allow-address (IP/IPv6 prefix; Default: 0.0.0.0/0) | IP address range from which is allowed to access graphing information |
| allow-target (yes | no; Default: yes) | Whether to allow access to graphs from queue’s target-address |
| comment (string; Default: ) | Description of current entry |
| disabled (yes | no; Default: no) | Defines whether item is used |
| simple-queue (all | queue name; Default: all) | Defines which queues will be monitored. all means that all queues on router will be monitored. |
| store-on-disk (yes | no; Default: yes) | Defines whether to store collected information on system drive. |
Note: If simple queue has target-address set to 0.0.0.0/0 everyone will be able to access queue graphs even if allow address is set to specific address. This happens because by default queue graphs are accessible also from target address.
Interface graphing
Sub-menu
Sub-menu allows to configure on which interfaces graphing will collect bandwidth usage data.
Properties
| Property | Description |
|---|---|
| allow-address (IP/IPv6 prefix; Default: 0.0.0.0/0) | IP address range from which is allowed to access graphing information |
| comment (string; Default: ) | Description of current entry |
| disabled (yes | no; Default: no) | Defines whether item is used |
| interface (all | interface name; Default: all) | Defines which interface will be monitored. all means that all interfaces on router will be monitored. |
| store-on-disk (yes | no; Default: yes) | Defines whether to store collected information on system drive. |
System Maintenance
- Add Static DHCP Leases to ARP List
- Alignment Script that «reads back» RSSI with beeps
- Antenna Alignment with RB532 LED
- Audible signal test
- Auto upgrade script V3.x
- Automated Upgrade/Downgrade script V3.9+
- Automatic Backup with Centralized Storage
- BackupROS (Centralized Backups) — by Nahuel Ramos (new!)
- Batch deployment of DSA key (SSH) and schedule backup with export
- Centralized Automated Backups via Email with Procmail and Perl
- Delete ARP trafic for arp table
- Flash Friendly Backup Script
- Generate routes for stress testing BGP functionality
- Improved auto upgrade script v3.X
- Improved Semi-automatic system-update script
- Logging Average CCQ and Wireless Clients Stats
- Logging SNR and thruput values
- Managing Power Distribution Unit via SMS
- Monitor input voltage on RB333/433AH
- Netwatch on web
- Reboot Boards due to low Memory with notification
- Remotely change password for managers
- Scheduled sending of an email with system backup attached
- Semi-automatic system-update by script
- Semi-Automating CPE ROS/Firmware/script updates and setting changes
- sending mails when on battery or battery low
- Sync Address List with DNS Cache
- Sync Address List from DNS Lookup Results — CNAME and A Records
- SXT 5HnD Alignment Script
- Use SSH to execute commands (DSA key login)
- Yet Another Alignment Script With LEDs And Sound
Пиковая скорость Burst
Пиковая скорость Burst применяется для того, чтобы выдать клиенту максимальную скорость на определенный промежуток времени.
Например, вам нужно ускорить загрузку страниц, и при этом ограничить скорость на закачку файлов. Или нужно изредка передавать и принимать данные, но делать это с максимальной скоростью.
Если клиенту изначально дать большую скорость, то он может поставить файлы на закачку и оставить остальных пользователей без интернета. В этом случае нам помогут инструменты управления пиковой скоростью Burst.
Пиковая скорость обладает следующими параметрами:
- burst-limit — скорость, которая будет доступна сразу при подключении;
- burst-threshold — средняя скорость за последние burst-time секунд;
- burst-time — время для подсчета burst-threshold.
Момент, когда клиенту или классу нужно выдать максимальную скорость, определяется следующим образом. Раз в 1/16 времени burst-time вычисляется загрузка канала на указанное число секунд. Если средняя загрузка составила менее burst-threshold, то клиенту или классу выделяется указанная в burst-limit скорость до тех пор, пока она не превысит burst-threshold. После этого действует ограничение max-limit до тех пор, пока снова не случится понижение скорости менее burst-threshold.
Установим следующие параметры limit-at=128000/128000, max-limit=256000/256000, burst-limit=512000/512000, burst-treshold=192000/192000, burst-time=8 и понаблюдаем, что случится с графиком загрузки канала от одного клиента:
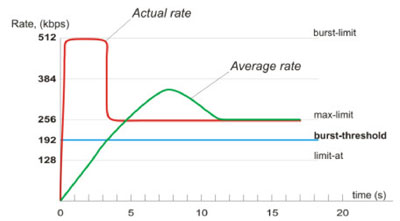
Данный график характерен для случая с закачкой большого файла по протоколу http. После первой секунды средняя загрузка канала будет равна (0+0+0+0+0+0+0+512)/8=64 kbps, что менее установленного нами параметра burst-threshold. После второй секунды средняя скорость будет равна (0+0+0+0+0+0+512+512)/8=128kbps. После третьей секунды средняя скорость превысит показатель burst-threshold. В этот момент скорость резко упадет до значения параметра max-limit и будет держаться на этом уровне до тех пор, пока средняя загрузка канала не станет меньше burst-threshold и снова не произойдет выдача burst скорости.
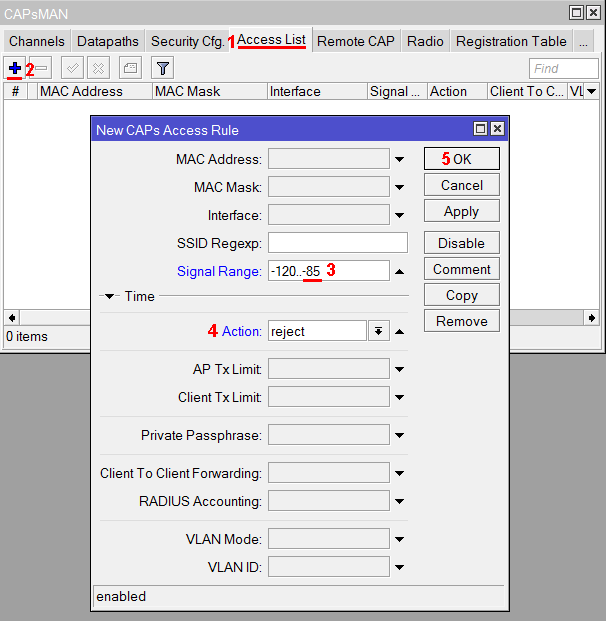
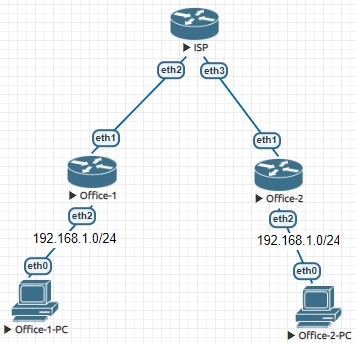
Запрещаем клиентам гостевой сети доступ к сети администрации
Запретим клиентам доступ из одной сети в другую.
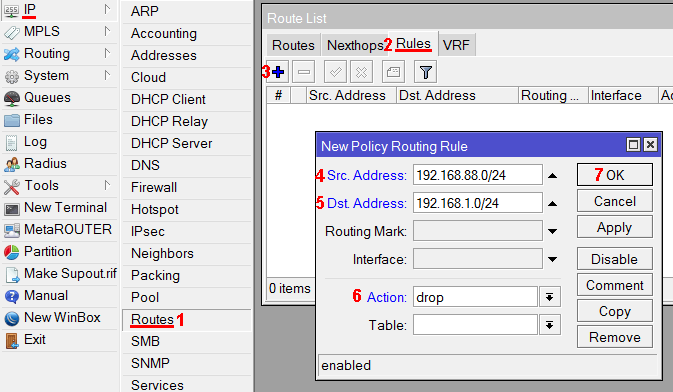
- Откройте меню IP — Routes.
- Перейдите на вкладку Rules.
- Нажмите синий плюсик.
- В поле Src. Address введите подсеть 192.168.88.0/24
- В поле Dst. Address введите открытую подсеть 192.168.1.0/24
- В списке Action выберите drop.
- Нажмите OK.
Этим правилом мы запретили доступ из гостевой подсети 192.168.1.0/24 в административную подсеть 192.168.88.0/24.
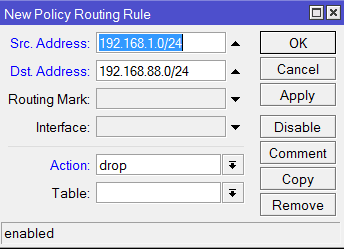
Теперь добавим еще одно правило, чтобы запретить доступ из административной подсети 192.168.88.0/24 в гостевую подсеть 192.168.1.0/24, т.е наоборот.
- Нажмите синий плюсик.
- В поле Src. Address введите подсеть 192.168.1.0/24
- В поле Dst. Address введите открытую подсеть 192.168.88.0/24
- В списке Action выберите drop.
- Нажмите OK.
Transforming queues
A is in fact a type alias for .
The signature for the expanded version is:
Which is to say:
- The queue may be offered values of type . The enqueueing operations require an environment of type and may fail with errors of type ;
- The queue will yield values of type . The dequeueing operations require an environment of type and may fail with errors of type .
Note how the basic cannot fail or require any environment for any of its operations.
With separate type parameters for input and output, there are rich composition opportunities for queues:
We may also use an effectful function to map the output. For example,
we could annotate each element with the timestamp at which it was dequeued:
ZQueue#contramapM
Similarly to , we can also apply an effectful function to
elements as they are enqueued. This queue will annotate the elements
with their enqueue timestamp:
This queue has the same type as the previous one, but the timestamp is
attached to the elements when they are enqueued. This is reflected in
the type of the environment required by the queue for enqueueing.
To complete this example, we could combine this queue with to
compute the time that the elements stayed in the queue:
Consumers and Acknowledgements
Messages can be consumed by registering a consumer (subscription),
which means RabbitMQ will push messages to the client, or fetched
individually for protocols that support this (e.g. the basic.get AMQP 0-9-1 method),
similarly to HTTP GET.
Delivered messages can be acknowledged by consumer explicitly
or automatically as soon as a delivery is written to connection socket.
Automatic acknowledgement mode generally will provide higher throughput
rate and uses less network bandwidth. However, it offers the least number
of guarantees when it comes to failures. As a rule of
thumb, consider using manual acknowledgement mode first.
Automatic acknowledgement mode can also overwhelm
consumers which cannot process messages as quickly as they are delivered.
This can result in permanently growing memory usage and/or
OS swapping for the consumer process.
Manual acknowledgement mode provides a way to set a limit on the number
of outstanding (unconfirmed) deliveries: channel QoS (prefetch).
Consumers using higher (several thousands or more) prefetch levels can experience
the same overload problem as consumers using automatic acknowledgements.
High number of unacknowledged messages will lead to higher memory usage by
the broker.
Enqueued messages therefore can be in one of two states:
- Ready for delivery
- Delivered but not yet acknowledged by consumer
Message breakdown by state can be found in the management UI.
Queue Tree
Sub-menu:
Queue tree creates only one directional queue in one of the HTBs. It is also the only way how to add queue on the separate interface. This way it is possible to ease mangle configuration — you don’t need separate marks for download and upload — only upload will get to Public interface and only download will get to Private interface.
Queue tree is not ordered — all traffic pass it together.
Read more about HTB and see configuration examples.
Flow Identifiers
- name (Text) : Unique queue identifier that can be used as parent option value for other queues
- packet-marks (Comma separated list of) : allows to use marked packets from /ip firewall mangle. Take look at this packet flow diagram. You need to make sure that packets are marked before the simple queues (before global-in HTB queue)
HTB Properties
- parent (Name of , or none) : assigns this queue as a child queue for selected target. Target queue can be HTB queue or any other previously created queue
- priority (1..8) : Prioritize one child queue over other child queue. Does not work on parent queues (if queue has at least one child). One is the highest, eight is the lowest priority. Child queue with higher priority will have chance to reach its max-limit before child with lower priority. Priority have nothing to do with bursts.
- queue (SOMETHING) : Choose the type of the queue. Queue types can be created
- limit-at (NUMBER) : normal data rate that is guaranteed to a target
- max-limit (NUMBER) : maximal data rate that is allowed for a target to reach
- burst-limit (NUMBER) : maximal data rate which can be reached while the burst is active
- burst-time (TIME) : period of time, in seconds, over which the average data rate is calculated. (This is NOT the time of actual burst)
- burst-threshold (NUMBER) : when average data rate is below this value — burst is allowed, as soon as average data rate reach this value — burst is denied. (basically this is burst on/off switch). For optimal burst behavior this value should above limit-at value and below max-limit value
Statistics
Command:
- rate (read-only) : average queue passing data rate in bytes per second
- packet-rate (read-only) : average queue passing data rate in packets per second
- bytes (read-only) : number of bytes processed by this queue
- packets (read-only) : number of packets processed by this queue
- queued-bytes (read-only) : number of bytes waiting in the queue
- queued-packets (read-only) : number of packets waiting in the queue
- dropped (read-only) : number of dropped packets
- borrows (read-only) : packets that passed queue over its «limit-at» value (and was unused and taken away from other queues)
- lends (read-only) : packets that passed queue below its «limit-at» value OR if queue is a parent — sum of all child borrowed packets
- pcq-queues (read-only) : number of PCQ substreams, if queue type is PCQ
Temporary Queues
With some workloads queues are supposed to be short lived. While clients can
delete the queues they declare before disconnection, this is not always convenient.
On top of that, client connections can fail, potentially leaving unused
resources (queues) behind.
There are three ways to make queue deleted automatically:
- Exclusive queues (covered below)
- TTLs (also covered below)
- Auto-delete queues
An auto-delete queue will be deleted when its last consumer
is cancelled (e.g. using the basic.cancel in AMQP 0-9-1)
or gone (closed channel or connection, or lost TCP connection with the server).
If a queue never had any consumers, for instance, when all consumption happens
using the basic.get method (the «pull» API), it won’t be automatically
deleted. For such cases, use exclusive queues or queue TTL.
Names
Queues have names so that applications can reference them.
Applications may pick queue names or ask the broker to generate a name
for them. Queue names may be up to 255 bytes of UTF-8 characters.
Queue names starting with «amq.» are reserved for internal
use by the broker. Attempts to declare a queue with a name that
violates this rule will result in a channel-level exception
with reply code 403 (ACCESS_REFUSED).
In AMQP 0-9-1, the broker can generate a unique queue name on behalf of
an app. To use this feature, pass an empty string as the queue name
argument: The same generated name may be obtained by subsequent
methods in the same channel by using the empty string where a queue
name is expected. This works because the channel remembers the last
server-generated queue name.