Phalcon — views
Содержание:
- Введение
- Введение
- Одностраничный магазин на Phalcon PHP + AngularJS. Работа над ошибками
- File Structure
- Защита веб-приложения на Phalcon + AngularJS от CSRF атак
- Views in Controllers
- Usage
- Релиз Phalcon 2.0.2
- Setting a Database Connection
- Features of Volt Files
- Почему Phalcon?
- Simple Rendering
- Как начать использование Phalcon?
- Parameters
- Methods
- Вступление
- Miscellaneous
- Storing Data using Models
- Events
- Hierarchical Rendering
- Cherokee
- Phalcon — идеальный баланс между возможностями и производительностью
- Designing a Sign-up Form
- Маршрутизация
- WAMP
- Apache
- tutorial/.htaccess
- Опыт перехода проекта на phalcon с php 5.6 на 7.1
Введение
Throughout this tutorial, we will create an application with a simple registration form, while introducing the main design aspects of Phalcon.
This tutorial covers the implementation of a simple MVC application, showing how fast and easy it can be done with Phalcon. Once developed, you can use this application and extend it to suit your needs. The code in this tutorial can also be used as a playground to learn other Phalcon specific concepts and ideas. <iframe width=»560″ height=»315″ src=»https://www.youtube.com/embed/75W-emM4wNQ» frameborder=»0″ allowfullscreen mark=»crwd-mark»></iframe>
If you just want to get started you can skip this and create a Phalcon project automatically with our developer tools.
The best way to use this guide is to follow along and try to have fun. You can get the complete code here. If you get stuck or have questions, please visit us on Discord or in our Forum.
Введение
A controller is a class that contains business logic for an application. It is also responsible for executing the requests from users. Controllers have methods called actions that contain such business logic and handle user requests.
An action is any public method in a controller with the suffix. These actions are accessible by a URL and are responsible for interpreting the request and creating the response. Usually responses are in the form of a rendered view, but there are other ways to create responses as well.
Controllers in Phalcon must have the suffix in their file and class name and must extend the class.
Одностраничный магазин на Phalcon PHP + AngularJS. Работа над ошибками
Введение
Всем привет! Не так давно я написал публикацию «Одностраничный магазин с корзиной на Phalcon + AngularJS + Zurb Foundation», которая имела неоднозначный эффект мягко говоря. А точнее получила много отрицательных комментариев, какие-то были объективные и конструктивные, какие-то нет, и они меня заставили задуматься, почему так произошло, ведь я хотел сделать полезный мануал, который пригодиться мне и другим, начинающим писать на AngularJS.
Исповедь
Да, мануал был полезен для меня, для меня старого, того, кому в 2009 году отказали в работе в местной веб-студии, и он по сей день ни разу ни работал в команде, ни разу не работал на наёмной работе, а полагался только на себя, и главным критерием эффективности реализации проектов был один — главное, что работает. Но это я — старый, после написания той статьи, и множества комментариев, я впервые решил попробовать сделать всё по правилам хорошего тона, хотя бы ради интереса.
File Structure
One of the key features of Phalcon is that it is loosely coupled. Because of that, you can use any directory structure that is convenient to you. In this tutorial we will use a standard directory structure, commonly used in MVC applications.
If this is all brand new it is recommended that you install the Phalcon Devtools also. The DevTools leverage PHP’s built-in web server, allowing you to run your application almost immediately. If you choose this option, you will need a file at the root of your project with the following contents:
In the case of our tutorial, this file must be located in the directory.
You can also use nginX, apache, cherokee or other web servers. You can check the webserver setup page for instructions.
Защита веб-приложения на Phalcon + AngularJS от CSRF атак
Привет всем! Не так давно столкнулся с проблемой защиты веб-приложения написанного на Phalcon PHP Framework вместе с AngularJS. Проблема заключалась в том что на странице есть несколько форм, которые посылают AJAX-запросы на сервер. Как подружить два фреймворка в вопросах безопасности, централизованного решения я не нашёл, пришлось его собирать по кусочкам из разных источников. И в этой статье я бы хотел предложить всем кто столкнулся, или столкнётся с такой проблемой, готовое рабочее решение.
Генерируем токен в meta-теге
К сожалению источника я сейчас не помню, но не раз замечал что между тегов частенько в meta лежали токены на крупных сайтах. Если вы посмотрите документацию Phalcon, то увидите что генерация токена происходит в форме. Вот так по-умолчанию генерируется токен в форме:
Views in Controllers
Phalcon automatically passes the execution to the view component as soon as a particular controller has completed its cycle. The view component will look in the views folder for a folder named as the same name of the last controller executed and then for a file named as the last action executed. For instance, if a request is made to the URL https://dev.phalcon.ld/admin/invoices/view/12345, Phalcon will parse the URL as follows:
| Server Address | |
|---|---|
| Phalcon Directory | |
| Controller | |
| Action | |
| Parameter |
The dispatcher will look for a and its action . A simple controller file for this example:
The method allows us to create view variables on demand so that they can be used in the view template. The example above demonstrates how to pass the parameter to the respective view template.
Usage
To get a list of available commands just execute following:
phalcon commands help
This command should display something similar to:
$ phalcon --help

Phalcon DevTools (3.4.0)

Help:
  Lists the commands available in Phalcon devtools

Available commands:
  info             (alias of: i)
  commands         (alias of: list, enumerate)
  controller       (alias of: create-controller)
  module           (alias of: create-module)
  model            (alias of: create-model)
  all-models       (alias of: create-all-models)
  project          (alias of: create-project)
  scaffold         (alias of: create-scaffold)
  migration        (alias of: create-migration)
  webtools         (alias of: create-webtools)
  serve            (alias of: server)
  console          (alias of: shell, psysh)
Релиз Phalcon 2.0.2
Перевод
Процесс разработки Phalcon с момента выхода 2.0.0 значительно ускорился. Все больше и больше контрибьюторов находит Zephir легким и понятным для работы. Результатом этого стал релиз Phalcon 2.0.2. Эта версия включает в себя множество новой функциональности, исправлений ошибок и улучшения производительности:
- Добавлен метод в Beanstalk
- Устранено падение при doc-блоке без аннотаций #10301
- Исправлено неверное количество передаваемых параметров при срабатывании события в
- Теперь проверяет есть ли у атрибута значение по умолчанию, указанное в схеме БД и игнорирует его при генерации SQL для вставки/обновления
- Исправлен критический баг при вызове #10283
- Phalcon\Text: добавлен метод — убирает множественные слешы, заменяя их одиночными
- Phalcon\Text: добавлен метод — объединяет строки с использованием разделителя без дублирования в местах конкатенации.
- Добавлено условие в адаптере сессии для проверки наличия уже начатой сессии
- Добавлен метод status() в адаптере сессии для проверки факта начала сессии
- Внедрение подзапросов в PHQL
- Повышение производительности, ориентированное на PHP5.6
Setting a Database Connection
In order to use a database connection and subsequently access data through our models, we need to specify it in our bootstrap process. A database connection is just another service that our application has, that can be used throughout our application:
Adjust the code snippet above as appropriate for your database.
With the correct database parameters, our model is ready to interact with the rest of the application so we can save the user’s input. First, let’s take a moment and create a view for that will display a message letting the user know the outcome of the save operation.
Note that we have added some css styling in the code above. We will cover including the stylesheet in the section below.
Features of Volt Files
-
It is a template written in C language and is considerably fast as compared to other languages.
-
It includes a set of highly integrated components, which are very beneficial in Phalcon.
-
It can also be used as a stand-alone component.
-
Volt is compiled to pure PHP code.
Following is the code for index.volt which loads by default for any project.
<!--<div class = "page-header">
   <h1>Congratulations!</h1>
</div>-->

<p>This is my first web application in Phalcon </p>
<!--<p>You're now flying with Phalcon. Great things are about to happen!</p>

<p>This page is located at <code>views/index/index.volt</code></p>-->
Почему Phalcon?
Есть много причин, почему вы должны по крайней мере дать Phalcon шанс. Просто перечислим некоторые из наиболее важных преимуществ этого фреймворка:
- Это самый быстрый PHP фреймворк.
- Он использует мало ресурсов сервера.
- Он предоставляет все стандартные компоненты, включая ORM (встроенную поддержку как SQL и NoSQL), MVC, маршрутизаторы, REST, внедренные зависимости, кэш, шаблонизаторы, ACL, и многое другое.
- Он может быть использован в качестве микро- и макрофреймворка.
- Понятная и широкая документация.
- Растущее с каждым днем дружественное сообщество, готовое предоставлять помощь.
- Поддерживает PHP7.
Simple Rendering
is an alternative component to . It keeps most of the philosophy of but lacks of a hierarchy of files which is, in fact, the main feature of its counterpart.
This component allows you to have control of when a view is rendered and its location. In addition, this component can leverage of view inheritance available in template engines such as Volt and others.
The default component must be replaced in the service container:
Automatic rendering must be disabled in Phalcon\Mvc\Application (if needed):
To render a view it is necessary to call the render method explicitly indicating the relative path to the view you want to display:
This is different to the that implementation, which uses controllers and actions as parameters:
Picking Views
As mentioned above, when is managed by Phalcon\Mvc\Application, the view rendered is the one related with the last controller and action executed. You could override this by using the method:
Как начать использование Phalcon?
Если вам интересно как начать использовать Phalcon, мы предлагаем следующие шаги:
Если вы используете Vagrant, скачать и ознакомиться со средой разработки Vagrant доступной на Github — https://github.com/phalcon/vagrant
Если вы используете Docker, загрузите этот стабильный пакет — https://github.com/szeist/docker-phalcon,
а также Apache и PHP7 пакет — https://github.com/szeist/docker-phalcon, который уже включают в себя структуру Phalcon.
Пользователи Windows тоже не остались с пустыми руками — получить библиотеку DLL можно здесь — https://phalconphp.com/pl/download/windows
Вам также потребуется список команд — https://phalconphp.com/pl/download, необходимых для установки и компиляции Phalcon на Linux/Unix/Mac.
Если у вас уже установлен Phalcon, либо возникли проблемы с ним, то в интернете полно качественных ресурсов.
Наиболее важные из них включают в себя официальную документацию — https://docs.phalconphp.com/en/latest/index.html (доступна на нескольких языках) и Phalcon,
конечно же, хорошо известен и любим на stackoverflow.com — http://stackoverflow.com/questions/tagged/phalcon.
Если Вы хотите оставаться в курсе событий:
сайт Phalcon — https://phalconphp.com/pl/,
официальный блог — https://blog.phalconphp.com/,
страница на Facebook — ,
страница Twitter — ,
страница Google Plus — https://plus.google.com/+PhalconPHP/videos,
страница Github — https://github.com/phalcon/cphalcon.
Parameters
Additional URI parameters are defined as action parameters, so that they can be easily accessed using local variables. A controller can optionally extend . By doing this, the controller can have easy access to the application services.
Parameters without a default value are handled as required. Setting optional values for parameters is done as in PHP:
For the example above, the URL to call the method is:
However, you will need to ensure that you account for a URL like this one:
The above URL will not match the for the or and thus result in an error. You might want to consider a strategy to counter that. One way is to remove the types and ensure that your parameters are converted in the action:
You can also remove the parameters from the action declaration and retrieve them from the dispatcher instead. Parameters are assigned in the same order as they were passed in the route. You can get a parameter from its name as follows:
The above parameters will match the route the way it was defined.
Methods
Phalcon\Mvc\View constructor
Magic method to retrieve a variable passed to the view
Magic method to retrieve if a variable is set in the view
Magic method to pass variables to the views
Resets any template before layouts
Resets any “template before” layouts
Disables a specific level of rendering
Render all levels except ACTION level
Disables the auto-rendering process
Enables the auto-rendering process
Checks whether view exists
Finishes the render process by stopping the output buffering
Gets the name of the action rendered
Returns the path (or paths) of the views that are currently rendered
Gets base path
Returns output from another view stage
Gets the name of the controller rendered
Returns the name of the main view
Gets the current layouts sub-directory
Returns the name of the main view
Returns parameters to views
Renders a partial view
Retrieve the contents of a partial
Retrieve the contents of a partial with arguments
Gets the current partials sub-directory
Perform the automatic rendering returning the output as a string
Returns a parameter previously set in the view
Gets views directory
Gets views directories
Whether automatic rendering is enabled
Renders a partial view
Show a partial inside another view
Show a partial inside another view with parameters
Choose a different view to render instead of last-controller/last-action
Register templating engines
Executes render process from dispatching data
Shows recent posts view (app/views/posts/recent.phtml)
Resets the view component to its factory default values
Sets base path. Depending of your platform, always add a trailing slash or backslash
Externally sets the view content
Change the layout to be used instead of using the name of the latest controller name
Sets the layouts subdirectory. It must be a directory under the views directory. Depending of your platform, always add a trailing slash or backslash
Sets default view name. Must be a file without extension in the views directory
Renders as main view views-dir/base.phtml
Sets a partials sub-directory. Must be a directory under the views directory. Depending of your platform, always add a trailing slash or backslash
Adds parameters to views (alias of setVar)
Sets the render level for the view
Render the view related to the controller only
Sets a “template after” controller layout
Sets a template before the controller layout
Set a single view parameter
Set all the render params
Sets the views directory. Depending of your platform, always add a trailing slash or backslash
Starts rendering process enabling the output buffering
Renders the view and returns it as a string
Вступление
Исходя их архитектуры Модель-Представление-Контроллер (model-view-controller MVC), Phalcon – это высокопроизводительный PHP фреймворк. Его первые версии появились в 2012 году и всегда были представлены в виде открытого кода. Большая часть его была написана на языках программирования C и Zephir. Phalcon также известен тем, что он первым реализовал объектно-реляционное отображение (object-relational mapping – ORM) на C.
Мотивацией, стоящей за разработкой Phalcon было создание расширение веб-сервера, которое повысит скорость выполнения, снизит расходы ресурсов и будет гарантировать более высокий уровень обработки запросов в сравнении с другими PHP фреймворками. Наибольшее преимущество Phalcon, в сравнении с конкурентами, эффективное использование памяти. Это позволяет хранить информацию в памяти, в то время как большинство других фреймворков PHP используют чтение файлов и статистику файлов, а это операции, требующими больших затрат. Исключая необходимость в них, Phalcon оптимизирует производительность и повышает эффективность.
Phalcon высоко настраиваемый благодаря наличию Zephir высокоуровневого языка программирования. Он может быть использован для разработки приложений на PHP без знания языка C. В то время как другие фреймворки могут потребовать от вас наличия тысяч файлов ядра для различных функций. Давайте начнём наше руководство по Phalcon со сравнения его с другими PHP фреймворками.
Phalcon vs. Laravel
Хотя Laravel широко обсуждаемый, как главный выбор среди PHP фреймворков, он не сравнится с Phalcon, когда идёт речь о скорости, масштабируемости и производительности. Однако, Laravel сравнительно легче изучить и у него лучшая поддержка отладки. В то время как, чтобы сделать отладку кода в Phalcon, вам потребуется знания языка C. Другое отличие Laravel, это то, что он может быть установлен на любой сервер, в то время как установка Phalcon потребует права доступа администратора (root) на сервере.
Phalcon vs. CodeIgniter
Когда ещё не было никаких других PHP фреймворков, был CodeIgniter. Хотя этот проект существует уже продолжительное время, вот уже несколько лет как его разработка замедлилась. И Phalcon, и CodeIgniter имеют похожий набор функций, подробную документацию и широкую поддержку сообщества разработчиков. Но Phalcon значительно быстрее. Однако, CodeIgniter может догнать Phalcon при соответствующей оптимизацией аппаратных средств.
Phalcon vs. Symfony
Как Symfony, так и Phalcon проекты с открытым кодом, с поддержкой многоязычности и объектно-реляционным отображением. Они расширяют архитектуру MVC, имеют свои интерфейсы командной строки CLI и подробную документацию. Если вы планируете создание REST API приложений, то оба фреймворка будут хорошим выбором. Но ещё раз, когда идёт речь об оценке производительности, Phalcon берёт первенство. В целом, Phalcon может обрабатывать на 50 процентов запросов в секунду больше, в сравнении с Symfony. Хотя, процесс отладки может показаться несколько сложнее в Phalcon, так как придётся пройти через знание C. Отладка в Symfony относительно проще.
Miscellaneous
These libraries were placed here because none of the other categories seemed to fit
- Breadcrumbs — Powerful and flexible component for building site breadcrumbs in Phalcon 2+.
- Feedback — Is intended to be used as a replacement for Phalcon’s built-in Flash and Message functionality
- Incubator — Repository to publish/share/experiment with new adapters, prototypes or functionality that can potentially be incorporated into the Phalcon Framework
- yarak — Laravel inspired Phalcon devtools
- phalcon-data-table — Allows you to simplify the interaction with the bootstrap-table in the Phalcon
Storing Data using Models
At the beginning of the we create an empty user object using the class we created earlier. We will use this class to manage the record of a user. As mentioned above, the class’s public properties map to the fields of the table in our database. Setting the relevant values in the new record and calling will store the data in the database for that record. The method returns a value which indicates whether the save was successful or not.
The ORM will automatically escape the input preventing SQL injections so we only need to pass the request to the method.
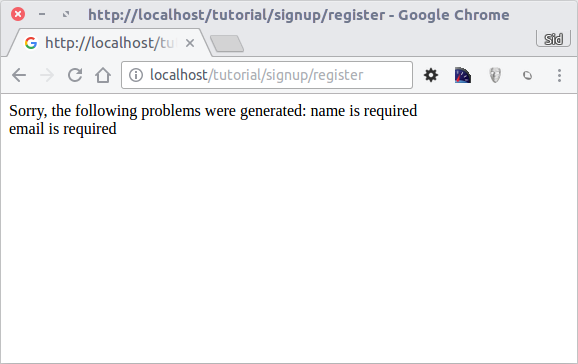
Additional validation happens automatically on fields that are defined as not null (required). If we do not enter any of the required fields in the sign-up form our screen will look like this:
Events
and are able to send events to an Events Manager if it is present. Events are triggered using the type . If an event returns it can stop the active operation. The following events are supported:
| Event Name | Triggered | Can stop |
|---|---|---|
| After completing the render process | No | |
| After rendering an existing view | No | |
| Before starting the render process | Yes | |
| Before rendering an existing view | Yes | |
| When a view was not found | No |
The following example demonstrates how to attach listeners to this component:
The following example demonstrates how you can create a plugin that tidies up your HTML produced by the render process using Tidy.
and we can now attach it to our events manager:
Hierarchical Rendering
Views in Phalcon support hierarchical rendering and Phalcon\Mvc\View is used as default rendering component. This component uses PHP as template engine in comparison with volt files which uses C as a template language.
These views should have .phtml extension. The default directory of views for the given project consists of the following three files −
-
Action view − This view is called to execute a particular action. It is called when “show” action is executed.
-
Controller layout − This view is present inside the layouts folder. For example, C:\xampp\htdocs\demo\app\views\layouts. It invokes the method calls associated with the appropriate controller. The code implemented in layout will be implemented as and when required.
-
Main layout − This layout view will invoke the main action and it will be shown for every controller or action within the web application.
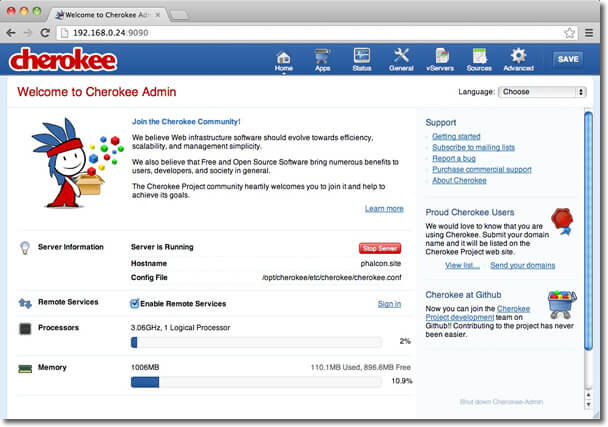
Cherokee
Cherokee is a high-performance web server. It is very fast, flexible and easy to configure.
Phalcon Configuration
Cherokee provides a friendly graphical interface to configure almost every setting available in the web server.
Start the cherokee administrator by executing as root
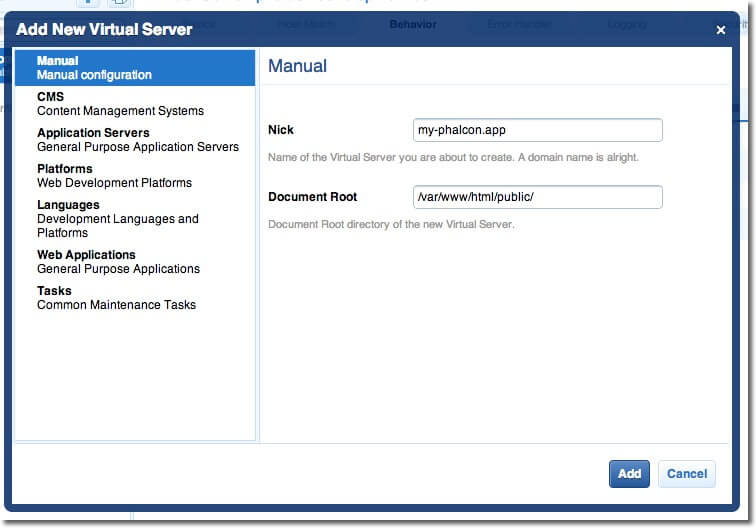
Create a new virtual host by clicking on , then add a new virtual server:
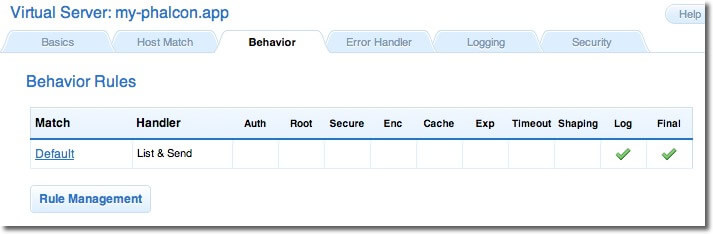
The recently added virtual server must appear at the left bar of the screen. In the tab you will see a set of default behaviors for this virtual server. Click the button. Remove those labeled as and :
Add the behavior using the wizard. This behavior allows you to run PHP applications:
Normally this behavior does not require additional settings. Add another behavior, this time in the section. In choose , then make sure the option is enabled:

In the tab choose as handler:
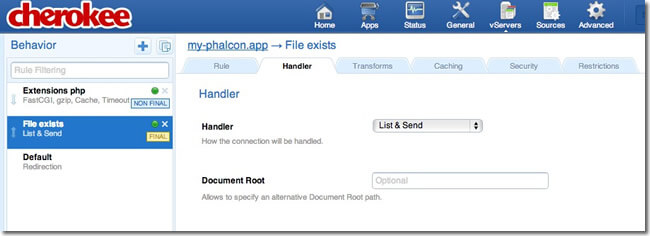
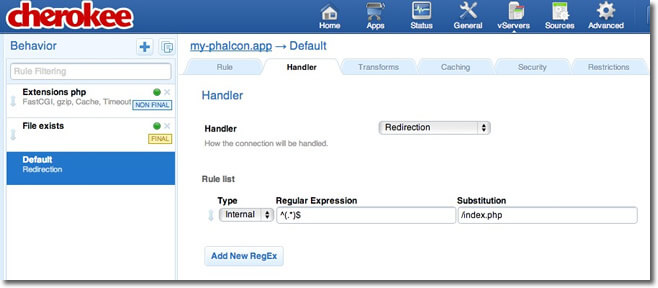
Edit the behavior in order to enable the URL-rewrite engine. Change the handler to , then add the following regular expression to the engine :
Finally, make sure the behaviors have the following order:
Execute the application in a browser:
Phalcon — идеальный баланс между возможностями и производительностью
Когда речь идет о создании приложений — вы не хотите идти на компромисс, не так ли? Если это действительно так, то вы должны обязательно обратить внимание на Phalcon.
Phalcon предоставит вам все типичные черты больших и комплексных фреймворков, но в то же время, так как он поставляется в виде модуля C на основе языка PHP,
его скомпилированные компоненты выполняются гораздо быстрее, чем традиционные фреймворки написаные на чистом PHP.
Phalcon реализует многие типичные решения — такие как внедрения зависимостей, например — но они сильно отличаются от тех, которые обычно предоставляются в большинстве фреймворков,
и являются гораздо более практичными.
Еще один интересный и примечательный факт — разработчики Phalcon создали новый язык программирования высокого уровня под названием Zephir.
Вы можете узнать больше об этом здесь — https://zephir-lang.com
Designing a Sign-up Form
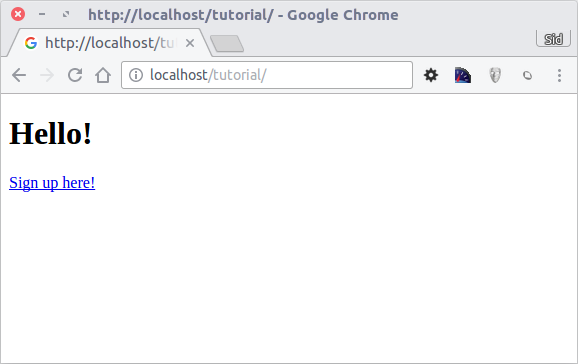
Now we will change the view file, to add a link to a new controller named signup. The goal is to allow users to sign up to our application.
The generated HTML code displays an anchor () HTML tag linking to a new controller:
(rendered)
To generate the link for the tag, we use the Phalcon\Tag component. This is a utility class that offers an easy way to build HTML tags with framework conventions in mind. This class is also a service registered in the Dependency Injector so we can use to access its functionality.
The Phalcon\Tag component also uses the previously registered Phalcon\Uri component to correctly generate URIs. A more detailed article regarding HTML generation can be found here.
And the Signup controller is ():
The empty index action gives the clean pass to a view with the form definition ():
Viewing the form in your browser will display the following:
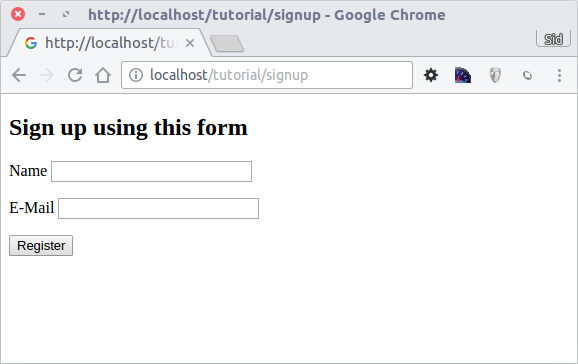
As mentioned above, the Phalcon\Tag utility class, exposes useful methods allowing you to build form HTML elements with ease. The method receives only one parameter for instance, a relative URI to a controller/action in the application. The creates a text HTML element with the name as the passed parameter, while the creates a submit HTML button.
By clicking the Register button, you will notice an exception thrown from the framework, indicating that we are missing the action in the controller . Our file throws this exception:
Implementing that method will remove the exception:
If you click the Register button again, you will see a blank page. We will be adding a view a little later that provides useful feedback. But first, we should work on the code to store the user’s inputs in a database.
According to MVC guidelines, database interactions must be done through models to ensure clean, object-oriented code.
Маршрутизация
Routing is further explained in the relevant document. However the default route is:
You can find more information about modules in the document. For an application that does not have any modules, the default routes are:
As a result, the URL:
will have:
| Slug | Описание |
|---|---|
| Контроллер | |
| Действие | |
| Parameter1 | |
| Parameter2 |
The above will call the and . The parameters will be available through the in the controller and action.
Controller classes can be in any folder in your application, so long as your autoloader knows where to look for them when called. Phalcon\Loader has numerous options for registering directories, namespaces etc. to help with the discovery of the controllers.
A sample controller is as follows:
WAMP
WampServer is a Windows web development environment. It allows you to create web applications with Apache2, PHP and a MySQL database. Below are detailed instructions on how to install Phalcon on WampServer for Windows. Using the latest WampServer version is highly recommended.
Download Phalcon
For Phalcon to work on Windows, you must install the correct version that matches your architecture and extension built. Load up the page provided by WAMP:

Check the and values. Those will allow you to download the correct DLL. In the above example you should download the file:
which will match , and which is Thread Safe. If your system reports (Non Thread Safe) then you should download that DLL.
WAMP has both 32 and 64 bit versions. From the download section, you can download the Phalcon DLL that suits your WAMP installation.
After downloading the Phalcon library you will have a zip file like the one shown below:
Extract the library from the archive to get the Phalcon DLL:

Copy the file to the PHP extensions folder. If WAMP is installed in the folder, the extension needs to be in (assuming your WAMP installation installed PHP 7.2.18).

Edit the file, it is located at . It can be edited with Notepad or a similar program. We recommend Notepad++ to avoid issues with line endings. Append at the end of the file:
and save it.

Also edit the file, which is located at . Append at the end of the file:
and save it.

Restart the Apache Web Server. Do a single click on the WampServer icon at system tray. Choose from the pop-up menu. Check out that tray icon will become green again.
Open your browser to navigate to https://localhost. The WAMP welcome page will appear. Check the section to ensure that Phalcon was loaded.

Apache
Apache — это популярный веб-сервер, доступный на большинстве современных платформ.
Phalcon Configuration
Ниже приведены возможные конфигурации, которые можно использовать для настройки Apache с Phalcon. Эти примеры в основном нацелены на настройку модуля ` mod_rewrite`, позволяющего использовать понятные URL-адреса (ЧПУ) и компонента маршрутизации. Типичное приложение имеет следующую структуру:
Корневой каталог Наиболее распространенным вариантом является установка приложения в корневой каталог. Если это так, то мы можем использовать файлы. Во первых, он будет использоваться для скрытия кода приложения, пересылающего все запросы в корневой каталог приложения ().
tutorial/.htaccess
Во вторых, файл находящийся в каталоге , перезаписывает все URI в файл:
Международные символы При использовании существует проблема для пользователей, использующих персидскую букву ‘م’ (meem) в параметрах uri. Чтобы сопоставление работало как и с английскими символами, вам нужно изменить файл :
Если URI вашего приложения может содержать символы, отличные от английского, вам, возможно, придется применить указанное выше изменение, чтобы результат работы модуля точно соответствовал маршруту (роуту) приложения.
Apache Configuration
Если вы не хотите использовать файлы , вы можете переместить соответствующие директивы в основной конфигурационный файл apache:
Опыт перехода проекта на phalcon с php 5.6 на 7.1
Время идет, прогресс приносит свои плоды, каждый месяц выходят новые версии того или иного программного обеспечения. То же происходит и с языком PHP. Наша команда проекта krisha.kz решила, что уже пора совершить переход на новую версию интерпретатора. Мы поделимся опытом перехода PHP с версии 5.6 на 7.1, который обслуживает наш основной монолит.
Существует видео об устройстве этого монолита. Его особенностью является, то что он основан на фреймворке Phalcon версии 2. В связи с этим, помимо обновления самого PHP, нам нужно было поработать и над переходом на 3-ю версию Phalcon.
Собственно, сам переезд был осуществлен еще 11 октября 2017 — руки не доходили написать про это. Но, думаю, тем кто использует флакон будет интересно.