Топ инструментов разработки для postgresql
Содержание:
- 2020-08-20 — pgAdmin 4 v4.25 Released
- The SQL Editor Panel
- The Data Grid
- Шаг 3 — Настройка Apache
- Шаг 2 — Настройка pgAdmin 4
- 2018-07-12 — pgAgent v4.0.0 Released
- Mapped Files and Directories
- Query History Panel
- Daemon installation on Unix
- Основные параметры конфигурационных файлов PostgreSQL
- Service installation on Windows
- Bug fixes
- Создание дампа базы данных PostgreSQL в pgAdmin 4
- Examples
- Requirements
2020-08-20 — pgAdmin 4 v4.25 Released
The pgAdmin Development Team are pleased to announce pgAdmin 4 version 4.25. This release of pgAdmin 4 includes 30 bug fixes and new features. For more details please see the release notes.
Notable changes in this release include:
- Modified schema diff tool to compare two databases instead of two schemas
- Resolve schema diff dependencies by selecting the appropriate node automatically and maintain the order in the generated script.
- Replace charting library Flotr2 with ChartJS using React.
- Upgrade font-awesome from v4 to v5.
- Fixed an issue where debugger doesn’t work if the search path is set other than ‘public’.
- Fixed ssh tunnel hang issue when the user tries to disconnect the server.
- Fixed an issue where conversion of bytea to the binary string results in an error.
- Fixed an issue where the entire logs are in red text when the user runs backup and restore.
- Ensure that the user will be able to modify the start value of the Identity column.
- Fixed an issue where ‘ALTER VIEW’ statement is missing when the user sets the default value of a column for View.
Download your copy now!
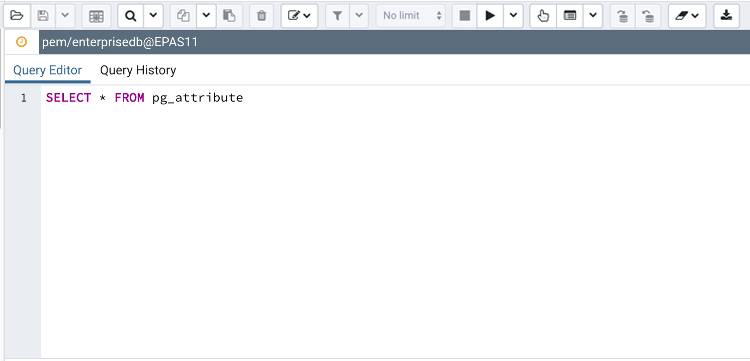
The SQL Editor Panel
The SQL editor panel is a workspace where you can manually provide a query,
copy a query from another source, or read a query from a file. The SQL editor
features syntax coloring and autocompletion.
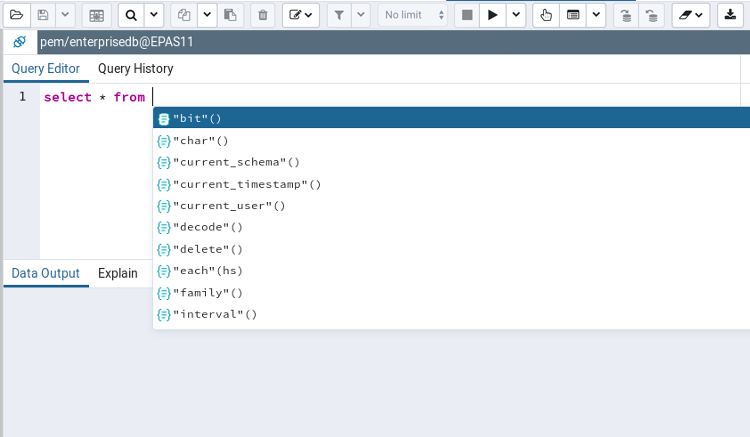
To use autocomplete, begin typing your query; when you would like the Query
editor to suggest object names or commands that might be next in your query,
press the Control+Space key combination. For example, type “*SELECT * FROM* ”
(without quotes, but with a trailing space), and then press the Control+Space
key combination to select from a popup menu of autocomplete options.
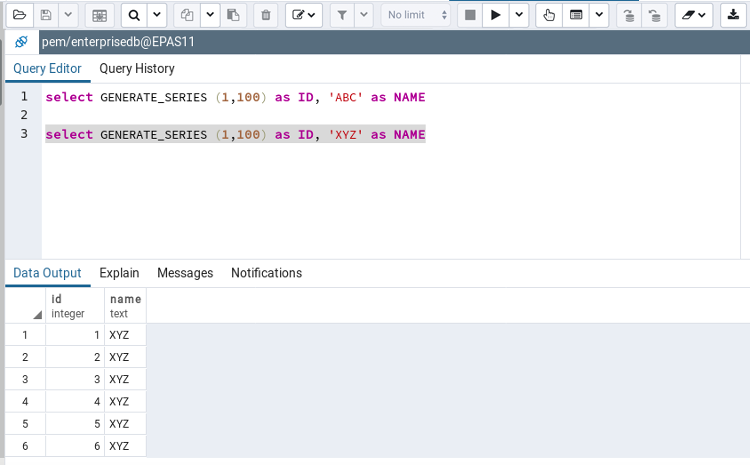
After entering a query, select the Execute/Refresh icon from the toolbar. The
complete contents of the SQL editor panel will be sent to the database server
for execution. To execute only a section of the code that is displayed in the
SQL editor, highlight the text that you want the server to execute, and click
the Execute/Refresh icon.
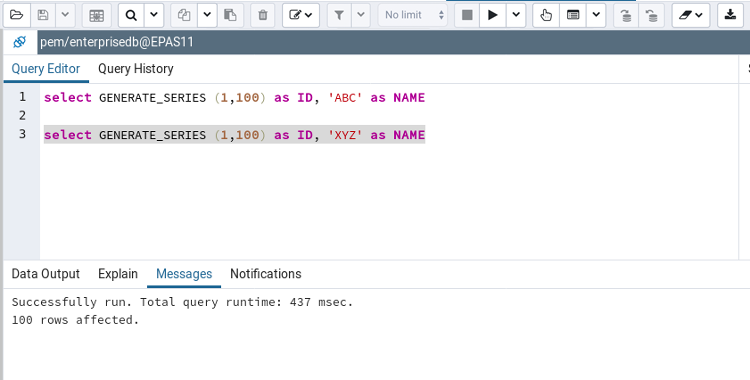
The message returned by the server when a command executes is displayed on the
Messages tab. If the command is successful, the Messages tab displays
execution details.
Options on the Edit menu offer functionality that helps with code formatting
and commenting:
-
The auto-indent feature will automatically indent text to the same depth as
the previous line when you press the Return key. -
Block indent text by selecting two or more lines and pressing the Tab key.
-
Implement or remove SQL style or toggle C style comment notation within your
code.
The Data Grid
The top row of the data grid displays the name of each column, the data type,
and if applicable, the number of characters allowed. A column that is part of
the primary key will additionally be marked with .
To modify the displayed data:
-
To change a numeric value within the grid, double-click the value to select
the field. Modify the content in the square in which it is displayed. -
To change a non-numeric value within the grid, double-click the content to
access the edit bubble. After modifying the contentof the edit bubble, click
the Ok button to display your changes in the data grid, or Cancel to
exit the edit bubble without saving.
To enter a newline character, click Ctrl-Enter or Shift-Enter. Newline
formatting is only displayed when the field content is accessed via an edit
bubble.
To add a new row to the table, enter data into the last (unnumbered) row of the
table. As soon as you store the data, the row is assigned a row number, and a
fresh empty line is added to the data grid.
To write a SQL NULL to the table, simply leave the field empty. When you store
the new row, the will server fill in the default value for that column. If you
store a change to an existing row, the value NULL will explicitly be written.
To write an empty string to the table, enter the special string ‘’ (two single
quotes) in the field. If you want to write a string containing solely two single
quotes to the table, you need to escape these quotes, by typing »
To delete a row, press the Delete toolbar button. A popup will open, asking
you to confirm the deletion.
To commit the changes to the server, select the Save Data toolbar button.
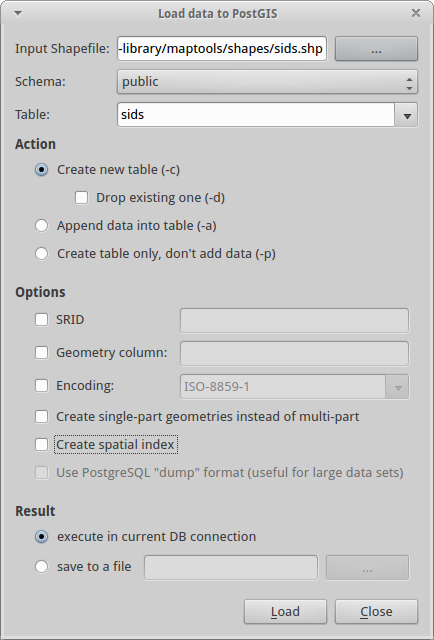
Geometry Data Viewer
If PostGIS is installed, you can view GIS objects in a map by selecting row(s)
and clicking the ‘View Geometry’ button in the column. If no rows are selected,
the entire data set will be rendered:

You can adjust the layout by dragging the title of the panel. To view the
properties of the geometries directly in map, just click the specific geometry:

Шаг 3 — Настройка Apache
Веб-сервер Apache использует виртуальные хосты для инкапсуляции данных конфигурации и размещения сразу нескольких доменов на одном сервере. Если вы выполнили указания предварительного руководства для Apache, у вас уже может быть настроен пример виртуального хоста с именем , но на этом шаге мы создадим новый хост, откуда мы сможем обслуживать веб-интерфейс pgAdmin.
Сначала убедитесь, что вы находитесь в директории root:
Затем создайте новый файл в вашей директории с именем . Это будет файл виртуального хоста вашего сервера:
Добавьте следующее содержимое в файл, заменив выделенные части в соответствии с вашей собственной конфигурацией:
/etc/apache2/sites-available/pgadmin4.conf
Сохраните и закройте файл виртуального хоста. Затем воспользуйтесь скриптом для отключения файла виртуального хоста по умолчанию, :
Примечание: если вы выполнили требования предварительного руководства Apache, вы должны были отключить и настроить пример файла конфигурации виртуального хоста (с именем согласно требованиям). В этом случае вам нужно будет отключить файл виртуального хоста с помощью следующей команды:
Затем воспользуйтесь скриптом , чтобы активировать ваш файл виртуального хоста . В результате будет создана символьная ссылка из файла виртуального хоста в директории в директорию :
После этого проверьте на правильность синтаксис вашего файла конфигурации:
Если файл конфигурации в порядке, вы увидите сообщение . Если вы увидите ошибку в результатах, снова откройте файл и повторно проверьте, что ваш IP-адрес и пути файлов корректны, после чего запустите .
После появления вывода перезапустите службу Apache, чтобы она смогла прочитать ваш новый файл виртуального хоста:
pgAdmin теперь полностью установлен и настроен. Теперь мы перейдем к тому, как организовать доступ к pgAdmin из браузера, прежде чем подключать его к базе данных PostgreSQL.
Шаг 2 — Настройка pgAdmin 4
Хотя pgAdmin был установлен на сервере, осталось несколько шагов, которые нужно выполнить, чтобы гарантировать, что в наличии все разрешения и конфигурации, необходимые для правильной работы с веб-интерфейсом.
Основной файл конфигурации pgAdmin с именем считывается перед любым другим файлом конфигурации. Его содержание можно использовать в качестве отправной точки для последующих настроек конфигурации, которые можно указать в других файлах конфигурации pgAdmin, но чтобы избежать непредвиденных ошибок, вы не должны редактировать файл самостоятельно. Мы внесем некоторые изменения конфигурации в новый файл с именем , который будет считываться непосредственно после основного файла.
Создайте этот файл сейчас, используя текстовый редактор. Мы будем использовать :
environments/my_env/lib/python3.6/site-packages/pgadmin4/config_local.py
Вот что делают эти пять директив:
- : данная директива определяет файл, в котором будут храниться журналы pgAdmin.
- : pgAdmin хранит данные о пользователях в базе данных SQLite, и эта директива указывает программному обеспечению PgAdmin на базу данных конфигурации. Поскольку этот файл находится в постоянной директории , ваши пользовательские данные после обновления не будут потеряны.
- : указывает, какая директория будет использоваться для хранения данных сеанса.
- : определяет, где pgAdmin будет хранить другие данные, например резервные копии и сертификаты безопасности.
- : установка значения для этой директивы говорит о том, что pgAdmin должен запускаться в режиме сервера, а не в режиме настольного компьютера.
Обратите внимание, что каждый из этих путей файла указывает на директории, созданные на шаге 1. После добавления этих строк сохраните и закройте файл (нажмите , а затем нажмите и )
После внесения этих изменений запустите скрипт установки pgAdmin, чтобы задать учетные данные для входа:
После добавления этих строк сохраните и закройте файл (нажмите , а затем нажмите и ). После внесения этих изменений запустите скрипт установки pgAdmin, чтобы задать учетные данные для входа:
После запуска этой команды вы увидите запрос на ввод адреса электронной почты и пароля. Они будут служить вашими учетными данными для последующего доступа к pgAdmin, обязательно запомните их или запишите:
После этого необходимо деактивировать вашу виртуальную среду:
Воспользуйтесь путями файла, которые вы указали в файле . Эти файлы хранятся в директориях, созданных на шаге 1, которые в настоящее время принадлежат вашему пользователю без прав root. Однако они должны быть доступны для пользователя и группы, которые запускают ваш веб-сервер. По умолчанию в Ubuntu 18.04 это пользователь и группа www-data, поэтому необходимо обновить разрешения для следующих директорий, чтобы предоставить www-data нужные права владения:
После этого настройку pgAdmin можно считать выполненной. Однако программа еще не обслуживается на вашем сервере, поэтому она остается недоступной. Для устранения данной проблемы мы настроим Apache для обслуживания pgAdmin, чтобы вы могли получить доступ к интерфейсу пользователя через браузер.
2018-07-12 — pgAgent v4.0.0 Released
The pgAdmin Development Team are pleased to announce the release of pgAgent v4.0.0.
pgAgent is a job scheduler for PostgreSQL; for more information please see the documentation included as part of the pgAdmin documentation at https://www.pgadmin.org/docs/pgadmin4/3.x/pgagent.html.
Download (source): https://www.pgadmin.org/download/pgagent-source-code/
We expect DEB and RPM packages to be available from the PostgreSQL APT/YUM repositories in due course, as well as an updated installer from EnterpriseDB available through StackBuilder.
Notable changes in this release include:
- Remove the dependency on wxWidgets. pgAgent now uses Boost for thread management and synchronisation
- Refactor connection parsing logic to fix issues with and improve handling of connection strings
- Handle 2 digit server version numbers
- Fix handling of the «succeeded» flag on job steps which could prevent failure of steps causing the following steps to fail
The current version of pgAdmin 4 is
4.25
Mapped Files and Directories
The following files or directories can be mapped from the container onto the
host machine to allow configuration to be customised and shared between
instances.
Warning
Warning: pgAdmin runs as the pgadmin user (UID: 5050) in the
pgadmin group (GID: 5050) in the container. You must ensure that all files
are readable, and where necessary (e.g. the working/session directory)
writeable for this user on the host machine. For example:
sudo chown -R 5050:5050 <host_directory>
On some filesystems that do not support extended attributes, it may not be
possible to run pgAdmin without specifying a value for PGADMIN_LISTEN_PORT
that is greater than 1024. In such cases, specify an alternate port when
launching the container by adding the environment variable, for example:
-e 'PGADMIN_LISTEN_PORT=5050'
Don’t forget to adjust any host-container port mapping accordingly.
/var/lib/pgadmin
This is the working directory in which pgAdmin stores session data, user files,
configuration files, and it’s configuration database. Mapping this directory
onto the host machine gives you an easy way to maintain configuration between
invocations of the container.
/pgadmin4/config_local.py
This file can be used to override configuration settings in pgAdmin. Settings
found in config.py can be overridden with deployment specific values if
required. Settings in config_local.py will also override anything specified in
the container environment through PGADMIN_CONFIG_ prefixed variables.
/pgadmin4/servers.json
If this file is mapped, server definitions found in it will be loaded at launch
time. This allows connection information to be pre-loaded into the instance of
pgAdmin in the container. Note that server definitions are only loaded on first
launch, i.e. when the configuration database is created, and not on subsequent
launches using the same configuration database.
/certs/server.cert
If TLS is enabled, this file will be used as the servers TLS certificate.
/certs/server.key
Query History Panel
Use the Query History tab to review activity for the current session:

The Query History tab displays information about recent commands:
-
The date and time that a query was invoked.
-
The text of the query.
-
The number of rows returned by the query.
-
The amount of time it took the server to process the query and return a
result set. -
Messages returned by the server (not noted on the Messages tab).
-
The source of the query (indicated by icons corresponding to the toolbar).
You can show or hide the queries generated internally by pgAdmin (during
‘View/Edit Data’ or ‘Save Data’ operations).
To erase the content of the Query History tab, select Clear history from
the Clear drop-down menu.
Daemon installation on Unix
Note
pgAgent is available in Debian/Ubuntu (DEB) and Redhat/Fedora (RPM)
packages for Linux users, as well as source code. See the
pgAdmin Website. for more
information.
To install the pgAgent daemon on a Unix system, you will normally need to have
root privileges to modify the system startup scripts. Modifying system startup
scripts is quite system-specific so you should consult your system documentation
for further information.
The program itself takes few command line options, most of which are only
needed for debugging or specialised configurations:
Usage
  pathtopgagent options <connect-string>

options
  -f run in the foreground (do not detach from the terminal)
  -t <poll time interval in seconds (default 10)>
  -r <retry period after connection abort in seconds (>=10, default 30)>
  -s <log file (messages are logged to STDOUT if not specified)>
  -l <logging verbosity (ERROR=, WARNING=1, DEBUG=2, default )>
The connection string is a standard PostgreSQL libpq connection string (see
the
for further details). For example, the following command line will run pgAgent
against a server listening on the localhost, using a database called ‘pgadmin’,
connecting as the user ‘postgres’:
Основные параметры конфигурационных файлов PostgreSQL
Файлы конфигурации postgresql находятся в директории /var/lib/pgsql/11/data:
- postgresql.conf — непосредственно сам файл конфигурации postgresql;
- pg_hba.conf — файл с настройками доступа. В данном файле, можно выставлять различные ограничения для пользователей, устанавливать политику подключения к БД;
- pg_ident.conf — этот файл используется при идентификации клиентов по протоколу ident.
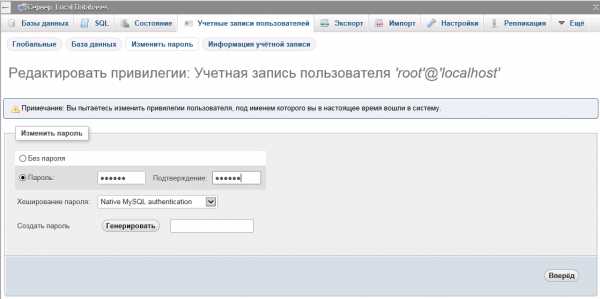
Чтобы запретить локальным пользователям вход в postgres без авторизации, в файле pg_hba.conf укажите:
local all all md5
host all all 127.0.0.1/32 md5
Рассмотрим наиболее важные параметры в конфигурационном файле postgresql.conf:
- listen_addresses — указывает на каких IP адресах сервер будет принимать клиентские подключения. По умолчанию указано localhost, это означает, что возможно только локальное подключение. Чтобы случашать на всех IPv4 интерфейсах, укажите 0.0.0.0
- max_connections – как и в других СУБД, это максимальное количество одновременных подключения к серверу БД;
- temp_buffers – максимальный размер временных буферов;
- shared_buffers — объем разделяемой памяти используемый сервером баз данных. Обычно выставляется в размере 25% от памяти, установленной на сервере;
- effective_cache_size – параметр, который помогает планировщику postgres определить количество доступной памяти для кеширования на диск. Обычно параметр выставляется размером в 50-75% от всей ОЗУ на сервере;
- work_mem – объем памяти, который будет использоваться внутренними операциями сортировки СУБД — ORDER BY, DISTINCT и слияния;
- maintenance_work_mem – объем памяти, который будет использоваться внутренними операциями — VACUUM, CREATE INDEX и ALTER TABLE ADD FOREIGN KEY;
- fsync – если этот параметр включен, то СУБД будет дожидаться физической записи данных на жесткий диск. При включенном fsynс вам будет проще восстановить БД после системного или аппаратного сбоя. Естественно, что включение данного параметра значительно снижает производительность СУБД, но повышает надежность хранения. При отключении этого параметра стоит отключать и full_page_writes;
- max_stack_depth — максимальный размер стека (2 Мб по умолчанию);
- max_fsm_pages — с помощью данного параметра, можно управлять свободным дисковым пространством на сервере. К примеру, после удаления данных из таблицы, занимаемое ранее место не освобождается на диске, а помечается на карте свободного пространства с меткой «свободно» и далее используется для новых записей в таблице. Если на сервере активно ведется запись/удаление данных в таблицах, увеличение данного параметра, положительно повлияет на производительность;
- wal_buffers – объем из разделяемой памяти (shared_buffers), который используется для хранения данных WAL;
- wal_writer_delay – время между периодами записи WAL на диск;
- commit_delay — задержка между записью транзакции в буфер WAL и сбросом его на диск;
- synchronous_commit — параметр определяет, что результат об успешном завершении транзакции будет отправлен тогда, когда данные WAL физически запишутся на диск.
Service installation on Windows
Note
pgAgent is available in a pre-built installer if you use
EnterpriseDB’s PostgreSQL Installers.
Use the StackBuilder application to download and install it. If installed
in this way, the service will automatically be created and the instructions
below can be ignored.
pgAgent can install itself as a service on Windows systems. The command line
options available are similar to those on Unix systems, but include an
additional parameter to tell the service what to do:
Usage
  pgAgent REMOVE <serviceName>
  pgAgent INSTALL <serviceName> options <connect-string>
  pgAgent DEBUG options <connect-string>

  options
    -u <user or DOMAIN\user>
    -p <password>
    -d <displayname>
    -t <poll time interval in seconds (default 10)>
    -r <retry period after connection abort in seconds (>=10, default 30)>
    -l <logging verbosity (ERROR=, WARNING=1, DEBUG=2, default )>
The service may be quite simply installed from the command line as follows
(adjust the path as required):
"C:\Program Files\pgAgent\bin\pgAgent" INSTALL pgAgent -u postgres -p secret hostaddr=127.0.0.1 dbname=postgres user=postgres
You can then start the service at the command line using net start pgAgent,
or from the Services control panel applet. Any logging output or errors will
be reported in the Application event log. The DEBUG mode may be used to run
pgAgent from a command prompt. When run this way, log messages will output to
the command window.
Bug fixes
Bug #3096 — Ensure size stats are prettified on the statistics tab when the UI language is not English.
Bug #3352 — Handle display of roles with expiration set to infinity correctly.
Bug #3418 — Allow editing of values in columns with the oid datatype which are not an actual row OID.
Bug #3544 — Make the Query Tool tab titles more concise and useful.
Bug #3587 — Fix support for bigint’s in JSONB data.
Bug #3583 — Update CodeMirror to 5.43.0 to resolve issues with auto-indent.
Bug #3600 — Ensure JSON data isn’t modified in-flight by psycopg2 when using View/Edit data.
Bug #3673 — Modify the Download as CSV option to use the same connection as the Query Tool its running in so temporary tables etc. can be used.
Bug #3873 — Fix context sub-menu alignment on Safari.
Bug #3890 — Update documentation screenshots as per new design.
Bug #3906 — Fix alignment of Close and Maximize button of Grant Wizard.
Bug #3911 — Add full support and testsfor all PG server side encodings.
Bug #3912 — Fix editing of table data with a JSON primary key.
Bug #3933 — Ignore exceptions in the logger.
Bug #3942 — Close connections gracefully when the user logs out of pgAdmin.
Bug #3946 — Fix alignment of checkbox to drop multiple schedules of pgAgent job.
Bug #3958 — Don’t exclude SELECT statements from transaction management in the Query Tool in case they call data-modifying functions.
Bug #3959 — Optimise display of Dependencies and Dependents, and use on-demand loading of rows in batches of 100.
Bug #3963 — Fix alignment of import/export toggle switch.
Bug #3970 — Prevent an error when closing the Sort/Filter dialogue with an empty filter string.
Bug #3974 — Fix alignment of Connection type toggle switch of pgagent.
Bug #3981 — Fix the query to set bytea_output so that read-only standbys don’t consider it a write query.
Bug #3982 — Add full support and testsfor all PG server side encodings.
Bug #3985 — Don’t embed docs and external sites in iframes, to allow the external sites to set X-FRAME-OPTIONS = DENY for security.
Bug #3992 — Add full support and testsfor all PG server side encodings.
Bug #3998 — Custom-encode forward slashes in URL parameters as Apache HTTPD doesn’t allow them in some cases.
Bug #4000 — Update CodeMirror to 5.43.0 to resolve issues with tab indent with use spaces enabled.
Bug #4013 — Ensure long queries don’t cause errors when downloading CSV in the Query Tool.
Bug #4021 — Disable the editor and execute functions whilst queries are executing.
Bug #4022 — Fix an issue where importing servers fails if a group already exists for a different user.
Создание дампа базы данных PostgreSQL в pgAdmin 4
Весь процесс переноса базы данных PostgreSQL достаточно простой, суть в следующем.
Нам необходимо создать копию нашей базы данных (дамп), затем создать пустую базу на нужном нам сервере и восстановить все данные, используя созданный ранее дамп.
Все это можно сделать с нашего клиентского компьютера, используя pgAdmin 4, если, конечно же, целевой сервер нам доступен, если недоступен, то придётся каким-то другим образом переносить дамп базы данных на нужный сервер и, используя стандартные консольные утилиты, восстановить базу данных из дампа.
Кстати, стоит отметить, что pgAdmin 4 для экспорта/импорта баз данных использует как раз эти стандартные консольные утилиты, в частности pg_dump, pg_dumpall и pg_restore, которые по умолчанию входят в состав PostgreSQL.
pg_dump – утилита для экспорта баз данных PostgreSQL
pg_dumpall – утилита для экспорта кластера баз данных PostgreSQL (всех данных на сервере)
pg_restore – утилита восстановления баз данных PostgreSQL из файла архива
Таким образом, благодаря pgAdmin 4 нам не нужно писать и выполнять команды в командной строке, за нас все это делает pgAdmin 4, мы всего лишь будем пользоваться мышкой, настраивая все параметры в графическом интерфейсе.
Создать дамп базы данных PostgreSQL можно в нескольких форматах, в частности:
Специальный (Custom) – это пользовательский формат, который использует сжатие. Данный формат по умолчанию предлагается в pgAdmin 4 и рекомендован для средних и больших баз данных. Обычно архивные файлы в таком формате создают с расширением backup, однако можно использовать и другое расширение.
Tar (tar) – база данных выгружается в формат tar. Данный формат не поддерживает сжатие.
Простой (plain) – в данном случае база данных выгружается в обычный текстовый SQL-скрипт, в котором все объекты базы данных и непосредственно сами данные будут в виде соответствующих SQL инструкций. Данный скрипт можно легко отредактировать в любом текстовом редакторе и выполнить, используя Query Tool, как обычные SQL запросы. Данный формат рекомендован для небольших баз данных, а также для тех случаев, когда требуется внести изменения в дамп базы данных перед восстановлением.
Каталог (directory) – этот формат файла создает каталог, в котором для каждой таблицы и большого объекта будут созданы отдельные файлы, а также файл оглавления в машиночитаемом формате, понятном для утилиты pg_restore. Этот формат по умолчанию использует сжатие, а также поддерживает работу в несколько потоков.
В данном материале мы рассмотрим создание дампа в специальном формате, а также в формате обычного SQL скрипта, дело в том, что процесс восстановления базы данных из этих форматов в pgAdmin 4 немного отличается.
Создание дампа базы данных в сжатом формате
Чтобы создать дамп базы данных PostgreSQL в pgAdmin 4, необходимо в обозревателе выбрать нужную базу данных, я выбираю базу данных shop, далее необходимо вызвать контекстное меню правой кнопкой мыши и нажать на пункт «Резервная копия».
Затем всего лишь нужно указать имя архивного файла и путь к каталогу, где его сохранить, для этого можно использовать кнопку с тремя точками.
Формат «Специальный», как было отмечено ранее, предлагается по умолчанию, поэтому выбирать его не требуется.
Как я уже отмечал, обычно архив в таком формате создают с расширением backup, я так и поступаю, т.е. архив назову shop.backup и сохраню его в каталоге D:\PostgreSQL_Backup\.
В случае необходимости задать определенный уровень сжатия можно с помощью параметра «Коэффициент сжатия», поддерживаются значения от 0 до 9, где 0 – вообще не использовать сжатие, а 9 самый высокий уровень сжатия, по умолчанию используется умеренное сжатие.
В нашем случае база данных небольшая, поэтому мы можем оставить все по умолчанию.

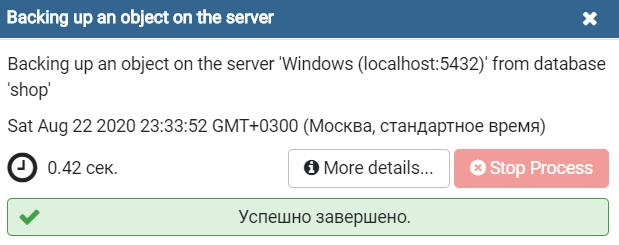
Больше никаких настроек в нашем случае делать нет необходимости, и мы можем нажать на кнопку «Резервная копия», чтобы запустить процесс создания дампа базы данных.

Когда появится сообщение «Успешно завершено», значит, процесс создания дампа базы данных PostgreSQL завершен успешно, в противном случае Вы будете получать сообщения о неуспешном завершении.
Создание дампа базы данных в простом формате SQL
В данном случае нам необходимо сделать практически все то же самое, только нужно выбрать формат «Простой» и дополнительно включить пару параметров, чтобы добавление данных осуществлялось с помощью обычных инструкций INSERT, а не с помощью команды COPY, которая используется по умолчанию.
Для этого переходим на вкладку «Параметры выгрузки» и включаем два параметра «Использовать команды INSERT» иINSERT с указанием столбцов», хотя данный параметр можно и не указывать.

Examples
Run a simple container over port 80:
docker pull dpage/pgadmin4
docker run -p 80:80 \
    -e 'PGADMIN_DEFAULT_EMAIL=user@domain.com' \
    -e 'PGADMIN_DEFAULT_PASSWORD=SuperSecret' \
    -d dpage/pgadmin4
Run a simple container over port 80, setting some configuration options:
docker pull dpage/pgadmin4
docker run -p 80:80 \
    -e 'PGADMIN_DEFAULT_EMAIL=user@domain.com' \
    -e 'PGADMIN_DEFAULT_PASSWORD=SuperSecret' \
    -e 'PGADMIN_CONFIG_ENHANCED_COOKIE_PROTECTION=True' \
    -e 'PGADMIN_CONFIG_LOGIN_BANNER="Authorised users only!"' \
    -e 'PGADMIN_CONFIG_CONSOLE_LOG_LEVEL=10' \
    -d dpage/pgadmin4
Run a TLS secured container using a shared config/storage directory in
/private/var/lib/pgadmin on the host, and servers pre-loaded from
/tmp/servers.json on the host:
Requirements
Important: Some components of pgAdmin require the ability to maintain affinity
between client sessions and a specific database connection (for example, the
Query Tool in which the user might run a BEGIN command followed by a number of
DML SQL statements, and then a COMMIT). pgAdmin has been designed with built-in
connection management to handle this, however it requires that only a single
Python process is used because it is not easily possible to maintain affinity
between a client session and one of multiple WSGI worker processes.
On Windows systems, the Apache HTTP server uses a single process, multi-threaded
architecture. WSGI applications run in mode, which means that only
a single process will be present on this platform in all cases.
On Unix systems, the Apache HTTP server typically uses a multi-process, single
threaded architecture (this is dependent on the that is chosen at
compile time). If mode is chosen for the WSGI application, then
there will be one Python environment for each Apache process, each with it’s own
connection manager which will lead to loss of connection affinity. Therefore
one should use ’s mode, configured to use a single
process. This will launch a single instance of the WSGI application which is
utilised by all the Apache worker processes.
Whilst it is true that this is a potential performance bottleneck, in reality
pgAdmin is not a web application that’s ever likely to see heavy traffic
unlike a busy website, so in practice should not be an issue.