Getting started with minicom
Содержание:
USE top
       Minicom is window based. To pop-up a window with the function you
       want, press Control-A (from now on, we will use C-A to mean Control-
       A), and then the function key (a-z or A-Z). By pressing C-A first and
       then 'z', a help screen comes up with a short summary of all
       commands. This escape key can be altered when minicom is configured
       (-s option or C-A O), but we'll stick to Control-A for now.

       For every menu the next keys can be used:
       UP     arrow-up or 'k'
       DOWN   arrow-down or 'j'
       LEFT   arrow-left or 'h'
       RIGHT  arrow-right or 'l'
       CHOOSE Enter
       CANCEL ESCape.

       The screen is divided into two portions: the upper 24 lines are the
       terminal-emulator screen. In this window, ANSI or VT100 escape
       sequences are interpreted.  If there is a line left at the bottom, a
       status line is placed there.  If this is not possible the status line
       will be showed every time you press C-A. On terminals that have a
       special status line that will be used if the termcap information is
       complete and the -k flag has been given.

       Possible commands are listed next, in alphabetical order.
       C-A  Pressing C-A a second time will just send a C-A to the remote
            system.  If you have changed your "escape character" to
            something other than C-A, this works analogously for that
            character.
       A    Toggle 'Add Linefeed' on/off. If it is on, a linefeed is added
            before every carriage return displayed on the screen.
       B    Gives you a scroll back buffer. You can scroll up with u, down
            with d, a page up with b, a page down with f, and if you have
            them the arrow and page up/page down keys can also be used. You
            can search for text in the buffer with s (case-sensitive) or S
            (case-insensitive). N will find the next occurrence of the
            string.  c will enter citation mode. A text cursor appears and
            you specify the start line by hitting Enter key. Then scroll
            back mode will finish and the contents with prefix '>' will be
            sent.
       C    Clears the screen.
       D    Dial a number, or go to the dialing directory.
       E    Toggle local echo on and off (if your version of minicom
            supports it).
       F    A break signal is sent to the modem.
       G    Run script (Go). Runs a login script.
       H    Hangup.
       I    Toggle the type of escape sequence that the cursor keys send
            between normal and applications mode. (See also the comment
            about the status line below).
       J    Jump to a shell. On return, the whole screen will be redrawn.
       K    Clears the screen, runs kermit and redraws the screen upon
            return.
       L    Turn Capture file on off. If turned on, all output sent to the
            screen will be captured in the file too.
       M    Sends the modem initialization string. If you are online and the
            DCD line setting is on, you are asked for confirmation before
            the modem is initialized.
       N    Toggle between timestamp modes to be added to the output.
            Available are simple and extended time formats for each line, a
            delta to the previous line, a time display each second and no
            timestamps (the default).
       O    Configure minicom. Puts you in the configuration menu.
       P    Communication Parameters. Allows you to change the bps rate,
            parity and number of bits.
       Q    Exit minicom without resetting the modem. If macros changed and
            were not saved, you will have a chance to do so.
       R    Receive files. Choose from various protocols (external). If you
            have the filename selection window and the prompt for download
            directory enabled, you'll get a selection window for choosing
            the directory for downloading. Otherwise the download directory
            defined in the Filenames and paths menu will be used.
       S    Send files. Choose the protocol like you do with the receive
            command. If you don't have the filename selection window enabled
            (in the File transfer protocols menu), you'll just have to write
            the filename(s) in a dialog window. If you have the selection
            window enabled, a window will pop up showing the filenames in
            your upload directory. You can tag and untag filenames by
            pressing spacebar, and move the cursor up and down with the
            cursor keys or j/k. The selected filenames are shown
            highlighted. Directory names are shown  and you
            can move up or down in the directory tree by pressing the
            spacebar twice. Finally, send the files by pressing ENTER or
            quit by pressing ESC.
       T    Choose Terminal emulation: Ansi(color) or vt100.  You can also
            change the backspace key here, turn the status line on or off,
            and define delay (in milliseconds) after each newline if you
            need that.
       U    Add carriage return to each received line.
       W    Toggle line-wrap on/off.
       X    Exit minicom, reset modem. If macros changed and were not saved,
            you will have a chance to do so.
       Y    Paste a file. Reads a file and sends its contests just as if it
            would be typed in.
       Z    Pop up the help screen.
Use
Minicom is window based. To popup a window with the function you want, press Control-A (from now on, we will use C-A to mean Control-A), and then the
function key (a-z or A-Z). By pressing C-A first and then ‘z’, a help screen comes up with a short summary of all commands. This escape key can be altered when
minicom is configured (-s option or C-A O), but we’ll stick to Control-A for now.
For every menu the next keys can be used:
- UP
arrow-up or ‘k’
DOWN
arrow-down or ‘j’
LEFT
arrow-left or ‘h’
RIGHT
arrow-right or ‘l’
CHOOSE
Enter
CANCEL
ESCape.
The screen is divided into two portions: the upper 24 lines are the terminal-emulator screen. In this window, ANSI or VT100 escape sequences are
interpreted. If there is a line left at the bottom, a status line is placed there. If this is not possible the status line will be showed every time you press
C-A. On terminals that have a special status line that will be used if the termcap information is complete and the -k flag has been given.
Possible commands are listed next, in alphabetical order.
C-A
Pressing C-A a second time will just send a C-A to the remote system. If you have changed your «escape character» to something other than C-A, this works
analogously for that character.
A
Toggle ‘Add Linefeed’ on/off. If it is on, a linefeed is added before every carriage return displayed on the screen.
B
Gives you a scroll back buffer. You can scroll up with u, down with d, a page up with b, a page down with f, and if you have
them the arrow and page up/page down keys can also be used. You can search for text in the buffer with s (case-sensitive) or S
(case-insensitive). N will find the next occurrence of the string. c will enter citation mode. A text cursor appears and you specify the start
line by hitting Enter key. Then scroll back mode will finish and the contents with prefix ‘>’ will be sent.
C
Clears the screen.
D
Dial a number, or go to the dialing directory.
E
Toggle local echo on and off (if your version of minicom supports it).
F
A break signal is sent to the modem.
G
Run script (Go). Runs a login script.
H
Hangup.
I
Toggle the type of escape sequence that the cursor keys send between normal and applications mode. (See also the comment about the status line below).
J
Jump to a shell. On return, the whole screen will be redrawn.
K
Clears the screen, runs kermit and redraws the screen upon return.
L
Turn Capture file on off. If turned on, all output sent to the screen will be captured in the file too.
M
Sends the modem initialization string. If you are online and the DCD line setting is on, you are asked for confirmation before the modem is initialized.
O
Configure minicom. Puts you in the configuration menu.
P
Communication Parameters. Allows you to change the bps rate, parity and number of bits.
Q
Exit minicom without resetting the modem. If macros changed and were not saved, you will have a chance to do so.
R
Receive files. Choose from various protocols (external). If you have the filename selection window and the prompt for download directory enabled, you’ll get
a selection window for choosing the directory for downloading. Otherwise the download directory defined in the Filenames and paths menu will be used.
S
Send files. Choose the protocol like you do with the receive command. If you don’t have the filename selection window enabled (in the File transfer
protocols menu), you’ll just have to write the filename(s) in a dialog window. If you have the selection window enabled, a window will pop up showing the
filenames in your upload directory. You can tag and untag filenames by pressing spacebar, and move the cursor up and down with the cursor keys or j/k. The
selected filenames are shown highlighted. Directory names are shown and you can move up or down in the directory tree by pressing the
spacebar twice. Finally, send the files by pressing ENTER or quit by pressing ESC.
T
Choose Terminal emulation: Ansi(color) or vt100. You can also change the backspace key here, turn the status line on or off, and define delay (in
milliseconds) after each newline if you need that.
W
Toggle line-wrap on/off.
X
Exit minicom, reset modem. If macros changed and were not saved, you will have a chance to do so.
Y
Paste a file. Reads a file and sends its contests just as if it would be typed in.
Z
Pop up the help screen.
MISC top
       If minicom is hung, kill it with SIGTERM . (This means kill -15, or
       since sigterm is default, just plain "kill <minicompid>". This will
       cause a graceful exit of minicom, doing resets and everything.  You
       may kill minicom from a script with the command "! killall -9
       minicom" without hanging up the line. Without the -9 parameter,
       minicom first hangs up before exiting.

       Since a lot of escape sequences begin with ESC (Arrow up is ESC [ A),
       Minicom does not know if the escape character it gets is you pressing
       the escape key, or part of a sequence.

       An old version of Minicom, V1.2, solved this in a rather crude way:
       to get the escape key, you had to press it twice.

       As of release 1.3 this has bettered a little: now a 1-second timeout
       is builtin, like in vi. For systems that have the select() system
       call the timeout is 0.5 seconds. And... surprise: a special Linux-
       dependent hack :-) was added. Now, minicom can separate the escape
       key and escape-sequences. To see how dirty this was done, look into
       wkeys.c.  But it works like a charm!
Running Minicom
Now that everything is configured, you are ready to open the serial connection.
-
Run the command to start with the serial port setting you configured above. If you wish to use on a different serial port, see the note below.
-
Log in, if necessary, with the appropriate username and password for the device. Login information can be found here.
You’re now able to communicate to the device and use in the same way as using the terminal for the device.
| NOTE |
|
When opening a connection to a different serial port than what has been saved from the configurations, use the option to specify the path to the desired serial port. For example, to use , run like this: |
2.5 Сценарий регистрации
«minicom» запускает сценарий регистрации (login-script) после того
как он примет строку «CONNECT». Чтобы быть точным, «minicom» не
выполняет сценарий сам, а вызывает для этого утилиту «runscript» в
качестве дочернего процесса.
Ниже показан пример, который я использую для моего провайдера.
Для запуска «pppd» используется cпособность «runscript» вызывать
внешние программы. Скопируйте ваш собственный файл options для ppp в
«/etc/ppp/options.ttyS1» (здесь вы можете заменить «ttyS1» на
устройство, к которому подключен ваш модем) и удалите все строки из
/etc/ppp/options, которые относятся к вашему модему (вроде «connect»,
«crtscts» или «modem»). Вставьте опции, которые специфичны для
ppp-соединения через minicom в «/etc/ppp/mini_options». Одной из
этих опций будет
COLOPHON top
       This page is part of the minicom (a serial communication program)
       project.  Information about the project can be found at
       ⟨https://salsa.debian.org/minicom-team/minicom⟩.  If you have a bug
       report for this manual page, send it to adam@lackorzynski.de.  This
       page was obtained from the project's upstream Git repository
       ⟨https://salsa.debian.org/minicom-team/minicom⟩ on 2020-08-13.  (At
       that time, the date of the most recent commit that was found in the
       repository was 2020-07-27.)  If you discover any rendering problems
       in this HTML version of the page, or you believe there is a better or
       more up-to-date source for the page, or you have corrections or
       improvements to the information in this COLOPHON (which is not part
       of the original manual page), send a mail to man-pages@man7.org

User's Manual                     Dec 2013                        MINICOM(1)
Pages that refer to this page:
ascii-xfr(1),
runscript(1),
xminicom(1)
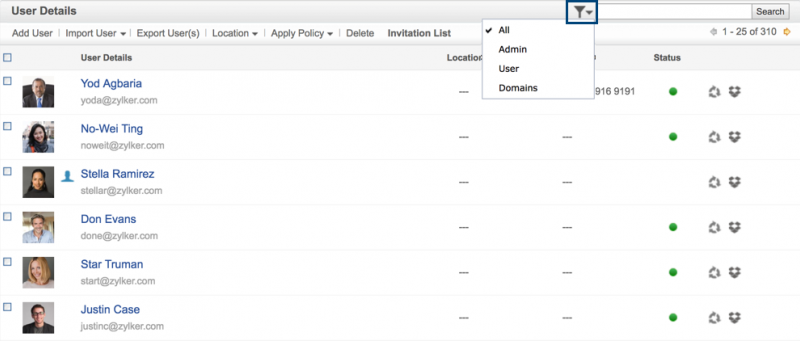
Определение занят ли порт и монопольное использование
Работать с последовательным портом может (обычно) только один процесс.
Если порт «занят» — то попытка передать/получить через него обычно неудачна.
Для того чтобы определить кто занял порт, можно использовать lsof/
Сначала установим:
apt install lsof -y
Потом запустим с именем интересующего нас файла (устройства):
lsof /dev/ttyRS485-2
Если вывод пуст — порт свободен. Если нет — то будет показан занявший процесс.
Порты /dev/ttyRS485-1 и /dev/ttyRS485-2 (если есть сконфигурированные на них устройства) обычно заняты сервисом wb-mqtt-serial
Чтобы его остановить на время работы с портом нужно выполнить:
systemctl stop wb-mqtt-serial
Для запуска:
systemctl start wb-mqtt-serial
Либо отключить порт в конфигурации wb-mqtt-serial сняв галочку «Enable port» (Не забудьте сохранить кнопкой «Save» вверху).
Отключение порта
PandaBoard
Цена: 182$ goo.gl/8fWYF
PandaBoard — еще один одноплатный компьютер, с которым мы сегодня познакомимся. Производитель — Texas Instruments (США). Компьютеры, о которых я уже рассказал, обычно поставляются в пластиковом корпусе, то есть сразу «пригодны для употребления». PandaBoard поставляется в виде платы, но при желании можно отдельно заказать и пластиковый корпус. Вообще, PandaBoard позиционируется не как мини-ПК, а как плата для разработчиков мобильных устройств — такой себе конструктор типа «собери сам».
Железо
Плата PandaBoard поставляется с процессором TI OMAP 4460 (для PandaBoard ES, на PandaBoard установлен процессор 4430) с двумя ядрами ARM Cortex-A9. Процессор работает на частоте 1,2 ГГц, объем оперативки — 1 Гб, а на борту имеется полноразмерный слот для SD-карт.
Обработкой видео занимается встроенный процессор PowerVR SGX540. Чип поддерживает OpenGL ES 2.0, OpenGL ES 1.1, OpenVG 1.1 и EGL 1.3.
Что еще интересного есть на плате? На рисунке продемонстрирован весь состав платы. Так, на ее борту есть модуль WiLinkTM 6.0, который отвечает за поддержку Wi-Fi (802.11 b/g/n) и Bluetooth, контроллер Ethernet 10/100, контроллер RTC (часы реального времени), интерфейсы HDMI и DVI-D, порты USB 2.0, а также аудиоразъем. При этом масса платы составляет всего 82 грамма, а размеры — 114,3 × 101,6 мм.
Изюминкой платы является последовательный порт RS-232 (дома ему уже не место, а вот на производстве пригодится, так что на базе этой платы можно строить не только мини-ПК для дома, но и индустриальные ПК) и слот для плат расширений. Чтобы увеличить функциональность платы, можно приобрести набор BeadaFrame 7″ LCD (BeadaFrame 7″ LCD display kit), который включает в себя сенсорный TFT-экран размером 7 дюймов и разрешением 800 × 480, пластиковый корпус, средство для хранения реального времени (RTC time keeper) и устройство контроля подсветки экрана.
Софт
Плата поставляется без какого-либо программного обеспечения, но «оживить» ее может любой дистрибутив Linux или же Android.
Как установить Ubuntu на PandaBoard
Я уже говорил, что на PandaBoard можно установить любой дистрибутив Linux или Android. Сейчас разберемся, как это сделать на примере Ubuntu. Сразу оговорюсь. PandaBoard — это платформа OMAP4, поэтому нам нужен не любой дистрибутив Linux, а «любой с поддержкой OMAP4». Например, Ubuntu. Нам понадобится компьютер под управлением Linux (дистрибутив значения не имеет), доступ к инету и SD-карта. Первым делом получаем образ Ubuntu с поддержкой OMAP4:
http://cdimage.ubuntu.com/releases/11.10/release/ubuntu-11.10-preinstalled-desktop-armel+omap4.img.gz.
Теперь этот образ нужно поместить на SD-карту. Вставь SD-карту, сейчас нужно выяснить ее имя устройства:
$ df -h
В ответ получишь что-то вроде:
FilesystemSize  Used Avail Use% Mounted on
/dev/sda5 100G  8.0G  92G   8% /
none  995M  700K  995M   1% /dev
none 1002M  308K 1001M   1% /dev/shm
none 1002M  104K 1002M   1% /var/run
none 1002M 0 1002M   0% /var/lock
/dev/sdb2  16G  0G   16G   0% /media/097afede-571b-32c4-8612-3364f0655f52
Отсюда ясно, что SD-карта — это /dev/sdb2. Размонтируем ее:
$ sudo umount /dev/sdb2
Запишем образ на SD-карту:
$ gunzip -c ubuntu-11.10-preinstalled-server-armel+omap4.img.gz | sudo dd bs=4M of=/dev/sdb
$ sync
Далее вставляем карточку в PandaBoard и подключаем ее к COM-порту своего компа. Если такого порта нет, тогда понадобится кабель USB2COM (USB to Serial). Включаем PandaBoard и запускаем терминал (на твоем компе):
$ TERM=vt100 minicom -s
По умолчанию minicom использует устройство /dev/ttyUSB0, обычно так называется первое устройство USB2COM. Узнать, к какому именно устройству подключена PandaBoard, можно командой $ dmesg | grep tty.
Осталось только следовать инструкциям, появляющимся на экране терминала, — через некоторое время Ubuntu будет установлена.
После установки Ubuntu нужно установить дополнительные плагины. Опять подключись к консоли PandaBoard и отредактируй файл /etc/apt/sources.list
sudo vim /etc/apt/sources.list
Нужно раскомментировать строки, отвечающие за подключение репозиториев Universe и Multiverse. После этого нужно ввести команды:
$ sudo apt-get install python-software-properties
$ sudo add-apt-repository ppa:tiomap-dev/release
$ sudo apt-get update
$ sudo apt-get install ubuntu-omap4-extras
После этого перезагружаем PandaBoard:
$ sudo reboot
Minicom — работаем с оборудованием через RS232
Опубликовано muff в Пт, 2010-03-26 23:24
Собственно говоря, довольно много комуникационного оборудования первоначально настраивается через консоль, тоесть через порт RS232. А поскольку уже довольно давно работаю за ноутбуком, на котором RS232 отсутствует, то иногда возникает потребность в наличии данного порта. Зато RS232 навалом в серверах в стойке… Воспользуемся этой возможностью. Соединим кабелем порты RS232 сервера и коммутатора, для примера.
Далее нам пригодится небольшая утилита, название которой minicom. Установка и настройка проблем не вызывает. Для начала установим утилиту из портов:
| # cd /usr/ports/comms/minicom && make install clean && rehash |
После первого запуска утилита «ругается» на отсутствие файла конфигурации.
minicom: ВНИМАНИЕ: файл конфигурации не найден, использую настройки по умолчанию
Но несмотря на это успешно запускается:
|
Добро пожаловать в minicom 2.3 ПАРАМЕТРЫ: I18n Дата компиляции Mar 26 2010, 21:54:53. Port /dev/cuad0 Нажмите CTRL-A Z для получения подсказки по клавишам |
Воспользуемся указанным зочетанием клавиш (CTRL-A Z):
|
Список команд minicom Команды могут быть вызваны нажатием CTRL-A <клавиша> Основные функции Прочие функции Телефонная книга…D Запустить скрипт…G | Очистить экран…..C Отправить файлы….S Принять файлы……R | Конфигурация…….O Параметры порта….P Добавлять LF…….A | Приостановить……J Захват вкл/выкл….L Повесить трубку….H | Выход и сброс……X Отправить break….F Инициализировать…M | Выход без сброса…Q Настр. терминала…T Запустить Kermit…K | Режим курсора……I Перенос вкл/выкл…W Местное эхо вк/вык.E | Экран подсказки….Z Вставить файл……Y | Cкроллинг назад….B Выберите функцию или нажмите Enter для выхода |
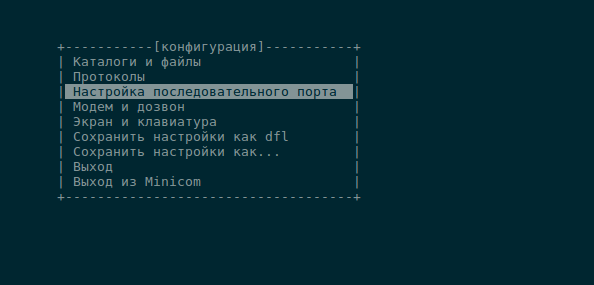
Эти все команды необязательно запоминать, всегда можно обратиться к подсказке. Не забываем о цели нашего визита — создания файла конфигурации. Для этого воспользуемся сочетаниями клавиш CTRL-A O. После их нажатия доступно следующее меню:
|
Каталоги и файлы Протоколы Настройка последовательного порта Модем и дозвон Экран и клавиатура Сохранить настройки как dfl Сохранить настройки как… Выход |
Порядок настройки очень прост. Для подключения к коммутатору в моем необходимо выставить следующие значения com-порта (необходимо смотреть в документации к устройству) — 9600 8N1.
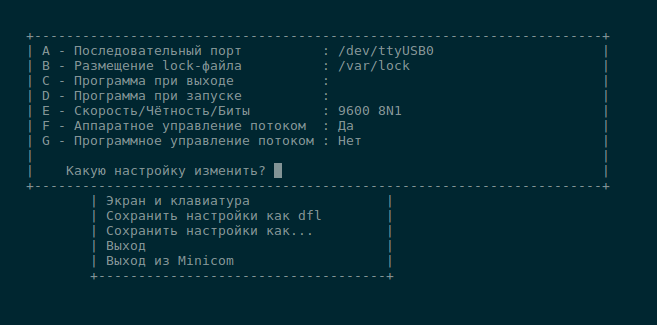
Перемещаем курсор на позицию «Настройка последовательного порта» и жмем «Enter». В результате получаем вывод на экран текущих настроек с возможностью их редактирования:
|
A — Последовательный порт : /dev/cuad0 B — Размещение lock-файла : /var/spool/lock C — Программа при выходе : D — Программа при запуске : E — Скорость/Чётность/Биты : 57600 8N1 F — Аппаратное управление потоком : Да G — Программное управление потоком : Нет |
Как видим, скорость порта у меня не совпадает с заявленной в документации. Для именения скорости работы порта жмем букву «E». Далее видим следующий вывод:
|
СкорТекущие: 57600 8N1 Бит данных A: <next> L: Нет S: 5 B: <prev> M: Чёт T: 6 C: 9600 N: Нечёт U: 7 D: 38400 O: Маркер V: 8 E: 115200 P: Пробел Стоповые биты W: 1 Q: 8-N-1 X: 2 R: 7-E-1 |
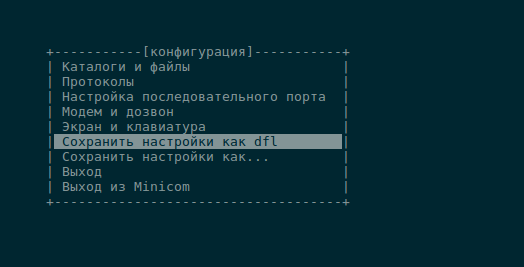
В моем случае достаточно было просто нажать «С» (установить скорость порта 9600 бод) и отключить апаратное управление потоком данных, нажав «F». Жмем два раза «Enter», чтобы попасть в меню . В меню выбираем пункт «Сохранить настройки как dfl» и жмем «Enter».
Результат — вывод на экрам сообщения «Конфигурация сохранена».
И вот, наконец… Приглашение коммутатора ввести логин для авторизации. Что ж… Авторизуемся, и работаем с коммутатором, согласно команд, которые поддерживает его CLI (Command Line Interface).
Для выхода из minicom достаточно воспользоваться сочетанием клавиш CTRL-A Q.
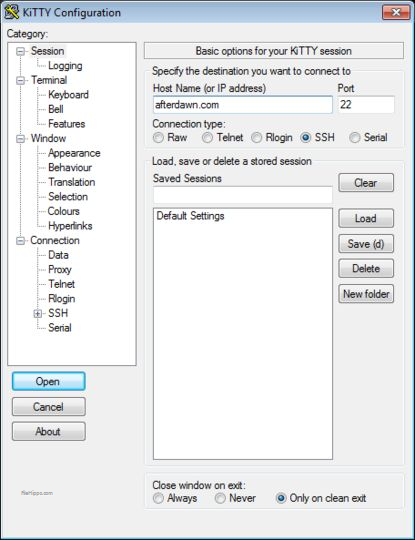
Установка minicom и подключение по консольному порту к коммутатору
Окружение: Cisco Catalyst 3550 12T, Linux Mint 18, minicom, console cable USB to RJ-45
Для всего далее происходящего использовалась собранная из имеющихся элеметов версия консольного кабеля.

Данный агрегат собран из адаптера USB to Serial, к которому вместо серийного DB9 подходит LAN-кабель. Рабочая версия распиновки для уже второго коммутатора представлена ниже:
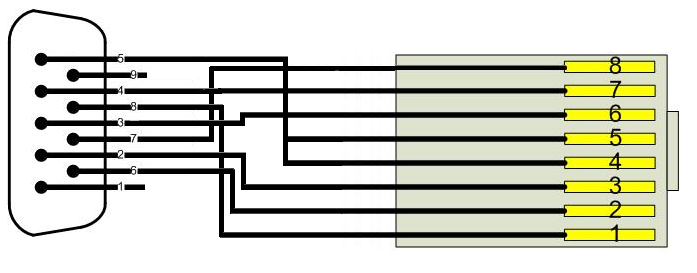
Если после сборки данной конструкции, эффекта приёма данных на наблюдается, то есть вероятность в отзеркаливании разъёма DB9.
Итак, кабель готов, коммутатор готов. Осталось настроить эмулятор терминала. Для эмуляции терминала будет использоваться minicom.
Далее для того чтобы узнать порт консольного кабеля, необходимо вставить кабель в компьютер и коммутатор. При этом не включать коммутатор.
Вышеприведённая команда покажет название необходимого порта. Обычно это ttyUSB0. Далее выполнив команду:
необходимо выбрать опцию как на картинке:
далее настроить название порта и скорость/четность/биты:
после этого сохранить как dhl и выйти:
Далее вновь зайти в mincom но уже без параметра «-s».
Теперь можно включать коммутатор, и при правильных настройках скорости на экране побежит post-информация операционной системы устройства.
Если на экране появляются символы с неверной кодировкой, то необходимо изменить скорость/чётность/биты подходящие для подключаемого устройтства.
источник
Authors
The original author of minicom is Miquel van Smoorenburg (miquels@cistron.nl). He wrote versions up to 1.75.
Jukka Lahtinen (walker@netsonic.fi, jukkal@despammed.com) has been responsible for new versions since 1.78, helped by some other people, including:filipg@paranoia.com wrote the History buffer searching to 1.79.
Arnaldo Carvalho de Melo (acme@conectiva.com.br) did the internationalization and the Brasilian Portuguese translations.
Jim Seymour (jseymour@jimsun.LinxNet.com) wrote the multiple modem support and the filename selection window used since 1.80.
Tomohiro Kubota (kubota@debian.or.jp) wrote the Japanese translations and the citation facility, and did some fixes.
Gael Queri (gqueri@mail.dotcom.fr) wrote the French translations.
Arkadiusz Miskiewicz (misiek@pld.org.pl) wrote the Polish translations.
Kim Soyoung (nexti@chollian.net) wrote the Korean translations.
Jork Loeser (jork.loeser@inf.tu-dresden.de) provided the socket extension.
Most of this man page is copied, with corrections, from the original minicom README, but some pieces and the corrections are by Michael K. Johnson.
Jukka Lahtinen (walker@netsonic.fi) has added some information of the changes made after version 1.75.
2.2 Запуск PPP вручную
Возможно, вы пытались звонить по телефону вашего провайдера
вместо «99999». Вы видели беспорядочные символы на экране после
регистрации (если нет, напечатайте «ppp»)? Они говорят о том, что на
другом конце линии запущен «pppd» (или его эквивалент). Если это так,
то вы со своей стороны можете попытаться запустить демон «pppd» и
впоследствии оценить содержимое лог-файлов.
Чтобы запустить «pppd» внутри minicom, вы можете определить новый
метод закачки «upload» (то есть, от вас) или переопределить
установку «kermit programm» из меню конфигурации «Filename and paths»:
Оставшаяся часть этого mini-HOWTO посвящена вопросам автоматизации
логгирования и запуска «pppd».