Http-кэширование
Содержание:
- Типичное использование[править | править код]
- Seguimiento utilizando ETags
- Example
- Настройка кэширования для fastcgi_pass
- Сильные и слабые проверки
- Benchmark
- Set cache-control directives
- Testing ETags
- Riesgos de implementación
- How to Add Expires Headers in WordPress Manually
- How Browser Caching Affects the Load Speed of a Website
- FAQs About Adding Expires Headers
- Настройка кэширования для proxy_pass
- Отслеживание с помощью Etag
- Риски использования
- Overview
- Client-Server Communication With curl
- How it works?
- Additional HTTP Cache Headers
Типичное использование[править | править код]
При обычном использовании, когда извлекается URL, веб-сервер вернет ресурс вместе с соответствующим значением ETag, который находится в поле HTTP :
Клиент может затем кэшировать ресурс вместе с его ETag. Позже, если клиент хочет получить страницу с того же адреса, он пошлет её ранее сохранённую копию ETag вместе с запросом в поле .
На этот последующий запрос сервер может теперь сравнить ETag клиента с ETag для текущей версии ресурса. Если значения ETag совпадают, это означает, что ресурс не изменился, сервер может отправить обратно очень короткий ответ с HTTP статусом 304 Not Modified. Статус 304 сообщает клиенту, что его кэш версия по-прежнему актуальна и что он должен использовать её.
Однако, если ETag-значения не совпадают, то есть ресурс, скорее всего, изменился, то полный ответ, в том числе содержание ресурса, возвращаются, как будто ETag не использовался. В этом случае клиент может принять решение о замене в кэше версии ресурса на вновь возвращённую и новый ETag.
ETag можно использовать в веб-страницах для системы мониторинга за изменениями и уведомлениями. Эффективному мониторингу веб-страницы мешает тот факт, что большинство веб-сайтов не устанавливают Etag заголовки веб-страниц. Когда веб-монитор не имеет никаких подсказок, был ли веб-контент изменён, весь контент должен быть восстановлен и проанализирован, используя вычислительные ресурсы как опубликовавшего контент, так и того, кто хочет его просмотреть.
Seguimiento utilizando ETags
Los ETags se pueden utilizar para realizar un seguimiento de usuarios únicos, puesto que las cookies HTTP son borradas cada vez más por los usuarios preocupados por su privacidad. En julio de 2011, Ashkan Soltani y un equipo de investigadores de UC Berkeley informaron que un número de sitios web, incluyendo Hulu.com, estaban usando ETags con fines de seguimiento. Hulu y KISSmetrics han dejado el «respawning» a fecha de 29 de julio 2011, puesto que KISSmetrics y más de 20 de sus clientes se enfrentan a una demanda colectiva por el uso de cookies de seguimiento «imborrables» que implican en parte el uso de ETags.
Debido a que los ETags se almacenan en caché por el navegador, y son recuperados con las solicitudes posteriores para el mismo recurso, un servidor de seguimiento simplemente puede repetir cualquier ETag recibida desde el navegador para asegurar que un ETag asignado persiste indefinidamente (de forma similar a las cookies persistentes). Las cabeceras adicionales de almacenamiento en caché también pueden mejorar la conservación de los datos ETag.
Los ETags pueden ser desechables limpiando la caché del navegador (las implementaciones varían).
Example
The Servlet
@WebServlet(urlPatterns = "/test")
public class MyServlet extends HttpServlet {

  @Override
  protected void doGet (HttpServletRequest req,
                        HttpServletResponse resp)
            throws ServletException, IOException {

      String eTagFromBrowser = req.getHeader("If-None-Match");
      String eTagFromServer = getETag();

      if (eTagFromServer.equals(eTagFromBrowser)) {
          //setting 304 and returning with empty body
          resp.setStatus(HttpServletResponse.SC_NOT_MODIFIED);
          return;
      }

      resp.addHeader("ETag", getETag());
      resp.setContentType("text/html");
      PrintWriter writer = resp.getWriter();
      writer.write("<h4>My Servlet</h4>");
      writer.write(LocalDateTime.now().toString());
      writer.write("<br/><a href='test'>test</a>");
  }

  private String getETag () {
      //Using hard coded value, in real scenario this value might be auto-generated
      //from the resource content, for example, by using a hash function.
      return "\"version1\"";
  }
}
The logger filter
Like our last example we are going to use same HeaderLogFilter to log the request/response headers.
@WebFilter(urlPatterns = {"/*"})
public class HeaderLogFilter implements Filter {

  @Override
  public void init (FilterConfig filterConfig) throws ServletException {
  }

  @Override
  public void doFilter (ServletRequest request, ServletResponse response,
                        FilterChain chain) throws IOException, ServletException {
      HttpServletRequest req = (HttpServletRequest) request;
      HttpServletResponse rep = (HttpServletResponse) response;

      System.out.println("----- Request ---------");
      Collections.list(req.getHeaderNames())
                 .forEach(n -> System.out.println(n + ": " + req.getHeader(n)));

      chain.doFilter(request, response);

      System.out.println("----- response ---------");

      rep.getHeaderNames()
         .forEach(n -> System.out.println(n + ": " + rep.getHeader(n)));

      System.out.println("response status: " + rep.getStatus());
  }

  @Override
  public void destroy () {
  }
}
Run the embedded Jetty (the plugin is included in the pom.xml):
mvn jetty:run
Output at /test
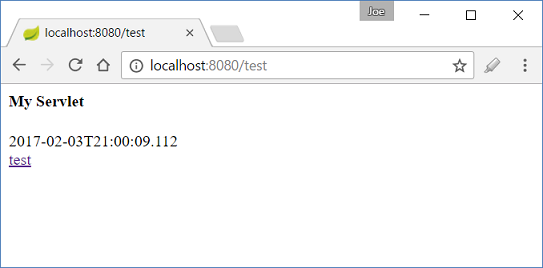
The console output, showing the ETag header in the response:
----- Request ---------
Cookie: JSESSIONID=424B4AF1976CBE891F2B470AA97C4575
Cache-Control: no-cache
Accept: text/html,application/xhtml+xml,application/xml;q=0.9,image/webp,*/*;q=0.8
Upgrade-Insecure-Requests: 1
Connection: keep-alive
User-Agent: Mozilla/5.0 (Windows NT 10.0; WOW64) AppleWebKit/537.36 (KHTML, like Gecko) Chrome/56.0.2924.87 Safari/537.36
Host: localhost:8080
Pragma: no-cache
Accept-Encoding: gzip, deflate, sdch, br
Accept-Language: en-US,en;q=0.8
----- response ---------
ETag: "version1"
Date: Sat, 04 Feb 2017 03:00:09 GMT
Content-Type: text/html;charset=utf-8
response status: 200
Subsequent refresh/reload will not reload the resource instead that will return 304 code with empty body. The browser will use cached copy of the resource:
----- Request ---------
Cookie: JSESSIONID=424B4AF1976CBE891F2B470AA97C4575
If-None-Match: "version1"
Cache-Control: max-age=0
Accept: text/html,application/xhtml+xml,application/xml;q=0.9,image/webp,*/*;q=0.8
Upgrade-Insecure-Requests: 1
Connection: keep-alive
User-Agent: Mozilla/5.0 (Windows NT 10.0; WOW64) AppleWebKit/537.36 (KHTML, like Gecko) Chrome/56.0.2924.87 Safari/537.36
Host: localhost:8080
Accept-Encoding: gzip, deflate, sdch, br
Accept-Language: en-US,en;q=0.8
----- response ---------
Date: Sat, 04 Feb 2017 03:01:58 GMT
response status: 304
Note that this time (comparing to the last tutorial Last-Modified/If-Modified-Since example) clicking on the link ‘test’ will also do server side validation. That’s the reason we don’t need response header like ‘Cache-Control:no-cache’ to force validation.
Now change the ETag value to ‘version2’ in the method MyServlet#getETag() and restart the server. On reloading the page or clicking on ‘test’ link:

----- Request ---------
Cookie: JSESSIONID=424B4AF1976CBE891F2B470AA97C4575
If-None-Match: "version1"
Accept: text/html,application/xhtml+xml,application/xml;q=0.9,image/webp,*/*;q=0.8
Upgrade-Insecure-Requests: 1
Connection: keep-alive
User-Agent: Mozilla/5.0 (Windows NT 10.0; WOW64) AppleWebKit/537.36 (KHTML, like Gecko) Chrome/56.0.2924.87 Safari/537.36
Referer: http://localhost:8080/test
Host: localhost:8080
Accept-Encoding: gzip, deflate, sdch, br
Accept-Language: en-US,en;q=0.8
----- response ---------
ETag: "version2"
Date: Sat, 04 Feb 2017 03:02:42 GMT
Content-Type: text/html;charset=utf-8
response status: 200
Настройка кэширования для fastcgi_pass
Настройка fastcgi_cache аналогична proxy_cache и настройки можно сделать по подобию последнего, заменив proxy_ на fastcgi_. Мы разберем основные настройки без подробностей и комментариев.
Открываем конфиг nginx:
vi /etc/nginx/nginx.conf
Добавляем в секцию http:
http {
…
fastcgi_cache_path /var/cache/fastcgi levels=1:2 keys_zone=fastcgi:64m inactive=2h max_size=2g;
…
}
* обратите внимание, что мы задали другой каталог и keys_zone. Создаем каталог для кэша:
Создаем каталог для кэша:
mkdir /var/cache/fastcgi
chown nginx:nginx /var/cache/fastcgi
Настраиваем хост:
vi /etc/nginx/conf.d/default.conf
location / {
if ($http_cookie ~* «.+» ) {
set $cookie_cache_bypass 1;
}
fastcgi_cache_bypass $cookie_cache_bypass;
fastcgi_pass http://localhost:9000;
…
fastcgi_cache all;
fastcgi_cache_valid 404 502 503 5m;
fastcgi_cache_valid any 1h;
fastcgi_cache_use_stale error timeout invalid_header updating;
}
Проверяем настройки и применяем их:
nginx -t
systemctl restart nginx
Сильные и слабые проверки
Механизм ETag поддерживает как сильные, так и слабые проверки. Они отличаются наличием начального в идентификаторе ETag, например, (сильная проверка ETag), (слабая проверка ETag).
Сильная проверка ETag проверяет, что содержание в обоих ресурсах байт за байтом идентично, и что все другие поля (такие как Content-Language), также не отличаются. Сильные ETags допускают кэширование и сборку частичных ответов, как при запросах диапазона байт.
Слабая проверка ETag проверяет только то, что два ресурса семантически эквивалентны, а это означает, что для практических целей они являются взаимозаменяемыми и что могут быть использованы кэшированные копии. Однако эти ресурсы не обязательно идентичны байт за байтом, поэтому слабый ETag не подходят для запросов диапазона байт. Слабые ETags могут быть полезны для случаев, в которых сильные ETags непрактичны для создания веб-сервером, например, в случаях с динамически генерируемым содержанием.
Benchmark
$ npm run-script bench> etag@1.8.1 bench nodejs-etag> node benchmark/index.js http_parser@2.7.0 node@6.11.1 v8@5.1.281.103 uv@1.11.0 zlib@1.2.11 ares@1.10.1-DEV icu@58.2 modules@48 openssl@1.0.2k> node benchmark/body0-100b.js 100B body 4 tests completed. buffer - strong x 258,647 ops/sec ±1.07% (180 runs sampled) buffer - weak x 263,812 ops/sec ±0.61% (184 runs sampled) string - strong x 259,955 ops/sec ±1.19% (185 runs sampled) string - weak x 264,356 ops/sec ±1.09% (184 runs sampled)> node benchmark/body1-1kb.js 1KB body 4 tests completed. buffer - strong x 189,018 ops/sec ±1.12% (182 runs sampled) buffer - weak x 190,586 ops/sec ±0.81% (186 runs sampled) string - strong x 144,272 ops/sec ±0.96% (188 runs sampled) string - weak x 145,380 ops/sec ±1.43% (187 runs sampled)> node benchmark/body2-5kb.js 5KB body 4 tests completed. buffer - strong x 92,435 ops/sec ±0.42% (188 runs sampled) buffer - weak x 92,373 ops/sec ±0.58% (189 runs sampled) string - strong x 48,850 ops/sec ±0.56% (186 runs sampled) string - weak x 49,380 ops/sec ±0.56% (190 runs sampled)> node benchmark/body3-10kb.js 10KB body 4 tests completed. buffer - strong x 55,989 ops/sec ±0.93% (188 runs sampled) buffer - weak x 56,148 ops/sec ±0.55% (190 runs sampled) string - strong x 27,345 ops/sec ±0.43% (188 runs sampled) string - weak x 27,496 ops/sec ±0.45% (190 runs sampled)> node benchmark/body4-100kb.js 100KB body 4 tests completed. buffer - strong x 7,083 ops/sec ±0.22% (190 runs sampled) buffer - weak x 7,115 ops/sec ±0.26% (191 runs sampled) string - strong x 3,068 ops/sec ±0.34% (190 runs sampled) string - weak x 3,096 ops/sec ±0.35% (190 runs sampled)> node benchmark/stats.js stat 4 tests completed. real - strong x 871,642 ops/sec ±0.34% (189 runs sampled) real - weak x 867,613 ops/sec ±0.39% (190 runs sampled) fake - strong x 401,051 ops/sec ±0.40% (189 runs sampled) fake - weak x 400,100 ops/sec ±0.47% (188 runs sampled)
Set cache-control directives
The Cache-Control header can include a number of directives. If multiple directives are passed together, each is separated by a comma.
For more information about Cache-Control directives at origin servers, refer to the Mozilla Cache-Control documentation.
If the directive takes an argument, it follows the directive separated by an equal sign. For example:
max-age=86400
These directives break down into groupings as follows:
Cacheability — should this resource enter a cache?
- public
- The public response directive indicates that any cache may store the response, even if the response is normally non-cacheable or cacheable only within a private cache.
- private
- The private response directive indicates that the response message is intended for a single user (eg. a browser cache) and must not be stored by a shared cache (like Cloudflare, or a corporate proxy).
- no-store
- The no-store response directive indicates that any cache (ie a client or proxy cache) must not store any part of either the immediate request or response.
Expiration — how long should this resource stay in the cache?
- max-age=seconds
- The max-age response directive indicates that the response is to be considered stale after its age is greater than the specified number of seconds. Age is defined as the time in seconds since the asset was served from the origin server. The seconds argument is an unquoted integer.
Cloudflare respects whichever value is higher: the Browser Cache TTL in Cloudflare or the max-age header.
- s-maxage=seconds
- The s-maxage response directive indicates that, in shared caches, the maximum age specified by this directive overrides the maximum age specified by either the max-age directive or the Expires header field. The s-maxage directive also implies the semantics of the proxy-revalidate response directive. Browsers ignore s-maxage.
- no-cache
- The no-cache response directive indicates that the response cannot be used to satisfy a subsequent request without successful validation on the origin server. This allows an origin server to prevent a cache from using it to satisfy a request without contacting it, even by caches that have been configured to send stale responses.
Simultaneously specify a Cloudflare Edge Cache TTL different than a browser’s cache TTL respectively via the s-maxage and max-age Cache-Control headers.
In addition to setting the parameters below, make sure the HTTP Expires header is set in your origin server to use the Greenwich Mean Time (GMT) format as stipulated in .
Revalidation — how should the cache behave when a resource has expired?
- must-revalidate
- The must-revalidate response directive indicates that once it has become stale, a cache (client or proxy) must not use the response to satisfy subsequent requests without successful validation on the origin server.
- proxy-revalidate
- The proxy-revalidate response directive has the same meaning as the must-revalidate response directive, except that it does not apply to private client caches.
- stale-while-revalidate=seconds
- When present in an HTTP response, the stale-while-revalidate Cache-Control extension indicates that caches may serve the response in which it appears after it becomes stale, up to the indicated number of seconds since the resource expired.
If Always Online is enabled, then the stale-while-revalidate and stale-if-error directive are ignored.
- stale-if-error=seconds
- The stale-if-error Cache-Control extension indicates that when an error is encountered, a cached stale response may be used to satisfy the request, regardless of other freshness information.
The stale-if-error directive is ignored if Always Online is enabled or if an explicit in-protocol directive (e.g., by a no-store or no-cache cache directive, a must-revalidate cache-response-directive, or an applicable s-maxage or proxy-revalidate cache-response-directive) is passed.
Other
- no-transform
- The no-transform response directive indicates that an intermediary (regardless of whether it implements a cache) must not transform the payload
- vary
- Cloudflare doesn’t consider vary values when making caching decisions.
- immutable
- Indicates to clients that the response body does not change over time. The resource, if unexpired, is unchanged on the server and therefore the client should not send a conditional revalidation for it (e.g. If-None-Match or If-Modified-Since) to check for updates, even when the user explicitly refreshes the page. This directive has no effect on public caches like Cloudflare, but does change browser behavior.
Testing ETags
Let’s start simple – we need to verify that the response of a simple request retrieving a single Resource will actually return the “ETag” header:
Next, we verify the happy path of the ETag behavior. If the Request to retrieve the Resource from the server uses the correct ETag value, then the server doesn’t retrieve the Resource:
Step by step:
- we create and retrieve a Resource, storing the ETag value
- send a new retrieve request, this time with the “If-None-Match” header specifying the ETag value previously stored
- on this second request, the server simply returns a 304 Not Modified, since the Resource itself has indeed not beeing modified between the two retrieval operations
Finally, we verify the case where the Resource is changed between the first and the second retrieval requests:
Step by step:
- we first create and retrieve a Resource – and store the ETag value for further use
- then we update the same Resource
- send a new GET request, this time with the “If-None-Match” header specifying the ETag that we previously stored
- on this second request, the server will return a 200 OK along with the full Resource, since the ETag value is no longer correct, as we updated the Resource in the meantime
Finally, the last test – which is not going to work because the functionality has not yet been implemented in Spring – is the support for the If-Match HTTP header:
Step by step:
- we create a Resource
- then retrieve it using the “If-Match” header specifying an incorrect ETag value – this is a conditional GET request
- the server should return a 412 Precondition Failed
Riesgos de implementación
El uso de ETags en la cabecera HTTP es opcional (no es obligatorio como ocurre con otros campos de la cabecera HTTP 1.1). El método por el cual se generan los ETags nunca se ha especificado en la especificación HTTP.
Los métodos comunes de generación de ETags incluyen el uso de una función hash resistente a colisiones del contenido del recurso, un hash del timestamp de última modificación, o incluso simplemente un número de revisión.
Con el fin de evitar el uso de datos de caché obsoletos, los métodos utilizados para generar ETags deben garantizar (tanto como sea práctico) que cada ETag es único. Sin embargo, una función de generación de ETags podría ser juzgada como «utilizable» si se puede demostrar (matemáticamente) que la duplicación de ETags sería «aceptablemente rara», aunque pudiese ocurrir.
En algunas funciones checksum, como CRC32 y CRC64, se sabe que sufren de este problema de colisión de hash. Debido a esto no son buenas candidatas para su uso en la generación de ETags.
How to Add Expires Headers in WordPress Manually
With that said, here’s how to set expires header on Apache and Nginx server
Apache Web Server
To add expires headers in WordPress on Apache servers, you will need to access your WordPress website htaccess file.
These files can either be accessed via the cPanel or an FTP program. For the sake of simplicity, we will stick with cPanel.
First, log into your cPanel account. After logging in, you will see a File Manager icon. Click on it.

Upon click, navigate to the section labeled public_html and double-click on it.

Here, you will find the .htaccess file. Right-click on this file and click Edit.

Then copy and paste the following lines of codes into it.
<IfModule mod_expires.c>

  ExpiresActive On
  # Images

  ExpiresByType image/jpeg "access plus 1 year"

  ExpiresByType image/gif "access plus 1 year"

  ExpiresByType image/png "access plus 1 year"

  ExpiresByType image/webp "access plus 1 year"

  ExpiresByType image/svg+xml "access plus 1 year"

  ExpiresByType image/x-icon "access plus 1 year"


  # Video

  ExpiresByType video/mp4 "access plus 1 year"

  ExpiresByType video/mpeg "access plus 1 year"


  # CSS, JavaScript

  ExpiresByType text/css "access plus 1 month"

  ExpiresByType text/javascript "access plus 1 month"

  ExpiresByType application/javascript "access plus 1 month"


  # Others

  ExpiresByType application/pdf "access plus 1 month"

  ExpiresByType application/x-shockwave-flash "access plus 1 month"

</IfModule>
From the code snippet above, you can see that images have been given an expiration time of 1 year. Likewise also videos. But for CSS and Javascript, they will be erased from the cache and replaced every month.
Of course, you can always change these time parameters but only do so with caution.
For better efficiency, some webmasters take things further by setting what is known as Cache-control Headers.
Cache_control headers serve the same purpose as Expire headers in that they also set an expiration date for cached files.
The major difference between Cache-control header and Expires header is that cache control is more detailed as you can specify other caching parameters in addition to when the cache should expire. It is also more modern.
Note that adding both to your server isn’t necessary as this might lead to redundancy.
If you would like to set cachecontrol headers to your server, add the following piece of code to the htaccess file.

# BEGIN Cache-Control Headers
<IfModule mod_expires.c>

  <IfModule mod_headers.c>

    <filesMatch "\.(ico|jpe?g|png|gif|swf)$">

      Header append Cache-Control "public"

    </filesMatch>

    <filesMatch "\.(css)$">

      Header append Cache-Control "public"

    </filesMatch>

    <filesMatch "\.(js)$">

      Header append Cache-Control "private"

  </filesMatch>

    <filesMatch "\.(x?html?|php)$">

      Header append Cache-Control "private, must-revalidate"

    </filesMatch>

  </IfModule>

</IfModule>
How to Add Expires Headers in WordPress When Using Nginx Web Server
Unlike Apache, Nginx server doesn’t work with .htaccess file. To set expires header on it, copy and paste the following line of code to your server block.
location ~* \.(js|css|png|jpg|jpeg|gif|svg|ico)$ {

 expires 30d;

 add_header Cache-Control "public, no-transform";

}
For Content Delivery Network
If your website runs on a content delivery network – or CDN for short – you will need a different approach to set expiration dates on cached files. The trick is to unset what are known as Etags from your CDN servers.
Doing so is quite simple. Just copy and paste the code snippet below to your htaccess file.
# Disable ETags

<IfModule mod_headers.c>

Header unset ETag

</IfModule>

FileETag None
How Browser Caching Affects the Load Speed of a Website
To get things started, let’s head over to GTMetrix – an online website performance test tool – and run an analysis of your website.
You might see something that looks like this:

From the screenshot above, you could see GTMetrix suggesting that we leverage browser caching.
So, how does browser caching work?
When a web user hits the homepage of your website for the first time, his/her browser will make an HTTP request to your web server. The request will instruct the server to download the needed images, Javascripts and CSS files, plus other file types needed to render the requested web page.
Since it’s the first visit, all resources will be downloaded and cached by the browser. As you might expect, the entire request/download process will take a significant amount of time.
However, upon subsequent visits, the process will change. Before making a download request to the web server, the browser will first check if the requested web page files have been cached. If they are cached, the browser will serve the files from its cache instead of the webserver.
Doing so will help speed up your WordPress website as zero time will be spent downloading these files from the server. In addition to that, the load on your server is greatly reduced, hence there’s more efficiency.
FAQs About Adding Expires Headers
1. What should be the expiration time?
You can set the expiration time for any resources in years, months, weeks, and so on. However, this doesn’t mean that you should set an unrealistic expiration date.
The best approach is to make an educated guess on how long the resource needs time before it’s refreshed. Most of the time, static files are good candidates for a long expiration time. However, it’s better to add low expiration time for files such as HTML, CSS, and JavaScript.
2. How can I test if my changes worked after adding expires headers?
The best way to test if your expires headers are working or not is to use tools such as GTMetrix, Google PageSpeed, and Pingdom.
Настройка кэширования для proxy_pass
Как было сказано выше, для разных методов обращения к серверу, который обрабатывает запрос, нужно использовать разные методы кэширования.
Включение кэширования
Открываем конфигурационный файл nginx:
vi /etc/nginx/nginx.conf
В секцию http добавляем:
http {
…
proxy_cache_path /var/cache/nginx levels=1:2 keys_zone=all:64m inactive=2h max_size=2g;
…
}
* в данном примере мы задали глобальную настройку для кэширования:
- /var/cache/nginx — путь хранения кэша.
- levels — уровень вложенности каталогов. В данном примере мы задаем настройку, при которой в каталог с кэшем будет создан каталог, а в ней — еще один каталог.
- keys_zone — имя зоны в разделяемой памяти, где будет храниться кэш, а также ее размер.
- inactive — задает время, после которого кэш будет автоматически чиститься.
- max_size — максимальный размер данных под кэш. Когда место заканчивается, nginx сам удаляет устаревшие данные.
Создаем каталог для хранения кэша и задаем владельца:
mkdir /var/cache/nginx
chown nginx:nginx /var/cache/nginx
Настройка хостов
Чтобы определенный сайт или отдельная страница кешировала запрос, открываем конфигурационный файл с настройками виртуального домена или хоста, например:
vi /etc/nginx/conf.d/default.conf
… и добавим к proxy_pass кэширование — мы получим что-то на подобие:
location / {
if ($http_cookie ~* «.+» ) {
set $cookie_cache_bypass 1;
}
proxy_cache_bypass $cookie_cache_bypass;
proxy_pass http://localhost:3000;
…
proxy_cache all;
proxy_cache_valid 404 502 503 5m;
proxy_cache_valid any 1h;
proxy_cache_use_stale error timeout invalid_header updating;
}
* где:
- set $cookie_cache_bypass 1 — задаем значения переменной $cookie_cache_bypass, если передаются куки. Необходимо для предотвращения отдачи устаревших данных.
- proxy_cache_bypass — не отдавать данные из кэша. В нашем случае, применяется при куках.
- proxy_pass — передает запросы на бэкэнд.
- proxy_cache — включаем кэширование.
- proxy_cache_valid — задает время кеширования. В нашем примере первый параметр задает кэширование страниц с кодами ответов 404, 502, 503 на 5 минут, второй — для всего остального на 1 час.
- proxy_cache_use_stale — указывает, в каких случаях можно отдать устаревший кэш.
Применение настроек
NGINX настроен. Проверим корректность настроек:
nginx -t
Если ошибок нет, применяем их:
systemctl restart nginx
Теперь заходим на сайт и смотрим в каталог с кэшем — в нем должны появиться каталоги и файлы:
ls /var/cache/nginx/
Мы должны увидеть что-то на подобие:
drwx——. 3 nginx nginx 4096 Jan 25 16:09 0
drwx——. 5 nginx nginx 4096 Jan 25 16:09 2
drwx——. 5 nginx nginx 4096 Jan 25 16:15 3
drwx——. 3 nginx nginx 4096 Jan 25 16:09 4
drwx——. 4 nginx nginx 4096 Jan 26 05:08 5
drwx——. 3 nginx nginx 4096 Jan 25 16:09 6
drwx——. 3 nginx nginx 4096 Jan 26 04:18 7
drwx——. 3 nginx nginx 4096 Jan 25 16:10 8
drwx——. 5 nginx nginx 4096 Jan 25 16:15 a
drwx——. 3 nginx nginx 4096 Jan 25 16:09 b
drwx——. 5 nginx nginx 4096 Jan 26 04:19 e
drwx——. 3 nginx nginx 4096 Jan 25 19:55 f
Отслеживание с помощью Etag
ETags может быть использована для отслеживания уникальных пользователей, так как HTTP cookie могут быть удалены стремящимися к полной конфиденциальности пользователями. В июле 2011 года Ashkan Солтани и команда исследователей из Калифорнийского университета в Беркли сообщили, что ряд веб-сайтов, в том числе Hulu.com, использовали ETag для отслеживания таких целей. Hulu и KISSmetrics перестали это делать по состоянию на 29 июля 2011,так как KISSmetrics и более 20 её клиентов столкнулись с групповым иском по поводу использования «неудаляемых» следящих cookie частично связанных с использованием ETag.
Риски использования
Использование ETags в заголовке HTTP не является обязательным (как и некоторые другие поля заголовка HTTP 1.1). Метод, с помощью которого ETags генерируются, никогда не был указан в спецификации HTTP.
Общие методы создания ETag включают использование устойчивой к коллизиям хэш-функции содержимого ресурса, хэш последнего времени изменения или даже только номер версии.
Для того, чтобы избежать использования устаревших данных кэша, методы, используемые для генерации ETags, должны гарантировать (настолько, насколько это практично), что каждый ETag является уникальным. Тем не менее, функция создания Etag может быть оценена как «полезная», если может быть доказано (математически), что создание одинаковых ETags «приемлемо редко», даже если оно может или будет происходить.
Некоторые ранние контрольные функции, например, CRC32 и CRC64, как известно, страдают от этой проблемы коллизий. По этой причине они не являются хорошими кандидатами для использования в генерации ETag.
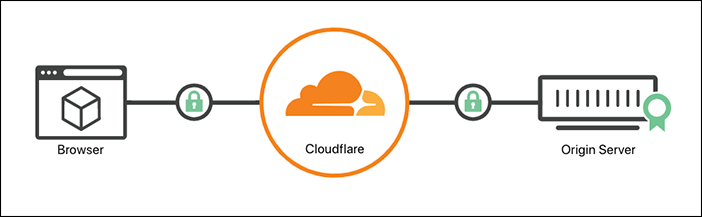
Overview
Cache-Control headers are one way for web administrators to tell Cloudflare how to handle content from the origin. This article explains how Cloudflare makes caching decisions during the request and response phase for a resource, and the options you have for setting Cache-Control directives at your origin server.
Request phase
In the request phase, the client request URL is matched against a list of cacheable file extensions. If the request matches an extension on this list, Cloudflare serves the resource from cache if present. If the content is stale in the Cloudflare cache, Cloudflare attempts to revalidate the content with the origin before serving the response to the client.
It is possible to modify what Cloudflare deems cacheable via the Cache Level setting in the Cloudflare Page Rule app.
To learn more about creating Page Rules, refer to our Page Rules tutorial.
As an example, Cache Everything skips the extension check, and all content is treated as cacheable. Refer to Cloudflare’s guide on how to enable Cache Everything.
Response phase
If Cloudflare deems a request cacheable, we first examine our caches in multiple network locations for content. If the resource is not present in cache, Cloudflare requests the resource from your origin web server to fill our cache. The response is then sent to the client who initiated the request.
At this point, our cache logic examines the HTTP response received from your origin server.
Based on how Cloudflare interprets request headers, the response is either deemed cacheable and written to disk (for use with the next request for the same resource) or deemed un-cacheable (resulting in the next request missing cache and repeating this flow).
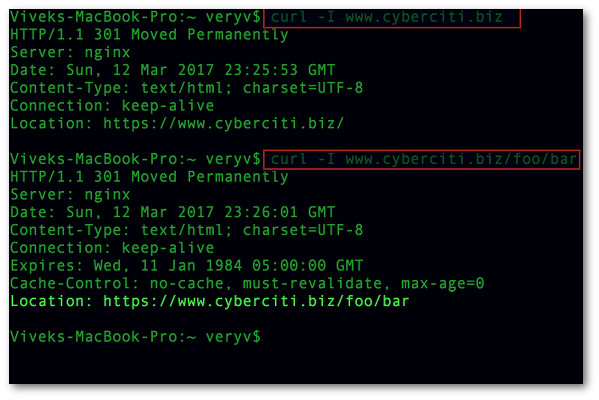
Client-Server Communication With curl
We can break down a simple Client-Server communication involving ETags into the steps:
First, the Client makes a REST API call – the Response includes the ETag header that will be stored for further use:
For the next request, the Client will include the If-None-Match request header with the ETag value from the previous step. If the Resource hasn’t changed on the Server, the Response will contain no body and a status code of 304 – Not Modified:
Now, before retrieving the Resource again, let’s change it by performing an update:
Finally, we send out the last request to retrieve the Foo again. Keep in mind that we’ve updated it since the last time we requested it, so the previous ETag value should no longer work. The response will contain the new data and a new ETag which, again, can be stored for further use:
And there you have it – ETags in the wild and saving bandwidth.
How it works?
Followings are the general high level steps where response header ‘ETag’ along with conditional request header ‘If-None-Match’ is used to cache the resource copy in the client browser:
- Server receives a normal HTTP request for a particular resource, say XYZ.
- The server side prepares the response. The server side logic wants the browser to cache XYZ locally. By default all browsers always cache the
resources ()
so no special header in the response is needed. - Server includes the header ‘ETag’ with it’s value in the response:
ETag: "version1"
- Server sends the response with above header, content of XYZ in the body and with the status code 200. The browser renders the resource and at the same time caches the resource copy along with header information.
- Later the same browser makes another request for the same resource XYZ. with following conditional request header:
If-None-Match: "version1"
-
On receiving the request for XYZ along with ‘If-None-Match’ header, the server side logic checks whether XYZ needs a new copy of the resource by comparing the current value of the ETag identifier on the server side and the one which is received in the request header.
- If request’s If-None-Match is same as currently generated/assigned value of ETag on the server, then status code 304 (Not Modified) with the empty body is sent back and the browser uses cached copy of XYZ.
-
If request’s If-None-Match value doesn’t match the currently generated/assigned value of ETag (say «version2») for XYZ then server sends back the new content in the body along with status code 200. The ‘ETag’ header with the new value is also
included in the response. The browser uses the new XYZ and updates its cache with the new data.
Additional HTTP Cache Headers
In addition to cache-control, notable HTTP cache headers include:
- Expires – This header specifies a fixed date/time for the expiration of a cached resource. For example, signals that the cached resource expires on May 13, 2017 at 7:00 am GMT. The expires header is ignored when a cache-control header containing a max-age directive is present.
- ETag – A response header that identifies the version of served content according to a token – a string of characters in quotes, e.g., – that changes after a resource is modified. If a token is unchanged before a request is made, the browser continues to use its local version.
- Vary – A header that determines the responses that must match a cached resource for it to be considered valid. For example, the header specifies that a cached version must exist for each combination of user agent and language.
See how Imperva CDN can help you with website performance.
Request Demo
or learn more