WordPress 5 in docker with nginx and letsencrypt
Содержание:
- TL; DR
- (Optional) Step 3 — Learning How to Expose the Port
- Introduction
- (Optional) Step 7 — Using Your Own Nginx Configuration File
- Securing HTTP Traffic with SSL
- 5: Отладка конфигурации веб-сервера
- Introduction
- Virtual hosts presets
- Firewall
- Setup Nginx as a Reverse-Proxy inside Docker
- Step 6 — Linking the Container to the Local Filesystem
- Аутентификация контейнеров
- Шаг 1 — Клонирование и тестирование приложения Node
- Реализация аутентификации
- Let’s Begin!
TL; DR
Подход, который я использовал для решения этой проблемы, заключался в передаче всех запросов apache любому .php файлы в PHP-FPM через fcgi://php:9000 , Порт 9000 по умолчанию
Вы можете увидеть эту настройку Apache в действии Вот .
/var/www/html/$1 часть настройки — это то, где файлы отображаются в контейнере PHP.
Вы столкнулись с мемом «контейнеры должны делать одну вещь», что хорошо, но это не значит, что вы должны разделить его так далеко. Контейнер LAMP совершенно нормален в Docker-land, и я не знаю, какие усилия были предприняты для разделения Apache и PHP — я подозреваю, что это пустая трата инженерных усилий.
Как вы говорите, вы хотите иметь возможность запускать разные версии PHP. Это абсолютно нормально, и вы должны настроить это в своем Dockerfile , Если вы намереваетесь создать набор контейнеров, от которых ваши службы могут наследовать, тогда вы можете просто иметь базовый контейнер Apache, к которому вы добавляете PHP в наследовании. Dockerfile s.
Я запускаю набор микросервисов, которые используют смесь 5,6 и 7,0. Все они наследуют от очень простого alpine (разных версий: 3.5, 3.6 и новее, которые станут 3.7). Копирование и вставка моей занимает около 15 минут Dockerfile требования на вершине, плюс немного настройки контейнера, что я, вероятно, все равно буду делать. Итак, если ваша цель — готовый набор контейнеров, я не уверен, сколько времени вы сэкономите на практике.
Это все сказано, если вы действительно чтобы продолжить это, вы могли бы посмотреть на механизм, который Piwik использует. Я не знаком с этим, но контейнер PHP обслуживает FastCGI, и его необходимо прокси-сервер веб-сервером в другом контейнере.
Docker, docker, docker. Было время, когда это слово звучало в каждой курилке разработчиков. Хайп вокруг докера уже подугас, однако он по-прежнему может быть полезен как для локальной среды, так и как production-ready решение. Но в посте речь пойдет именно о среде для локальной разработки.
Но для тех, кто не в курсе, на всякий случай:
(Optional) Step 3 — Learning How to Expose the Port
In this section we’ll download the Nginx Docker image and show you how to run the container so it’s publicly accessible as a web server.
By default containers are not accessible from the Internet, so we need to map the container’s internal port to the Droplet’s port. That’s what this section will teach you!
First, though, we’ll get the Nginx image.
Step 5 contains the final commands to deploy the full container, so if you aren’t overly concerned with the implementation details you can skip straight there.
Run the following command to get the Nginx Docker image:
This downloads all the necessary components for the container. Docker will cache these, so when we run the container we don’t need to download the container image(s) each time.
Docker maintains a site called Dockerhub, a public repository of Docker files (including both official and user-submitted images). The image we downloaded is the official Nginx one, which saves us from having to build our own image.
Let’s start our Nginx Docker container with this command:
- is the command to create a new container
- The flag is how we specify the name of the container (if left blank one is assigned for us, like nostalgic_hopper from Step 2)
- specifies the port we are exposing in the format of . In this case we are mapping Port 80 in the container to Port 80 on the server
- is the name of the image on dockerhub (we downloaded this before with the pull command, but Docker will do this automatically if the image is missing)
That’s all we need to get Nginx up! Paste the IP address of your Droplet into a web browser and you should see Nginx’s “Welcome to nginx!” page.
You’ll also notice in your shell session that the log for Nginx is being updated when you make requests to your server, because we’re running our container interactively.
Let’s hit the break shortcut to get back to our shell session.
If you try to load the page now, you’ll get a “connection refused” page. This is because we shut down our container. We can verify this with this command:
You should see something similar to the output shown below.
We can see that our Docker container has exited.
Nginx isn’t going to be very useful if we need to be attached to the container image for it to work, so in the next step we’ll show you how to detach the container to allow it to run independently.
Remove the existing container with this command:
In the next step we’ll show you how to run it in detached mode.
Introduction
Some aspects of web applications, like SSL encryption, request caching and service discovery can be managed outside of the application itself. Reverse-proxies like Nginx can handle many of those responsibilities, so we as developers don’t have to think about it in our software.
Additionally, some software is not meant to be available over the internet, since the don’t have proper security measures in place. Many databases are like that. And it is good practice in general to not make internal services public-facing that don’t have to be.
All of that can be achieved with docker-compose and Nginx.
(Optional) Step 7 — Using Your Own Nginx Configuration File
This section is for advanced users who want to use their own Nginx config file with their Nginx container. Please skip this step if you don’t have a custom config file you want to use.
Let’s go back a directory so we aren’t writing to our public HTML directory:
If you’d like to take a look at the default config file, just copy it using the Docker copy command:
Since we’re going to be using a custom file for Nginx, we will need to rebuild the container.
First stop the container:
Remove it with:
Now you can edit the default file locally (to serve a new directory, or to use a to forward the traffic to another app/container like you would with a regular Nginx installation). You can read about Nginx’s configuration file in our Nginx config file guide.
Once you’ve saved your custom config file, it’s time to make the Nginx container. Simply add a second flag with the appropriate paths to give a fresh Nginx container the appropriate links to run from your own config file.
This command also still links in the custom website pages to the container.
Please note that you will need to restart the container using a command if you make any changes to your config file after starting the container, since Nginx does not hot reload if its config file is changed:
Securing HTTP Traffic with SSL
By now the server setup is finished. docker-compose starts up all containers, and the Nginx container acts as a reverse-proxy for the services. There is just one thing left to set up, as this site so beautifully explains, encryption.
To install certbot, the client that fetches certificates from Let’s Encrypt, follow the install instructions.
Generating SSL Certificates with certbot
certbot has a variety of ways to get SSL certificates. There are plugins for widespread webservers, like Apache and Nginx, one to use a standalone webserver to verify the domain, and of course a manual way.
We’ll use the plugin. It starts up a separate webserver for the certificate challenge, which means the port 80 or 443 must be available. For this to work, the Nginx webserver has to be shut down, as it binds to both ports, and the certbot server needs to be able to accept inbound connections on at least one of them.
To create a certificate, execute
and follow the instructions. You can also create a certificate for multiple urls at once, by adding more parameters, e.g. .
Automating Certificate Renewal
The Let’s Encrypt CA issues short-lived certificates, they are only valid for 90 days. This makes automating the renewal process important. Thankfully, certbot makes that easy with the command . It checks all installed certificates, and renews the ones that will expire in less than 30 days.
It will use the same plugin for the renewal as was used when initially getting the certificate. In our case that is the plugin.
The challenge process is the same, so also for renewals the ports 80 or 443 must be free.certbot provides pre and post hooks, which we use to stop and start the webserver during the renewal, to free the ports.The hooks are executed only if a certificate needs to be renewed, so there is no unnecessary downtime of your services.
Since we are using , the whole command looks like this:
To complete the automation simply add the previous command as a cronjob.Open the cron file with .In there add a new line with
That’s it. Now the renew command is executed daily, and you won’t have to worry about your certificates’ expiration date.
Using the Certificates in the Nginx Docker Container
By now the certificates are requested and stored on the server, but we don’t use them yet. To achieve that, we have to
1) Make the certificates available to the Nginx container and
2) Change the config to use them
To make the certificates available to the Nginx container, simply specify the whole directory as a volume on it.
Adapting the config and making it secure is a bit more work.
By default, a virtual server listens to port 80, but with SSL, it should also listen to port 443. This has to be specified by 2 directives.Additionally, the certificate must be defined. This is done with the and directives.
These small changes are enough to configure nginx for SSL.It uses the default SSL settings of Nginx though, which is ok, but can be improved upon.
Improving Security of Nginx Config
At the beginning of this section I should mention that, if you use the latest version of nginx, its default SSL settings are secure. There is no need to define the protocols, ciphers and other parameters.
That said, there are a few SSL directives with which we can improve security even further.Just keep in mind that by setting these, you are responsible for keeping them up to date yourself. The changes Nginx does to the default config settings won’t affect you, since you’re overwriting them.
First, set
This disables all SSL protocols and TLSv1.0, which are considered insecure (TLSv1.0, SSLv3, SSLv2). TLSv1.1 and TLSv1.2 are, at the time of writing (July 2018), considered secure, but nobody can promise that they will not be broken in the future.
Next, set
The ciphers define how the encryption is done. Those values are copied from this article, as I’m not an expert in this area.
Those are the most important settings. To improve security even more, follow these articles:
- Optimizing HTTPS on Nginx
You can check the security of your SSL configuration with a great website SSL Labs provides.
5: Отладка конфигурации веб-сервера
SSL в конфигурации Nginx подразумевает поддержку перенаправления HTTP на HTTPS. Также нужно определить пути к сертификату SSL и ключам и указать группу Диффи-Хеллмана, которую мы будем использовать для Perfect Forward Secrecy.
Чтобы обновить конфигурацию веб-сервера и включить эти дополнения, вы можете остановить его:
Затем в каталоге проекта создайте каталог для ключа Диффи-Хеллмана:
Сгенерируйте его с помощью команды openssl:
Создание ключа займет несколько минут.
Чтобы добавить соответствующую информацию Диффи-Хеллмана и SSL в конфигурацию Nginx, сначала удалите файл конфигурации Nginx, который вы создали ранее:
Откройте новую версию файла:
Добавьте следующий код в файл, чтобы перенаправить HTTP на HTTPS и добавить учетные данные SSL, протоколы и заголовки безопасности. Не забудьте заменить example.com своим доменом:
Блок HTTP-сервера определяет webroot для запросов на обновление Certbot в каталоге .well-known/acme-challenge. Он также включает , которая направляет HTTP-запросы к корневому каталогу на HTTPS.
Блок server HTTPS включает ssl и http2. Этот блок также содержит ряд параметров, которые включают поддержку самых современных SSL-протоколов и шифров и OSCP stapling. OSCP stapling (или сшивание) позволяет вам предложить ответ с меткой времени от вашего центра сертификации во время начального рукопожатия TLS, что может ускорить процесс аутентификации.
- Настройка Nginx с поддержкой HTTP/2 в Ubuntu 18.04
- Краткий обзор сервиса Let’s Encrypt
Также блок определяет расположение ключей SSL и Диффи-Хеллмана.
Мы также переместили в этот блок информацию о прокси. Он включает блок location с директивой try_files, который направляет запросы к контейнеру приложения с псевдонимом Node.js, и блок location для этого псевдонима, который включает заголовки безопасности (благодаря этому вы можете получить наивысшую оценку в тестах типа SSL Labs и Security Headers). Эти заголовки включают X-Frame-Options, X-Content-Type-Options, Referrer Policy, Content-Security-Policy и X-XSS-Protection. Заголовок HTTP Strict Transport Security (HSTS) закомментирован – включите его, только если вы понимаете последствия и оценили его функции предварительной загрузки.
Сохраните и закройте файл.
Прежде чем снова создать сервис webserver, необходимо добавить несколько обновлений в определение сервиса в docker-compose.yml, включая информацию о порте для HTTPS и определение тома Диффи-Хеллмана.
Откройте файл:
В определение сервиса webserver добавьте следующее преобразование портов и dhparam по имени volume:
Затем добавьте dhparam в определение volumes.
Как и том web-root, том dhparam будет монтировать ключ Диффи-Хеллмана, хранящийся на хосте, в контейнере webserver.
Сохраните и закройте файл, когда закончите редактирование.
Создайте сервис webserver:
Проверьте сервис с помощью docker-compose ps:
Вывод сообщит, что сервисы nodejs и webserver запущены.
Теперь откройте свой домен, чтобы убедиться, что все работает как положено. Перейдите в браузере по адресу https://example.com (заменив example.com собственным доменом). Вы увидите домашнюю страницу приложения.
Вы также должны увидеть символ зеленого замочка в индикаторе безопасности вашего браузера. При желании вы можете пройти SSL Labs Server Test или Security Headers server test. Учитывая включенные ранее параметры конфигурации, приложение должно пройти оба теста с оценкой А.
Introduction
The Docker open platform includes the Docker Engine – the open source runtime that builds, runs, and orchestrates containers – and Docker Hub, a hosted service where Dockerized applications are distributed, shared, and collaborated on by the entire development community or within the confines of a specific organization.
Docker containers enable developers to focus their efforts on application “content” by separating applications from the constraints of infrastructure. Dockerized applications are instantly portable to any infrastructure – laptop, bare‑metal server, VM, or cloud – making them modular components that can be readily assembled and reassembled into fully featured distributed applications and continuously innovated on in real time.
For more information about Docker, see Why Docker? or the full Docker documentation.
Virtual hosts presets
By default will be used virtual host preset, you can change it via env var . The list of available presets:
- Preset template
- Usage: this preset selected by default
Overridden default values:
| Variable | Default Value |
|---|---|
- Preset template
- Usage: add and
Overridden default values:
| Variable | Default Value |
|---|---|
Django
Same as HTTP proxy but with additional media/static locations for Django.
- Preset template
- Usage: add
Overridden default values:
| Variable | Default Value |
|---|---|
Overridden default values:
| Variable | Default Value |
|---|---|
- Preset template
- Usage: add , optionally modify
Overridden default values:
| Variable | Default Value |
|---|---|
WordPress
- Preset template
- Usage: add , optionally modify
- Access to files allowed only if they are located in uploads directory
- Access to disallowed
- Dynamic generated supported
- Supports endpoint
- Alternative endpoints:
Drupal
- Preset templates: Drupal 9, Drupal 8, Drupal 7, Drupal 6
- Usage: add with the value of , , or . Optionally modify
- Access to files allowed only if they are located in files directory
Firewall
You should also deploy a firewall on your box. However, it’s very easy to lock yourself out of your box, so I will not give you exact instructions on how to do it. The following is what I use for my box using arno-iptables-firewall.
Once the firewall is in place, notice when the box reboots, Docker might not start in the right order and therefore the iptables rules it might need might not be initialized and due to this things might not work. Simply restart the Docker service:
Docker DOES NOT own, operate, license, sponsors or authorizes this site. Docker is a registered trademark of Docker, Inc. Similarly, WordPress Foundation DOES NOT own, operate, license, sponsors or authorizes this site. WordPress is a registered trademark of WordPress Foundation. wordpressdocker.com Unofficial WordPress Docker Tutorial is not affiliated with Docker, Inc or WordPress Foundation. This site is a not for profit tutorial made available free of charge.
Setup Nginx as a Reverse-Proxy inside Docker
For a basic setup only 3 things are needed:
1) Mapping of the host ports to the container ports
2) Mapping a config file to the default Nginx config file at
3) The Nginx config
In a docker-compose file, the port mapping can be done with the config entry, as we’ve seen above.
The mapping for the Nginx config is done with a volume, which we’ve also seen before:
The Nginx config is assumed to be in the same directory as (), but it can be anywhere of course.
Cache Configuration
Adding caching to the setup is quite easy, only the Nginx config has to be changed.In the context, add a directive, which defines the local filesystem path for cached content and name and size of the memory zone.Keep in mind though that the path is inside the container, not on the host’s filesystem.
In the or context for which responses should be cached, add a directive specifying the memory zone.
That’s enough to define the cache with the default caching configuration. There are a lot of other directives which specify which responses to cache in much more detail. For more details on those, have a look at the .
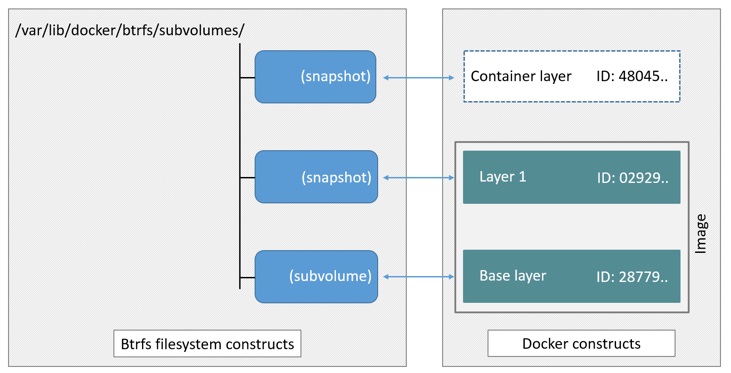
Step 6 — Linking the Container to the Local Filesystem
In this section, we’ll put it all together. We’ll start our Nginx container so it’s accessible on the Internet over Port 80, and we’ll connect it to our website content on the server.
Background information about volumes; that is, linking to permanent server content from your container:
Docker allows us to link directories from our virtual machine’s local file system to our containers.
In our case, since we want to server web pages, we need to give our container the files to render.
We could copy the files into the container as part of a Dockerfile, or copy them into the container after the fact, but both of these methods leave our website in a static state inside the container. By using Docker’s data volumes feature, we can create a symbolic link between the Droplet’s filesystem and the container’s filesystem. This allows us to edit our existing web page files and add new ones into the directory and our container will automatically access them. If you want to read more about Docker and volumes check out the data volumes documentation.
The Nginx container is set up by default to look for an index page at , so in our new Docker container, we need to give it access to our files at that location.
Making the link:
To do this, we use the flag to map a folder from our local machine () to a relative path in the container ().
We can accomplish this by running the following command:
We can see that the new addition to the command is our volume link.
- specifies that we’re linking a volume
- the part to the left of the is the location of our file/directory on our virtual machine ()
- the part to the right of the is the location that we are linking to in our container ()
After running that command, if you now point your browser to your DigitalOcean Droplet’s IP address, you should see the first heading of Hello Digital Ocean (or whatever web page you created in Step 5).
If you’re happy with the other Nginx defaults, you’re all set.
You can upload more content to the directory, and it will be added to your live website.
For example, if we modify our index file, and if we reload our browser window, we will be able to see it update in realtime. We could build a whole site out of flat HTML files this way if we wanted to. For example, if we added an page, we could access it at without needing to interact with the container.
Аутентификация контейнеров
В рамках NAS, сервисы работают в контейнерах, поэтому есть желание сделать так, чтобы возможно было переключать режимы аутентификации, просто установив переменные внутри контейнера.
Такой механизм уже есть в используемом образе ngingx-proxy и реализован он через шаблоны, которые обрабатывает docker-gen.
Он подставляет в шаблон метаданные, которые содержат описание запущенных в данный момент контейнеров Docker.
Таким образом, всё что надо сделать — это доработать шаблон конфигурации обратного прокси так, чтобы при наличии условной переменной в контейнере, было включено перенаправление на сервис сквозной аутентификации, который также работает в контейнере.
Затем, внести соответствующие коррективы в конфигурацию docker-compose.
Шаг 1 — Клонирование и тестирование приложения Node
В качестве первого шага мы клонируем репозиторий с кодом приложения Node, который включает файл Dockerfile, который мы будем использовать для сборки образа нашего приложения с помощью Compose. Мы можем протестировать приложение, выполнив его сборку и запустив его с помощью команды без использования обратного прокси или SSL.
В корневой директории пользователя без прав root клонируйте репозиторий из учетной записи DigitalOcean на GitHub. Этот репозиторий содержит код настройки, описанной в руководстве Сборка приложения Node.js с помощью Docker.
Клонируйте репозиторий в директорию с именем :
Перейдите в директорию :
В этой директории имеется файл Dockerfile, содержащий инструкции по сборке приложения Node с помощью образа Docker и содержимое директории вашего текущего проекта. Вы можете посмотреть содержимое файла Dockerfile, введя следующую команду:
Эти инструкции позволят собрать образ Node, скопировав код проекта из текущей директории в контейнер и установив зависимости с помощью . Также они помогут воспользоваться преимуществами Docker, отделив копию и , содержащую список зависимостей проекта, от копии остального кода. Наконец, инструкции указывают, что контейнер будет запускаться в качестве пользователя node без прав root с соответствующими разрешениями, заданными для кода приложения и директорий .
Дополнительную информацию о рекомендуемых практиках работы с Dockerfile и образом Node см. в шаге 3 руководства .
Чтобы протестировать приложение без SSL, вы можете выполнить сборку и создать метку с помощью команды и флага . Мы назовем образ , но вы можете указать другое имя:
После завершения процесса сборки вы можете вывести список образов с помощью команды :
Вы увидите следующий вывод, подтверждающий сборку образа приложения:
Затем создайте контейнер с помощью команды . Мы добавим к этой команде три флага:
- : публикует порт контейнера и сопоставляет его с портом хоста. Мы используем порт на нашем хосте, но вы можете использовать любой другой порт, если этот порт занят каким-то другим процессом. Дополнительную информацию по принципам привязки портов можно найти в соответствующей документации Docker.
- : запускает контейнер в фоновом режиме.
- : позволяет присвоить контейнеру запоминающееся имя.
Запустите следующую команду для сборки контейнера:
Просмотрите запущенные контейнеры с помощью команды :
Вы увидите вывод, подтверждающий, что контейнер вашего приложения запущен:
Теперь вы можете посетить ваш домен, чтобы протестировать настройку: . Обязательно замените на ваше доменное имя. Ваше приложение отобразит следующую начальную страницу:
Теперь, когда вы протестировали приложение, вы можете остановить контейнер и удалить образы. Воспользуйтесь снова, чтобы получить идентификатор :
Остановите контейнер с помощью команды . Обязательно замените указанный здесь на вашего приложения:
Теперь вы можете удалить остановленный контейнер и все образы, включая неиспользуемые и недействительные образы, с помощью команды и флага :
Введите в диалоговом окне, чтобы подтвердить удаление остановленного контейнера и образов. Помните, что при этом также будет удален кэш вашей сборки.
Когда образ вашего приложения будет протестирован, вы можете перейти к сборке остальной части настройки с помощью Docker Compose.
Реализация аутентификации
Модификация шаблона конфигурации nginx-proxy
В первую очередь добавляется новый upstream, который позволяет обращаться к сервису аутентификации в конфиге:
Видно, что сервис аутентификации работает на хосте и порту , по умолчанию 9000.
Значения переменных будут подставлены docker-gen так, что данная часть конфига будет выглядеть следующим образом в внутри контейнера:
Следующее дополнение устанавливает переменную , если в контейнере некоего сервиса была взведена переменная .
Также, устанавливаются ещё несколько переменных для настройки аутентификации.
Основной блок дополнений приведён ниже. Он активируется, только если установлена переменная .
Если установлена, то будет включено перенаправление на страницу аутентификации, иначе будет использовано окно базовой аутентификации HTTP.
И последнее, когда LDAP аутентификация для сервиса включена, добавляется в его location:
Ниже приведён полный листинг шаблона.
Модификация конфигурации docker-compose
В были добавлены:
- Новый сервис «ldap-auth», который отвечает за авторизацию.
- Блок переменных, настраивающих взаимодействия с LDAP сервером.
То что записано в переменных, nginx передаст сервису аутентификации через HTTP заголовки.
Назначение параметров ясно из названий переменных, так что останавливаться я на них не буду.
Полный конфиг смотрите ниже.
Let’s Begin!
===
Building a Docker Container With Nginx Installed
After having installed docker on our VPS and having quickly gone over its commands, we are ready to start with the actual work to create our docker container running Nginx.
Note: Although after following this section we will have a running docker container with Nginx installed, it is definitely not the recommended method due to its complexity. However, it is here to offer you a chance to learn how to work with a live container and get familiarized with the commands we will need to define later to automate the process. To create a docker image with Nginx installed in a much better way, see the next section: Creating a Dockerfile to Automatically Build Nginx Image.
Creating a Base Docker Container From Ubuntu
Using docker’s RUN command, we will begin with creating a new container based on the Ubuntu image. We are going to attach a terminal to it using the “-t” flag.
Note: After executing this command, docker might need to pull the Ubuntu image before creating a new container for you.
Remember: You will be attached to the container you create. In order to detach yourself and go back to your main terminal access point, run the escape sequence: CTRL+P followed by CTRL+Q. Being attached to a docker container is like being connected to a new droplet from inside another.
To attach yourself back to this container:
- List all running containers using sudo docker ps
- Find its ID
- Use sudo docker attach to attach back to its terminal
Important: Please do not forget that since we are in a container, all the following commands will be executed there, without affecting the host.
Preparing the Base Container for Nginx Installation
In order to install Nginx and the tools we are going to need for the process, the relevant application repository must be available for downloads.
Let’s append Ubuntu’s universe to the default list of the base image.
Update the list with the newly added source.
Before we proceed to install Nginx, there are some tools we should have installed such as nano — just in case.
Configuring Nginx
Using the text editor nano, which we have installed in the previous step, let’s create a sample Nginx configuration to proxy connections to application servers.
First, on top of the file, a line must be added to not to have Nginx spawn its processes and then quit.
The reason we cannot allow this to happen is because docker depends on a single process to run (which can even be a process manager nonetheless) and when that process stops (i.e. quitting after spawning workers), the container stops.
Start with the following as the first line of the :
We will use a simple sample configuration to have Nginx run as a reverse proxy. Copy-and-paste the following after the instruction.
Save and exit pressing CTRL+X and confirming with Y.
To run Nginx, you can execute the following:
And that’s it! We now have Nginx running in a docker container, accessible from the outside world on port 80 as we set using the flag.
Remember: This Nginx file, albeit configured correctly, will not do anything since there are currently no application servers running on the server. Instead of this one, you can copy and use another example which simply works as a forward proxy for testing HTTP headers until you have your application server(s) installed and working.