Установка docker в windows
Содержание:
- Step 5 — Running a Docker Container
- Шаг 3 — Настройка аутентификации
- Шаг 1 — Настройка и запуск Traefik
- Register Arm executables to run on x64 machines
- Install buildx for multi-architecture image builds
- How To Use Docker
- Шаг 7 — Сохранение изменений в контейнере в образ Docker
- Step 6 — Executing Commands on a Dockerized Host via SSH
- Шаг 2 — Использование команды Docker без прав sudo (опционально)
- Step 6 — Managing Docker Containers
- The Docker Project and its Main Parts
- Step 8 — Creating Docker Containers on a Remote Dockerized Host
- Step 2 — Executing the Docker Command Without Sudo (Optional)
- Шаг 1 — Установка и настройка реестра Docker
- Предварительные требования
- Step 4 — Working with Docker Images
- 4: Образы Docker
- Шаг 7 — Внесение изменений в контейнер для образа Docker
- Step 6 — Managing Docker Containers
Step 5 — Running a Docker Container
The container you ran in the previous step is an example of a container that runs and exits after emitting a test message. Containers can be much more useful than that, and they can be interactive. After all, they are similar to virtual machines, only more resource-friendly.
As an example, let’s run a container using the latest image of Ubuntu. The combination of the -i and -t switches gives you interactive shell access into the container:
Note: The default behavior for the command is to start a new container. Once you run the preceding the command, you will open up the shell interface of a second container.
Your command prompt should change to reflect the fact that you’re now working inside the container and should take this form:
Note: Remember the container id in the command prompt. In the preceding example, it is . You’ll need that container ID later to identify the container when you want to remove it.
Now you can run any command inside the container. For example, let’s update the package database inside the container. You don’t need to prefix any command with , because you’re operating inside the container as the root user:
Then install any application in it. Let’s install Node.js:
This installs Node.js in the container from the official Ubuntu repository. When the installation finishes, verify that Node.js is installed:
You’ll see the version number displayed in your terminal:
Any changes you make inside the container only apply to that container.
To exit the container, type at the prompt.
Let’s look at managing the containers on our system next.
Шаг 3 — Настройка аутентификации
Теперь веб-сервер Nginx правильно перенаправляет запросы, и вы можете защитить свой реестр Docker системой аутентификации HTTP, чтобы контролировать доступ к нему. Для этого вам потребуется создать файл аутентификации с помощью и добавить в него пользователей. Аутентификация HTTP быстро настраивается и обеспечивает безопасность, если использовать соединение HTTPS, как в случае нашего реестра.
Для установки пакета запустите следующую команду:
Теперь вы создадите каталог, где будут храниться учетные данные аутентификации, и перейдете в этот каталог. раскрывается в последний аргумент предыдущей команды, в данном случае :
Теперь вы создадите первого пользователя, заменив желаемым именем пользователя. Флаг указывает, что нужно использовать шифрование , которое более безопасно, чем шифрование по умолчанию. Введите пароль в диалоговом окне:
Примечание. Для добавления дополнительных пользователей запустите предыдущую команду еще раз с опцией («c» означает создание):
Теперь вам нужно отредактировать файл , чтобы предписать Docker использовать созданный файл для аутентификации пользователей.
Вы можете добавить переменные среды и том для созданного вами каталога , отредактировав файл , чтобы указать Docker желаемый способ аутентификации пользователей. Добавьте в файл следующий выделенный код:
docker-compose.yml
Для вы задали как используемую схему аутентификации, а для вы задали путь к файлу аутентификации. Наконец, означает имя области .
Теперь вы можете убедиться в нормальной работе аутентификации, попробовав запустить реестр и проверив, запрашивает ли система имя пользователя и пароль.
Откройте в окне браузера адрес .
Введите и соответствующий пароль, и вы снова увидите . Вы подтвердили базовую настройку аутентификации. Реестр возвратил результат только после ввода правильного имени пользователя и пароля. Вы защитили свой реестр и теперь можете переходить к его использованию.
Шаг 1 — Настройка и запуск Traefik
Проект Traefik имеет официальный образ Docker, так что мы будем использовать его для запуска Traefik в контейнере Docker.
Однако прежде чем мы запустим наш контейнер Traefik, нам нужно будет создать файл конфигурации и настроить шифрованный пароль для доступа к информационной панели мониторинга.
Для создания шифрованного пароля мы используем утилиту . Вначале следует установить эту утилиту, которая входит в пакет :
Затем нужно сгенерировать пароль с помощью . Замените паролем, который вы хотите использовать для административного пользователя Traefik:
Программа выдаст следующий результат:
Используйте этот результат в файле конфигурации Traefik для настройки базовой аутентификации HTTP для проверки состояния Traefik и информационной панели мониторинга. Скопируйте всю строку результатов, чтобы ее можно было вставить.
Для настройки сервера Traefik мы создадим новый файл конфигурации с именем в формате TOML. TOML — это язык конфигурации, похожий на используемый в файлах INI, но при этом стандартизированный. Этот файл позволит нам настроить сервер Traefik и различные интеграции или провайдеров, которых мы хотим использовать. В этом обучающем модуле мы будем использовать три из числа доступных провайдеров Traefik: , и , который используется для поддержки TLS при использовании Let’s Encrypt.
Откройте новый файл в или в другом предпочитаемом текстовом редакторе:
Добавьте две точки входа с именами и , которые будут по умолчанию доступны всем серверным компонентам:
traefik.toml
Мы настроим точки входа и в следующих шагах.
Затем настройте провайдер , который дает доступ к интерфейсу информационной панели. Здесь вам нужно вставить результат выполнения команды :
traefik.toml
Информационная панель — это отдельное веб-приложение, работающее в контейнере Traefik. Мы настроим информационную панель для запуска на порту .
Раздел настраивает способ подключения с помощью провайдера , а раздел настраивает базовую аутентификацию HTTP для информационной панели. Используйте результат выполнения команды для получения значения записи . Вы можете указать дополнительные имена пользователей, отделяя их с помощью запятых.
Мы определили первую точку входа , но теперь нам нужно определить другие точки входа для стандартных коммуникаций HTTP и HTTPS, которые не направлены на провайдер . В разделе настраиваются адреса, которые могут прослушивать Traefik и контейнеры, подключенные через прокси. Добавьте в файл следующие строки под заголовком
traefik.toml
Точка входа использует порт , а точка входа использует порт для TLS/SSL. Мы автоматически перенаправляем весь трафик порта на точку входа , чтобы принудительно использовать защищенные соединения для всех запросов.
Затем добавьте этот раздел для настройки поддержки сертификата Let’s Encrypt для Traefik:
traefik.toml
Ключ указывает, как Traefik следует генерировать сертификаты. Мы хотим получать сертификаты сразу же после создания контейнеров с заданными именами хостов, и для этого мы используем параметр .
Раздел позволяет указать, как Let’s Encrypt сможет проверять необходимость генерирования сертификата. Мы настроим его для обслуживания файла в рамках запроса через точку входа .
В заключение мы настроим провайдер , добавив в файл следующие строки:
traefik.toml
Провайдер позволяет Traefik выступать в качестве прокси для контейнеров Docker. Мы настроили провайдер на новых контейнеров в сети (которую мы вскоре создадим) и для предоставления доступа к ним как к субдоменам домена .
traefik.toml
Сохраните файл и выйдите из редактора. Настроив эти параметры конфигурации, мы можем запускать Traefik.
Register Arm executables to run on x64 machines
Install the qemu instruction emulation to register Arm executables to run on the x86 machine. For best results, the latest qemu image should be used. If an older qemu is used some application may not work correctly on the x86 hardware.
$ docker run --rm --privileged docker/binfmt:820fdd95a9972a5308930a2bdfb8573dd4447ad3
To verify the qemu handlers are registered properly, run the following and make sure the first line of the output is “enabled”. Note that the handler registration doesn’t survive a reboot, but could be added to the system start-up scripts.
$ cat /proc/sys/fs/binfmt_misc/qemu-aarch64
enabled
interpreter /usr/bin/qemu-aarch64
flags: OCF
offset 0
magic 7f454c460201010000000000000000000200b7
Install buildx for multi-architecture image builds
There are three options to get buildx on Linux:
- Use buildx directly from the test channel version of Docker
- Download a of buildx and copy it to the $HOME/.docker directory
- Download, build, and install buildx from github.com
Use buildx from Docker test channel
The test version of Docker already has buildx included. The only thing needed is to set the environment variable to enable experimental command line features.
$ export DOCKER_CLI_EXPERIMENTAL=enabled
Download a binary release
Another way to get buildx is to download a binary release from github and put in the .docker/cli-plugins directory.
For example, download the buildx for Linux amd64 with a browser from: https://github.com/docker/buildx/releases/tag/v0.2.0
Then copy it to the cli-plugins/ directory (create it first if necessary):
$ cp buildx-v0.2.0.linux-amd64 ~/.docker/cli-plugins/docker-buildx
Download, build, and install buildx
Because buildx is a new command and documentation is still catching up, github is a good place to read more information about how buildx works.
To get buildx from github use the commands:
$ export DOCKER_BUILDKIT=1
$ docker build --platform=local -o . git://github.com/docker/buildx
$ mkdir -p ~/.docker/cli-plugins
$ mv buildx ~/.docker/cli-plugins/docker-buildx
To confirm buildx is now installed run the help and the version command.
$ docker buildx --help

Usage:  docker buildx COMMAND
Build with BuildKit

Management Commands:
  imagetools  Commands to work on images in registry

Commands:
  bake        Build from a file
  build       Start a build
  create      Create a new builder instance
  inspect     Inspect current builder instance
  ls          List builder instances
  rm          Remove a builder instance
  stop        Stop builder instance
  use         Set the current builder instance
  version     Show buildx version information

Run 'docker buildx COMMAND --help' for more information on a command.

$ docker buildx version
github.com/docker/buildx v0.2.0-36-g4e61674 4e61674ac805117794cc55475a62efdef0be9818
How To Use Docker
Once you have docker installed, its intuitive usage experience makes it very easy to work with. By now, you shall have the docker daemon running in the background. If not, use the following command to run the docker daemon.
To run the docker daemon:
Usage Syntax:
Using docker (via CLI) consists of passing it a chain of options and commands followed by arguments. Please note that docker needs sudo privileges in order to work.
Note: Below instructions and explanations are provided to be used as a guide and to give you an overall idea of using and working with docker. The best way to get familiar with it is practice on a new VPS. Do not be afraid of breaking anything– in fact, do break things! With docker, you can save your progress and continue from there very easily.
Beginning
Let’s begin with seeing all available commands docker have.
Ask docker for a list of all available commands:
Check out system-wide information and docker version:
Working with Images
As we have discussed at length, the key to start working with any docker container is using images. There are many freely available images shared across docker image index and the CLI allows simple access to query the image repository and to download new ones.
Searching for a docker image:*
This will provide you a very long list of all available images matching the query: Ubuntu.
Downloading (PULLing) an image:
Either when you are building / creating a container or before you do, you will need to have an image present at the host machine where the containers will exist. In order to download images (perhaps following “search”) you can execute pull to get one.
Listing images:
All the images on your system, including the ones you have created by committing (see below for details), can be listed using “images”. This provides a full list of all available ones.
Committing changes to an image:
As you work with a container and continue to perform actions on it (e.g. download and install software, configure files etc.), to have it keep its state, you need to “commit”. Committing makes sure that everything continues from where they left next time you use one (i.e. an image).
Sharing (PUSHing) images:
Although it is a bit early at this moment — in our article, when you have created your own container which you would like to share with the rest of the world, you can use push to have your image listed in the index where everybody can download and use.
Note: You need to sign-up at index.docker.io to push images to docker index.
Working with Containers
When you “run” any process using an image, in return, you will have a container. When the process is not actively running, this container will be a non-running container. Nonetheless, all of them will reside on your system until you remove them via rm command.
Listing all current containers:
By default, you can use the following to list all running containers:
To have a list of both running and non-running ones, use:
Creating a New Container
It is currently not possible to create a container without running anything (i.e. commands). To create a new container, you need to use a base image and specify a command to run.
Running a container:
When you create a container and it stops (either due to its process ending or you stopping it explicitly), you can use “run” to get the container working again with the same command used to create it.
Stopping a container:
To stop a container’s process from running:
Saving (committing) a container:
If you would like to save the progress and changes you made with a container, you can use “commit” as explained above to save it as an image.
Remember that with docker, commits are cheap. Do not hesitate to use them to create images to save your progress with a
container or to roll back when you need (e.g. like snapshots in time).
Removing / Deleting a container:
Using the ID of a container, you can delete one with rm.
You can learn more about Docker by reading their <a href=“http://docs.docker.io/en/latest/”>official documentation</a>
<div class=“author”>Submitted by: <a
href=“https://twitter.com/ostezer”>O.S. Tezer</a></div>
Шаг 7 — Сохранение изменений в контейнере в образ Docker
При запуске контейнера из образа Docker вы можете создавать, изменять и удалять файлы, как и на виртуальной машине. Внесенные изменения применяются только для такого контейнера. Можно запускать и останавливать контейнер, однако как только он будет уничтожен командой , все изменения будут безвозвратно потеряны.
В данном разделе показано, как сохранить состояние контейнера в виде нового образа Docker.
После установки Node.js в контейнере Ubuntu у вас будет работать запущенный из образа контейнер, но он будет отличаться от образа, использованного для его создания. Однако вам может потребоваться такой контейнер Node.js как основа для будущих образов.
Затем подтверждаем изменения в новом образе Docker с помощью следующей команды.
Параметр -m позволяет задать сообщение подтверждения, чтобы облегчить вам и другим пользователям образа понимание того, какие изменения были внесены, а параметр -a позволяет указать автора. Идентификатор контейнера — этот тот самый идентификатор, который использовался ранее, когда мы начинали интерактивную сессию в контейнере Docker. Если вы не создавали дополнительных репозиториев в Docker Hub, имя репозитория () обычно является вашим именем пользователя в Docker Hub.
Например, для пользователя sammy и идентификатора контейнера команда будет выглядеть следующим образом:
После подтверждения (commit) образа, новый образ сохраняется локально на вашем компьютере. Далее в этой инструкции мы расскажем, как отправить образ в реестр Docker (например, в Docker Hub) так, чтобы он был доступен не только вам, но и другим пользователям.
Если теперь просмотреть список образов Docker, в нем окажутся и новый образ, и исходный образ, на котором он был основан:
Результат получится примерно следующим:
В данном примере — это новый образ, созданный на основе существующего образа из Docker Hub. Разница размеров отражает внесенные изменения. В данном примере изменение связано с установкой NodeJS. В следующий раз, когда потребуется запустить контейнер Ubuntu с предустановленным NodeJS, можно использовать этот новый образ.
Образы также могут строиться с помощью файла , который позволяет автоматизировать установку программ в новом образе. Однако в данной статье этот процесс не описывается.
Давайте теперь поделимся новым образом с другими пользователями, чтобы они могли создавать на его основе контейнеры.
Step 6 — Executing Commands on a Dockerized Host via SSH
At this point, you’ve been getting information about your machines, but you can do more than that. For example, you can execute native Linux commands on a Docker host by using the subcommand of from your local system. This section explains how to perform commands via as well as how to open an SSH session to a Dockerized host.
Assuming that you’ve provisioned a machine with Ubuntu as the operating system, execute the following command from your local system to update the package database on the Docker host:
You can even apply available updates using:
Not sure what kernel your remote Docker host is using? Type the following:
Besides using the subcommand to execute commands on the remote Docker host, you can also use it to log into the machine itself. It’s as easy as typing:
Your command prompt will change to reflect the fact that you’re logged into the remote host:
To exit from the remote host, type:
Шаг 2 — Использование команды Docker без прав sudo (опционально)
По умолчанию, запуск команды требует привилегий root, что означает, что вы должны использовать . Также эта команда может запускаться пользователем, включённым в группу docker, которая автоматически создаётся при установке Docker. При попытке использования команды пользователем без привилегий или пользователем, не входящим в группу docker, вы получите такой результат:
Для того, чтобы не вводить каждый раз при запуске , добавьте имя своего пользователя в группу docker:
Для применения этих изменений вам необходимо разлогиниться и залогиниться в ваш дроплет.
Если вы хотите добавить произвольного пользователя в группу docker, вы можете указать имя пользователя в явном виде:
Далее в этой статье мы будем считать, что вы используете команду пользователем, находящимся в группе docker. Если вы не хотите добавлять своего пользователя в группу docker, пишите для выполнения команд .
Step 6 — Managing Docker Containers
After using Docker for a while, you’ll have many active (running) and inactive containers on your computer. To view the active ones, use:
You will see output similar to the following:
In this tutorial, you started three containers; one from the image and two from the image. These containers are no longer running, but they still exist on your system.
To view all containers — active and inactive — run with the switch:
You’ll see output similar to this:
To view the latest container you created, pass it the switch:
To start a stopped container, use , followed by the container ID or the container’s name. Let’s start the Ubuntu-based container with the ID of :
The container will start, and you can use to see its status:
To stop a running container, use , followed by the container ID or name. This time, we’ll use the name that Docker assigned the container, which is :
Once you’ve decided you no longer need a container anymore, remove it with the command, again using either the container ID or the name. Use the command to find the container ID or name for the container associated with the image and remove it.
You can start a new container and give it a name using the switch. You can also use the switch to create a container that removes itself when it’s stopped. See the command for more information on these options and others.
Containers can be turned into images which you can use to build new containers. Let’s look at how that works.
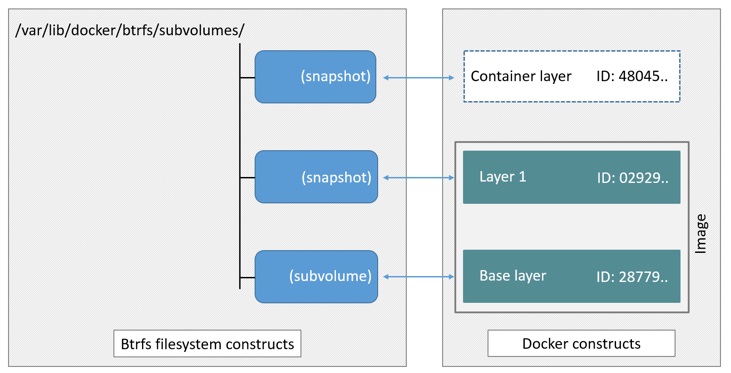
The Docker Project and its Main Parts
Docker project (open-sourced by dotCloud in March ‘13) consists of several main parts (applications) and elements (used by these parts) which are all built on top of already existing functionality, libraries and frameworks offered by the Linux kernel and third-parties (e.g. LXC, device-mapper, aufs etc.).
Main Docker Parts
- docker daemon: used to manage docker (LXC) containers on the host it runs
- docker CLI: used to command and communicate with the docker daemon
- docker image index: a repository (public or private) for docker images
Main Docker Elements
- docker containers: directories containing everything-your-application
- docker images: snapshots of containers or base OS (e.g. Ubuntu) images
- Dockerfiles: scripts automating the building process of images
Step 8 — Creating Docker Containers on a Remote Dockerized Host
So far, you have provisioned a Dockerized Droplet on your DigitalOcean account and you’ve activated it — that is, your Docker client is pointing to it. The next logical step is to spin up containers on it. As an example, let’s try running the official Nginx container.
Use to select your remote machine:
Now execute this command to run an Nginx container on that machine:
In this command, we’re mapping port in the Nginx container to port on the Dockerized host so that we can access the default Nginx page from anywhere.
If the command executed successfully, you will be able to access the default Nginx page by pointing your Web browser to .
While the Docker host is still activated (as seen by its name in the prompt), you should be able to list the images on that host:
The output should include the Nginx image you just used, plus others you downloaded before:
You can also list the active or running containers on the host:
If the Nginx container you ran in this step is the only active container, the output should look like this:
To exit the prompt for the remote host, type. This will close the terminal as well:
Note: If you intend to create containers on a remote machine, your Docker client must be pointing to it — that is, it must be the active machine in the terminal that you’re using. Otherwise you’ll be creating the container on your local machine. Again, let your command prompt be your guide.
Step 2 — Executing the Docker Command Without Sudo (Optional)
By default, running the command requires root privileges — that is, you have to prefix the command with . It can also be run by a user in the docker group, which is automatically created during the installation of Docker. If you attempt to run the command without prefixing it with or without being in the docker group, you’ll get an output like this:
If you want to avoid typing whenever you run the command, add your username to the group:
To apply the new group membership, you can log out of the server and back in, or you can type the following:
You will be prompted to enter your user’s password to continue. Afterwards, you can confirm that your user is now added to the group by typing:
If you need to add a user to the group that you’re not logged in as, declare that username explicitly using:
The rest of this article assumes you are running the command as a user in the docker user group. If you choose not to, please prepend the commands with .
Шаг 1 — Установка и настройка реестра Docker
Инструмент командной строки Docker подойдет для запуска и управления одним или двумя контейнерами Docker, но для полноценного развертывания большинства приложений, запущенных внутри контейнеров Docker, необходимо, чтобы параллельно работали и другие компоненты. Например, многие приложения включают Nginx или другой веб-сервер, обслуживающий код приложения, а также PHP или другой язык интерпретации скриптов и MySQL или другой сервер СУБД.
С помощью Docker Compose вы можете записать один файл для настройки конфигурации каждого контейнера и информации, необходимой контейнерам для взаимодействия друг с другом. Затем вы можете использовать инструмент командной строки для отправки команд всем компонентам, составляющим ваше приложение.
Реестр Docker сам по себе является приложением с несколькими компонентами, и поэтому вы будете использовать Docker Compose для управления его конфигурацией. Чтобы запустить экземпляр реестра, вам нужно задать в файле место, где ваш реестр будет хранить свои данные.
На том же сервере, который вы создали для размещения частного реестра Docker, вы можете создать каталог , перейти в него, а затем создать подпапку с помощью следующих команд:
Используйте текстовый редактор для создания файла конфигурации :
Добавьте в файл следующие строки, описывающие базовую конфигурацию реестра Docker:
docker-compose.yml
Раздел задает в контейнере реестра Docker переменную среды с путем . Приложение Docker Registry проверяет эту переменную среды при запуске и в результате сохраняет свои данные в папку .
Однако поскольку вы добавили строку , Docker начнет сопоставлять каталог в этом контейнере с на вашем сервере реестра. В конечном итоге все данные реестра Docker будут храниться в каталоге на сервере реестра.
Раздел с конфигурацией предписывает Docker сопоставить порт на сервере с портом запущенного контейнера. Это позволяет отправить запрос на порт на сервере так, чтобы этот запрос был перенаправлен в приложение реестра.
Теперь вы можете запустить Docker Compose для проверки настройки:
В результатах вы увидите панели загрузки, показывающие, что Docker загружает образ реестра Docker из собственного реестра Docker. Через одну или две минуты вы увидите примерно следующее (номера версий могут отличаться):
С предупреждающим сообщением мы разберемся в этом же обучающем модуле, но чуть позднее. Экран результатов показывает, что контейнер запускается. Последняя строка результатов показывает, что прослушивание порта началось успешно.
Docker Compose по умолчанию будет ожидать от вас команд, так что нажмите , чтобы закрыть контейнер реестра Docker.
Вы настроили полный реестр Docker, прослушивающий порт . Сейчас реестр не будет запускаться, если вы не запустите его вручную. Также в реестре Docker отсутствуют встроенные механизмы аутентификации, и это значит, что сейчас он не защищен и полностью открыт для публики. На следующих шагах вы решите эти проблемы безопасности.
Предварительные требования
Для прохождения этого обучающего модуля вам потребуется следующее:
- Два сервера Ubuntu 18.04, настроенных в соответствии с руководством по начальной настройке сервера Ubuntu 18.04, включая пользователя sudo без прав root и брандмауэр. На одном сервере будет располагаться ваш частный реестр Docker, а другой будет выступать в качестве сервера-клиента.
- На обоих серверах должны быть установлены Docker и Docker-Compose в соответствии с указаниями обучающего модуля «Установка Docker-Compose в Ubuntu 18.04». Для установки Docker Compose достаточно выполнить первый шаг этого обучающего модуля. В этом обучающем модуле объясняется, как устанавливать Docker для выполнения предварительных требований.
- На сервере частного реестра Docker должен быть установлен веб-сервер Nginx в соответствии с указаниями руководства «Установка Nginx в Ubuntu 18.04».
- Веб-сервер Nginx на сервере частного реестра Docker должен быть защищен Let’s Encrypt в соответствии с указаниями обучающего модуля «Защита Nginx с помощью Let’s Encrypt». Убедитесь, что весь трафик протокола HTTP перенаправляется на протокол HTTPS в соответствии с указаниями шага 4.
- Доменное имя для сервера, используемого вами для частного реестра Docker. Вы должны были настроить его во время выполнения предварительных требований по защите с помощью Let’s Encrypt.
Step 4 — Working with Docker Images
Docker containers are built from Docker images. By default, Docker pulls these images from Docker Hub, a Docker registry managed by Docker, the company behind the Docker project. Anyone can host their Docker images on Docker Hub, so most applications and Linux distributions you’ll need will have images hosted there.
To check whether you can access and download images from Docker Hub, type:
The output will indicate that Docker in working correctly:
Docker was initially unable to find the image locally, so it downloaded the image from Docker Hub, which is the default repository. Once the image downloaded, Docker created a container from the image and the application within the container executed, displaying the message.
You can search for images available on Docker Hub by using the command with the subcommand. For example, to search for the Ubuntu image, type:
The script will crawl Docker Hub and return a listing of all images whose name match the search string. In this case, the output will be similar to this:
In the OFFICIAL column, OK indicates an image built and supported by the company behind the project. Once you’ve identified the image that you would like to use, you can download it to your computer using the subcommand.
Execute the following command to download the official image to your computer:
You’ll see the following output:
After an image has been downloaded, you can then run a container using the downloaded image with the subcommand. As you saw with the example, if an image has not been downloaded when is executed with the subcommand, the Docker client will first download the image, then run a container using it.
To see the images that have been downloaded to your computer, type:
The output will look similar to the following:
As you’ll see later in this tutorial, images that you use to run containers can be modified and used to generate new images, which may then be uploaded (pushed is the technical term) to Docker Hub or other Docker registries.
Let’s look at how to run containers in more detail.
4: Образы Docker
Контейнеры Docker запускаются из образов. По умолчанию образы Docker хранятся на Docker Hub – это реестр Docker, поддерживаемый командой разработчиков проекта. Разместить свой образ на Docker Hub может любой пользователь, потому здесь можно найти образы для большей части приложений и дистрибутивов Linux.
Чтобы проверить доступ и возможность загружать образы с Docker Hub, введите:
Команда должна вернуть следующий результат:
Изначально Docker не может локально найти образ hello-world, потому он загружает этот образ с Docker Hub. Затем он создает контейнер на основе этого образа и запускает приложение внутри контейнера, после чего выдает это сообщение.
Для поиска необходимых образов на Docker Hub используется команда docker и подкоманда search. К примеру, чтобы найти образ Ubuntu, нужно ввести:
Данная команда выполнит поиск по Docker Hub и вернёт список образов, чьё имя соответствует поисковому запросу. В данном случае команда вернула:
Если в столбце OFFICIAL содержится OK, это значит, что данный образ поддерживается командой разработчиков проекта. Выбрав необходимый образ, вы можете загрузить его при помощи подкоманды pull:
Загрузив образ, вы можете запустить контейнер с помощью подкоманды run. Как вы уже видели на примере с образом hello-world, если команда docker run обнаружит, что запрашиваемый образ не был загружен, она выполнит его загрузку самостоятельно, а затем запустит контейнер.
Чтобы просмотреть список загруженных образов, введите:
Далее в руководстве будет показано, как изменять загруженные образы и использовать их для создания новых образов, которые затем можно загрузить на Docker Hub или в другой реестр Docker.
Шаг 7 — Внесение изменений в контейнер для образа Docker
После запуска образа Docker вы можете создавать, изменять и удалять файлы так же, как и с помощью виртуальной машины. Эти изменения будут применяться только к данному контейнеру. Вы можете запускать и останавливать его, но после того как вы уничтожите его с помощью команды , изменения будут утрачены навсегда.
Данный раздел показывает, как сохранить состояние контейнера в виде нового образа Docker.
После установки Node.js внутри контейнера Ubuntu у вас появился контейнер, запускающий образ, но этот контейнер отличается от образа, который вы использовали для его создания. Но позже вам может снова потребоваться этот контейнер Node.js в качестве основы для новых образов.
Затем внесите изменения в новый экземпляр образа Docker с помощью следующей команды.
Переключатель -m используется в качестве сообщения о внесении изменений, которое помогает вам и остальным узнать, какие изменения вы внесли, в то время как -a используется для указания автора. — это тот самый идентификатор, который вы отмечали ранее в этом руководстве, когда запускали интерактивную сессию Docker. Если вы не создавали дополнительные репозитории на Docker Hub, , как правило, является вашим именем пользователя на Docker Hub.
Например, для пользователя sammy с идентификатором контейнера команда будет выглядеть следующим образом:
Когда вы вносите образ, новый образ сохраняется локально на компьютере. Позже в этом обучающем руководстве вы узнаете, как добавить образ в реестр Docker, например, на Docker Hub, чтобы другие могли получить к нему доступ.
Список образов Docker теперь будет содержать новый образ, а также старый образ, из которого он будет получен:
Вывод будет выглядеть следующим образом:
В данном примере является новым образом, который был получен из образа на Docker Hub. Разница в размере отражает внесенные изменения. В данном примере изменение состояло в том, что NodeJS был установлен. В следующий раз, когда вам потребуется запустить контейнер, использующий Ubuntu с предустановленным NodeJS, вы сможете использовать новый образ.
Вы также можете создавать образы из , что позволяет автоматизировать установку программного обеспечения в новом образе. Однако это не относится к предмету данного обучающего руководства.
Теперь мы поделимся новым образом с другими, чтобы они могли создавать из него контейнеры.
Step 6 — Managing Docker Containers
After using Docker for a while, you’ll have many active (running) and inactive containers on your computer. To view the active ones, use:
You will see output similar to the following:
In this tutorial, you started two containers; one from the image and another from the image. Both containers are no longer running, but they still exist on your system.
To view all containers — active and inactive, run with the switch:
You’ll see output similar to this:
To view the latest container you created, pass it the switch:
To start a stopped container, use , followed by the container ID or the container’s name. Let’s start the Ubuntu-based container with the ID of :
The container will start, and you can use to see its status:
To stop a running container, use , followed by the container ID or name. This time, we’ll use the name that Docker assigned the container, which is :
Once you’ve decided you no longer need a container anymore, remove it with the command, again using either the container ID or the name. Use the command to find the container ID or name for the container associated with the image and remove it.
You can start a new container and give it a name using the switch. You can also use the switch to create a container that removes itself when it’s stopped. See the command for more information on these options and others.
Containers can be turned into images which you can use to build new containers. Let’s look at how that works.