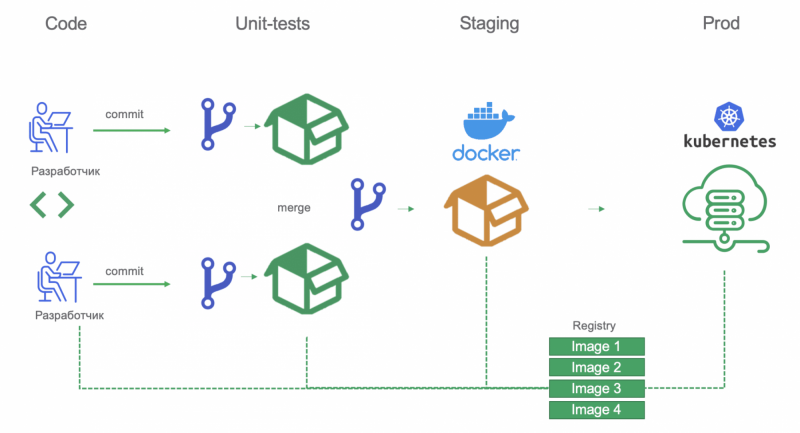
Docker can now run within docker
Содержание:
- Start a container with a volume
- Windows 10 with Anniversary Update
- Btrfs and Docker performance
- Tips for using bind mounts or volumes
- Looking for Moby?
- Настройка Grafana
- Zero-configuration bind mount support
- Technical Preview of Docker Desktop for WSL 2
- Configure bind propagation
- Choose the -v or —mount flag
- Good use cases for bind mounts
- How container reads and writes work with zfs
- Windows Server 2016
- Configure Docker to use the btrfs storage driver
- How the btrfs storage driver works
Start a container with a volume
If you start a container with a volume that does not yet exist, Docker creates
the volume for you. The following example mounts the volume into
in the container.
The and examples below produce the same result. You can’t run
them both unless you remove the container and the volume
after running the first one.
Use to verify that the volume was created and mounted
correctly. Look for the section:
This shows that the mount is a volume, it shows the correct source and
destination, and that the mount is read-write.
Stop the container and remove the volume. Note volume removal is a separate
step.
Start a service with volumes
When you start a service and define a volume, each service container uses its own
local volume. None of the containers can share this data if you use the
volume driver, but some volume drivers do support shared storage. Docker for AWS and
Docker for Azure both support persistent storage using the Cloudstor plugin.
The following example starts a service with four replicas, each of which
uses a local volume called .
Use to verify that the service is running:
Remove the service, which stops all its tasks:
Removing the service does not remove any volumes created by the service.
Volume removal is a separate step.
Syntax differences for services
The command does not support the or flag.
When mounting a volume into a service’s containers, you must use the
flag.
Populate a volume using a container
If you start a container which creates a new volume, as above, and the container
has files or directories in the directory to be mounted (such as above),
the directory’s contents are copied into the volume. The container then
mounts and uses the volume, and other containers which use the volume also
have access to the pre-populated content.
To illustrate this, this example starts an container and populates the
new volume with the contents of the container’s
directory, which is where Nginx stores its default HTML
content.
The and examples have the same end result.
After running either of these examples, run the following commands to clean up
the containers and volumes. Note volume removal is a separate step.
Windows 10 with Anniversary Update
For developers, Windows 10 is a great place to run Docker Windows containers and containerization support was added to the the Windows 10 kernel with the Anniversary Update (note that container images can only be based on Windows Server Core and Nanoserver, not Windows 10). All that’s missing is the Windows-native Docker Engine and some image base layers.
The simplest way to get a Windows Docker Engine is by installing the Docker for Windows public beta (direct download link). Docker for Windows used to only setup a Linux-based Docker development environment (slightly confusing, we know), but the public beta version now sets up both Linux and Windows Docker development environments, and we’re working on improving Windows container support and Linux/Windows container interoperability.
With the public beta installed, the Docker for Windows tray icon has an option to switch between Linux and Windows container development. For details on this new feature, check out Stefan Scherers blog post.
Switch to Windows containers and skip the next section.

Btrfs and Docker performance
There are several factors that influence Docker’s performance under the
storage driver.
-
Page caching. Btrfs does not support page cache sharing. This means that
each process accessing the same file copies the file into the Docker hosts’s
memory. As a result, the driver may not be the best choice
high-density use cases such as PaaS. -
Small writes. Containers performing lots of small writes (this usage
pattern matches what happens when you start and stop many containers in a short
period of time, as well) can lead to poor use of Btrfs chunks. This can
prematurely fill the Btrfs filesystem and lead to out-of-space conditions on
your Docker host. Use to closely monitor the amount of
free space on your Btrfs device. -
Sequential writes. Btrfs uses a journaling technique when writing to disk.
This can impact the performance of sequential writes, reducing performance by
up to 50%. -
Fragmentation. Fragmentation is a natural byproduct of copy-on-write
filesystems like Btrfs. Many small random writes can compound this issue.
Fragmentation can manifest as CPU spikes when using SSDs or head thrashing
when using spinning disks. Either of these issues can harm performance.If your Linux kernel version is 3.9 or higher, you can enable the
feature when mounting a Btrfs volume. Test this feature on your own workloads
before deploying it into production, as some tests have shown a negative
impact on performance. -
SSD performance: Btrfs includes native optimizations for SSD media.
To enable these features, mount the Btrfs filesystem with the mount
option. These optimizations include enhanced SSD write performance by avoiding
optimization such as seek optimizations which do not apply to solid-state
media. -
Balance Btrfs filesystems often: Use operating system utilities such as a
job to balance the Btrfs filesystem regularly, during non-peak hours.
This reclaims unallocated blocks and helps to prevent the filesystem from
filling up unnecessarily. You cannot rebalance a totally full Btrfs
filesystem unless you add additional physical block devices to the filesystem.
See the
. -
Use fast storage: Solid-state drives (SSDs) provide faster reads and
writes than spinning disks. -
Use volumes for write-heavy workloads: Volumes provide the best and most
predictable performance for write-heavy workloads. This is because they bypass
the storage driver and do not incur any of the potential overheads introduced
by thin provisioning and copy-on-write. Volumes have other benefits, such as
allowing you to share data among containers and persisting even when no
running container is using them.
Tips for using bind mounts or volumes
If you use either bind mounts or volumes, keep the following in mind:
-
If you mount an empty volume into a directory in the container in which files
or directories exist, these files or directories are propagated (copied)
into the volume. Similarly, if you start a container and specify a volume which
does not already exist, an empty volume is created for you.
This is a good way to pre-populate data that another container needs. -
If you mount a bind mount or non-empty volume into a directory in the container
in which some files or directories exist, these files or directories are
obscured by the mount, just as if you saved files into on a Linux host
and then mounted a USB drive into . The contents of would be
obscured by the contents of the USB drive until the USB drive were unmounted.
The obscured files are not removed or altered, but are not accessible while the
bind mount or volume is mounted.
Looking for Moby?
Docker introduced the open source Moby
project to
further promote collaboration, experimentation, and development of
container-based systems in the broader community. Moby is a library of
containerized components, a framework for assembling components into a container
platform, and tools to build, test, and deploy artifacts. It included a
reference assembly, which is the open base for the Docker platform.
You can read about the Moby project, the open framework, components, and
relationship of Docker to Moby at mobyproject.org.
The Moby project lives here.
See Contribute to the Moby project
to learn how to help work on the codebase.
open, source, contributing, overview
Настройка Grafana
После того как все сервисы развернуты, можно открыть grafana. Для этого подойдет IP любой ноды роя. Мы укажем IP менеджера, выполнив следующую команду:
По умолчанию для входа в grafana используются имя пользователя admin и пароль admin. В grafana в качестве источника данных надо добавить InfluxDB. На домашней страничке должна быть ссылка Create your first data source, кликните по ней. Если ссылки нет, выберите из меню Data Sources пункт Add data source, который откроет форму добавления нового Data Source.
Добавление Data Source в Grafana
Источнику данных можно дать любое имя. Поставьте галку в чекбоксе default, чтобы в дальнейшем не приходилось указывать его в других формах. Далее установим Type равным InfluxDB, URL — http://influx:8086 и Access — proxy. Таким образом мы указали на наш InfluxDb-контейнер. В поле Database введите cadvisor и нажмите Save and Test — должно появиться сообщение Data source is working.
В github-репозитории проекта есть файл dashboard.json, созданный для импорта в Grafana. В нем описана панель инструментов мониторинга систем и контейнеров, которые выполняются в рое. Сейчас мы только импортируем эту панель инструментов, а поговорим о ней в следующем разделе. Наведите курсор на пункт меню Dashboards и выберите Import Option. Нажмите кнопку Upload .json file и выберите dashboard.json. Далее выберите источник данных и нажмите кнопку Import.
Grafana Dashboard
Grafana Dashboard
Импортированная в Grafana панель инструментов предназначена для мониторинга хостов и контейнеров роя. Вы можете детализировать отчет до уровня хоста и выполняющихся на нем контейнеров. Нам понадобятся две переменные, для добавление которых в панель инструментов Grafana необходима функциональность работы с шаблонами. Более подробная информация о работе с шаблонами в связке с InfluxDB — на . У нас есть две переменные: host для выбора ноды и container для выбора контейнера. Чтобы увидеть эти переменные, на странице панели инструментов выберите Settings и нажмите Templating.
Первая переменная — host — позволяет выбрать ноду и ее метрики. Когда cAdvisor отправляет метрики в InfluxDB, он присоединяет к ним несколько тегов, которые можно использовать для фильтрации. У нас есть тег под названием machine, который содержит имя хоста (hostname) экземпляра cAdvisor. В данном случае он будет соответствовать ID хоста в рое. Для получения значений тега используется запрос .
Вторая переменная — container — позволяет детализировать отчет до уровня контейнера. У нас есть тег с именем container_name, в котором вполне предсказуемо содержится имя контейнера. Нам также надо фильтровать метрики по значению тега host. Запрос будет выглядеть следующим образом: . Он вернет нам список контейнеров, у которых переменная host содержит имя интересующего нас хоста.
Имя контейнера будет выглядеть примерно так:
monitor_cadvisor.y78ac29r904m8uy6hxffb7uvn.3j231njh03spl0j8h67z069cy. Мы, однако, заинтересованы только в его monitor_cadvisor-части (до первой точки). Если запущено несколько экземпляров одного сервиса, их данные нужно будет выводить в отдельных строках. Чтобы получить подстроку до первой точки, применим регулярное выражение .
Переменные мы настроили, теперь можем использовать их в графиках. Далее разговор пойдет о графике Memory, а с остальными можно работать по такому же принципу. Данные, относящиеся к памяти, находятся в InfluxDB в ряде memory_usage, поэтому запрос будет начинаться с .
Теперь надо добавить фильтры в выражение WHERE. Первым условием будет равенство machine значению переменной host: . В следующем условии container_name должен начинаться со значения переменной container. Здесь мы воспользуемся оператором «начинается с», поскольку отфильтровали переменную container до первой точки: . Последние условие накладывает ограничение на время событий в соответствии с временным интервалом $timeFilter, выбранным в панели инструментов grafana. Запрос теперь выглядит так:
Поскольку нам нужны отдельные строки для разных хостов и контейнеров, необходимо сгруппировать данные на основе значений тегов machine и container_name:
Мы также создали alias для этого запроса: . Здесь $tag_machine будет замещен значением тега machine, а tag_container_name — значением тега container_name. Остальные графики настраиваются похожим образом, меняются только имена рядов (series). Для этих метрик в Grafana можно создать предупреждения. Более подробную информацию о системе предупреждений (Alerting) см. здесь.
Zero-configuration bind mount support
One of the major issues users have today with Docker Desktop – especially in an enterprise environment – is the reliability of Windows file bind mounts. The current implementation relies on Samba Windows service, which may be deactivated, blocked by enterprise GPOs, blocked by 3rd party firewalls etc. Docker Desktop with WSL 2 will solve this whole category of issues by leveraging WSL features for implementing bind mounts of Windows files. It will provide an “it just works” experience, out of the box.
Technical Preview of Docker Desktop for WSL 2
Thanks to our collaboration with Microsoft, we are already hard at work on implementing our vision. We have written core functionalities to deploy an integration package, run the daemon and expose it to Windows processes, with support for bind mounts and port forwarding.
A technical preview of Docker Desktop for WSL 2 will be available for download in July. It will run side by side with the current version of Docker Desktop, so you can continue to work safely on your existing projects. If you are running the latest Windows Insider build, you will be able to experience this first hand. In the coming months, we will add more features until the WSL 2 architecture is used in Docker Desktop for everyone running a compatible version of Windows.
Configure bind propagation
Bind propagation defaults to for both bind mounts and volumes. It is
only configurable for bind mounts, and only on Linux host machines. Bind
propagation is an advanced topic and many users never need to configure it.
Bind propagation refers to whether or not mounts created within a given
bind-mount or named volume can be propagated to replicas of that mount. Consider
a mount point , which is also mounted on . The propagation settings
control whether a mount on would also be available on . Each
propagation setting has a recursive counterpoint. In the case of recursion,
consider that is also mounted as . The propagation settings
control whether and/or would exist.
| Propagation setting | Description |
|---|---|
| Sub-mounts of the original mount are exposed to replica mounts, and sub-mounts of replica mounts are also propagated to the original mount. | |
| similar to a shared mount, but only in one direction. If the original mount exposes a sub-mount, the replica mount can see it. However, if the replica mount exposes a sub-mount, the original mount cannot see it. | |
| The mount is private. Sub-mounts within it are not exposed to replica mounts, and sub-mounts of replica mounts are not exposed to the original mount. | |
| The same as shared, but the propagation also extends to and from mount points nested within any of the original or replica mount points. | |
| The same as slave, but the propagation also extends to and from mount points nested within any of the original or replica mount points. | |
| The default. The same as private, meaning that no mount points anywhere within the original or replica mount points propagate in either direction. |
Before you can set bind propagation on a mount point, the host filesystem needs
to already support bind propagation.
For more information about bind propagation, see the
Linux kernel documentation for shared subtree.
The following example mounts the directory into the container twice,
and the second mount sets both the option and the bind propagation
option.
The and examples have the same result.
Now if you create , also exists.
Choose the -v or —mount flag
Originally, the or flag was used for standalone containers and
the flag was used for swarm services. However, starting with Docker
17.06, you can also use with standalone containers. In general,
is more explicit and verbose. The biggest difference is that the
syntax combines all the options together in one field, while the
syntax separates them. Here is a comparison of the syntax for each flag.
-
or : Consists of three fields, separated by colon characters
(). The fields must be in the correct order, and the meaning of each field
is not immediately obvious.- In the case of bind mounts, the first field is the path to the file or
directory on the host machine. - The second field is the path where the file or directory is mounted in
the container. - The third field is optional, and is a comma-separated list of options, such
as , , , , , and . These options
are discussed below.
- In the case of bind mounts, the first field is the path to the file or
-
: Consists of multiple key-value pairs, separated by commas and each
consisting of a tuple. The syntax is more verbose
than or , but the order of the keys is not significant, and
the value of the flag is easier to understand.- The of the mount, which can be , , or . This
topic discusses bind mounts, so the type is always . - The of the mount. For bind mounts, this is the path to the file
or directory on the Docker daemon host. May be specified as or
. - The takes as its value the path where the file or directory
is mounted in the container. May be specified as , ,
or . - The option, if present, causes the bind mount to be .
- The option, if present, changes the
. May be one of ,
, , , , . - The option, if
present, may be one of , , or . This setting
only applies to Docker Desktop for Mac, and is ignored on all other platforms. - The flag does not support or options for modifying
selinux labels.
- The of the mount, which can be , , or . This
The examples below show both the and syntax where possible, and
is presented first.
Differences between and behavior
Because the and flags have been a part of Docker for a long
time, their behavior cannot be changed. This means that there is one behavior
that is different between and .
If you use or to bind-mount a file or directory that does not
yet exist on the Docker host, creates the endpoint for you. It is
always created as a directory.
If you use to bind-mount a file or directory that does not
yet exist on the Docker host, Docker does not automatically create it for
you, but generates an error.
Good use cases for bind mounts
In general, you should use volumes where possible. Bind mounts are appropriate
for the following types of use case:
-
Sharing configuration files from the host machine to containers. This is how
Docker provides DNS resolution to containers by default, by mounting
from the host machine into each container. -
Sharing source code or build artifacts between a development environment on
the Docker host and a container. For instance, you may mount a Maven
directory into a container, and each time you build the Maven project on the
Docker host, the container gets access to the rebuilt artifacts.If you use Docker for development this way, your production Dockerfile would
copy the production-ready artifacts directly into the image, rather than
relying on a bind mount. -
When the file or directory structure of the Docker host is guaranteed to be
consistent with the bind mounts the containers require.
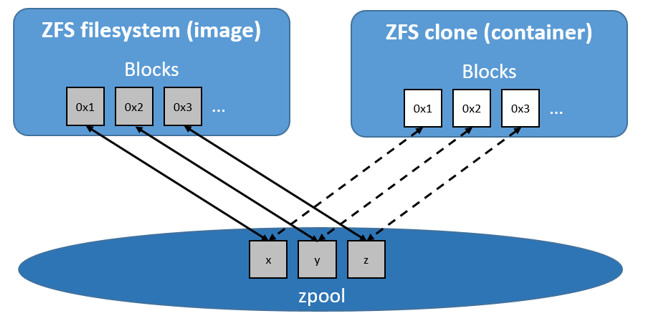
How container reads and writes work with zfs
Reading files
Each container’s writable layer is a ZFS clone which shares all its data with
the dataset it was created from (the snapshots of its parent layers). Read
operations are fasst, even if the data being read is from a deep layer.
This diagram illustrates how block sharing works:
Writing files
Writing a new file: space is allocated on demand from the underlying
and the blocks are written directly into the container’s writable layer.
Modifying an existing file: space is allocated only for the changed blocks,
and those blocks are written into the container’s writable layer using a
copy-on-write (CoW) strategy. This minimizes the size of the layer and increases
write performance.
Deleting a file or directory:
- When you delete a file or directory that exists in a lower layer, the ZFS
driver masks the existence of the file or directory in the container’s
writable layer, even though the file or directory still exists in the lower
read-only layers. - If you create and then delete a file or directory within the container’s
writable layer, the blocks are reclaimed by the .
Windows Server 2016
Windows Server 2016 is the where Docker Windows containers should be deployed for production. For developers planning to do lots of Docker Windows container development, it may also be worth setting up a Windows Server 2016 dev system (in a VM, for example), at least until Windows 10 and Docker for Windows support for Windows containers matures.
For Microsoft Ignite 2016 conference attendees, USB flash drives with Windows Server 2016 preloaded are available at the expo. Not at ignite? Download a free evaluation version and install it on bare metal or in a VM running on Hyper-V, VirtualBox or similar. Running a VM with Windows Server 2016 is also a great way to do Docker Windows container development on macOS and older Windows versions.
Once Windows Server 2016 is running, log in, run Windows Update to ensure you have all the latest updates and install the Windows-native Docker Engine directly (that is, not using “Docker for Windows”). Run the following in an Administrative PowerShell prompt:
Docker Engine is now running as a Windows service, listening on the default Docker named pipe. For development VMs running (for example) in a Hyper-V VM on Windows 10, it might be advantageous to make the Docker Engine running in the Windows Server 2016 VM available to the Windows 10 host:
The Windows Server 2016 Docker engine can now be used from the VM host by setting :
$env:DOCKER_HOST = "<ip-address-of-vm>:2375"
See the Microsoft documentation for more comprehensive instructions.
Configure Docker to use the btrfs storage driver
This procedure is essentially identical on SLES and Ubuntu.
-
Stop Docker.
-
Copy the contents of to a backup location, then empty
the contents of : -
Format your dedicated block device or devices as a Btrfs filesystem. This
example assumes that you are using two block devices called and
. Double-check the block device names because this is a
destructive operation.There are many more options for Btrfs, including striping and RAID. See the
Btrfs documentation. -
Mount the new Btrfs filesystem on the mount point. You
can specify any of the block devices used to create the Btrfs filesystem.Don’t forget to make the change permanent across reboots by adding an
entry to . -
Copy the contents of to .
-
Configure Docker to use the storage driver. This is required even
though is now using a Btrfs filesystem.
Edit or create the file . If it is a new file, add
the following contents. If it is an existing file, add the key and value
only, being careful to end the line with a comma if it is not the final
line before an ending curly bracket ().See all storage options for each storage driver in the
-
Start Docker. After it is running, verify that is being used as the
storage driver. -
When you are ready, remove the directory.
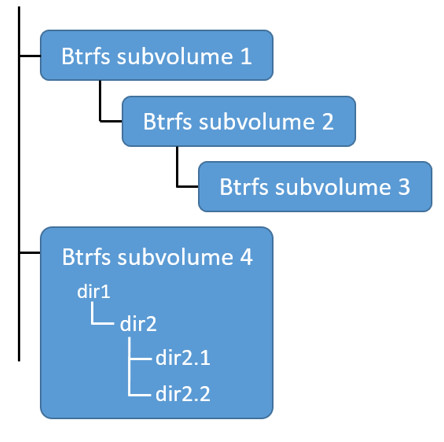
How the btrfs storage driver works
The storage driver works differently from or other
storage drivers in that your entire directory is stored on a
Btrfs volume.
Image and container layers on-disk
Information about image layers and writable container layers is stored in
. This subdirectory contains one directory
per image or container layer, with the unified filesystem built from a layer
plus all its parent layers. Subvolumes are natively copy-on-write and have space
allocated to them on-demand from an underlying storage pool. They can also be
nested and snapshotted. The diagram below shows 4 subvolumes. ‘Subvolume 2’ and
‘Subvolume 3’ are nested, whereas ‘Subvolume 4’ shows its own internal directory
tree.
Only the base layer of an image is stored as a true subvolume. All the other
layers are stored as snapshots, which only contain the differences introduced
in that layer. You can create snapshots of snapshots as shown in the diagram
below.
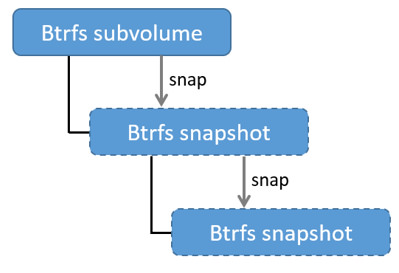
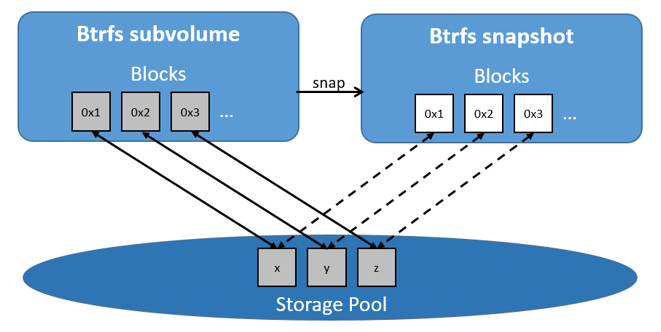
On disk, snapshots look and feel just like subvolumes, but in reality they are
much smaller and more space-efficient. Copy-on-write is used to maximize storage
efficiency and minimize layer size, and writes in the container’s writable layer
are managed at the block level. The following image shows a subvolume and its
snapshot sharing data.
For maximum efficiency, when a container needs more space, it is allocated in
chunks of roughly 1 GB in size.
Docker’s storage driver stores every image layer and container in its
own Btrfs subvolume or snapshot. The base layer of an image is stored as a
subvolume whereas child image layers and containers are stored as snapshots.
This is shown in the diagram below.
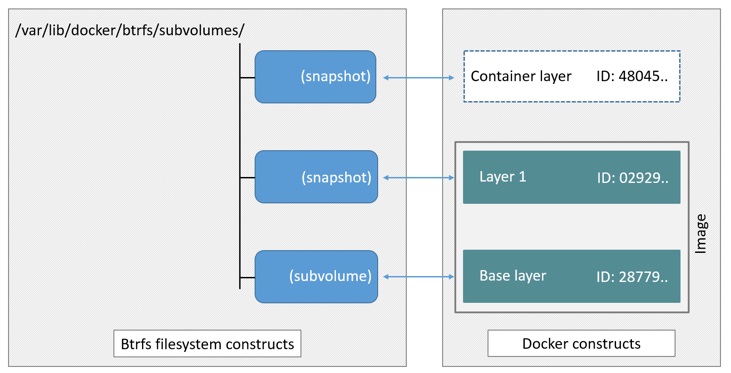
The high level process for creating images and containers on Docker hosts
running the driver is as follows:
-
The image’s base layer is stored in a Btrfs subvolume under
. -
Subsequent image layers are stored as a Btrfs snapshot of the parent
layer’s subvolume or snapshot, but with the changes introduced by this
layer. These differences are stored at the block level. -
The container’s writable layer is a Btrfs snapshot of the final image layer,
with the differences introduced by the running container. These differences
are stored at the block level.