Dockerfile в windowsdockerfile on windows
Содержание:
- Before We Do
- Reduce Image size
- Использование сторонних «Контейнерных» сервисов
- Image creation using a Dockerfile
- But wait, there’s more
- About Jérôme Petazzoni
- Q&A
- Incremental build time
- Emulation
- Docker-as-a-Service
- Немного о docker
- Walkthrough – Extracting All IIS Websites
- Manifest Lists
- Готовы к большему?
- Building the Image with Docker Compose
- Заключение
Before We Do
This is a long, in-depth article. I understand that you might be busy and not looking to learn all there
is to know, but fix your current problem. Here are shorter articles, which will help you make progress as
quickly as possible:
- Understand the difference between ARG and ENV
- Set default ENV values dynamically during the image build
- Use the output of a command during your Docker image build in subsequent steps
- Debug a broken docker-compose service which crashes right away
If you’re kinda new to the topic or not firm in the basics, you might want to invest a bit of time into fixing that. It’s a quick read and you will
have an easier time using Docker.
Reduce Image size
Image size can be important because smaller images equal faster deployments and a smaller attack surface.
Tip #4: Remove unnecessary dependencies
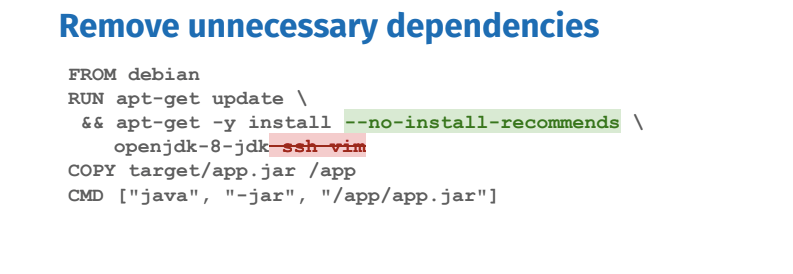
Remove unnecessary dependencies and do not install debugging tools. If needed debugging tools can always be installed later. Certain package managers such as apt, automatically install packages that are recommended by the user-specified package, unnecessarily increasing the footprint. Apt has the –no-install-recommends flag which ensures that dependencies that were not actually needed are not installed. If they are needed, add them explicitly.
Tip #5: Remove package manager cache
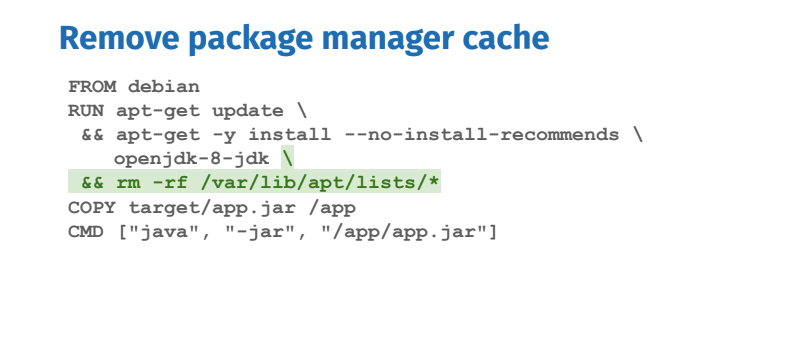
Package managers maintain their own cache which may end up in the image. One way to deal with it is to remove the cache in the same RUN instruction that installed packages. Removing it in another RUN instruction would not reduce the image size.
There are further ways to reduce image size such as multi-stage builds which will be covered at the end of this blog post. The next set of best practices will look at how we can optimize for maintainability, security, and repeatability of the Dockerfile.
Использование сторонних «Контейнерных» сервисов
Контейнерная версия Microblog выглядит неплохо, но я пока еще не очень много думал о хранении. Проблема в том, что я не задал переменную среды , и приложение использует базу данных SQLite по умолчанию, которая поддерживается файлом на диске. Как вы думаете, что произойдет с этим SQLite-файлом, когда вы остановите и удалите контейнер? Файл исчезнет!
Файловая система в контейнере является эфемерной, то есть она исчезает вместе с остановкой контейнера. Вы можете записывать данные в файловую систему, и данные будут доступны, если контейнер должен ее прочитать, но если по какой-либо причине вам нужно переработать контейнер и заменить его новым, любые данные, сохраненные приложением на диск будет потеряны навсегда.
Хорошей стратегией проектирования для приложения-контейнера является создание контейнеров приложения не зависящих от состояния (stateless). Если у вас есть контейнер, который имеет код приложения и не имеет данных, вы можете выбросить его и заменить новым без каких-либо проблем, контейнер становится действительно одноразовым, что является большим достижением с точки зрения упрощения развертывания обновлений.
Но, конечно, это означает, что данные должны быть помещены где-то за пределами контейнера приложения. Именно здесь вступает в игру фантастическая экосистема Docker. Реестр контейнеров Docker содержит большое разнообразие образов контейнеров. Я уже рассказал вам об образе контейнера Python, который я использую в качестве базового образа для своего контейнера Микроблога. Кроме того, Docker поддерживает образы для многих других языков, баз данных и других служб в реестре Docker, и если этого недостаточно, реестр также позволяет компаниям публиковать образы контейнеров для своих продуктов, а также обычным пользователям, таким как вы или я, публиковать свои собственные образы. Это означает, что усилия по установке сторонних служб сводятся к поиску соответствующего образа в реестре и запуску его с помощью команды с соответствующими аргументами.
Итак, теперь я создам два дополнительных контейнера: один для базы данных MySQL и еще один для службы Elasticsearch, а затем я выполню длиннющую командную строку, которая запустит контейнер Microblog с кучей параметров, которые разрешат мне доступ к этим двум новым контейнерам.
Image creation using a Dockerfile
Instead of creating a static binary image, we can use a file called a Dockerfile to create an image. The final result is essentially the same, but with a Dockerfile we are supplying the instructions for building the image, rather than just the raw binary files. This is useful because it becomes much easier to manage changes, especially as your images get bigger and more complex.
For example, if a new version of figlet is released we would either have to re-create our image from scratch, or run our image and upgrade the installed version of figlet. In contrast, a Dockerfile would include the commands we used to install figlet so that we — or anybody using the Dockerfile — could simply recompose the image using those instructions.
It is kind of like the old adage:
Ok, maybe that’s a bit of a stretch but Dockerfiles are powerful because they allow us to manage how an image is built, rather than just managing binaries. In practice, Dockerfiles can be managed the same way you might manage source code: they are simply text files so almost any version control system can be used to manage Dockerfiles over time.
We will use a simple example in this section and build a “hello world” application in Node.js. Do not be concerned if you are not familiar with Node.js: Docker (and this exercise) does not require you to know all these details.
We will start by creating a file in which we retrieve the hostname and display it.
NOTE: You should be at the Docker host’s command line (). If you see a command line that looks similar to then you are probably still inside your ubuntu container from the previous exercise. Type to return to the host command line.
Type the following content into a file named index.js. You can use vi, vim or several other Linux editors in this exercise. If you need assistance with the Linux editor commands to do this follow this footnote.
The file we just created is the javascript code for our server. As you can probably guess, Node.js will simply print out a “hello” message. We will Docker-ize this application by creating a Dockerfile. We will use alpine as the base OS image, add a Node.js runtime and then copy our source code in to the container. We will also specify the default command to be run upon container creation.
Create a file named Dockerfile and copy the following content into it. Again, help creating this file with Linux editors is here .
Let’s build our first image out of this Dockerfile and name it hello:v0.1:
This is what you just completed:
We then start a container to check that our applications runs correctly:
You should then have an output similar to the following one (the ID will be different though).
What just happened?
We created two files: our application code (index.js) is a simple bit of javascript code that prints out a message. And the Dockerfile is the instructions for Docker engine to create our custom container. This Dockerfile does the following:
- Specifies a base image to pull FROM — the alpine image we used in earlier labs.
- Then it RUNs two commands (apk update and apk add) inside that container which installs the Node.js server.
- Then we told it to COPY files from our working directory in to the container. The only file we have right now is our index.js.
- Next we specify the WORKDIR — the directory the container should use when it starts up
- And finally, we gave our container a command (CMD) to run when the container starts.
Recall that in previous labs we put commands like on the command line. With a Dockerfile we can specify precise commands to run for everyone who uses this container. Other users do not have to build the container themselves once you push your container up to a repository (which we will cover later) or even know what commands are used. The Dockerfile allows us to specify how to build a container so that we can repeat those steps precisely everytime and we can specify what the container should do when it runs. There are actually multiple methods for specifying the commands and accepting parameters a container will use, but for now it is enough to know that you have the tools to create some pretty powerful containers.
But wait, there’s more
When working with docker-compose, you have one more way to use variables.
You can do string substitution inside of the docker-compose file.
Neat-o, but also a bit confusing, when you don’t have an overview.
This one has nothing to do with ENV, ARG, or anything Docker-specifig explained above. It’s exclusively a docker-compose thing.
It’s also known as the .
An .env file resides in the same folder as your docker-compose.yml file. It’s the same folder from which you run the docker-compose commands.
It contains values like:
(.env file:)
which is exactly the same format as an env_file.
Those values don’t get injected into container environments. They are however available inside the docker-compose.yml file. They are used to substitute strings in the format of ${some_name} or $some_name. That’s it.
Of course, we can use this to pass values into args, or environments, to name your images, and many more. Basically, you can think of your docker-compose.yml file as a template, from which a temporary docker-compose.yml file is created and used with the values from the .env file.
Llet’s look at an example!
In the case below, we simply set an environment variable of the future container, based on the value we got from the .env file. Just putting it directly into the docker-compose.yml file. Think string replacement.
(docker-compose.yml file:)
Hint:
When working with an .env file, you can debug your docker-compose.yml files quite easily.
Just type docker-compose config. This way you’ll see if everything looks after the substitution step.
About Jérôme Petazzoni
Jérôme is a senior engineer at dotCloud, where he rotates between Ops, Support and Evangelist duties and has earned the nickname of “master Yoda”. In a previous life he built and operated large scale Xen hosting back when EC2 was just the name of a plane, supervized the deployment of fiber interconnects through the French subway, built a specialized GIS to visualize fiber infrastructure, specialized in commando deployments of large-scale computer systems in bandwidth-constrained environments such as conference centers, and various other feats of technical wizardry. He cares for the servers powering dotCloud, helps our users feel at home on the platform, and documents the many ways to use dotCloud in articles, tutorials and sample applications. He’s also an avid dotCloud power user who has deployed just about anything on dotCloud – look for one of his many custom services on our Github repository.
Connect with Jérôme on Twitter! @jpetazzo
Q&A
Can these containers be hosted on a Linux host?
No. Docker containers use the underlying operating system kernel to run processes, so you can’t mix and match kernels. You can only run Windows Docker images on Windows, and Linux Docker images on Linux.
However, with an upcoming release to the Windows network stack, you will be able to run a hybrid Docker Swarm – a single cluster containing a mixture of Linux and Windows hosts. Then you can run distributed apps with Linux containers and Windows containers communicating in the same Docker Swarm, using Docker’s networking layer.
Is this only for ASP.NET Core apps?
No. You can package pretty much any Windows application into a Docker image, provided it can be installed and run without a UI.
The first demo in the Webinar showed an ASP.NET Core app running in Docker. The advantage with .NET Core is that it’s cross-platform so the same app can run in Linux or Windows containers, and on Windows you can use the lightweight Nano Server option.
In the second demo we showed ASP.NET WebForms and ASP.NET MVC apps running in Docker. Full .NET Framework apps need to use the WIndows Server Core base image, but that gives you access to the whole feature set of Windows Server 2016.
If you have existing ASP.NET applications running in VMs, you can use the Image2Docker tool to port them across to Docker images. Image2Docker works on any Windows Server VM, from Server 2003 to Server 2016.

How does licensing work?
For production, licensing is at the host level, i.e. each machine or VM which is running Docker. Your Windows licence on the host allows you to run any number of Windows Docker containers on that host. With Windows Server 2016 you get the commercially supported version of Docker included in the licence costs, with support from Microsoft and Docker, Inc.
For development, Docker for Windows runs on Windows 10 and is free, open-source software. Docker for Windows can also run a Linux VM on your machine, so you can use both Linux and Windows containers in development. Like the server version, your Windows 10 licence allows you to run any number of Windows Docker containers.
Windows admins will want a unified platform for managing images and containers. That’s Docker Datacenter which is separately licensed, and will be available for Windows soon.
What about Windows updates for the containers?
Docker containers have a different life cycle from full VMs or bare-metal servers. You wouldn’t deploy an app update or a Windows update inside a running container – instead you update the image that packages your app, then just kill the container and start a new container from the updated image.
Microsoft are supporting that workflow with the two Windows base images on Docker Hub – for Windows Server Core and Nano Server. They are following a monthly release cycle, and each release adds an incremental update with new patches and security updates.
For your own applications, you would aim to have the same deployment schedule – after a new release of the Windows base image, you would rebuild your application images and deploy new containers. All this can be automated, so it’s much faster and more reliable than manual patching. Docker Captain Stefan Scherer has a great blog post on keeping your Windows containers up to date.
Incremental build time
In a development cycle, when building a Docker image, making code changes, then rebuilding, it is important to leverage caching. Caching helps to avoid running build steps again when they don’t need to.
Tip #1: Order matters for caching
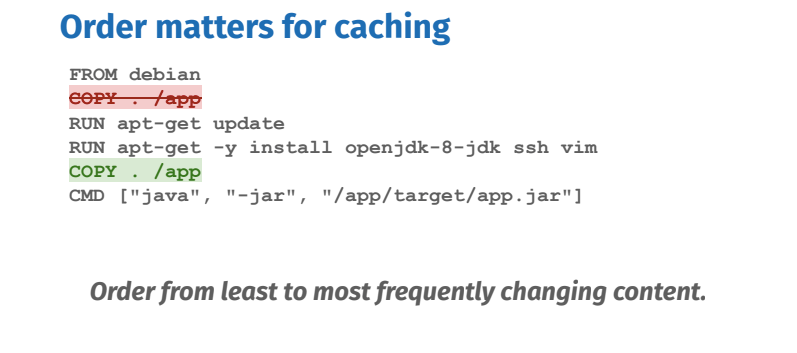
However, the order of the build steps (Dockerfile instructions) matters, because when a step’s cache is invalidated by changing files or modifying lines in the Dockerfile, subsequent steps of their cache will break. Order your steps from least to most frequently changing steps to optimize caching.
Tip #2: More specific COPY to limit cache busts

Only copy what’s needed. If possible, avoid “COPY .” When copying files into your image, make sure you are very specific about what you want to copy. Any changes to the files being copied will break the cache. In the example above, only the pre-built jar application is needed inside the image, so only copy that. That way unrelated file changes will not affect the cache.
Tip #3: Identify cacheable units such as apt-get update & install
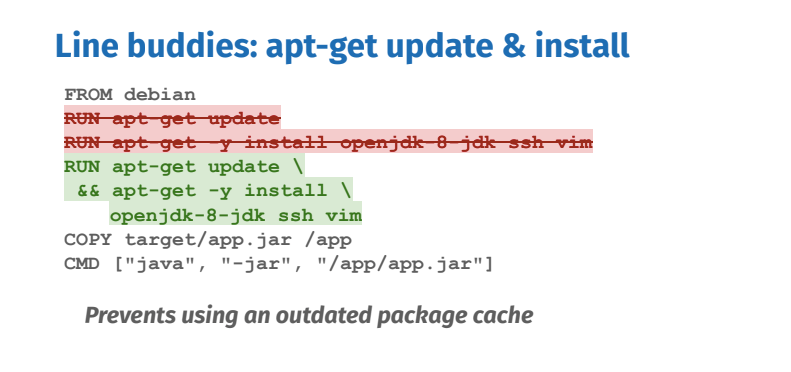
Each RUN instruction can be seen as a cacheable unit of execution. Too many of them can be unnecessary, while chaining all commands into one RUN instruction can bust the cache easily, hurting the development cycle. When installing packages from package managers, you always want to update the index and install packages in the same RUN: they form together one cacheable unit. Otherwise you risk installing outdated packages.
Emulation
Let’s start by looking at the first option, emulation. There’s a fantastic project called QEMU that can emulate a whole bunch of platforms. With the recent buildx work, it’s easier than ever to use QEMU with Docker.
The QEMU integration relies on a Linux kernel feature with the slightly cryptic name of the binfmt_misc handler. When Linux encounters an executable file format it doesn’t recognise (i.e. one for a different architecture), it will check with the handler if there any “user space applications” configured to deal with the format (i.e. an emulator or VM). If there are, it will pass the executable to the application.
For this to work, we need to register the platforms we’re interested in with the kernel. If you’re using Docker Desktop this will already have been done for you for the most common platforms. If you’re using Linux, you can register handlers in the same way as Docker Desktop by running the latest image e.g:
docker run --privileged --rm docker/binfmt:a7996909642ee92942dcd6cff44b9b95f08dad64
You may need to restart Docker after doing this. If you’d like a little more control over which platforms you want to register or want to use a more esoteric platform (e.g. PowerPC) take a look at the qus project.
There’s a couple of different ways to use buildx, but the easiest is probably to enable experimental features on the Docker CLI if you haven’t already – just edit to include the following:
{
    ...
     "experimental": “enabled”
}
You should now be able to run and you should get output similar to the following:
$ docker buildx ls
NAME/NODE     DRIVER/ENDPOINT             STATUS   PLATFORMS
default       docker
  default     default                     running  linux/amd64, linux/arm64, linux/riscv64, linux/ppc64le, linux/s390x, linux/386, linux/arm/v7, linux/arm/v6
Let’s try building an image for another platform. Start with this Dockerfile:
FROM debian:buster

CMD uname -m
If we build it normally and run it:
$ docker buildx build -t local-build .
…
$ docker run --rm local-build
x86_64
But if we explicitly name a platform to build for:
$ docker buildx build --platform linux/arm/v7 -t arm-build .
…
$ docker run --rm arm-build
armv7l
Success! We’ve managed to build and run an armv7 image on an x86_64 laptop with little work. This technique is effective, but for more complex builds you may find it runs too slowly or you hit bugs in QEMU. In those cases, it’s worth looking into whether or not you can cross-compile your image.
Docker-as-a-Service
If you just want to experiment with Docker-in-Docker, just start the image interactively, as shown above. Now, let’s pretend that you want to provide Docker-as-a-Service. I’m not speaking about Containers-as-a-Service here, but whole Docker instances. Well, each time someone wants their own private Docker instance, just run this:
docker run -privileged -d -p 1234 -e PORT=1234 jpetazzo/dind
Then use to retrieve the public port allocated to that container, and give it to your user. They will be able to create containers on this “private Docker” by pointing their Docker client to the IP address and port that you gave them. (See Memcached-as-a-Service for a similar example.)
Note, however, that there are serious security implications there: since the private Docker instances run in privileged mode, they can easily escalate to the host, and you probably don’t want this! If you really want to run something like this and expose it to the public, you will have to fine-tune the LXC template file, to restrict the capabilities and devices available to the Docker instances. In the future, Docker will allow fine-grained permission management; but for now, we think that the ability to switch between “locked down” and “privileged” is a great first step.
Немного о docker
Для наглядности дальнейшего изложения необходимо привести описание некоторых компонент docker.
Image
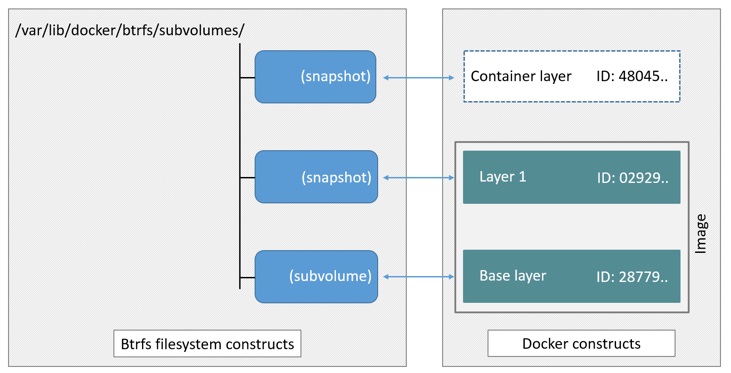
это шаблон только для чтения с инструкциями по созданию контейнера. Для того, чтобы собрать image необходимо создать Dockerfile, в котором описываются все шаги сборки. Каждый такой шаг создает отдельный слой внутри image. Каждый последующий слой накладывается поверх всех предыдущих и содержит лишь изменения, которые необходимо внести в предшествующий слой.
Например, для Dockerfile:
docker-образ будет иметь следующую структуру:
Слои внутри image кешируются и могут быть переиспользованы, если никаких изменений не обнаружено. Если слой , то все последующие создаются с нуля. Для внесения изменений в образ контейнера (и соответственно в окружение запускаемого процесса) достаточно поправить Dockerfile и запустить сборку образа.
Контейнер
— это запускаемый экземпляр image. Его можно создать, запустить, остановить, удалить и пр. По умолчанию, контейнеры изолированы друг от друга и хост-системы. При старте контейнер запускает команду, которая может быть указана в или , и останавливается при ее завершении. Допустимой является ситуация, когда присутствуют и CMD и ENTRYPOINT, как они взаимодействуют .
При создании каждого контейнера добавляется новый слой поверх всех существующих. Он доступен для записи в текущем контейнере, и уничтожается вместе с контейнером. Все операции записи, создания новых файлов при работе контейнера применяются к этому слою, image всегда остается неизменным. Таким образом структура слоев созданного контейнера будет иметь вид:
При использовании команды каждый раз будет контейнер, со своим слоем для записи. В задачах сборки это означает, что при каждом запуске будет создавать новое чистое окружение, которое никак не связано с предыдущими выполнениями. Список созданных контейнеров можно посмотреть, выполнив команду: .
Walkthrough – Extracting All IIS Websites
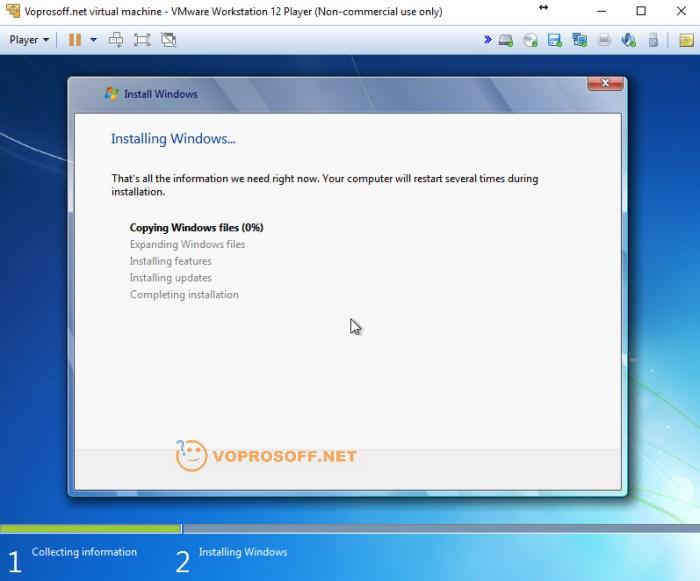
This is a Windows Server 2016 VM with five websites configured in IIS, all using different ports:

Image2Docker also supports Windows Server 2012, with support for 2008 and 2003 on its way. The websites on this VM are a mixture of technologies – ASP.NET WebForms, ASP.NET MVC, ASP.NET WebApi, together with a static HTML website.
I took a copy of the VHD, and ran Image2Docker to generate a Dockerfile for all the IIS websites:
ConvertTo-Dockerfile -ImagePath C:\i2d2\win-2016-iis.vhd -Artifact IIS -Verbose -OutputPath c:\i2d2\iis
In verbose mode there’s a whole lot of output, but here are some of the key lines – where Image2Docker has found IIS and ASP.NET, and is extracting website details:
VERBOSE: IIS service is present on the system
VERBOSE: ASP.NET is present on the system
VERBOSE: Finished discovering IIS artifact
VERBOSE: Generating Dockerfile based on discovered artifacts in
:C:\Users\elton\AppData\Local\Temp\49865115-6dbb-40e8-b88a-c0142922d954-mount
VERBOSE: Generating result for IIS component
VERBOSE: Copying IIS configuration files
VERBOSE: Writing instruction to install IIS
VERBOSE: Writing instruction to install ASP.NET
VERBOSE: Copying website files from
C:\Users\elton\AppData\Local\Temp\49865115-6dbb-40e8-b88a-c0142922d954-mount\websites\aspnet-mvc to
C:\i2d2\iis
VERBOSE: Writing instruction to copy files for aspnet-mvc site
VERBOSE: Writing instruction to create site aspnet-mvc
VERBOSE: Writing instruction to expose port for site aspnet-mvc
When it completes, the cmdlet generates a Dockerfile which turns that web server into a Docker image. The Dockerfile has instructions to installs IIS and ASP.NET, copy in the website content, and create the sites in IIS.
Here’s a snippet of the Dockerfile – if you’re not familiar with Dockerfile syntax but you know some PowerShell, then it should be pretty clear what’s happening:
# Install Windows features for IIS
RUN Add-WindowsFeature Web-server, NET-Framework-45-ASPNET, Web-Asp-Net45
RUN Enable-WindowsOptionalFeature -Online -FeatureName IIS-ApplicationDevelopment,IIS-ASPNET45,IIS-BasicAuthentication...
# Set up website: aspnet-mvc
COPY aspnet-mvc /websites/aspnet-mvc
RUN New-Website -Name 'aspnet-mvc' -PhysicalPath "C:\websites\aspnet-mvc" -Port 8081 -Force
EXPOSE 8081
# Set up website: aspnet-webapi
COPY aspnet-webapi /websites/aspnet-webapi
RUN New-Website -Name 'aspnet-webapi' -PhysicalPath "C:\websites\aspnet-webapi" -Port 8082 -Force
EXPOSE 8082
You can build that Dockerfile into a Docker image, run a container from the image and you’ll have all five websites running in a Docker container on Windows. But that’s not the best use of Docker.
When you run applications in containers, each container should have a single responsibility – that makes it easier to deploy, manage, scale and upgrade your applications independently. Image2Docker support that approach too.
Manifest Lists
In the above advice about emulation, you might have noticed we used the argument to set the build platform, but we left the image specified in the FROM line as . It might seem this doesn’t make sense – surely the platform depends on the base image and how it was built, not what the user decides at a later stage?
What is happening here is Docker is using something called manifest lists. These are lists for a given image that contain pointers to images for different architectures. Because the official debian image has a manifest list defined, when I pull the image on my laptop, I automagically get the amd64 image and when I pull it on my Raspberry Pi, I get the armv7 image.
To keep our users happy, we can create manifest lists for our own images. If we go back to our earlier example, first we need to rebuild and push the images to a repository:
$ docker buildx build --platform linux/arm/v7 -t amouat/arch-test:armv7 .
…
$ docker push amouat/arch-test:armv7
…
$ docker buildx build -t amouat/arch-test:amd64 .
…
$ docker push amouat/arch-test:amd64
Next, we create a manifest list that points to these two separate images and push that:
$ docker manifest create amouat/arch-test:blog amouat/arch-test:amd64 amouat/arch-test:armv7
Created manifest list docker.io/amouat/arch-test:blog
$ docker manifest push amouat/arch-test:blog
sha256:039dd768fc0758fbe82e3296d40b45f71fd69768f21bb9e0da02d0fb28c67648
Now Docker will pull and run the appropriate image for the current platform:
$ docker run amouat/arch-test:blog
Unable to find image 'amouat/arch-test:blog' locally
blog: Pulling from amouat/arch-test
Digest: sha256:039dd768fc0758fbe82e3296d40b45f71fd69768f21bb9e0da02d0fb28c67648
Status: Downloaded newer image for amouat/arch-test:blog
x86_64
Somebody with a Raspberry Pi to hand can try running the image and confirm that it does indeed work on that platform as well!
To recap; not all users of Docker images run amd64. With buildx and QEMU, it’s possible to support these users with a small amount of extra work.
Happy Birthday, Docker!
Готовы к большему?
В следующем примере представлены ещё несколько Docker-инструкций:
В Docker-файле вы можете добавлять комментарии. Комментарии начинаются со знака .
Обычно установка пакетов — приоритетная задача для Docker’а. Как говорилось ранее, есть несколько способов загрузки пакетов при помощи инструкции .
Для Alpine Docker-образа вы используете для типичной Linux-сборки — . Например, пакеты для базового Ubuntu-образа могут быть установлены и обновлены так: .
В дополнение к и , Python-пакеты могут быть установлены через pip, wheel и conda. Методы варьируются в зависимости от языка.
Нижележащие слои должны предоставить свое средство установки и управления пакетами. Если возникнет проблема с установкой пакетов, убедитесь, что у вас установлен менеджер пакетов.
Можно использовать вместе с pip и списком нужных пакетов. Для этого объедините команды установки пакетов в одну инструкцию и разделите их символом продолжения строки (). Этот метод позволяет улучшить читаемость и уменьшить количество слоев (из-за отсутствия возможности использовать несколько инструкций).
Также вы можете запустить установщик, указав ему файл, содержащий все зависимости для вашего образа. Обычно он называется requirements.txt.
WORKDIR
Меняет текущую рабочую директорию в контейнере для инструкций: , , и .
Несколько замечаний:
- Предпочтительно задать абсолютный путь с помощью WORKDIR, а не перемещаться по файловой системе с помощью команд в Docker-файле;
- автоматически создаёт директорию, если её ещё нет;
- Можно использовать несколько -инструкций. Если используются относительные пути — каждая инструкция поменяет рабочую директорию.
ARG
Определяет переменную для передачи из командной строки в образ. Для можно указать значение по умолчанию: .
В отличие от -переменных, -переменные не доступны для запущенных контейнеров. Однако вы можете использовать их для установки дефолтных значений для -переменных, когда вы создаёте образ. И затем ENV-переменные сохраняются. Больше про это вы найдёте здесь.
ENTRYPOINT
тоже позволяет вам задавать дефолтные команды и аргументы во время запуска контейнера. Она похожа на , но параметры не переопределяются, если контейнер запущен с параметрами командной строки.
Вместо этого аргументы командной строки, передаваемые , добавляются к аргументам инструкции . Например, добавляет аргумент в конец, ко всем другим аргументам .
Docker-файл обязательно должен содержать либо -инструкцию, либо -инструкцию.
В есть несколько советов, которые помогут сделать выбор между и для начальной команды:
- Если вам нужно запускать одну и туже команду несколько раз, выбирайте ;
- Используйте , когда ваш контейнер выступает в роли исполняющейся программы;
- При наличии дополнительных дефолтных аргументов, которые могут быть изменены через командную строку, лучше подойдёт .
В примере выше, запускает в контейнере Python-скрипт с аргументом . Затем переменная может быть использована в argparse. Заметьте, у есть дефолтное значение, ранее установленное в Docker-файле при помощи . Так что, если аргумент не будет задан через командную строку, возьмётся его значение по умолчанию.
Как правило, Docker рекомендует вам использовать исполняемую форму с JSON-синтаксисом .
EXPOSE
Инструкция показывает, какой порт пробрасывать из контейнера.
Используйте команду с флагом для пробрасывания и сопоставления нескольких портов во время запуска. Флаг в верхнем регистре будет пробрасывать все открытые порты.
Building the Image with Docker Compose
So, how does this translate to using docker-compose?
In docker-compose, you can specify values to pass on for ARG, in an args block:
(docker-compose.yml file)
Here’s what happens above: You set variables to be passed to docker when building a new image from “Dockerfile” in directory “./app”
If the Dockerfile contains an ARG entry as above, a_value will be passed into it and available as $some_variable_name.
When building an image, no other variables apart from those listed in “args” are used. Environment stuff only applies to containers, not images. Just a heads-up to prevent confusion. Read on for more info on that. Those ARG variables will not be available in containers started based on the built image without further work.
If you want ARG entries to change and take effect, you need to build a new image. Probably you’ll need to manually delete any old ones.
Заключение
В заключении хотелось бы отметить, что docker является не единственной технологией контейнеризации. Но есть некоторые особенности, которые его выгодно отличают для задач сборки от того же LXC:
- Создать контейнер можно используя текстовый Dockerfile. Это файл с простым синтаксисом, его можно добавить в репозиторий с проектом (как я всегда делаю) и держать постоянно под рукой.
- Каждый раз, запуская контейнер docker командой мы получаем чистую среду, как если бы выполняли все в первый раз. Временные файлы между сборками не сохраняются.
- Контейнер запускет не целую операционную систему, а только необходимый процесс сборки.