How to use your own registry
Содержание:
- Запускаем контейнер через прокси и HTTPS
- Control Container Registry from within GitLab
- Другие варианты
- Pushing and Pulling Images
- Troubleshooting the GitLab Container Registry
- Quickstart
- Example config
- What is a service
- What is a private Docker registry anyway?
- Создание псевдонима образаCreate an alias of the image
- Considerations
Запускаем контейнер через прокси и HTTPS
Версия ASP.NET Core 2.1 принесла с собой улучшения поддержки HTTPS.
Скажем, следующий middleware позволяет совершать редирект с незащищенного соединения на защищенное:
А следующий позволяет использовать HTTP Strict Transport Security Protocol – HSTS.
HSTS — это фича из протокола HTTP/2, спецификация которого была выпущена в 2015-ом году. Этот функционал поддерживается современными браузерами и информирует о том, что вебсайт использует только https. Таким образом происходит защита от downgrade атаки, во время которой атакующий может с помощью перехода на незащищенный протокол http каким-либо образом воспользоваться ситуацией. Например, понизить версию TLS или даже подменить сертификат.
Как правило, данный вид атак используется совместно с man-in-the-middle атаками. Следует знать и помнить о том, что HSTS не спасает от ситуации, когда пользователь заходит на сайт по протоколу http и потом редиректится на https. Существует так называемый Chrome preload list, который содержит ссылки на сайты поддерживающие https. Другие браузеры (Firefox, Opera, Safari, Edge) также поддерживают списки https сайтов, созданные на базе списка Chrome. Но во всех этих списках содержатся далеко не все сайты.
При первом запуске какого-либо Core приложения на Windows вы получите сообщение о том, что был создан и установлен сертификат разработчика. Кликнув кнопку и установив сертификат, вы таким образом сделаете его доверенным. С командной строки на macOS добавить доверие сертификату можно с помощью команды:
dotnet dev-certs https –trust
Если утилита dev-certs не установлена, то установить ее можно командой:
Как добавить сертификат в trusted на Linux зависит от дистрибутива.
В тестовых целях используем именно сертификат разработчика. Действия с сертификатом подписанным CA аналогичные. При желании можно использовать и бесплатные сертификаты LetsEncrypt
Экспортировать сертификат разработчика в файл можно с помощью команды
Файл необходимо скопировать в директорию %APPDATA%/ASP.NET/Https/ под Windows или же в /root/.aspnet/https/ под macOS/Linux.
Для того, чтобы контейнер подцепил путь к сертификату и его пароль необходимо создать User secrets со следующим содержимым:
Этот файл хранит незашифрованные данные и потому используется только при разработке. Создается файл в Visual Studio через вызов контекстного меню на иконке проекта или с помощью утилиты user-secrets на Linux.
На Windows файл будет сохранен в директории %APPDATA%\Microsoft\UserSecrets\<user_secrets_id>\secrets.json, а на macOS и Linux он сохранится в ~/.microsoft/usersecrets/<user_secrets_id>/secrets.json
Для сохранения настроек на продакшн некоторые дистрибутивы Linux могут использовать systemd Настройки сохраняются под атрибутом Service. Например, так:
Далее приведу и разберу сразу рабочий вариант конфигурации докера для прокси и контейнера через https.
Файл docker-compose:
Теперь опишу непонятные моменты. ASPNETCORE_URLS позволяет нам не указывать в коде приложения с помощью app.UseUrl прослушиваемый приложением порт.
ASPNETCORE_HTTPS_PORT делает редирект аналогичный тому, какой бы сделал следующий код:
services.AddHttpsRedirection(options => options.HttpsPort = 44392)
То есть трафик с http запросов будет перенаправлен на определенный порт https запросов.
С помощью ports указывается, что запрос с внешнего 59404-ого порта будет перенаправлен на 80-ый контейнера, а с 44392-ого внешнего порта на 44392-ой. Теоретически, раз у нас будет настроен реверс прокси-сервер, то ports с этими перенаправлениями мы можем и убрать.
С помощью volumes монтируется директория с pfx сертификатом и UserSecrets приложения с указанием пароля и ссылки на сертификат.
В разделе proxy указывается что запросы с 5001-ого внешнего порта будут перенаправляться на 44392-ой порт nginx. Кроме того, монтируется файл с конфигурацией nginx, а также сертификат и ключ к сертификату.
Для того, чтобы их одного сертификата формата pfx (который у нас уже есть) создать файлы crt и rsa можно воспользоваться OpenSSL. Сначала необходимо извлечь сертификат:
А затем приватный ключ:
Конфигурация nginx следующая:
Прокси сервер прослушивает 44392-ой порт. На этот порт приходят запросы с 5001-ого порта хоста. Далее прокси перенаправляет запросы на 44392-ой порт контейнера dockerdemoservice.
Разобравшись с данными примерами, вы получите хороший бэкграунд для работы с докером, микросервисами и nginx.
Напоминаем, что это полная версия статьи из журнала Хакер. Ее автор — Алексей Соммер.
Control Container Registry from within GitLab
GitLab offers a simple Container Registry management panel. This management panel is available
for both projects and groups.
Control Container Registry for your project
Navigate to your project’sPackages & Registries > Container Registry.

This view allows you to:
- Show all the image repositories that belong to the project.
- Filter image repositories by their name.
- one or more image repository.
- Navigate to the image repository details page.
- Show a Quick start dropdown with the most common commands to log in, build and push
- Show a banner if the optional is enabled for this project.
Control Container Registry for your group
Navigate to your group’sPackages & Registries > Container Registry.

This view allows you to:
- Show all the image repositories of the projects that belong to this group.
- one or more image repositories.
- Navigate to a specific image repository details page.
Image Repository details page
Clicking on the name of any image repository navigates to the details.

Note:
The following page has the same functionalities both in the Group level container registry
and in the Project level container registry.
This view:
- Shows all the image repository details.
- Shows all the tags of the image repository.
- Allows you to quickly copy the tag path (by clicking on the clipboard button near the tag name).
- Allows you to .
Другие варианты
- Rancher — платформа управления контейнерами, обладающая функциями оркестровки и поддержкой Kubernetes. Open Source (Apache License 2.0); работает в Linux; написана на Java. Имеет веб-интерфейс Rancher UI на Node.js.
- Kontena — «дружелюбная к разработчикам платформа для запуска контейнеров в production», по существу конкурирующая с Kubernetes, но позиционируемая как более готовое «из коробки» и простое в использовании решение. Помимо CLI и REST API проект предлагает веб-интерфейс (скриншот) для управления кластером и его оркестровкой (включая работу с узлами кластера, сервисами, томами, секретами), просмотра статистики/логов. Open Source (Apache License 2.0); работает в Linux, Mac OS X, Windows; написана на Ruby.
- Data Pulley — простая утилита, имеющая минимум функций и документации. Open Source (MIT License); работает в Linux (имеется только пакет для Ubuntu); написана на Python. Поддерживает Docker Hub для образов, просмотр логов для контейнеров.
- Panamax — проект, задававшийся целью «сделать деплой сложных контейнеризированных приложений таким простым, как drag-n-drop». Для этого был создан свой каталог шаблонов для деплоя приложений (Panamax Public Templates), результаты из которого показываются при поиске образов/приложений наравне с данными из Docker Hub. Open Source (Apache License 2.0); работает в Linux, Mac OS X, Windows; написан на Ruby. Интегрирован с ОС CoreOS и системой для оркестровки Fleet. Судя по видимой в интернете активности, перестал поддерживаться в 2015 году.
- Dockly — консольный графический интерфейс для управления контейнерами и образами Docker. Open Source (MIT License); написан на JavaScript/Node.js.
Pushing and Pulling Images
We now need to set up a repository to hold an image. This is a little bit different than Docker Hub which automatically creates a repository if one doesn’t exist when you do a
docker push. To create the repository, point your browser to https://<Your DTR hostname> and
then sign-in with your admin credentials when prompted. If you added a license to UCP, that
license will automatically have been picked up by DTR. If not, make certain you upload
your license now.
Once you’re in, click on the ‘New Repository` button and create a new repository.
We’ll create a repo to hold Alpine linux, so type `alpine` in the name field, and click
`Save` (it’s labelled `Create` in DTR 2.5 and newer).
Now let’s go back to our shell and type the commands:
# Pull the latest version of Alpine Linux
docker pull alpine:latest
# Sign in to your new DTR instance
docker login <Your DTR hostname>
# Tag Alpine to be able to push it to your DTR
docker tag alpine:latest <Your DTR hostname>/admin/alpine:latest
# Push the image to DTR
docker push <Your DTR hostname>/admin/alpine:latest
And that’s it! We just pulled a copy of the latest Alpine Linux, re-tagged it so that we could store it inside of DTR, and then pushed it to our private registry. If you want to pull that image to a different Docker engine, set up your DTR certs as shown above, and issue the command:
# Pull the image from DTR
docker pull <Your DTR hostname>/admin/alpine:latest
DTR has a lot of great image management features built right in such as image caching, mirroring, scanning, signing, and even automated supply chain policies. We’ll leave these to future blog posts which we can explore in more detail.
Step-by-step instructions on how to setup and use your own private registry with #Docker Enterprise Edition
To learn more about Docker Enterprise Edition:
- Visit the website and view pricing
- Read more about Docker EE customers and the benefits they’re seeing
- Don’t have time to install and configure Docker EE? Register for the free hosted trial to test drive Docker EE in just a few minutes
Troubleshooting the GitLab Container Registry
Docker connection error
A Docker connection error can occur when there are special characters in either the group,
project or branch name. Special characters can include:
- Leading underscore
- Trailing hyphen/dash
To get around this, you can ,
or change the branch
name.
Troubleshoot as a GitLab server admin
Troubleshooting the GitLab Container Registry, most of the times, requires
administrator access to the GitLab server.
Unable to change path or transfer a project
If you try to change a project’s path or transfer a project to a new namespace,
you may receive one of the following errors:
- “Project cannot be transferred, because tags are present in its container registry.”
- “Namespace cannot be moved because at least one project has tags in container registry.”
This issue occurs when the project has images in the Container Registry.
You must delete or move these images before you can change the path or transfer
the project.
The following procedure uses these sample project names:
- For the current project:
- For the new project:
Use your own URLs to complete the following steps:
-
Download the Docker images on your computer:
-
Rename the images to match the new project name:
- Delete the images in both projects by using the or .
There may be a delay while the images are queued and deleted. - Change the path or transfer the project by going to Settings > General
and expanding Advanced. -
Restore the images:
Follow this issue for details.
Quickstart
Docker-Compose (Recommended)
 git clone https://github.com/snagles/docker-registry-manager.git && cd docker-registry-manager
 vim registries.yml # add your registry
 vim docker-compose.yml # Edit application settings e.g log level, port
 docker-compose up -d
 firefox localhost:8080
Environment Options:
- MANAGER_PORT: Port to run on inside the docker container
- MANAGER_REGISTRIES: Registries.yml file location inside the docker container
- MANAGER_LOG_LEVEL: Log level for logs (fatal, panic, error, warn, info, debug)
- MANAGER_ENABLE_HTTPS: true/false for using HTTPS. When using HTTPS the below options must be set
- MANAGER_KEY: key file location inside the docker container
- MANAGER_CERTIFICATE: Certificate location inside the docker container
Helm (Kubernetes)
With a working kubernetes cluster and helm installation, run the following:
 git clone https://github.com/snagles/docker-registry-manager.git && cd docker-registry-manager
 vim helm/values.yaml # configure with your cluster specifics and add registries
 helm install --name docker-registry-manager helm/
Go
   git clone https://github.com/snagles/docker-registry-manager.git && cd docker-registry-manager
   vim registries.yml # add your registry
   cd app && go build . && ./app --port 8080 --log-level warn --registries "../registries.yml"
   firefox localhost:8080
CLI Options
- port, p: Port to run on
- registries, r: Registrys.yml file location
- log-level, l: Log level for logs (fatal, panic, error, warn, info, debug)
- enable-https, e: true/false for using HTTPS. When using HTTPS the below options must be set
- tls-key, k: key file location inside the docker container
- tls-certificate, cert: Certificate location inside the docker container
Dockerfile
   vim registries.yml # add your registry
   docker run --detach --name docker-registry-manager -p 8080:8080 -e MANAGER_PORT=8080 -e MANAGER_REGISTRIES=/app/registries.yml -e MANAGER_LOG_LEVEL=warn docker-registry-manager
   firefox localhost:8080
Environment Options:
- MANAGER_PORT: Port to run on inside the docker container
- MANAGER_REGISTRIES: Registries.yml file location inside the docker container
- MANAGER_LOG_LEVEL: Log level for logs (fatal, panic, error, warn, info, debug)
- MANAGER_ENABLE_HTTPS: true/false for using HTTPS. When using HTTPS the below options must be set
- MANAGER_KEY: key file location inside the docker container
- MANAGER_CERTIFICATE: Certificate location inside the docker container
registries:
  localRegistry:
    displayname: registry.example.com:5000
    url: http://localhost # Example https://localhost, http://remotehost.com
    port: 5000  # Example: 443, 8080, 5000
    username: exampleUser
    password: examplePassword
    refresh-rate: "5m" # Example: 60s, 5m, 1h
    skip-tls-validation: true # REQUIRED for self signed certificates
    dockerhub-integration: true # Optional - compares to dockerhub to determine if image up to date
Example config
common: &common
    standalone: true
    loglevel: info
    search_backend: "_env:SEARCH_BACKEND:"
    sqlalchemy_index_database:
        "_env:SQLALCHEMY_INDEX_DATABASE:sqlite:////tmp/docker-registry.db"

prod:
    <<: *common
    loglevel: warn
    storage: s3
    s3_access_key: _env:AWS_S3_ACCESS_KEY
    s3_secret_key: _env:AWS_S3_SECRET_KEY
    s3_bucket: _env:AWS_S3_BUCKET
    boto_bucket: _env:AWS_S3_BUCKET
    storage_path: /srv/docker
    smtp_host: localhost
    from_addr: docker@myself.com
    to_addr: my@myself.com

dev:
    <<: *common
    loglevel: debug
    storage: local
    storage_path: /home/myself/docker

test:
    <<: *common
    storage: local
    storage_path: /tmp/tmpdockertmp
What is a service
The keyword defines just another Docker image that’s run during
your job and is linked to the Docker image that the keyword defines.
This allows you to access the service image during build time.
The service image can run any application, but the most common use case is to
run a database container, for example, . It’s easier and faster to use an
existing image and run it as an additional container than install every
time the project is built.
You’re not limited to have only database services. You can add as many
services you need to or manually modify .
Any image found at Docker Hub or your private Container Registry can be
used as a service.
Services inherit the same DNS servers, search domains, and additional hosts as
the CI container itself.
You can see some widely used services examples in the relevant documentation of
CI services examples.
How services are linked to the job
To better understand how the container linking works, read
Linking containers together.
To summarize, if you add as service to your application, the image is
then used to create a container that’s linked to the job container.
The service container for MySQL is accessible under the hostname .
So, in order to access your database service you have to connect to the host
named instead of a socket or . Read more in .
How the health check of services works
Services are designed to provide additional functionality which is network accessible.
It may be a database like MySQL, or Redis, and even which
allows you to use Docker in Docker. It can be practically anything that’s
required for the CI/CD job to proceed and is accessed by network.
To make sure this works, the runner:
- Checks which ports are exposed from the container by default.
- Starts a special container that waits for these ports to be accessible.
When the second stage of the check fails, either because there is no opened port in the
service, or the service was not started properly before the timeout and the port is not
responding, it prints the warning: .
In most cases it affects the job, but there may be situations when the job
still succeeds even if that warning was printed. For example:
- The service was started a little after the warning was raised, and the job is
not using the linked service from the beginning. In that case, when the
job needed to access the service, it may have been already there waiting for
connections. - The service container is not providing any networking service, but it’s doing
something with the job’s directory (all services have the job directory mounted
as a volume under ). In that case, the service does its job, and
since the job is not trying to connect to it, it does not fail.
What services are not for
As it was mentioned before, this feature is designed to provide network accessible
services. A database is the simplest example of such a service.
Note:
The services feature is not designed to, and does not add any software from the
defined image(s) to the job’s container.
For example, if you have the following defined in your job, the ,
or commands are not available for your script, and thus
the job fails:
If you need to have , and available for your script, you should
either:
- Choose an existing Docker image that contains all required tools.
- Create your own Docker image, with all the required tools included
and use that in your job.
Accessing the services
Let’s say that you need a WordPress instance to test some API integration with
your application.
You can then use for example the tutum/wordpress image in your
:
If you don’t ,
when the job is run, is started and you have
access to it from your build container under two hostnames to choose from:
Note:
Hostnames with underscores are not RFC valid and may cause problems in 3rd party
applications.
The default aliases for the service’s hostname are created from its image name
following these rules:
- Everything after the colon () is stripped.
- Slash () is replaced with double underscores () and the primary alias
is created. - Slash () is replaced with a single dash () and the secondary alias is
created (requires GitLab Runner v1.1.0 or higher).
To override the default behavior, you can
.
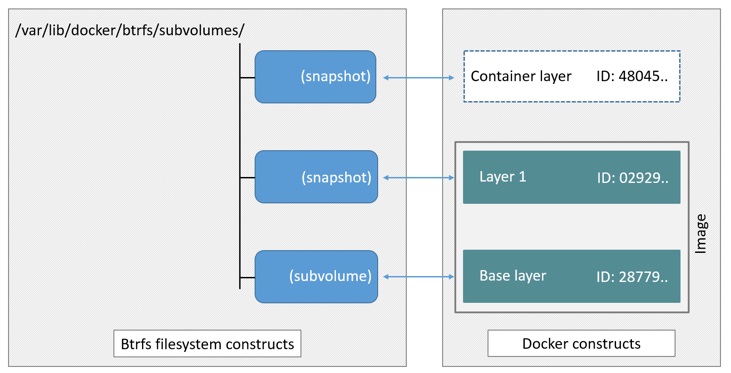
What is a private Docker registry anyway?
After building a Docker image on your machine, it’s possible to run it on the spot.
But if you’re a software provider, what if you want to share the image with the whole world?
Or, what if you want to privately share the image with your team?
A Docker registry is a place where you can store your images i.e. , and let third-parties get them i.e. .
Docker Hub is the default registry.
For example, let’s run:
In a very simplified way, the process goes like this:
- Check if the image is found locally
- If it isn’t, pull it from Docker Hub
- Register it in the local Docker.
The image is now available locally - Run it via the local Docker daemon
Note that while you can pull freely, pushing still requires some kind of authentication.
A registry can be considered private if pulling requires authentication too.
For example, GitLab, a popular Continuous Integration platform,
provides a Docker registry per project among more traditional “build” capabilities,
and it can be configured to be freely accessible or private.
However, GitLab’s registry is a solution that is still a bit rough around the edges.
It’s quite hard to remove images (while it’s possible to untag them though), and
more importantly, using the SaaS version of Gitlab’s registry is an all-or-nothing option:
there’s no way to customize it e.g. integrate it with one’s identity store for authenticated access.
Let’s start from scratch instead, and publish our private registry on Exoscale’s cloud servers.
Создание псевдонима образаCreate an alias of the image
Выполните команду docker tag, чтобы создать псевдоним образа с полным путем к вашему реестру.Use docker tag to create an alias of the image with the fully qualified path to your registry. Чтобы избежать беспорядка в корне реестра, эта команда указывает пространство имен .This example specifies the namespace to avoid clutter in the root of the registry.
Дополнительные сведения о расстановке тегов с помощью пространства имен см. в разделе статьи Рекомендации по использованию реестра контейнеров Azure.For more information about tagging with namespaces, see the section of Best practices for Azure Container Registry.
Considerations
Currently, the queues are inmemory, so endpoints should be reasonably
reliable. They are designed to make a best-effort to send the messages but if
an instance is lost, messages may be dropped. If an endpoint goes down, care
should be taken to ensure that the registry instance is not terminated before
the endpoint comes back up or messages are lost.
This can be mitigated by running endpoints in close proximity to the registry
instances. One could run an endpoint that pages to disk and then forwards a
request to provide better durability.
The notification system is designed around a series of interchangeable sinks
which can be wired up to achieve interesting behavior. If this system doesn’t
provide acceptable guarantees, adding a transactional to the registry
is a possibility, although it may have an effect on request service time.
See the
for more information.
registry, on-prem, images, tags, repository, distribution, notifications, advanced