Как установить jitsi meet в debian / ubuntu
Содержание:
- Getting Started with installing Jitsi Meet on Ubuntu 20.04
- Live Streaming and Recording a Jitsi Conference
- Anyone can mute or kick me out of my meeting, what’s up with that?
- Скайп
- Passo 5 — Bloqueando a Criação de Conferências
- Основные функции Jitsi Meet
- Do you use analytics?
- Шаг 4 — Получение подписанного сертификата TLS
- Paso 1: Configurar el nombre de host del sistema
- Настройка софтфона Linphone для iPhone
- Passo 3 — Instalando o Jitsi Meet
- Jitsi, then and now
- Общение с помощью Jitsi Meet
- Passo 2 — Configurando o Firewall
- Step 6: Set Up User Authentication
- Does Jitsi support end-to-end encryption?
- Install Jitsi
- Optional: Set Up Jigasi For Telephone Dial-in or Dial-Out
Getting Started with installing Jitsi Meet on Ubuntu 20.04
Before starting, update your system with the latest version with the following command:
sudo apt-get update -y
sudo apt-get upgrade -y
Once your system is up-to-date, restart your system to apply the changes.
Next, you will need to set up a hostname and FQDN to your system. You can do this by running the following command:
sudo hostnamectl set-hostname server1
Next, open /etc/hosts file and add FQDN:
sudo nano /etc/hosts
Add the following line:
127.0.1.1 server1.example.com server1
Save and close the file. Then, verify the hostname with the following command:
hostname -f
The result shall be:
:/# hostname -f
server1.example.com
Live Streaming and Recording a Jitsi Conference
A: As many as you want!
While Jitsi allows for a high number of participants to go into a conference, sometimes you need an audience that exceeds the practical limits of two-way communication. Enter live streaming.
You can think of it as a regular conference with a panel of speakers having a discussion in front of a large audience.
Well, you can now do this with Jitsi, as you can see from this VUC/IP Communications & VoIP session:

Here’s how to do it yourself.
You first need to take care of the YouTube side of things and get your “Stream name/key” out of there so that you can pass it to Jitsi. Here’s how you do this:
THE YOUTUBE SIDE OF IT ALL
Step 1. Go to creator studio. You normally do this by logging into YouTube, then clicking on your avatar in the upper right corner.
Step 2. Go to the Live Streaming section of your creator studio. This should be among the first several options in your creator studio menu. Like it is here:
Step 3. (ONLY THE FIRST TIME) If this is the first time your are live streaming with this account, and only then, you will be asked to validate your account:

I’ll let you walk this walk by yourself. Once you are done validating, go to:
Step 4. There are two ways you can set up streaming in YouTube:
For most practical cases and especially for testing, you should be fine with the simple “Stream now” option. If you need to schedule an event though, things would work exactly the same on the Jitsi side of things.
For now, let’s just click on “Stream now”
Step 5. This is the last piece on YouTube. Scroll to the bottom of the page, to the “Encoder Setup”. You should see a “Stream Name/Key” field there that is obfuscated by default.
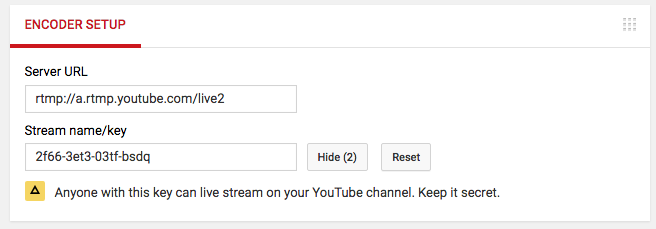
Click on the “Reveal” button and copy the key.
Note: This is probably also a good time for you to notice that the link where your audience will be able to watch the conference is available in the bottom right corner of the page:

THE JITSI SIDE OF THINGS
Almost there. Start your Jitsi conference as you normally would. If you are in a non-authenticated setup like meet.jit.si you need to make sure that you are the first in the room in order to become moderator and have the star symbol appear on your thumbnail:
Once you are there you should see the live streaming button in your toolbar:
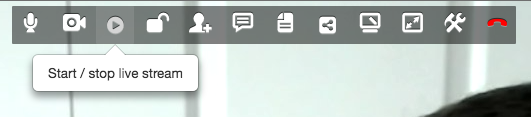
You’ll then be prompted to enter your stream name key from above:

Next you will see your stream starting:

Note that sometimes this step may fail. For reasons we don’t completely understand at this point, YouTube would sometimes simply not like the incoming stream and reject it. If this ever happens to you, and that should be super rare, fear not. Just retry until you see the following in your upper right corner:

And that’s it! Hope you enjoy the feature!
Love, The Jitsi Team
Anyone can mute or kick me out of my meeting, what’s up with that?
Jitsi models its meetings after in-person gatherings. Take the case of 10 people having a discussion in a room. You wouldn’t expect one person to have exclusive “kick” and “mute” privileges in an in-person meeting and yet, those meetings usually go fine.
In the vast majority of cases, moderation controls in online meetings serve a different purpose: they help address tech related issues, such as people not realizing their microphones are introducing noise, or people forgetting to leave. Moderation controls help you solve those, so that people can continue their conversation. And now, with that in mind, why wouldn’t you want to enable anyone in the meeting to help solve these kinds of issues?
For that reason our moderation controls are soft, and for everyone.
This is specifically the case on meet.jit.si, since all users are moderators.
If you really, really, really need moderation controls to be limited then consider deploying your own Jitsi Meet instance and configuring it in a way that suits your needs. Once you do, you can configure strong authentication, so only authorised users will be moderators.
We understand the settings in meet.jit.si are not for everyone, so if you’d rather have your own private setup (which we encourage you to do!) you can get started quickly with our Docker setup or the quick-install guide. We’ll be happy to help you in our community.
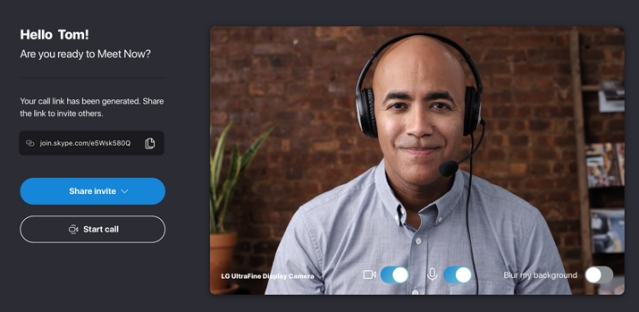
Скайп
Я знаю, что Skype для бизнеса был заменен Microsoft Teams и больше не доступен. И именно поэтому я говорю о бесплатной версии Skype, которая предназначена для личного использования.
Skype может быть очень полезным для небольших компаний для проведения веб-встреч и семинаров в качестве HD и, что лучше всего, без какой-либо оплаты. С точки зрения лимита участника, Skype может принять до 50 участников что составляет половину из 100 участников Zoom, предлагаемых по бесплатному плану уровня. Тем не менее, у вас нет никаких ограничений на групповые звонки в Skype, в то время как Zoom имеет 40-минутное ограничение, если есть более 3 участников.
Таким образом, в некотором смысле, Skype совсем не плох и предоставляет безграничные возможности без каких-либо затрат. Вы также можете общаться в чате и звонить своим товарищам по команде, но если вы хотите напрямую звонить по телефонным номерам в разных регионах, вам придется оплатить некоторые расходы. Но кроме этого, все бесплатно и доступно в том числе запись разговоров, совместное использование экрана на экране, субтитры и более. Я бы посоветовал, если вы используете Базовый план Zoom, вам следует попробовать Skype.
И если вас устраивает бесплатное предложение Skype, вы также можете посмотреть альтернативные варианты Skype, чтобы проверить похожие бесплатные решения для видеозвонков.
Посетить сайт (Бесплатно)
Passo 5 — Bloqueando a Criação de Conferências
Neste passo, você configurará sua instância Jitsi Meet para permitir apenas que usuários registrados criem salas de conferências. Os arquivos que você editará foram gerados pelo instalador e estão configurados com seu nome de domínio.
A variável será usada no lugar de um nome de domínio nos exemplos seguintes.
Primeiro, abra o arquivo com um editor de texto:
Edite esta linha:
/etc/prosody/conf.avail/your_domain.cfg.lua
Para o seguinte:
/etc/prosody/conf.avail/your_domain.cfg.lua
Esta configuração informa ao Jitsi Meet para forçar autenticação de usuário e senha antes de permitir a criação de sala de conferências por um novo visitante.
Depois disso, no mesmo arquivo, adicione a seguinte seção ao final do arquivo:
/etc/prosody/conf.avail/your_domain.cfg.lua
Esta configuração permite que usuários anônimos se juntem às salas de conferências que foram criadas por um usuário autenticado. No entanto, o convidado deve ter um endereço único e uma senha opcional para a sala para acessá-la.
Aqui, você adicionou à frente de seu nome de domínio. Por exemplo, para , você colocaria O hostname é usado apenas internamente pelo Jitsi Meet. Você nunca o digitará em um navegador ou precisará criar um registro DNS para ele.
Abra outro arquivo de configuração em com um editor de texto
Edite esta linha:
/etc/jitsi/meet/your_domain-config.js
Para o seguinte:
/etc/jitsi/meet/your_domain-config.js
Novamente, usando o hostname que você usou antes, esta configuração informa ao Jitsi Meet qual hostname interno usar para os convidados não autenticados.
Em seguida, abra :
E adicione a seguinte linha para completar as alterações de configuração:
/etc/jitsi/jicofo/sip-communicator.properties
Esta configuração aponta um dos processos do Jitsi Meet para o servidor local que executa a autenticação do usuário que agora é necessária.
Agora, sua instância Jitsi Meet está configurada para que apenas usuários registrados possam criar salas de conferências. Após criar uma sala de conferências, qualquer um pode se juntar a ela sem precisar ser um usuário registrado. Tudo o que eles precisarão é do endereço único da sala de conferências e de uma senha opcional definida pelo criador da sala.
Agora que o Jitsi Meet está configurado para exigir usuários autenticados para a criação de salas você precisa registrar esses usuários e suas senhas. Você utilizará o utilitário para fazer isso.
Execute o seguinte comando para adicionar um usuário ao seu servidor:
O usuário que você adiciona aqui não é um usuário de sistema. Eles apenas poderão criar uma sala de conferências e não poderão fazer login em seu servidor através do SSH.
Por fim, reinicie os processos do Jitsi Meet para carregar a nova configuração:
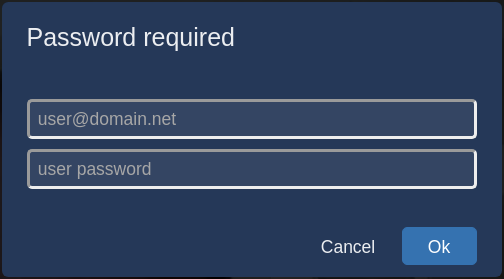
A instância Jitsi Meet agora irá solicitar um nome de usuário e senha com uma caixa de diálogo quando uma sala de conferências for criada.
Agora, seu servidor Jitsi Meet está pronto e configurado com segurança.
Основные функции Jitsi Meet
Наведите курсор на нижнюю часть экрана. Всплывет меню
Обратите внимание на левую часть
- Показать свой экран (рабочий стол) собеседникам. Может быть полезно, если вы объясняете собеседникам, как совершать то или иное действие на компьютере. Или, наоборот, увидеть, что у них не в порядке.
- «Рука». Нажатие на кнопку показывает участникам чата, что вы хотите высказаться. Полезно, чтобы не перебивать говорящих. В окошке, соответствующем вашему персонажу (справа), появится такой же значок ладони в кружке синего цвета.
- Текстовый чат. Пригодится для задания вопросов выступающему. Можно также использовать, если не хватает пропускной способности канала, аудио- и видеотрансляция прерывается и «тормозит». В чате можно общаться и на русском языке.
Теперь обратимся к правой части всплывающего меню.
- Изменить внешний вид окна чата. Вы можете вывести окошки собеседников в центр экрана, сделать их крупнее, если так вам удобнее общаться.
- Пригласить людей в чат. Jitsi Meet предлагает ввести номер телефона приглашенного. Вряд ли это самый разумный способ приглашать людей в чат (с точки зрения безопасности). Впрочем, на момент обновления этого материала эта функция не работала для России.
- Информация о чате. Единственная полезная функция здесь – возможность защитить чат паролем. Может быть полезно, если все нужные люди собрались и вы не хотите видеть посторонних, которым так или иначе стала известна ссылка.
- Прочие функции. О них – далее.
Do you use analytics?
Jitsi Meet does not come with any preconfigured analytics engines.
We do use analytics on meet.jit.si, so let’s talk about it.
We are very committed to privacy and security and we are extremely careful about what information reaches the analytics engines we use. That said we also want to provide our users with a great product experience, so we need some visibility into what’s actually going on. We are currently using Amplitude, Datadog and Crashlytics to cover various aspects of the apps and the infrastructure on meet.jit.si. Things that we track in analytics include, an anonymous identifier (you can run in “incognito” mode if this bothers you), bitrate, available bandwidth, SDP offers and answers, product utilization events, mobile app crash dumps (how much various product features are used overall).
While we hope that the meet.jit.si configuration will be satisfactory to most users, we completely understand that it will be incompatible with what some others are looking for. If, for any reason, this is the case for you please remember that you could be running your private Jitsi Meet instance in as little 15 minutes!
Шаг 4 — Получение подписанного сертификата TLS
Jitsi Meet использует сертификаты TLS для шифрования трафика вызова, чтобы никто не мог прослушивать вызов через Интернет. Сертификаты TLS — это те же сертификаты, которые используются сайтами для активации URL с протоколом HTTPS.
Jitsi Meet предоставляет программу для автоматической загрузки сертификата TLS для вашего доменного имени. Эта программа использует утилиту Certbot. Вам нужно будет установить эту программу до того, как вы запустите скрипт установки сертификата.
Вначале добавьте в систему репозиторий Certbot, чтобы убедиться, что вы используете последнюю версию Certbot. Запустите следующую команду, чтобы добавить новый репозиторий и обновить систему:
Затем установите пакет :
Теперь ваш сервер может спокойно запускать программу установки сертификата TLS, предоставленную Jitsi Meet:
При запуске скрипта откроется следующий диалог ввода адреса электронной почты:
Этот адрес электронной почты будет отправлен эмитенту сертификата и будет использоваться для уведомлений о безопасности и других вопросах, связанных с сертификатом TLS. Для продолжения установки необходимо ввести адрес электронной почты. После этого установка продолжится без дальнейших остановок.
После ее завершения ваш экземпляр Jitsi Meet будет настроен для использования подписанного сертификата TLS для вашего доменного имени. Обновление сертификатов также будет производиться автоматически, поскольку программа установки разместила по адресу скрипт обновления, который будет запускаться каждую неделю.
Программа установки TLS использовала порт для проверки наличия у вас контроля вашего доменного имени. Теперь вы получили сертификат, и вашему серверу больше не нужно открывать порт , потому что порт используется для обычного трафика HTTP без шифрования. Jitsi Meet обслуживает сайт только по протоколу HTTPS через порт .
Закройте этот порт в брандмауэре с помощью следующей команды :
Теперь ваш сервер Jitsi Meet запущен и готов к тестированию. Откройте браузер и введите свое доменное имя. Вы сможете создать новую конференцию и пригласить других пользователей.
Конфигурация Jitsi Meet по умолчанию разрешает всем посетителям главной страницы вашего сервера Jitsi Meet создавать новые конференции. Для проведения конференции будут использоваться ресурсы вашего сервера, поэтому нежелательно давать такую возможность сторонним пользователям. На следующем шаге мы настроим ваш экземпляр Jitsi Meet так, чтобы конференции могли создавать только зарегистрированные пользователи.
Paso 1: Configurar el nombre de host del sistema
En este paso, cambiará el nombre de host del sistema para que coincida con el nombre del dominio que quiere usar en su instancia de Jitsi Meet y resolverá ese nombre de host con la IP del host local: . Jitsi Meet utiliza estos dos ajustes al instalar y generar sus archivos de configuración.
Primero, establezca el nombre de host del sistema con el nombre de dominio que utilizará en su instancia de Jitsi. El siguiente comando establecerá el nombre de host actual y modificará , que mantiene el nombre de host entre reinicios:
El comando que ejecutó se desglosa de la siguiente manera:
- es un componente del conjunto de herramientas systemd que se utiliza para gestionar el nombre de host del sistema.
- establece el nombre de host del sistema.
Compruebe que el resultado sea correcto ejecutando lo siguiente:
Esto devuelve el nombre de host que estableció con el comando :
A continuación, establecerá una asignación local del nombre de host a la dirección IP de bucle: . Hágalo abriendo el archivo con un editor de texto:
A continuación, añada la siguiente línea:
/etc/hosts
Asignar el nombre de dominio de su servidor de Jitsi a le permite utilizar varios procesos en red que aceptan conexiones locales los unos de los otros en la dirección IP . Estas conexiones se autentican y cifran con un certificado TLS, que se registra en su nombre de dominio. El hecho de asignar de forma local un nombre de dominio a permite utilizar el certificado TLS para estas conexiones de red locales.
Guarde y cierre su archivo.
Ahora, su servidor tiene el nombre de host que Jitsi requiere para la instalación. En el siguiente paso, abrirá los puertos del firewall que requieren Jitsi y el instalador de certificados TLS.
Настройка софтфона Linphone для iPhone
Скачиваем программу из appstore. Linphone является бесплатным приложением. Запускаем. Тут у вас программа спросит разрешение на использование адресной книги (iOS 6 и выше) а так же возможность отправлять пуш-уведомления. После стартового окна запускается помощник Выбираем 3ий пункт (I have already a SIP account) Далее вам остается ввести логин и пароль к вашему SIP аккаунту и указать домен либо ip-адрес вашей IP-АТС. Этой информации может быть достаточно что бы начать пользоваться

Linphone является бесплатным приложением.
Запускаем. Тут у вас программа спросит разрешение на использование адресной книги (iOS 6 и выше) а так же возможность отправлять пуш-уведомления.
После стартового окна запускается помощник
Выбираем 3ий пункт (I have already a SIP account)
Далее вам остается ввести логин и пароль к вашему SIP аккаунту и указать домен либо ip-адрес вашей IP-АТС. Этой информации может быть достаточно что бы начать пользоваться программой
Нажимаем Sign in и если все правильно и ваша ip-атс не требует специфических настроек то мы должны увидеть статус Registered в левом верхнем углу, что означает что мы зарегистрировались на атс и можем пробовать совершать звонки.
Вводим номер и пробуем звонить, если абонент ответил, в правом верхнем углу стартует счетчик разговора
Во время разговора можно перевести звонок, для этого нажимаем Options и выбираем Transfer
Так же можно обратиться к истории звонков что бы не набирать номер каждый раз, нажимаем History, попадаем в историю звонков
Далее немного рассмотрим настройки программы. Нажимаем Settings и попадаем в настройки
Меняем sip-настройки по необходимости
Можем включить или отключить поддержку видео
В разделе Audio выбираем поддержку нужных кодеков, лишние отключаем
Automatically start – автоматически включать видео
Automatically accept – автоматически разрешать входящее видео
Ahow self view – показывать себя в маленьком окошке
В разделе кодеков доступен только VP8, остальные нужно компилировать из сорсов.
В разделе Call можем указать префикс, если нужно добавлять скажем 9 к набираемому номеру и выбрать режим DTMF
В разделе Network можем изменять сетевые настройки, наиболее полезные опции
Edge optimization – оптимизирует качество под мобильный интернет edge или 3g ( а именно выбирает подходящий кодек)
Animations – использовать ли анимацию в программе ( красивые переходы и тд)
Rotation – режим экрана ( автоматический, альбомный, портретный)
Background mode – режим фона, что бы всегда оставаться на связи ( необходимо постоянное интернет соединение. Влияет на ресурс батарии)
Start at boot – запускать программу при включении телефона
Expire – время перерегистрации ( в мс)
На этом настройку и обзор программы можно закончить.
Linphone явлется вполне себе отличным бесплатным софтфоном.
источник
Passo 3 — Instalando o Jitsi Meet
Neste passo, você adicionará o repositório stable do Jitsi ao seu servidor e, depois disso, instalará o pacote Jitsi Meet a partir desse repositório. Isso garantirá que você esteja executando sempre o último pacote estável do Jitsi Meet.
Primeiro, baixe a chave GPG do Jitsi com o utilitário de download :
O gerenciador de pacotes utilizará essa chave GPG para validar os pacotes que você irá baixar do repositório Jitsi.
A seguir, adicione a chave GPG que você baixou para seu gestor de chaves do usando o utilitário :
Agora, você pode excluir o arquivo de chaves GPG, pois ele já não é necessário:
Agora, você adicionará o repositório do Jitsi ao seu servidor criando um novo arquivo-fonte que contém o repositório Jitsi. Abra e crie o novo arquivo com seu editor:
Adicione essa linha ao arquivo para o repositório Jitsi:
/etc/apt/sources.list.d/jitsi-stable.list
Salve e saia do seu editor.
Por fim, execute uma atualização do sistema para coletar a lista de pacotes do repositório Jitsi e, depois, instale o pacote :
Durante a instalação do , você será solicitado a digitar o nome de domínio (por exemplo, ) que você deseja usar para sua instância Jitsi Meet.

Nota: mova o cursor do campo hostname para destacar o <OK> o botão OK com a tecla . Pressione quando <OK> o OK estiver destacado para submeter o hostname.
Em seguida, será mostrada uma nova caixa de diálogo que lhe pergunta se você deseja que o Jitsi crie e utilize um certificado TLS autoassinado ou use um certificado existente que você já tenha:

Se não tiver um certificado TLS para seu domínio Jitsi, selecione a primeira opção Generate a new self-signed certificate.
Agora, sua instância Jitsi Meet está instalada usando um certificado TLS autoassinado. Isso causará avisos do navegador. Assim, você irá obter um certificado TLS assinado no próximo passo.
Jitsi, then and now
| 2020 |
Jitsi surpasses 10 million monthly average users! |
|---|---|
| 2018 |
8×8 acquires the Jitsi Technology and team from Atlassian. Jitsi now powers all 8×8 Video Meetings and continues to grow in the heart of many successful initiatives |
| 2015 |
Atlassian acquires Blue Jimp, making a long-term investment in keeping Jitsi open source, community-based, and pushing the envelope of great video conferences. |
| 2014 |
Using a prototype from Philipp Hancke as a basis, the Jitsi community starts the Jitsi Meet project: a Web Conferencing application that rivals Hangouts and Skype |
| 2013 |
Jitsi’s video routing capabilities are extracted in a separate server application and Jitsi Videobridge is born. Later this year Jitsi Videobridge adds support for ICE and DTLS/SRTP, thus becoming compatible with WebRTC clients. This is a first step to its importance in today’s WebRTC ecosystem. |
| 2012 |
Jitsi adds video conferencing capabilities based on the concept of routing video streams. The client of the conference organizer acts as a video router. |
| 2011 |
SIP Communicator is renamed Jitsi (from the Bulgarian “жици”, or “wires”), since it now also supports audio and video over XMPP’s Jingle extensions and it would be silly to still call it SIP Communicator. |
| 2009 |
Emil Ivov founds the Blue Jimp company, which employs some of Jitsi’s main contributors. They offer professional support and development services. |
| 2008 |
JsPhone departs from the JAIN SIP reference implementation project, and becomes a separate project on java.net. It’s renamed SIP Communicator, since it mostly made audio/video calls through the Session Initiation Protocol (SIP). |
| 2007 |
We get our own Wikipedia entry. Look out, world. |
| 2005 |
SIP communicator is completely rearchitected, adopting a new OSGi based design to make it easier to write plugins for the project. |
| 2003 |
Emil Ivov, a student at the University of Strasbourg, France, creates JsPhone. He also teaches salsa and West Coast swing. |
Общение с помощью Jitsi Meet
1. Договоритесь с друзьями о времени чата и отправьте им (например, по электронной почте) ссылку вида https://meet.jit.si/name, где name – произвольное сочетание букв и цифр, придумайте его сами. Лучше, если это будет что-то неординарное (не /chat, /talk, /meet). Меньше шансов, что в вашу чат-комнату забредет какой-нибудь случайный прохожий. Можете ввести название комнаты в окно на странице Jitsi Meet
или просто перейти по адресу, добавив к сайту придуманное вами название комнаты:
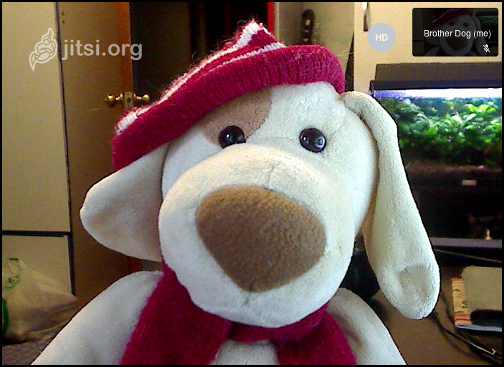
https://meet.jit.si/BigPinkPig
2. Браузер может попросить разрешение на доступ к микрофону и видеокамере. Нажмите на кнопки «Разрешить доступ…». (В разных браузерах и операционных системах этот запрос может выглядеть по-разному).
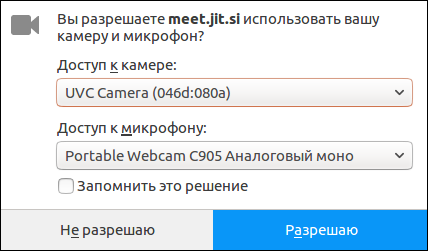
Вы можете заметить, что перед адресом в браузере появился значок камеры, а в верхней части экрана по центру – вот такой маленький значок (пример для Firefox):
Рабочая чат-комната выглядит так. Это вы. В правом верхнем углу отразится экранное имя. По умолчанию все участники видят друг друга по одинаковыми именами «Fellow Jitster». Так общаться неудобно. Лучше сразу выбрать для себя имя (достаточно щелкнуть по прямоугольнику в правом верхнем углу). На картинке выбрано имя «Brother Dog».
Дождитесь, когда присоединятся ваши друзья. (У зайчика камера на ноутбуке похуже вашей).

Можете общаться. В правой части чата, сверху вниз, маленькие окошки – вы и ваши собеседники. Здесь можно увидеть их лица (если камеры включены, иначе – картинки-аватары, которые Jitsi Meet назначает произвольно) и имена (имя каждый может задать себе сам).
3. Подведите курсор к нижней части экрана чат-комнаты. Появится полоска меню. Там целый ряд кнопок, но нас сейчас интересуют три центральные:
- Центральная кнопка – «повесить трубку», завершить чат. (Перед выходом вам предложат оценить качество связи).
- Слева – включить/отключить микрофон.
- Справа – включить/отключить камеру.
Советуем сначала при включенных камерах удостовериться, что в чате присутствуют именно те люди, которые должны там находиться, а потом отключить камеры для экономии трафика. Разумно также отключать свой микрофон, если вы не говорите в данный момент. Это сэкономит трафик и уберет из общего «эфира» лишние шумы.
Passo 2 — Configurando o Firewall
Ao seguir o guia Configuração Inicial de Servidor com o Ubuntu 18.04, você habilitou o firewall UFW e abriu a porta SSH. O servidor Jitsi precisa de algumas portas abertas para que ele possa se comunicar com os clientes de chamada. Além disso, o processo de instalação do TLS precisa ter uma porta aberta para poder autenticar a solicitação do certificado.
As portas que você abrirá são as seguintes:
- utilizada na solicitação do certificado TLS.
- utilizada para a página web de criação da sala de conferências.
- utilizadas para transmitir e receber o tráfego de chamadas criptografado.
Execute os comandos a seguir para abrir essas portas:
Verifique se elas foram adicionadas com o comando :
Você verá o seguinte resultado se essas portas estiverem abertas:
Agora, o servidor está pronto para a instalação do Jitsi, que você terminará no próximo passo.
Step 6: Set Up User Authentication
By default, anyone can go to your Jitsi Meet instance, create a room and start a meeting. To set up user authentication, edit the Prosody configuration file.
sudo nano /etc/prosody/conf.d/meet.example.com.cfg.lua
Find the following line.
authentication = "anonymous"
Change it to the following, which will require the user to enter username and password to start a conference.
authentication = "internal_plain"
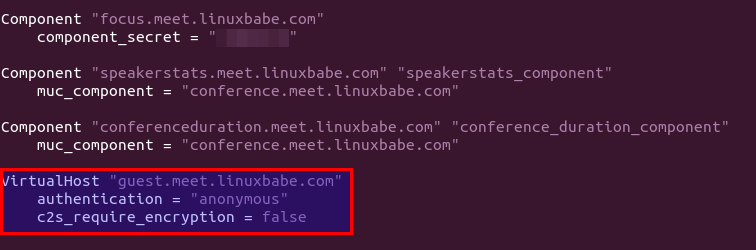
However, we don’t want attendees to enter username and password when joining the conference, so we need to create an anonymous login for guests, by adding the following lines at the end of this file. Note that you don’t need to create DNS A record for .
VirtualHost "guest.meet.example.com"
    authentication = "anonymous"
    c2s_require_encryption = false
Save and close the file.
Next, edit the Jitsi Meet configuration file.
sudo nano /etc/jitsi/meet/meet.example.com-config.js
Find the following line,
// anonymousdomain: 'guest.example.com',
Remove the double slashes and change the guest domain. Replace meet.example.com with your real Jitsi Meet hostname.
anonymousdomain: 'guest.meet.example.com',
Save and close the file.
Then edit the Jicofo configuration file.
sudo nano /etc/jitsi/jicofo/sip-communicator.properties
Add the following line at the end of this file.
org.jitsi.jicofo.auth.URL=XMPP:meet.example.com
Save and close the file. Restart the systemd services for the changes to take effect.
sudo systemctl restart jitsi-videobridge2 prosody jicofo
To create user accounts in Jisi Meet, run the following command. You will be promoted to enter a password for the new user.
sudo prosodyctl register username meet.example.com
Now if you create a room in Jitsi Meet, you will need to enter a username and password.

Does Jitsi support end-to-end encryption?
The short answer is: Yes, we do!
You can turn on end-to-end encryption (e2ee) as long as you are using Jitsi Meet on a browser with support for insertable streams. Currently this means any browser based on Chromium 83 and above, including Microsoft Edge, Google Chrome, Brave and Opera. You may also use our Electron client, which supports it out of the box.
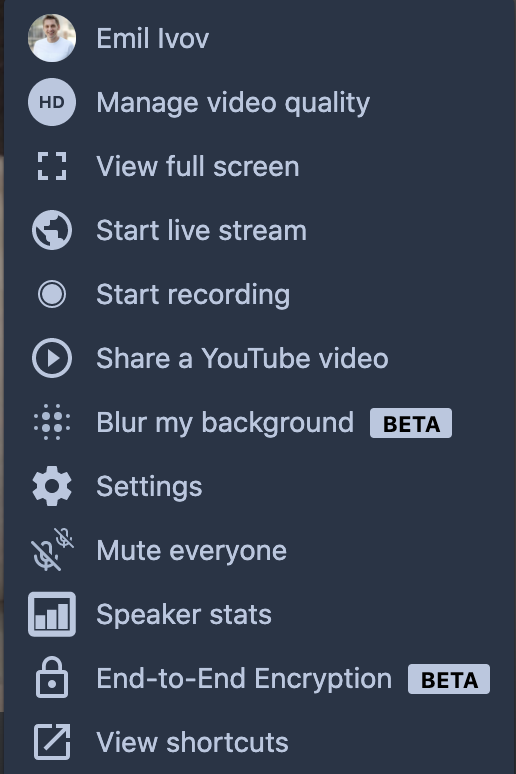
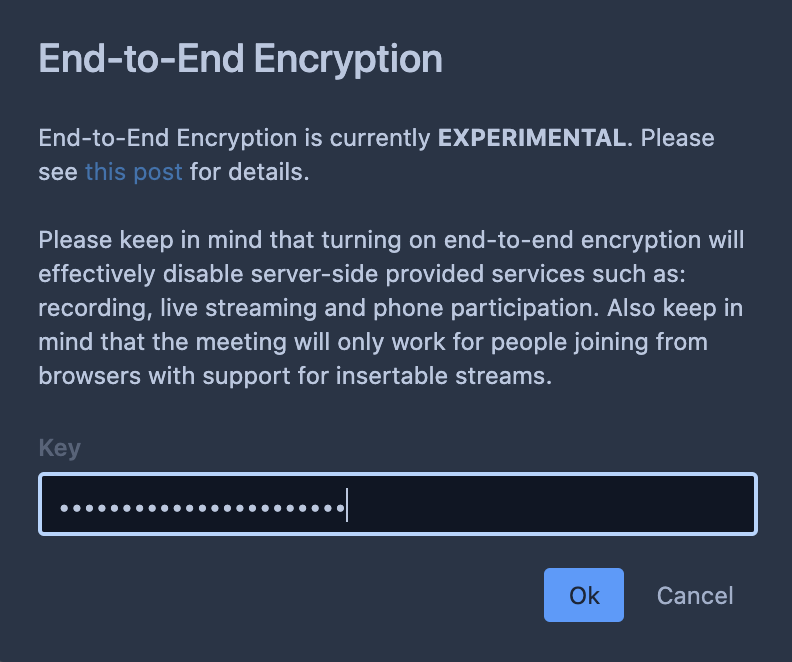
All you need to do is select the “End-to-end Encryption” option in the overflow menu and then make sure that all participants fill in the same pass word or phrase in the Key field.
You can learn more about our e2ee support at: https://jitsi.org/e2ee
Jitsi Meet offers very strong protection even if you don’t explicitly turn on e2ee. Here are more details:
Jitsi meetings in general operate in 2 ways: peer-to-peer (P2P) or via the Jitsi Videobridge (JVB). This is transparent to the user. P2P mode is only used for 1-to-1 meetings. In this case, audio and video are encrypted using DTLS-SRTP all the way from the sender to the receiver, even if they traverse network components like TURN servers.
In the case of multiparty meetings all audio and video traffic is still encrypted on the network (again, using DTLS-SRTP). This outer layer of DTLS-SRTP encryption is removed while packets are traversing Jitsi Videobridge; however they are never stored to any persistent storage and only live in memory while being routed to other participants in the meeting.
It is very important to note that when packets are also end-to-end encrypted, this second layer of encryption is never removed (nor can it be)
Since Jitsi is built on top of WebRTC, a deeper look into its security architecture is very important when evaluating Jitsi’s security aspects.
Install Jitsi
Next, we can proceed with installing the Jitsi software itself. We must note that there is a vast difference between Jitsi Meet used with or without active video bridge. Without video bridge, all video streams are peer to peer, so the more video participants you have, the more each local client has to work and, the more streams each participant’s internet connection has to interact with. If we use video bridge, it bundles these streams on the server side.
Add Universal Repository
In Ubuntu, a Jitsi installation requires the universal package repositories to be enabled to install all the required dependencies.
Install Apt HTTPS Security
Next, we should verify that https support for apt repositories is available. This allows for the use of HTTPS when accessing repositories.
Now, let’s update the package repository again.
Install JitsiMeet
Before installing, make sure to disable the installation of Nginx using the –no-install-recommends command flag like so.
Caution:
Do not skip entering important data during installation.
During installation, you will need to provide the name of the current host.
And then we ask Jitsi to generate the SSL certificate themselves, we need to select the following option…
and press enter.
Now, we can use apt to install jitsi-meet.
After the installation has completed, enter the following command to submit the SSL-certificate.
admin@example.com
And then click enter.
Verify Installation
Now we can open our browser and enter the address http://jitsimeet.example.com or https://jitsimeet.example.com. Then, follow the link above to get better acquainted with the interface.
Note:
Jitsi recommends using a minimum of 2 GB memory, although most servers now use two or more GB as a standard, even if you have less or want to play it safe by configuring the memory paging file.
Optional: Set Up Jigasi For Telephone Dial-in or Dial-Out
Jitsi offers a telephony interface that allows users to dial into a conference or place dial-out reminder calls. Install the package (Jitsi gateway for SIP).
sudo apt install jigasi
During the installation, you will need to enter your SIP username and password. If you don’t have one, you can create a free SIP account at OnSIP.com.

If you have set up user authentication in step 6, then you need to edit Jigasi configuration file.
sudo nano /etc/jitsi/jigasi/sip-communicator.properties
Find the following lines.
# _DOMAIN
# org.jitsi.jigasi.xmpp.acc.PASS=SOME_PASS
# org.jitsi.jigasi.xmpp.acc.ANONYMOUS_AUTH=false
Uncomment them and enter an account and password that you created in step 6.
org.jitsi.jigasi.xmpp.acc.USER_ID=
org.jitsi.jigasi.xmpp.acc.PASS=user1_password
org.jitsi.jigasi.xmpp.acc.ANONYMOUS_AUTH=false
Save and close the file. Restart the systemd service.
sudo systemctl restart jigasi