Интеграция lanbilling c cisco isg (ipoe)
Содержание:
- COA — Change Of Authorization
- Probe Overview
- Настройка DHCP-сервера
- Solution Overview
- Какие преимущества даёт Cisco ONE?
- ISE Profiling Global Configuration
- Tcl Packages
- Настройка тарифов и сервисов
- Постановка задачи
- Общий принцип функционирования
- DNS
- Совместимость
- Описание настройки локальных сервисов
- Tcl Policy Register and Unregister
- Global Variable Usage
- About Cisco Identity Services Engine (ISE)
- Dynamic Event Registration
- Scalability
COA — Change Of Authorization
COA представляет из себя интерфейс, который позволяет произвести динамическое изменение абонентской сессии с внешнего сервера.
Первым делом необходимо на роутер с ISG добавить следующую конфигурацию:
После этого с хоста 1.2.3.5 можно будет выполнять COA запросы.
Возможности COA:
Проверить активность сессии и получить набор сервисов и другой информации. Пример кода на Perl:
В случае отсутствия сессии в ответ приходит COA-NACK, в случае успешного выполнения команды — COA-ACK.
Активировать/деактивировать сервис на сессии. В примере выше следует заменить строку
на
Для деактивации сервиса указывать .
Завершить сессию. Аналогично предыдущему пункту, за исключением subscriber:command=account-logoff.
Probe Overview
An ISE probe is the component of ISE Profiling Services that collects endpoint attributes. Each probe uses different collection methods and can gather unique information about endpoints. Consequently, some probes are better suited than others to classify certain device types or may be preferred based on the particular environment.
ISE Profiler supports the following probes:
- RADIUS
- AnyConnect Identity Extensions (ACIDex)
- Device Sensor
- SNMP Trap
- SNMP Query
- DHCP
- DHCP SPAN
- DNS
- HTTP
- NetFlow
- Network Scan (NMAP)
- Active Directory (AD)
- pxGrid
As suggested by their names, some probes such as DHCP and DHCP SPAN, for example, are capable of collecting specific attributes; in this example, DHCP attributes and associated option fields in DHCP packets. The choice between DHCP and DHCP SPAN will depend on whether the particular network environment supports the relay of DHCP traffic to the ISE Policy Service node, or if use of a SPAN method is better suited to network topology and capabilities of the infrastructure. Furthermore, some features like Device Sensor or the pxGrid probe are capable of collecting DHCP data. It is important to understand the attribute data collected by various probes so that care is taken to enable optimal probes without duplicating the data collected. This guide includes detailed guidance on probe selection under the individual sections for each probe.
Each probe type varies in how simple or difficult it is to configure services essential for data collection. Each probe type also has varying levels of impact to the network or endpoints based on the protocols used and how they are deployed. Finally, each probe varies in the value of the data it produces and its applicability to classifying the specific endpoints of interest in the network. This guide reviews how each probe is configured and deployed and also aims to provide an overall understanding of each probe’s deployment difficulty, network impact, and relative profiling value based on type of deployment.
As highlighted in Figure 7, the configuration of probes that collect endpoint attributes is the start of the profiling process.
Figure 7: Configuration Flow: Probes and Attribute Collection
Настройка DHCP-сервера
В качестве DHCP-сервера используется ISC DHCPD версии 4.1.1-P1-15+ из стандартных репозиториев Debian Squeeze. К достоинствам DHCPD стоит отнести низкие требования к ресурсам – сервер, обслуживающий примерно 50-70 запросов в секунду, при размере конфига в 600 кб потребляет 11 мб памяти менее 0,1% ЦП.
Примерная конфигурация:
ddns-update-stylenone;
default-lease-time 600;
max-lease-time 600;
log-facility local7;
authoritative;

if exists agent.circuit-id
{
log (info, concat(
"Leased address ", binary-to-ascii (10, 8, ".", leased-address),
" for MAC ", binary-to-ascii(16, 8, "", substring(hardware, 1, 6)),
" at switch ", binary-to-ascii (16, 8, "", suffix( option agent.remote-id, 6)),
" on port ", binary-to-ascii (10, 8, "", suffix( option agent.circuit-id, 1)) ,
" invlan ", binary-to-ascii(10, 16, "", substring(option agent.circuit-id, 2, 2))));
}

subnet 10.0.0.0 netmask 255.0.0.0 {

class "0:e:5e:13:d8:e7-1"{
match if (binary-to-ascii (10, 8, "", suffix( option agent.circuit-id, 1)) = "1")
# and (binary-to-ascii (10, 16, "", substring ( option agent.circuit-id, 2,2)) = "vlanid");
and (binary-to-ascii (16, 8, ":", suffix ( option agent.remote-id, 6)) = "0:e:5e:13:d8:e7");
}

pool {
allow members of "0:e:5e:13:d8:e7-1";
range 10.21.255.225;
option subnet-mask 255.255.255.244;
option routers 10.21.255.254;
}
}
Из примера видно, что для связки MAC коммутатора + номер порта выделяется отдельный класс, к которому привязывается пул из одного адреса со своим набором опции. Функция «suffix» берет последние 6 байт из поля RemoteID при вычленении MAC-адреса коммутатора доступа и 1 байт при вычленении номера порта. Затем эти значения конвертируются из бинарного вида в ASCII функцией «binary-to-ascii» и сравниваются с условиями. Если условие соответствия выполняется, то выдается адрес из привязанного пула.
Хотя конфиг DHCPD и кажется несколько громоздким, тем не менее, его генерация очень легко автоматизируется. Сгенерированный конфиг же меняется только в случае замены коммутатора. Таже DHCPD позволяет включать в конфиг произвольные текстовые файлы при помощи функции include, что позволяет структурировать конфиг.
В нашем случае при установке нового коммутатора под него выделяется подсеть и на основе шаблона создается конфигурационный файл, в котором заранее описываются все порты устройства. Далее конфиг коммутатораподключается к общему конфигу DHCPD через include.
В дальнейших планах у нас интеграция DHCPD и LBInventory с целью автоматизации генерации конфига DHCP-сервера. В дальнейшем абоненту выделяется порт и его адрес остается неизменным.
Более подробно настройка и работа DHCP-Snooping описана здесь:
http://xgu.ru/wiki/DHCP_snooping;http://xgu.ru/wiki/%D0%9E%D0%BF%D1%86%D0%B8%D1%8F_82_DHCP
Solution Overview
Cisco ISE Profiling Services provides dynamic detection and classification of endpoints connected to the network. Using MAC addresses as the unique identifier, ISE collects various attributes for each network endpoint to build an internal endpoint database. The classification process matches the collected attributes to prebuilt or user-defined conditions, which are then correlated to an extensive library of profiles. These profiles include a wide range of device types, including mobile clients (iPads, Android tablets, Chromebooks, and so on), desktop operating systems (for example, Windows, Mac OS X, Linux, and others), and numerous non-user systems such as printers, phones, cameras, and game consoles. Cisco ISE Profiling also covers the Internet of Things (IoT) by classifying building automation including devices used to control heating, ventilation, and air conditioning (HVAC), power and lighting systems, as well as vertical-specific endpoints such as healthcare patient monitors and imaging devices, as well as manufacturing controllers and sensors.
Once classified, endpoints can be authorized to the network and granted access based on their profile. For example, endpoints that match the IP phone profile can be placed into a voice VLAN using MAC Authentication Bypass (MAB) as the authentication method. Another example is to provide differentiated network access to users based on the device used. For example, employees can get full access when accessing the network from their corporate workstation but be granted limited network access when accessing the network from their personal iPhone.
Какие преимущества даёт Cisco ONE?
Упрощённая и универсальная схема лицензирования.
Здесь имеется в виду, что ранее, для различных категорий устройств нужно было помнить различные схемы лицензирования. Например, для коммутаторов 2960X есть варианты Lan Lite и Lan Base и IP Lite (правда, для этих коммутаторов более правильно говорить не лицензия, а набор функций (Feature Set), см. статью «Отличия Lan Lite и Lan Base»). Для 3560X/3750X и для новых 3650/3850 существуют лицензии LAN BASE, IP BASE, IP Services. Для маршрутизаторов ISR G2, ISR4K существуют IP Base, Security, UC, AppX. А теперь, если мы хотим использовать подход Cisco ONE, то у нас будет выбор только из трёх вариантов лицензий, не зависимо от типа устройств:Foundation;
Advanced Application;
Advanced Security.
Foundation – лицензии на минимальный по мнению компании Cisco набор функциональности, который необходимо иметь в полноценной сети.Advanced Application – лицензии на дополнительную функциональность, к которой может относиться Collaboration, Advanced Mobility Services и т.д.Advanced Security – лицензии на функциональность «продвинутой» безопасности, например FirePOWER для Cisco ASA, Cisco ISE. Данный тип лицензий пока не реализован (март 2016).
Далее в статье мы попробуем более подробно разобраться, что именно входит в тот или иной набор лицензий. На данном моменте нужно заметить, что сейчас (март 2016) существуют всего два вида лицензий – Foundation и Advanced (да, просто Advanced). При этом, для разных типов устройств, Advanced лицензия открывает совершенно различные функции. Например, для маршрутизаторов, Advanced открывает лицензии Unified Communications, а для WLC – лицензии на Wireless Intrusion Prevention (система предотвращения вторжений для беспроводной сети).
Если нужно использовать функциональность Advanced лицензии, Foundation лицензию также необходимо приобрести.
Снижение совокупной стоимости владения
Осторожно – маркетинг! Безусловно снижение совокупной стоимости владения зависит от многих факторов. В маркетинг вдаваться не будем, однако, в некоторых случаях покупка по схеме Cisco ONE выйдет действительно дешевле, чем покупка по стандартной схеме «A-la-carte».
Партномер Cisco ONE всегда будет на несколько сотен долларов дороже по Cisco GPL (Global Price List), относительно обычного партномера
Причина – в состав Cisco ONE входят дополнительные лицензии, необходимые по мнению Cisco для построения полноценной сети. Например, для коммутаторов Catalyst к дополнительным лицензиям относятся лицензии для подключения устройства к Cisco Prime Infrastructure (централизованная система мониторинга и управления сетью), лицензии на Cisco ISE (централизованная система контроля доступа к сети) и т.д. Таким образом, снижение стоимости покупки может происходить только тогда, когда вы внедряете или уже используете в сети те инструменты, лицензии которых входят в партномер Cisco ONE. Далее в статье мы посмотрим конкретный пример снижения стоимости.
Перенос лицензий на устройства следующего поколения. Упрощается процедура hardware upgrade. Другими словами, если вы используете Cisco ONE, то при замене аппаратной части, лицензии Cisco ONE можно будет перенести на новое устройство. Докупать новый комплект лицензий для нового устройства не придётся.
Возможность управлять лицензиями с помощью пользовательского портала. Пока, к сожалению, не было возможности воспользоваться данным порталом.
ISE Profiling Global Configuration
This section reviews the process for globally enabling ISE Profiling Services on a Policy Service node and configuring global profiling parameters.
Global Profiler Settings include configurations that impact the entire deployment so are covered first. These settings will be referenced throughout the guide as they relate to a particular feature or function. It is useful to be aware of these settings to understand why some ISE Profiler functions behave (or misbehave) in a certain way.
Procedure 1 Configure Global Profiling Settings from the Policy Administration Node
Step 1 Access the ISE administrative interface of the primary Policy Administration node (PAN) using a supported web browser and your admin credentials: https://<ISE_PAN_FQDN_or_IP>
Step 2 Navigate to Work Centers > Profiler > Settings and select Profiler Settings from the left-hand-side (LHS) pane.
Step 3 From the right-hand side (RHS) pane, choose the CoA Type to be used for profiling transitions and Exception Actions (Figure 4). It is possible to override CoA response for a specific Profile Policy or Exception Action, but the global configuration dictates the default behavior in absence of more specific settings.
Figure 4: Global Profiler Configuration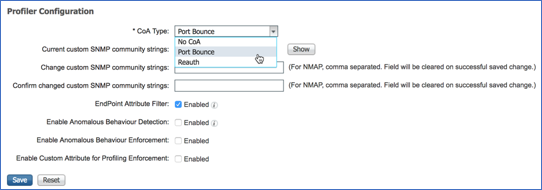
If the goal is visibility only, leave the default value of No CoA. Furthermore, a setting of No CoA overrides all per-profile settings and disables CoA for all profiler operations and Exception Actions. If the goal is to immediately update access policy based on profile changes, select Port Bounce. This will help ensure that even clientless endpoints will go through complete reauthorization process, including an IP address refresh, if needed. The Reauth option may be sufficient for cases where no VLAN or address change is expected following reauthorization of the current session.
If multiple endpoints are detected on a wired switchport, ISE will automatically revert to using the Reauth option to avoid service disruption of other connected devices. A common example is a workstation connected to an IP phone where a port bounce would interrupt communications for both workstation and phone.
| Note: Ultimately, the behavior of a Network Access Device (NAD) to a CoA directive will depend on the ISE NAD Profile template assigned to the access device and the CoA methods it supports. For example, a Wireless Controller does not have the concept of “port bounce” and may simply reauthorize the port without forcing IP address renewal by the client. |
Step 4 ISE Profiler supports the ability to scan endpoints and trigger an SNMP query against the endpoint if determined to be SNMP-enabled. The default SNMP community string used for these queries is public. To use a different community string or sequence of strings, enter the new string values under Change custom SNMP community strings and enter again to confirm correct spelling.
Values are hidden from passive viewers, but can be exposed by clicking the Show button once saved. This setting will be covered in more detail under the NMAP probe section.
Step 5 Change the default setting for Endpoint Attribute Filter to Enabled. The filter (also referred to as the “Whitelist Filter”) limits endpoint data collection to whitelisted attributes. Whitelisted attributes include the endpoint data required for profiling and maintenance. Other attributes are deemed extraneous and will be dropped (not saved or replicated to the endpoint database). This can significantly improve the efficiency of profiling operations as less data needs to be maintained and replicated.
Cisco Best Practice: Best practice is to enable the Endpoint Attribute Filter in production deployments. To add an attribute to the whitelist that is currently not present, the administrator simply needs to create a new Profiler Condition and Policy that uses the attribute. The attribute will automatically be added to the whitelist of stored and replicated attributes.
For lab deployments or a production deployment in a discovery phase or visibility-only mode, the Endpoint Attribute Filter can be left Disabled (not Enabled) to allow collection of all potential endpoint attributes. This can be useful in determining which attributes may be normally dropped but desirable for visibility or new profile creation.
Step 6 Keep the default settings of Disabled for “Custom Attribute for Profiling Enforcement”. More details on the use of this feature are provided later in this guide.
Tcl Packages
EEM comes with a number of Tcl packages built in. In addition to libraries found in the ::cisco::eem and ::cisco::lib namespaces, EEM ships with the following additional libraries.
Namespace / ProcedureDescriptionMore Info
| parray | Print the contents of a global array |
Syntax: parray arrayName ?pattern? Where arrayName is the name of an array in the global namespace and pattern is an optional element name pattern to print (by default all elements will be printed) |
| ::http | HTTP client library | See http://tmml.sourceforge.net/doc/tcl/http.html |
| ::tcl::opt | Command-line option parsing library | See http://wiki.tcl.tk/1539 |
| ::base64 | Base64 encoding and decoding library | See http://wiki.tcl.tk/775 |
Each of these packages can be found under tmpsys:/lib/tcl and are automatically loaded for all EEM Tcl policies.
Настройка тарифов и сервисов
Помимо аутентификации сессии, к ней обычно требуется применить политику авторизации. Обычно на сессию применяется набор сервисов. Сервис классифицирует трафик по определенному ACL и указывает, что делать с трафиком.
Сервисы могут храниться как на BRAS, так и загружаться на BRAS через специально сформированный access-accept. Данные способы можно комбинировать.
Хранение сервисов в биллинге позволяет при изменении тарифов не трогать BRAS, однако механизм хранения сервисов в биллинге при большом количестве тарифов выглядит несколько громоздким.
Хранение сервисов на сервере доступа позволяет представить конфигурацию в более структурированном и наглядном виде, однако при любом изменении тарифов требуется вмешательство в конфигурацию BRAS.
Как правило, используется комбинированный подход и описание непосредственно тарифов хранится в биллинге, а вспомогательные сервисы (редирект, доверенные сайты и т.д.) описываются на BRAS т.к. изменяются нечасто.
Для того чтобы BRAS загрузил сервисы, их имена передаются через Cisco AVPair ssg-account-info c префиксом N для задания имени сервиса, который надо загрузить и префиксом A для активации сервиса на сессии (NInet3072 и AInet3072 соответственно). Атрибуты описания и активации сессии включаются в access-accept от RADIUS-сервера.
Загрузка сервисов производится методом посылки access-request со стороны BRAS, где в поле User-Name указывается имя сервиса, который надо получить. LANBilling позволяет ответить access-accept на эти запросы в случае, если в тарифе указан идентификатор внешней услуги, совпадающий с набором атрибутов, привязанных к сервису.
В нашем случае настройка биллинга сильно упрощается тем фактом, что нам не требуется разделять трафик на отдельные классы и соответственно применять к ним разные политики, а достаточно просто применить целиком к сессии атрибут полисера и аккаунтинг-листа.
Для этого в тарифе укажем требуемую скорость, а к ней привяжем следующий атрибут:
| 250 | account-info | QU;cir, normal burst, excess burst;D;cir,normal burst;exess burst |
Здесь QU – скорость от абонента к BRAS, DU – от BRAS к абоненту.
Пример для 8 Мбит:
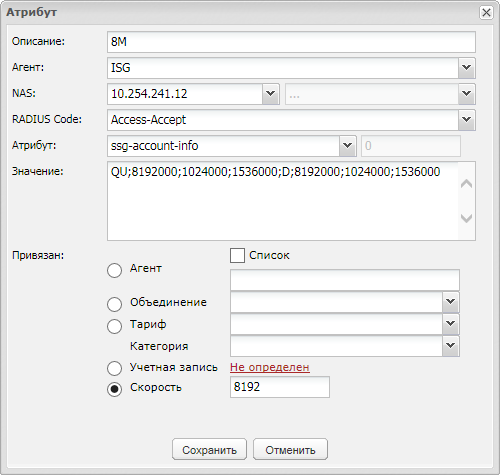
Рисунок 3
Для аккаунтинга применим на сессию следующий атрибут:
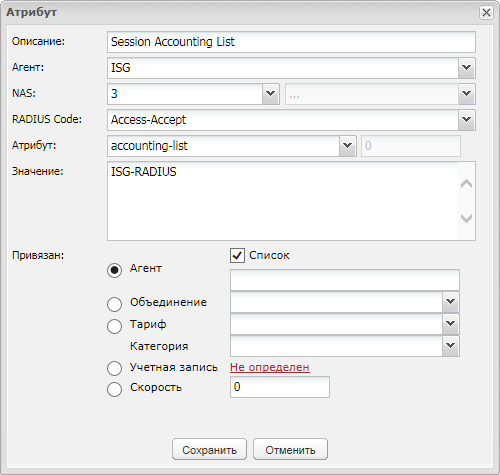
Рисунок 4
Также можно использовать атрибут 251, имеющий похожие опции.
Подробно RADIUS-интерфейс ISG описан на http://www.cisco.com/en/US/docs/ios/12_2sb/isg/coa/guide/isg_ig.html.
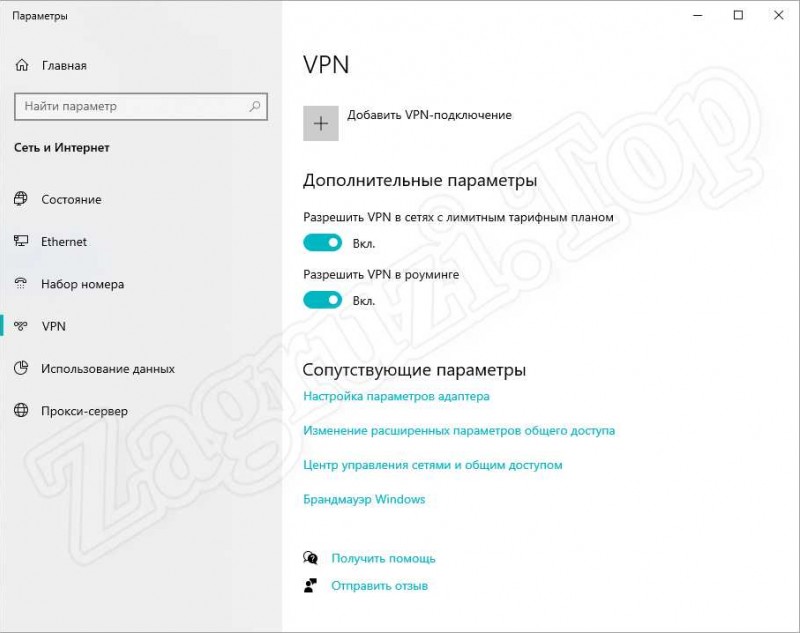
Постановка задачи
В небольшом интернет-провайдере отказаться от использования VPN (pptp) для контроля сессий.
Траффик контролировать непосредсвенно на уровне IP. Контроль валидность src-IP осуществляется на уровне сети доступа (DHCP-snooping + ACL),
любой клиент который попадает на роутер с ISG имеет верефицированный src-IP.
Требуется поддреживать следующие тарифы:
- Volume-Based Prepaid (помегабайтный тариф)
- Безлимитные тарифы (ограничение по скорости)
- (опционально) Тарифы с ограничением по скорости и времени. (Lagacy-тарифы, которые были предназначены для создания альтернативы диал-ап, пока не реализовано.)
Restrictions for ISG Prepaid Billing Support
Внимание: Volume-monitor работает только с суммарным траффиком. Возможно, это ограничение можно обойти созданием 2-х сервисов на входящий и исходящий траффик, однако я не вижу в этом смысла для себя на данный момент.. Вот цитата с cisco.com
Вот цитата с cisco.com
ISG volume-based prepaid billing is not supported on the Cisco 10000-PRE2
не важно для меня
ISG prepaid billing support can only be applied to traffic flows that have been defined by an ISG traffic class.
Quotas are measured in seconds for time and in bytes for volume. There is no way to change the unit of measure
не важно для меня, непонятно кому может быть нужно что то другое
The volume quota is for combined upstream and downstream traffic.
Общяя схема работы
Общяя схема работы такова: Биллинг (оригинальная разработка) управляет RADIUS-сервером (FreeRadius), который в свою очередь хранит информацию о пользователях и сервисах в «понятном» для ISG виде.
При необходимости что-либо изменить непосредсвенно на маршрутизаторе с ISG (например, изменить текущий тариф, если пользователь поменял себе тариф и хочет наблюдать изменение скорости) биллинг посылает
CoA-пакет который вызывает деавторизацию пользователя и потом — повторную авторизацию с новыми параметрами.
Пользователи Volume-Based тарифов перенаправляются на «портал» при исчерпании лимита траффика.
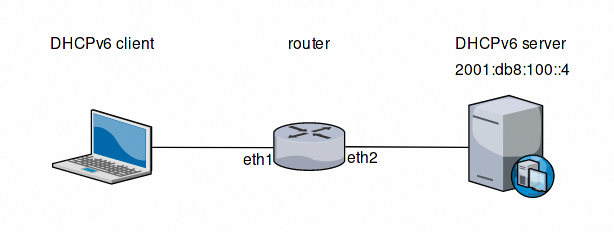
Общий принцип функционирования

Рисунок 1
1. Абонент при подключении к сети запрашивает адрес от DHCP-сервера.
2. Коммутатор доступа вставляет в DHCP-Request опцию 82, которая состоит из двух субопций – Remote-ID (идентификатор устройства, вставившего опцию, как правило, MAC-адрес или IP коммутатора) и Circuit-ID(номер модуля и номер порта на модуле, в который подключен клиент). Если не порту доступа обнаруживается DHCP-сервер, то ответы от него подавляются.
3. Далее broadcast-пакет попадает на коммутатор агрегации с настроенной функцией DHCP-Relay, откуда уже unicast-пакет пересылается на внешний DHCP-сервер. На коммутаторе агрегации делается запись в таблице DHCP-Snooping, на основе которой работает функция Dynamic ARP Inspection. Эта функция позволяет динамически создавать связку MAC+IP на основе данных DHCP-Snooping и отбрасывать трафик от клиентов, не получивших адрес от DHCP. Таким образом, уже на уровне агрегации получается верифицированный IP, по которому можно однозначно идентифицировать клиента.
4. Далее трафик попадает в ядро сети, откуда перенаправляется в BRAS c поддержкой функционала Cisco ISG.
5. На BRAS к трафику применяются политики ограничения согласно данным, полученным из биллинга. В случае, если сессия аутентифицирована, трафик заворачивается в NAT, иначе пользователю показывается страничка с информацией о блокировке.
В этой схеме биллинг занимается только аутентификацией и авторизацией пользователей, адресным пространством же занимается внешний DHCP-сервер, никак не связанный с биллингом.
Таким образом, для реализации описанной выше схемы нужно следующее:
- Коммутаторы доступа с функцией DHCP-Snooping.
- Коммутаторы агрегации с функционалом L3 и поддержкой DHCP-Snooping, DHCP-Relay и Dynamic ARP Inspection/IP Source Guard.
- Функционал DHCP-Relay, DAI, IP Source Guard может быть вынесен на коммутаторы доступа, однако желательно все- таки оставить эти функции на коммутаторах агрегации.
- На коммутаторах доступа и агрегации порты, направленные в сторону DHCP-сервера должны быть сделаны доверенными для того, чтобы ответы от DHCP-сервера пропускались коммутатором. Соответственно порты, направленные в сторону абонентов должны быть недоверенными для того, чтобы исключить появление неавторизованных DHCP-серверов.
- DHCP-Snooping на коммутаторе агрегации не должен переписывать значение опции 82, вставленную коммутаторами доступа на недоверенных портах.
- BRAS с поддержкой Cisco ISG (Cisco 7200/Cisco ASR10xx/Cisco ESR), настроенный на инициализацию сессии при прохождении трафика. Сервер DHCP с поддержкой опции 82 (к примеру, DHCPD).
Далее опишем процесс настройки DHCP-сервера, агента RADIUS и BRAS.
DNS
Dual Domain
с внешним доменом, обычно логины совпадают с адресом электронной корпоративной почты
Сервисы
SIP registrations and provisioning on Expressway — Указывает, является ли Expressway доверенной для этого SIP-домена. Expressway действует как SIP-регистратор и сервер присутствия для данного домена, а также принимает запросы на регистрацию для любых SIP-клиентов, пытающихся зарегистрироваться с алиасом, который включает этот домен.SIP registrations and provisioning on Unified CM — Указывает действует ли Expressway в качестве шлюза для CUCM для обеспечения безопасного прохождения брандмауэра и поддержки регистрации конечных устройств на CUCM.IM and Presence Service — Указывает действует ли Expressway в качестве шлюза для IMP и поддерживает сервис мессенджинга и присутствия.XMPP federation — Указывает, что федеративные службы XMPP будут предоставляться для этого локального домена
Проще говоря участвует ли этот домен в федерации с какими-либо другими доменами.
Обратите внимание, что если требуются статические маршруты для федеративных внешних доменов, они настраиваются на Expressway-E.
Совместимость
Многие лицензии практически повторяют принципы, заложенные в GPL и отличаются, в принципе, только тем, что приняты коммерческими или другими организациями. Совместимость означает то, что отдельные части ПО с лицензией совместимого типа можно выпускать в комплексе с GPL-частями и под одной GPL лицензией.
Совместимые только с GPL v3.0 лицензии
- GNU Affero General Public License (AGPL) v3 — содержит пункт о том, что пользователи, которые взаимодействуют с программой по сети, так же должны иметь возможность получать исходные коды;
- Apache License, Version 2.0;
- Educational Community License 2.0;
- Freetype Project License;
- Microsoft Public License (Ms-PL);
- XFree86 1.1 License;
Совместимые с GNU GPL лицензии (как с v2.0, v2.1 так и с v3.0 версией)
- Artistic License 2.0;
- Berkeley Database License (aka the Sleepycat Software Product License);
- Boost Software License;
- Modified BSD license;
- CeCILL version 2;
- Cryptix General License;
- Eiffel Forum License, version 2 — предыдущие версии не были совместимы;
- Expat License;
- FreeBSD license;
- Лицензия the iMatix Standard Function Library;
- Independent JPEG Group License;
- Лицензия imlib2;
- Intel Open Source License;
- ISC License;
- NCSA/University of Illinois Open Source License;
- Лицензия Netscape Javascript;
- OpenLDAP License, Version 2.7;
- Лицензия Perl 5 и ниже;
- Public Domain;
- Лицензии Python 2.0.1, 2.1.1, и более новые версии;
- Лицензия Ruby;
- Standard ML of New Jersey Copyright License;
- Unicode, Inc. License Agreement for Data Files and Software;
- W3C Software Notice and License;
Описание настройки локальных сервисов
Сервисы могут быть заведены как локально, так и в RADIUS.
Пример конфигурации локального сервиса для ограничения скорости:
Пример сервиса для L4-redirect:
Для работоспособности сервиса редиректа необходимо создать сервис OpenGarden. В него также следует вносить списки платежных шлюзов или других ресурсов, которые должны быть доступны в момент, когда у пользователя отсутствует сервис, предоставляющий доступ в Интернет.
Примечание:
Цифровое значение перед class type в настройках сервисов указывает приоритет. Если необходимо назначить повышенную скорость до определенных сетей, то следует создать сервис с наименьшим приоритетом. Например:
При прохождении пакета сначала будет проверено вхождение в ACL для сервиса IX, далее INET.
Примеры настройки OpenGarden через RADIUS доступны на других ресурсах в Интернете, но стоит помнить, что RADIUS может быть недоступен и потому сервисы OpenGarden и L4-redirect следует держать локально в конфигурации оборудования.
Tcl Policy Register and Unregister
Script policies are registered with the single «event manager policy POLNAME» command. When this command is entered, the EEM server using the following rules to locate the policy and load it.
- If neither the system or user type is specified then EEM looks in the system area first and then the user area. This allows a user policy to override a system policy with the same name only if the user specifies a type of user. If the policy is not found in either area, the EEM will stop and emit an error. If a policy is found:
- in the system area, register the policy as registration run-type of system.
- in the user area, if digital signature support is available, look for a valid Cisco digital signature. If a valid Cisco digital signature is found, register the policy as registration run-type system. Otherwise register the policy as registration run-type user.
- If a type of system is specified look in the system area. If the policy is not found, the EEM server will stop and emit an error message. If the policy is found register the policy as registration run-type system.
- If a type of user is specified look in the user area. If the policy is not found, the EEM server will stop and emit an error message. If the policy is found, look for a valid Cisco digital signature. If a valid Cisco digital signature is found, register the policy as registration run-type system. Otherwise register the policy as registration run-type user.
The class keyword is used to specify which scheduling class the policy will be assigned to. If the scheduling class has no available threads, the policy will be registered, but a warning message will be emitted about the lack of threads.
If the trap keyword is specified, then an SNMP trap (the cEventMgrServerEvent trap from CISCO-EMBEDDED-EVENT-MGR-MIB) will be sent when the policy is triggered.
To unregister a script policy, configure the «event manager policy POLNAME» command preceded with the «no» argument. When that command is configured, the EEM Server will perform the following steps.
- All options after the policy name are ignored.
- The policy is unregistered.
- If the policy is a system mandatory policy, special rules apply. When a mandatory policy is unregistered it is not removed from the policy info queue. Instead it is simply marked as not being registered.
NOTE: Simply copying a new version of a script policy into your EEM user policy directory is not sufficient to make the changes go into effect. The policy must be re-registered first. To do that, unregister the policy with the «no event manager policy» command, then register it again with the «event manager policy» command.
Global Variable Usage
Before a global variable can be used in a Tcl procedure, it must be declared as global. For example:
proc myProc { } {
global debug
…
}
set debug 1
myProc
It is usually easy to remember this for variables you create in your policies. However, this rule also applies for Tcl-supplied global variables such as errorInfo. It is common for scripts to do something like the following:
proc myProc { } {
if { } {
error $result $errorInfo
}
}
However, if errorInfo is not declared global, the «error» command will fail with an unexpected stack trace. The proper solution is as follows.
proc myProc { } {
global errorInfo
if { } {
error $result $errorInfo
}
}
An alternative to using the global command is to use namespace syntax. The global namespace is called «::». Another way of writing the example above using namespace notation is as follows.
proc myProc { } {
if { } {
error $result $::errorInfo
}
}
NOTE: Using the «::» notation is known to have a slight performance hit. It is better to declare variables as global.
About Cisco Identity Services Engine (ISE)
Cisco Identity Services Engine (ISE) is a market leading, identity-based network access control and policy enforcement system. It’s a common policy engine for controlling, endpoint access and network device administration for your enterprise. ISE allows an administrator to centrally control access policies for wired wireless and VPN endpoints in the network.
ISE builds context about the endpoints that include users and groups (Who), device-type (What), access-time (When), access-location (Where), access-type (Wired/Wireless/VPN) (how), threats and vulnerabilities. Through the sharing of vital contextual data with technology partner integrations and the implementation of Cisco Scalable Group Policy for software-defined segmentation, Cisco ISE transforms the network from simply a conduit for data into a security enforcer that accelerates the time to detection and time to resolution of network threats.
Dynamic Event Registration
The event registration line in an EEM Tcl policy is like any other Tcl code. You can be quite creative with the content in order to register for events using dynamic data. For example, you can embed EEM environment variables into an event registration line.
::cisco::eem::event_register_syslog pattern $my_syslog_pattern occurs 3
In this example, the syslog pattern that triggers the policy can be changed without needing to modify the Tcl code.
More advanced code flows can be included as well. For example, if you want to allow a configurable maxrun timer (via an EEM environment variable), but you also want to set a reasonable default if a value is not set, you can use code similar to the following.
::cisco::eem::event_register_none maxrun ? $my_policy_timeout : 36}]
In this example, if the my_policy_timeout EEM environment variable is set, then the value of that variable will be used as the maxrun timer value. If the variable is not set, then the maxrun timer will be set to 36 seconds.
Scalability
Consider how a policy operates when it is scaled. If you are testing a policy that executes a few config commands per interface and it works great on 3 or 4 interfaces, consider what would happen if the number of interfaces is increased to one thousand or two thousand which may be more realistic in a production environment. Sending one config command to several hundred interfaces can take a really long time. In the case of interfaces, using the «interface range» notation is a way to deploy a set of commands to a large number of interfaces at once.
By default, EEM allocates 32 scheduler threads for applets and one thread each for Tcl and IOS.sh policies. This means that up to 32 applets can run at one time where as only one of each Tcl and IOS.sh policy can run simultaneously. If you are making heavy use of script policies, you may find that if many policies are triggered at the same time, events will be lost. This is because each type of policy has a fixed-size event pool. If the pool fills up before the events can be serviced, then new events will be dropped. By default, applet and Tcl policies have event queue sizes of 64 where as the IOS.sh queue’s size is 128.
To modify the number of policies that can be executed simultaneously, use the «event manager scheduler TYPE thread class default number NUM» command, where TYPE is the policy type (either applet, shell, or script) and NUM is the number of policies that can be run simultaneously. For example, to allow for 10 EEM Tcl policies to be run simultaneously, configure the following command.
Router(config)#event manager scheduler script thread class default number 10
The ability tune the number of Tcl threads was added in EEM 2.3 where as the ability to tweak the number of applet threads was added in EEM 3.0.