Как сделать регистрацию
Содержание:
- Reviews
- Frequently Asked Questions (FAQ)
- Основной сайт сети
- Добавьте двух-факторную авторизацию или дополнительные вопросы
- Покупка хостинга. Надёжный хостинг BeGet
- Reviews
- Basic Instructions # Basic Instructions
- Description
- WP-RECALL Плагин для реализации личного кабинета на сайте WordPress
- Reviews
- Pages – Your Static Content # Pages – Your Static Content
- Reviews
- Toolbar – Keeping It All Together # Toolbar – Keeping It All Together
- Through MySQL Command Line # Through MySQL Command Line
- Changelog
- Как добавить домен и установить CMS WordPress на хостинг Beget
Reviews
http-equiv=»Content-Type» content=»text/html;charset=UTF-8″>lass=»plugin-reviews»>
I highly recommend this plugin. It is super easy to use and everything is straight forward. You can pick the expiration period and everything. I found out about this plugin through Yoast and I am thankful for it. Yoast actually recommends this plugin.
What a plugin of this kind should be, provides the solution for the requirement in the most straightforward way possible. Thanks a lot.
Fast easy setup and no problems for support to login. Highly recommended
Thanks, this plugin is really helping a lot when I need support.
Very good plugin!
A great plugin with useful parameters to allow someone temporary access to your wordpress site.
Frequently Asked Questions (FAQ)
When will the WordPress Editor be available on WordPress.org?
It already is! The block editor is set as your default editor unless you installed the classic editor plugin
Does the Block editor allow editing posts and pages in the front-end?
No. It’s a representation of what site visitors see on the front-end of your site. However, the layout and visual experience in the editor are much closer to the way things look like on the public-facing side of your site.
How will my existing content look?
Your current content should look the same as it did before. If you edit an existing post or page in the new editor, all the content will be placed in a Classic Block, which will treat it the same way that the Classic editor did.
Why doesn’t my content look the same in the editor and on the site?
You may see some variation between your content in the editor and on the site, largely because of the way your theme displays different visual elements. Some themes will include styles to help the editor look more like the front of the site; others will not. If your theme includes a sidebar, for example, you won’t see it in the editor, which may affect the width of your content when it displays on the front of the site.
Why are some settings available on one of my sites, but not another?
Some settings in blocks — “wide” or “full-width” — need to be supported by your theme. While the same blocks will be present on different sites, the specific settings you can apply to those blocks might be a bit different based on your active theme.
Will I still be able to use the Classic editor?
To switch to the classic editor, install and activate the Classic Editor plugin in your site.
Do shortcodes still work?
Yes. The editor comes with a shortcode block, which you can use for shortcodes just like before. In the future many shortcodes will become their own blocks.
Is this editor accessible?
Our aim is for the WordPress Editor to be as accessible as previous editors if not more so. We want everyone to be able to use it. The WordPress Accessibility Coding Standards state that “All new or updated code released in WordPress must conform with the WCAG 2.0 guidelines at level AA.“ This will be no exception.
Do I need to use a particular theme for the new editor?
No. The block editor will work with all themes. However, only some themes might support specific layout features (like “wide” and “full width” content). Some blocks CSS might need small adjustments for a better display.
Change Log
- Update 2020-08-17
- Added Section: New to WordPress 5.5
- Added link to Block Directory page.
- Update 2020-03-29
- Update 2020-03-19
- Update 2020-03-18
- changed occurrences of “new editor” to “block editor”
- changed occurrences to “old editor” to “Classic editor”
- Added Anatomy of a Block graphic and explanations
- Reformatted the FAQ questions to Paragraph with medium size bolded text instead of Capitalized H5
- Added link to Classic Block page and Shorcode Block page
- Changed link to the Shortcut list to the
Основной сайт сети
По умолчанию, WordPress открывает страницу регистрации () на основном домене (сайте) сети. Тем не менее, можно создавать страницы регистрации для каждого сайта сети, даже если у них разные домены и темы.
Мы будем рассматривать случай, когда на всех сайтах сети используется одна тема, но на каждом из них есть страница регистрации. Сайты различаются языком (английский и русский), поэтому страница регистрации будет выводиться на «родном» языке сайта. В случае, если сайты используют разные темы, все будет зависеть от того, какие именно это темы, подойдет ли им одинаковая верстка (отличная ситуация, которая может подтолкнуть вас к унификации всех своих тем) или стоит прорабатывать страницы индивидуально.
Добавьте двух-факторную авторизацию или дополнительные вопросы
Двух-факторная авторизацация — это идентификация через логин и пароль, плюс дополнительная идентификация через смартфон или е-мейл. Для включения двойной авторизации есть бесплатные плагины, например, Google Two-Factor Authentication, Google Authenticator или Duo Two-Factor Authentication.
Или в большом плагине Wordfence.
Google Authenticator — WordPress Two Factor Authentication (2FA , MFA)
Author(s): miniOrange
Current Version: 5.4.14
Last Updated: 14.08.2020
Довольно интересный плагин двух-факторной авторизации UNLOQ Two Factor Authentication (2FA):
UNLOQ Two Factor Authentication (2FA)
Author(s): UNLOQ.io
Current Version: 2.1.24
Last Updated: 24.02.2020
Для его работы нужно установить приложение на смартфон, после этого на него будут приходить push-уведомления, в которых вы можете разрешить или запретить доступ. Можно настроить вход только по push-уведомлениям или вместе с одноразовым кодом на смартфон или е-мейл.
Упрощенная версия этой идеи — дополнительные вопросы на странице авторизации. Установите плагин WP Security Questions:
Дополнительные вопросы на странице авторизации
Покупка хостинга. Надёжный хостинг BeGet
Я использую данный хостинг уже приличное время и очень им доволен. Поэтому и вам предлагаю выбрать его. Хостинг бегет не дорогой, понятная панель управления, а также хостинг заточен для работы наиболее популярных CMS (систем управления сайтом).
Таких как: Joomla!, WordPress, Drupal и многие другие, как платных так и бесплатных CMS. Все бесплатные движки для сайта устанавливаются автоматически (об этом речь будет чуть ниже), вообщем любому новичку, то, что нужно.
Цены на хостинг очень даже выгодные, в том числе для тарифов, на которых можно размещать 5 (как у меня) и более сайтов одновременно. Представляется возможность 30 дней тестового периода, то есть, бесплатно. Если вы решили разместить сайт на этом хостинге, то вам необходимо зайти на сайт . Выбрать подходящий тарифный план. Вполне хватит тариф START на пять сайтов, 10 Гб дискового пространства и многое другое:
Базовые тарифы на хостинг. Выбираем Start
Заполните форму регистрации аккаунта. Заполняем все необходимые поля и кликаем — Зарегистрировать аккаунт:
Зарегистрировать аккаунт
После регистрации в системе уже можно начинать непосредственно работу над размещением сайта, блога в Сети. Как вы уже знаете выше, даётся месяц на тестирование хостинга, после этого можете оплачивать (помесячно или сразу за год). Вот мы уже находимся на пол пути к появлению нового сайта в интернете.
Reviews
http-equiv=»Content-Type» content=»text/html;charset=UTF-8″>lass=»plugin-reviews»>
Can I use a hyperlink in forms anyway in the free version?
A dedicated plugin with excellent functionalities and very flexible to customize it to your favour and I can truly recommend this plugin. Furthermore, the price of the premium version of the plugin is very reasonable. I got great support for the free version of the product so imagine what you’ll get if you use the premium version. 100% recommended.
Word press is one of the best things that has happened to this generation
It took a little while to get everything settled, but with the support docs I have it all up and running. Yay!
This one does exactly what I want and it has enough options to be very versatile, but not so many you’ll drown in them. I’m very happy with this one.
Really nice
Basic Instructions # Basic Instructions
Here’s the quick version of the instructions for those who are already comfortable with performing such installations. More follow.
- Download and unzip the WordPress package if you haven’t already.
- Create a database for WordPress on your web server, as well as a (or MariaDB) user who has all privileges for accessing and modifying it.
- (Optional) Find and rename wp-config-sample.php to wp-config.php, then edit the file (see Editing wp-config.php) and add your database information.Note: If you are not comfortable with renaming files, step 3 is optional and you can skip it as the install program will create the wp-config.php file for you.
- Upload the WordPress files to the desired location on your web server:
- If you want to integrate WordPress into the root of your domain (e.g. http://example.com/), move or upload all contents of the unzipped WordPress directory (excluding the WordPress directory itself) into the root directory of your web server.
- If you want to have your WordPress installation in its own subdirectory on your website (e.g. http://example.com/blog/), create the blog directory on your server and upload the contents of the unzipped WordPress package to the directory via FTP.
- Note: If your FTP client has an option to convert file names to lower case, make sure it’s disabled.
- Run the WordPress installation script by accessing the URL in a web browser. This should be the URL where you uploaded the WordPress files.
- If you installed WordPress in the root directory, you should visit: http://example.com/
- If you installed WordPress in its own subdirectory called blog, for example, you should visit: http://example.com/blog/
That’s it! WordPress should now be installed.
Description
Members is a roles and capabilities based WordPress membership plugin. It gives your users the ultimate member experience by giving you powerful tools to add roles and capabilities and assign them to your users.
Members allows you to set permissions to restrict content on your site by providing a simple user interface (UI) for WordPress’ powerful roles and capabilities system, which has traditionally only been available to developers who know how to code this by hand.
Plugin Features
- Role Editor: Allows you to edit, create, and delete roles as well as capabilities for these roles.
- Multiple User Roles: Give one, two, or even more roles to any user.
- Explicitly Deny Capabilities: Deny specific capabilities to specific user roles.
- Clone Roles: Build a new role by cloning an existing role.
- Content Permissions / Restricted Content: Protect content to determine which users (by role) have access to post content.
- Shortcodes: Shortcodes to control who has access to content.
- Widgets: A login form widget and users widget to show in your theme’s sidebars.
- Private Site: You can make your site and its feed completely private if you want.
- Plugin Integration: Members is highly recommended by other WordPress developers. Many existing plugins integrate their custom roles and capabilities directly into it.
Seamless MemberPress Integration
If you’re looking to build a business out of your membership site by creating paid memberships there’s no better way than to use MemberPress. Members and MemberPress work together to provide the ultimate member experience and will help you start and profit from your amazing WordPress membership sites!
All Add-ons are now included
Members now includes ALL of it’s add-ons completely free of charge! Here are some of the awesome features they add to Members:
- Block Permissions: Allows site owners to hide or show blocks based on user logged-in status, user role, or capability.
- Privacy Caps: Creates additional capabilities for control over WordPress†privacy and personal data features (GDPR).
- Admin Access: Allows site administrators to control which users have access to the WordPress admin via role.
- Core Create Caps: Adds the create_posts and create_pages caps to posts/pages to separate them from their edit_* counterparts, providing more flexible editing capabilities.
- Categories and Tag Caps: The Category and Tag Caps add-on creates custom capabilities for the core category and post tag taxonomies. This allows site owners to have precise control over who can manage, edit, delete, or assign categories/tags.
- Role Levels: Exposes the old user levels system, which fixes the WordPress author drop-down bug when users donâ€t have a role with one of the assigned levels.
- Role Hierarchy: Creates a hierarchical roles system.
- ACF Integration: Creates custom capabilities for the Advanced Custom Fields (ACF) plugin for managing with the Members plugin.
- EDD Integration: Integrates the Easy Digital Downloads plugin capabilities into the Members plugin’s role manager.
- GiveWP Integration: Integrates the GiveWP and GiveWP Recurring Donations plugin capabilities into the Members plugin’s role manager.
- Meta Box Integration: Integrates the Meta Box plugin capabilities into the Members plugin’s role manager.
- WooCommerce Integration: Integrates the WooCommerce plugin capabilities into the Members plugin’s role manager.
For more info, visit the Members plugin home page.
Like this plugin?
The Members plugin is a massive project with 1,000s of lines of code to maintain. A major update can take weeks or months of work. We donâ€t make any money directly from this plugin while other, similar plugins charge substantial fees to even download them or get updates. Please consider helping the cause by:
- Upgrading to MemberPress.
- .
WP-RECALL Плагин для реализации личного кабинета на сайте WordPress
Базовая часть плагина уже включает в себя широкий спектр функций, которые вы можете использовать сразу после активации.
Добавление кнопки “ВХОД, РЕГИСТРАЦИЯ | ВЫЙТИ” Без использования плагина WP-RECALL
Если Вам не нужен функционал отличного плагина WP-RECALL а достаточно простого перехода на определенную страницу (например страницу личного кабинета созданного при помощи стороннего плагина, или в админ панель WP) после аутентификации. Вам необходимо перейти в свое меню на сайте, и создать новый пункт меню с следующим содержимым:
URL
Текст ссылки
Классы CSS
Внешний вид данного меню должен быть таким:
После добавления пункта в меню, не забудьте сохранить меню.
Добавление кнопки “ВХОД, РЕГИСТРАЦИЯ | ВЫЙТИ” с использованием плагина WP-RECALL
Данный вариант пригодится Вам если Вы хотите использовать всплывающую форму WP-RECALL (попап) для авторизации на сайте. Вам необходимо прийти в свое меню на сайте, и создать новый пункт меню с следующим содержимым:
URL
Текст ссылки
Классы CSS
Здесь Важным моментом является класс:
Ведь только благодаря ему на сайте и появится всплывающее окно для входа на сайт.
Внешний вид данного меню должен быть таким:
После добавления пункта в меню, не забудьте сохранить меню.
Если Вы все сделали правильно, то увидите данное всплывающее окно при нажатии на кнопку “ВХОД, РЕГИСТРАЦИЯ”:
Сценарий перехода на нужные страницы при входе и выходе v1 – (Отличный, актуальный вариант)
Теперь мы добрались к той самой важной части, которая отвечает за переход на нужную страницу в зависимости от события входа или выхода. То есть речь идет о редиректе после входа или же выхода из админ панели или личного кабинета (без разницы, создан личный кабинет при помощи WP-RECALL, или каким-то другим плагином)
Данный вариант самый практичный и пригодится в большинстве случаев реализации ЛК (ЛК – личный кабинет).
В начале мы изменим настройки нашего пункта меню для входа и выхода. Точнее нам необходимо будет только заменить ссылку следующим содержимым:
URL
Это слаг страницы личного кабинета, у Вас он может отличаться.
Внешний вид данного меню должен быть таким:
Все, теперь мы можем быть полностью спокойны что при выходе с сайта пользователь не попадет на страницу с текстом “Вы вышли из системы.” или “Вы уверены, что хотите выйти”. Ну а при входе пользователь точно попадет на страницу аккаунта.
И так что если нам необходимо где-то еще добавить ссылку на выход из системы? Для этого достаточно добавить ссылку:
Но, в таком случае в 90% случаев опять появится редирект на страницу подтверждения выхода все с теми же уведомлениями “Вы вышли из системы.” или “Вы уверены, что хотите выйти”. Для того что бы можно было беспрепятственно добавить и использовать ссылку необходимо воспользоваться функцией ниже:
Теперь спокойно используем ссылку, в любом месте сайта, и не волнуемся о появлении страницы с уведомлениями.
Это слаг страницы личного кабинета, измените его на слаг своей страницы.
Reviews
http-equiv=»Content-Type» content=»text/html;charset=UTF-8″>lass=»plugin-reviews»>
it helped me a lot to solve some problems I had on my website.
quick and easy. Can not miss on my website
Easy to use plugin, good support by the author.
Does not work. Support forum does not work either.
The interface was really great hidden under wordpress native menues in version 2.2.0 now its all over the place in its own menu, thats really not cool, I think ill be stuck with versión 2.2 forever sometimes there are just to many menues and this plugin helps to make a mess in the wp admin with the latest version.
After installing this plugins author capability changed in and can not login in admin panel.
Pages – Your Static Content # Pages – Your Static Content
A is another tool to add content to a WordPress site and is often used to present “static” information about the site; Pages are typically “timeless” in nature. A good example of a Page is the information contained in “About” or “Contact” Pages. A Page should not be confused with the time-oriented objects called Posts, nor should a WordPress Page be confused with the word “page” referring to any web page or HTML document on the Web.
Because Pages live outside of the normal blog chronology, and as such, are not displayed with the rest of your Posts, but are displayed individually.
All Pages
The All Pages Screen provides the necessary tools to edit, delete or view existing Pages. On this Screen you can select the Page to edit, delete or view. Multiple Pages can be selected for deletion and for editing. A powerful bulk edit tool allows certain fields to be edited for a whole group of Pages. A handy in-line edit tool, called Quick Edit, allows you to update many fields for an individual Page. Various search and filtering options allow you to find the Pages you want to edit or delete.
Reviews
http-equiv=»Content-Type» content=»text/html;charset=UTF-8″>lass=»plugin-reviews»>
I have been using UWP for almost a year now and have only pleasent experience to share with you all, whether it’s the easy to understand and use interface of UWP or a resolution of an issue.
I have not only raised issues but have given my suggestions as well and each time, my messages have been received well and a resolution provided.
Manish
I’ve been very happy with the level of support from the Ayecode team. I also like how the plugin continues to improve upon itself, adding more functionality as it grows. Keep up the good work!
This is my first time leaving a review but that’s because THIS PLUGIN IS PERFECT. I’ve been looking for something for ages. It’s complete. Not overly done. Simply to configure. Seriously. PLEASE CONTINUE UPDATING THIS PLUGIN.
In the past 12 months, I think I’ve tested all the free plugins and many paid plugins without being completely satisfied, as if I was left hungry, severely in the dark.
So, with usersWP, I too want to say: FINALLY!
A plugin developed intelligently, with just the necessary options because certain configurations are done automatically by logical deduction of the fields activated or not.
Being a senior developer myself, I usually add my own code to free plugins. But this time, it was with pleasure that I agreed to pay for the Modarator addon, the code of which is certainly of much better quality than what I could have produced myself.
Even if it’s free, the quality of the code is here and the support is very responsive.
I extend my encouragement to the team.
I bought the premium license of the plugin and installed the following plugin, but it didn’t work. It was compatible with the WordPress theme and compatible plugin. My goal is to use the userswp plugin, disable all other installed plugins, change the theme and try again and again but it didn’t work again. I contacted the plugin writer by default, but I did not get any results. Finally, I requested a refund of the fee I paid for the premium license. I expect them to return.
EDİT:
The plugin writer was interested in my error and resolved the problem soon. Due to the late support that coincides with the weekend, I increase 1 star to 4 stars. Thank you userswp team
plugin used to work quite well and then suddenly I get this message «Oops! That page can’t be found.» while I try to get to users profiles !!!!
Toolbar – Keeping It All Together # Toolbar – Keeping It All Together
The Toolbar contains links to information About WordPress, as well as quick-links to create new posts, pages and links, add new plugins and users, review comments, and alerts to available updates to plugins and themes on your site.
Tips: To hide the Toolbar, go to Administration Screens > Users > Your Profile, and turn off “Show Toolbar when viewing site” of Toolbar option.
About WordPress
At the left-most side of the Toolbar is a WordPress logo. Place, or hover, the mouse cursor over the logo to see to About WordPress, WordPress.org, Documentation, Support, and Feedback.
The top link on that menu is for the ‘About WordPress’ page, which contains tabs for What’s New, Credits, Freedoms and Privacy.
- What’s New screen describes many of the new features WordPress current version.
- Credits screen provides some details about the various individuals who contribute to the WordPress code base.
- Freedoms screen describes your rights as a user of WordPress as open source software.
- Privacy screen describes handling of privacy information in WordPress.
Visit Site link
In the Toolbar, to the right of the WordPress logo, your site name is displayed as a link. Hover over the site name to see the View Site link to visit the main page of your site.
Howdy, User
On the far right of the Toolbar is “Howdy, User”, with an image of your Gravatar. When hovered over, this expands to link you to your Profile Screen as well as a Log Out link.
Howdy, User
When you log in to your blog, WordPress stores a so called cookie in your web browser. This cookie allows WordPress to remember who you are; if you leave your blog’s site for a while but come back to it later, WordPress will see the cookie and not require you to log in again.
Tips: If you have a WordPress cookie set in your web browser, anyone using your computer can access the Administration Screens of your blog. If you don’t want this to happen (perhaps you are using a public computer or a computer which other people use), you can click this Log Out link, and WordPress will delete the cookie from your web browser.
Screen Options
Screen Options, displayed as a hanging tab under the toolbar, allow the user to decide what fields or modules are presented in the work area for a given Administration Screen. Each Screen may have a different set of Screen Options.
Click on the Screen Options tab to expand the options available for a particular Screen, check (or uncheck) the desired options, then click the Screen Options hanging tab to collapse the Screen Options.
Screen Options
Help
Contextual Help, displayed as a hanging tab under the toolbar, displays one or more Help items that are related to the Screen that is displayed in the work area.
Click on the Help tab to expand the Help available for a particular Screen, then click the Help hanging tab to collapse the Help display.
Through MySQL Command Line # Through MySQL Command Line
- Get an MD5 hash of your password.
- Visit md5 Hash Generator, or…
- Create a key with Python, or…
- On Unix/Linux:
- Create a file called wp.txt, containing nothing but the new password.
- tr -d ‘\r\n’ < wp.txt | md5sum | tr -d ‘ -‘
- rm wp.txt
- On Mac OS X:
- Create a file called wp.txt, containing nothing but the new password. Then enter either of the lines below
- md5 -q ./wp.txt; rm ./wp.txt (If you want the MD5 hash printed out.)
- md5 -q ./wp.txt | pbcopy; rm ./wp.txt (If you want the MD5 hash copied to the clipboard.)
- “mysql -u root -p” (log in to MySQL)
- enter your mysql password
- “use (name-of-database)” (select WordPress database)
- “show tables;” (you’re looking for a table name with “users” at the end)
- “SELECT ID, user_login, user_pass FROM (name-of-table-you-found);” (this gives you an idea of what’s going on inside)
- “UPDATE (name-of-table-you-found) SET user_pass=”(MD5-string-you-made)” WHERE ID = (id#-of-account-you-are-reseting-password-for);” (actually changes the password)
- “SELECT ID, user_login, user_pass FROM (name-of-table-you-found);” (confirm that it was changed)
- (type Control-D to exit mysql client)
Note: if you have a recent version of MySQL (version 5.x?) you can have MySQL compute the MD5 hash for you.
- Skip step# 1 above.
- Do the following for step# 7 instead.
Note that even if the passwords are salted, meaning they look like $P$BLDJMdyBwegaCLE0GeDiGtC/mqXLzB0, you can still replace the password with an MD5 hash, and WordPress will let you log in.
Changelog
= 1.8.6 – 11/08/2020
* Enhance – Login form customization
* Enhance – Introduce tooltips in Form Builder
* Enhance – Copy icon on shortcode column in registration forms list table
* Enhance – Option to disable logout confirmation
* Tweak- WordPress 5.5 Compatibility
* Fix – Profile picture, file upload, mailchimp and smart phone field sync with woocommerce
* Fix – ReCaptcha script loads in lost password page
* Fix – Cannot auto scroll while dragging fields in the form builder
* Fix – Required option and Hide Label option conflict
* Fix – Reset password for other plugin registered users
* Dev – SASS files
= 1.8.5 – 13/07/2020
* Feature- Ajax form submission on edit profile
* Dev – Added OR Logic Gate in conditional logic.
* Dev – User Registration Stripe Addon Compatibility.
* Dev – User Registration Extras Addon Compatibility.
* Dev – Content Restriction Access Rules.
* Fix – Form Preview issue.
* Fix – My account shortcode with Elementor.
* Fix – User approval status change and filter.
* Fix – Date field value disappearing from the Profile Details section.
* Fix – UR script enqueued in non UR-Page.
* Fix – WPML Compatibility in myaccount section.
* Fix – Multiple forms load and submit.
* Fix – wysiwyg field value update in admin profile edit.
* Fix – Phone field country code submission.
= 1.8.4 – 14/05/2020
* Enhance – Add custom CSS class in fields.
* Dev – MailChimp add-on compatibility changes.
* Dev – File upload addon compatibility changes
* Dev – Invite code add-on compatibility changes.
* Fix – Display of new users count even after the all users page refresh
* Fix – Enable/Disable checkbox backward compatibility
* Fix – Elementor plugin nav menu title conflict.
= 1.8.3 – 17/04/2020
* Security – Form field validation for missing required fields.
* Enhance – Toggle out on clicking out of form name edit box.
* Enhance – Confirmation message on field deletion.
* Enhance – Form live changes for conditional logic.
* Enhance – Registered At column to display registered log.
* Dev – WordPress v5.4 Compatibility.
* Dev – WPML compatibility for Select2 and Multi Select2 fields.
* Dev – Invite code compatibility with the conditional logic addon.
* Fix – Section division issue in form builder.
* Fix – Multiple date field.
* Fix – User approval status.
* Fix – Enable Recaptcha and password strength checkbox backward compatibility.
* Fix – Placeholder conflict with the value of the select field.
* Fix – User Registration component placeholder design on Gutenblock.
* Fix – Form event submit conflict in presence of popup creator plugins.
= 1.8.2.1 – 20/03/2020
* Fix – Unable to Login User Due to Pending Status.
* Fix – Recaptcha Backward compatibility
= 1.8.2 – 18/03/2020
* Feature – Search Field introduced in form builder.
* Enhancement – Prevent Core Login enabled with redirect login page.
* Enhancement – WPML on multiple choice options.
* Refactor – Remove unnecessary CSS codes.
* Tweak – Custom class in submit button.
* Tweak – Password strength meter and password visibility enabled in change password.
* Fix – User Approval status in Users Section.
* Fix – Toggle option in field option’s setting.
* Fix – pre_get_users hook placement.
* Fix – Password reset link validation.
* Fix – Incompatibility with password fields of other registration plugins.
= 1.8.1 – 13/02/2020
* Fix – Fatal error while installing the plugin.
* Fix – SweetAlert issue.
1.7.6 – 30/12/2019
- Enhancement – Registered user source.
- Tweak – Remove inline css from recaptcha.
- Fix – Email attachment hook mismatch arguments.
- Fix – wp_authenticate_user filter mismatch arguments.
- Fix – Hide/show password enabled in edit profile.
Как добавить домен и установить CMS WordPress на хостинг Beget
В качестве примера я буду использовать движок WP, так как сам сижу на нём и это самая популярная система управления контентом для ведения собственного сайта. WordPress бесплатен и свободен к распространению. И так, зайдите в панель управления вашим хостингом. Для добавление существующего домена необходимо зайти в раздел «Домены и поддомены»:
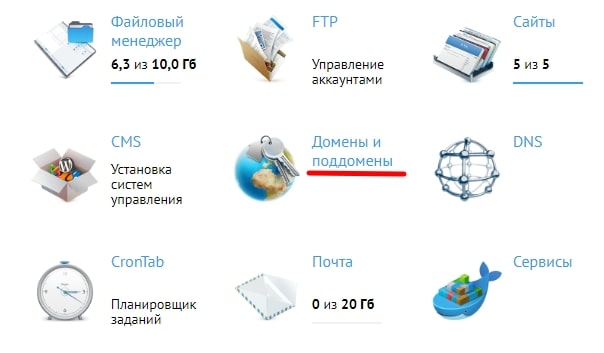 Раздел Домены и поддомены
Добавление доменов и поддоменов. В поле Домены: введите ваш домен/ы. При добавлении домена нужно указать:Создать новый сайт для домена.В данном случае под сайтом подразумевается директория на диске. Например, если мы заказываем домен mydomain.ru и выбираем «Создать новый сайт«, на диске будет автоматически создана директория ~/mydomain.ru, а в ней директория public_html, куда и необходимо будет загружать файлы сайта. Например:
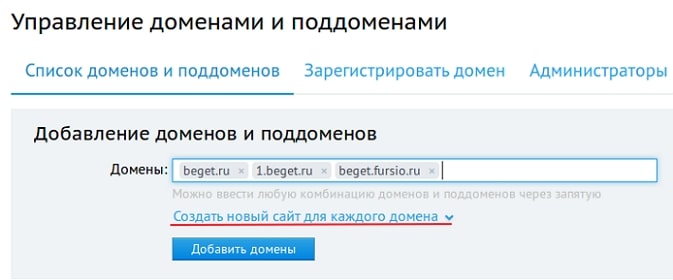 Добавление уже зарегистрированного домена
После выполнения этой операции вам необходимо подождать 10-15 минут (это время необходимо для того, чтобы домен успешно прописался на DNS-серверах). Вот и всё. Готово.
Сайт вы создали, но он работать пока не будет. Для полного счастья не хватает только движка для вашего нового сайта. Будем устанавливать его на хостинг. В панели управления хостингом выбираем раздел «Автоматическая установка CMS». Раздел CMS позволит быстро установить любую из более чем 30 популярных CMS (Content Managment System — Система Управления Контентом):
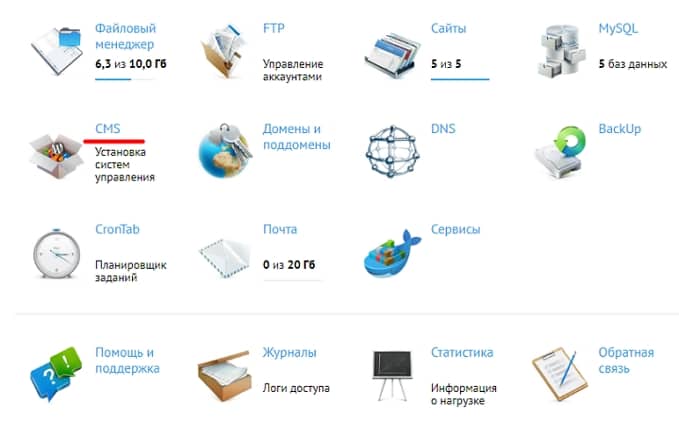 Системы управления контентом (CMS)
После открытия раздела (на моём скриншоте будет два списка, у вас только тот сайт на который нужно установить движок) вы увидите два списка: сайты на которые уже установлены CMS:
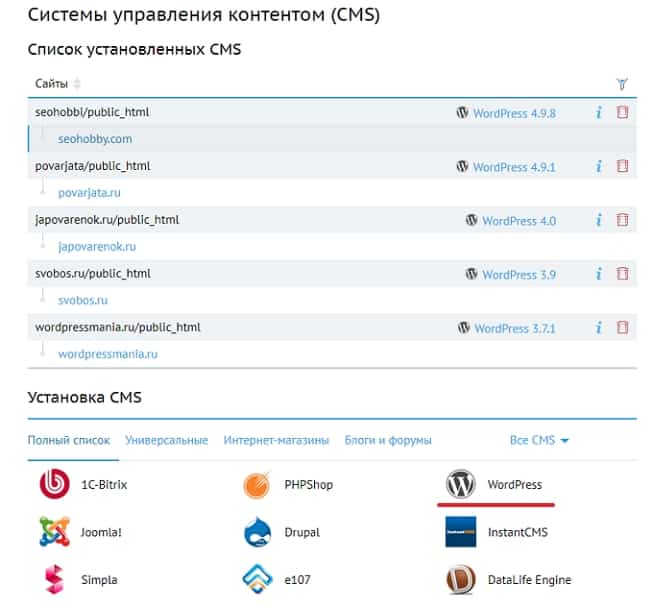 Список установленных CMS и Установка CMS
Нажимаете WordPress, в примере будет вордпресс, а вы можете установить движок любой, какой вам нужен. После нажатия на логотип CMS вы можете в диалоговом окне выбрать сайт, на который она будет установлена, а также ввести необходимые данные для установки.
Скажу сразу, вы сделали правильный выбор, решив создать свой веб-проект на платформе WordPress. Сам ведущий специалист в Google по интернет спаму и оптимизации сказал, что WP — отличная CMS для продвижения сайта в поисковых системах.—Matt Cutts—
 Автоматическая установка CMS WordPress. Данные для управления сайтом
Установка происходит в течение минуты и появляется информация для вашего сайта. Я только затёр на скрине мои данные (сами знаете почему):
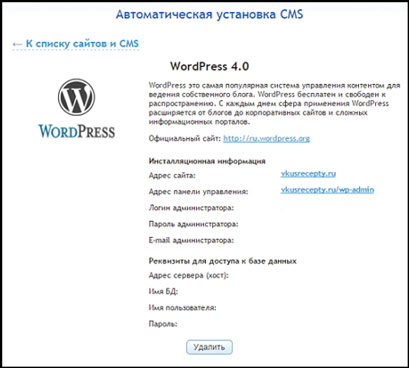 Инсталляционная информация и реквизиты для доступа к базе данных
Здесь, нужная вам вся информация о сайте, вы можете в любой момент посмотреть её, вдруг вы забудете или потеряете логин и пароль для входа в административную панель сайта.
Вот и все! Поздравляю, вы только что, создали свой сайт на Вордпресс. Вы выполнили все шаги и теперь ваш сайт уже должен начать работать на хостинге. Не забывайте, что свеже зарегистрированный домен заработает не сразу, равно как и домен, у которого изменялись DNS-записи. Но совсем скоро блог/сайт начнет открываться по своему имени и вы сможете начать принимать на нем первых посетителей.
Для входа в панель управления вашего только, что созданного сайта нажмите ссылку (информация сайта) «ваш сайт.ru/wp-admin». Введите свои данные:
Вход в панель управления сайтом
Войдите и вы в консоле управления своего нового сайта или блога на движке WordPress:
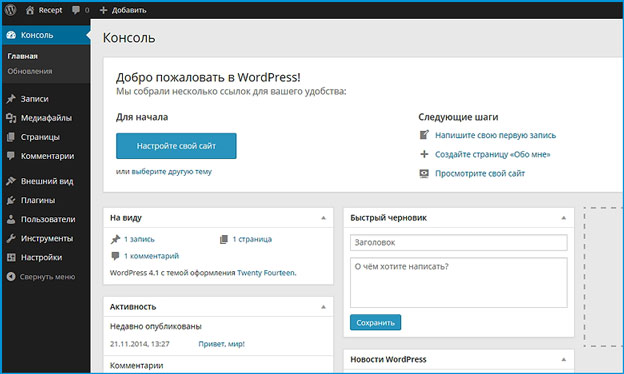 Админпанель сайта WordPress