Virtual network computing
Содержание:
- USAGE WITH INETD
- Тестирование и отладка
- How long do we retain your data for?
- Easy & secure remote access from anywhere
- License for usage with ultravnc
- Установка VNC Server на Ubuntu 18.04
- DESCRIPTION
- OPTIONS
- Where do we store your data?
- What has PCHelpWare in common with UltraVNC «Single click» ?
- Подключение к VNC серверу
- Easy & secure remote access from anywhere
- Alternatives to VNC
- Заключение
USAGE WITH INETD
By configuring
the inetd(1) service appropriately, Xvnc can be
launched on demand when a connection comes in, rather than
having to be started manually. When given the -inetd
option, instead of listening for TCP connections on a given
port it uses its standard input and standard output. There
are two modes controlled by the wait/nowait entry in the
inetd.conf file.
In the nowait
mode, Xvnc uses its standard input and output directly as
the connection to a viewer. It never has a listening socket,
so cannot accept further connections from viewers (it can
however connect out to listening viewers by use of the
vncconfig program). Further viewer connections to the same
TCP port result in inetd spawning off a new Xvnc to deal
with each connection. When the connection to the viewer
dies, the Xvnc and any associated X clients die. This
behaviour is most useful when combined with the XDMCP
options -query and -once. An typical example in inetd.conf
might be (all on one line):
5950 stream tcp
nowait nobody /usr/local/bin/Xvnc Xvnc -inetd -query
localhost -once securitytypes=none
In this example
a viewer connection to :50 will result in a new Xvnc for
that connection which should display the standard XDM login
screen on that machine. Because the user needs to login via
XDM, it is usually OK to accept connections without a VNC
password in this case.
In the wait
mode, when the first connection comes in, inetd gives the
listening socket to Xvnc. This means that for a given TCP
port, there is only ever one Xvnc at a time. Further viewer
connections to the same port are accepted by the same Xvnc
in the normal way. Even when the original connection is
broken, the Xvnc will continue to run. If this is used with
the XDMCP options -query and -once, the Xvnc and associated
X clients will die when the user logs out of the X session
in the normal way. It is important to use a VNC password in
this case. A typical entry in inetd.conf might be:
5951 stream tcp
wait james /usr/local/bin/Xvnc Xvnc -inetd -query localhost
-once passwordFile=/home/james/.vnc/passwd
In fact
typically, you would have one entry for each user who uses
VNC regularly, each of whom has their own dedicated TCP port
which they use. In this example, when user «james»
connects to :51, he enters his VNC password, then gets the
XDM login screen where he logs in in the normal way.
However, unlike the previous example, if he disconnects, the
session remains persistent, and when he reconnects he will
get the same session back again. When he logs out of the X
session, the Xvnc will die, but of course a new one will be
created automatically the next time he connects.
Тестирование и отладка
Теперь можно входить в систему с удаленного компьютера с помощью VNC-клиента. Большинство дистрибутивов Linux содержат команду vncviewer, так что можно ввести:
vncviewer
. . . чтобы войти в систему remotename через VNC. Если VNC настроена и работает правильно, результат будет примерно таким, как показано на рисунке 4. Если настроить несколько сеансов VNC через разные порты, можно указать номер сеанса VNC, передав его как часть имени хоста. Введите:
vncviewer :3
. . . чтобы войти в сеанс 3 (через порт 5903).
Рисунок 4. При настройке на работу с XDMCP VNC обеспечивает обычное приглашение Linux
Кликните, чтобы увидеть увеличенное изображение
Если при выполнении этого теста вы не видите экран входа в систему XDMCP, придется произвести отладку. Ниже приведены некоторые рекомендации.
- Если
vncviewerсообщает, что в соединении было отказано, это, скорее всего, означает, что суперсервер на компьютере сервера VNC не настроен должным образом. Проверьте конфигурациюxinetdи попробуйте перезапустить суперсервер. Возможно также, что межсетевой экран блокирует доступ к компьютеру VNC-сервера. - Если VNC-клиент запускается и подключается к серверу, но вы видите только серый экран с курсором, который можно перемещать, проблема, скорее всего, в настройке XDMCP-сервера. Проверьте описанные выше параметры и перезапустите XDMCP-сервер.
- Просмотрите файлы журнала событий, как это обычно делается при отладке. Может потребоваться поиск всех файлов журнала в каталоге /var/log по ссылкам на ваши
xinetd, XDMCP-сервер и VNC-сервер.
How long do we retain your data for?
We will only retain your personal information for as long as necessary to fulfil the purposes we collected it for, including for the purposes of satisfying any accounting or legal requirements.
To determine the appropriate retention period for the personal information we hold, we consider the amount, nature and sensitivity of the personal information, the risk of harm from unauthorised use or disclosure of your personal information, the reasons why we handle your personal information and whether we can achieve those purposes through other means, and the applicable legal requirements. If you require further information about our specific retention periods, please contact us at privacy@realvnc.com.
Easy & secure remote access from anywhere
PCHelpWare is a free alternative to the various comercial remote assistance services that can be found on the netPCHelpWare is a powerful remote support software that allows you to control (right from your own PC) a distant PC connected to the internet. It is the ideal solution to provide quick remote assistance and help your customers, colleagues, friends and family members, even if they are on the other side of the worldPCHelpWare is customizable you can create your own server package with your logo and -company- nameThe individual you want to remotely assist only has to download and execute your customized package. That’s allNo router/modem/firewall configuration is needed to access a remote PC even when it’s standing on a protected network behind a NATIf your PC is also behind Firewall/NAT routers, PCHelpware has the solution that makes everything simple anywayUsing the provided Repeater service, no router configuration is needed at all
License for usage with ultravnc
1. GRANT OF LICENSE:UVNC bvba hereby grants Ultr@VNC Team -non-exclusive, royalty-free, worldwide, perpetual license to distribute, use the software product «Mirror driver» in binary form for their remote controle software. Ultr@VNC Team hereby grants the end-user the right to use and distribute the software product «Mirror Driver» with «Ultr@VNC».2. LIMITED WARRANTYNO WARRANTY. To the maximum extent permitted by applicable law, We expressly disclaims any warranty for the SOFTWARE PRODUCT «Mirror Driver». The SOFTWARE PRODUCT «Mirror Driver» and any related documentation are provided «as is» without warranty of any kind, either express or implied, including, without limitation, the implied warranties of merchantability or fitness for a particular purpose. NO LIABILITY FOR CONSEQUENTIAL DAMAGES. To the maximum extent permitted by applicable law, in no event shall we be liable for any damages whatsoever (including, without limitation, damages for loss of business profit, business interruption, loss of business information, or any other pecuniary loss) arising out of the use of, or inability to use, this product.
Установка VNC Server на Ubuntu 18.04
Протокол VNC позволяет делиться рабочим столом, поэтому вам будет необходимо иметь установленное окружение рабочего стола. В редакции Ubuntu для рабочего стола используется окружение Gnome. Но если вы пытаетесь установить программу на сервер, то сначала установите графическую оболочку.
Чтобы установить VNC server в Ubuntu выполните такую команду:
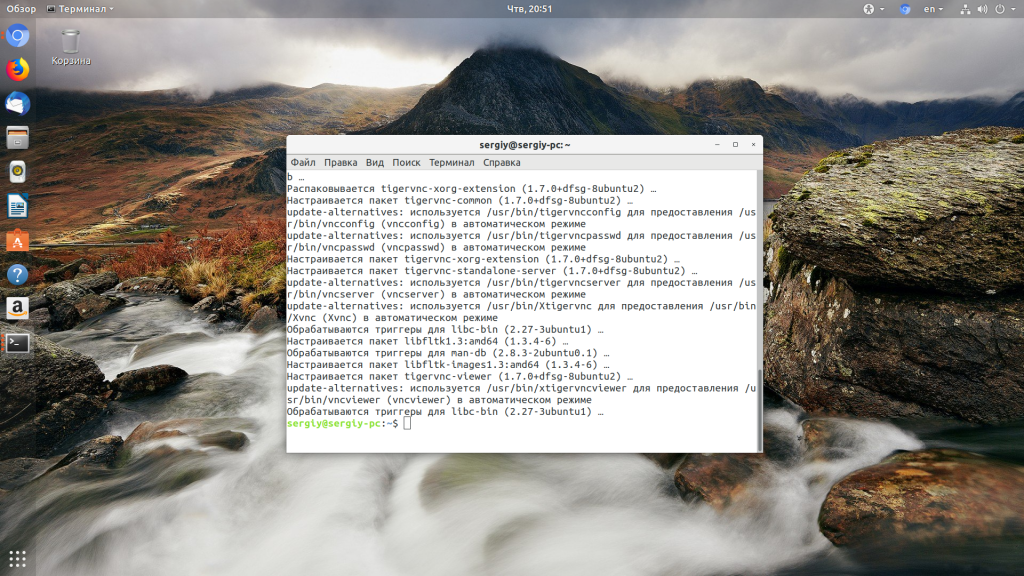
Также необходимо установить эмулятор терминала xterm, его программа будет использовать для запуска тестового окружения:
Для запуска сервера используется команда vncserver. Её синтаксис очень прост:
vncserver порт:номер_дисплея опции
А вот её основные опции:
- -dry-run — тестовый запуск, не выполнять никаких реальных действий;
- -verbose — включить более подробный вывод;
- -useold — запустить VNC сервер только если он ещё не запущен;
- -cleanstale — очистить оставшиеся файлы после предыдущего запуска;
- -localhost — разрешить подключения только с локального компьютера;
- -name — имя VNC сервера, которое будет отображаться при подключении, по умолчанию используется host:display# (username);
- -geometry — разрешение экрана для запускаемого окружения, например, 1024×768;
- -depth — глубина цвета, доступны значения: 8, 15, 16 и 24;
- -fg — не запускать сервис в фоновом режиме и оставить его привязанным к терминалу;
- -autokill — автоматически останавливать сервер после завершения подключения;
- -xstartup — программа, которую следует использовать вместо оболочки;
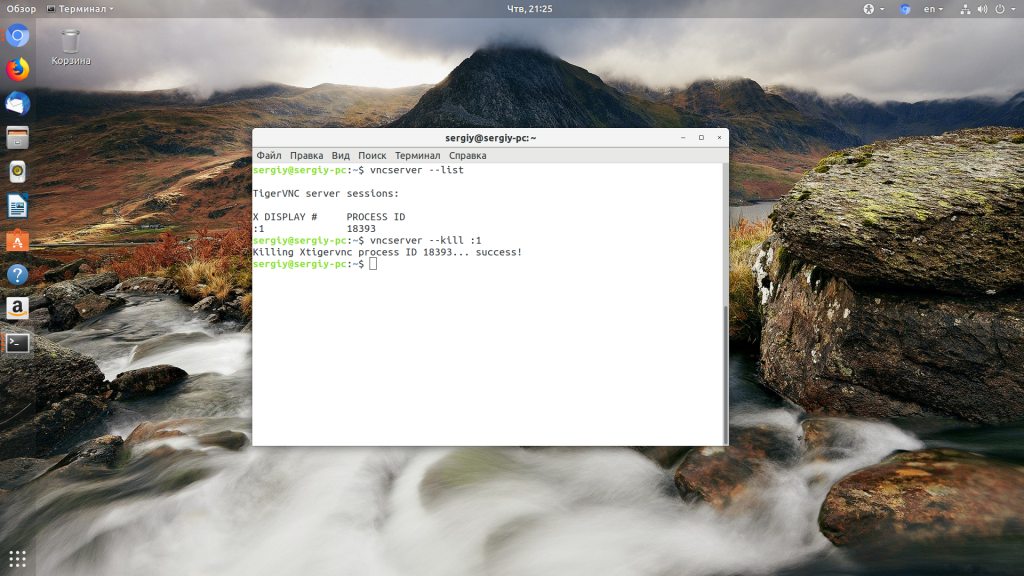
- -list — список запущенных серверов;
- -kill — завершить запущенный vnc сервер.
Теперь можно попытаться запустить VNC Server:
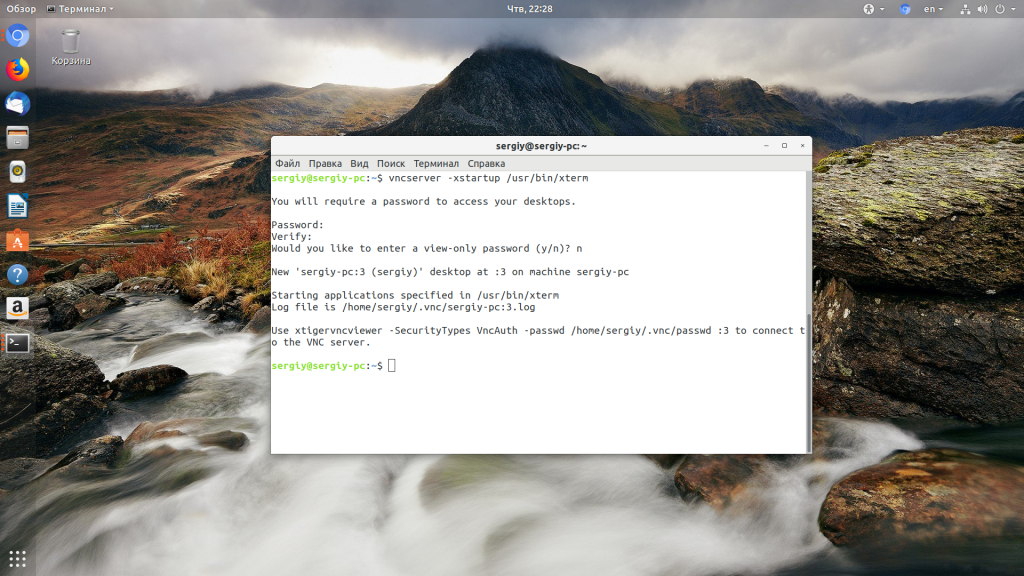
При первом запуске утилита предложит вам ввести пароль, который можно будет использовать для подключения к компьютеру, а также ввести пароль для подключения в режиме только просмотр. Последнее можно пропустить
Обратите внимание, что утилиту необходимо запускать от имени обычного пользователя, а не суперпользователя
Утилита не только создаст конфигурацию, но и запустит VNC сервер. Посмотреть список запущенных серверов можно командой:

Чтобы завершить запущенный VNC сервер используйте опцию kill и идентификатор дисплея, на котором запущен сервер из предыдущей команды:
Мы запускали TigerVNC с рабочем окружением в виде терминала, но теперь нам необходимо полноценное рабочее окружение Gnome. Чтобы его настроить создайте файл ~/.vnc/xstartup со следующим содержимым:
Это скрипт, который запускает рабочее окружение Gnome, вы также можете запускать и другие окружения. Теперь запущенный VNC сервер появится в списке доступных серверов и вы можете к нему подключиться.
Чтобы показать использование других опций давайте запустим vncserver на четвертом виртуальном дисплее с разрешением экрана 1024×768:
DESCRIPTION
Xvnc
is the X VNC (Virtual Network Computing) server. It is based
on a standard X server, but it has a «virtual»
screen rather than a physical one. X applications display
themselves on it as if it were a normal X display, but they
can only be accessed via a VNC viewer — see
vncviewer(1).
So Xvnc is
really two servers in one. To the applications it is an X
server, and to the remote VNC users it is a VNC server. By
convention we have arranged that the VNC server display
number will be the same as the X server display number,
which means you can use eg. snoopy:2 to refer to display 2
on machine «snoopy» in both the X world and the
VNC world.
The best way of
starting Xvnc is via the vncserver script.
This sets up the environment appropriately and runs some X
applications to get you going. See the manual page for
vncserver(1) for more information.
OPTIONS
Xvnc
takes lots of options — running Xvnc -help gives a
list. Many of these are standard X server options, which are
described in the Xserver(1) manual page. In addition
to options which can only be set via the command-line, there
are also «parameters» which can be set both via
the command-line and through the vncconfig(1)
program.
−geometry widthxheight
Specify the size of the desktop
to be created. Default is 1024×768.
−depth
depth
Specify the pixel depth in bits
of the desktop to be created. Default is 24, other possible
values are 8, 15, and 16 — anything else is likely to cause
strange behaviour by applications.
−pixelformat
format
Specify pixel format for server
to use (BGRnnn or RGBnnn). The default for depth 8 is BGR233
(meaning the most significant two bits represent blue, the
next three green, and the least significant three represent
red), the default for depth 16 is RGB565 and for depth 24 is
RGB888.
−interface IP
address
Listen on interface. By default
Xvnc listens on all available interfaces.
|
−inetd |
This significantly changes Xvnc’s behaviour so |
||
|
−help |
List all the options and parameters |
Where do we store your data?
We may store and transfer personal information either within or outside of the European Economic Area (EEA). We transfer data in such a way where it is necessary to fulfil:
- Your requests and requirements in respect of our software and services; and
- Certain business functions that we use a third party business partner to provide, which may include the provision of sales and marketing assistance, data analysis and data cleansing services.
Where we transfer your personal information outside of the EEA, we ensure it is protected by making sure at least one of the following safeguards is in place:
- By transferring your personal information to a country that has been deemed to provide an adequate level of protection by the European Commission;
- By using specific contracts approved by the European Commission which give your personal information the same protection it has within the EEA; or
- Where we use providers based in the US, we may transfer data to them if they are part of the Privacy Shield which requires them to provide similar protection to personal data shared between Europe and the US.
To keep this privacy policy as short and easy to understand as possible, we have not set out the specific circumstances when each of these protection measures are used. You can contact us at privacy@realvnc.com for the details as to how we protect specific transfer of your data.
What has PCHelpWare in common with UltraVNC «Single click» ?
PCHelpware has been made compatible with the helpdesk.txt (UltraVNC SC custom.zip file). But internally, all has been rewritten from scratch to be able to easily handle encryption, unicode and intel performance libraries. PCHelpWare capture, display and communication engine comes from a commercial real time remote screen application… it has his own protocole and is not compatible with UltraVNC or any other VNC flavorTo use PCHelpware you need to use both its server and viewer
> Global PCHelpware SC connectivity scheme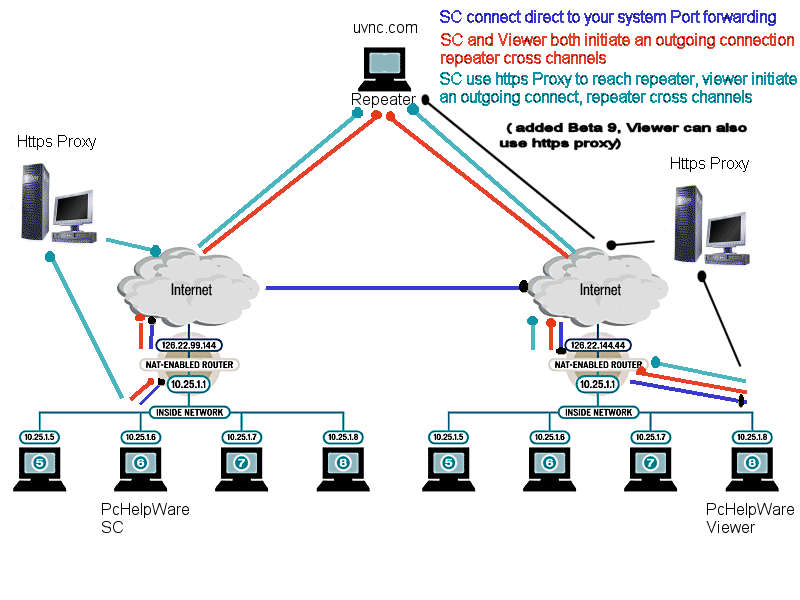
> Login screen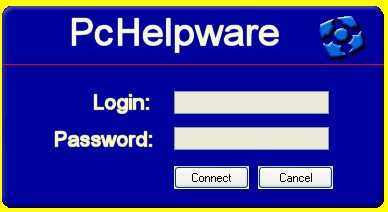
> Controls remote PC desktop viewed through the connected Viewer
Подключение к VNC серверу
Во-первых, на локальной машине вы можете подключиться к только что запущенному VNC серверу с помощью команды, которую предлагает сам сервер после запуска:

В этой команде мы указываем тип авторизации и передаем файл с паролем, который создали при первом запуске VNC сервера. Перед вами откроется окно удаленного соединения.
Также можно запустить vncviewer Ubuntu без параметров, тогда утилита откроет графический интерфейс, где вам нужно ввести ip адрес машины, на которой запущен сервер, а также номер дисплея или порта:

После этого нужно ввести пароль для подключения и откроется это же окно удаленного соединения:

Easy & secure remote access from anywhere
PCHelpWare is a free
alternative to the various paying remote assistance services that can be found on the netPCHelpWare is a powerful remote support software that allows you to control (right from your own PC)
a distant PC connected to the internet. It is the ideal solution to provide quick remote assistance and help your
customers, colleagues, friends and family members, even if they are on the other side of the worldPCHelpWare is customizable
you can create your own server package with your logo and -company- name
The individual you want to remotely assist only has to download and execute your customized package. That’s allNo router/modem/firewall configuration is needed to access a
remote PC even when it’s standing on a protected network behind a NAT
If your PC is also behind Firewall/NAT routers, PCHelpware has the solution that makes everything simple anyway
Using the provided Repeater service, no router configuration is needed at all
Key features
- Security: Build-in communication encryption (TWF 256) and DH key exchange (using a 512 prime)
- File transfer (using clipboard style Copy/Paste : ctr-alt-c, ctrl-alt-v)
- Text Chat
- Clipboard transfer (Text, RTF, HTML, pictures)
- Scalable and easy to use Viewer. Various color modes to fit bandwidth at best
- International keyboard support
- Additional password if wanted
Server requirements
- Windows 95, 98, ME, 2000, 2003, XP, Vista*
- For optimal performances an optional Mirror Driver can be installed on 2000/2003/XP and Vista
* Vista UAC temporarily disables the remote keyboard when asking for
administrator access. This new security feature in Vista locks all applications when asking the user for this access level. It can be disabled it in Vista…
Connection without Repeater
The PCHelpware remote server initiates the connection to your Viewer. Thus the Viewer needs to be reachable from outside (the
internet). If you are behind a router you have to configure it so the viewer port is forwarded to your machine. But no configuration is needed on server (remote) side
Connection through Repeater
When using the Repeater, both the Server and Viewer can stand behind a NAT firewall/router
without having to configure ports forwarding. A Repeater is most time available on the uvnc server.
Connection ports
The server use one outgoing port ( default port = 5500 )
The viewer use one outgoing port ( default = 5901 ) and one incoming port (same than server default port = 5500)
What has PCHelpWare in common with UltraVNC «Single click» ?
PCHelpware has been made compatible with the helpdesk.txt (UltraVNC SC custom.zip file). But internally, all has been
rewritten from scratch to be able to easily handle encryption, unicode and intel performance libraries. PCHelpWare capture,
display and communication engine comes from a commercial real time remote screen application… it has his own protocole and is
not compatible with UltraVNC or any other VNC flavor
To use PCHelpware you need to use both its server and viewer
> Global PCHelpware SC connectivity scheme
> Login screen
> Controls remote PC desktop viewed through the connected Viewer
Alternatives to VNC
VNC applications, however, are generally regarded as slower and offer fewer features and security options than newer alternatives.
Microsoft incorporated remote desktop functionality into its operating system starting with Windows XP. Windows Remote Desktop enables a Windows computer to receive remote connection requests from compatible clients.
Besides client support built into other Windows devices, iOS and Android tablet and smartphone devices also can function as Windows Remote Desktop clients (but not servers) using available apps.
Unlike VNC that uses its RFB protocol, WRD uses the remote desktop protocol. RDP does not work directly with framebuffers as RFB does. Instead, RDP breaks down a desktop screen into sets of instructions to generate the framebuffers and transmits only those instructions across the remote connection. The difference in protocols results in WRD sessions using less network bandwidth and being more responsive to user interaction than VNC sessions. That also means, however, that WRD clients cannot see the actual display of the remote device but instead must work with their own separate user session.
Google developed Chrome Remote Desktop and its own Chromoting protocol to support Chrome OS devices, similar to Windows Remote Desktop. Apple extended the RFB protocol with added security and usability features to create its own Apple Remote Desktop solution for macOS devices. An app of the same name enables iOS devices to function as remote clients. Independent software vendors have developed numerous other third-party remote desktop applications as well.
Заключение
В целом соединение VNC и XDMCP ― полезный метод обеспечения удаленного входа с графическим интерфейсом пользователя для многопользовательских Linux компьютеров. Этот метод имеет преимущества по сравнению с прямым применением XDMCP в кроссплатформенной среде или при наличии проблем, вызванных межсетевым экраном или NAT. На многопользовательских компьютерах он предпочтительнее более распространенных способов прямого подключения VNC. При использовании этого метода необходимо рассмотреть вопросы безопасности. Будьте готовы настроить правила межсетевого экрана для ограничения нежелательного доступа извне и используйте шифрование, если данные передаются по ненадежной сети.
Похожие темы
- Оригинал статьи
- Firewall uptime and security with iptables (Alfredo Deza, developerWorks, январь 2012 г.): как настроить межсетевой экран Linux.
- Lazy Linux: 10 essential tricks for admins (Vallard Benincosa, developerWorks, июль 2008 г.): как туннелировать VNC через SSH (Trick #6).
- Set up a Linux VPN server by following these 10 steps (James M. Garvin, TechRepublic, февраль 2006 г.): как настроить VPN с помощью инструментария Linux.
- Speaking UNIX: Working with inetd and xinetd, the Internet «super servers» (Martin Streicher, developerWorks, декабрь 2009 г.): подробнее о суперсерверах.
- TightVNC входит во многие дистрибутивы или доступен для загрузки на Web-сайте TightVNC.
- TigerVNC представляет собой версию TightVNC, которая содержится в некоторых дистрибутивах и доступна для загрузки на Web-сайте TigerVNC. Примечательна тем, что содержит расширения, поддерживающие защищенные соединения.
- RealVNC – это компания, основанная некоторыми из разработчиков VNC. Предлагает как бесплатные, так и коммерческие версии VNC собственной реализации.
- Следите за .