Настройка network bonding с lacp между centos linux 7.2 и коммутатором cisco 3560g
Содержание:
- Static Network configuration
- udev renaming issue
- Change the active slave to em1
- Sample Network Configuration on Cisco Router (Nexus 3048)
- Агрегирование сетевых интерфейсов (bonding) в Ubuntu (обновлено 18.11.15)
- Простая настройка сети
- DHCP configuration
- Bonding Curve Price Formulas
- Bonding Curves on the Blockchain
- Contract Code
- Stage 07 (Practice)
- Stage 05 (Thrill of the Race)
- Возможные ошибки
- Reserve Ratio = Price Sensitivity
- Linux bounding Driver Configuration
- Stage 06 (Rivals Return)
- Диагностика bonding
- Debugging ifenslave
- Stage 02 (Trial Day)
- Stage 08 (Return to Le Mans)
- Querying Bonding Configuration
- Install ifenslave
Static Network configuration
/etc/conf.d/network.conf
# These Environment names are formed by prefixing the base variable name with the interface names.
# Remember, here, these are systemd.service Environment variables, not shell variables.
# Variables that are not set or that are set to the empty string will have no effect.
# Add a list of interface names here, in the form of a comment, for reference.
# wlp2s0 enp3s0 bond0

# PRIMARY is the name of the preferred network interface in the bonded group of interfaces.
bond0PRIMARY='enp3s0'

# ADDRS is a single-quoted space separated list of IPv4 and IPv6 addresses to apply to the interface.
# The ADDRESS must be followed by a slash and a decimal number which encodes the network prefix length.
# interfaceADDRS='address1/length address2/length ...'
bond0ADDRS='192.168.0.2/24'
wlp2s0ADDRS=
enp3s0ADDRS=

# ROUTES is a single-quoted space separated list of double-quoted ip-route ROUTE specifications.
# A PREFIX must be followed by a slash and a decimal number which encodes the network prefix length.
# Remember, to be able to add a route, the host must first be able to reach the gateway.
# interfaceROUTES='"to prefix1/length] via gateway1" "to prefix2/length via gateway2" ...'
bond0ROUTES=
Here, for instance, a static private IPv4 address will be assigned to the bonding interface as a «fail-safe», were the DHCP server to fail or be otherwise inaccessible. The primary slave interface is also specified in this file.
/etc/systemd/system/static@.service
Of course, static network configuration may be used as an alternative to, or in addition to, dynamic network configuration, or not at all.
udev renaming issue
You will likely only see UDEV rules for your network devices if you have upgraded from previous versions of Debian. New installations name the network cards after their pci addresses. The rules are used to preserve the legacy names for devices (e.g. eth0) in case they are being used elsewhere.
If you are confident that you are not using the legacy names, you can simply remove the file described below.
«udev» assign network adapter names as per
/etc/udev/rules.d/70-persistent-net.rules
where rule typically looks like this:
# PCI device 0x10ec:0x8168 (r8169)
SUBSYSTEM=="net", ACTION=="add", DRIVERS=="?*", ATTR{address}=="xx:xx:xx:xx:xx:xx", ATTR{dev_id}=="0x0", ATTR{type}=="1", KERNEL=="eth*", NAME="eth0"
The problem with bonding is that two or more NICs may have the very same MAC address which confuses udev when it tries to (re)name adapters as per their MACs and fails because another card with this MAC already exists. When it happens NIC may be left named like «rename2» instead of «eth0» etc.
Possible solution is to change udev rule to assign network interface names as per NICs PCI IDs instead of MAC addresses. This can be done by replacing
ATTR{address}=="xx:xx:xx:xx:xx:xx"
with something like
KERNELS=="0000:04:00.0"
in the file «70-persistent-net.rules».
Corresponding PCI IDs can be found in dmesg:
sudo dmesg | grep eth
Where one can look for line fragment like this:
r8169 0000:04:00.0 eth0: RTL8168e/8111e
#     ^^^^^^^^^^^^
But this is not recommended as it will not find, for example, wireless devices or devices not using legacy names.
The preferred alternative is to find PCI IDs using «lspci -D | grep Ether«:
0000:04:00.0 Ethernet controller: Realtek Semiconductor Co., Ltd. RTL8111/8168/8411 PCI Express Gigabit Ethernet Controller (rev 06)
Note that on modern systems, you can translate the PCI address to the network name by using the two middle numbers expressed in base10. In the above example, the controller 0000:04:00.0 would be enp4s00.
Change the active slave to em1
ifenslave command can be used to attach or detach or change the currently active slave interface from the bonding. Now, Change the active slave interface to em1.
# ifenslave -c bond0 em1
Check the bonding status again to ensure that em1 is the new active slave :
# cat /proc/net/bonding/bond0
Ethernet Channel Bonding Driver: v3.7.1 (April 27, 2011)

Bonding Mode: fault-tolerance (active-backup)
Primary Slave: None
Currently Active Slave: em1
MII Status: up
MII Polling Interval (ms): 100
Up Delay (ms): 5000
Down Delay (ms): 5000

Slave Interface: em0
MII Status: up
Speed: 1000 Mbps
Duplex: full
Link Failure Count: 0
Permanent HW addr: 00:21:28:b2:65:26
Slave queue ID: 0

Slave Interface: em1
MII Status: up
Speed: 1000 Mbps
Duplex: full
Link Failure Count: 0
Permanent HW addr: 00:21:28:b2:65:27
Slave queue ID: 0
The switch of active slave should get effective immediately, but on critical production systems, please schedule maintenance window or make some test in an identical test environment first.
Sample Network Configuration on Cisco Router (Nexus 3048)
Below is an example of setting up a port channel (link aggregation or lag port) on a Cisco switch.
vlan interface
interface Vlan348
description ds4348
no shutdown
no ip redirects
ip address 64.20.40.1/30
Port channel interface
interface port-channel11
description ds4348
switchport
switchport mode trunk
switchport trunk native vlan 348
switchport trunk allowed vlan 348
no negotiate auto
Physical Interface(s)
interface Ethernet1/31
description ds4348
switchport
switchport mode trunk
switchport trunk native vlan 348
switchport trunk allowed vlan 348
channel-group 11 mode active

interface Ethernet1/32
description ds4348
switchport
switchport mode trunk
switchport trunk native vlan 348
switchport trunk allowed vlan 348
channel-group 11 mode active
Агрегирование сетевых интерфейсов (bonding) в Ubuntu (обновлено 18.11.15)
- You are here: Ubuntu в Сумах » Debian family » Агрегирование сетевых интерфейсов (bonding) в Ubuntu (обновлено 18.11.15)
- Categories: Debian family Tags: bonding , ethernet , ifconfig , lts , network , сеть
Почти каждый сталкивался с ситуацией, когда поиск неисправности или сбоя после длительных мучений заканчивается обнаружением вытащенной вилки электропитания, отошедшего штекера, окисления контактов или другой мелочи. Если для обычной рабочей/домашней машины это чревато просто потеренным временем, то в случае, если компьютер используется в качестве сервера, это может привести к неприятным последствиям.
Если от сбоя дисковой подсистемы можно предохраниться использованием RAID, то для защиты от сбоя сетевого оборудования используют агрегацию каналов (или бондинг (bonding)). Как и в случае с RAID, существуют различные режимы, рассчитанные на увеличение пропускной способности или просто на включение второго канала в случае отказа первого. Например, при физическом случайном отключении кабеля из свитча, его обрыва / окисления контактов коннектора или банального выхода из строя сетевой карты. Я рассмотрю режим balance-xor, который можно считать оптимальным выбором в случае, когда необходимо как сбалансировать нагрузку между интерфейсами и при этом защититься в случае отказа одного из каналов. Стоит сразу отметить, что данный режим должен поддерживаться на «другой стороне», т.к. управляемым свитчем / другим сервером, поэтому если у вас нет такого оборудования, вам скорее подойдет режим balance-alb, который (говоря простым языком) «притворяется» одним интерфейсом для системы. Подробнее по режимам очень хорошо рассказано здесь.
- Установим поддержку агрегации:
и добавим ее в файл /etc/modules для старта вместе с системой:
После этого вносим правки в /etc/network/interfaces согласно вашей конфигурации. Для Debian 8 читайте ниже! У меня выглядит примерно так:
где bond — наш агрегированный интерфейс из em1 и em2 — сетевых интерфейсов (обычно eth0 и eth1).
upd: Как оказалось, в Debian 8 этот способ уже не работает, поэтому нужно немного изменить interfaces. Этот же конфигурационный файл примет такой вид:
Данный способ даже более аккуратен и должен работать в других новых дистрибутивах.
После внесения правок перезагружаемся или же, выполняем сразу:
Смотри ifconfig появился ли у нас bond0. Так же можем воспользоваться командой
Более детальную информацию можно посмотреть выводом
Вот так выглядит вывод, когда «все хорошо»:
А вот так, в случае отключения одного из кабелей:
Обратите внимание на выделенное полужирными в сравнении с предыдущим выводом. Описанная настройка осуществлялась в Ubuntu 14.04 LTS
Описанная настройка осуществлялась в Ubuntu 14.04 LTS
Простая настройка сети
Разберем пример настройки 3-х сетевых интерфейсов. Два из них будут с IP-адресами назначенными вручную (static IP), один — по DHCP.
Приводим файл к следующему виду:
network:
version: 2
renderer: networkd
ethernets:
ens3:
dhcp4: true
ens7:
dhcp4: no
addresses: [192.168.122.195/24]
gateway4: 192.168.122.1
mtu: 1500
nameservers:
addresses:
search:
ens9:
dhcp4: no
addresses: [192.168.1.10/24, 192.168.1.20/24]
nameservers:
addresses:
— 8.8.8.8
— 77.88.8.8
search:
* где:
version — версия YAML. На момент обновления статьи, была 2.
renderer — менеджер сети (networkd или NetworkManager).
ethernets — настройка сетевых адаптеров ethernet.
ens3, ens7, ens9 — настройки для соответствующих сетевых адаптеров. В данном примере мы настраиваем 3 сетевых адаптера.
dhcp4 — будет ли получать сетевой адаптер IP-адрес автоматически. Возможны варианты yes/true — получать адрес автоматически; no/false — адрес должен быть назначен вручную.
addresses — задает IP-адреса через запятую.
gateway4 — шлюз по умолчанию. В данном примере указывается только для интерфейса ens7.
mtu — при желании, можно задать значение MTU.
nameservers — настройка серверов имен (DNS).
nameservers addresses — указываем серверы DNS
Обратите внимание на разный формат записи для ens7 и ens9. Приемлемы оба варианта.
nameservers search — дописывает окончание домена, если мы обращаемся к узлу сети только по его имени
Стоит обратить внимание, что мы можем указать несколько доменов через запятую.
DHCP configuration
/etc/dhclient.conf
# These time-outs are aggressively short, supposing a sparsely populated network.
initial-interval 2;
reboot 5;
timeout 10;
retry 20;

# RFC 4361          Node-specific Identifiers for DHCPv4     February 2006
send dhcp-client-identifier 00:02:00:02:2e:2d:01:bd:c3:92:9a:44:2a:c4 ;
send host-name "laptop";
If you also run a DHCPv6 client, make sure that the DHCP Client Identifier and the DHCPv6 Client Identifier are the same DUID. The DHCP Server, for instance, can be configured to give fixed IP addresses based upon multiple MAC addresses, or provided hostname, or provided Client Identifier.
/etc/systemd/system/dhclient@.service
There is a particular issue to address. When starting kernel bonding, where the only working interface is the non-primary slave — for instance, starting with only a wireless interface available when the wired interface is the primary — then dhclient will quickly start and adopt the MAC address of the initial primary slave, and use that MAC address when attempting to communicate with the DHCP server. When the wireless interface, some short time later, is authenticated, associated, and authorized with the access point/base station, establishing a connection to the network, the bonding driver will make the wireless interface the new active interface, and change the active MAC address on the bond0 interface, to match the wireless MAC address. Because dhclient will continue to use the MAC address from the wired interface, and that MAC address is no longer accepted by the bond0 interface, all DHCP communication will fail. If there is no saved lease file in /var/lib/dhclient/dhclient.leases, then no IPv4 address will be configured, and no IPv4 traffic will be possible. It can also be seen that when dhclient starts quickly, it can read the primary slave’s firmware MAC address, rather than any MAC address assigned to the device interface. If the firmware MAC address is «null», then dhclient assigns a random MAC address. BOOTP/DHCP packets using these firmware or random MAC addresses may «succeed» in gaining a reply on the primary slave device and fail on the non-primary slave device. That can be confusing and annoying.
These are only issues with dhclient and IPv4. Fortunately, on a dhclient DHCP request, after the lease expires, dhclient «does the right thing». dhclient will function properly no matter on which slave interface it was started.
Ideally, dhclient would re-determine the bonding interface MAC address each time it initially retried contacting the DHCP server. Without that, a different approach is to simply delay the start of dhclient until after the kernel bonding driver has configured an active slave. If the active slave is to be the wireless interface, then wpa_supplicant will first have authenticated, associated, and authorized with the access point/base station, and dhclient will adopt the correct MAC address. If the active slave is the primary slave, again dhclient will adopt the correct MAC address. This delay is imposed with the simple line in the dhclient service unit file, a conservatively long delay between the time systemd starts dhclient and the supplicant and the bonding driver selects the active interface. This selection time is longest during system boot, when many processes are starting. On faster hardware, a shorter delay, perhaps , may still be effective.
Bonding Curve Price Formulas
We can simplify the Bancor formula and compute the Continuous Token’s current price as follows:

Recall that the price of a Continuous Token increases as the supply of continuous tokens increase. Buying slides you up the price curve and selling slides you back down. Calculating price thus becomes problematic when you want to exchange a plural amount of tokens.
Calculating the number of tokens minted for a given amount of ETH (or the number of ETH sent back for a given amount tokens) requires integral calculus, because we need to compute the area under the bonding curve:

From the original formula, two new formulas can be derived. One to calculate the amount of continuous tokens one receives for a given number of reserve tokens:

And another to calculate the amount of reserve tokens one receives in exchange for a given number of continuous tokens:

These formulas are the final price functions we can use for our bonding curve contracts.
Bonding Curves on the Blockchain
We can inscribe these curves on the blockchain. A bonding curve contract is a specific type of contract that issues its own Continuous Token. Prices are calculated by the contract based on a bonding curve.
A bonding curve contract hold a balance of a Reserve Token (e.g. a balance of ).
To buy Continuous Tokens, the buyer sends some amount of to a bonding curve contract’s Buy function which calculates the price of the token in a and issues you the correct amount of Continuous Tokens. The Sell function works in reverse: The contract will calculate the Continuous Token’s current selling price and will send you the correct amount of .
Contract Code
The following contract calculates the price of both Buy and Sell functions:
The above contract makes use of the aforementioned Bancor Formula to implement :
And :
The and functions returns a price for a given buy or sell amount respectively.
We can implement a Continuous Token contract using the two functions by inheriting from :
In the contract, we define :
And :
Both and are internal functions that increase and decrease the Continuous Token supply respectively. They make use of the contract to perform the calculation.
Next, the contract also defines public and functions, which investors can call to buy or sell our continuous token:
That’s it! We now have a continuous token that can be purchased anytime at dynamically calculated prices, powered by a bonding curve.
Recall that our continuous token has interesting properties, such as:
- Limitless supply. There is no limit to the number of tokens that can be minted.
- Deterministic price calculation. The buy and sell prices of tokens increase and decrease with the number of tokens minted.
- Continuous price. The price of token is less than token and more than token .
- Immediate liquidity. Tokens can be bought or sold instantaneously at any time, the bonding curve acting as an automated market maker.
The adaptive supply of a Continuous Token (recall that it is newly issued when purchased and removed from circulation when sold) is a unique and enabling feature which allows for supply to adjust to demand and for Continuous Tokens to be continuously available for purchase at predictable prices.
Stage 07 (Practice)
Players who successfully complete all of the goals given in the seventh stage (Practice) are rewarded with 15
ASTON MARTIN VANTAGE GTE (2017)Circuit des 24 Heures
| “ | Hey champ! Today’s the final day before our last event of the tour—a big finale at Le Mans! Zoe’s on the track in her Corvette, and she’s making the folks from Aston Martin nervous. You HAVE to win! | ” | |
| — Natalia, Agent |
| Goal | Description | LapsPR | RewardR(+CRB) | Fame | SkipG | |
|---|---|---|---|---|---|---|
| 1 | Cup | Circuit des 24 Heures (Morning) | 188.4 | 14,100(+3,525) | 2,600 | 60 |
| Win without skidding more than once. | ||||||
| 2 | Time Trial | Circuit des 24 HeuresRolling Start | 188.4 | 10,200 | 1,870 | 60 |
| Complete this event within 3:06.30 |
| “ | Nice work! Now, with those times, we’re going to set up for a longer event! Jump back into the saddle, and away we go! | ” | |
| — Natalia, Agent |
| Goal | Description | LapsPR | RewardR(+CRB) | Fame | SkipG | |
|---|---|---|---|---|---|---|
| 3 | Cup | Circuit des 24 HeuresRolling Start | 188.4 | 14,300(+3,575) | 2,600 | 60 |
| Defend first place and finish without going off-trackThe race begins at Arnage and finishes when crossing the Start/Finish Line— with Tyre Degradation. | ||||||
| 4 | Hunter | Circuit des 24 Heures (Evening) | 188.4 | 14,500(+3,625) | 2,700 | 60 |
| Reach a top speed of at least 209 mph(337 kph) 2 times, and win without going off-track |
| “ | You did it, champ. Tomorrow’s the last day of the tour, where we’re going to recreate some of the highlights of the 24 Hours of Le Mans 2017. I’ll make sure is on top of those tyre issues, though! | ” | |
| — Natalia, Agent |
For tips and advice on stage 07, see this: .
Stage 05 (Thrill of the Race)
Players who successfully complete all of the goals given in the fifth stage (Thrill of the Race) are rewarded with 10
ASTON MARTIN VANTAGE GTE (2017)Red Bull Ring
| “ | The Balance of Performance evens the playing field across motorsports, and aims to prevent one manufacturer dominating over all the others, like they used to. It makes sure each race is as exciting as possible! | ” | |
| — Natalia, Agent |
| Goal | Description | LapsPR | RewardR(+CRB) | Fame | SkipG | |
|---|---|---|---|---|---|---|
| 1 | Cup | Red Bull Ring – Grand Prix Circuit | 285.9 | 10,100(+2,525) | 1,900 | 40 |
| Win this event with a lead of less than 66yd (60m) | ||||||
| 2 | Speed Snap | Red Bull Ring – Grand Prix Circuit | —85.9 | 1,900 | 400 | 40 |
| Win this event without going off-track | ||||||
| 3 | Cup | Red Bull Ring – Südschleife National Circuit | 185.9 | 2,800(+700) | 600 | 40 |
| Reach a top speed of at least 175 mph (282 kph), and win without going off-track | ||||||
| 4 | Elimination | Red Bull Ring – Grand Prix CircuitRolling Start | Differs85.9 | 7,300(+1,825) | 1,400 | 40 |
| Stay one place away from each Elimination, then winThis elimination is run with a 6-car grid |
| “ | OK! I’m back! What did I miss? Oh, nothing big? Great… So, I figured out how we can settle this little disagreement: I brought along a driver who can match your skills, to be the decider. | ” | |
| — Eric, Auto Engineer |
| “ | Uh, I don’t really know what Eric’s getting me into, here, but it’ll be fun to drive alongside you, hotshot. How about it? I’ll see you tomorrow. | ” | |
| — Zoé |
For tips and advice on stage 05, see this: .
Возможные ошибки
1. Error in network definition *.yaml line xxx column yyy: expected mapping
Ошибка появляется при проверке (generate) или применении (apply) настроек сети.
Причина: ошибка синтаксиса YAML.
Решение: внимательно смотрим на количество отступов, которое сделано для строки xxx. Количество пробелов должно точно соответствовать количеству в других строках. Если параметр вложенный, он также должен отделяться от родителя нужным количеством пробелов. Пример неправильной настройки:
network:
version: 2
renderer: networkd
* обратите внимание, что version имеет 4 пробела для отступа, а renderer — 2. Так как version и renderer равнозначные параметры для родителя network, они должны иметь одинаковое количество пробелов
Reserve Ratio = Price Sensitivity
The Reserve Ratio determines how sharply a Continuous Token’s price needs to adjust in order to be maintained with every transaction, or in other words, its price sensitivity.
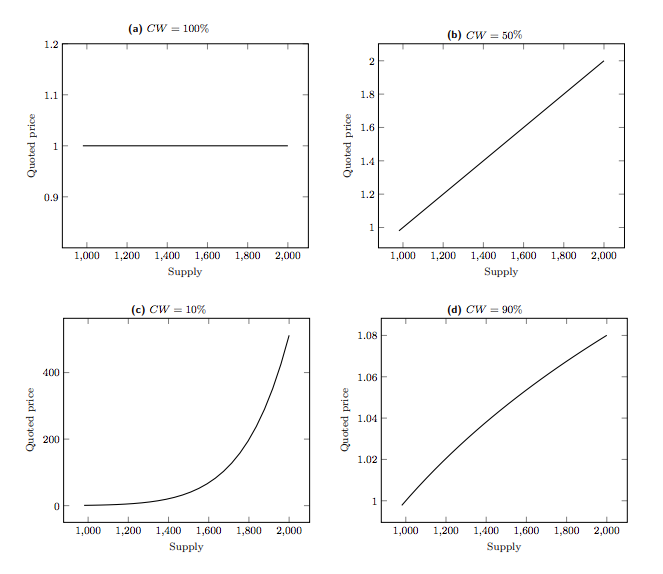
The diagram above shows some examples of bonding curves with different Reserve Ratios.
In the bottom-left curve with a 10% Reserve Ratio, the price curve grow more aggressively with increasing supply. A Reserve Ratio higher than 10% would flatten towards the linear top-right shape as it approaches 50%.
At different reserve ratios, we arrive at the following graph functions:
- When RR = 1 and n = 0, we get
- When RR = 1/2 and n = 1, we get
- When RR = 1/10 and n = 9, we get
- When RR = 9/10 and n = 1/9, we get
A higher reserve ratio between the Reserve Token balance and the Continuous Token will result in lower price sensitivity, meaning that each buy and sell will have a less than proportionate effect on the Continuous Token’s price movement. Conversely, a lower ratio between the Reserve Token balance and the Continuous Token will result in higher price sensitivity, meaning that each buy and sell will have a more than proportionate effect on the Continuous Token’s price movement.
Linux bounding Driver Configuration
Create a file called /etc/modprobe.d/bonding.conf, enter: Append the following
alias bond0 bonding
  options bonding mode=0 arp_interval=100 arp_ip_target=192.168.1.254, 192.168.1.12
Save and close the file. This configuration file is used by the Linux kernel driver called bounding. The options are important here:
- mode=0 : Set the bonding policies to balance-rr (round robin). This is default. This mode provides load balancing and fault tolerance.
- arp_interval=100 : Set the ARP link monitoring frequency to 100 milliseconds. Without option you will get various warning when start bond0 via /etc/network/interfaces.
- arp_ip_target=192.168.1.254, 192.168.1.12 : Use the 192.168.1.254 (router ip) and 192.168.1.2 IP addresses to use as ARP monitoring peers when arp_interval is > 0. This is used determine the health of the link to the targets. Multiple IP addresses must be separated by a comma. At least one IP address must be given (usually I set it to router IP) for ARP monitoring to function. The maximum number of targets that can be specified is 16.
Stage 06 (Rivals Return)
Players who successfully complete all of the goals given in the sixth stage (Rivals Return) are rewarded with
ASTON MARTIN VANTAGE GTE (2017)Red Bull Ring
| “ | Alright, filled me in on the competition, and I’m more than happy to be a part of it. Driving in a host of other GTEs against the prestigious Aston Martin GTE? Sounds like a great way to spend my time! | ” | |
| — Zoé |
| Goal | Description | LapsPR | RewardR(+CRB) | Fame | SkipG | |
|---|---|---|---|---|---|---|
| 1 | Cup | Red Bull Ring (Morning) – Grand Prix CircuitRolling Start | 287.5 | 10,500(+2,625) | 2,000 | 50 |
| Win this event with a lead of at least 350 yd (320 m) | ||||||
| 2 | Autocross | Red Bull Ring (Afternoon) – Grand Prix Circuit | —87.5 | 3,000 | 600 | 50 |
| Win this event without going off-track |
| “ | Did you know Aston Martin got its name thanks to co-founder Lionel Martin’s success at the Aston Hill Climb of 1914? Seeing you perform out there put me in mind of him, is all. | ” | |
| — Zoé |
| Goal | Description | LapsPR | RewardR(+CRB) | Fame | SkipG | |
|---|---|---|---|---|---|---|
| 3 | Cup | Red Bull Ring (Afternoon) – Grand Prix CircuitRolling Start | 287.5 | 10,800(+2,700) | 2,000 | 50 |
| Reach an average speed of at least135.5 mph (218 kph) and win without going off-track |
| “ | Wow! I really thought I had you there. Look, you probably can’t, but I’m just too curious not to set the challenge… | ” | |
| — Zoé |
| Goal | Description | LapsPR | RewardR(+CRB) | Fame | SkipG | |
|---|---|---|---|---|---|---|
| 4 | Elimination | Red Bull Ring (Afternoon) – Grand Prix CircuitRolling Start | Differs87.5 | 7,600(+1,900) | 1,400 | 50 |
| Stay one place away from each Elimination, thenwin with a lead of at least 55 yd (50 m)This elimination is run with a 6-car grid |
| “ | Phew, well, that was a tough set of challenges, but you did it. I think, for tomorrow, I’m going to settle on the Corvette C7.R. To be honest, I like the Balance of Performance…In most motorsports, it’s difficult to separate driver ability from the vehicle—you don’t know if you lost to better engineering or driving. The BoP makes it a little clearer. See you tomorrow! | ” | |
| — Zoé |
For tips and advice on stage 06, see this: .
Диагностика bonding
Для проверки работы объединения интерфейсов необходимо просмотреть содержимое каталога /proc/net/bonding/ на наличие каждого из бонд-интерфейсов:
root@bond-srv:~# ls -la /proc/net/bonding/
итого 0
dr-xr-xr-x 2 root root 0 Июл 28 22:07 .
dr-xr-xr-x 5 root root 0 Июл 28 22:07 ..
-r--r--r-- 1 root root 0 Июл 28 22:07 bond0
root@bond-srv:~# cat /proc/net/bonding/bond0
Ethernet Channel Bonding Driver: v3.5.0 (November 4, 2008)

Bonding Mode: adaptive load balancing
Primary Slave: eth0
Currently Active Slave: eth0
MII Status: up
MII Polling Interval (ms): 100
Up Delay (ms): 200
Down Delay (ms): 200

Slave Interface: eth0
MII Status: up
Link Failure Count: 0
Permanent HW addr: 00:02:b3:b0:27:98

Slave Interface: eth1
MII Status: up
Link Failure Count: 0
Permanent HW addr: 00:02:b3:b0:27:24
На сегодня это все. такая маленькая заметочка, как говориться «чтобы было».
Что еще почитать
Для более подробного ознакомления с объединением сетевых интерфейсов, советую почитать:
1. http://www.linuxfoundation.org/collaborate/workgroups/networking/bonding
2. http://www.kernel.org/doc/Documentation/networking/bonding.txt
3. http://www.opennet.ru/man.shtml?topic=etcnet-options&category=5&russian=0
Debugging ifenslave
The bonding mechanism is based on a kernel module named bonding which exposes its interface via the virtual /sys filesystem (e.g. /sys/class/net/bond0/*).
Setup and configuration is done in userland with shell-scripts:
- /etc/network/if-post-down.d/ifenslave
- /etc/network/if-up.d/ifenslave
- /etc/network/if-pre-up.d/ifenslave
These scripts are called on system initialization and shutdown (actually it is ifup which calls them). Their intention is to feed the kernel module with the appropriate parameters and settings.
If something with bonding fails at all (and the tip above doesn’t help) you may have a look what the scripts do step by step.
To enable verbose output, invoke ifup -a -v directly (instead of invoking /etc/init.d/networking). The -v option enables a log of all commands the scripts are executing. This gives at least a trace what is happening when.
Unfortunately this will not show the reactions of the kernel module (like possible error messages), because kernel (module) messages are reported via the syslog utility.
To get a real insight what is going on you have to do what is called invasive debugging. This means to add lines to the scripts at critical points to send a message to syslog.
Example:
Function sysfs_change_down in file /etc/network/if-pre-up.d/ifenslave
        logger -t sysfs_change_down sysfs "$1" "$2"
                sysfs "$1" "$2"
        logger -t sysfs_change_down $(cat /sys/class/net/bond0/bonding/mode)
Stage 02 (Trial Day)
Players who successfully complete all of the goals given in the second stage (Trial Day) are rewarded with
ASTON MARTIN VANTAGE GTE (2017)Brands Hatch
| “ | Hey champ! Today’s your day to prove what you’ve got. If you can beat all of Aston Martin’s challenges, you will get to drive the GTE for the rest of their tour, and you’ll earn one to keep at the end of it! | ” | |
| — Natalia, Agent |
| Goal | Description | LapsPR | RewardR(+CRB) | Fame | SkipG | |
|---|---|---|---|---|---|---|
| 1 | Elimination | Brands Hatch – Indy CircuitRolling Start | Differs80.8 | 6,300(+1,575) | 1,200 | 10 |
| Win this event | ||||||
| 2 | Cup | Brands Hatch – Indy Circuit | 180.8 | 2,200(+550) | 400 | 10 |
| Reach an average speed of 114.4 mph (184 kph), and finish | ||||||
| 3 | Cup | Brands Hatch – Indy Circuit | 280.8 | 4,300(+1,075) | 800 | 10 |
| Overtake exactly 11 times, and no more, and win |
| “ | We’ve made it! Tomorrow we’re heading off for our first leg of the tour. Aston Martin want us to bring our own engineer, so I’ve sent for . He was… Well, I’ll let him explain it when he gets here. | ” | |
| — Natalia, Agent |
For tips and advice on stage 02, see this: .
Stage 08 (Return to Le Mans)
Players who successfully complete all of the goals given in the eighth and final stage (Return to Le Mans) are rewarded with
ASTON MARTIN VANTAGE GTE (2017)ASTON MARTIN VANTAGE GTE (2017)Circuit des 24 Heures
| “ | still going off about it, and all can do is smirk. At least she’s got a level head. We’re all keen to see what happens today, champ. This is the decider—is the BoP fair, or not?Oh, and of course, this is the final day of Aston Martin’s tour of the GTE, so you better put on an extra special show for them! | ” | |
| — Natalia, Agent |
| Goal | Description | LapsPR | RewardR(+CRB) | Fame | SkipG | |
|---|---|---|---|---|---|---|
| 1 | Cup | Circuit des 24 Heures (Morning) | 189.3 | 14,600(+3,650) | 2,700 | 80 |
| Win this event with a lead of at least 110 yd (100m) without going off-track | ||||||
| 2 | Autocross | Circuit des 24 Heures | —89.3 | 3,200 | 600 | 80 |
| Win this event without going off-track or skidding. | ||||||
| 3 | Cup | Circuit des 24 HeuresRolling Start | 189.3 | 14,900(+3,725) | 2,700 | 80 |
| Win within 3:20.65 without going off-track | ||||||
| 4 | Cup | Circuit des 24 Heures (Evening)Rolling Start | 189.3 | 15,000(+3,750) | 2,800 | 80 |
| Be in 1st place before the final lap, and then win, without ever going off-track | ||||||
| 5 | Head To Head | Circuit des 24 Heures (Night) | 189.3 | 15,200(+3,800) | 2,800 | 80 |
| Win this event OR perform 2 donuts |
| “ | Heh, so… I may have cheated. I removed the BoP adjustments on both cars for those last few events. What?! I wanted a fair test! And, I guess, you know… You may have been right or something I suppose. | ” | |
| — Eric, Auto Engineer |
| “ | ! Well, I guess that settles it, doesn’t it ? That’s also completely ignoring that non-apology and non-admittance of being wrong, as well. Nicely done, hotshot. | ” | |
| — Zoé |
| “ | Eh, I’m used to being like this. I’ll never get used to seeing our champ here win races though—it’s still so exciting every time! And what’s more exciting is, as the deal said, we get the keys to the GTE! | ” | |
| — Natalia, Agent |
For tips and advice on stage 08, see this: .
Querying Bonding Configuration
Each bonding device has a read-only file residing in the /proc/net/bonding directory. The file contents include information about the bonding configuration, options and state of each slave.
For example, the contents of /proc/net/bonding/bond0 after the driver is loaded with parameters of mode=0 and miimon=1000 is generally as follows:
# cat /proc/net/bonding
Ethernet Channel Bonding Driver: 2.6.1 (October 29, 2004)
Bonding Mode: load balancing (round-robin)
Currently Active Slave: eth0
MII Status: up
MII Polling Interval (ms): 1000
Up Delay (ms): 0
Down Delay (ms): 0

Slave Interface: eth1
MII Status: up
Link Failure Count: 1

Slave Interface: eth0
MII Status: up
Link Failure Count: 1
The precise format and contents will change depending upon the bonding configuration, state, and version of the bonding driver.
Install ifenslave
Use the apt-get command to install ifenslave, enter: Sample outputs:
Reading package lists... Done
Building dependency tree
Reading state information... Done
Note, selecting 'ifenslave-2.6' instead of 'ifenslave'
The following NEW packages will be installed:
  ifenslave-2.6
0 upgraded, 1 newly installed, 0 to remove and 0 not upgraded.
Need to get 18.4 kB of archives.
After this operation, 143 kB of additional disk space will be used.
Get:1 http://mirror.anl.gov/debian/ squeeze/main ifenslave-2.6 amd64 1.1.0-17
Fetched 18.4 kB in 1s (10.9 kB/s)
Selecting previously deselected package ifenslave-2.6.
(Reading database ... 24191 files and directories currently installed.)
Unpacking ifenslave-2.6 (from .../ifenslave-2.6_1.1.0-17_amd64.deb) ...
Processing triggers for man-db ...
Setting up ifenslave-2.6 (1.1.0-17) ...
update-alternatives: using /sbin/ifenslave-2.6 to provide /sbin/ifenslave (ifenslave) in auto mode.