Пишем soap клиент-серверное приложение на php
Содержание:
- Введение
- WS-I Settings
- HTTP Settings
- Add Projects to Workspace
- Какой стиль предпочитают
- UDDI
- Дальнейшие примечания:
- Как отправлять запросы
- WSDL Settings
- Project Types
- When Mocking is Required
- UI Settings
- Генерация доменных классов на основе XML схемы
- Proxy Settings
- Сервис-имитация
- Getting Started with REST APIs
- Project Encryption
- 9 Список литературы
- Editor Settings
- Resource Root Property
- 8 Заключение
Введение
SoapUI — это приложение для тестирования веб-сервисов с открытым исходным кодом для
сервисно-ориентированных архитектур (SOA) и передач состояния представления (REST).
Разработчик — Eviware Software
Язык программирования, на котором пишут скрипты в SOAP UI, называется Groovy.
Его функциональность охватывает проверку веб-сервисов, вызов,
разработку, моделирование и имитацию, функциональное тестирование, нагрузочное тестирование
и проверку соответствия.
Коммерческая версия SoapUI Pro, которая в основном фокусируется
на функциях, предназначенных для повышения производительности, также была разработана
Eviware Software. В 2011 году SmartBear Software приобрела Eviware.
SoapUI был первоначально выпущен в SourceForge в сентябре 2005 года. Это бесплатное
программное обеспечение, лицензированное в соответствии с публичной лицензией Европейского Союза.
Начиная с первого релиза, SoapUI был загружен более 2 000 000 раз.
Он полностью построен на платформе Java и использует Swing для пользовательского
интерфейса. Это означает, что SoapUI является кросс-платформенным. Сегодня SoapUI
также поддерживает IDEA, Eclipse и NetBeans.
SoapUI может тестировать веб-службы SOAP и REST, JMS, AMF, а также совершать
любые вызовы HTTP(S) и JDBC.
Ссылку на скачивание SOAP UI можно найти
WS-I Settings
| Option | Description |
|---|---|
| Verbose | Sets verbose output of WS-I tools |
| Profile | WS-I Profile |
| Correlation | Header for correlation between encrypted and unecrypted messages. |
| Message Entry | Shows message entries in report |
| Failure Message | Includes defined failure messages in report |
| Assertion Description | Includes description of each test assertion in report |
| Tool Location | Local path to installed WS-I test tools |
| Show Log | Shows Log window when running WS-I tools |
| Output Folder | If specified, generated HTML reports will automatically be exported to this folder, which is required when running ws-i validation from the command-line or one of the Maven plug-ins |
HTTP Settings
| Option | Description |
|---|---|
| HTTP Version | Selects the HTTP version |
| User-Agent Header | Sets the HTTP User-Agent Header. If none is specified the default HttpClient header is used |
| Request Compression | Selects the request compression type |
| Response Compression | Indicates if compressed responses from hosts are accepted |
| Disable Response Decompression | Disables decompression of compressed responses |
| Close connections after request | Disables HTTP Keep-Alives by requesting to close the HTTP connection after each request. This will have a negative impact on performance but may give more realistic values during load testing |
| Chunking Threshold | Using content-chunking for requests larger than thresholds, blank to disable |
| Authenticate Preemptively | Send Authentication headers with each request without first receiving an authentication challenge. This is a potential security hazard but will improve performance since only one request will be required for authenticated endpoints instead of two |
| Expect-Continue | Adds Expect-Continue header to outgoing request.For further info on this feature check |
| Preencoded Endpoints | Do not URL-encode endpoints, set this if your endpoint URLs are already URL-encoded (containing for example %20 or %3A) |
| Bind Address | The local address to bind to when sending requests, can be overridden on a request level (with the corresponding request property) and on a system level by setting the soapui.bind.address system variable. |
| Include request in time taken | Includes the time it took to write the request in time-taken |
| Include response in time taken | Includes the time it took to read the response body in time-taken |
| Socket Timeout | The socket timeout for HTTP requests in milliseconds |
| Max Response Size | The maximum number of bytes to read from a response (0 = unlimited) |
| Max Connections Per Host | The maximum number of simultaneous connections to a specific host. Increase this value if you are running LoadTests with more than 500 threads on a particular host. |
| Max Total Connections | The total maximum number of connections. Increase this value if you are running LoadTests with more than 2000 threads. |
| Leave MockEngine | Will leave the MockEngine running even when all MockServices have stopped resulting in much faster startup-times for new MockServices and 404 errors when trying to call a stopped MockService (instead of connection failure) |
| Enable Mock HTTP Log | Logs wire content of all mock requests. Selecting this option will degrade Mock Engine performance marginally and may require restart to enable or disable. |
Add Projects to Workspace
There are two ways to add a project to the workspace:
- By creating a
- By importing an local, composite, packed, or remote project
3.1. Create New Project
-
To create a new SOAP project, select File > New SOAP Project.
Specify the name for your new project and the WSDL file that SoapUI will use for the initial configuration, then select the necessary options.
Click OK. SoapUI will generate the service and, optionally, test suite and mock service.
-
To create a new REST project, select File > New REST project.
Specify an URI to use for the project generation in the subsequent dialog and click OK.
You can also click Import WADL to switch to the New WADL project dialog.
With this dialog, you create a REST project based on WADL.
-
To create a new empty project, select File > Create Empty Project. It will immediately appear in the Navigator, and the editor for the project will become available in the Workspace.
In ReadyAPI, you can also create projects from the OpenAPI or Swagger definition, or use the built-in API discovery feature. To try it out, download a free trial of ReadyAPI.
3.2.1. Local Project File
To import an existing project file from your computer:
-
Select File > Import Project.
-
Specify a path to the project XML file, or click Browse and navigate to the file manually.
-
Click OK.
3.2.2. Local Packed Project
To import an existing packed project ZIP file from your computer:
-
Select File > Import Packed project.
-
Specify a path to the project ZIP file, or click Browse and navigate to the file manually.
-
Click OK.
3.2.3. Local Composite Project
To import a composite project consisting of multiple files:
-
Select File > Import Project.
-
Specify a path to the folder that contains the project files, or click Browse and navigate to the folder manually.
-
Click OK.
3.2.4. Remote Project
To import a remote project (for example, a tutorial, demonstration, bug report, and so on) using HTTP:
-
Select File > Import Remote Project.
-
In the subsequent dialog, specify an URL that leads to the project.
-
Click OK.
Note: SoapUI saves all changes you apply to the imported remote project to the local copy.
3.2.5. Resolve Projects
When you import a project, SoapUI checks it to verify it is consistent and has all necessary external dependencies available. This process is called resolving.
If errors are found, the Resolve Project dialog appears. It shows all errors, so you can resolve them as you need.
To take a closer look on a specific item, double-click it in the list, and the corresponding editor will appear.
Resolve Project Dialog
In the Resolve Project dialog, you handle conflicting resources in your project when you import it.
To resolve a potential problem:
-
Select a needed action from the drop-down list to the right of each item.
-
Enter parameters or values as needed.
-
Click OK.
3.2.6. Import Postman Collection
To create a project based on the Postman Collection:
-
Select File > Import Postman Collection.
-
In the subsequent dialog, specify the path to the collection file.
-
Click OK.
To learn more about the Postman integration in SoapUI, see Postman Collections.
Какой стиль предпочитают
Раздел привязки WSDL описывает, как служба привязана к протоколу обмена сообщениями SOAP. В приведенном выше примере использовался как стиль привязки, который позволяет структурировать тело SOAP так, как мы хотим, пока результирующий вывод является допустимым экземпляром XML. Это стиль привязки по умолчанию и часто упоминается как на .
В отличие от стиля , тела запроса стиля должны содержать как имя операции, так и набор параметров метода. Поэтому структура экземпляра XML предопределена и не может быть изменена.
В дополнение к стилю привязки секция связывания также определяет модель трансляции для привязок к сообщениям SOAP в имени или . Разница между ними заключается в том, что эта модель должна соответствовать пользовательской структуре XSD, которая может использоваться для проверки запросов и ответов, в то время как модель должна использовать типы данных XSD, такие как или но взамен поэтому не должен соответствовать какой-либо пользовательской схеме. Однако это затрудняет проверку тела сообщения или преобразование сообщения через XSLT в другой формат.
Сочетание стиля привязки с используемой моделью позволяет фактически 4 разных результата сообщения. 5-я запись добавляется в список, который обычно используется (хотя и не является частью стандарта).
- RPC / закодированный
- RPC / литерал
- Документ / кодировка
- Документ / литерал
- Документ / литерал (завернутый)
В приведенном ниже разделе представлен обзор различий в отношении объявления WSDL или схемы и их влияние на результирующий формат сообщения SOAP при изменении стиля привязки или определения модели использования.
RPC / закодированный
WSDL:
Запрос SOAP
Ответ SOAP
Pros
- простой WSDL
- Название операции и элементов, доступных в запросе и ответе
Cons
- Явное объявление типов XSI
- Трудно проверить
- Не соответствует WS-I
RPC / литерал
WSDL:
Запрос SOAP
Ответ SOAP
Pros
- простой WSDL
- Название операции и элементов, доступных в запросе и ответе
- Нет необходимости в спецификации типа XSI
- Соответствие WS-I
Cons
Трудно проверить
Документ / литерал
WSDL:
Запрос SOAP
Ответ SOAP
Pros
- Нет кодировки типа XSI
- Возможность проверки тела
- WS-I, соответствующий ограничениям
Cons
- WSDL более сложна из-за дополнительного определения XSD
- Название операции потеряно
- WS-I разрешает только одному ребенку в теле SOAP
Документ / литерал (завернутый)
WSDL:
Запрос SOAP
Ответ SOAP
Pros
- Нет кодировки типа XSI
- Возможность проверки тела
- Название операции и элементов, доступных в запросе и ответе
- Соответствие WS-I
Cons
WSDL более сложна из-за дополнительного определения XSD
UDDI
— это открытая отраслевая инициатива, выпущенная в 2000 году, которая служит реестром на основе желтых страниц на базе XML для веб-сервисов, который помогает находить службы, которые решают конкретные задачи. Чтобы найти подходящую услугу, служба сначала должна быть зарегистрирована в реестре веб-службы, например UDDI.
UDDI работает с обменом сообщениями SOAP и предоставляет доступ к документам WSDL, которые могут использоваться для вызова фактической веб-службы.
UDDI предоставляет критерии поиска, такие как
- бизнес-идентификатор
- Наименование фирмы
- расположение бизнеса
- бизнес-категория
- тип услуги по имени
- URL-адреса обнаружения
Однако большой недостаток нынешнего UDDI заключается в том, что он позволяет использовать только один критерий в инструкции поиска. Некоторые разработчики, таким образом, модулировали свои реализации UDDI, чтобы разрешить запросы, порождающие несколько UDDI одновременно, а затем агрегировать возвращенные результаты.
Дальнейшие примечания:
SOAP / WSDL предоставляют широкий спектр поддержки инструментальных средств, а также позволяют динамически генерировать классы-заглушки для клиентов и серверов, поскольку тип сообщений и обмен данными хорошо определяется через встроенные или связанные схемы XSD.
SOAP по-прежнему полезен в настоящее время, если вы не можете напрямую сопоставить свою задачу с ресурсами, например, базовыми службами HTTP / REST, поскольку задача выполнения представляет собой естественное действие или должна определять определенную семантику транзакций. Кроме того, если у вас нет ресурсов для определения или реализации собственного протокола, вы, вероятно, лучше используете SOAP. SOAP особенно полезен, если вам приходится иметь дело с оркестровкой, поскольку описание WSDL в сочетании с UDDI позволяет динамически комбинировать службы.
Как отправлять запросы
New REST Project → Пишем URI → Запрос создаётся, можно добавлять новые.
Method можно выбирать из выпадающего списка.
Проект имеет иерархическую структуру.
Названия отражают суть:
Request (запрос) это то место, где можно поменять тело запроса и
просмотреть ответ сервера.
Чтобы отправлять запросы нужно нажимать зелёный треугольник.
Method (метод) указывает
GET, POST, PUT или другой метод, который Вы будете использовать. Все дочерние запросы
будут иметь один и тот же Method.
Resourse (ресурс) отвечает за ту часть URL, которая добавляется к базовой.
Service (сервис) отвечает за базовую часть URL
WSDL Settings
| Option | Description |
|---|---|
| Cache WSDLs | Turns on and off caching of WSDL’s (Read Reference Caching Definitions |
| Sample Values | Generates example values in requests when creating from schema |
| Type Comment | Generates comments with type information in new requests |
| Include Optional | Always includes optional elements in generated requests |
| Pretty Print | Pretty prints response messages in response editor |
| Attachment Parts | Generates part-elements in request messages for mime-attachments in RPC messages (required by some ws-stacks) |
| No Content-Type Validation | Does not validate the content-type of a mime-attachment against the type(s) specified in the SOAP-Binding |
| Schema Directory | Specifies a directory containing schema (.xsd) files that should be automatically added when parsing or validating wsdl or requests. Changing the contents of this directory requires a restart. |
| Name with Binding | Tells SoapUI to name imported interfaces with the name of their corresponding soap/http binding, and not with their portType (Read Reference Interfaces). This ensures that WSDL containing bindings for both SOAP 1.1 and SOAP 1.2 will get unique names during import. This setting defaults to true. |
| Excluded Types | A list of XML-Schema types and global elements in the form of name@namespace which will be used when generating sample requests and responses and input forms in the SoapUI Pro Form editor. By default the XML-Schema root element is added since it is quite common in .NET services and generates a sample xml fragment of about 300 kb!. |
| Strict Schema Types | Check this to not allow schema type redefinitions in included/imported xsd:s for a specific WSDL (default behavior in versions prior to 1.7.5) |
| Compression Limit | The minimum message size to compress in the SoapUI project file for preserving space. Compression is performed with gzip and the result is base64 encoded into the project file. For large requests, this can save up to 90% file-space, but be aware that the requests are no longer readable or diffable. |
| Pretty Print Project Files | Pretty prints project files when they are saved, which makes it easier to work with a source-control system (diffing, etc…). Be aware that when selecting this option the size of the project files will increase substantially and also cached WSDLs and XSDs will be pretty-printed. |
Project Types
There are three main types of projects in SoapUI:
The project type indicates the main type of the tested service. However, you can manually combine service types in any projects you create.
2.1. SOAP Projects
SOAP projects can be created from a WSDL file or single service call. You can use these projects to test every aspect of your SOAP services, verify that the services support commonly used standards such as WS-Security, WS-Addressing, and MTOM, create functional and load tests, and much more.
To learn more about SOAP projects in SoapUI, see the corresponding section of the documentation.
2.2. REST Projects
REST projects can be created from WADL file or, directly, URI and its parameters. You can use these projects to test RESTful services, create various requests and check the information you receive, give a try to a multitude of methods and operations, and so on.
To learn more about REST projects in SoapUI, see the corresponding section of the documentation.
2.3. Generic Projects
Generic projects are all-purpose project for services with varied interfaces and methods. They may combine tests you create for REST and SOAP services, as well as data-driven tests, mockups, and all the functionality SoapUI provides.
When Mocking is Required
You can use SOAP mock services to perform various tasks:
-
Create a web service prototype. You can generate a complete mock service using just a single request. In this case, you can implement and test clients much faster, since there is no need to create a complex working solution.
-
Develop and test client applications. You can simulate requests you want to test and prepare a number of various responses for them. These responses can contain scripts, custom HTTP headers, attachments, and other content. You can cycle or randomize the responses, or prepare specific responses for certain requests.
-
Test every aspect of your future service. With SoapUI, you can perform functional and load testing against a mock service before even creating an actual live service.
Note: Please keep in mind that SoapUI mock services are not designed to be implemented as actual live services. Even if a mock service works correctly, it does not mean the actual service built atop of that mock will work as required. It also does not provide any actual functionality except for sending the predefined responses.
UI Settings
| Option | Description |
|---|---|
| Close Projects | Closes all projects at startup for improved startup-time and less memory consumption. |
| Order Projects | Sorts Projects in alphabetical order in the navigator. |
| Order Services | Sorts Services in alphabetical order in the navigator. |
| Order Requests | Sorts Requests in alphabetical order in the navigator. |
| Show Descriptions | Show description content when available |
| Save Projects On Exit | Automatically save all projects on exit. |
| Create Backup | Creates a backup copy of a projects project-file before saving. |
| Backup Folder | The folder where to save backups, if relative or empty the folder is relative to the project files folder |
| Auto Save Interval | Sets a project auto save interval (in minutes). If set over 0, SoapUI will automatically save all projects that have no running tests (both Functional and Load) at the specified interval |
| Desktop Type | Selects which desktop layout to use. SoapUI Pro adds a Tabbed Desktop (Read Reference Tabbed Desktop ) as an alternative to the default layout. Changing this setting will be applied when closing the preferences dialog. |
| Native L&F | Turns off the use of the default Look & Feel and uses the JRE default instead. Requires a restart. |
| Do not disable Groovy Log | Keeps the groovy log active during LoadTests, which can be useful for debugging, etc. |
| Show Log Tabs | Expands the log tabs when starting SoapUI. |
| Show Startup Page | Opens startup web page when starting SoapUI. |
| Disable Tooltips | Disables all tooltips |
| Normalize Line-Break | Normalize line-breaks when saving project |
| Garbage Collection Interval | Sets the Garbage Collector interval in seconds (o means the garbage collection is only performed by JRE) |
| Size of Raw Response Message | Sets the size of raw response message to show |
| Size of Raw Request Message | Sets the size of raw request message to show |
| Wrap content in Raw Message Viewers | Wraps the content in Raw Message Viewer |
| Disable Usage Statistics | Defines if anonymous usage statistics are to be sent or not. |
Генерация доменных классов на основе XML схемы
Следубщим шагом необходимо сгенерировать Java классы из XSD файла. Правильным подходом является
их автоматическое создание в процессе сборки с использованием плагина maven или gradle.
Конфигурация плагина для maven:
Сгенерированные классы будут помещены в каталог.
То же самое и с gradle:
Следующий шаг — добавление задачи , необходимой gradle для генерации Java классов:
Т.к. gradle не имеет JAXB плагина(пока), он включает в себя ant задачу, которая делает файл сборки
немного сложнее по сравнению с файлом сборки Maven.
В обоих случаях, процесс генерации объектов включен в жизненный цикл сборки, поэтому не требуются
отдельные шаги по запуску этого процесса.
Proxy Settings
| Option | Description |
|---|---|
| Proxy setting | How the proxy is determined. Automatic tries to automatically determine proxy by looking at Java settings, environment variables, browser settings and operating system settings. None turns off the proxy. Manual uses the host, port and excludes entered below. |
| Host | The HTTP Proxy host to use (only applicable for manual proxy). |
| Port | The HTTP Proxy port to use (only applicable for manual proxy). |
| Excludes | A comma-separated list of hosts to exclude, for example «127.0.0.1:8080,myserver.com» will not use a proxy for 127.0.0.1 on port 8080 and myserver.com on any port (only applicable for manual proxy). |
| Username | The username sent for proxy authentications |
| Password | The password sent for proxy authentications |
Сервис-имитация
File → Create Empty Project

Введите имя проекта

New Rest Mock Service

Укажите имя MockService
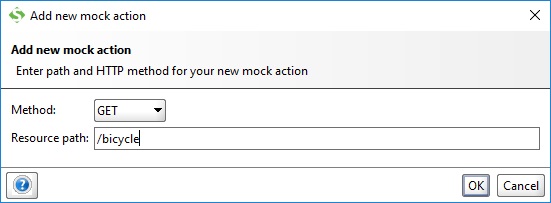
Add new mock action

Введите путь и выберите метод
New MockResponse

Введите имя нового ответа
Скопируйте json и вставьте в
тело ответа
Замените Content | Media type на application/json. Http Status Code должен быть 200 – OK.
Headers введите по желанию. Их можно добавить нажав на зелёный плюс +

Правой кнопкой мыши кликните на BicycleService и
Add new mock action
Назовите его «bicycle/1»
Правой кнопкой мыши кликните на «bicycle/1» (или кликните Ctrl + N) и
create New MockResponse
назовите его «singleBicycle»
Скопируйте json и вставьте в
тело ответа

Создайте новый mock action, имя оставьте старое «/bicycle» а тип измените на
вместо GET.
Создайте новый MockResponse и назовите его «addBicycle»
Скопируйте json и вставьте в тело ответа

Создайте новый mock action типа GET и назовите его «/incorrectep»
а новый MockResponse «400»
Измените
на 400 – Bad Request

Обратите внимание, что сервис BicycleService использует порт

Запустите BicycleService нажав на зелёный треугольник

У нас есть четыре сценария
Используем Postman чтобы протестировать их
Должен вернуть key 12041961

Должен вернуть список велосипедов

Должен вернуть первый велосипед

Должен вернуть пустой ответ и Http Status 400 Bad Request

Getting Started with REST APIs
In general, REST testing is sending different requests to a REST API and verifying responses from it. SoapUI supports extensive testing of RESTful web services and their resources, representations, and so on.
This step-by-step tutorial will help you learn how to send requests to a REST API and verify its responses with assertions in SoapUI. Follow along below with a quick demo using the Google Maps API to get you going. In just a few minutes, you’ll know how to create your first functional test of a RESTful web service — and it only takes a few clicks! Once you get the hang of it, start testing your own APIs!
To get started with this tutorial download SoapUI now!
If you’d like a more detailed guide to testing RESTful APIs, download our E-book: REST 101: The Beginner’s Guide to Using and Testing RESTful APIs
Project Encryption
You can use the Project Password project property to encrypt the entire contents of the project file.
When you save such project, the project icon will contain a small character to indicate it has been encrypted.
When you open the password-protected project, SoapUI will suggest to decrypt the project before using it.
To remove the encryption, clear the project password value and save the project.
Important: Do not lose your password. SoapUI provides no means to recover an encrypted project file if the password has been lost.
No one knows APIs better than SmartBear. Find out what our Pro version of SoapUI can do to improve your testing.
9 Список литературы
- www.w3.org/XML/Schema – спецификация и прочая информация по XML-схемам
- www.w3.org/TR/soap – спецификация протокола SOAP
- ru.wikipedia.org/wiki/Remote_Procedure_Call – статья про RPC
- ru.wikipedia.org/wiki/REST – статья про REST
- ru.wikipedia.org/wiki/XML – статья про XML
- ru.wikipedia.org/wiki/XML_Schema – статья про XML-схемы
- ru.wikipedia.org/wiki/WSDL – статья про WSDL
- www.php.net/manual/ru/book.soap.php – официальный мануал по работе с SOAP в PHP
- github.com/hats/soap-sms-service – исходные коды примеров из топика
P.P.S. дополнение от Mikaz
Нужно вместо массива использовать ArrayObject в совокупности с SoapVar.
Рабочий код мог бы выглядеть так:
Editor Settings
| Option | Description |
|---|---|
| Editor Font | The font to be used by all XML Editors. The «Select Font» button opens a dialog for selecting the desired font and size. |
| XML Line Numbers | Shows line-numbers by default in all XML-Editors (use Alt-L in editors to toggle). |
| Groovy Line Numbers | Shows line-numbers by default in all Groovy-Editors (use Alt-L in editors to toggle). |
| Disable auto-resize | Disables automatic resizing of request/response editors. |
| Tabbed Request view | Sets the tab-layout as the default layout for request/response editors (Read Reference Requests). |
| Validate Requests | Turns on automatic validation of requests before they are submitted from a request editor. The validation performed is the same as when pressing Alt-V in the editor. |
| Abort on Invalid | Enabled in conjunction with «Validate Requests», if selected any requests that fail validation will not be submitted. |
| Validate Responses | Turns on automatic validation of response messages when they are received in a response editor. The validation performed is the same as when pressing Alt-V in the editor. |
Resource Root Property
4.1. Description
The Resource Root property controls how SoapUI handles paths for the project resources.
If the project contains references to external resource, they will need to be included with the project when distributed.
| Option | Description |
|---|---|
| An absolute path | Use this absolute path. |
| ${projectDir} | Resolves files relative to the project folder. |
| ${workspaceDir} | Resolves files relative to the folder containing the workspace file. |
Note: SoapUI also applies this setting to external files the project uses.
4.2. Resource Root Examples
For example, you have the testdata.xls file you need access from the project. The d:\projects\ folder contains workspace files, and d:\projects\webservice\ is the folder of the project.
-
Absolute path – The d:\data path resolves to d:\data\testdata.xls.
-
Project path – The ${projectDir}\data path resolves to d:\data\testdata.xls.
-
Workspace path – The {workspaceDir}\data path resolves to d:\proects\webservice\data\testdata.xls.
8 Заключение
- вам по силам написать необходимый для вашего веб-сервиса WSDL-файл;
- вы без всяких проблем можете написать свой собственный клиент способный общаться с сервером по протоколу SOAP;
- вы можете написать свой собственный сервер общающийся с окружающим миром по SOAP;
- вы можете отправлять массивы однотипных объектов на сервер со своего клиента (с некоторыми ограничениями).
- нативный класс SoapClient не умеет правильно сериализовывать однотипные структуры данных в XML;
- при сериализации массива в XML он создает лишний элемент с именем Struct;
- при сериализации объекта в XML он создает лишний элемент с именем BOGUS;
- BOGUS меньшее зло чем Struct из-за того, что конверт получается компактнее (не добавляются лишние namespace’ы в XML заголовке конверта);
- к сожалению, класс SoapServer автоматически не валидирует данные конверта нашей XML-схемой (возможно, и другие сервера этого не делают).