Пишем обработку asterisk ami своими руками. часть первая: создаем класс на php для обращения к звездочке или как сделать php socket клиент своими руками
Содержание:
- What is Stasis?
- Diving Deeper
- Configuring the SIP Softphone
- Раздел для тех, кто не в теме.
- Manager Asterisk
- Твики и допиливания
- Реализация
- Configuring the Asterisk Server
- Настройка AJAM HTTPS
- Новая версия API Телфин
- What is REST?
- Тонкая настройка фильтров на основе регулярных выражений
- Enter AMI and AGI
- Ложка дегтя
- Использование
- Параметры компонента
- Проверка работы и дополнительные настройки
- ARI: An Interface for Communications Applications
- Overview
- Пример: Совершение вызова с канала SIP на указанный номер.
- Installing Asterisk
- SIP телефон(софтфон) для 1С:Предприятия 8 и IP АТС (виртуальная и офисная) Промо
- Оборудование
What is Stasis?
Stasis is a dialplan application in Asterisk. It is the mechanism that Asterisk uses to hand control of a channel over from the dialplan — which is the traditional way in which channels are controlled — to ARI and the client. Generally, ARI applications manipulate channels in the Stasis dialplan application, as well as other resources in Asterisk. Channels not in a Stasis dialplan application generally cannot be manipulated by ARI — the purpose of ARI, after all, is to build your own dialplan application, not manipulate an existing one.
Diving Deeper
This space has a number of pages that explore different resources available to you in ARI and examples of what you can build with them. Generally, the examples assume the following:
- That you have some phone registered to Asterisk, typically using or
- That you have some basic knowledge of configuring Asterisk
- A basic knowledge of Python, JavaScript, or some other higher level programming language (or a willingness to learn!)
Most of the examples will not directly construct the HTTP REST calls, as a number of very useful libraries have been written to encapsulate those mechanics. These libraries are listed below.
Configuring the SIP Softphone
Ensure that the Asterisk has been installed properly, with the SIP users defined.
1. SJPhone
a) Download and run the installation file from the website: http://www.sjphone.org/sjp.html, to install the SJPhone in your machine.
b) Open the SJPhone. Go to «Menu -> Options».
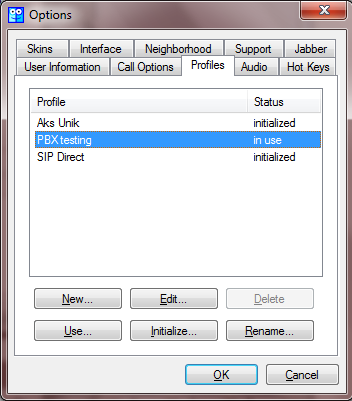
c) Select the Profiles tab and click New to create a new profile. Enter the Asterisk server details and the SIP user credentials.
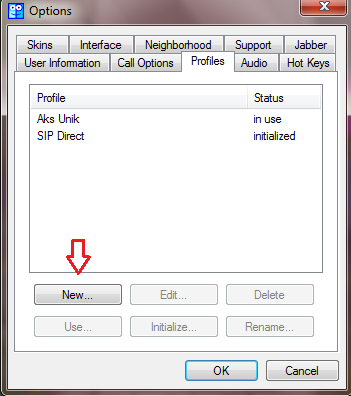
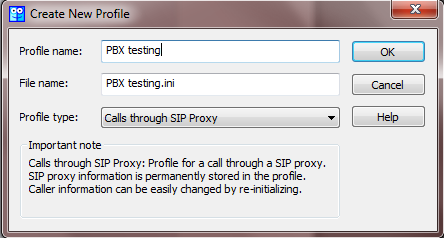
d) Give a Profile name and File name for your reference. Choose a Profile type and that must be Call through SIP Proxy. Click OK.
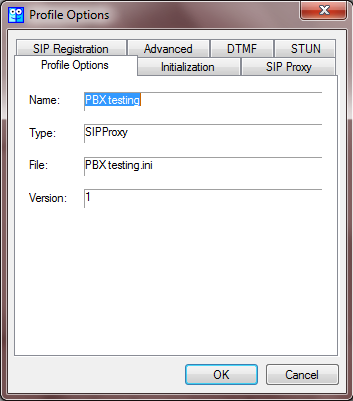
e) The Profile Options dialog box opens up. No changes are required to be done here.
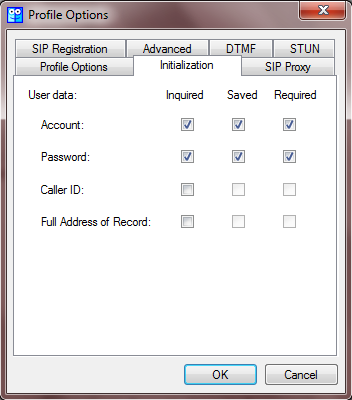
f) Click the Initialization tab and ensure the check boxes are checked as shown in the below image.
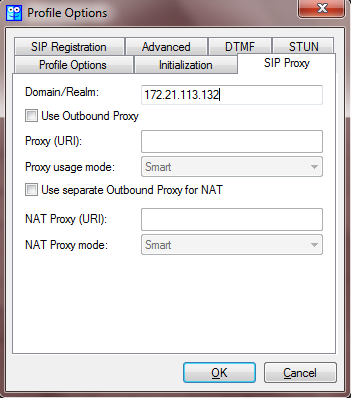
g) Click the SIP Proxy tab. In Domain/Realm text box, enter the IP Address of the machine, where the Asterisk is running. You can also enter the Proxy settings, if required. Click OK.
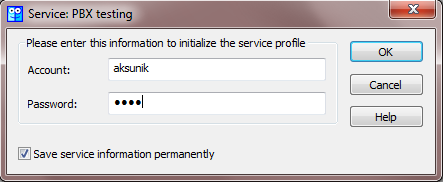
h) The Service: PBX testing dialog box shows up. Give the SIP username (Account) and Password. This is the account information used to login. Click OK.
The profile is set now. The Asterisk server details and the SIP user account information have been successfully added. Put the PBX testing profile in use, for the SJPhone to establish a connection to the server. Click OK.
Upon successful connection establishment, the following registered as message will be shown. The SJPhone will be now able to place and receive calls.
Note: To register with another SIP user account, go to the Profiles tab and click Initialize to provide the required account details.
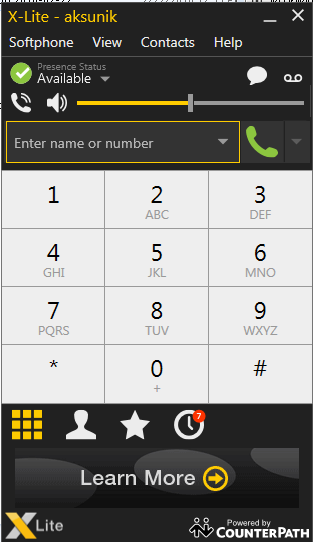
2. X-Lite
a) Install X-Lite in your machine by downloading and running the relevant installation file from the website: http://www.counterpath.com/x-lite-download.
b) Open the download X_Lite application and go to «Softphone -> Account Settings».
c) Provide the following details:
- Account nameAn account name for you reference.
- User ID: The username of the SIP User.
- DomainThe IP address where Asterisk is running.
- PasswordThe secret of the respective SIP User.
Provide Proxy details (if required), under the Domain Proxy section. Click OK.
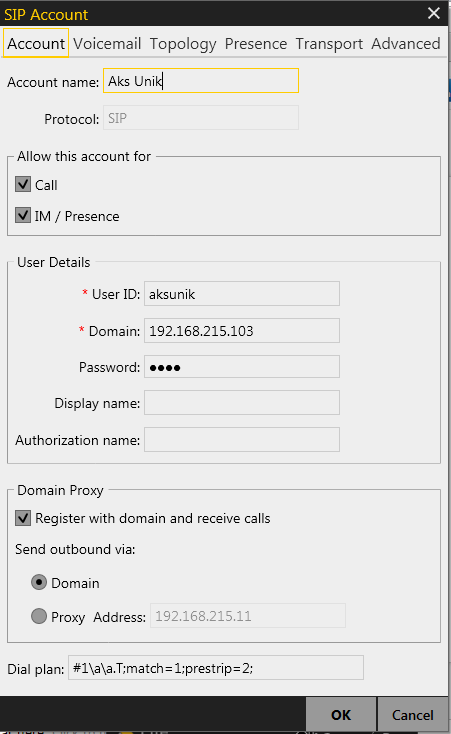
d) You will see the below window, with your account details enabled in X-Lite.
Раздел для тех, кто не в теме.
Кто уже читал предыдущие статьи и знает про AMI (Asterisk Manager Interface) и AJAM, может смело пропустить этот раздел.
AMI – это интерфейс управления Asterisk-ом. Но, подключения к AMI, как и девушки, бывают разные. Два основных:
- AMI поверх TCP, который часто называют просто AMI.
- AMI поверх HTTP, его еще называют AJAM (Asynchronous Javascript Asterisk Manager). Хотя, особой асинхронности я там не увидел.
Если объяснять на пальцах, то разница между 1 и 2, как между толстым и веб-клиентом. Для тех, кто хочет накуриться правильных английских мануалов — ссылка.
Внешняя компонента ROM-Asterisk может использовать оба способа подключения. Внешняя компонента от МИКО использует только AJAM.
Но нам, они пока не нужны – мы будем подключаться без них.
Manager Asterisk
Необходимо перейти в интерфейс модуля

Указать имя / пароль менеджера, указать разрешенные / запрещенные сети:

В примере параметр «Разрешены» (Permit) установлен в значение 0.0.0.0/0.0.0.0 (разрешено подключаться под всеми сетевыми адресами).
Установите значения привилегий:
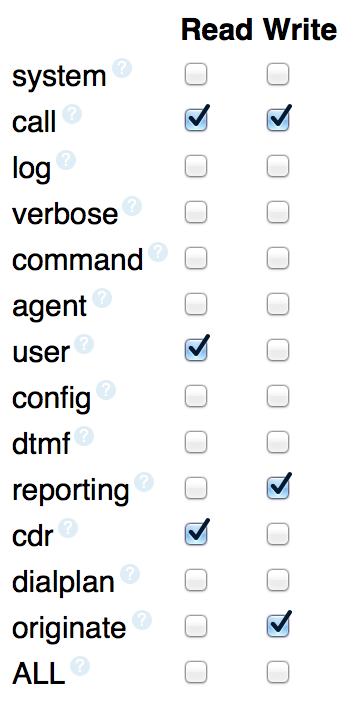
Не устанавливайте полные права для учетной записи! Больше — не значит лучше!
Современные версии FreePBX используют Asterisk 11+. Для этих версий asterisk необходимы выполнить дополнительные настройки manager AMI.
- Подключитесь к ПК c АТС по ssh
-
Создайте новый файл
touch /etc/asterisk/manager_custom_level_2.conf
-
Предоставьте права доступа на чтение:
chmod +r /etc/asterisk/manager_custom_level_2.conf
-
В файл manager_custom_level_2.conf добавьте дополнительные опции для менеджера 1cami
(+)
;;; Дополнительные опции для ASTERISK 11+ ;;; Начало ;;;;
eventfilter=!Event: Newexten
eventfilter=!Event: DeviceStateChange
eventfilter=!Event: NewConnectedLine
eventfilter=!Event: Newchannel
eventfilter=!Event: SoftHangupRequest
eventfilter=!Event: HangupRequest
eventfilter=!Event: BridgeDestroy
eventfilter=!Event: BridgeCreate
eventfilter=!Event: BridgeMerge
eventfilter=!Event: MusicOnHoldStop
eventfilter=!Event: MusicOnHoldStart
eventfilter=!Event: NewCallerid
eventfilter=!Event: LocalBridge
eventfilter=!Event: Unhold
eventfilter=!Event: Hold
eventfilter=!Event: AttendedTransfer
;;; Дополнительные опции для ASTERISK 11+ ;;; Конец ;;;;
-
Чтобы изменения вступили в силу выполните команду:
asterisk -rx'manager reload'
Твики и допиливания
Небольшой твик для стабильной работы FOP панели, перезапускает её раз в 10 минут
chmod 770 -R /var/www/admin/modules/fw_fop
echo "*/10 * * * * root amportal restart_fop 2>/dev/null">>/etc/crontab
Исправляем косяки с путями хранения звуков
cp -r /var/lib/asterisk/sounds/ /usr/share/asterisk/
rm -r /var/lib/asterisk/sounds/
ln -s /usr/share/asterisk/sounds /var/lib/asterisk/
chown -R asterisk:asterisk /var/lib/asterisk/sounds/
chown -R asterisk:asterisk /var/lib/asterisk/sounds/custom/
echo "" >>/etc/modprobe.d/dahdi.conf
chown asterisk:asterisk /etc/modprobe.d/dahdi.conf
Если планируется загружать на сервер файлы через WEB интерфейс (например мелодии в ожидании) большого размера, нужно увеличить параметры php отвечающие за предельные размеры таких файлов. Редактируем файл:
nano /etc/php5/apache2/php.ini
Ищем параметры и устанавливаем свои значения, например 32 мбайта
post_max_size = 32M
upload_max_filesize = 32M
Перезагрузим WEB сервер.
/etc/init.d/apache2 restart
Реализация
Считаем, что админ уже все настроил и можно приступать. Все, что нам нужно – это объект 1С HTTPСоединение и ровные руки, чтобы отправлять ровные запросы.
Код работы с Asterisk настолько тривиальный, что его нет смысла здесь приводить. Все сводится к элементарной отправке и чтению HTTP-запросов. Не верите? Смотрите сами:
Организация соединения:
Соединение=Новый HTTPСоединение(IP,Port,,,,Таймаут,);
Отправка и чтение запроса:
ТекстКоманды=«/asterisk/rawman?action=…бла-бла-бла»;
Запрос= Новый HTTPЗапрос();
Запрос.АдресРесурса=ТекстКоманды;
Ответ=Соединение.Получить(Запрос);
Это все
Configuring the Asterisk Server
Three files located in /etc/asterisk/ have to be modified as follows:
a) manager.conf
Asterisk can be connected to Asterisk Manager Interface (AMI) via a Manager. The manager.conf is the configuration file that holds information such as, the list of users allowed to connect to the AMI, their secrets (passwords), the IP’s from which they can connect, their privileges, etc.
Following is a simple sample configuration:
1.                        ; the name of the main default context - it must not be changed
2. enabled = yes                   ; By default is set to "no". Must be set it to "yes" in order for the AMI to work
3. port = 5038                     ; The port to which the AMI will listen
4. bindaddr = 0.0.0.0            ; This binds the AMI to all the IPs of the server  (0.0.0.0 binds to all)
5.       ; The username to identify when connecting to the AMI at log on
6. secret = manager_pwd      ; The password to enter at log on
7. permit=0.0.0.0/0.0.0.0     ; The IPs that the user manager_username will be able to connect from (0.0.0.0/0.0.0.0 permits all)
8. read = system,call,log,verbose,command,agent,user,originate     ; read permissions for the user manager_username
9. write = system,call,log,verbose,command,agent,user,originate    ; write permissions for the user manager_username
Refer the website http://www.voip-info.org/wiki/view/Asterisk+config+manager.conf for more details.
b) sip.conf
The sip.conf is the SIP (Session Initiation Protocol) channel configuration file that contains the configuration for the SIP channel driver, chan_sip.so. It also has the information and credentials, required for a telephony device to contact and interact with Asterisk.
1.                         ; Defines the default configuration for every user and peer
2. context = default            ; The context as defined in extensions.conf for incoming calls
3. bindport = 5060             ; UDP Port to bind to (SIP standard port is 5060)
4. bindaddr = 0.0.0.0          ; IP address to bind to (0.0.0.0 binds to all)
5. srvlookup = yes              ; Enable DNS SRV lookups on outbound calls
6.                         ; SIP user 1
7. type = friend                  ; A SIP entity which can place calls and to which Asterisk can place calls (Both incoming and outgoing)
8. context = default
9. username = aksunik      ; This declares that our user will be named 'aksunik'
10. secret=3294
11. host = dynamic              ; Enables the telephone to connect from any IP address
12. callerid= "Aks Unik :)"
13.                           ; SIP user 2
14. type = friend
15. context = default
16. username = 3166
17. secret=3166
18. host = dynamic
19. callerid="Rahul Gupta"
20.                        ; SIP user 3
21. type = friend
22. username = 3023
23. secret=3023
24. context = default
25. host = dynamic
26. callerid="Anand Balan"
Refer the website http://www.voip-info.org/wiki/view/Asterisk+config+sip.conf for more details.
c) extensions.conf
The configuration file «extensions.conf» contains the «dial plan» of Asterisk and the master plan of control or execution flow for all of its operations. It controls the way by which the incoming and outgoing calls are handled and routed.
1.
2. autofallthrough=yes
3.                 ; Context name
4. exten => 3294,1,Dial(SIP/aksunik)           ; Syntax: Dial(protocol/user)
5. exten => 3166,1,Dial(SIP/rahulg)
6. exten => 3023,1,Dial(SIP/anandb)
Each execution step in the extension is written in this format:
exten =>
- extension is the phone number to which the call is placed.
- priority is a sequence number for each command line of an extension, indicating the order of execution of the commands.
- command is the command to be executed. Refer http://www.voip-info.org/wiki/view/Asterisk+-+documentation+of+application+commands for the commands list.
exten => 3294,1,Dial(SIP/aksunik) implies that when dialing 3294, Asterisk will Dial the user aksunik through SIP protocol.
Refer the website http://www.voip-info.org/wiki/view/Asterisk+config+extensions.conf for more details.
Important: Asterisk server has to be restarted for the configuration changes to take effect.
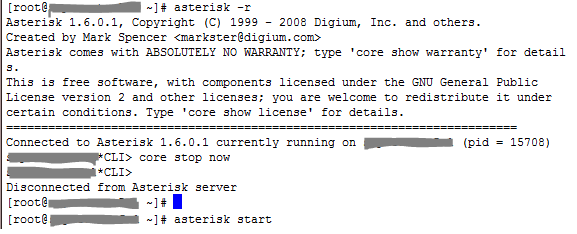
Restarting the Asterisk Server:
Do the following:
a) Execute the command asterisk -r to connect to the asterisk CLI.
b) In CLI, execute the command core stop now to stop the Asterisk server. The server will be stopped and the CLI will be closed.
c) Execute asterisk start to start the Asterisk server.
All the configuration file changes will be applied once the server is restarted.
Настройка AJAM HTTPS
Настройка HTTPS не является обязательным условием. Этот раздел можно пропустить.
Если мы хотим опубликовать ajam интерфейс на порту 4443 в режиме https, файл http.conf должен выглядеть примерно так:
Для астериск версии 1.6
- http.conf
-
enabled=yes
bindaddr=0.0.0.0
bindport=8088
prefix=asterisk
enablestatic=yes

sslenable=yes
sslbindaddr=0.0.0.0
sslbindport=4443
sslcert = /etc/asterisk/ssl/ajam.pem
Для астериск версии 1.8 и выше
- http.conf
-
enabled=yes
bindaddr=0.0.0.0
bindport=8088
prefix=asterisk
enablestatic=yes

tlsenable=yes
tlsbindaddr=0.0.0.0:4443
tlscertfile= /etc/asterisk/ssl/ajam.pem
tlsprivatekey= /etc/asterisk/ssl/ajam.pem
Также для https режима необходимо сгенерировать сертификат, которым будут шифроваться передаваемые данные.
Самый простой способ, это генерация самоподписанного сертификата на сервере Asterisk командой:
 cd /tmp
openssl req -new -x509 -days 365 -nodes -out /tmp/foo.pem -keyout /tmp/foo.pem
mkdir /etc/asterisk/ssl
mv /tmp/foo.pem /etc/asterisk/ssl/ajam.pem
Новая версия API Телфин
Сразу хочется сказать пару слов о новой версии API Телфин — API стал значительно лучше.
Во-первых, новый API предоставляет значительно больше возможностей, что точно понравится и разработчикам, и клиентам.
Во-вторых, API стал понятнее, вопреки тому, что в разы увеличился в размерах. Прежде всего, за счет логичной и понятной архитектура новой версии
В-третьих, в Телфин позаботились о разработчиках и добавили Swagger UI, что сильно экономит время при разработке.
До конца года Телфин будет поддерживать обе версии и новую, и старую, чтобы все клиенты смогли перейти на новую версию без лишней спешки.
What is REST?
- Communication is performed using a client-server model.
- The communication is stateless. Servers do not store client state between requests.
- Connections are layered, allowing for intermediaries to assist in routing and load balancing.
- A uniform interface. Resources are identified in the requests, messages are self-descriptive, etc.
ARI does not strictly conform to a REST API. Asterisk, as a stand-alone application, has state that may change outside of a client request through ARI. For example, a SIP phone may be hung up, and Asterisk will hang up the channel — even though a client through ARI did not tell Asterisk to hang up the SIP phone. Asterisk lives in an asynchronous, state-ful world: hence, ARI is RESTful. It attempts to follow the tenants of REST as best as it can, without getting bogged down in philosophical constraints.
Тонкая настройка фильтров на основе регулярных выражений
Фильтрация на базе регулярных выражений — это мощный инструмент внешней компоненты ROM-Asterisk. В других внешних компонентах для работы с Asterisk эта функциональность отсутствует.
Именно эта функциональность дает возможность успешно реализовать проекты в больших call-центрах, где идет серьезный поток звонков и Asterisk генерирует огромное количество событий.
Правильная настройка фильтра регулярных выражений дает возможность «отбить» лишние события еще на стороне ROM-Asterisk, не пуская их в процедуру ОбработкаВнешнегоСобытия и тем самым значительно снять нагрузку с пользовательского сеанса 1С.
В идеале, сеанс пользователя 1С должен получать только те события Asterisk, которые касаются только его.
Пример
Пользователь Василий имеет внутренний номер телефона «902». При начале входящего звонка, еще до поднятия трубки, необходимо показать номер звонящего. А при ответе на звонок, необходимо создать документ «Событие».
Соответственно, пользовательский сеанс 1С должен отслеживать события Asterisk: Dial, Bridge и Hangup. Но, не все, а только касающиеся номера «902». Событие Dial выглядит следующим образом:
Event: Dial
Privilege: call,all
SubEvent: Begin
Channel: SIP/202-0000019c
Destination: SIP/902-0000019d
CallerIDNum: 202
CallerIDName: Operator-202
ConnectedLineNum: 902
ConnectedLineName: Vasiliy-902
UniqueID: 1335616897.790
DestUniqueID: 1335616897.791
Dialstring: 902
|
1 |
EventDial Privilegecall,all SubEventBegin ChannelSIP202-0000019c DestinationSIP902-0000019d CallerIDNum202 CallerIDNameOperator-202 ConnectedLineNum902 ConnectedLineNameVasiliy-902 UniqueID1335616897.790 DestUniqueID1335616897.791 Dialstring902 |
Для этого применим регулярное выражение:
Dial.{1,}?902|Bridge.{1,}?902|Hangup.{1,}?902
| 1 | Dial.{1,}?902|Bridge.{1,}?902|Hangup.{1,}?902 |
Можно слегка усложнить задачу, ведь нам важно получать только события начала звонка, т.е. Dial…Begin, а в при использовании фильтра выше, в сеанс Василия попадут еще и события окончания набора Dial…End
Модифицируем регулярное выражение:
Dial.{1,}?Begin.{1,}?902|Bridge.{1,}?902|Hangup.{1,}?902
| 1 | Dial.{1,}?Begin.{1,}?902|Bridge.{1,}?902|Hangup.{1,}?902 |
Установка строки фильтра выполняется с помощью метода УстановитьРегулярноеВыражение объекта ROM-Asterisk.
Enter AMI and AGI
Not long into the project, two application programming interfaces (APIs) were added to Asterisk: the Asterisk Gateway Interface (AGI) and the Asterisk Manager Interface (AMI). These interfaces have distinct purposes:
- AGI is analogous to CGI in Apache. AGI provides an interface between the Asterisk dialplan and an external program that wants to manipulate a channel in the dialplan. In general, the interface is synchronous — actions taken on a channel from an AGI block and do not return until the action is completed.
- AMI provides a mechanism to control where channels execute in the dialplan. Unlike AGI, AMI is an asynchronous, event driven interface. For the most part, AMI does not provide mechanisms to control channel execution — rather, it provides information about the state of the channels and controls about where the channels are executing.
Ложка дегтя
Когда мы являемся источником события, то все вроде бы как хорошо. А вот, когда мы хотим просто слушать, то не все так гладко.
Перефразируя мем «нельзя просто так взять и получать события по AJAM». При работе через AJAM нам нужно будет периодически задалбывать HTTP-сервер запросами типа «Сервер, там для меня случайно нет событий?».
Допустим, нам нужно получить инфу о том, что на нас идет входящий звонок. Тогда нам нужен какой-то обработчик ожидания, который периодически будет опрашивать HTTP-сервер.
Именно для такого случая, придумали AMI-команду . Она делает следующую вещь — говорит Asterisk-у: «Мол, я тут событие жду. Не разрывай пож-та соединение пока оно не придет. Я готов ждать максимум 30 секунд». Asterisk конечно же так и поступит.
Но, все это время, пока мы ждем событие, наш HTTP-запрос будет находиться в «висячем» состоянии и клиентское окно 1С будет выглядеть зависшим.
- Пользователю, независимо от пола, «висячее» состояние вряд ли понравится
- Сервер тратит свои ресурсы на поддержание открытой сессии
Вы спросите, а может делать частые HTTP-запросы, допустим каждые 10 секунд, с таймаутом ожидания 10 секунд?
Может быть… Я же не знаю вашей нагрузки на Asterisk и на 1С.
ИМХО, здесь важно найти оптимальный баланс — и сервер не задолбать, и не пропустить важное событие AMI
Использование
Загрузка внешней компоненты
Загрузка выполняется стандартно — с помощью методов ЗагрузитьВнешнююКомпоненту и ПодключитьВнешнююКомпоненту.
Получение событий
События, полученные внешней компонентой, передаются в 1С через стандартный интерфейс IAsyncEvent и доступны в предопределенной процедуре ОбработкаВнешнегоСобытия(Источник,Событие,Данные)
Можно отключить получение событий, для этого достаточно воспользоваться методом РежимПрослушивания(0). Это может пригодиться при реализации исходящего Call-центра, где нужно отдавать команды на оригинацию, а события в этом случае не важны.
При разрыве соединения ОбработкаВнешнегоСобытия получит событие «Disconnect». В демо-примере показано как сделать автоподключение.
Фильтрация на стороне внешней компоненты
По большому счету, события можно фильтровать и внутри 1С в процедуре ОбработкаВнешнегоСобытия, но это дороже по ресурсам. Дешевле «отбивать» события на стороне ВК, тем самым снимая нагрузку с клиентского сеанса 1С. При правильно настроенных фильтрах в пользовательский сеанс 1С будут попадать только события, которые относятся к этому пользователю.
Пример фильтра
Например, стоит задача получать только события Dial, Bridge и Hangup, причем только для внутреннего номера 902.
Фильтр будет таким:
Dial.{1,}?902|Bridge.{1,}?902|Hangup.{1,}?902
Можно использовать обычный фильтр вхождения подстроки, тогда просто: «902«.
Если фильтр не указан, то вы получите все события.
Параметры компонента
| Параметр | Описание |
|---|---|
| Host | Адрес сервера Asterisk |
| Port | Порт на котором опубликован AJAM интерфейс, по-умолчанию 8088 |
| Prefix | Префикс AJAM интерфейса, по-умолчанию asterisk |
| Enabled | Состояние компонента, если true значит компонент соединен с Asterisk |
| DigestAutorization | Режима Digest авторизации в AJAM инетрфейсе |
| ObjectEventMode | Если установить в true, то все внешние события будут возбраняться в виде строки которая вычисляется функцией 1С «Вычислить» |
| SOAPEvents | Если установить в true включится режим отправки всех событий на указанный в следующем параметре адрес |
| SOAPUrl | Полный путь к вебсервису, способному обрабатывать события Asterisk |
| EventsTimeout | Таймаут обработки событий Asterisk |
| UseHTTPS | Если установить в true, компонент будет шифровать все сообщения AJAM |
| Version | Возвращает версию компонента |
| HaspLicenseServer | Адрес сервера лицензирования HASP |
| Proxy | Адрес HTTP прокси сервера |
| PorxyLogin | Логин на HTTP прокси |
| PorxySecret | Пароль на HTTP прокси |
| MikoLicense | Параметр для установки облачной лицензии МИКО SAAS |
| LicenseMode | Возвращает текущий режим лицензирования компонента |
Проверка работы и дополнительные настройки
В консоли сервера где установлен Asterisk выполняем следующую команду:
sudo asterisk -rx "http show status"
Если все настроено правильно, то ответ будет примерно такой:
HTTP Server Status:
Prefix: /asterisk
Server Enabled and Bound to 0.0.0.0:8088

HTTPS Server Enabled and Bound to 0.0.0.0:4443

Enabled URI's:
/asterisk/httpstatus => Asterisk HTTP General Status
/asterisk/phoneprov/... => Asterisk HTTP Phone Provisioning Tool
/asterisk/amanager => HTML Manager Event Interface w/Digest authentication
/asterisk/uploads => HTTP POST mapping
/asterisk/arawman => Raw HTTP Manager Event Interface w/Digest authentication
/asterisk/manager => HTML Manager Event Interface
/asterisk/rawman => Raw HTTP Manager Event Interface
/asterisk/static/... => Asterisk HTTP Static Delivery
/asterisk/amxml => XML Manager Event Interface w/Digest authentication
/asterisk/mxml => XML Manager Event Interface

Enabled Redirects:
  None.
Проверка настроек AMI:
manager show settings
Вывод команды
Global Settings:
----------------
  Manager (AMI):             Yes
  Web Manager (AMI/HTTP):    Yes
  TCP Bindaddress:           0.0.0.0:5038
  HTTP Timeout (minutes):    60
  TLS Enable:                No
  TLS Bindaddress:           Disabled
  TLS Certfile:              asterisk.pem
  TLS Privatekey:
  TLS Cipher:
  Allow multiple login:      Yes
  Display connects:          Yes
  Timestamp events:          No
  Channel vars:
  Debug:                     No
  Block sockets:             No
Проверка настроек менеджера Asterisk:
sip*CLI> manager show user 1cami

       username: 1cami
         secret: <Set>
            acl: yes
      read perm: call,user,cdr,all
     write perm: call,reporting,originate,all
displayconnects: yes
Если в качестве результата получим строку:
Response: Success
Message: Authentication accepted
Значит со стороны Asterisk все настроено правильно.
Не забудьте открыть на фаерволе порт 4443 или 8088 чтобы интерфейс ajam был доступен из вне.
Например для iptables под управлением CENTOS это делается добавлением строчки в файл /etc/sysconfig/iptables
-A RH-Firewall-1-INPUT -m state --state NEW -m tcp -p tcp   --dport 8088 -j ACCEPT
-A RH-Firewall-1-INPUT -m state --state NEW -m tcp -p tcp   --dport 4443 -j ACCEPT
ARI: An Interface for Communications Applications
The Asterisk RESTful Interface (ARI) was created to address these concerns. While AMI is good at call control and AGI is good at allowing a remote process to execute dialplan applications, neither of these APIs was designed to let a developer build their own custom communications application. ARI is an asynchronous API that allows developers to build communications applications by exposing the raw primitive objects in Asterisk — channels, bridges, endpoints, media, etc. — through an intuitive REST interface. The state of the objects being controlled by the user are conveyed via JSON events over a WebSocket.
These resources were traditionally the purview of Asterisk’s C modules. By handing control of these resources over to all developers — regardless of their language choice — Asterisk becomes an engine of communication, with the business logic of how things should communicate deferred to the application using Asterisk.
Overview
The Hangup Cause family of functions and dialplan applications allow for inspection of the hangup cause codes for each channel involved in a call. This allows a dialplan writer to determine, for each channel, who hung up and for what reason(s). Note that this extends the functionality available in the HANGUPCAUSE channel variable, by allowing a calling channel to inspect all called channel’s hangup causes in a variety of dialling situations.
Note that this feature replaces the technology specific mechanism of using the MASTER_CHANNEL function to access a SIP channel’s SIP_CAUSE, as well as extends similar functionality to a variety of other channel drivers.
Пример: Совершение вызова с канала SIP на указанный номер.
В данном случае исходящий вызов на номер внешнего абонента не будет совершаться до тех пор, пока наш SIP абонент не ответит на вызов:
 Action: Originate
 Channel: SIP/101test
 Context: default
 Exten: 8135551212
 Priority: 1
 Callerid: 3125551212
 Timeout: 30000
 Variable: var1=23|var2=24|var3=25
 ActionID: ABC45678901234567890
Где номер 8135551212 – это локальный городской номер телефона.
В данном примере также показано, как устанавливать переменные канала в Originate запросе.
Обратите внимание: Что параметры (в данном случае набор переменных канала) в версии 1.6 (и выше) должны отделяться друг от друга символом “,” (запятой), а не символом “|”. Чтобы полностью быть уверенным, какой разделитель используется в Вашей версии, можно в исходных кодах взглянуть на содержимое файла “include/asterisk/app.h”, на предмет определения конструкции с именем “AST_STANDARD_APP_ARGS”
Там вы сразу поймете, какой символ используется в качестве разделителя в наборе параметров.
При использовании данного примера, вызов абонента SIP/101test будет завершен, если он не ответит в течение 30 секунд.
Installing Asterisk
Asterisk is predominantly for Linux machines. Anyhow, it works for CentOS and Ubuntu, as well. Follow the steps one by one to install Asterisk in your Linux machine.
a) Go to «/usr/src/» directory and download the required version of Asterisk from the website: http://www.asterisk.org/downloads/asterisk/all-asterisk-versions.
Example: wget http://downloads.asterisk.org/pub/telephony/asterisk/asterisk-13-current.tar.gz
b) Extract the downloaded tar file as follows:
tar zxvf asterisk*
c) Navigate to the folder created after extracting the tar file, as mentioned below:
cd /usr/src/asterisk*
d) Execute the following command:
./configure && make menuselect && make && make install && make samples && make config
e) Navigate to «/etc/asterisk». Check if all the configuration files (.conf files) are available there.
Now, Asterisk is successfully installed and the server has started.
Refer the website http://www.voip-info.org/wiki/view/Asterisk+Step-by-step+Installation for more details.
SIP телефон(софтфон) для 1С:Предприятия 8 и IP АТС (виртуальная и офисная) Промо
«АТС.Ринголайн» и «Ringophone» — это современный взгляд, комплексное решение для организации телефонии в офисе, которое работает прямо из коробки. Решения направлены на организации, где главный упор сделан на коммуникацию и взаимоотношения с клиентами.
RingoPhone 1С — это бесплатный sip телефон, выполненный в виде внешней обработки для 1С. Данная панель телефонии разработана для любых конфигураций 1С:Предприятия 8. RingoPhone работает с АТС на базе Asterisk и провайдерами, которые поддерживают SIP протокол. IP телефония набирает огромную популярность и всё больше возможностей открывается при объединении телефонии и CRM системы. Возможность встроить телефон в свою CRM систему, позволяет осуществлять управление не только на уровне АТС, но и на уровне самого телефона.
АТС.RingoLine изначально создавалась с учётом интеграции с современными CRM системами. CRM системам доступно менять любые настройки АТС. Такие как: создание пользователей, добавление и удаление операторов колл-центра, возможность задавать переадресацию сотрудникам, получать информацию о звонках с АТС, а возможность доработки позволит заложить новые алгоритмы распределения звонков по сотрудникам в зависимости от данных в CRM системе.
1 стартмани
04.06.2013
52627
221
logilink.ru
81
Оборудование
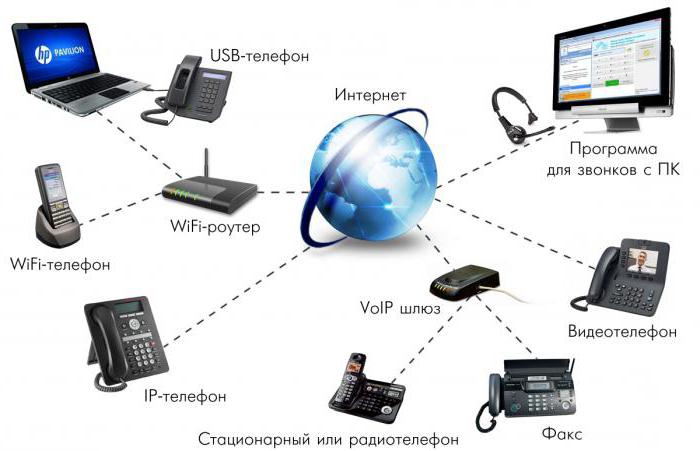
Asterisk может работать как с аналоговыми линиями (FXO-/FXS-модули), так и цифровыми (ISDN, BRI и PRI — потоки Т1/E1). С помощью определённых компьютерных плат (наиболее известными производителями которых являются Digium, Sangoma, OpenVox, Rhino, AudioCodes) Asterisk можно подключить к высокопропускным линиям Т1/E1, которые позволяют работать параллельно с десятками телефонных соединений. Полный список поддерживаемого оборудования для соединения с телефонной сетью общего пользования определяется поддержкой оборудования в модулях ядра, например:
- DAHDI, акроним «Digium Asterisk Hardware Device Interface» (ранее назывался Zaptel), разрабатывается параллельно с Asterisk компанией Digium.
- mISDN, разрабатывается Карстеном Кайлом (англ. Karsten Keil) из команды SuSE и компанией Beronet.
- CAPI.