Обзор, установка и настройка корпоративного чата myсhat
Содержание:
- Configure Livechat feature
- Корпоративный мессенджер Rocket.Chat
- (Users) Start a Live Stream
- Часть 1. установка и настройка zimbra collaboration suite Prune Messages
- Соревнование
- Check Caddy’s logs
- Configure Caddy yourself or use another http proxy
- Testing with an untrusted self-signed certificate
- Redirecting HTTP to HTTPS
- Disabling SSL or listening on custom ports
- Opening ports when running Rocket.Chat server from behind router
- Notifications Preferences
- Joining new channels and starting direct messages
- Leaving channels
- Creating Channels
- Video
- Interacting with Google Drive
- Планы и цены
- особенности
- Управление
- Установка Rocket.Chat на CentOS 7
- Basic Search Commands
- 0.69 Highlights
- Заключение
Configure Livechat feature
At Livechat manager you’ll have the following configuration options:
User Management
You can add new Livechat manager users and agents.
To start receiving incoming live chats you need to add Livechat agents.
Departments
You can have the following behavior depending on how many departments you have created:
-
No departments: all Livechat agents will receive incoming chats using a round robin rule;
-
One department: all incoming chats will be offered to agents only on that department using a round robin rule;
-
More than one department: the visitor will have to choose what department he wants to talk to at registration.
Triggers
You can configure how your Livechat widget will be triggered and what it will do on your website.
You can set a condition (e.g. user access a URL) and an action (e.g. send a message with the text «hello»).

image
Installation
Go to the Livechat Manager -> Installation
image
Then copy the code displayed into the source code of your website. You may modify it to meet your specific requirements.
To customize the appearance of your Livechat widget goto Livechat -> Appearance

image
Integrations
You can use webhooks to easily integrate Livechat with your CRM.
The Rocket.Chat will send a POST to the WebHook URL when the Livechat ends or you receive a new offline message.
Here is an example of the JSON data sent at the end of a Livechat session:
{ "type": "LivechatSession", "_id": "fasd6f5a4sd6f8a4sdf", "label": "title", "topic": "topic of the session", "code": 123123, "createdAt": "2016-06-01T18:41:16.856Z", "lastMessageAt": "2016-06-01T18:41:16.856Z", "tags": , "customFields": { "productId": "123456" }, "visitor": { "_id": "", "name": "viistor name", "username": "visitor-username", "department": "department", "email": "email@address.com", "phone": "192873192873", "ip": "123.456.7.89", "browser": "Chrome", "os": "Linux", "customFields": { "customerId": "123456" } }, "agent": { "_id": "asdf89as6df8", "username": "agent.username", "name": "Agent Name", "email": "agent@email.com" }, "messages": [ { "username": "visitor-username", "msg": "message content", "ts": "2016-06-01T18:41:16.856Z" }, { "username": "agent.username", "agentId": "asdf89as6df8", "msg": "message content from agent", "ts": "2016-06-01T18:41:16.856Z" }}
Here is an example of the JSON data sent on a Livechat offline message:
{ "type": "LivechatOfflineMessage", "sentAt": "2016-06-01T19:55:53.867Z", "visitor": { "name": "name from the form", "email": "email@fromtheform.com" }, "message": "message from the form"}
The field Secret Token is sent to a header so you can validate if the request became from the Livechat.
If your endpoint returns a response status other than 200, Rocket.Chat will retry 10 times waiting 10 seconds between retries.
Widget Embedding
Magento 2
Magento 2 depends on RequireJS to load JavaScript resources, so we need to change the widget code a little to look like:
<script defer="defer" async="async" type="text/javascript"> require(, function ($) { (function(w, d, s, u) { w.RocketChat = function(c) { w.RocketChat._.push(c) }; w.RocketChat._ = []; w.RocketChat.url = u; var h = d.getElementsByTagName(s), j = d.createElement(s); j.async = true; j.src = 'https://rc.example.com/packages/rocketchat_livechat/assets/rocket-livechat.js'; h.parentNode.insertBefore(j, h); })(window, document, 'script', 'https://rc.example.com/livechat'); }); </script>
Replace the with your Rocket.Chat (sub-)domain, and paste the code into your theme file right before the closing tag. Flush your PHP OpCode cache, and you are ready to go.
Корпоративный мессенджер Rocket.Chat
В начале этого года я принимал участие во внедрении Skype for Bussiness 2015 и интеграции в наши будние бизнес-процессы Битрикс24. Как коммуникаторы корпоративного сегмента оба продукта отлично справляются с возложенным функционалом, но так случилось, что на новом месте работы нет возможности иметь в арсенале ни S4B ни Битрикс24. Остается только OpenSource и наличие XMPP на почтовом сервере Mdaemon. Почему бы нет, доменное имя и сертификат оплачены. Именно с таким настроением начал тестирование клиентской части. Windows и andoid клиенты так произвольно отрабатывали, что порой казалось “а интернет вообще работает?!”. Но кривизну рук исправлять я не стал и сразу же приступил к поиску альтернативы, который привел меня к аналогичной статье как эта, итоговый выбор которой пал на Rocket.Chat.
(Users) Start a Live Stream
If you are not a channel owner and there is already a live stream set to that channel, press play on the stream tab. This starts a pop-up with the stream embedded. The pop-up does not close even if you change channels.
Prune Messages
If you are a server admin, or your admin has given you the clean-channel-history permission, the prune messages option allows you to delete messages from a channel swiftly.
Note: Messages and files deleted with this option are deleted forever and cannot be recovered. Be careful and double-check your arguments before pressing Prune.
Use the following parameters to delete specific messages:
-
: Deletes all messages posted after a particular date.
-
: Deletes all messages posted before a particular date.
Fill dates for both the and fields to delete all messages.
Users: Allows you to specify any users to delete the content. When filled with a username, that user’s messages deleted.
Refine the parameters above with the following options. Check each to enable:
-
Inclusive: Deletes all messages that land on the exact start/end times you have specified in the and fields.
-
Exclude pinned messages: Do not delete pinned messages.
-
Only remove the attached files, keep messages: Removes files but not the messages themselves
Соревнование
Нет таких приложений для обмена сообщениями, как Rocket.Chat. Это благословение и проклятие. Поскольку существует так много возможностей и платных планов, есть исключительная мощность и функциональность, но это также является серьезным ущербом, когда командам может просто понадобиться подключиться и начать решать проблемы. Если ваша команда постоянно пытается выяснить, какие функции использовать и как выполнять задачи в приложении, коммуникация пострадает.
Такие приложения, как Flock, Glip, Slack и другие, обеспечивают гораздо более рациональный подход. Вы можете изучить основные и расширенные функции в Slack примерно за час..
(Изображение предоставлено: Rocket.Chat)
С Rocket.Chat даже экран настроек для администраторов выглядит так, как будто вы настраиваете сервер. Кто-то, очевидно, решил создать самое мощное на планете приложение для обмена сообщениями с функциями для каждого возможного сценария, но, возможно, забыл, что обмен сообщениями в команде предназначен для совместной работы. Расширенные функции хороши, но когда они продолжают появляться и сбивать с толку пользователей, они только мешают.
Check Caddy’s logs
journalctl -r |grep caddy |less
Configure Caddy yourself or use another http proxy
In case you plan to use another https proxy or you prefer other options in Caddy configuration, you can disable caddy:
sudo snap set rocketchat-server caddy=disable
Then, edit the Caddyfile found at and write your configuration.
Replace and with your site information. For instance, let’s say I have example-domain.com pointing at my server.
First, be sure that your DNS has finished resolving before before attempting to enable SSL. If your DNS is not working yet, you could be instantly for up to a week. To test your DNS you can use http:
http://example-domain.comproxy / localhost:3000 { websocket transparent}
and restart caddy:
sudo systemctl restart snap.rocketchat-server.rocketchat-caddy
You can check that the Caddy service started correctly by running:
sudo systemctl status snap.rocketchat-server.rocketchat-caddy
Once that is tested and resolved, to get secured communications, you can remove the
example-domain.comproxy / localhost:3000 { websocket transparent}
Please note: using an IP address will not work for automatically enabling SSL. You must use a valid hostname (here’s why).
Now you can restart the Caddy service by running:
sudo systemctl restart snap.rocketchat-server.rocketchat-caddy
You can check that the Caddy service started correctly by running:
sudo systemctl status snap.rocketchat-server.rocketchat-caddy
If everything went well, the site will be accessible at .
Testing with an untrusted self-signed certificate
Simply add the directive to your Caddyfile like so:
https://example-domain.comtls self_signedproxy / localhost:3000 { websocket transparent}
Remember to restart the Caddy service:
sudo systemctl restart snap.rocketchat-server.rocketchat-caddy
This will enable SSL with an untrusted, self-signed certificate for testing purposes.
For details on the Caddy TLS directive, visit https://caddyserver.com/docs/tls
Redirecting HTTP to HTTPS
Redirecting is handled automatically by caddy by omitting the http / https in front.
example-domain.com { proxy / localhost:3000 { websocket transparent}}
Remember to restart the Caddy service:
sudo systemctl restart snap.rocketchat-server.rocketchat-caddy
Disabling SSL or listening on custom ports
This configuration will listen without SSL on the default port 80:
http://example-domain.com { proxy / localhost:3000 { websocket transparent}}
This configuration will listen without SSL on port 8080:
http://example-domain.com:8080 { proxy / localhost:3000 { websocket transparent}}
This configuration will listen with SSL on port 8080:
https://example-domain.com:8080 { proxy / localhost:3000 { websocket transparent}}
Note that, without SSL, you can use an IP address:
http://192.168.1.1:8080 { proxy / localhost:3000 { websocket transparent}}
Remember to restart the Caddy service:
sudo systemctl restart snap.rocketchat-server.rocketchat-caddy
Opening ports when running Rocket.Chat server from behind router
For Caddy to be able to work from behind a router, the following ports need to be opened between the internet and the server. This is usually achieved through router software or web-interface.
-
HTTP: port 80
-
HTTPS: port 443
Notifications Preferences
There are several notification settings a user can customize to channels. To find notification settings for a specific channel, go to the channel and click the More symbol at the top-right of the chat view. Then, select Notification Preferences.
-
Mute/Receive alerts: Receive or mute any notifications from a channel.
-
Mute/Receive mentions: Receive or mute notifications for mentions while receiving notifications for messages in a channel.
-
Hide/Show counter: Show the number of unread messages for a channel.
-
Notification sound: Choose a sound for notifications besides the alerts default Desktop. Mobile currently supports only the alerts inside your mobile device. You can also select when to play the alert, duration of the alert, and the alert itself.
Joining new channels and starting direct messages
There are three ways of joining a public channel; through search, invites, or mentions.
For starting a direct message, you can either search the user you want to talk or click on that user’s avatar and click on the Conversation Button.
To search for channels and users, use the search bar under your account box. Alternatively you can press Ctrl/Cmd + k to access the search bar quickly.
A search will find channels (including the ones you are part of) and users. You can not search inside private channels.
When you click on a search result, the following can happen:
-
If the result is a channel, and you already aren’t part of it, you will join that channel;
-
If the result is a user, you will start a direct message with that user;
Leaving channels
There are two options for leaving a channel:
-
Hide: Remain a member of the channel but remove it from your list of channels on the left-hand pane.
-
Leave: Remove the channel your list of channels and abdicate membership.
Every channel has an owner, and the owner of a channel cannot leave a channel until setting someone else as the owner of that channel.
To leave a channel, enter the command or in the message window. Alternatively, hover your mouse over the channel in the list of channels on the left-hand side and click on the leave channel button.
To hide a channel, hover your mouse over the channel in the list of channels on the left-hand side and click on the hide channel button.
Creating Channels
To create a channel, you need to click on the plus button that is alongside the channel search bar.
A pop-up opens. You can set the name of that channel, choose if the channel is public or private, set the channel to read-only, broadcast the channel, and invite users.
In read-only channels, messages can only be sent by users with write permissions. All users can react to messages in this channel. Read-only channels are most suitable for announcements and voting.
Encrypted channels, messages will be end to end encrypted. See: End to End Encryption for details.
Broadcasted channels behave like read-only channels, with only users with the right permission being able to post there. The differences to a read-only channel are:
-
Users without permission (the same one to post on read-only channels) inside this channel won’t be able to see each other in the user list.
-
Users without permission won’t be able to react to messages.
-
Every message contains a reply button that redirects the user to a direct message with the user that posted the message.
-
This channel cannot be converted to a read-only or open channel again.
Video
When using Rocket.Chat through a web browser give Rocket.Chat permission to use your webcam.
To start recording, click on the Create new Video Message option in the attachment menu, then click the red circle icon.
While recording, a stop button appears. To end the recording, press Stop.
Preview the video you recorded by pressing Ok. A window appears where you can watch, download, and name the video. To send the video, click Send or click Cancel to discard the video.
Interacting with Google Drive
Note: Google Drive features available only if the server’s admin has enabled Google Drive access and provided the correct API keys. For instructions to obtain these keys can see the Administrator guides.
Планы и цены
Обсуждение планов и цен на Rocket.Chat немного похоже на уплату налогов. Существует бесплатная версия «сообщества», которая запускается как настольное приложение с использованием вашего собственного сервера Rocket.Chat. Вы можете обновить до версии Pro или Enterprise. Затем есть платные облачные версии с сервером, размещенным в Rocket.Chat. Эти платные планы включают Бронзовый (2 доллара на пользователя в месяц), Серебряный (4 доллара на пользователя в месяц) или Золото (цены варьируются). Как бронзовые, так и золотые планы доступны для ежегодного членского взноса в размере 20 или 40 долларов США соответственно..
Если вы являетесь бухгалтером или математиком, вы можете определить различные функции, доступные для всех этих «самоуправляемых» или размещенных в облаке планов (всего шесть). Вы можете обнаружить, что, к сожалению, вы можете использовать квитанции о прочтении только для сообщений с планом Silver и выше. Или соглашение об уровне обслуживания для поддержки зависит от выбранного вами плана..
(Изображение предоставлено: Rocket.Chat)
К счастью, большинство основных функций для чата, обмена файлами и интеграции с другими приложениями, такими как Trello или Google Drive, доступны в каждой версии. Только когда вы начнете возиться, вы поймете, что тарифные планы довольно разнообразны. Например, бронзовые пользователи для размещенной версии могут хранить до 1 ТБ файлов в приложении групповых сообщений. Пользователи Silver могут получить доступ к 5 ТБ, а пользователи Gold могут получить доступ к 10 ТБ. Это почти нелепо с точки зрения потенциала хранилища, и неясно, почему приложение для обмена сообщениями в команде, предназначенное для быстрых чатов о проектах, предоставляет достаточно памяти для каждого видео, фотографии и документа, которые вы когда-либо могли создать..
Даже не очевидно, что на самом деле делают некоторые функции. Расширенный мониторинг очереди и интеллектуальная маршрутизация чата действительно не кажутся такими полезными. Уникальная функция, которая переводит то, что вы печатаете в режиме реального времени, доступна только в версии Gold. Чем больше функций предоставляется пользователям в зависимости от выбранного вами плана, тем больше вероятность путаницы.
(Изображение предоставлено: Rocket.Chat)
особенности
В Rocket.Chat есть так много функций, которые входят в различные платные планы, что трудно понять, с чего начать, и есть вопросы о том, сможет ли кто-нибудь ими воспользоваться..
Одним из примеров этого является то, что версии Bronze, Silver и Gold позволяют выполнять автоматическое резервное копирование всей платформы. Вы можете платить больше, чтобы делать это дважды в день или каждый час, но вопрос в том, действительно ли это ценно. Многофакторная аутентификация также доступна с некоторыми платными планами, что полезно в целях безопасности. Вы можете запускать аналитику в своем приложении обмена сообщениями в команде ежедневно или даже ежечасно..
Управление
Обновление Rocket.Chat
Snaps обновляются автоматически — как правило, в течение 6 часов с момента выпуска обновления. Однако при желании вы можете выполнить обновление вручную с помощью команды:
sudo snap refresh rocketchat-server
Как узнать, запущен ли Rocket.Chat?
Вы можете проверить статус Rocket.Chat с помощью:
sudo service snap.rocketchat-server.rocketchat-server status
Аналогичным образом можно проверить статус служб rocketchat-mongo и rocketchat-caddy:
sudo service snap.rocketchat-server.rocketchat-mongo status
sudo service snap.rocketchat-server.rocketchat-caddy status
Как перезапустить Rocket.Chat?
Для перезапуска службы выполните:
sudo service snap.rocketchat-server.rocketchat-server restart
Аналогичным образом перезапускаются службы mongo и caddy:
sudo service snap.rocketchat-server.rocketchat-mongo restart
sudo service snap.rocketchat-server.rocketchat-caddy restart
Резервные копии
Чтобы сделать резервную копию данных, выполните следующие действия:
1. Остановите rocketchat-сервер:
sudo service snap.rocketchat-server.rocketchat-server stop
Обратите внимание, что служба rocketchat-mongo должна быть по-прежнему запущена. Проверить ее состояние можно командой:
sudo service snap.rocketchat-server.rocketchat-mongo status | grep Active
2. Запустите процесс резервного копирования:
sudo snap run rocketchat-server.backupdb
Если процесс прошел успешно, в консоли будет похожий вывод:
A backup of your data can be found at /var/snap/rocketchat-server/common/backup/rocketchat_backup_<timestamp>.tar.gz
3. Запустите rocketchat-сервер:
sudo service snap.rocketchat-server.rocketchat-server start
Чтобы обезопасить свои данные, скопируйте файл бэкапа в удаленное хранилище.
Восстановление данных из резервной копии
1. Остановите rocketchat-сервер:
sudo service snap.rocketchat-server.rocketchat-server stop
Обратите внимание, что служба rocketchat-mongo должна быть по-прежнему запущена. Проверить ее состояние можно командой:
sudo service snap.rocketchat-server.rocketchat-mongo status | grep Active
2. Скопируйте архив с бэкапом в директорию common:
sudo cp rocketchat_backup.tgz /var/snap/rocketchat-server/common/
3. Запустите процесс восстановлен данных следующей командой:
sudo snap run rocketchat-server.restoredb /var/snap/rocketchat-server/common/rocketchat_backup.tgz
4. Если вы заменяете существующую базу данных, будет выведено предупреждение:
*** ATTENTION ***
* Your current database WILL BE DROPPED prior to the restore!
* Would you like to make a backup of the current database before proceeding?
* (y/n/Q)>
- Нажмите y и Enter, чтобы сделать бэкап базы данных в ее текущем состоянии.
- Нажмите n и Enter, чтобы продолжить без создания бэкапа базы.
- Нажмите любую клавишу и/или Enter, чтобы остановить процесс восстановления без сохранения каких-либо изменений.
5. Если процесс восстановления прошел успешно, будет выведена подобная информация:
 Extracting backup file...
 Restoring data...
 Preparing database...
 Restore completed! Please restart the snap.rocketchat services to verify.
В случае, если в процессе восстановления данных возникнут проблемы, в консоли будет отображен путь к лог-файлу, чтобы проанализировать ошибки. В этом случае база данных может быть недоступна до успешного завершения восстановления.
6. Запустите rocketchat-сервер:
sudo service snap.rocketchat-server.rocketchat-server start
Логи
Чтобы просмотреть логи Rocket.Chat, выполните:
sudo journalctl -f -u snap.rocketchat-server.rocketchat-server
Чтобы просмотреть журналы rocketchat-mongo и rocketchat-caddy:
sudo journalctl -f -u snap.rocketchat-server.rocketchat-mongo
sudo journalctl -f -u snap.rocketchat-server.rocketchat-caddy
Установка Rocket.Chat на CentOS 7
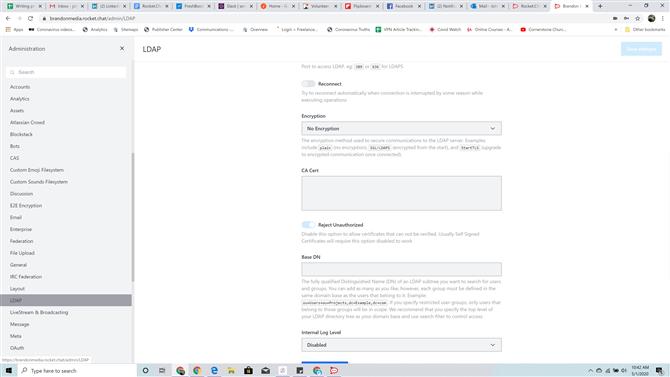
На Hypervisor-е был установлен минимальный пакет CentOS и собственно сам Rocket.Chat. При установке активно обращался к инструкции разработчиков. Следующим важным шагом была синхронизация с LDAP, ну куда же без него. AD у меня крутится на Windows Server 2016 и по прошлому опыту с Битрикс24 я создал группу, по которой в расписании будут добавляться пользователи. Это было удобно тогда и оказалось удобным и сейчас. Фильтр запроса будет расширен исключением отключенных учётных записей, сейчас он такой memberOf=cn=Rocket.Chat,ou=Groups,dc=DOMEN,dc=COM.
Поддержи автора статьи, просмотри рекламу ↓↓↓
Набор пакетов: CentOS+Rocket.Chat+MongoDB+Nginx+LetsEncrypt
yum -y install epel-release nano && yum -y update
nano /etc/yum.repos.d/mongodb-org.repo


name=MongoDB Repository
baseurl=https://repo.mongodb.org/yum/redhat/$releasever/mongodb-org/3.6/x86_64/
gpgcheck=1
enabled=1
gpgkey=https://www.mongodb.org/static/pgp/server-3.6.asc

yum install -y nodejs curl GraphicsMagick npm mongodb-org-server mongodb-org gcc-c++
npm install -g inherits n
n 8.9.3

cd /opt
curl -L https://releases.rocket.chat/latest/download -o rocket.chat.tar.gz
tar zxvf rocket.chat.tar.gz
mv bundle Rocket.Chat
cd Rocket.Chat/programs/server
npm install
cd ../..

export PORT=3000
export ROOT_URL=http://your-host-name.com-as-accessed-from-internet:3000/
export MONGO_URL=mongodb://localhost:27017/rocketchat

chkconfig mongod on
systemctl start mongod
/etc/init.d/mongod start
node main.js

nano /usr/lib/systemd/system/rocketchat.service

  Description=The Rocket.Chat server
  After=network.target remote-fs.target nss-lookup.target nginx.target mongod.target

  ExecStart=/usr/local/bin/node /opt/Rocket.Chat/main.js
  StandardOutput=syslog
  StandardError=syslog
  SyslogIdentifier=rocketchat
  User=root
  Environment=MONGO_URL=mongodb://localhost:27017/rocketchat ROOT_URL=http://your-host-name.com-as-accessed-from-internet:3000/ PORT=3000

  WantedBy=multi-user.target

systemctl enable rocketchat.service
systemctl start rocketchat.service

systemctl stop rocketchat.service
yum install nginx
yum install certbot-nginx
делаем backup конфигурации nginx
cp /etc/nginx/nginx.conf /etc/nginx/nginx.conf.backup
certbot --authenticator standalone --installer nginx -d domain.name
конфигурации виртуальных хостом будут работать через ссылку
mkdir /etc/nginx/sites-available
mkdir /etc/nginx/sites-enabled
адаптируем конфигурацию nginx
nano /etc/nginx/nginx.conf
добавляем в директиву http
include /etc/nginx/sites-enabled/*.conf;
и комментируем блок server, виртуальные хосты сохраним в отдельных папках.

Создаем конфигурацию виртуального хоста. Из основного она будет содержать переадресацию с портов 80,443 на 3000 и ссылки на сертификаты.
nano /etc/nginx/sites-available/domain.name.conf
server {
  listen 80;
  server_name domain.name;
    return 301 https://$server_name$request_uri;
}
server {
    listen 443;
    server_name domain.name;

    error_log /var/log/nginx/rocketchat.access.log;
    ssl on;
    ssl_certificate /etc/letsencrypt/live/domain.name
/fullchain.pem;
    ssl_certificate_key /etc/letsencrypt/live/domain.name
/privkey.pem;
    ssl_protocols TLSv1 TLSv1.1 TLSv1.2; # don’t use SSLv3 ref: POODLE
    location / {
        proxy_pass http://domain.name:3000/;
        proxy_http_version 1.1;
        proxy_set_header Upgrade $http_upgrade;
        proxy_set_header Connection "upgrade";
        proxy_set_header Host $http_host;
        proxy_set_header X-Real-IP $remote_addr;
        proxy_set_header X-Forward-For $proxy_add_x_forwarded_for;
        proxy_set_header X-Forward-Proto http;
        proxy_set_header X-Nginx-Proxy true;
        proxy_redirect off;
    }
}
продолжаем
ln -s /etc/nginx/sites-available/domain.name.conf /etc/nginx/sites-enabled/domain.name.conf
обновляем конфигурацию RocketChat для доступа по https и 3000 порту
Environment="ROOT_URL=https://domain.name"
Environment="PORT=3000"
Environment="MONGO_URL=mongodb://localhost:27017/rocketchat"
firewall-cmd --add-service=https
firewall-cmd --runtime-to-permanent
systemctl daemon-reload
полезная привычна тестирования конфигурации nginx
nginx -t
systemctl start nginx
systemctl enable nginx
systemctl start rocketchat.service
cat /var/log/audit/audit.log | grep nginx | grep denied | audit2allow -M mynginx
semodule -i mynginx.pp

добавление расписания на обновление сертификата
nano /etc/crontab
0 0 15 * * /usr/bin/certbot renew --quiet
Basic Search Commands
You can use these commands before or after entering search terms:
-
to search for messages only created by the current user.
-
to search for messages created by a specific user. The username entered must be the format without spaces (i.e., «john.doe» and not «John Doe.») Search for any mentions of a user by searching for their username.
-
returns messages that are starred by the current user.
-
or returns messages that pin in the current channel.
-
or returns messages that contain a link.
-
or returns messages that have a location attached.
-
, and return message that were created before, after, or on the provided date.
Dashes or dots can be used instead of slashes. , , or sorts messages by ascending timestamp.
-
, , or sorts messages by descending timestamp.
You can also jump to where a message is located by hovering the mouse over the search result and selecting
0.69 Highlights
- Rocket.Chat Marketplace: our new app ecosystem
- Beta support for Big Blue Button video conferencing system
- Personal access tokens for users to create API tokens
- Slackbridge: send attachment notifications
- UI changes
- Push notification improvements
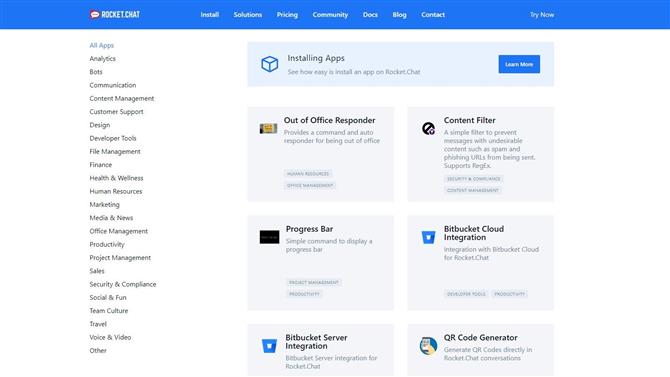
Rocket.Chat Marketplace is live!
We’ve been working towards having an internal application platform that allows users to extend Rocket.Chat’s functionalities and facilitate customization. With this release we are now ready to launch the first public iteration of our brand new apps ecosystem and our internal marketplace UI for admins. With Marketplace, you’ll be able to build, browse, and download apps to customize Rocket.Chat More info in our latest blog post!
Beta support for Big Blue Button video conferencing system
BigBlueButton is an open source web conferencing system that we’ve been working to add as an option for video and voice calls. We are now releasing our first beta implementation that makes it possible to configure your own BBB server and start using it from inside rooms. We are working to increase the integration between Rocket.Chat and BBB for the next release so please try it and let us know your thoughts here.
Personal access tokens for users to create API tokens
This feature is disabled by default and only admins can enable it.
Once enabled, users will be able to generate consistent access tokens to be used within the APIs. It’s possible to give them names and remove them when necessary. This kind of token does not expire automatically as the normal tokens does.
These tokens can be used in place of the normal auth tokens received when a user logs in via the API, affording security by allowing users to delete the token which revokes access.
Slackbridge: send attachment notifications
There have been many conversations where the other party didn’t realize a screenshot/text file had been uploaded and then the follow up messages had no context. In light of this, we wanted to create notifications to inform users that an attachement had been sent, so now they will see a message that a file was uploaded and can then take action (switch group chat tools) to view it.
Until we have full bi-directional file uploading supported via the SlackBridge, we’ll at least post a message so that one knows it occurred.
The role tag is now lighter
Unread items are now bolder
Push notification improvements
We’ve verified a few issues that were preventing some push notifications from being sent:
- A race condition on the client connection process was indicating a permanently online status for some users, which then meant new notifications for those specific users would not be sent
- Any db connection issue was causing the notifications queue to stop sending notifications
With both these fixes we expect to have fixed the main causes preventing push notifications from being sent.
Other new features
- REST endpoint to manage server assets
- Rich message text and image buttons
- Setting to enable/disable Slackbridge reactions
- Setting to block unauthenticated access to avatars
- Setting to give users the power to set a JS/CSS CDN
Smaller Improvements
- Start storing Livechat department within rooms
- Escape parameters before send them to email template
- Warn about push settings that need server restart
- Role tag UI
- Messagebox fix performance
- Add template tag #{userdn} to filter LDAP group member format (by crazy-max)
- Add nyan rocket on Rocket.Chat preview Docker image
- Reducing saveUser code complexity
Bug Fixes
We fixed lots of bugs for this release, including:
- Message attachments was not respecting sort and lost spacing (#11740) Before:After:
- Livechat rooms starting with two unread message counter (#11834)
- Delete removed user’s subscriptions (#10700)
- Some assets were pointing to nonexistent path (#11796)
- Login logo now centered on small screens (#11626 by @wreiske) Before:After:
For more bug fixes and a full list of minor changes, visit the Rocket.Chat 0.69 release changelog
Заключение
Я вижу, что статья получилось хвалебная 🙂 Могу вас уверить, меня никто не просил так написать. Я не заключал никакого договора, мне никто не будет платить денег за переходы по ссылкам и покупки. Никто не выставлял мне требования рецензирования статьи. Меня просто попросили написать о продукте и я согласился это сделать на свое усмотрение. В итоге написал по своим впечатлениям. Продукт в целом понравился, но подойдет он далеко не всем и не везде. Я рекомендую его просто посмотреть, попробовать, если вы ищите чат для какой-то компании, коллектива.
Уточню еще раз на мой взгляд ключевые преимущества — богатый функционал и хороший клиент
Это на самом деле важно. Клиент это то, с чем работаешь постоянно
И при этом трудно сразу оценить насколько он будет удобен в повседневной работе. Я, когда тестировал чаты, не догадался проверить, насколько удобно работать с историей. Оказалось, неудобно у всех. А зулип еще и тормозит, когда много скролишь назад.