Часть 1. установка и настройка zimbra collaboration suite
Содержание:
- Incoming spamming
- LDAP
- Encrypted Authentication
- Admin views
- Установка ZCS OpenSource Edition
- Examples
- Using Zimbra OpenDrive — Web Client
- Mailboxd (Jetty)
- Administering the archive server
- Установка почтового сервера Zimbra Collaboration 8.6 на Ubuntu 14.04 Trusty Tahr
- Undesirable Content
- Zimbra Web-client
- MTA
- Set Up Archive Account Name
- Дополнительно
- How it works
- Автоматизация переноса учёток
- Intended audience
Incoming spamming
Solution
/opt/zimbra/libexec/zmqstat
hold=2054
corrupt=0
deferred=2
active=20000
incoming=37593
With the following command you can checked what all IP’s were making how many connections
cat /var/log/zimbra.log | grep -Eo '{1,3}\.{1,3}\.{1,3}\.{1,3}'| sort | uniq -c | sort -nr
439416 xxx.xxx.xxx.xxx
19884 192.168.1.246
11587 192.168.5.1
2723 192.168.5.246
su - zimbra
zmprov gacf zimbraMtaRestriction
zimbraMtaRestriction: check_client_access lmdb:/opt/zimbra/conf/postfix_blacklist
zimbraMtaRestriction: check_client_access lmdb:/opt/zimbra/conf/postfix_rbl_override
strings /opt/zimbra/conf/postfix_blacklist.lmdb
xxx.xxx.xxx.xxx
REJECT
Reviewing the configuration for the RBL configuration if it is in place or not. If not immediately added the following RBL
zmprov mcf +zimbraMtaRestriction "reject_rbl_client zen.spamhaus.org"
zmprov mcf +zimbraMtaRestriction "reject_rbl_client b.barracudacentral.org"
zmprov mcf +zimbraMtaRestriction "reject_rbl_client bl.spamcop.net"
/opt/zimbra/postfix/sbin/postqueue -p | head
74A443D43D43*   21733 Wed Month 30 12:29:15  MAILER-DAEMON
                                        user1@domain.com
A614D3D43CCF*   21745 Wed Month 30 12:29:43  MAILER-DAEMON
                                        user2@domain.com
781443D4364F*   21751 Wed Month 30 12:25:16  MAILER-DAEMON
                                        user3@domain.com
5C72C3D44438*   21721 Wed Month 30 12:36:53  MAILER-DAEMON
                                        user4@domain.com
/opt/zimbra/postfix/sbin/postqueue -p | awk 'BEGIN { RS = "" } { if ($7 == "MAILER-DAEMON" ) print $1 }' | tr -d '!*' | /opt/zimbra/postfix/sbin/postsuper -h -
# /opt/zimbra/libexec/zmqstat
hold=43464
corrupt=0
deferred=0
active=0
incoming=0
To improve your Anti-spam-system you can refer the following wiki and implement the things according to your need.
| Verified Against: Zimbra Collaboration Suite 8.5+ | Date Created: 05/29/2018 |
| Date Modified: 2018-05-31 |
Try Zimbra
Want to get involved?
Other help Resources
Looking for a Video?
LDAP
The single-valued localconfig attributes controlling the acceptable TLS protocol versions and ciphers to be used by the OpenLDAP server are ldap_common_tlsprotocolmin and ldap_common_tlsciphersuite.
Protocols
- ldap_common_tlsprotocolmin
- Specifies minimum SSL/TLS protocol version that will be negotiated. To require TLS 1.x or higher, set this option to 3.(x+1), e.g., a value of 3.2 would require TLS 1.1.
Ciphers
- ldap_common_tlsciphersuite
Configures what ciphers will be accepted and the preference order for OpenSSL. To check what ciphers a given spec selects in OpenSSL, use:
The current recommend values for these localconfig settings are:
ldap_common_tlsprotocolmin = "3.1"
ldap_common_tlsciphersuite = "MEDIUM:HIGH"
Encrypted Authentication
All authentication must be done over TLS/SSL. Restart services after making these changes.
HTTP
zmprov gs `zmhostname` zimbraMailClearTextPasswordEnabled
zmprov ms `zmhostname` zimbraMailClearTextPasswordEnabled FALSE # if not already
IMAP4
zmprov gs `zmhostname` zimbraImapCleartextLoginEnabled
zmprov ms `zmhostname` zimbraImapCleartextLoginEnabled FALSE # if not already
zmprov gs `zmhostname` zimbraReverseProxyImapStartTlsMode
zimbraReverseProxyImapStartTlsMode: only
POP3
zmprov gs `zmhostname` zimbraPop3CleartextLoginEnabled
zmprov ms `zmhostname` zimbraPop3CleartextLoginEnabled FALSE # if not already
zmprov gs `zmhostname` zimbraReverseProxyPop3StartTlsMode
zimbraReverseProxyPop3StartTlsMode: only
SMTP
zmprov gs `zmhostname` zimbraMtaTlsAuthOnly
zmprov ms `zmhostname` zimbraMtaTlsAuthOnly TRUE # if not already
Use opportunistic outbound STARTTLS. If not already, set to use «may». Note that it is not usually possible to use «encrypt» here, as you cannot require remote MTAs to use encryption:
zmlocalconfig postfix_smtp_tls_security_level
zmlocalconfig -e postfix_smtp_tls_security_level=may # if not already
Use opportunistic inbound STARTTLS. If not already, set to use «may». Note that it is not usually possible to use «encrypt» here, as you cannot require remote MTAs to use encryption:
zmprov gs `zmhostname` zimbraMtaTlsSecurityLevel
zmprov ms `zmhostname` zimbraMtaTlsSecurityLevel may
Admin views
Below are list of Admin view’s available which can be assigned to delegated admin.
Account List View           :	accountListView
Distribution List View      :	DLListView
Alias List View             :	aliasListView
Resource List View          : 	resourceListView
Class of Service LIst View  : 	COSListView
Domain List View            :	domainListView
Server List View            :	serverListView
Zimlet List View            : 	zimletListView
Admin Zimlet List View      :	adminZimletListView
Global Settings View        : 	globalConfigView
Global Server Status View   :	globalServerStatusView
Help Search View            :	helpSearch
Saved Searches View         : 	saveSearch
Mail Queue View             : 	mailQueue
Backups  View               : 	backupsView
Certificates View           : 	certsView
Software Updates            : 	softwareUpdatesView
Account Migration           :	bulkProvisionTasksView
Per Server Statistics View  : 	perServerStatisticsView
Global ACL View             : 	globalPermissionView
Right List View             :	rightListView
Assigning the admin view
$ zmprov ma delegatedadmin@example.com zimbraAdminConsoleUIComponents accountListView zimbraAdminConsoleUIComponents DLListView zimbraAdminConsoleUIComponents COSListView
  $ zmprov ga delegatedadmin@example.com  | grep -i view
  zimbraAdminConsoleUIComponents: accountListView
  zimbraAdminConsoleUIComponents: DLListView
  zimbraAdminConsoleUIComponents: COSListView
Revoking admin view
caution: If you want to revoke the COS list view, then you need to run the full command except appending the revoking component ‘COSListView’
$ zmprov ma delegatedadmin@example.com zimbraAdminConsoleUIComponents accountListView zimbraAdminConsoleUIComponents DLListView
  $ zmprov ga delegatedadmin@domain.com  | grep -i view
    zimbraAdminConsoleUIComponents: accountListView
    zimbraAdminConsoleUIComponents: DLListView
Установка ZCS OpenSource Edition
На момент написания этих строк актуальной является версия 6.0.8, которую мы и
будем далее устанавливать в Ubuntu 10.04 LTS. Серверная часть доступна для х32 и
x64 битных версий Linux (Red Hat Enterprise, Fedora, Ubuntu, Debian, Mandriva,
SUSE Linux) и Mac OS X. Кроме этого доступны исходные тексты и последние патчи.
К слову из Ubuntu официально поддерживается установка на 6.06 и 8.04 LTS, версия
10.04 пока находится в бета-стадии и официально пока не поддерживается. Но на
самом деле это не говорит, что это невозможно.
Перед установкой следует правильно настроить разрешение имен на DNS сервере,
мастер установки будет проверять A и MX и в случае неудачи завершит работу с
ошибкой.
Сам процесс установки очень прост и если все требования выполнены, займет не
более 10 минут времени.
Качаем архив, под требуемую платформу. В моем примере используется 64-битная
версия ОС.
Распаковываем и запускаем установочный скрипт.
Так как Ubuntu 10.04 не поддерживается, используем дополнительный параметр
«—platform-override»:
Скрипт проверит наличие предыдущих установок Zimbra, и предложит
принять условия лицензии. Затем важная часть проверка записи имени узла в /etc/hosts
и зависимостей. Сама программа установки ничего из репозитария не ставит, это
нужно сделать админу. Если какого-то пакета не будет найдено, напротив его имени
выводится MISSING, а скрипт по окончании анализа заканчивает свою работу.
Доустанавливаем что не хватает, и повторяем.
Если этот шаг пройден нормально, скрипт проверяет наличие пакетов в архиве и
запрашивает разрешение на установку каждого (всего их 11). По умолчанию мастер
предлагает установить все компоненты, за исключением zimbra-memcached и
zimbra-proxy (прокси POP3, IMAP и HTTP). Причем, если выбран zimbra-proxy, то
memcached будет установлен автоматически. Далее выдается запрос на разрешение
модификации системы. Соглашаемся, и начинается собственно процесс установки
пакетов и настройки параметров. Теперь скрипт запросит DNS сервер на предмет
имени узла Zimbra, если ответ (A и MX) не будет совпадать с записью в /etc/hosts,
последует вопрос о смене. Далее проверка конфликта портов и выводится меню
установки, в котором можно откорректировать любое значение
Особое внимание
следует обратить на пункты, отмеченные несколькими звездочками, это означает не
настроенный параметр. Как минимум один такой есть — «Admin Password», означающий
на отсутствие пароля администратора
Для изменения нужного пункта нажимаем
соответствующую ему цифру. Так чтобы установить пароль, выбираем 3, появляется
еще одно меню, ищем «Admin Password» и нажимаем цифру (она опять будет
подсвечена ***), после чего вводим дважды пароль.
Чтобы перейти в старшее меню, нажимаем «r», клавишей «s» или «a» сохраняем
настройки (скрипт выдаст имя файла) и для выхода из меню используем «q». Вот
собственно и весь процесс установки. Еще некоторое время будут настраиваться
сервисы, вся информация по установке будет сохранена в /opt/zimbra/log.
К слову убрать Zimbra так же просто, как и установить. Вначале вводим
команду:
Затем обязательно удаляем каталог /opt/zimbra, в нем даже после удаления
сохраняются все настройки.
Examples
Note: For the examples here, we will assume the hostname of the zimbra server is «zimbra.example.com» with an IP address of 10.10.130.10.
Note: Make sure that the localhost «127.0.0.0/8» network is included.
Making sure the LAN interface of the zimbra server itself is allowed
If you see lines like this one in /var/log/zimbra.log when a webmail user (for example, «user@example.com») tries to send mail (for example, to «somebody@domain.com»):
Jun 28 06:39:23 zimbra postfix/smtpd: NOQUEUE: reject:
RCPT from zimbra.example.com: 554 <somebody@domain.com>:
Relay access denied; from=<user@example.com> to=<somebody@domain.com>
proto=SMTP helo=<zimbra.example.com>
You probably see this as well:
postconf mynetworks
mynetworks = 127.0.0.0/8
If you want to allow all the other machines on the 10.10.130.x network to relay, configure the server like this:
zmprov ms zimbra.example.com zimbraMtaMyNetworks '127.0.0.0/8 10.10.130.0/24'
postfix reload
If you don’t want to allow relaying for the network, but only for the zimbra server itself, configure the server like this:
zmprov ms zimbra.example.com zimbraMtaMyNetworks '127.0.0.0/8 10.10.130.10/32'
postfix reload
Allowing relaying for a remote machine
Let’s say you have a single machine on a remote network (for example, an automated mailing list manager with the IP address 10.10.200.25), and the current settings look like this:
postconf mynetworks
mynetworks = 127.0.0.0/8 10.10.130.0/24
Add the remote machine like this:
zmprov ms zimbra.example.com zimbraMtaMyNetworks '127.0.0.0/8 10.10.130.0/24 10.10.200.25/32'
postfix reload
Allowing relaying for a remote network
Let’s say you have POP or IMAP users on a remote network (for example, 192.168.1.x, with a netmask of 255.255.255.0), and the current settings look like this:
postconf mynetworks
mynetworks = 127.0.0.0/8 10.10.130.0/24
Add the remote network like this:
zmprov ms zimbra.example.com zimbraMtaMyNetworks '127.0.0.0/8 10.10.130.0/24 192.168.1.0/24'
postfix reload
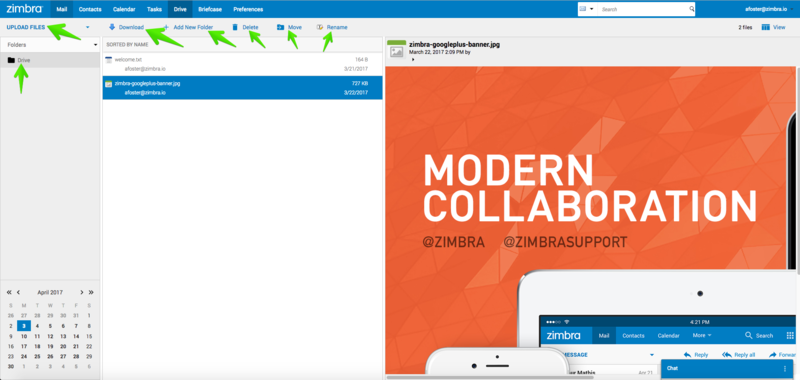
Using Zimbra OpenDrive — Web Client
Inside the UI, you can find the new tab called Drive, click on it:

Once in Zimbra OpenDrive, you can perform all the next actions for now:
- Upload files to Drive
- Downloads files from Drive
- Create a new folder on Drive
- Delete files and folders
- Move files and folders
- Rename files and folders
- And of course, the auth is all automated and the server extension perform it against the ownCloud/nextCloud server
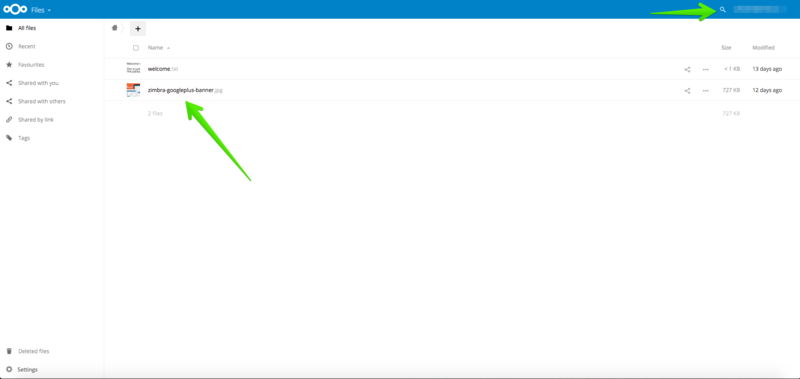
If you log-in directly into the ownCloud/nextCloud server, you are going to see the same files/folders, which means everything is on sync, and of course Drive gives the opportunity to the user to install and use the ownCloud/nextCloud desktop or Mobile apps and use all the Corporate Cloud File Sync and Sharing capabilities of this product, and keep seeing the files everywhere from anywhere at any time using Zimbra Collaboration Web Client.
Mailboxd (Jetty)
Ciphers
The multi-valued attributes controlling the acceptable TLS ciphers to be used by mailboxd are zimbraSSLExcludeCipherSuites and zimbraSSLIncludeCipherSuites. They can be set at the globalconfig level.
zimbraSSLExcludeCipherSuites
excluded cipher suites
zimbraSSLIncludeCipherSuites
SSL_RSA_WITH_DES_CBC_SHA
SSL_DHE_RSA_WITH_DES_CBC_SHA
SSL_DHE_DSS_WITH_DES_CBC_SHA
SSL_RSA_EXPORT_WITH_RC4_40_MD5
SSL_RSA_EXPORT_WITH_DES40_CBC_SHA
SSL_DHE_RSA_EXPORT_WITH_DES40_CBC_SHA
SSL_DHE_DSS_EXPORT_WITH_DES40_CBC_SHA
Recommended (*may break compatibility with clients with limited capabilities):
.*_(3DES|RC4)_.*
Ciphers: Potential Impacts
- Excluding RC4 will likely cause problems for Windows XP users, and possibly other old clients.
- Keeping 3DES may still be desirable for interoperability with old clients, including Outlook 2011 for Mac.
References:
Protocols
- zimbraMailboxdSSLProtocols
- contains a list of SSL/TLS protocols (as documented by SunJSSE Provider Protocols and used in setEnabledProtocols) to be enabled in Jetty for HTTPS, IMAPS, POP3S, and STARTTLS (including LMTP)
The current recommend values for this attribute are:
TLSv1
TLSv1.1
TLSv1.2
Protocols: Potential impacts
Adding SSLv2Hello may be desirable for interoperability with old clients, including Outlook 2011 for Mac and Clients using Java 6 (see: bug 97332). Please note: Enabling SSLv2Hello does not mean that the server is actually allowing SSLv2, but it does mean that it allows the SSLv2Hello «introduction» before switching to TLSv1 or greater. One known downside of the SSLv2Hello is that it does not support the Server Name Indication TLS extension.
Administering the archive server
The amavisd-new server process controls account archiving as well as antivirus and antispam processes. The zmarchivectl command can be used to start, stop, restart or obtain the status of the amavisd-new server process that controls account archiving. Caution should be taken when starting or stopping the archiving process as it is a shared server process between archiving, antivirus, and antispam processes. Performing actions on any of them affect any of the other services that may be enabled in your deployment.
If you want to disable archiving and not antivirus, or antispam services, disable the respective service either through the CLI or through the Administration Console.
Установка почтового сервера Zimbra Collaboration 8.6 на Ubuntu 14.04 Trusty Tahr
Разберем как развернуть мощный и в тоже время бесплатный почтовый сервер Zimbra Collaboration 8.6. Zimbra может соперничать с Microsoft Exchange своим функционалом, в который входит необходимый набор инструментов для работы в корпоративной среде
Zimbra имеет удобный и понятный Web интерфейс, поддерживающий работу мобильных устройств, что не мало важно для сотрудников находящихся вне офиса
Исходные данные для развертывания Zimbra:
- Домен jakondo.ru (на этом доменном имени будет ходить почта)
- Локальная сеть 10.5.5.0/24
- Домен контроллер на базе Windows Server 2012R2 (AD DS, DNS) DC1, jakonda.local, 10.5.5.5 (Установленный по данной статье)
- Установленная система Ubuntu 14.04 Trusty Tahr (10.5.5.10, Hostname — mail)
- Настроить DNS на домен контроллере DC1, для работы почтового сервера Zimbra.
- Выполнить предварительную настройку системы Ubuntu 14.04 Trusty Tahr перед установкой Zimbra.
- Установить почтовый сервер Zimbra Collaboration 8.6.
- Добавление почтового домена jakondo.ru в развернутый почтовый сервер.
- Проверить работу почты.
Настройка DNS зоны на домен контроллере DC1
Zimbra зависит от правильно настроенного DNS сервера. Запускаем оснастку DNS Manager и в Forward Lookup Zones добавляем новую зону New Zone…
Указываем тип зоны — Primary zone, нажимаем Next.
Выбираем пункт To all DNS servers running on domain controller in this domain: jakonda.local. Нажимаем Next.
В поле Zone name — указываем как будет называться создаваемая зона. В моем случае это jakondo.ru. Нажимаем Next.
Отмечаем пункт Allow both nonsecure and secure dynamic updates. Нажимаем Next.
Нажимаем Finish.
В созданной зоне jakondo.ru добавляем необходимые для работы почтового сервера A-записи:
- mail — 10.5.5.10 Create associated pointer (PTR) record
- imap — 10.5.5.10 Create associated pointer (PTR) record
- pop3 — 10.5.5.10 Create associated pointer (PTR) record
- smtp — 10.5.5.10 Create associated pointer (PTR) record
Добавляем MX-запись:
- в поле Host or child domain — указываем имя хоста почтового сервера (в моем случае mail).
- в поле Fully qualied domain name (FQDN) of mail server — нажимаем Browse… и выбираем A-запись mail из зоны jakondo.ru (получится FQDN mail.jakondo.ru).
- в поле Mail server priority — приоритет оставляю по-умолчанию 10.
В итоге должно получится вот так:
Предварительная настройка системы Ubuntu 14.04 Trusty Tahr
Перед тем как начать установку почтового сервера Zimbra на Ubuntu 14.04 Trusty Tahr, систему необходимо настроить и установить необходимые для установки зависимости.
источник
Undesirable Content
Avoid letting undesirable content into the ZCS platform altogether by:
- Setting/Tuning Anti-spam Strategies
- Consider also setting zimbraMtaBlockedExtension to reject email with specific types of attachments. For example (using bash expansion for brevity):
# add/remove file name extensions as makes sense in your environment
zmprov "+zimbraMtaBlockedExtension "{bat,cmd,docm,exe,js,lnk,ocx,rar,vbs,vbx}
# optionally, warn the recipient about the blocked message
zimbraVirusWarnRecipient TRUE
| Verified Against: ZCS 8.0 | Date Created: 06/28/2014 |
| Date Modified: 2016-04-01 |
Try Zimbra
Want to get involved?
Other help Resources
Looking for a Video?
Zimbra Web-client
Для пользователей платформы ZCS доступны несколько версий Web-клиента:
стандартный (HTML), расширенный с использованием (AJAX) и клиент для
мобильного телефона.
В стандартной версии интерфейса присутствует возможность работы с почтой,
календарем, задачами, адресной книгой и портфелем (документы). Расширенная
версия включает в себя поддержку AJAX и помимо функций, имеющихся в
стандартной версии клиента, предлагает полноценный WYSIWYG редактор,
интеграцию с социальными сетями и возможность использовать плагины
Zimlets. Все многообразие возможностей Web-клиента ZCS описано в
русскоязычном руководстве, так что разобраться во всех тонкостях
использования Zimbra Collaboration Suite не составляет труда.
MTA
Protocols
The current recommend values for the MTA’s protocol attributes are:
zimbraMtaSmtpdTlsProtocols = !SSLv2, !SSLv3
zimbraMtaLmtpTlsProtocols  = !SSLv2, !SSLv3
zimbraMtaSmtpdTlsMandatoryProtocols (smtpd_tls_mandatory_protocols)
zimbraMtaSmtpTlsMandatoryProtocols  (smtp_tls_mandatory_protocols)
zimbraMtaLmtpTlsMandatoryProtocols  (lmtp_tls_mandatory_protocols)
Ciphers
zimbraMtaLmtpTlsCiphers = medium                # default is export
zimbraMtaLmtpTlsMandatoryCiphers = medium
zimbraMtaSmtpTlsCiphers = medium                # default is export
zimbraMtaSmtpTlsMandatoryCiphers = medium
zimbraMtaSmtpdTlsCiphers = medium               # default is export
zimbraMtaSmtpdTlsMandatoryCiphers = medium
Set Up Archive Account Name
You use attributes to create and manage the naming scheme for archive accounts. You can set up these attributes either by COS or by account. For COS, these attributes can be changed from the administration console, COS or individual account’s Archiving page.
- Account date template. Sets the date format used in the name template. The default is yyyyMMdd. Adding the date to the account name makes it easier to roll off older data from the system to backups.
- Account name template. Sets up how the archive mailbox name is created. The default value is ${USER} ${DATE}@${DOMAIN}.archive. The archive account address would be like this example: user-20070510@example.com.archive. If you change the default value, you must use syntax that creates a valid email address. We recommend that you add .archive to all archive accounts to create archive mailboxes in a non-routable domain to prevent spoofing of the archives.
When the template based on the zimbraArchiveAccountDateTemplate attribute is set up, amavisArchiveQuarantineAccount is updated to the new template name when zmconfigarchive is run.
Дополнительно
Лимиты:
- Предельный размер поля указанных пользователем адресов пересылки — Максимальное колчиставо пользователей, которых можно перечислить в поле пересылки. В количестве знаков.
- Максимальное количество указанных пользователем адресов пересылки — Максимальное количество указанных пользователей в штуках.
- Лимит учетной записи — дисковая квота на пользователя.
- Предельное число контактов в папке — речь о максимальном количестве адресов в книге контактов пользователя.
- Процентный порог предупреждения о лимите — при достижении какого лимита в процентах предупреждать пользователей о ограничениях.
- Минимальный интервал времени между предупреждениями о достижении лимитов. От нескольких мекунд до нескольких дней.
- Шаблон предупреждений о достижении лимита — все предельно ясно. Что сообщать пользователю при достижении лимита.
Источник данных:
- Самая короткая разрешенная длительность для любого интервала опроса: — только смутно догадываюсь что бы это могло значить.
- Интервал опроса POP3 — интервал опроса сервиса.
Интервал опроса IMAP — интервал опроса сервиса.
Интервал опроса ежедневника — интервал опроса сервиса.
Интервал опроса RSS — интервал опроса сервиса.
Интервал опроса CalDav — интервал опроса сервиса.
How it works
Zimbra OpenDrive includes multiple components that make it work transparently for the user, while the Zimbra OpenDrive server extension and the Zimbra OpenDrive app on ownCloud/nextCloud do all the rest of the work. Here is a list of the components:
- Zimbra OpenDrive Zimlet: This is the Zimlet which the user sees on the top navigation bar, this zimlet shows the user the functionalities, icons, etc. And provides the javascript work which is sent back to the Server Extension. It comes inside Zimbra Collaboration 8.7.6 and above.
- Zimbra OpenDrive Extension: This server extension has the mission of establishing communication with the ownCloud/nextCloud, and it is in charge of transforming all the operations using the ownCloud/nextCloud API to Zimbra and vice-versa. It comes with Zimbra Collaboration 8.7.6 and above.
- Zimbra OpenDrive App for ownCloud/nextCloud: This app role is to do the Zimbra authentication from ownCloud/nextCloud to Zimbra and vice-versa, also the app is in charge to provision the users in an automated manner first time the log-in inside Zimbra Collaboration.
Topology with usual scenarios of Zimbra OpenDrive
In this example, the scenario includes a Zimbra Collaboration Server in a local Data Center, and the ownCloud/nextCloud in another different location on Internet, Amazon, Digitalocean, or another external Data Center

On this example, the scenario includes a Zimbra Collaboration Server and the ownCloud/nextCloud the same local Data Center

Автоматизация переноса учёток
Почтовая учётная запись создаётся двумя командами:
/opt/zimbra/bin/zmprov ca user@domain.ru userpass displayName "Фамилия Имя Отчество"
/opt/zimbra/bin/zmprov ma user@domain.ru userPassword 'userpass'
где userpass — пароль пользователя
Первая команда создаёт пользователя с открытым паролем, вторая — перезаписывает открытый пароль шифрованным (поэтому первый пароль может быть любым).
Если есть список пользоватей и их пароли, то скрипт можно составить, например, в OpenOffice Calc добавить необходимые поля (команды, кавычки), и затем сохранить в формате csv с разделителем «пробел».
Можно сначала создать все учётные записи, а зетем у всех поменять пароль.
Чтобы корректно отображались кирилические буквы, скрипт лучше выполнять от имени root или можно настроить локаль. Проверить настройки локали можно командной:
# echo $LANG
ru_RU.UTF-8
а установить командами:
LANG=ru_RU.UTF-8
export $LANG
Intended audience
This document is intended mainly for network administrators who are faced with the task of integrating multiple OpenSource software packages to support a corporate network. The author assumes that the reader has basic knowledge of Linux/Unix OS, is capable of using a text editor and is at least vaguely familiar with Zimbra, Samba, LDAP and PAM. If these four words sound foreign to you, please take some time to look at the aforementioned sources of helpful information, or even better – have them open in separate tabs in Firefox on your second monitor while you are following the directions in this document 😉