Python sleep()
Содержание:
How to delay the execution of function using sleep()?
The example shown below has a function defined called display(). The display() function prints a message «Welcome to Guru99 Tutorials». When the function is called, it will execute and display the message inside the terminal.
To add delay to the execution of the function, let us add the time.sleep() before making a call to the function. During execution time.sleep() will halt there for the number of seconds given, and later the function display() will be called.
Example:
import time

print('Code Execution Started')

def display():
    print('Welcome to Guru99 Tutorials')
    time.sleep(5)

display()
print('Function Execution Delayed')
Output:
Code Execution Started
Welcome to Guru99 Tutorials
Function Execution Delayed
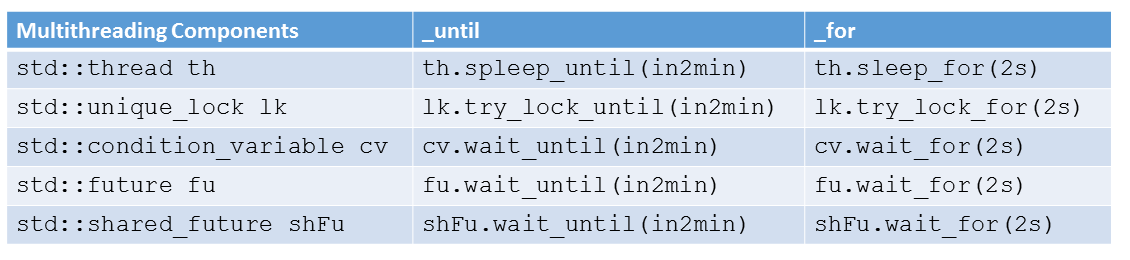
Adding a Python sleep() Call With Threads#
There are also times when you might want to add a Python call to a thread. Perhaps you’re running a migration script against a database with millions of records in production. You don’t want to cause any downtime, but you also don’t want to wait longer than necessary to finish the migration, so you decide to use threads.
Note: Threads are a method of doing concurrency in Python. You can run multiple threads at once to increase your application’s throughput. If you’re not familiar with threads in Python, then check out An Intro to Threading in Python.
To prevent customers from noticing any kind of slowdown, each thread needs to run for a short period and then sleep. There are two ways to do this:
- Use as before.
- Use from the module.
Let’s start by looking at .
What is Tick?
Time intervals are floating-point numbers in units of seconds. Particular instants in time are expressed in seconds since 12:00am, January 1, 1970(epoch).
There is a popular time module available in Python which provides functions for working with times, and for converting between representations. The function time.time() returns the current system time in ticks since 12:00am, January 1, 1970(epoch).
Example
#!/usr/bin/python3
import time;      # This is required to include time module.

ticks = time.time()
print ("Number of ticks since 12:00am, January 1, 1970:", ticks)
This would produce a result something as follows −
Number of ticks since 12:00am, January 1, 1970: 1455508609.34375
Date arithmetic is easy to do with ticks. However, dates before the epoch cannot be represented in this form. Dates in the far future also cannot be represented this way — the cutoff point is sometime in 2038 for UNIX and Windows.
Example: Using sleep() function in Python
Follow the steps given below to add sleep() in your python script.
Step 1:
import time
Step 2: Add time.sleep()
The number 5 given as input to sleep(), is the number of seconds you want the code execution to halt when it is executed.
time.sleep(5)
Here is a working code along with messages inside print(), to show the delay of message display on the terminal when executed.
import time
print("Welcome to guru99 Python Tutorials")
time.sleep(5)
print("This message will be printed after a wait of 5 seconds")
Output:
Welcome to guru99 Python Tutorials
This message will be printed after a wait of 5 seconds
Adding a Python sleep() Call With Async IO#
Asynchronous capabilities were added to Python in the 3.4 release, and this feature set has been aggressively expanding ever since. Asynchronous programming is a type of parallel programming that allows you to run multiple tasks at once. When a task finishes, it will notify the main thread.
is a module that lets you add a Python call asynchronously. If you’re unfamiliar with Python’s implementation of asynchronous programming, then check out Async IO in Python: A Complete Walkthrough and Python Concurrency & Parallel Programming.
Here’s an example from Python’s own documentation:
In this example, you run and have it sleep for one second between two calls.
Here’s a more compelling example from the Coroutines and Tasks portion of the documentation:
In this code, you create a worker called that takes in the number of seconds to and the to print out. Then, you use Python’s keyword to wait for the code to run. is required here because has been marked as an function, so you can’t call it like you would a normal function.
When you run this code, your program will execute 3 times. The code will wait for 1, 2, and 3 seconds, for a total wait time of 6 seconds. You can also rewrite the code so that the tasks run in parallel:
functool.partial
Один из классов functools называется partial. Вы можете использовать для создания новой функции с частичным приложением аргументов и ключевых слов, которые вы передаете. Вы также можете использовать partial для «заморозки» части аргументов вашей функции и\или ключей, которые отображаются в новом объекте. Еще один способ применения partial это создание функции с разными настройками. Давайте взглянем на пример:
Python
from functools import partial
def add(x, y):
return x + y
p_add = partial(add, 2)
p_add(4) # 6
|
1 |
fromfunctoolsimportpartial defadd(x,y) returnx+y p_add=partial(add,2) p_add(4)# 6 |
Здесь мы создали простую функцию добавления, которая возвращает результат добавленных ею аргументов x и y. Далее мы создаем новую вызываемую, создав экземпляр partial и передав его нашей функции, а также аргумент для этой функции. Другими словами, мы в целом присваиваем параметру х в нашей функции значение 2. Наконец, мы вызываем p_add с аргументом числа 4, что в результате дает 6, так как 2+4=6.
Еще одним удобным вариантом использования для partials является передача аргументов коллбекам. Девайте взглянем на пример, используя wx:
Python
# -*- coding: utf-8 -*-
import wx
from functools import partial
class MainFrame(wx.Frame):
«»»
Приложение показывает несколько кнопок
«»»
def __init__(self, *args, **kwargs):
«»»Конструктор»»»
super(MainFrame, self).__init__(parent=None, title=’Partial’)
panel = wx.Panel(self)
sizer = wx.BoxSizer(wx.VERTICAL)
btn_labels =
for label in btn_labels:
btn = wx.Button(panel, label=label)
btn.Bind(wx.EVT_BUTTON, partial(self.onButton, label=label))
sizer.Add(btn, 0, wx.ALL, 5)
panel.SetSizer(sizer)
self.Show()
def onButton(self, event, label):
«»»
Дожидаемся действия нажатия кнопки
«»»
print(‘Вы нажали: ‘ + str(label))
if __name__ == ‘__main__’:
app = wx.App(False)
frame = MainFrame()
app.MainLoop()
|
1 |
# -*- coding: utf-8 -*- importwx fromfunctoolsimportpartial classMainFrame(wx.Frame) «»» Приложение показывает несколько кнопок def__init__(self,*args,**kwargs) «»»Конструктор»»» super(MainFrame,self).__init__(parent=None,title=’Partial’) panel=wx.Panel(self) sizer=wx.BoxSizer(wx.VERTICAL) btn_labels=’one’,’two’,’three’ forlabel inbtn_labels btn=wx.Button(panel,label=label) btn.Bind(wx.EVT_BUTTON,partial(self.onButton,label=label)) sizer.Add(btn,,wx.ALL,5) panel.SetSizer(sizer) self.Show() defonButton(self,event,label) «»» Дожидаемся действия нажатия кнопки print(‘Вы нажали: ‘+str(label)) if__name__==’__main__’ app=wx.App(False) frame=MainFrame() app.MainLoop() |
Здесь мы используем partial для вызова onButton, обработчика событий с дополнительным аргументом, который представлен в виде ярлыка кнопки. Это может выглядеть не слишком полезным, но если вы связанны с программированием графического интерфейса, вы заметите, как часто люди задаются вопросом «а как это сделать?». Конечно, вы также можете использовать lambda функцию вместо передачи аргументов коллбекам.
Один из способов применения используется в работе для автоматического теста Фреймворка. Мы тестируем пользовательский интерфейс при помощи Python и нам нужно быть в состоянии передать функцию, чтобы отменить определенные диалоги. Обычно вы можете передать функцию вместе с названием диалога для отмены, но для корректной работы его потребуется вызвать в конкретной точке в процессе. Так как я не могу показать тот код, вот очень простой пример передачи функции partial:
Python
from functools import partial
def add(x, y):
return x + y
def multiply(x, y):
return x * y
def run(func):
print(func())
def main():
a1 = partial(add, 1, 2)
m1 = partial(multiply, 5, 8)
run(a1)
run(m1)
if __name__ == «__main__»:
main()
|
1 |
fromfunctoolsimportpartial defadd(x,y) returnx+y defmultiply(x,y) returnx*y defrun(func) print(func()) defmain() a1=partial(add,1,2) m1=partial(multiply,5,8) run(a1) run(m1) if__name__==»__main__» main() |
Здесь мы создаем несколько функций partial в нашей главной функции. Далее мы передаем их нашей функции run, вызываем её и затем выводим результат вызванной функции.
Основные исключения
Вы уже сталкивались со множеством исключений. Ниже изложен список основных встроенных исключений (определение в документации к Пайтону):
- Exception – то, на чем фактически строятся все остальные ошибки;
- AttributeError – возникает, когда ссылка атрибута или присвоение не могут быть выполнены;
- IOError – возникает в том случае, когда операция I/O (такая как оператор вывода, встроенная функция open() или метод объекта-файла) не может быть выполнена, по связанной с I/O причине: «файл не найден», или «диск заполнен», иными словами.
- ImportError – возникает, когда оператор import не может найти определение модуля, или когда оператор не может найти имя файла, который должен быть импортирован;
- IndexError – возникает, когда индекс последовательности находится вне допустимого диапазона;
- KeyError – возникает, когда ключ сопоставления (dictionary key) не найден в наборе существующих ключей;
- KeyboardInterrupt – возникает, когда пользователь нажимает клавишу прерывания(обычно Delete или Ctrl+C);
- NameError – возникает, когда локальное или глобальное имя не найдено;
- OSError – возникает, когда функция получает связанную с системой ошибку;
- SyntaxError — возникает, когда синтаксическая ошибка встречается синтаксическим анализатором;
- TypeError – возникает, когда операция или функция применяется к объекту несоответствующего типа. Связанное значение представляет собой строку, в которой приводятся подробные сведения о несоответствии типов;
- ValueError – возникает, когда встроенная операция или функция получают аргумент, тип которого правильный, но неправильно значение, и ситуация не может описано более точно, как при возникновении IndexError;
- ZeroDivisionError – возникает, когда второй аргумент операции division или modulo равен нулю;
Существует много других исключений, но вы вряд ли будете сталкиваться с ними так же часто. В целом, если вы заинтересованы, вы можете узнать больше о них в документации Пайтон.
Подведем итоги
Давайте подумаем. В этой статье вы научились базовому кэшированию с использованием lru_cache. После этого мы изучили partial, который позволяет нам «замораживать» часть аргументов и\или ключей в вашей функции, позволяя вам создавать новый объект, который вам нужно вызвать. Далее, мы использовали singledispatch для перегрузки функций в Python. Так как это только позволяет функции перегрузиться на основании первого аргумента, этот инструмент может оказаться весьма кстати в будущем! Наконец, мы рассмотрели wraps, который обладает весьма узкой спецификой: исправление docstring и названий функций, которые были декорированы таким образом, что у них нет docstring декоратора, или названия.