Сдруживаем python и bash: библиотеки smart-env и python-shell
Содержание:
Server Side
First, let’s start off by the server (attacker’s code):
Notice that i’ve used «0.0.0.0» as the server IP address, this means all IPv4 addresses on the local machine. You may wonder, why we don’t just use our local IP address or «localhost» or «127.0.0.1» ? Well, if the server has two IP addresses, let’s say «192.168.1.101» on a network, and «10.0.1.1» on another, and the server listens on «0.0.0.0», it will be reachable at both of those IPs.
We then specified some variables and initiated the TCP socket. Notice I used 5003 as the TCP port, feel free to choose any port above 1024, just make sure to use it on both the server’s and client’s code.
However, malicious reverse shells usually uses the popular port 80 (i.e http) or 443 (i.e https), this will allow it to bypass firewall restrictions of the target client, feel free to change it and try it out!
Now let’s bind that socket we just created to our IP address and port:
Listening for connections:
If any client attempts to connect to the server, we need to accept it:
accept() function waits for an incoming connection and returns a new socket representing the connection (client_socket), and the address (IP and port) of the client.
Now below code will be executed only if a user is connected to the server, let’s try to send a welcome message, just to let you know how you can send messages over sockets:
Note that we need to encode the message to bytes before sending, and we must send the message using the client_socket and not the server socket «s».
Now let’s start our main loop, which is sending shell commands and retrieving the results and printing them:
All we are doing here is prompting the attacker for the desired command, we encode and send the command to the client, after that we receive the output of that command executed on the client (we’ll see how in the client’s code).
If the command is «exit», just exit out of the loop and close the connections.
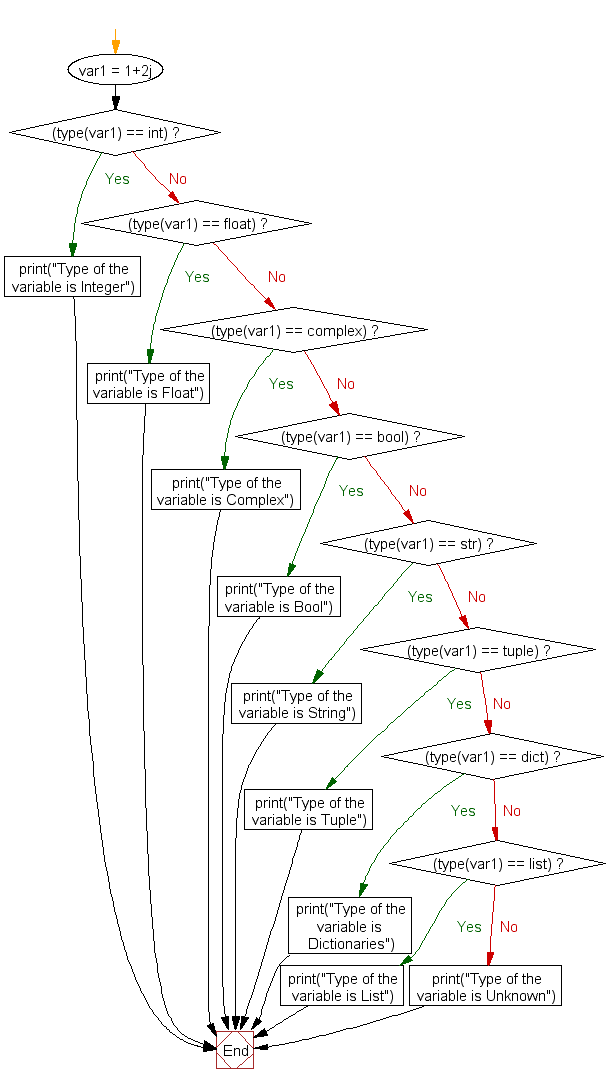
Variable Annotations
PEP 526 introduced variable annotations. The style recommendations for them are
similar to those on function annotations described above:
-
Annotations for module level variables, class and instance variables,
and local variables should have a single space after the colon. -
There should be no space before the colon.
-
If an assignment has a right hand side, then the equality sign should have
exactly one space on both sides:# Correct: code: int class Point: coords: Tuple label: str = '<unknown>'# Wrong: code:int # No space after colon code : int # Space before colon class Test: result: int=0 # No spaces around equality sign -
Although the PEP 526 is accepted for Python 3.6, the variable annotation
syntax is the preferred syntax for stub files on all versions of Python
(see PEP 484 for details).
Footnotes
|
Hanging indentation is a type-setting style where all the lines in a paragraph are indented except the first line. In the context of Python, the term is used to describe a style where the opening parenthesis of a parenthesized statement is the last non-whitespace character of the line, with subsequent lines being indented until the closing parenthesis. |
Делаем полноценный reverse shell
От обучающих примеров переходим к реальной задаче — разработке обратного шелла, который позволит выполнять команды на захваченной удаленной машине.
При этом добавить нам нужно только вызов функции . Что это такое? В Python есть модуль subprocess, который позволяет запускать в операционной системе процессы, управлять ими и взаимодействовать с ними через стандартный ввод и вывод. В качестве простейшего примера используем subprocess, чтобы запустить блокнот:
Здесь метод вызывает (запускает) указанную программу.
Переходим к разработке шелла. В данном случае сторона сервера будет атакующей (то есть наш компьютер), а сторона клиента — атакованной машиной. Именно поэтому шелл называется обратным.
Вариант 1. Присоединись к сообществу «Xakep.ru», чтобы читать все материалы на сайте
Членство в сообществе в течение указанного срока откроет тебе доступ ко ВСЕМ материалам «Хакера», увеличит личную накопительную скидку и позволит накапливать профессиональный рейтинг Xakep Score!
Подробнее
Вариант 2. Открой один материал
Заинтересовала статья, но нет возможности стать членом клуба «Xakep.ru»? Тогда этот вариант для тебя!
Обрати внимание: этот способ подходит только для статей, опубликованных более двух месяцев назад.
Я уже участник «Xakep.ru»
Example Application
Example cmd2 application (examples/example.py):
#!/usr/bin/env python
# coding=utf-8
"""
A sample application for cmd2.
"""
import argparse
import random
import sys
import cmd2

class CmdLineApp(cmd2.Cmd):
    """ Example cmd2 application. """

    # Setting this true makes it run a shell command if a cmd2/cmd command doesn't exist
    # default_to_shell = True
    MUMBLES =
    MUMBLE_FIRST =
    MUMBLE_LAST =

    def __init__(self):
        self.maxrepeats = 3
        shortcuts = dict(cmd2.DEFAULT_SHORTCUTS)
        shortcuts.update({'&': 'speak'})

        # Set use_ipython to True to enable the "ipy" command which embeds and interactive IPython shell
        super().__init__(use_ipython=False, multiline_commands=, shortcuts=shortcuts)

        # Make maxrepeats settable at runtime
        self.add_settable(cmd2.Settable('maxrepeats', int, 'max repetitions for speak command'))

    speak_parser = argparse.ArgumentParser()
    speak_parser.add_argument('-p', '--piglatin', action='store_true', help='atinLay')
    speak_parser.add_argument('-s', '--shout', action='store_true', help='N00B EMULATION MODE')
    speak_parser.add_argument('-r', '--repeat', type=int, help='output  times')
    speak_parser.add_argument('words', nargs='+', help='words to say')

    @cmd2.with_argparser(speak_parser)
    def do_speak(self, args):
        """Repeats what you tell me to."""
        words = []
        for word in args.words:
            if args.piglatin:
                word = '%s%say' % (word, word[])
            if args.shout:
                word = word.upper()
            words.append(word)
        repetitions = args.repeat or 1
        for i in range(min(repetitions, self.maxrepeats)):
            # .poutput handles newlines, and accommodates output redirection too
            self.poutput(' '.join(words))

    do_say = do_speak  # now "say" is a synonym for "speak"
    do_orate = do_speak  # another synonym, but this one takes multi-line input

    mumble_parser = argparse.ArgumentParser()
    mumble_parser.add_argument('-r', '--repeat', type=int, help='how many times to repeat')
    mumble_parser.add_argument('words', nargs='+', help='words to say')

    @cmd2.with_argparser(mumble_parser)
    def do_mumble(self, args):
        """Mumbles what you tell me to."""
        repetitions = args.repeat or 1
        for i in range(min(repetitions, self.maxrepeats)):
            output = []
            if (random.random() < .33):
                output.append(random.choice(self.MUMBLE_FIRST))
            for word in args.words:
                if (random.random() < .40):
                    output.append(random.choice(self.MUMBLES))
                output.append(word)
            if (random.random() < .25):
                output.append(random.choice(self.MUMBLE_LAST))
            self.poutput(' '.join(output))

if __name__ == '__main__':
    app = CmdLineApp()
    sys.exit(app.cmdloop())
The following is a sample session running example.py.
Thanks to Cmd2’s built-in transcript testing capability, it also serves as a test
suite for example.py when saved as transcript_regex.txt.
Running
python example.py -t transcript_regex.txt
will run all the commands in the transcript against , verifying that the output produced
matches the transcript.
example/transcript_regex.txt:
Regular expressions can be used anywhere within a transcript file simply by enclosing them within forward slashes, .
Режим редактирования файлов
В IDLE есть возможность полноценно работать с файлами – просматривать, редактировать, создавать новые. Чтобы создать новый файл, выберите «File» -> «New File» (или Ctrl + N). Откроется новое окно:
Новый файл в IDLE
В новом окне доступен тот же функционал, что и в интерактивном режиме. Однако разница все же есть – в режиме редактирования файлов используется 4 пробела для отступа, в отличие от интерактивного режима (там используется 8 пробелов).
Для примера, напишем простой код и сохраним его с помощью «File» -> «Save» (или Ctrl + S). После того как файл сохранен, IDLE начнет понимать что этот файл имеет расширение «.py» и подсветит синтаксис.
Подсветка синтаксиса в IDLE доступна после сохранения файла с расширением «.py»
Теперь, чтобы запустить код, выберите «Run» -> «Run Module» (или F5). Откроется новое окно Python Shell с результатом выполнения нашего кода.
Нажмите F5 для выполнения кода
IDLE особенно удобно использовать при обучении языку Python, чтобы быстро проверять на практике команды и инструкции. Также, в режиме REPL, IDLE имеет ряд преимуществ перед обычной консолью (подсказки, подсветка синтаксиса, авто-отступы и др.)
Однако имеющегося функционала может оказаться не достаточно для серьезной разработки. Стоит присмотреться к PyCharm или VSCode.
Multi Line Comments
Python does not really have a syntax for multi line comments.
To add a multiline comment you could insert a for each line:
Example
#This is a comment#written in#more than just one lineprint(«Hello,
World!»)
Or, not quite as intended, you can use a multiline string.
Since Python will ignore string literals that are not assigned to a variable, you can add a multiline string (triple quotes) in your code, and place your comment inside it:
Example
«»»This is a commentwritten in more than just
one line»»»print(«Hello, World!»)
As long as the string is not assigned to a variable, Python will read the code, but then ignore it, and you have made a multiline comment.
Creating components
One other strengths of the cmd module is that it handles multiple inheritance. That means that you can create helper classes intended to provide additional features.
Shell access
import os
class shell_cmd(cmd.Cmd,object):
    def do_shell(self, s):
        os.system(s)
    def help_shell(self):
        print "execute shell commands"
By deriving from this class, you will be able to execute any shell command:
(Cmd) shell date
Thu Sep 9 08:57:14 CEST 2002
(Cmd) ! ls /usr/local/lib/python2.2/config
Makefile Setup.config config.c install-sh makesetup Setup
Setup.local config.c.in libpython2.2.a python.o
By the way, the cmd module understands the ! character as a shortcut for the shell command.
Exit
class exit_cmd(cmd.Cmd,object):
    def can_exit(self):
        return True
    def onecmd(self, line):
        r = super (exit_cmd, self).onecmd(line)
        if r and (self.can_exit() or
           raw_input('exit anyway ? (yes/no):')=='yes'):
             return True
        return False
    def do_exit(self, s):
        return True
    def help_exit(self):
        print "Exit the interpreter."
        print "You can also use the Ctrl-D shortcut."
    do_EOF = do_exit
    help_EOF= help_exit
This class provides the exit command to abort the interpreter. You can protect exit by overriding the can_exit method.
Gluing all together
Now with a class that inherits both from exit_cmd and shell_cmd you will be able to define an interpreter that understands the shell and exit commands.
Discussion
It would be cool if you could call these mini-command lines from «the» command line.
If there were some sort of default OptParse-like behavior, that would totally rock.
That way, I could pass in instructions, scripts, and get back the results on stdout.
Something like «-c» for Python, where you can pass in a line, and get back the result, without seeing the intro text.
— LionKimbro 2006-03-06 19:06:56
The onecmd() function may be what you’re after. Write your interpreter as you normally would. Then, in main, parse the command line for a ‘-c’ option. If you find it, call onecmd() with the string following the ‘-c’ as the parameter, else call cmdloop().
— Mark Workman 2020-09-01 02:27:52
Creating a command
The main goal of an interpreter is to respond to commands. A command is the first part of a line of text entered at the interpreter prompt. This part is defined as the longest string of characters contained in the identchars member. By default identchars contains non accented letters, digits and the underscore symbol. The end of the line is the command’s parameters.
Command handling is really easy: if you want to define the command spam, you only have to define the do_spam method in your derived class.
parameters
The do_xxx method should only take one extra parameter. This parameter corresponds to the part of the string entered by the user after the command name. The job of do_xxx is to parse this string and to find the command parameter’s values. Python provides many helpful tools to parse this string, but this is quite out of the scope of his how-to.
errors
The interpreter uses the following format to signal errors:
*** <error description>: <additional parameters>
It’s generally a good idea to use the same format for application errors.
return value
In the most common case: commands shouldn’t return a value. The exception is when you want to exit the interpreter loop: any command that returns a true value stops the interpreter.
sample
The following function defines a command which takes two numerical arguments and prints the result of the addition:
def do_add(self,s):
    l = s.split()
    if len(l)!=2:
       print "*** invalid number of arguments"
       return
    try:
       l =
    except ValueError:
       print "*** arguments should be numbers"
       return
    print l+l
Now if you run the interpreter, you will have:
(Cmd) add 4
*** invalid number of arguments
(Cmd) add 5 4
9
Используем TCP
Пришло время познакомиться с TCP. Точно так же создаем класс , но в качестве второго параметра будем использовать константу .
Сторона сервера
Снова резервируем порт, на котором будем принимать пакеты:
Дальше появляется незнакомый нам ранее метод . С его помощью мы устанавливаем некую очередь для подключенных клиентов. Например, с параметром мы создаем ограничение на пять подключенных и ожидающих ответа клиентов.
Делаем бесконечный цикл, в котором будем обрабатывать запросы от каждого нового клиента, находящегося в очереди.
Страшновато? Начнем по порядку. Сначала мы создаем обработчик исключения (остановка работы программы с клавиатуры), чтобы сервер работал бесконечно, пока мы что-нибудь не нажмем.
Метод возвращает пару значений, которую мы помещаем в две переменные: в будут содержаться данные о том, кто был отправителем, а станет экземпляром класса . То есть мы создали новое подключение.
Теперь посмотрим вот на эти три строчки:
В них мы останавливаем прослушивание и освобождаем порт, только если сами остановим работу программы. Если прерывания не произошло, то выполняется блок :
Здесь мы сохраняем пользовательские данные в переменную result, а функцией выводим на экран сообщение, которое нам отправлял клиент (предварительно превратив байты в строку Unicode). В результате сторона сервера будет выглядеть примерно так:
Сторона клиента
Со стороной клиента опять же все обстоит проще. После подключения библиотеки и создания экземпляра класса мы, используя метод , подключаемся к серверу и порту, на котором принимаются сообщения:
Далее мы отправляем пакет данных получателю методом :
В конце останавливаем прослушивание и освобождаем порт:
Код клиента будет выглядеть примерно так:
Тестируем
Запустим в двух разных консолях код сервера и код клиента. На выходе мы должны получить примерно то же самое, что и с протоколом UDP.
Вывод на стороне сервера
Успех! Поздравляю: теперь тебе открыты большие возможности. Как видишь, ничего страшного в работе с сетью нет. И конечно, не забываем, что раз мы эксперты в ИБ, то можем добавить шифрование в наш протокол.
В качестве следующего упражнения можешь попробовать, например, написать чат на несколько персон, как на скриншоте.
Самодельный чат, вид со стороны сервера
Переходим к практике
Писать код мы будем на современном Python 3. Вместе с Python поставляется набор стандартных библиотек, из которого нам потребуется модуль socket. Подключаем его.
Дальше мы договоримся, что у нас есть сервер и клиент, где клиентом обычно будет наш компьютер, а сервером — удаленный. В реальности все это условности, и речь может идти о любых двух компьютерах (в том числе виртуальных машинах) или даже просто двух процессах, запущенных локально
Важно только то, что код по разные стороны будет разным
На каждой из сторон первым делом создаем экземпляр класса socket и устанавливаем для него две константы (параметры).
License
The MIT License (MIT)
Copyright (c) 2014 Nicolas Mercier
Permission is hereby granted, free of charge, to any person obtaining a copy
of this software and associated documentation files (the «Software»), to deal
in the Software without restriction, including without limitation the rights
to use, copy, modify, merge, publish, distribute, sublicense, and/or sell
copies of the Software, and to permit persons to whom the Software is
furnished to do so, subject to the following conditions:
The above copyright notice and this permission notice shall be included in
all copies or substantial portions of the Software.
THE SOFTWARE IS PROVIDED «AS IS», WITHOUT WARRANTY OF ANY KIND, EXPRESS OR
IMPLIED, INCLUDING BUT NOT LIMITED TO THE WARRANTIES OF MERCHANTABILITY,
FITNESS FOR A PARTICULAR PURPOSE AND NONINFRINGEMENT. IN NO EVENT SHALL THE
AUTHORS OR COPYRIGHT HOLDERS BE LIABLE FOR ANY CLAIM, DAMAGES OR OTHER
LIABILITY, WHETHER IN AN ACTION OF CONTRACT, TORT OR OTHERWISE, ARISING FROM,
OUT OF OR IN CONNECTION WITH THE SOFTWARE OR THE USE OR OTHER DEALINGS IN
THE SOFTWARE.