Freepbx advanced settings
Содержание:
General Settings

Outbound CallerID
Use this field to specify caller ID for calls placed out of this trunk with the <NXXNXXXXXX> format. You can also use the format: “hidden” <NXXNXXXXXX> to hide the caller ID sent out over digital lines, if supported (E1/T1/J1/BRI/SIP/IAX2).
CID Options
This setting determines what CIDs will be allowed out of this trunk. Please NOTE that Emergency CIDs defined on an extension or device will ALWAYS be used if this trunk is part of an emergency route regardless of these settings.
Block Foreign CIDs
This will block any CID that is the result of a forwarded call from off the system. CIDs that are defined for an extension or device will be transmitted.
Force Trunk CID
This will always use the CID defined for the trunk, except if the trunk is part of an emergency route with an emergency CID defined for the extension or device. Intra-Company routes will always transmit an extension’s internal number and name.
Maximum Channels
Controls the maximum number of outbound channels (simultaneous calls) that can be used on this trunk. To count inbound calls against this maximum, use the auto-generated context: from-trunk- as the inbound trunk’s context (see extensions_additional.conf). Leave blank to specify no maximum.
Continue if Busy
Normally the next trunk is only tried upon a trunk being ‘Congested’ in some form, or unavailable. Checking this box will force a failed call to always continue to the next configured trunk or destination even when the channel reports BUSY or INVALID NUMBER. This should normally be unchecked
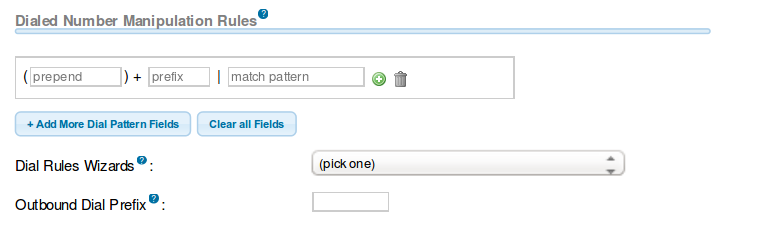
Dial Pattern Manipulation Rules
These rules can manipulate the dialled number before sending it out of this trunk. If no rule applies, the number is not changed. The original dialled number is passed down from the route where some manipulation may have already occurred. This trunk has the option to further manipulate the number. If the number matches the combined values in the prefix plus the match pattern boxes, the rule will be applied and all subsequent rules ignored. Upon a match, the prefix, if defined, will be stripped. Next, the prepend will be inserted in front of the match pattern and the resulting number will be sent to the trunk. All fields are optional.
| Pattern | Description |
|---|---|
| X | Matches any digit from 0-9 |
| Z | Matches any digit from 1-9 |
| N | Matches any digit from 2-9 |
| Matches any digit in the brackets (example: 1,2,3,7,8,9) | |
| . (dot) | Wildcard, matches one or more dialled digits. |
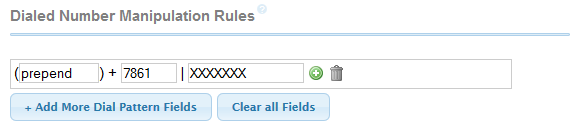
Prepend
Digits to prepend upon a successful match. If the dialled number matches the patterns in the prefix and match pattern boxes, this will be prepended before sending to the trunk.
Prefix
Prefix to remove upon a successful match. If the dialled number matches this, plus the match pattern box, this prefix is removed before adding the optional prepend box and sending the results to the trunk.
Match pattern
The dialled number will be compared against the prefix, plus this pattern. Upon a match, this portion of the number will be sent to the trunks after removing the prefix and appending the prepend digits. You can completely replace a number by matching on the prefix only, replacing it with a prepend and leaving the match pattern blank.
Dialled Rules Wizard
Remove prefix from local numbers
This is useful for ZAP and DAHDi trunks, where if a local number is dialled as «6135551234,” it can be converted to «555-1234.”
Upload from CSV
Upload patterns from a CSV file, replacing existing entries. If there are no headers, then the file must have 3 columns of patterns in the same order as in the GUI. You can also supply headers: prepend, prefix and match pattern in the first row. If there are less than 3 recognized headers, then the remaining columns will be blank.
The outbound dialling prefix is used to prefix a dialling string to all outbound calls placed on this trunk. For example, if this trunk is behind another PBX or is a Centrex line, then you would put “9” here to access an outbound line. Another common use is to prefix calls with “w” (to add a 500ms wait per w) on a POTS line that needs time to obtain a dial tone to avoid eating digits. Most users should leave this option blank.
Find Me / Follow Me
- Click on the Find Me / Follow Me tab.
- Find Me / Follow Me is enabled by default here so that you may edit the settings. After entering settings, you can disable it if desired.
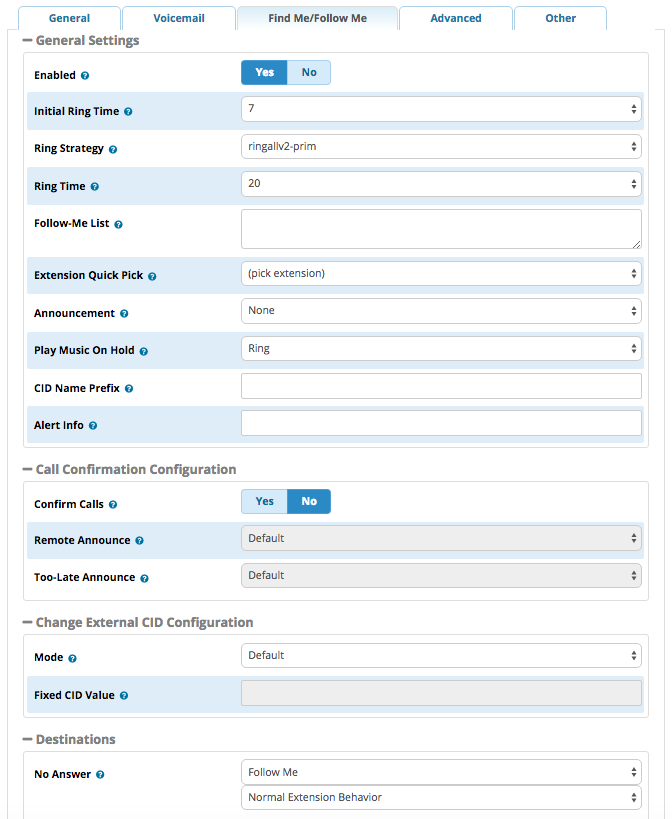
General Settings
Enabled
Yes/No: Whether to enable Find Me / Follow Me. Must be set to Yes (at least temporarily) in order to edit other settings on this page. If you leave it set to Yes, Find Me / Follow Me will be active for this extension when you save the extension and apply config. You can set to No to disable Find Me / Follow Me for an extension until the user activates it.
Initial Ring Time
Use the drop-down menu to select initial ring time, in seconds. This is the number of seconds to ring the primary extension prior to proceeding to the follow-me list. If «0,» the primary extension will not be rung before proceeding to the follow-me list. The extension can also be included in the follow-me list.
Ring Strategy
-
- ringallv2: ring Extension for duration set in Initial Ring Time, and then, while continuing call to extension, ring Follow-Me List for duration set in Ring Time.
- ringall: ring Extension for duration set in Initial Ring Time, and then terminate call to Extension and ring Follow-Me List for duration set in Ring Time.
- hunt: take turns ringing each available extension
- memoryhunt: ring first extension in the list, then ring the 1st and 2nd extension, then ring 1st 2nd and 3rd extension in the list…. etc.
- *-prim: these modes act as described above. However, if the primary extension (first in list) is occupied, the other extensions will not be rung. If the primary is in do-not-disturb (DND) mode, it won’t be rung. If the primary is in call forward (CF) unconditional mode, then all will be rung.
- firstavailable: ring only the first available channel
- firstnotonphone: ring only the first channel which is not off hook — ignore CW
Ring Time
Time in seconds that the phones will ring. For all hunt-style ring strategies, this is the time for each iteration of phone(s) that are rung.
Follow-Me List
Enter a list of extensions to ring, one per line, or use the Extension Quick Pick menu below. You can include an extension on a remote system, or an external number, by suffixing a number with a pound (#). ex: 2448089# would dial 2448089 on the appropriate trunk (see Outbound Routing).
Announcement
Select the message to be played to the caller before dialing the find me / follow me list. Default = none. The drop-down menu shows available system recordings. To add additional recordings, please use the System Recordings module.
Play Music On Hold
If you select a Music on Hold class to play, instead of the default «Ring,» the caller will hear that MoH instead of ringing while they are waiting for someone to pick up.
CID Name Prefix
Optional — You can optionally prefix the Caller ID name when ringing extensions in this group. For example, if you prefix with «Sales:», a call from John Doe would display as «Sales:John Doe» on the find me / follow me list extensions that ring.
Alert Info
Optional — You can optionally include an Alert Info, which can create distinctive rings on SIP phones.
Call Confirmation Configuration
Remote Announce
Message to be played to the person receiving the call if Confirm Calls = Yes. You can use the default message or select one of your System Recordings.
Too-Late Announce
Message to be played to the person receiving the call if Confirm Calls = Yes and the call has already been accepted elsewhere.
Change External CID Configuration
Mode
- Default: Transmits the caller’s CID if allowed by the trunk.
- Fixed CID Value: Always transmit the Fixed CID Value below.
- Outside Calls Fixed CID Value: Transmit the Fixed CID Value below on calls that come in from outside only. Internal extension-to-extension calls will continue to operate in default mode.
- Use Dialed Number: Transmit the number that was dialed as the CID for calls coming from outside. Internal extension-to-extension calls will continue to operate in default mode. There must be a DID on the inbound route for this. This will be BLOCKED on trunks that block foreign CallerID.
- Force Dialed Number: Transmit the number that was dialed as the CID for calls coming from outside. Internal extension-to-extension calls will continue to operate in default mode. There must be a DID on the inbound route for this. This WILL be transmitted on trunks that block foreign CallerID.
Fixed CID Value
Fixed value to replace the CID used with some of the modes above. Should be in a format of digits only with an option of E164 format using a leading «+».
Optional destination call is routed to when the call is not answered on an otherwise idle phone. If the phone is in use and the call is simply ignored, then the busy destination will be used.
Route Name: BlockPublicPhone
This route might be used to block a phone that is in a public area from making outgoing calls. In this example, the public area phone is extension 105. If the public area phone you wish to block uses a different extension number, change 105 to match the correct extension number.
Route CID: YOURNUMBER
Dial Patterns that will use this Route:
|
Patterns: () + | . / 105 |
What it does: This line will force any calls placed by Extension 105 to use this route. Please note the period that appears between the pipe and the slash! |
|---|
Trunk Sequence: DeadRestricted
Note: Create a SIP Trunk called DeadRestricted. Check the Disable Trunk box and put «DeadRestricted» in the Outgoing Settings, Trunk Name (above PEER Details).
Custom Trunk
Custom trunks are useful when attempting to integrate certain devices like cellular gateways or perhaps when setting up least cost routing schemas.

Custom Dial String
Define the custom dial string here. Use the token $OUTNUM$ wherever the number to dial should go. For example:
- Local/$OUTNUM$@leastcost-custom
- SIP/$OUTNUM$@192.168.41.23:5064
- IAX2/$OUTNUM$@10.100.1.11
| Permanent Auth Rejection?: | |
| Retry Interval?: | |
| Expiration?: | |
| Forbidden Retry Interval?: | |
| Max Retries?: | |
| Qualify Frequency?: | |
| Username?: | |
| Secret?: | |
| SIP Server?: | |
| SIP Server Port?: | |
| Outbound Proxy?: | |
| Contact User?: | |
| Context?: | |
| Transport?: | |
| Codecs |
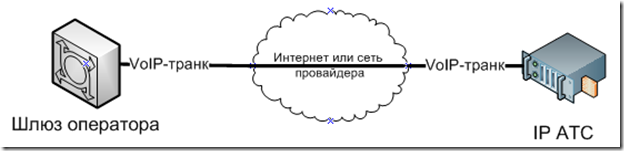
Пример
Рассмотрим такой пример:
У нас есть 4 транка:
Gateway — голосовой шлюз, который подключён через обычные телефонные линии в городскую сеть (ТФоП), используется 7мизначная нумерация, код выхода на межгород 8. Выгодно использовать для звонков внутри города, но абсолютно не выгодно использовать для всех остальных направлений.
Trunk L — провайдер, использует международный набор номера (т.е. через 7), его выгодно использовать для звонков в Москву и вполне можно использовать для звонков в город, если голосовой шлюз занят или не работает, также будем использовать как резервный для звонков на мобильники.
Trunk M — провайдер, использует международный набор номера (т.е. через 7), его выгодно использовать для звонков на мобильные телефоны и для звонков по России.
Trunk T — провайдер, использует наш местный формат набора номера (т.е. через 8), его можно использовать как резервный для звонков в Москву и по России.
В рассматриваемом примере можно выделить 4 направления, т.е. будем использовать 4 маршрута — это город, мобильники, Москва и Россия. В примере в маршрутах я буду приводить формат набора номера к международному, а в самом транке выворачивать в формат который требует сам транк. Первыми настраиваются транки, затем исходящие маршруты.
Информацию о том как создать транк и настроить его Вы можете прочитать в статье по настройке мультифона для FreePBX Distro
Я же сосредоточу внимание только на шаблонах и правилах
Транки
Итак транк Gateway:
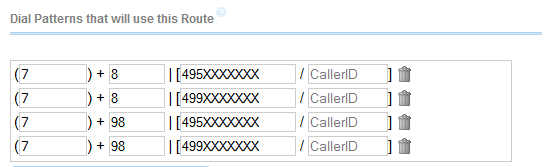
Тут всё просто. Преобразуем номер из международного в местный, больше ничего не пропускаем, 9 будем убирать в маршруте.
Trunk L:
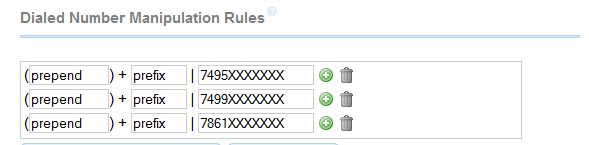
Тут всё просто, никаких манипуляций нам делать не нужно, но мы хотим пропустить через этот транк только звонки в Москву и звонки в город.
Trunk M:

Опять таки, никаких манипуляций, но разрешаем звонить через этот транк в любую точку России. Поскольку маска в транке определяет не направление звонков, а только разрешение на прохождение определённых номеров то добавлять маску мобильников (79XXXXXXXXX) нет смысла, ибо она входит в маску России.
Trunk T:

Как и в предыдущем случае задаём маску которая разрешает звонить по всем направления в России. Мы не добавляем маску мобильников и Москвы, маска этих направлений уже перекрывается маской России. Исключение составляет только то что мы убираем 7ку и добавляем 8ку, поскольку наш провайдер пропускает номера так как это привычно делать с обычного телефона — через 8ку, 8 код города, номер телефона.
Маршруты
Переходим к маршрутам, маршруты надо составлять по принципу чем уже шаблон тем он выше. Самые узкие шаблоны у нас город и Москвы. Друг друга они не перекрывают поэтому нет разницы в каком порядке их размещать, начнём с города. Чтобы добавить новый маршрут выбираем раздел Подключения (Connectivity) — Исходящая маршрутизация (Outbound Routes) и там жмём кнопку Добавить маршрут (Add Route).
Задаём название маршрута
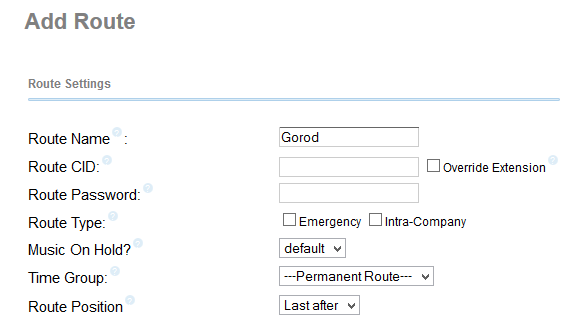
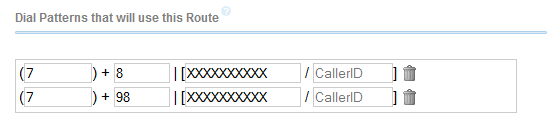
Задаём шаблон номера, помним что абоненты будут набирать либо просто 7 знаков либо 7знаков с 9кой. Врядли будут набирать номер с кодом города, но мы будем приводить номер в международный формат.
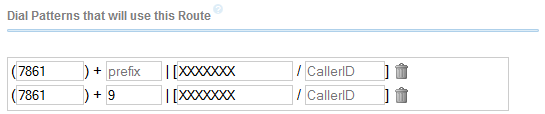
Следующим шагом выбираем транки через которые будет звонить Астер по этому маршруту. В случае с городом буде транк Gateway и Trunk L. И жмём кнопку Сохранить изменения (Submit Changes).
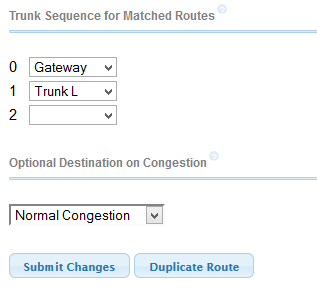
Этот маршрут готов, переходим к Москве. Помним что абоненты скорее всего будут набирать по привычке код Москвы через 8ку, а может быть даже через 9-8.
Задаём транки, выше я писал что для этого направления будем использоваться Trunk L и Trunk T. Не забываем сохраняться.
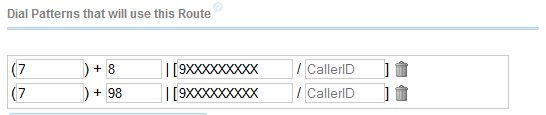
Остаются ещё два маршрута Россия и мобильники. Россия имеет более широкую маску чем мобильники, поэтому сначала добавляем маршрут на мобильники, иначе маршрут Россия перекроет маршрут для мобильников.
Для этого направления мы договорились использовать Trunk M и Trunk L
Последний маршрут — Россия.
Ну вот и всё. Не забываем применить настройки (большая красная кнопка). Должно получиться примерно как-то так:
Voicemail
- Click on the Voicemail tab.
- If you wish to enable voicemail, click the Yes button next to Enabled in order to allow editing the options below.

Voicemail
VM Context
VMX Locater
Whenever you enter information into the 0, 1, and/or 2 options below, you should run a test to make sure the number is functional, because otherwise the caller might become stranded or receive messages about a number being invalid.

Yes/No: Whether to enable the VMX Locater feature. Set to Yes if you would like to enable this feature and edit the options below.
Use When
Select one or more of the buttons to enable VMX Locater for these types of greetings: Unavailable, Busy, and/or Temporary.
Press 0
Check the Go to Operator box to send the caller to the operator when they press 0. Uncheck the Go to Operator box and enter an alternative destination if you want the caller to be sent to a different destination when they press 0. This feature is still accessible to callers even when VMX Locater is disabled for the user.
Press 1
Optional — Enter a destination to send the caller to when they press 1. This can be an internal extension, ring group, queue, or external number such as a cell phone number.
Press 2
Optional — Enter a destination to send the caller to when they press 2. This can be an internal extension, ring group, queue, or external number such as a cell phone number.
Route Name: EMERGENCY
Note: This route will be used to route emergency calls to 911.
Route CID: YOURNUMBER
Route Type: EMERGENCY CHECKED (be sure that each extension has an emergency Caller ID set in the Extensions Module)
Dial Patterns that will use this Route:
|
Patterns () + | 911 () + | 811 |
What it does: 911 calls will follow this route OPTIONAL: 811 calls will follow this route. You can include this to allow you to test the route without actually calling 911. If you do this, be sure to redefine 811 to dial a test number in the Trunk Dialed Number Manipulation Rules. |
|---|
Trunk Sequence: Select the Trunks that you’d like FreePBX/Asterisk to attempt to use when the number dialed by one of your phones matches the Dial Patterns. FreePBX will try each Trunk in the order you list them until it is able to complete the call.
Notes:
Emergency Routes should always be the first Routes in the Outbound Routes list to ensure that all users can reach them.
Route Name: BlockCallerID
This route will allow your users to dial *67 and then a X11 number, a seven-digit number, a ten digit number, or 1 + a ten digit number, and then call will be sent out with Caller ID blocked.
Route CID: «hidden» <YOURNUMBER>
Override Extension: Checked
Dial Patterns that will use this Route:
|
Patterns: () + *67 | 1NXXNXXXXXX () + *67 | NXXNXXXXXX () + *67 | NXXXXXX () + *67 | N11 |
What it does: For any calls that match the pattern *67 + 1 + Area Code + Number, this line will remove *67 and then send the calls to the trunks listed. Same, but for calls that match *67 + Area Code + Number Same, but for calls that match *67 + Seven-digit Number Same, but for N11 calls, i.e. 211, 311, 411, 511, 611, 711, 811, and 911 |
|---|
Trunk Sequence: Select the Trunks that you’d like FreePBX/Asterisk to attempt to use when the number dialed by one of your phones matches the Dial Patterns. FreePBX will try each Trunk in the order you list them until it is able to complete the call.
Note:
You can use variations of the above trunk to force a particular Caller ID, or allow your users to choose to use a particular line, or trunk. Just change the Route CID settings, change *67 in the Dial Patterns to whatever prefix you want to use (i.e., *81 for line 1, *82 for line 2, and so on), and then whatever Trunk sequence you prefer. If you change the Route CID from «hidden» <YOURNUMBER> to just a number, the route can be used to force a particular Caller ID.
Route Name: Restricted
This route will prevent restricted calls from being placed. The Dial Patterns suggested below will prevent calls to international numbers and to 900 and 976 numbers. If you want to permit such calls, you can remove the lines in the Dial Patterns, below.
Dial Patterns that will use this Route:
|
Patterns: () + | 011. / () + | 900XXXXXXX / () + | 1976XXXX / () + | 1XXX976XXXX / () + | 900XXXXXXX / () + | 976XXXX / () + | XXX976XXXX / |
What it does: This line will cause any number that starts with 011 to use this route. Delete if you want to allow international calls. This line will cause 900 number calls to use this route. This line will cause 1976 number calls to use this route. This line will cause 1 + Area Code + 976 + numbers to use this route. This line will cause 900 + XXX + XXXX Numbers to use this route. This line will cause 976-XXXX numbers to use this route. This line will cause Area Code + 976 + XXX numbers to use this route |
|---|
Trunk Sequence: DeadRestricted
Note: Create a SIP Trunk called DeadRestricted. Check the Disable Trunk box and put «DeadRestricted» in the Outgoing Settings, Trunk Name (above PEER Details).
DUNDi Trunk

The PBX offers limited support for DUNDi trunks and additional manual configuration is required. The trunk name should correspond to the section of the remote dundi.conf systems. For example, you may have a mapping on the remote system and corresponding configurations in dundi.conf locally, that looks as follows:
priv => dundi-extens,0,IAX2,priv:${SECRET}@218.23.42.26/${NUMBER},nopartial
In this example, you would create this trunk and name it priv. You would then create the corresponding IAX2 trunk with proper settings to work with DUNDi. This can be done by making an IAX2 trunk in PBX or by using the iax_custom.conf file
DUNDi Mapping
This is the name of the DUNDi mappings as defined in the section of the remote dundi.conf peers. This corresponds to the “include” section of the peer details in the local dundi.conf file.
Overview
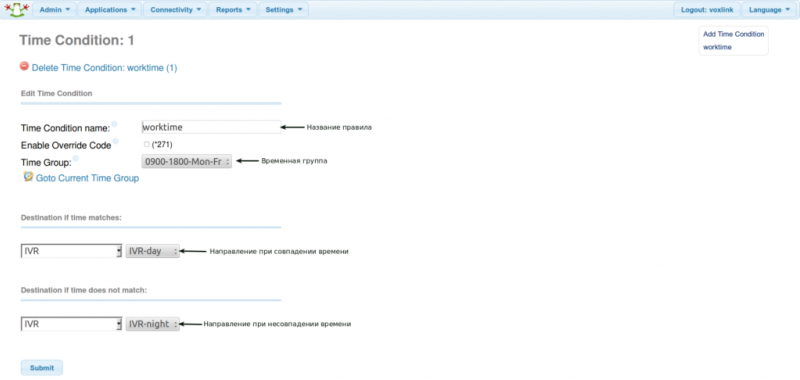
Inbound routing is one of the key pieces to a functional PBX. The Inbound Routes module is the mechanism used to tell your PBX where to route inbound calls based on the phone number or DID dialed. This module is used to handle SIP, PRI and analog inbound routing. Setting up inbound routing properly is a critical step in the deployment of a PBX system. Inbound routes are often used in conjunction with time conditions and IVRs. A typical setup will go from an inbound route to a time condition, then to an IVR or after-hours answering service depending on the time condition met.
Settings depend on installed modules. You may have more settings than are shown here, or settings may be missing.