Configuring asternic to work with the tag queue calls fop2 plugin
Содержание:
- Login in
- Call Groups
- Установка FOP2 в Asterisk (FreePBX)
- Темы блога
- Outbound Call Tracking and FreePBX
- Performing Actions
- Краткая справка
- Hello World with FOP¶
- Getting the software
- Установка FreePBX
- Preferences
- Frequently Asked Questions
- What is the difference between Lite and Pro versions?
- What benefits do I have on buying the PRO version?
- Can I use the license in different servers?
- How much does the PRO version cost?
- Can I monitor outbound campaigns or calls?
- Can I monitor Ring Groups?
- I use trixbox/elastix/freepbx and I see numbers instead of queue names?
- I have a multi tenant environment, how does licensing work?
- My Call Center Stats PRO Demo is still running but I need to input the License Code, how to do it?
- Установка статистики Asternic Call Center Stats 2
- Description
- Answered Reports Description
- Description
- System Requirements
- Configuration
- XSL-FO Core Function Library Support Table (§5.10)¶
- Recordings and FreePBX
- Main Panel View
- Установка и настройка FOP2 в Asterisk
- Queue Buttons
Login in
Once Asternic CDR Reports is installed and activated with either a trial or purchased code, you should point your browser to http://your.server/cdrstats in order to log into the system. You will be presented with a login form similar to this:
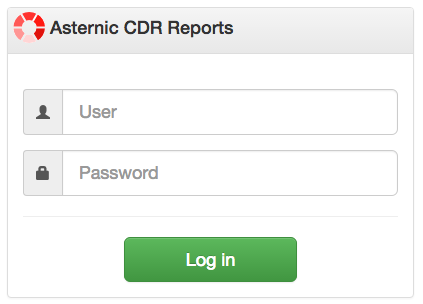
In an IssabelPBX based installation, you will use the same user and password you normally use to log into IssabelPBX.
However, if you want to use the integrated user authentication system (separated from your configuration backend), then you must edit the file /var/www/html/cdrstats/config.php and set the configuration USE_BACKEND_AUTH to false:
The default administrator user when using the built in user system is admin with password admin
Once logged in, you will have access to the main dashboard, and at the top of it access to the menu, where you will reach all the administrator management pages.
Call Groups
The dialer needs to be fed with a list of numbers to dial. In order to make management simpler, FOP2 Dialer uses the concept of groups. From this page you can add/edit or import group numbers. You can also add all group numbers to any campaign from this page.
That is why to import or create telephone numbers it is mandatory to fill the Group field for them. The basic fields for a phone entry are:
- Group
- Group name for this particular contact. You can use any logic you want in that name, like ‘Miami’, ‘Sales’, ‘Prospects’, or any other name that will make campaign management simpler. As you will later will have the option to import all group numbers into a particular campaign.
- Name
- The name of the person/contact. This variable will be available in the Preview mode as well as in the Agent script/form if any.
- Number
- Phone number to dial for that contact
- Caller ID
- Caller ID to use when calling that contact (if empty, it can be auto populated when adding group numbers to a campaign as explained in the following section).
- Variables
- A pipe separated list of variable = value pairs to pass to the dialer. This variables will be available for phone or agent scripts.
Here is one record in detail, as an example:

Creating multiple records using ranges
It is possible to create a number range directly using the GUI, by filling the number field with two numbers separated by a dash symbol. For example, to create 100 records from numbers 555000 to 555099 just add a new record and in the number field enter:
Once done, you will have 100 new records created for that group in just one step.
Adding numbers to Campaigns
Once you have your groups populated, and some campaign already created, you must add numbers from any of your groups into one of your campaigns. Once they are added to the campaign, that campaign will have actual data to process and start working.
You can add numbers to campaigns from the right side of the page, as shown highlighted here:

In the above image we can see that we can add all numbers from group ‘Test’ into the ‘Pruebas’ campaign.
We can also specify what callerid to use (if the particular record has the callerid field empty, then it will be populated with the one entered during this process. In the other hand, if the individual record already has a callerid set, it will remain the same no matter what you enter in this field.
It is also possible to specify a priority, numbers with higher priority will be tried first.
Once you have selected the Call Group, the Campaign and fill the remaining fields if needed, click the ‘Proceed’ button to add all those numbers into the campaign. If its running and active, the dialer will start dialing all those numbers at that moment.
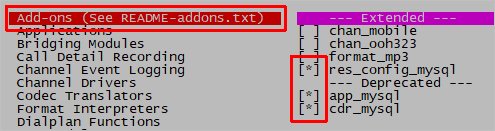
Установка FOP2 в Asterisk (FreePBX)
FOP2 — это панель управления операторами для IP-АТС Asterisk, работа с которой осуществляется посредством веб-доступа. FOP2 позволяет выполнять разнообразные действия над телефонными разговорами, как над своими, так и над чужими ( при наличии привелегий), что делает эту панель удобной для использования в колл-центрах супервайзерами и в компаниях секретарями. Далее мы рассмотрим пошаговый процесс по его установке на сервер Asterisk.
FOP2 — это платный продукт. В бесплатном режиме доступен только статус 15-и абонентов. Иначе — требуется лицензия.
Инструкция по установке FOP2.
- Скачать последнюю версию FOP2 панели для своей системы всегда можно с официального сайта http://fop2.com/download.php и купить лицензию (в демо режиме доступно 15 кнопок) http://fop2.com/buy.php
- Подключаемся консольно к своему серверу по протоколу SSH.
- Переходим во временную папку tmp
Скачиваем нужный архив (найдите самостоятельно последнюю версию)
tar zxvf fop2-2.28-centos-x86_64.tgz
cd fop2 make install (если не сработает, делаем просто make)
Если все удачно то видим Done!
Переходим в директорию веб сервера и переименовываем паку в fop2 в папку panel
cd /var/www/html mv fop2 panel
Генерируем диалплан фопа для asterisk
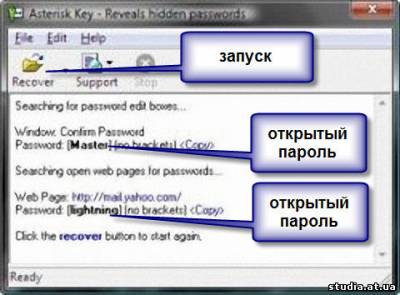
Теперь нам нужно узнать AMI пароль, что бы соединить fop2 панель с астериском, для этого выполняем команду и смотрим пароль в графе , строчка secret
В целях безопасности рекомендуем создать отдельного пользователя для fop2 с ограниченными правами и использовать эти данные в 11 пункте, например:
secret = сложный-пароль deny=0.0.0.0/0.0.0.0 permit=127.0.0.1/255.255.255.0 read = system,call,command,agent,user,originate write = system,call,command,agent,user,originate writetimeout = 500
После добавления нового пользователя в консоли Asterisk вводим команду:
Редактируем следующий файл /usr/local/fop2/fop2.cfg заменяем в строчке manager_secret=на наш пароль AMI который мы узнали в предыдущем пункте
manager_host=127.0.0.1 раскомментируем строчку web_dir и меняем fop2 на panel
Проверяем корректность наших настроек по установке fop2 следующей командой
Если все удачно то видим следующее, где говорится что у нас нет лицензии на панель и мы используем ее в демо режиме (ограничение на 15 кнопок) и самое главное, подключение к менеджеру ОК
Стартуем панельку и если все хорошо видим ОК
Если у Вас ранее был установлен модуль FOP2Admin во FreePBX, то Вам необходимо удалить его.
Для того чтобы сохранить конфигурацию, Вы должны удалить файл / var/www/html/admin/modules/fop2admin/uninstall.php, а затем перейти во FreePBX GUI -> Администратор -> Управление модулями и удалить оттуда FOP2Admin модуль.
Если вы используете FreePBX Distro, вы должны установить php multibyte string support с помощью команды: yum -y install php-mbstring
Далее необходимо переместить папку admin (скачанную с официального сайта fop2) в каталог /var/www/html/panel
Теперь нужно создать пользователя, переходим в http://your.server/panel/admin, указываем номер которому доступен вход в панель, задаем ему пароль, ограничения, сохраняем и применяем.
Пробуем зайти в панель, в браузере пишем http://your.server/panel появляется окно с логином и паролем, вводим
Попадаем в интерфейс fop2 панели и можем ею пользоваться
Если при входе в панель у вас не отображается toolbar то нужно проверить следующее:
- Проверить права пользователя в http://your.server/panel/admin и поставить для начала all.
- В системе должен быть заведен extension (внутренний номер) такой же какой вы используете для входа в панель.
- Если у вас demo версия, то система имеет ограничение на 15 кнопок, следовательно в FOP2Manager в разделе Buttons нужно отключить все лишние.
Если после проделанных операций у Вас некорректно отображается окно статистики системы FreePBX, то вводим следующую команду в консоли Linux: [root@myStation
]# Chown asterisk:asterisk /var/lib/php/sessions [root@myStation
источник
Темы блога
Microsoft Windows
(59)
Microsoft
(58)
Asterisk
(52)
Linux
(51)
Operating system
(47)
Operating Systems
(36)
Windows XP
(34)
Protocols
(28)
Windows
(28)
Business
(19)
(18)
Programming
(18)
FAQs Help and Tutorials
(17)
Windows 7
(17)
Windows Vista
(15)
Администратору на заметку
(14)
Windows Server 2008
(13)
Domain Name System
(12)
IP address
(11)
Open source
(11)
Clients
(10)
Security
(10)
DNS
(9)
Internet Protocol
(9)
Server
(9)
Windows 2000
(9)
Active Directory
(8)
Hardware
(8)
IPhone
(8)
Shareware
(8)
Skype
(8)
Windows Server
(8)
Windows Server 2003
(8)
DNS Providers
(7)
Virtual private network
(7)
Apple
(6)
Domain name
(6)
Dynamic DNS
(6)
Internet Explorer
(6)
Internet Protocol Suite
(6)
Hard disk drive
(5)
RAID
(5)
Web Tools
(5)
Windows NT
(5)
Windows Server 2008 R2
(5)
Cisco Systems
(4)
Computers and Internet
(4)
Dynamic Host Configuration Protocol
(4)
Firewall
(4)
Personal computer
(4)
Search Engines
(4)
Storage
(4)
Symantec
(4)
Yahoo
(4)
DVD
(3)
Local area network
(3)
NTFS
(3)
Opera
(3)
Remote Desktop
(3)
Remote Desktop Protocol
(3)
Router
(3)
Terminal Services
(3)
Wi-Fi
(3)
Window 7
(3)
YouTube
(3)
Сервер терминалов
(3)
Синий экран смерти
(3)
восстановление данных
(3)
BIOS
(2)
Blue Screen of Death
(2)
CD-ROM
(2)
Cisco
(2)
Data recovery
(2)
Disk Management
(2)
General Packet Radio Service
(2)
Internet
(2)
Mac OS
(2)
NTLDR
(2)
RSS
(2)
Remote Access
(2)
Service pack
(2)
Sony Ericsson
(2)
Terminal server
(2)
Transmission Protocols
(2)
Unix
(2)
Window XP
(2)
Windows Mobile
(2)
ntdetect.com
(2)
Почта
(2)
Серверное оборудование
(2)
Cisco IOS
(1)
Conficker
(1)
DirectX
(1)
IPSec
(1)
Java
(1)
Motherboard
(1)
Net-Worm
(1)
Printer
(1)
Telnet
(1)
VentaFax
(1)
Windows 98/ME/NT
(1)
Windows 9x
(1)
Windows Me
(1)
Windows Mobile 6
(1)
Windows XP Professional
(1)
Windows XP editions
(1)
Winsock
(1)
Wireless
(1)
dlink
(1)
ВОССТАНОВЛЕНИЕ ФАЙЛОВ
(1)
Горячие клавиши
(1)
Защита от вирусов
(1)
Интернет
(1)
ОГО
(1)
Сборками Windows
(1)
Серверные шкафы
(1)
Сетевые черви
(1)
Тонкий клиент
(1)
прокси proxy
(1)
Outbound Call Tracking and FreePBX
Asternic CCStats will report queue based activity. That means that only inbound calls that go into queues will be reported. However, there is a method to enable outbound call tracking by using a custom dialplan that intercepts outbound trunks calls under FreePBX and updates the queue_log file with their activity.
The included dialplan will only track calls for extensions that have an account code set inside FreePBX preferences.
The dialplan file is located in
You have to copy it over to your /etc/asterisk directory with the command:
Then you have to include that dialplan into Asterisk. For doing so, you will have to use your favorite text editor to modify the
file and add at the end of it:
Finally restart your asterisk dialplan:
Once that is done, the only thing left to do is edit an extension inside FreePBX, and set an account code for it. The account code you use will be used as a fake queue name in queue_log. You should use the same account code on the extensions you want to track outbound calling so their calls will be grouped under the same queue. We recommend to use a name like «Outbound» or similar.
To test, perform outbound calls with any of the extensions with an account code set, after a short while, you will see a new Queue appear as available in the Asternic Reports, that will include those calls. Refer to the Administrator Guide in order to see how to separate Distribution reports based in call flow/direction to separate reports for inbound and outbound calls further.
Performing Actions
Whole buttons can be clicked to select or deselect them. When selected, the border will turn blue. Once the button is selected it will become the target button for your action.
Every button in the toolbar requires a destination button to be selected. Clicking an action button with no extension selected won’t trigger any results. Some actions will work only on the active line for that extension. For example, if an extension has two calls, and one of them is held, if you click the record button it will start recording only the active line (not the held one). The same happens with the hangup or transfer buttons: if you have two calls on your phone and one is held, clicking the transfer button will redirect your active call, and not the held call.
To transfer a call, when talking to someone click on the target extension, it will be highlighted blue, and then click the transfer button in the toolbar.
To record a conversation to disk, click on the extension button you want to monitor and then click the record button in the toolbar.
Extension actions:
For parking slots, trunks and queue waiting calls you can pick the calls up. (needs the pickup permission)
For queue member icons you can choose to remove them or pause/unpause them (it requires the queuemanager permission)
For conferences you can perform global actions or individual actions, like mute/unmute, lock/unlock, kick, etc. (it requires the meetme permission)
Краткая справка
ООО «Рязань Ритейл Центр» зарегистрирована 26 февраля 2015 г. регистратором МЕЖРАЙОННАЯ ИНСПЕКЦИЯ ФЕДЕРАЛЬНОЙ НАЛОГОВОЙ СЛУЖБЫ №2 ПО РЯЗАНСКОЙ ОБЛАСТИ. Руководитель организации: ликвидатор Луговский Александр Ильич. Юридический адрес ООО «Рязань Ритейл Центр» — 390023, Рязанская область, город Рязань, Новая улица, дом 53 в.
Основным видом деятельности является «Торговля розничная играми и игрушками в специализированных магазинах», зарегистрировано 16 дополнительных видов деятельности. Организации ОБЩЕСТВО С ОГРАНИЧЕННОЙ ОТВЕТСТВЕННОСТЬЮ «РЯЗАНЬ РИТЕЙЛ ЦЕНТР» присвоены ИНН 1419555246, ОГРН 4232595281156, ОКПО 12499683.
Организация ОБЩЕСТВО С ОГРАНИЧЕННОЙ ОТВЕТСТВЕННОСТЬЮ «РЯЗАНЬ РИТЕЙЛ ЦЕНТР» ликвидирована 7 августа 2020 г. Причина: Исключение из ЕГРЮЛ юридического лица в связи наличием в ЕГРЮЛ сведений о нем, в отношении которых внесена запись о недостоверности.
Hello World with FOP¶
This section walks you through a «Hello World!» page with Apache FOP. We’re assuming you download the binary distribution and that you have a Java Runtime Environment (version 1.7 or later) installed.
-
Unpack the downloaded binary distribution to a directory of your choice (for example, if you’re on Windows). Let’s call that directory .
-
Get a command prompt in the directory and write:
Windows:
Unix:
-
If all went well, this should open a window showing you a «readme»-style document. This is just to verify that FOP runs correctly.
-
Now, take your favorite XML editor and create a small XML file like the following. Replace «Frank» with your own first name to make it a bit more personal and save it as :
<name>Frank</name>
-
To produce a PDF file from this XML file, we need an XSLT stylesheet that converts the XML to XSL-FO. This is the first step in the processing chain. The second step will be done by FOP when it reads the generated XSL-FO document and formats it to a PDF document. You can copy the following minimal XSLT stylesheet, which takes your first name and produces a «Hello World!»-style document (save it as ):
<?xml version="1.0" encoding="utf-8"?> <xsl:stylesheet version="1.0" xmlns:xsl="http://www.w3.org/1999/XSL/Transform" xmlns:fo="http://www.w3.org/1999/XSL/Format"> <xsl:output method="xml" indent="yes"/> <xsl:template match="/"> <fo:root> <fo:layout-master-set> <fo:simple-page-master master-name="A4-portrait" page-height="29.7cm" page-width="21.0cm" margin="2cm"> <fo:region-body/> </fo:simple-page-master> </fo:layout-master-set> <fo:page-sequence master-reference="A4-portrait"> <fo:flow flow-name="xsl-region-body"> <fo:block> Hello, <xsl:value-of select="name"/>! </fo:block> </fo:flow> </fo:page-sequence> </fo:root> </xsl:template> </xsl:stylesheet> -
Finally, let’s put the previous two steps together: Go back to the command prompt and enter the following command:
Windows:
Unix:
- You’ve produced your first PDF with Apache FOP! Please open in your favorite PDF viewer.
Getting the software
You can see available downloads in http://www.asternic.net/download.php. Asternic Call Center Stats PRO requires an activation code, you can purchase a license to get a perpetual activation code, or you can request a 30 days trial code for testing it out before buying.
You also have the choice of installing the open source Lite version of our software. It is important to note that it is not the same software as the PRO version. Database schemas differ and installation instructions are also different. There is another installation guide for the Lite version that you can find here.
So, log into your server and run this from your server command line:
Установка FreePBX
1.Необходимо установить mysql. Здесь нет ничего сложного, ставим из рэпов командой:
во время установки необходимо задать и запомнить root пароль для mysql, не путайте его с паролем root пользователя, это разные пароли.
2.После установки mysql, переходим к созданию баз данных asteriskcdrdb и asterisk:
для создания баз потребуется ввести пароль root пользователя mysql
3.Создаем таблицы в базах данных. Для этого в исходниках FreePBX есть необходимые скрипты, нам нужно лишь их запустить от имени root пользователя mysql:
4.Настраиваем права доступа. Создаем пользователя asteriskuser и даем ему права на созданные ранее базы данных:
Назначаем привилегии, создаем пользователя и задаем ему пароль:
Для выхода из консоли Mysql наберите:
Базу данных Mysql для работы с FreePBX мы подготовили, теперь можно запустить скрипт для установки файлов FreePBX.
Нужно запустить скрипт install_amp который скопирует все необходимые файлы. Все вопросы которые будут заданы при установке можно оставить по умолчанию, укажите только правильный пароль для пользователя asteriskuser, пароль который мы задали на этапе назначения привилегий на базы данных.
все зависит от того куда вы скопировали исходники FreePBX
После установки пробуем зайти на Web GUI Asterisk FreePBX:
Preferences
It is possible to configure individual settings once you are logged into the FOP2 Panel. You must open the Settings Window from the User icon in the top right of your panel display:
Once you select ‘Preferences’ you will be presented with the Preferences Window, as depicted below:

Sound Preferences
It is possible to turn different sounds on or off. Chat sounds are the ‘blip’ sounds that you get when you receive a new chat message, or when you send one. Queue sounds are alert sounds that play whenever a new call enters a queue. Ring Sound is the loud ring you hear when your extension receives a call.
Display Preferences
Among the display preferences you can select an individual Language from the user, that will override the global Language setting that can be set from the FOP2 Manager Settings tab. You can also change the queue display mode: the default view is expanded and will show all agents and waiting calls, while the Summary mode will show just the number of agents logged and waiting calls, with no details. Finally, the Dynamic Line display will hide the Line1/Line2 entries in every extension button, and will only show it if there is a call going on. This option saves screen real estate, but button also will have different heights, making the display ‘unorganized’.
Popup Preferences
FOP2 has the avility to launch a browser popup, and will also show call notifications when a new call arrives.
With Notify duration you can select the amount of time you want the call notifications to show on screen. If you set the value to zero it will disable call notifications.
The Automatic Popup option will make a new browser popup to be opened automatically, with the URL specified in the URL field. If you do not set Automatic Popup, you can still open the URL link if its defined from the Notification window.
Finally, in the URL you should specify the URL of the web page or application you want to popup. It is possible to use variables to pass to your URL so you can integrate FOP2 with your CRM software. Variables take the this form:
There are some fixed variables you can use directly: #{CLIDNUM} and #{CLIDNAME} for any notification event (on ring or on answer), and #{UNIQUEID} available only on answer notification events.
Frequently Asked Questions
What is the difference between Lite and Pro versions?
Asternic PRO imports data every time an event is fired/logged in the asterisk queue_log file (in realtime), while the LITE version uses a cron job to import new data at scheduled intervals. The PRO version includes several more reports, includes access control and levels, search, agent reports, custom formulas, etc. The Lite version is free, licensed under GPL3, and the PRO version is commercial software.
What benefits do I have on buying the PRO version?
State of the art reporting for your Asterisk Call Center! It also includes one year of software upgrades and priority support from the day you buy it.
Can I use the license in different servers?
The PRO license is to be used on one server only. You cannot use it on many different servers simultaneously. The Devel license allows you to install it up to 5 servers into the same organization.
How much does the PRO version cost?
It costs u$s500 per server. There is no per seat license. That means that you can have unlimited queues, agents and users.
Can I monitor outbound campaigns or calls?
Asterisk call queues are inherently inbound. However, depending on the dialer you use, or even by creative use of the Asterisk dialplan you can monitor outbound calls, even by placing dialer calls inside a queue to be delivered to available agents, or by modifying your outbound calls context to add fake events to the queue_log whenever an outbound call is placed.
By default, the realtime view shows agents that are engaged in dialout calls (calls outside a queue).
Can I monitor Ring Groups?
No. Asternic Call Center Stats reports on Queues activities by means of the asterisk queue_log file. Ring groups do not log activity in the queue_log file.
I use trixbox/elastix/freepbx and I see numbers instead of queue names?
FreePBX uses numbers for queue names internally, the reports display the real data. If you want to change that, the Pro version has dictionaries for queues or agent names.
I have a multi tenant environment, how does licensing work?
Asternic Call Center Stats PRO has a non nonsense license. You need only one license per server. That means that you can monitor multiple queues and agents, and have unlimited users accessing the reports.
My Call Center Stats PRO Demo is still running but I need to input the License Code, how to do it?
You only need to delete the actual software license file located at Call Center Stats PRO web directory in your server. In most cases (but not all cases) it is located here : /var/www/html/stats/asterniclic.php
Установка статистики Asternic Call Center Stats 2
Устанавливаем значение следующих переменных:
Копируем содержимое каталога html из исходников, в каталог /var/www/stats/
Устанавливаем права на каталоги:
Создаем файл для лицензионного ключа:
Далее нужно скопировать анализатор активности, который и будет собирать статисику:
Установка IonCube. IonCube одна из лучших систем по защите кода PHP проектов. Позволяет скрыть от посторонних глаз истинный PHP-код, создавая защищенные и полностью рабочие проекты.
Вставляем в /etc/php5/conf.d/20-ioncube.ini следующий код:
Перезагружаем apache и пробуем зайти на статистику, http://ip-address/stats, должна появиться страница ввода лицензии, значит все работает.
Description
Asternic CDR reports is a call detail records reporting solution for the open source Asterisk PBX. In order to use the software you must have a working
Asterisk PBX with CDR records stored in a MySQL database. Most popular distributions for Asterisk store CDR on a MySQL database by default.
Asterisk is a powerful and complex software. You won’t find instructions on setting up Asterisk itself here. If you are new to Asterisk and VoIP and want to get started, an easy and quick way is to install one Asterisk based Linux distribution like Elastix, PBXinaFlash, AsteriskNow, etc. Any of these distributions will install a complete Linux system with Asterisk and a web fronted for configuring it.
Once you have Asterisk working you can install Asternic CDR Reports to get the best of breed CDR reporting available for it. Don’t take our word for it. Download it and see it for yourself.
Answered Reports Description
Answered reports will show only calls that have been Answered: that means calls that entered the queue and were connected to an Agent/Representative. As this calls are connected to a specific Agent, then you will see a report for Answered by Agent. That is something you cannot have in unanswered calls, because an unanswered call cannot be blamed into a particular agent (as there might be more than one agent in a queue).
Service Level
This report shows the calls answered within different ringing times. Each new row will include the number of calls from the previous row, the difference from one row to the next is shown in the Delta column, while Count will show the sum of calls up to that point.

GROUP FIELD : Answered whitin XX seconds
Pressing on each value in the first column will expand the data (drill down) and show all the calls that conform that group.
Amount of calls expressed in units.
Porcentage that represent the Count field information.

Amounts of calls received and answered in that queue.
Representative percent over the 100% of total answered calls.

Amount of calls received for that agent.
Amount of calls answered for that agent.
Amount of calls transferred from that agent.
Representative percent of answered calls for that agent over the total answered.
Total time the agent has been talking.
Representative percent of talk time for that agent over the total talked time.
Average talk time per call for the agent.
Total amount of ringing time in this agent.
Total amount of time the callers waited for being answered by the agent.
Average time the callers waited to talk with the agent.
Maximum wait time a caller needed to wait for being answered by the agent.
Disconnection Cause

This column will show the latest event fired by the answered call. Most are Completed by Caller, Completed by Agent, Transfer. Pressing on the grouped field will show you calls details for it.
Amount of calls finished with the event.
Percent for the total answered calls.
Answered by Call Length

GROUP FIELD : Duration
How long was the call duration. Pressing on the data in the first column will show in detail the calls grouped in that row.
Total time the agent has been talking.
Total amount of time callers has been waiting to be answered.
The maximun time a caller waited to be answered.
Transfers

Agent that has been started the transfer process.
Amount of transfer made from the agent to the destination.
Answered Calls Detail

Description
FOP2 Dialer is, as the name implies, a dialer component for your Asterisk PBX, bundled as a FOP2 plugin for easy installation and administration via the FOP2 Manager.
The dialer is meant to be used on outbound dial campaigns. It is tightly integrated with IssabelPBX and similar configuration engines. The dialing modes available available are: automatic, preview and progressive.
For inbound campaigns you can use Asterisk queues directly.
For dynamic form or scripts, either for inbound or outbound campaigns, you might want to use the FOP2 Scripter plugin, that integrates tightly into the solution.
System Requirements
Asternic CDR Reports is a PHP application, encoded with Ioncube. There are certain requirements to be met in order to successfully run the software
Server Requirements
On the server side you need:
- A web server (Apache/Nginx)
- 32 or 64 bits Linux Operating System
- PHP 5.2 or above
- MySQL Server 5 or above
- Ioncube Loader
If you have PHP 5.1 it might work, but you will have to be sure some modules are installed, like php-pecl-zip
We recommend to use PHP 5.2 or higher if you can.
Client Requirements
You access rerpots using your web browser. For a full experience you have to use a modern one:
- Modern Web Browser (IE8 or above, Google Chrome, Safari, Firefox)
- Javascript enabled
In order to listen to recordings directly on the browser, you must have Adobe Flash Player installed and working in your browser. Without it you won’t be able to listen to call recordings, but you will be able to download them and listen directly in your Operating System.
Configuration
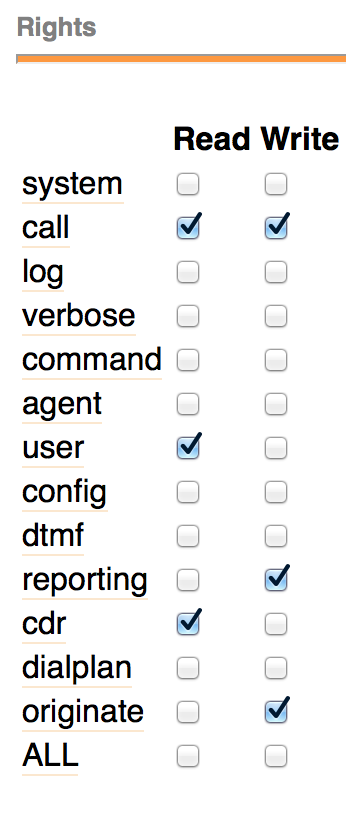
Manager Credentials
For the realtime page to work, you must supply valid Asterisk Manager Interface (AMI) credentials to Asternic config.php file. So, look at your /etc/asterisk/manager.conf file and search for a valid user and secret, it will look something similar to this:
In the above case, the user is ‘admin’ and the secret is ‘amp111’. Use those values into Asternic’s file:
Without those credentials being set, the realtime view won’t display any agents or queue activity. But reports will run normally.
Asterisk queue_log file
Asternic reads and parses queue log activity data that is registered in the queue_log file by Asterisk. In most setups and Asterisk distros, that log file is enabled by default.
However, there are some distros, like MiRTA or SNEP, that might have that log to file disabled as they use another way to store data in real time using a database.
In those cases, you will have to edit the Asterisk logger configuration to enable it. Look at the file and under the section be sure to have both of these lines:
XSL-FO Core Function Library Support Table (§5.10)¶
The following is a summary of FOP’s current support for the XSL-FO Core Function Library.
| Citation | Function Name | XSL-FO Conformance Level | FOP 1.0 | FOP 1.1 | FOP 2.0 | FOP 2.3 | FOP 2.4 | FOP dev |
|---|---|---|---|---|---|---|---|---|
| Number Functions | ||||||||
| floor | Basic | yes | yes | yes | yes | yes | yes | |
| ceiling | Basic | yes | yes | yes | yes | yes | yes | |
| round | Basic | yes | yes | yes | yes | yes | yes | |
| min | Basic | yes | yes | yes | yes | yes | yes | |
| max | Basic | yes | yes | yes | yes | yes | yes | |
| abs | Basic | yes | yes | yes | yes | yes | yes | |
| Color Functions | ||||||||
| rgb | Basic | yes | yes | yes | yes | yes | yes | |
| rgb-icc | Basic | yes | yes | yes | yes | yes | yes | |
| system-color | Basic | yes | yes | yes | yes | yes | yes | |
| Font Functions | ||||||||
| system-font | Basic | no | no | no | no | no | no | |
| Property Value Functions | ||||||||
| inherited-property-value | Basic | yes | yes | yes | yes | yes | yes | |
| label-end | Basic | yes | yes | yes | yes | yes | yes | |
| body-start | Basic | yes | yes | yes | yes | yes | yes | |
| from-parent | Basic | yes | yes | yes | yes | yes | yes | |
| from-nearest-specified-value | Basic | yes | yes | yes | yes | yes | yes | |
| from-page-master-region | Basic | no | no | no | no | no | no | |
| from-table-column | Basic | yes | yes | yes | yes | yes | yes | |
| proportional-column-width | Basic | yes | yes | yes | yes | yes | yes | |
| merge-property-values | Basic | no | no | no | no | no | no |
Recordings and FreePBX
In order to have recordings available in Asternic reports, we provide a custom script that will run as soon as a queue recording is finished. The script will udpate the Asternic recordings table and will also move the recording to a new directory with optional convertion to MP3.
The script is located in /usr/local/parselog/update_mix_mixmonitor.pl
FreePBX 2.11 or higher
FreePBX must be instructed to run the post recording script.
You will need to open SETTINGS — Advanced Settings and under the
option DEVELOPER AND CUSTOMIZATION you need to set the field
POST CALL RECORDING SCRIPT to:
Older FreePBX versions
For older FreePBX versions, you must patch it. There are different patches depending on your FreePBX version:
- For version 2.8 or older:
- For version 2.9:
- For version 2.10:
You will need to apply that patch to FreePBX in order to have the queue recordings integrated in the reports. You can do so with the following commands (change the path to the directory where you extracted the tarball):
For version 2.8:
For version 2.9:
For version 2.10:
After the patch is applied, you must go to the FreePBX GUI and Apply Changes. That will modify the appropiate parts of the dialplan so the post call recording script is executed after a queue call recording finishes. To verify if the patch applied correctly, after applying changes in FreePBX you can run this command:
It should show some matches. If it returns empty, then the patch was not set correctly.
Configuring the post recording script
If you installed the software using make install then you do not need to modify anything in it. You can skip this step.
If you installed copying files by hand, be sure that the script has execute permissions (mode 755). If in doubt, change it with the command:
Also you have to be sure that the MySQL credentials inside the script are set correctly and match your configuration. Again, this is done automatically in a default install, only modify in case of a manual install/config.
As you can see, not only you can set the MySQL credentials, but also you have the option to enable MP3 convertion. By default it is disabled, you can set convertmp3 to true to convert recordings to mp3 format. For that to work be sure that lame is installed. Also be sure that in your queue configuration the recording format is set to wav (not WAV, nor wav49 nor gsm), as the lame convertion tools only handles the wav format correctly.
Main Panel View
After successful login, you will be presented with the panel window

There is a toolbar that is always visible at the top, and four sections in the content area: one for each kind of button.
The button corresponding to your extension (the one you used to login), is always at the top left of the Extension section, with the label in bold.
Each section has a title bar with a minus/plus sign icon at the right. Clicking on the button will collapse or expand the section from view. The collapse state is remembered across sessions. Suppose that you are not interested in trunks, you can collapse the section and it will remain minimized until you click the plus sign again.
It is also possible to move panels up or down by dragging the sections with your mouse. The layout is also persistent and individual to each user.
Установка и настройка FOP2 в Asterisk
Панель оператора и супервизора в Asterisk
Поговорим про популярную утилиту IP – АТС Asterisk FOP2 (Flash Operator Panel 2) . Данная панель позволяет видеть и понимать детальную real-time (реального времени) статистику вашей АТС, например, кто с кем разговаривает, продолжительность вызовов, количество вызовов в очереди или на удержании и так далее. Помимо этого, FOP2 предлагает полноценный телефон в браузере, с помощью которого можно осуществлять вызов и прием звонков, трансфер, перевод на мобильный и запись разговора, а для супервизора доступны опции прослушивания (шпионский канал) разговоров операторов в реальном времени и просмотр статистики по звонкам.
В бесплатной версии приложения вы можете работать максимум с пятнадцатью сущностями (экстеншены, конференц — румы, транки и так далее). В терминологии продукта их называют «кнопками. »Интересный функционал, не правда ли? В статье расскажем про установку и первичную настройку продукта.
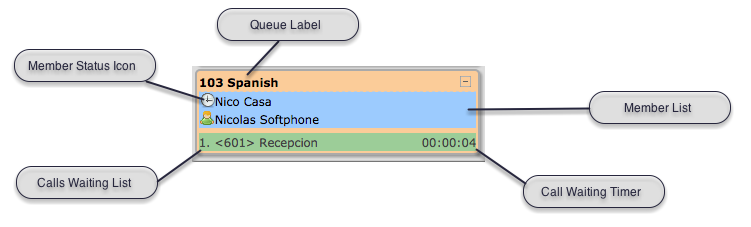
Queue Buttons
Queue buttons have some particularities. Besides the queue name, they will show the list of members or agents for that queue, with a little icon representing the member state, and also the list of calls waiting on the queue with their call counter and timer, as depicted below:
They also can be used to filter out extension buttons. When a queue button is selected, only the extensions that are part of the queue will be displayed. This is particularly useful for call center managers, as you can focus on a particular queue activity, removing the ‘noise’ from other queues/extensions.
The state icon for the queue members might be:
= ready
= busy
= unavailable / invalid
= paused.
FOP2 will also monitor agent or device names, and rename extension buttons accordingly.
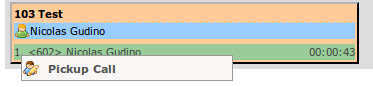
Picking up queued calls
From FOP version 2.10 you can click on a call waiting on the queue to display the pickup submenu. If your extension is allowed to pickup calls you can click on the action and the waiting call will be redirected directly to your extension: