Установка squid в ubuntu
Содержание:
- Шаг 4 — Проверка функционала PHP
- Export Proxy Server Settings
- Step 3: How to Configure Squid Proxy Server
- Управление squid
- 1: Включение модулей Apache
- Step 4: Using Squid as an HTTP Proxy
- Быстрая установка прокси-сервера 3proxy в Ubuntu и Debian
- 5.7. Command Line Options
- Set up proxy server using http_proxy environment variable
- Экспорт Настроек Прокси Сервера
- Step 2 — Creating Backend Test Servers
- The Almost-Easy Proxy For Ubuntu
- The Easy Proxy For Ubuntu
- Шаг 2 – Создание внутренних тестовых серверов
- Test The Proxy Server From The Linux Command-Line
- Step 1: Preparing your Ubuntu Server
- Настройка telegraf и отправка данных в InfluxDB
- Заключение
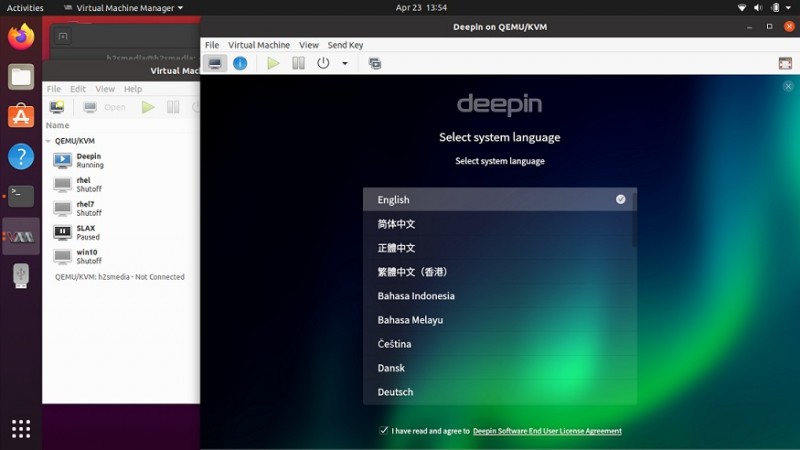
Шаг 4 — Проверка функционала PHP
Чтобы убедиться, что PHP работает, мы создадим файл и получим к нему доступ к через браузер.
Создайте файл , содержащий вызов функции :
Чтобы просмотреть файл в браузере, откройте адрес . На странице появится перечень параметров конфигурации, используемых PHP. Результат будет выглядеть примерно так:


Убедитесь, что в Server API вверху страницы указано значение FPM/FastCGI. Раздел «Переменные PHP» в нижней трети страницы покажет, что параметр SERVER_SOFTWARE имеет значение Apache на Ubuntu. Это подтверждает, что модуль активен, и что Apache использует PHP-FPM для обработки файлов PHP.
Export Proxy Server Settings
Set these variables to configure Linux proxy server settings for the command-line tools:
$ export http_proxy="http://PROXY_SERVER:PORT"
$ export https_proxy="https://PROXY_SERVER:PORT"
$ export ftp_proxy="http://PROXY_SERVER:PORT"
If a proxy server requires authentication, set the proxy variables as follows:
$ export http_proxy="http://USER:PASSWORD@PROXY_SERVER:PORT"
$ export https_proxy="https://USER:PASSWORD@PROXY_SERVER:PORT"
$ export ftp_proxy="http://USER:PASSWORD@PROXY_SERVER:PORT"
Special Characters: If your password contains special characters, you must replace them with ASCII codes, for example the at sign must be replaced by the code, e.g. = .
Step 3: How to Configure Squid Proxy Server
The default configuration file for squid is located under ‘/etc/squid/squid.conf‘ which contains some configuration directives that needs to be configured to affect the behavior of the Squid. To edit the configuration file, first take the backup of the original file so that we can revert any changes that goes wrong.
# cp /etc/squid/squid.conf /etc/squid/squid.conf.org
Squid listens on port 3128 by default and if you would like to change the default listening port you can do by to editing the ‘http_port’ directive in the configuration file.
# vim /etc/squid/squid.conf
http_port 3128
Next to allow access to the HTTP proxy server from all IP addresses, you need to edit the ‘http_access’ directive as by default, the HTTP proxy server will not allow access to anybody.
http_access allow all
Saveand close the configuration file and make sure to restart squid server service to impact the changes.
Управление squid
Демон управляется init-скриптом /etc/init.d/squid3. Прокси-сервер представляет собой процесс /usr/sbin/squid3. Демон поддерживает множество параметров, с которыми можно ознакомиться в man squid, но в таких дистрибутивах, как Debian и RH для управления демоном вполне достаточно init-скрипта.
Проверить работоспособность сервера squid можно следующим образом:
gw ~ # # проверка работоспособности squid на сетевом интерфейсе
gw ~ # netstat -npl | grep 3128
tcp        0      0 0.0.0.0:3128            0.0.0.0:*               LISTEN      25816/(squid)
gw ~ # # проверка, запущен ли процесс демона
gw ~ # ps aux | grep squ
root     25814  0.0  0.0   9316  1644 ?        Ss   Feb15   0:00 /usr/sbin/squid3 -YC -f /etc/squid3/squid.conf
proxy    25816  0.0  0.4  37308 13184 ?        S    Feb15   2:29 (squid) -YC -f /etc/squid3/squid.conf
root     28451  0.0  0.0   3328   784 pts/0    S+   00:20   0:00 grep --colour=auto squ
Как видно, при запуске данный демон стартует с параметрами -YC -f /etc/squid3/squid.conf. Параметр -f задает конфигурационный файл, который используется для работы демона. Параметры -Y и -С мне не совсем ясны. -Y вроде как ускоряет каким-то образом запуск в случае падения, а -С позволяет корректно завершать демона.
Программа squid3 с ключом -k и дополнительным параметром позволяет удобно управлять демоном, не прерывая пользователей. Примеры:
- -k — послать команду работающему серверу:
- reconfigure — посылка сигнала HUP — перечитать и использовать файл конфигурации
- rotate — обрезать логи; сигнал USR1
- shutdown — корректно остановить squid; сигнал TERM
- interrupt — убить squid; сигнал INT
- kill — жестко убить squid; сигнал KILL
- debug — начать/закончить полную трассировку; сигнал USR2
- check — проверить корректность работы squid (без сообщений — работает корректно); сигнал ZERO
- parse — проверить синтаксис squid.conf
Собственно, изменив squid.conf, выполнив squid3 -k parse, можно убедиться в корректности внесенных изменений, далее выполнив squi3 -k reconfigure можно практически не обрывая пользователей применить изменения. Очистку кэша (пересоздание) можно выполнить командой squid3 -z.
Будет неправильно, если я не обращу внимание на следующий момент. При установке squid из репозиториев Вашего дистрибутива, пакет является уже настроенным и имеет какие-то заданные настройки по умолчанию
Например, расположение каталога журнала, каталога конфигурационных файлов, поддерживаемые методы проверки подлинности и множество других. Какие настройки задавать при сборке бинарного пакета определяется сборщиком пакета и сообществом, которое осуществляет поддержку дистрибутива. Если параметры по умолчанию Вас не устраивают, то необходимо будет .
Параметры, с которыми был собран squid Вашего дистрибутива можно посмотреть командой squid3 -v. Например, в Debian squeezу squid собран с параметрами, приведенными ниже:
--prefix=/usr - префикс для других ключей:
--mandir=${prefix}/share/man - каталог хранения man-страниц
--libexecdir=${prefix}/lib/squid3 - каталог с исполняемыми модулями (в том числе и хелперы)
--sysconfdir=/etc/squid3 - каталог хранения конфигурации
--with-logdir=/var/log/squid3 - каталог хранения журналов
и мн. др...
1: Включение модулей Apache
В комплекте с Apache поставляется множество модулей, но не все они включены по умолчанию. Сначала нужно включить модули, которые понадобятся нам в работе: это mod_proxy и ещё несколько дополнительных модулей, которые расширяют функции Apache.
Для работы нужны модули:
- mod_proxy: основной модуль проксирования Apache, который управляет соединениями и перенаправляет их.
- mod_proxy_http: включает поддержку проксирования HTTP.
- mod_proxy_balancer и mod_lbmethod_byrequests: добавляют балансировку нагрузки.
Чтобы включить их, выполните следующие команды:
Чтобы обновить настройки, перезапустите Apache.
Теперь Apache готов к настройке проксирования запросов HTTP. Следующий (опциональный) раздел поможет создать два простых сервера бэкэнда, с помощью которых можно проверить работу обратного прокси-сервера. Если у вас есть сервер на бэкэнде, можете перейти к разделу 3.
Step 4: Using Squid as an HTTP Proxy
To use Squid as an HTTP proxy, let’s configure it to use only the client IP address for authentication and restrict all other access.
Open the configuration file using any of your favourite editor to add a new ACL in it.
# vim /etc/squid/squid.conf
acl k_vm src 111.11.11.11# Your Servers IP
 http_access allow k_vm
Here k_vm is a name identifying the connection to our VM and ‘111.11.11.11’is our local IP address, so you can replace this with your own IP and Hostname.
Save and close the using using ‘:wq!’ and restart squid service by issuing below command.
# systemctl restart squid
Next, we are going test our proxy server functionality if its working fine or not. To do so open your favourite web browser, like if you are using firefox then go the Options > Advanced > Network > Connection Settings and select Manual Proxy Configurations provided by the IP address of your squid server and its port as shown.

That’s it, now click on ‘OK’ key to continue working under the limits of your squid proxy server and like the same way you can do the same settings for any other web browser.
Now you may check the logs files if you faced any errors or if you want to know which websites are being visited by people using Squid proxy settings using squid logs files located in ‘/var/log/squid/’ directory.
# more /var/log/squid/access.log
# more /var/log/squid/cache.log
You can also change the default location of your logs files by making changes in the Squid configuration file.
Быстрая установка прокси-сервера 3proxy в Ubuntu и Debian
Прокси-сервер 3proxy является одним из самых настраиваемых прокси серверов. Кроссплатформенность 3proxy делает его популярным не только на серверах Linux, но и на серверах Windows Server.
3proxy поддерживает такие протоколы как: SOCKS5 (4), HTTP прокси с поддержкой HTTPS и FTP, AIM/ICQ, прокси сервера на MSN messenger / Live messenger, FTP, кэширующий DNS прокси, TCP и UDP портмапперы (tcppm, udppm).
Кроме того, поддерживает комбинированный прокси сервер, который позволяет настроить управление доступом, шириной канала, ограничением объема трафика, перенаправлением и т.д.
Автоматическая установка прокси-сервера 3proxy с помощью скрипта в Ubuntu и Debian
Редактируем файл авторизации. Меняем имя пользователя и пароль:
Сохраняем изменения и закрываем редактор: CTRL+O, CTRL+X.
Ознакомимся и если надо, то отредактируем файл конфигурации прокси-сервера:
По умолчанию для протокола socks (5) используется порт 9999, а для http протокола прокси-сервера порт 2525.
За тип авторизации отвечает строка с названием auth strong cache.
Работают следующие типы авторизации:
- auth strong cache – по имени пользователя и паролю
- auth iponly — авторизация по IP-адресу.
Где 192.168.0.1 IP-адрес пользователя.
auth none – отсутствие авторизации
Можно добавить еще одну строку:
maxconn 32 – максимально разрешённое число одновременных подключений.
Как фильтровать только определенные адреса в 3proxy
Можно разрешить фильтрацию только для определённых адресов, а все остальные заблокировать.
Подобные правила работают только при наличии авторизации, без авторизации будет разрешена фильтрация всего трафика.
Правила по доменам корректно работают на http протоколе прокси-сервера.
источник
5.7. Command Line Options
Privoxy may be invoked with the following command-line options:
-
—config-test
Exit after loading the configuration files before binding to the listen address. The exit code signals
whether or not the configuration files have been successfully loaded.If the exit code is 1, at least one of the configuration files is invalid, if it is 0, all the
configuration files have been successfully loaded (but may still contain errors that can currently only be
detected at run time).This option doesn’t affect the log setting, combination with —no-daemon is recommended if a configured log file shouldn’t be used.
-
—version
Print version info and exit. Unix only.
-
—help
Print short usage info and exit. Unix only.
-
—no-daemon
Don’t become a daemon, i.e. don’t fork and become process group leader, and don’t detach from controlling
tty. Unix only. -
—pidfile FILE
On startup, write the process ID to FILE. Delete the
FILE on exit. Failure to create or delete the
FILE is non-fatal. If no FILE option is given, no PID file will be used. Unix only. -
—user USER
After (optionally) writing the PID file, assume the user ID of USER, and if included the GID of GROUP. Exit if the privileges are not sufficient to do
so. Unix only. -
—chroot
Before changing to the user ID given in the —user
option, chroot to that user’s home directory, i.e. make the kernel pretend to the Privoxy process that the directory tree starts there. If set up carefully, this can
limit the impact of possible vulnerabilities in Privoxy to the files
contained in that hierarchy. Unix only. -
—pre-chroot-nslookup hostname
Specifies a hostname (for example www.privoxy.org) to look up before doing a chroot. On some systems,
initializing the resolver library involves reading config files from /etc and/or loading additional shared
libraries from /lib. On these systems, doing a hostname lookup before the chroot reduces the number of files
that must be copied into the chroot tree.For fastest startup speed, a good value is a hostname that is not in /etc/hosts but that your local name
server (listed in /etc/resolv.conf) can resolve without recursion (that is, without having to ask any other
name servers). The hostname need not exist, but if it doesn’t, an error message (which can be ignored) will
be output. -
configfile
If no configfile is included on the command line,
Privoxy will look for a file named «config» in
the current directory (except on Win32 where it will look for «config.txt»
instead). Specify full path to avoid confusion. If no config file is found, Privoxy will fail to start.
On MS Windows only there are two additional command-line options to allow
Privoxy to install and run as a service. See the for details.
Set up proxy server using http_proxy environment variable
The and environment variable is used to specify proxy settings to client programs such as and .
Set up proxy without username and password
Execute the below command with valid and on the terminal. This will enable proxy configuration for the current session but these values will not be persistent across reboot.
# export http_proxy=http://SERVER:PORT/
Set up proxy with username and password
You can modify the earlier command to add the username and password value assuming a valid authentication is required to enable the proxy server configuration. But again this command will also enable proxy server for the current session only and will not be persistent across reboots.
# export http_proxy=http://USERNAME:PASSWORD@SERVER:PORT/
Set up proxy with domain, username and password
Assuming you are also required to add domain detail while setting up proxy configuration on your system then use the below command
# export http_proxy=http://DOMAIN\\USERNAME:PASSWORD@SERVER:PORT/
Экспорт Настроек Прокси Сервера
Задайте эти переменные, чтобы настроить прокси сервер для утилит командной строки в Linux:
$ export http_proxy="http://ПРОКСИ_СЕРВЕР:ПОРТ"
$ export https_proxy="https://ПРОКСИ_СЕРВЕР:ПОРТ"
$ export ftp_proxy="http://ПРОКСИ_СЕРВЕР:ПОРТ"
Если прокси сервер требует логин и пароль, задайте переменные следующим образом:
$ export http_proxy="http://ЛОГИН:ПАРОЛЬ@ПРОКСИ_СЕРВЕР:ПОРТ"
$ export https_proxy="https://ЛОГИН:ПАРОЛЬ@ПРОКСИ_СЕРВЕР:ПОРТ"
$ export ftp_proxy="http://ЛОГИН:ПАРОЛЬ@ПРОКСИ_СЕРВЕР:ПОРТ"
Спецсимволы: Если ваш пароль содержит спецсимволы, вы должны заменить их на соответствующие ASCII коды, например символ собачки должен быть заменен на . Пример: = .
Step 2 — Creating Backend Test Servers
Running some simple backend servers is an easy way to test if your Apache configuration is working properly. Here, we’ll make two test servers which respond to HTTP requests with printing a line of text. One server will say Hello world! and the other will say Howdy world!.
Note: In non-test setups, backend servers usually all return the same kind of content. However, for this test in particular, having the two servers return different messages makes it easy to check that the load balancing mechanism uses both.
Flask is a Python microframework for building web applications. We’re using Flask to create the test servers because a basic app requires just a few lines of code. You don’t need to know Python to set these up, but if you’d like to learn, you can look at these Python tutorials.
Update the packages list first.
Then install Pip, the recommended Python package manager.
Use Pip to install Flask.
Now that all the required components are installed, start by creating a new file that will contain the code for the first backend server in the home directory of the current user.
Copy the following code into the file, then save and close it.
~/backend1.py
The first two lines initialize the Flask framework. There is one function, , which returns a line of text (). The line above the function definition tells Flask to use ’s return value as a response to HTTP requests directed at the root URL of the application.
The second backend server is exactly the same as the first, aside from returning to a different line of text, so start by duplicating the first file.
Open the newly copied file.
Change the message to be returned from Hello world! to Howdy world!, then save and close the file.
~/backend2.py
Use the following command to start the first background server on port . This also redirects Flask’s output to because it would cloud the console output further on.
Here, we are preceding the command by setting environment variable in the same line. Environment variables are a convenient way to pass information into processes that are spawned from the shell. You can learn more about environment variables in How To Read and Set Environmental and Shell Variables on a Linux VPS.
In this case, using an environment variable makes sure the setting applies only to the command being run and will not stay available afterwards, as we will be passing another filename the same way to tell command to start the second server
Similarly, use this command to start the second server on port . Note the different value for the environment variable.
You can test that the two servers are running using . Test the first server:
This will output Hello world! in the terminal. Test the second server:
This will output Howdy world! instead.
Note: To close both test servers after you no longer need them, like when you finish this tutorial, you can simply execute .
In the next step, we’ll modify Apache’s configuration file to enable its use as a reverse proxy.
The Almost-Easy Proxy For Ubuntu
The second way you can do this is to use a web proxy. As long as your Ubuntu system is set up to serve websites, you can install a web app named GlypeProxy which will act as a proxy for your web browsing session. Simon has a great how-to on setting up GlypeProxy and it would work the same way if you were running a web server on your own Ubuntu system.
Using this method has its pluses and minuses. On the upside, you do not need to modify your own browser settings to use this web proxy. This would be essential if you are in an environment where you do not have the ability to specify a proxy server in your browser options.
On the downside, unless your web server is set up to use SSL encryption, it is also very insecure. Anyone watching the traffic from your machine would still be able to view your content with no problem at all.
The Easy Proxy For Ubuntu
The ‘easiest’ way to create a proxy with Ubuntu is creating a tunnel through SSH. Jorge wrote this excellent how-to on the topic, and the process remains much the same for us.
For a quick overview, you first must have an Ubuntu server with SSH access available to you. You can do this by having a server on your home connection, work connection, or wherever you want your proxy to sit.
Once you have that set up, you follow the process in the article to use the «SOCKS» protocol to tell your browser to use that proxy location to download all information from.
This method also works if you have a wireless router that supports SSH, such as Tomato or DD-WRT.
Шаг 2 – Создание внутренних тестовых серверов
Запуск некоторых простых внутренних серверов является простой способ проверить, что ваша конфигурация Apache работает должным образом. Здесь мы сделаем два тестовых сервера, которые отвечают HTTP – запросам с печатью строки текста. Один сервер скажет ‘Привет , мир! а другой скажет ‘AndreyEx мир! ,
Flask является microframework Python для создания веб – приложений. Мы используем Flask для создания тестовых серверов, так как основное приложение требует всего несколько строк кода. Вам не нужно знать Python, чтобы настроить их.
Обновление списка пакетов в первую очередь.
Затем установите pip, рекомендуемый менеджер пакетов Python.
Используйте pip чтобы установить Flask.
Теперь, когда все необходимые компоненты установлены, начните с создания нового файла, который будет содержать код для первого сервера бэкэнда в домашнем каталоге текущего пользователя.
Скопируйте следующий код в файл, а затем сохраните и закройте его.
Первые две строки инициализации фреймворка Flask. Существует одна функция, home() , которая возвращает строку текста ( Hello world! ). @app.route(‘/’) над home() функции говорит Flask использовать home() ‘s возвращаемое значение в качестве ответа на HTTP – запросы, направленных на / корневой URL приложения.
Второй сервер Бэкэнд точно так же, как и первый, кроме возвращения другой строчки текста, поэтому начните путем дублирования первого файла.
Откройте вновь скопированный файл.
Измените сообщение , которое будет возвращено из Привет , мир! в AndreyEx мир! А затем сохраните и закройте файл.
Используйте следующую команду, чтобы запустить первый фоновый сервер на порту 8080 . Это также перенаправляет вывод Flask к /dev/null .
Здесь мы предшествовали команде flask , установив переменную окружения FLASK_APP в той же строке. Переменные окружения представляют собой удобный способ передачи информации в процессах , которые порождаются из оболочки.
В этом случае, используя переменная окружения гарантирует, что параметр применим только к запущенной команде и не будет оставаться доступен после этого, как мы будет проходить другое имя файла точно так же набрать команду flask , чтобы запустить второй сервер
Аналогичным образом, используйте эту команду, чтобы запустить второй сервер на порту 8081
Обратите внимание на другое значение для переменной окружения FLASK_APP
Вы можете проверить, что оба сервера работают с использованием curl . Тестирование первого сервера:
Это выведет Привет , мир! в терминале. Проверка второго сервера:
Это выведет AndreyEx мир!
На следующем шаге мы будем изменять конфигурационный файл Apache, чтобы включить его использование в качестве обратного прокси-сервера на Debian 8.
Test The Proxy Server From The Linux Command-Line
First off all it is required to check that the proxy server settings are set in the corresponding proxy variables.
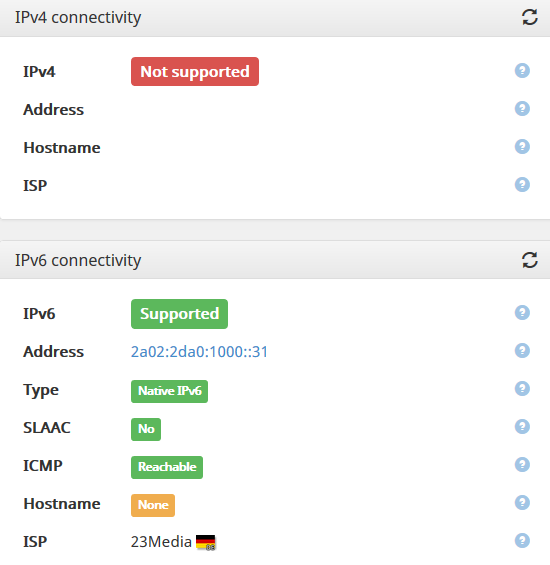
Than it is required to ensure that your public IP address has changed.
Also it would be interesting to measure and compare response time of the remote resources and the Internet speed with and without proxy.
Check the current proxy server settings:
$ env | grep -i proxy
Check your public IP address from the Linux command-line:
$ wget -q -O - checkip.dyndns.org \
| sed -e 's/.*Current IP Address: //' -e 's/<.*$//'
Compare the difference in the response time with the configured proxy and without it:
$ time wget -q -O - checkip.dyndns.org \
| sed -e 's/.*Current IP Address: //' -e 's/<.*$//'
Check the Internet download speed through the proxy:
$ wget --output-document=\
/dev/null http://speedtest.wdc01.softlayer.com/downloads/test500.zip
Step 1: Preparing your Ubuntu Server
In order to setup your own Squid proxy server on Ubuntu 16.04. You need to login on your system with sudo or root user credentials. To do so connect to your Ubuntu serer using Putty or with ssh.
ssh _server_ip
The next you need to set up an alternative user account with a reduced scope of influence for day-to-day work.
# adduser kash
You will be asked few questions, starting with the account password and fill in any of the additional information if you would like as its optional.
Next allow this user to root user privileges adding it to sudoers group.
# usermod -aG sudo kash
Now you can run commands with superuser privileges with sudo commands.
Once you have created your general user with sudo privileges, then update your system software for missing security patches and latest version updates available by using below command.
# sudo apt-get update && sudo apt-get -y upgrade
Once the your system is back with all updates and security patches, then move to the next step.
Настройка telegraf и отправка данных в InfluxDB
Независимо от операционной системы, создание конфига происходит в командной строке. Рассмотрим процедуры генерирования конфигурационного файла, настройки сервера баз данных и запуска агента по сбору метрик.
Создание конфигурационного файла для telegtaf
В командной строке переходим в каталог с конфигом телеграфа.
а) в Linux:
cd /etc/telegraf
б) в Windows:
cd «c:\Program Files\Telegraf»
* если мы установили агент в другой каталог, переходим в него.
Затем генерируем конфигурационный файл. Синтаксис для команды следующий:
telegraf -sample-config —input-filter <плагины сбора метрик через «:»> —output-filter <плагины передачи данных с метрик через «:»> > <имя конфигурационного файла>
* на странице https://docs.influxdata.com/telegraf/latest/plugins/plugin-list/ можно найти список всех доступных плагинов.
Если мы введем команду:
telegraf -sample-config > telegraf.conf
… то мы получим конфигурационный файл telegraf.conf со всеми возможными плагинами.
Лучше создавать конфигурационный файл с нужными нам плагинами. Например, создадим конфиг для получения метрик дисковой системы с помещением данных в InfluxDB:
telegraf -sample-config —input-filter disk:diskio:hddtemp —output-filter influxdb > telegraf.conf
* перечень плагинов для получения метрик идет после ключа —input-filter; после —output-filter мы перечисляем системы, для отправки в которые будут подготовлены данные — в нашем случае это influxdb. Также это могут быть Elasticsearch, Graphite, OpenTSDB, Prometheus и другие.
Проверить полученный конфигурационный файл можно командой:
telegraf —test
* если путь до конфигурационного файла отличается от стандартного, его можно указать с помощью ключа —config.
Если в настройках telegraf будут ошибки, мы увидим:
Error running agent:
Настройка адреса базы
Как правило, сервер баз данных находится на одном сервере, но по умолчанию, в telegtaf создается конфигурационный файл для отправки метрик на локальный сервер баз данных. Чтобы изменить настройку, открываем созданный нами ранее конфиг.
а) в Linux с помощью текстового редактора, например:
vi /etc/telegraf/telegraf.conf
б) в Windows также текстовым редактором, например, обычным блокнотом или Notepad++.
Находим строку в разделе OUTPUT PLUGINS:
# urls = [«http://127.0.0.1:8086»]
Снимаем комментарий и меняем адрес сервера, например:
urls = [«http://192.168.1.16:8086»]
* где 192.168.1.16 — IP-адрес нашего сервера баз данных.
Если наш сервер баз данных требует аутентификации, добавим 2 строки:
username = «username»
password = «userpass»
* где username и password — соответственно, логин и парлоль для подключения к базе.
Разрешаем автозапуск telegraf:
systemctl enable telegraf
Перезапускаем сервис:
systemctl restart telegraf
В Windows
Открываем службы Windows. Находим службу Telegraf Data Collector Service — открываем ее. Проверяем, чтобы тип запуска был автоматический и кликаем по Запустить:
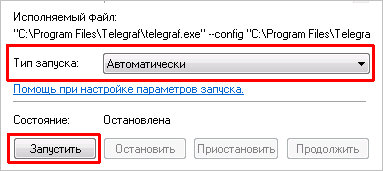
Также запустить службу можно из командной строки:
net start telegraf
Заключение
Теперь вы умеете настраивать Apache как обратный прокси-сервер для одного или нескольких серверов бэкэнда. Модуль mod_proxy позволяет настроить обратный прокси-сервер для серверов приложений, написанных на разных языках программирования (Python и Django, Ruby и Ruby on Rails и т.д.). Также с его помощью можно настроить балансировку нагрузки между серверами и обеспечить SSL-шифрование для тех серверов, которые не поддерживают его по умолчанию.
Модули mod_proxy и mod_proxy_http часто используются в связке, но существует ещё несколько полезных модулей, которые поддерживают разные сетевые протоколы и которые можно добавить:
- mod_proxy_ftp для FTP.
- mod_proxy_connect для SSL-туннелирования.
- mod_proxy_ajp для поддержки AJP (Apache JServ Protocol, используется в приложениях на основе Tomcat).
- mod_proxy_wstunnel для поддержки веб-сокетов.
ApacheApache 2mod_proxySSLUbuntu 16.04