Windows subsystem for linux documentation
Содержание:
- Обычная установка Linux рядом с Windows 10
- 我要如何備份 WSL 發行版本,或將其從某個磁碟機移到另一個磁碟機?How can I back up my WSL distros, or move them from one drive to another?
- Linux 驱动器中的文件是否不同于装载的 Windows 驱动器中的文件?Are files in the Linux drive different from the mounted Windows drive?
- 我可以使用 WSL 來做什麼?What can I do with WSL?
- Linux 磁碟機中與掛接的 Windows 磁碟機中的檔案有何不同?Are files in the Linux drive different from the mounted Windows drive?
- Windows 10 的早期版本Earlier versions of Windows 10
- Комфортное использование с Cmder
- 例外情况(使用 WSL 1 而不是 WSL 2)Exceptions for using WSL 1 rather than WSL 2
- 按分发版启动 WSLLaunch WSL by distribution
- 使用 Linux 檔案系統以獲得更快的效能Use the Linux file system for faster performance
- Настройка консоли Ubuntu
- WSL 2 架構WSL 2 architecture
- Унификация Win32 и UWP
- 比较功能Comparing features
- Установка Kali Linux с графическим интерфейсом в Windows 10
Обычная установка Linux рядом с Windows 10
Обычная установка аналогична для всех систем:
- Перезагрузка.
-
Вход в BIOS SETUP.
Входим в BIOS SETUP
- Изменение главного загрузочного устройства на нужное.
- Сохранение параметров (F10) и перезагрузка.
-
Выбор установочной системы. Если есть пункт «Live», то можно загрузить ОС с носителя без установки.
Выбираем установочную систему
-
Разметка жесткого диска и выбор раздела, куда будет ставиться система.
Выбираем раздел, куда будет ставиться система
-
Выбор устанавливаемых пакетов. Выбираем самое необходимое, остальное добавим позже.
Выбираем установку программных пакетов
Установка
Настройка, второй шаг: ввод пароля администратора (ROOT) и прочие вопросы, на которые следует ответить.
Заполняем данные при установке
Видео — Установка Ubuntu рядом с Windows. (BIOS+MBR)
Такой метод установки — самый рациональный, так как каждая ОС будет использовать все ресурсы ПК, в отличие от работы в пределах виртуальной машине.
我要如何備份 WSL 發行版本,或將其從某個磁碟機移到另一個磁碟機?How can I back up my WSL distros, or move them from one drive to another?
若要備份或移動發行版本,最佳方式是透過 Windows 1809 版和更新版本中提供的匯出/匯入命令。The best way to backup or move your distros is via the export/import commands available in Windows Version 1809 and later. 您可以使用 命令,將整個散發套件匯出至 tarball。You can export your entire distribution to a tarball using the command. 接著,您可以使用 命令將此發行版本匯回 WSL,此命令可為匯入作業指定新的磁碟機位置,讓您能夠備份和儲存 (或移動) WSL 發行版本的狀態。You can then import this distro back into WSL using the command, which can name a new drive location for the import, allowing you to backup and save states of (or move) your WSL distributions.
請注意,在 Appdata 資料夾中備份檔案的傳統備份服務 (例如 Windows 備份),不會損毀您的 Linux 檔案。Please note that traditional backup services that backup files in your Appdata folders (like Windows Backup) will not corrupt your Linux files.
Linux 驱动器中的文件是否不同于装载的 Windows 驱动器中的文件?Are files in the Linux drive different from the mounted Windows drive?
-
Linux 根目录(即 )下的文件由模拟 Linux 特定行为的 WSL 控制,控制的内容和操作包括但不限于:Files under the Linux root (i.e. ) are controlled by WSL which mimics Linux specific behavior, including but not limited to:
- 包含无效 Windows 文件名字符的文件Files which contain invalid Windows filename characters
- 为非管理员用户创建的符号链接Symlinks created for non-admin users
- 通过 chmod 和 chown 更改文件属性Changing file attributes through chmod and chown
- 文件/文件夹的区分大小写状态File/folder case sensitivity
-
装载的驱动器中的文件由 Windows 控制,并具有以下行为:Files in mounted drives are controlled by Windows and have the following behaviors:
- 支持区分大小写Support case sensitivity
- 设置的所有权限可以最好地反映 Windows 权限All permissions are set to best reflect the Windows permissions
我可以使用 WSL 來做什麼?What can I do with WSL?
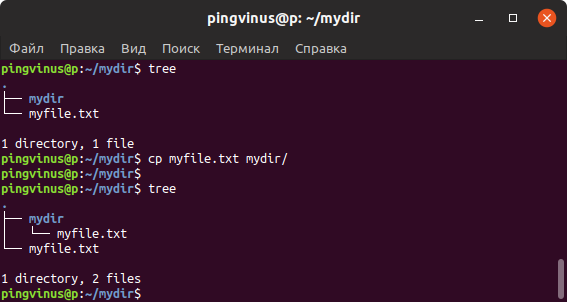
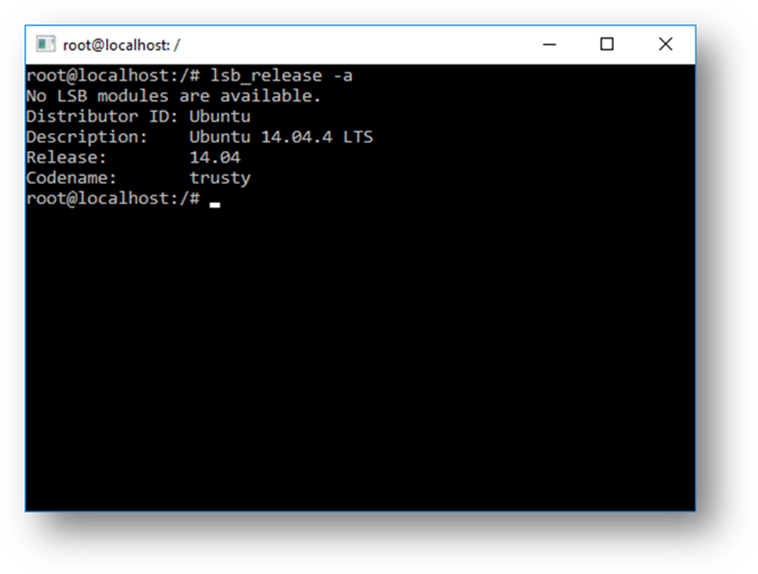
WSL 會提供名為 Bash.exe 的應用程式,啟動時,會開啟執行 Bash 命令介面的 Windows 主控台。WSL provides an application called Bash.exe that, when started, opens a Windows console running the Bash shell. 使用 Bash,您可以執行命令列 Linux 工具和應用程式。Using Bash, you can run command-line Linux tools and apps. 例如,輸入 並按下 Enter 鍵,您會看到目前正在執行 Linux 散發版本的詳細資料:For example, type and hit enter; you’ll see details of the Linux distro currently running:
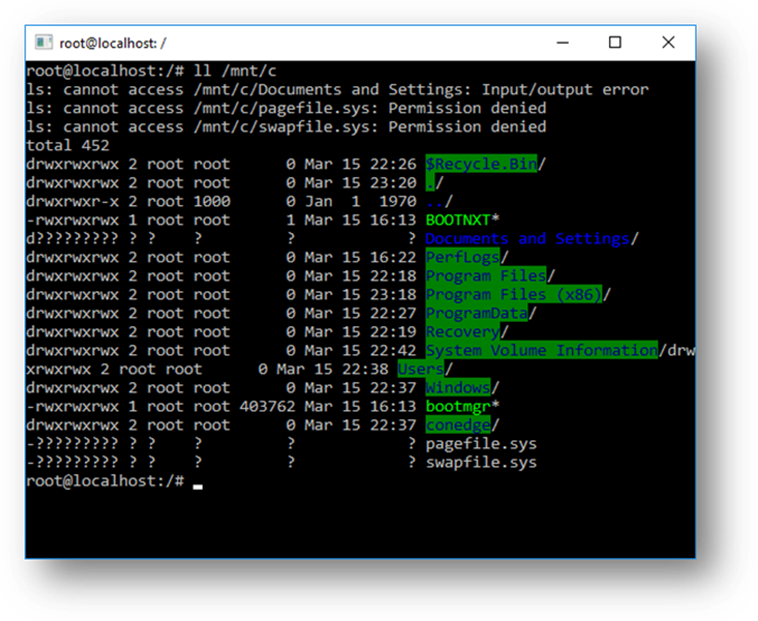
您也可以從 Linux Bash 命令介面存取本機電腦的檔案系統,您會發現您的本機磁碟機掛接在 資料夾下。You can also access your local machine’s filesystem from within the Linux Bash shell – you’ll find your local drives mounted under the folder. 例如,您的 磁碟機掛接在 底下:For example, your drive is mounted under :
Linux 磁碟機中與掛接的 Windows 磁碟機中的檔案有何不同?Are files in the Linux drive different from the mounted Windows drive?
-
Linux 根目錄下的檔案 (亦即 ) 是由模擬 Linux 特定行為的 WSL 所控制,包括但不限於:Files under the Linux root (i.e. ) are controlled by WSL which mimics Linux specific behavior, including but not limited to:
- 包含無效 Windows 檔案名稱字元的檔案Files which contain invalid Windows filename characters
- 為非系統管理員使用者建立的符號連結Symlinks created for non-admin users
- 透過 chmod 和 chown 變更檔案屬性Changing file attributes through chmod and chown
- 檔案/資料夾區分大小寫File/folder case sensitivity
-
掛接磁碟機中的檔案是由 Windows 所控制,並具有下列行為:Files in mounted drives are controlled by Windows and have the following behaviors:
- 支援區分大小寫Support case sensitivity
- 所有權限都設定為最佳反映 Windows 權限All permissions are set to best reflect the Windows permissions
Windows 10 的早期版本Earlier versions of Windows 10
对于早期的 Windows 10 版本,互操作性命令有一些不同之处。There are several differences for the interoperability commands on earlier Windows 10 versions. 如果运行的是创意者更新(2017 年10 月的版本 16299)或周年更新(2016 年 8 月的版本 14393),则建议你更新到最新的 Windows 版本,但如果无法执行此操作,请了解下面概述的一些互操作差异。If you’re running a Creators Update (Oct 2017, Build 16299), or Anniversary Update (Aug 2016, Build 14393) version of Windows 10, we recommend you update to the latest Windows version, but if that’s not possible, we have outlined some of the interop differences below.
摘要:Summary:
- 已替换为 。 has been replaced with .
- 在 中不需要指定用于运行单个命令的 选项。 option for running a single command isn’t needed with .
- Windows 路径包含在 WSL 中。Windows path is included in the WSL .
- 禁用互操作的过程未有变化。The process for disabling interop is unchanged.
可以从 Windows 命令提示或 PowerShell 运行 Linux 命令,但对于早期 Windows 版本,可能需要使用 命令。Linux commands can be run from the Windows Command Prompt or from PowerShell, but for early Windows versions, you man need to use the command. 例如:For example:
可按预期方式执行输入、管道处理和文件重定向等操作。Things such as input, piping, and file redirection work as expected.
传入 的 WSL 命令将按原样转发到 WSL 进程。The WSL commands passed into are forwarded to the WSL process without modification. 必须以 WSL 格式指定文件路径,并且必须谨慎转义相关字符。File paths must be specified in the WSL format and care must be taken to escape relevant characters. 例如:Example:
或…Or…
从早期的 Windows 10 版本中的 WSL 分发版调用 Windows 工具时,需要指定目录路径。When calling a Windows tool from a WSL distribution in an earlier version of Windows 10, you will need to specify the directory path. 例如,在 WSL 命令行中,输入:For example, from your WSL command line, enter:
在 WSL 中,这些可执行文件的处理方式类似于本机 Linux 可执行文件。In WSL, these executables are handled similar to native Linux executables. 这意味着,可按预期方式将目录添加到 Linux 路径,以及在命令之间进行管道处理。This means adding directories to the Linux path and piping between commands works as expected. 例如:For example:
或Or
Windows 二进制文件必须包含文件扩展名,匹配文件大小写,并且可执行。The Windows binary must include the file extension, match the file case, and be executable. 不可执行文件(包括批处理脚本)和 等命令可与 命令一起运行。Non-executables including batch scripts and command like can be run with command. 例如:For example:
Комфортное использование с Cmder
Для более тонкой настройки внешнего вида и комфортной работы с буфером обмена (привычное сочетание для вставки) удобно использовать bash-терминал подсистемы Linux внутри cmder (эмулятор терминала, внутри которого можно запустить один из установленных в Windows терминалов). Для этого нужно добавить возможность старта WSL-консоли в настройках Cmder:
- Правый клик по иконке бургера в нижнем правом углу для перехода к настройкам.
- В разделе Startup выбрать радиокнопку Auto save/restore opened tabs, чтобы при рестарте не создавать вкладки заново.
- В разделе Startup, подразделе Tasks проверить наличие задачи WSL::bash. Если её нет, нажать кнопку Add/refresh default tasks… и согласиться на добавление задач.
- В списке задач появится пункт WSL::bash, при создании новой вкладки терминала нужно выбрать его.
Если в списке задач есть пункт WSL::bash, но WSL не запускается при его выборе (в момент создания новой вкладки Cmder), то в настройках можно попробовать нажать Add/refresh default tasks… и согласиться на обновление списка задач (см. п. 3). Если и после этого не получается запустить терминал подсистемы (Cmder сообщает о проблеме и пишет, что по нажатию Enter закроет вкладку), то можно добавить свою собственную задачу, которая будет запускать cmd.exe и сразу вызывать в ней команду . Команда запуска терминала будет выглядеть так:
例外情况(使用 WSL 1 而不是 WSL 2)Exceptions for using WSL 1 rather than WSL 2
我们建议使用 WSL 2,因为它提供更快的性能和100% 的系统调用兼容性。We recommend that you use WSL 2 as it offers faster performance and 100% system call compatibility. 但是,在某些特定情况下,你可能会更倾向于使用 WSL 1。However, there are a few specific scenarios where you might prefer using WSL 1. 在以下情况下,请考虑使用 WSL 1:Consider using WSL 1 if:
-
你的项目文件必须存储在 Windows 文件系统中。Your project files must be stored in the Windows file system.
如果你将使用 WSL Linux 分发版来访问 Windows 文件系统上的项目文件,并且这些文件无法存储在 Linux 文件系统上,那么,通过使用 WSL 1,你将跨 OS 文件系统实现更快的性能。If you will be using your WSL Linux distribution to access project files on the Windows file system, and these files cannot be stored on the Linux file system, you will achieve faster performance across the OS files systems by using WSL 1.
-
一个项目要求对相同的文件使用 Windows 和 Linux 工具进行交叉编译。A project which requires cross-compilation using both Windows and Linux tools on the same files.
在 WSL 1 中,跨 Windows 和 Linux 操作系统的文件性能比 WSL 2 中更快,因此如果要使用 Windows 应用程序来访问 Linux 文件,则目前通过 WSL 1 可实现更快的性能。File performance across the Windows and Linux operating systems is faster in WSL 1 than WSL 2, so if you are using Windows applications to access Linux files, you will currently achieve faster performance with WSL 1.
备注
请考虑尝试 VS Code 远程 WSL 扩展,以便使你不仅能够使用 Linux 命令行工具将项目文件存储在 Linux 文件系统上,而且还可以使用 Windows 上的 VS Code 在 Internet 浏览器中创作、编辑、调试或运行项目,而不会造成任何与跨 Linux 和 Windows 文件系统工作相关联的性能下降。Consider trying the VS Code Remote WSL Extension to enable you to store your project files on the Linux file system, using Linux command line tools, but also using VS Code on Windows to author, edit, debug, or run your project in an internet browser without any of the performance slow-downs associated with working across the Linux and Windows file systems. 了解详细信息。Learn more.
按分发版启动 WSLLaunch WSL by distribution
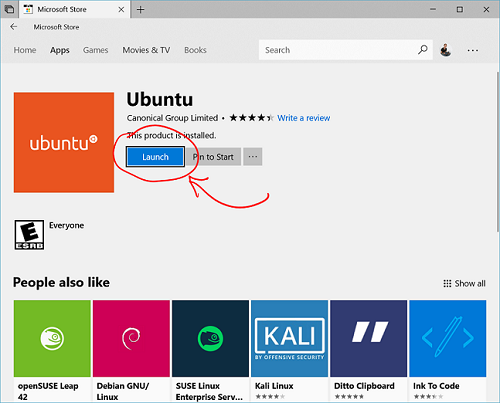
使用特定于分发版的应用程序运行某个分发版会在其自身的控制台窗口中将它启动。Running a distribution using it’s distro-specific application launches that distribution in it’s own console window.
这相当于在 Microsoft Store 中单击“启动”。It is the same as clicking «Launch» in the Microsoft store.
还可以在命令行中运行 来运行分发版。You can also run the distribution from the command line by running .
以这种方式从命令行运行分发版的缺点是,会自动将工作目录从当前目录更改为分发版的主目录。The disadvantage of running a distribution from the command line in this way is that it will automatically change your working directory from the current directory to the distribution’s home directory.
示例:使用 PowerShell) (Example: (using PowerShell)
wsl 和 wsl wsl and wsl
从命令行运行 WSL 的最佳方式是使用 。The best way to run WSL from the command line is using .
示例:使用 PowerShell) (Example: (using PowerShell)
这样, 不仅可以保留当前工作目录,而且还允许结合 Windows 命令运行单个命令。Not only does keep the current working directory in place, it lets you run a single command along side Windows commands.
示例:使用 PowerShell) (Example: (using PowerShell)
示例:使用 PowerShell) (Example: (using PowerShell)
使用 Linux 檔案系統以獲得更快的效能Use the Linux file system for faster performance
若要最佳化以獲得最快速的效能,請務必將您的專案檔儲存在 Linux 檔案系統中 (而不是 Windows 檔案系統)。In order to optimize for the fastest performance speed, be sure to store your project files in the Linux file system (not the Windows file system).
例如,儲存 WSL 專案檔時:For example, when storing your WSL project files:
- 使用 Linux 檔案系統根目錄:Use the Linux file system root directory:
- 不是 Windows 檔案系統根目錄:Not the Windows file system root directory:
搭配 WSL 發行版本 (例如 Ubuntu) 使用的專案檔必須位於 Linux 根檔案系統中,才能更快速地存取檔案系統。Project files that you are working with using a WSL distribution (like Ubuntu) must be in the Linux root file system to take advantage of faster file system access.
您可以使用 Windows 應用程式和工具 (例如檔案總管) 來存取 Linux 根檔案系統。You can access your Linux root file system with Windows apps and tools like File Explorer. 請嘗試開啟 Linux 發行版本 (例如 Ubuntu),並輸入下列命令以確定您位於 Linux 主目錄:。Try opening a Linux distribution (like Ubuntu), be sure that you are in the Linux home directory by entering this command: . 然後藉由輸入: (不要忘了結尾的句點),在 中開啟您的 Linux 檔案系統Then open your Linux file system in File Explorer by entering (don’t forget the period at the end):
Настройка консоли Ubuntu
Цвета
Увы, сразу после установки консоль (особенно вывод команды ) выглядит «бородато» и «носит свитер».

Можно добавить файл с настройками цветового оформления ( для создания файла) с этим содержимым.
Содержимое удобно добавлять из Windows, но тогда после сохранения файла в bash-терминале выполните и перезапустите терминал.

Переход к нужной директории при старте
Если при запуске терминала хочется попадать в директорию проектов, можно вписать в самом верху команду (укажите путь к нужной директории).
Алиасы
Добавим файл ( ) c этим содержимым и перезапустим bash-терминал.
Теперь по команде откроется Sublime Text (текущая папка будет показана как проект), а по команде наподобие можно быстро открывать файлы.
Странная проблема с алиасами
Я настраивал bash-терминал на двух домашних компьютерах с Windows 10 и на одном из них после добавления файла терминал при рестарте выводил 4 сообщения . Из-за чего — я так и не понял (права доступа были и владелец файла — я), но нашел строки в , которые к этому приводили. Это было подключение файла с алиасами:
Решил проблему, закомментировав эти строки и вписав алиасы прямо в (в самом низу).
Показ git-ветки в командной строке
Шаг 1: добавим в начале функцию для показа ветки:
Шаг 2: определим переменную, отвечающую за приглашение командной строки, добавим в неё показ результата работы этой функции (см. ). Получится что-то вроде:
Мелкие улучшения
Есть довольно много действий в bash-терминале, на которые Windows 10 отреагирует звуковым сигналом (нажатие , когда уже нечего стирать, например). Чтобы это отключить, создайте со строкой .
Vim по умолчанию показывает довольно тёмный текст, что на тёмном фоне смотрится плохо. Можно создать со строкой , чтобы текст стал более читаемым.
WSL 2 架構WSL 2 architecture
傳統的 VM 體驗可能會很慢而無法開機、隔離的、耗用大量資源,而且需要您花時間管理。A traditional VM experience can be slow to boot up, is isolated, consumes lots of resources, and requires your time to manage it. WSL 2 沒有這些屬性。WSL 2 does not have these attributes.
WSL 2 可提供 WSL 1 的優點,包括 Windows 和 Linux 之間的無縫整合、快速開機時間、低資源使用量,以及不需要進行 VM 設定或管理。WSL 2 provides the benefits of WSL 1, including seamless integration between Windows and Linux, fast boot times, a small resource footprint, and requires no VM configuration or management. 雖然 WSL 2 會使用 VM,但會在幕後進行管理及執行,讓您擁有與 WSL 1 相同的使用者體驗。While WSL 2 does use a VM, it is managed and run behind the scenes, leaving you with the same user experience as WSL 1.
完整的 Linux 核心Full Linux kernel
WSL 2 中的 Linux 核心是 Microsoft 根據可在 kernel.org 取得的來源,從最新的穩定分支所建立的。此核心已特別針對 WSL 2 進行微調,並針對大小和效能進行最佳化,可在 Windows 上提供絕佳的 Linux 體驗。The Linux kernel in WSL 2 is built by Microsoft from the latest stable branch, based on the source available at kernel.org. This kernel has been specially tuned for WSL 2, optimizing for size and performance to provide an amazing Linux experience on Windows. 該核心將由 Windows 更新提供服務,這表示您將會獲得最新的安全性修正程式和核心改良功能,而且不需要自行管理。The kernel will be serviced by Windows updates, which means you will get the latest security fixes and kernel improvements without needing to manage it yourself.
WSL 2 Linux 核心是開放原始碼。The WSL 2 Linux kernel is open source. 如果您想要深入了解,請參閱部落格文章:以 Windows 搭載 Linux 核心,此文章是由其開發小組所撰寫。If you’d like to learn more, check out the blog post Shipping a Linux Kernel with Windows written by the team that built it.
增加檔案 IO 效能Increased file IO performance
處理大量檔案的作業 (例如 git 複製、npm 安裝、apt 更新、apt 升級等等) 都可使用 WSL 2 來明顯地加快速度。File intensive operations like git clone, npm install, apt update, apt upgrade, and more are all noticeably faster with WSL 2.
實際增加的速度將取決於您正在執行的應用程式,以及其與檔案系統的互動方式。The actual speed increase will depend on which app you’re running and how it is interacting with the file system. 相較於 WSL 1,WSL 2 的初始版本在解壓縮 zip 壓縮的 tarball 時,執行速度最多可快 20 倍,而在各種專案上使用 git 複製、npm 安裝和 cmake 時,大約可快 2 至 5 倍。Initial versions of WSL 2 run up to 20x faster compared to WSL 1 when unpacking a zipped tarball, and around 2-5x faster when using git clone, npm install and cmake on various projects.
完整的系統呼叫相容性Full system call compatibility
Linux 二進位檔會使用系統呼叫來執行功能,例如存取檔案、要求記憶體、建立處理程序等等。Linux binaries use system calls to perform functions such as accessing files, requesting memory, creating processes, and more. WSL 1 使用 WSL 小組所建置的轉譯層,而 WSL 2 則包含其本身的 Linux 核心,並具有完整系統呼叫相容性。Whereas WSL 1 used a translation layer that was built by the WSL team, WSL 2 includes its own Linux kernel with full system call compatibility. 好處包括:Benefits include:
-
您可以在 WSL 內執行一套全新的應用程式,例如 Docker 等。A whole new set of apps that you can run inside of WSL, such as Docker and more.
-
Linux 核心的任何更新都會立即準備好供您使用。Any updates to the Linux kernel are immediately ready for use. (您不需要等候 WSL 小組執行更新和新增變更)。(You don’t have to wait for the WSL team to implement updates and add the changes).
WSL 2 會在啟動時使用較低的記憶體數量WSL 2 uses a smaller amount of memory on startup
WSL 2 在實際的 Linux 核心上使用輕量公用程式 VM,其記憶體使用量較小。WSL 2 uses a lightweight utility VM on a real Linux kernel with a small memory footprint. 公用程式會在啟動時配置虛擬位址支援的記憶體。The utility will allocate Virtual Address backed memory on startup. 其已設定為從您總記憶體 (WSL 1 所需用量) 中的一小部分啟動。It is configured to start with a smaller proportion of your total memory that what was required for WSL 1.
Унификация Win32 и UWP
В рамках проекта «Воссоединение» (Project Reunion), анонсированного Microsoft, компания планирует обеспечить простую интеграцию между программными интерфейсами Win32 и Universal Windows Platform (UWP). предоставляя единую платформу для разработки с поддержкой обратной совместимости.
Другими словами, теперь разработчики смогут создавать такие приложения, которые заработают на любом устройстве с Windows 10, вне зависимости от аппаратной платформы и версии операционной системы. Существующие приложения также будет возможно адаптировать к новой модели.
Первыми компонентами новой платформы стали нативный фреймворк для проектирования интерфейса WinUI 3 и WebView2, позволяющий интегрировать веб-содержимое в любое приложение.
Исходный код обеих библиотек открыт и доступен любому желающему в соответствующих репозиториях Github.
- Короткая ссылка
- Распечатать
比较功能Comparing features
| 功能Feature | WSL 1WSL 1 | WSL 2WSL 2 |
|---|---|---|
| Windows 和 Linux 之间的集成Integration between Windows and Linux | ||
| 启动时间短Fast boot times | ||
| 占用的资源量少Small resource foot print | ||
| 可以与当前版本的 VMWare 和 VirtualBox 一起运行Runs with current versions of VMWare and VirtualBox | ||
| 托管 VMManaged VM | ||
| 完整的 Linux 内核Full Linux Kernel | ||
| 完全的系统调用兼容性Full system call compatibility | ||
| 跨 OS 文件系统的性能Performance across OS file systems |
已在使用 WSL 1 并且想要升级到 WSL 2?Already using WSL 1 and want to upgrade to WSL 2? 请按照说明!Follow the instructions to !
只有 Windows 10 版本 2004 的内部版本 19041 或更高版本中才提供 WSL 2。WSL 2 is only available in Windows 10, Version 2004, Build 19041 or higher. 通过按 Windows 徽标键 + R,检查你的 Windows 版本,然后键入 winver,选择“确定”。Check your Windows version by selecting the Windows logo key + R, type winver, select OK. (或者在 Windows 命令提示符下输入 命令)。(Or enter the command in Windows Command Prompt). 你可能需要更新到最新的 Windows 版本。You may need to update to the latest Windows version. 对于低于 19041 的版本,WSL 根本不受支持。For builds lower than 19041, WSL is not supported at all.
备注
WSL 2 适用于 VMWare 15.5.5+ 和 VirtualBox 6+。WSL 2 will work with VMWare 15.5.5+ and VirtualBox 6+.
Установка Kali Linux с графическим интерфейсом в Windows 10
Порядок установки Kali Linux с графическим интерфейсом (GUI) для подсистемы Windows для Linux будет состоять из следующих шагов (напоминаю: необходима версия Windows 10 2004 или новее):
- Включите компонент «Подсистема Windows для Linux». Сделать это можно в Панель управления — Программы и компоненты — Включение или отключение компонентов Windows. После установки перезагрузите компьютер.
- Этот шаг можно пропустить, если у вас включены компоненты Hyper-V, иначе запустите Windows PowerShell от имени администратора (можно сделать через правый клик по кнопке «Пуск» и выполните команду
dism.exe /online /enable-feature /featurename:VirtualMachinePlatform /all /norestart
- Скачайте и установите обновление ядра Linux WSL2 со страницы https://docs.microsoft.com/ru-ru/windows/wsl/wsl2-kernel
- Перезагрузите компьютер, запустите PowerShell от имени администратора и выполните команду
wsl --set-default-version 2
- Зайдите в магазин приложений Windows Store, используйте поиск чтобы найти и установить Kali Linux.
- После завершения установки в PowerShell от имени администратора выполните команду:
wsl --set-version kali-linux 2
- Запустите Kali Linux (пункт будет доступен в меню «Пуск»), выполните первоначальную настройку (имя пользователя и пароль), после чего по порядку выполните следующие команды (требуется подключение к Интернету, последний шаг может занять много времени.
sudo apt update
sudo apt dist-upgrade
sudo apt install -y kali-win-kex
- В ходе выполнения последней команды вам будет предложено выбрать клавиатуру. Я оставил значения по умолчанию, но, возможно, стоило выбрать русскую, так как в дальнейшем при включении русского языка интерфейса в ряде случаев кириллица не отрисовывается (не знаю, есть ли связь, лишь предположение).
- По завершении установки введите команду kex для запуска Kali Linux с графическим интерфейсом. При первом запуске вам будет предложено создать отдельный пароль, можно от этого отказаться.
В результате запустится Kali Linux с графическим интерфейсом в полноэкранном режиме. Для выхода из полноэкранного режима можете вызвать меню клавишей F8 и отключить опцию «Full Screen».
Если вам потребуется включить русский язык интерфейса для Kali Linux, у меня сработал следующий метод:
- В графическом интерфейсе Kali Linux запускаем терминал, вводим команду
sudo dpkg-reconfigure locales
- Выбираем ru_RU UTF-8 на двух экранах (отметку ставим пробелом, переключаемся на кнопку Ok клавишей Tab).
- Закрываем окно терминала и окно графического интерфейса, в терминале из которого мы запускали графический интерфейс вводим kex stop (если приглашение ввода не отображается, попробуйте изменить размер окна — у меня встретился такой баг).
- Снова запускаем kex — в результате интерфейс будет на русском языке.
А в целом, хотя я еще и не придумал, для чего мне это использовать (возможно, попробую запускать пакеты от bitnami для экспериментов с сайтами), но на первый взгляд всё работает исправно и быстро: быстрее, чем в виртуальной машине.
А вдруг и это будет интересно: