How to use the locate command in minecraft
Содержание:
- Команды[править | править код]
- Dangers[edit]
- Permission[править | править код]
- Примеры использования[править | править код]
- Outcome[edit | edit source]
- История
- Using Locate Command in Linux
- Команды which, type и whereis
- Установка[править | править код]
- How to Enter the Command
- Поиск папки
- Поиск текста в Linux при помощи утилиты grep
- Other Game Commands
- Описание[править | править код]
- Possible locations[edit | edit source]
- Start a Discussion Discussions about Commands/List of Commands
- Requirements
Команды[править | править код]
| Команда | Описание |
|---|---|
| /lwc | Вывести список основных команд LWC |
| /cadmin | Администрирование LWC |
| /cprivate <nick/group> | Создать частную защиту для игрока <nick> или группы <group> |
| /cpublic | Создать публичную защиту |
| /cdonation | Создать сундук для пожертвований (забирать с него можете только Вы) |
| /cpassword <password> | Установить защиту с паролем <password> |
| /cunlock <password> | Открыть защиту с помощью пароля <password> (Если после ввода команды нажать на вещь правой кнопкой мыши, то она только откроется, а пароль будет действовать. Если нажать левой, то пароль удалится.) |
| /cmodify <nick/-nick> | Дать доступ к защите игроку <nick> или забрать доступ у игрока <-nick> |
| /cinfo | Посмотреть информацию о защите |
| /cremove | Удалить защиту |
| /climits | Посмотреть ограничения на защиту |
| /credstone <on/off> | Вкл./откл. доступ красной пыли к защите |
| /cmagnet <on/off> | Вкл./откл. режим автоматического подбора сундуком блоков и предметов на расстоянии 3 блоков |
| /cdroptransfer <select/on/off> | Вкл./откл. режим автоматического подбора сундуком блоков и предметов, выброшеных Вами на любом расстоянии |
| /callowexplosions <on/off> | Вкл./откл. возможность взрыва защищенного блока |
| /cautoclose | Автоматически закрывать двери через 3 секунды после открытия (настраиваемо) |
| /cpersist | Повторять предыдущую команду LWC без написания её заново |
| /cnospam | Спрятать сообщения о создании защиты |
| /cremoveall | Удалить всю Вашу защиту |
Dangers[edit]
The most common mob within the monument are guardians. They swim quickly, have 30 × 15 health, and have two ways to damage the player:
- A laser is their primary offensive attack. It takes several seconds to charge, emitting a distinctive sound and changing color from purple to yellow in the process, and does 4 points of damage when the charging completes.
- There is no way to dodge the laser, but the guardian must maintain line-of-sight during the charging process. If you can get behind a wall or pillar, the attack will be canceled and will do no damage. Circling narrow pillars therefore can be used to circumvent multiple attacks from all sides.
- The laser has a maximum range of about 15 blocks. If you can get far enough away before the charging completes, the attack will be cancelled and do no damage.
- If the player gets too close to the guardian, it is liable to abandon the attack and swim away.
- Guardians also have a natural Thorns-like defense. If attacked while their orange spikes are extended, the attacker will take 2 damage.
Each monument also contains three elder guardians. They have 80 × 40 health and a somewhat stronger laser attack which deals 8 points of damage, but move slowly and infrequently. They will also inflict any player within 50 blocks with Mining Fatigue III for 5 minutes, checking for nearby players to afflict every 60 seconds. You will want to be sure to kill the elders in a manner that counts as a player kill so they will drop wet sponges, which can be smelted in a furnace or placed in the Nether to make dry sponges. Under the Mining Fatigue, you take about 370 times longer to break blocks and your attack speed is reduced by 30%. When an elder guardian inflicts you with Mining Fatigue III, then you could drink a bucket of milk. However, drinking milk will also remove Water Breathing, and you will just get Mining Fatigue again. An easier way is to wait until you have defeated all 3 elder guardians before drinking milk. Until then, simply don’t break blocks, and travel only through pre-made passages. If you must place blocks, such as in the case where you need to run around a pillar to break line of sight with the guardians, use slime blocks, honey blocks or TNT. Slime blocks, honey blocks and TNT are breakable instantaneously even under the effect of Mining Fatigue. There are still ways to brute-force your way into a monument, which is covered later.
Permission[править | править код]
| Permission | Группа | Описание |
|---|---|---|
| lwc.protect | Обычный игрок |
Разрешает большинство команд LWC, включая следующие:
lwc.create Разрешает создавать любую защиту. lwc.create.private Позволяет создавать только частную защиту (остальные по аналогии). lwc.info Разрешает доступ к команде /cinfo lwc.remove Позволяет убрать защиту. lwc.unlock Разрешает разблокировку блока с паролем. lwc.modify Разрешает использовать команду /cmodify lwc.flag.* Позволяет игроку установить любой флаг на защищенный блок (например: lwc.flag.redstone или lwc.flag.magnet). |
| lwc.mod | Модератор LWC | Позволяет игроку/группе доступ к любой защите, за исключением тех которые принадлежат LWC админу. |
| lwc.admin | Администратор LWC | Дает полный администраторский доступ к LWC (lwc.admin.* не тоже самое, что lwc.admin). |
| lwc.deny | Блокирует доступ игроку/группе ко всем командам LWC (если установлен lwc.protect, то lwc.deny действовать не будет). | |
| lwc.mode.<mode> | Разрешает выбранный режим, где <mode> — droptransfer или persist, по умолчанию доступны всем. | |
| lwc.flag.<flag> | Разрешает устанавливать выбранный флаг. |
Примеры использования[править | править код]
Откат блоковправить | править код
- Откатить все действия игрока Notch за последний час.
- Откатить только блоки камня, поставленные игроком Notch за последний час.
- Откатить все действия игрока Notch в мире world_nether за последнюю неделю.
- Откатить все действия игрока Notch за последний час, кроме действий с камнем.
- Откатить только сломанные игроком Notch блоки камня во всех мирах за последний час.
- Откатить все действия за последние 15 минут, произведённые в выделении WorldEdit.
Просмотр логовправить | править код
- Посмотреть все блоки алмазной руды, добытые за последний час.
- Посмотреть все сообщения, отправленные игроком Notch за последние 15 минут.
- Посмотреть все входы игрока Notch на сервер.
Outcome[edit | edit source]
(Disaster): Your crew found some promising signs of the Caitian diaspora, but were unable to locate the planet for which they were searching. Before your crew could complete a complete survey of the area, however, an attack on the deep space science station where the Caitian scientist was working forced you to recall all away teams.
(Failure): Your crew found the planet, but before they could start a survey you were forced to recall all away teams after you were notified on an attack attack (sic) on the deep space science station where the Caitian scientist was working.
(Success): Your crew found the planet and were able to locate a few signs of the Caitian diaspora. Before your crew could complete a complete survey of the area, however, an attack on the deep space science station where the Caitian scientist was working forced you to recall all away teams.
(Critical Success): Your crew found the planet and were able to locate the site of a Caitian settlement. Before your crew could complete a complete survey of the area, however, an attack on the deep space science station where the Caitian scientist was working forced you to recall all away teams.
История
| Бета-версия Java Edition | |||||
|---|---|---|---|---|---|
| 1.8 | 1.8 Pre-release | ||||
| Добавлен странник Края. Может подбирать любые блоки. Глаза зелёного цвета. Испускает чёрный дым, горит на солнце. | |||||
| 1.8 | Теперь глаза странника и дым фиолетового цвета. | ||||
| Официальный выпуск Java Edition | |||||
| 1.0.0 | Beta 1.9 Prerelease 3 | Увеличено количество очков здоровья: 40 ( × 20) вместо 20 ( × 10). | |||
| Beta 1.9 Prerelease 4 | Может заспауниться в Крае. В этом мире странники Края спаунятся чаще всего. | ||||
| RC1 | Добавлены звуки для странника Края. До этого использовались звуки зомби. | ||||
| 1.3.1 | 12w22a | Немного усовершенствован ИИ. | |||
| 1.7.2 | pre | Больше не реагируют на игрока, если тот его бьет в творческом режиме. | |||
| 1.8 | 14w06a | Теперь телепортируется после получения урона. | |||
| 14w11a | Теперь ходит немного быстрее. | ||||
| 1.9 | 15w31a | Странники Края теперь остаются враждебными к игроку, несмотря на контакт с водой. | |||
| Странники Края при смерти дают блок, который держат. | |||||
| Больше не могут брать блоки сквозь стены. | |||||
| Имеют анимацию атаки. | |||||
| 1.10 | 16w20a | Может заспауниться в Нижнем мире. | |||
| Может поднимать и ставить адский камень. | |||||
| 1.11 | 16w32a | ID Странника Края изменен с на . | |||
| 16w35a | Теперь получает урон в 1 () от взрывного пузырька воды. | ||||
| 1.16 | 20w06a | Странники Края теперь спаунятся в долине песка душ и искажённых лесах. | |||
| 20w07a | Теперь может поднимать новые блоки из Нижнего мира. Больше не может поднимать адский камень. |
||||
| 0.9.0 | build 1 | Странник Края добавлен в игру. | |||
| build 2 | Теперь имеет звуки. | ||||
| Телепортируется при полёте снарядов в него. | |||||
| build 8 | Сила атаки теперь аналогична таковой в ПК-версии. | ||||
| 0.12.1 | build 10 | Теперь странник Края избегает попадания в воду. | |||
| 0.14.0 | build 1 | Странник Края при смерти дропает блок, который он держал в руках. | |||
| 0.15.0 | build 1 | Может заспауниться в Нижнем мире. | |||
| Может поднимать и ставить адский камень. | |||||
| 1.0 | build 1 | Может заспауниться в Крае. | |||
| При убийстве теперь выпадает Жемчуг Края. | |||||
| Официальный выпуск Bedrock Edition | |||||
| 1.2 | Странники Края больше не трясутся при агрессии. | ||||
| При смерти из странников Края выпадает блок, который они держали. | |||||
| Legacy Console Edition | |||||
| Странник Края добавлен в игру. | |||||
| Теперь открывает рот и трясётся, когда спровоцирован. | |||||
| Странник Края останавливается перед игроком. При замахе игрока мечом телепортируется игроку за спину. | |||||
| Странники Края теперь спаунятся в Нижнем мире и могут подобрать адский камень. | |||||
| Странники Края и чешуйницы Края теперь враждебны друг к другу. | |||||
| New Nintendo 3DS Edition | |||||
| 0.1.0 | Странник Края добавлен в игру. |
Начиная с Beta 1.9 Prerelease 2, он не получает урон от солнечного света и может телепортироваться бесцельно (днём). К тому же, теперь он, попав в воду, телепортируется из неё (теряя при этом интерес к игроку) и не получает урон от стрел, телепортируясь. На солнечном свету совершенно нейтрален, избегает сражений, телепортируясь. Если его атаковать, временно становится враждебным, но быстро снова становится нейтральным. В предварительной версии 14w06a у странника Края обновлён ИИ.
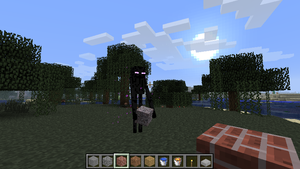
Странник Края не горит на солнце и совершенно бесцельно телепортируется по болотной местности
Using Locate Command in Linux
The locate command is a useful alternative, as it is faster than the find command when performing searches. That’s because the former only scans your Linux database instead of the whole system. Furthermore, the syntax is relatively easier to write.
How to Install locate Package
By default, Linux does not come with the locate command pre-installed. To get the package, run the following commands one after another:
sudo apt-get update
sudo apt-get install mlocate
The Basic Syntax
You can now use the command to search for files using this syntax:
locate
The vanilla locate command can sometimes return files that have been deleted, if the database wasn’t updated. The best solution is to manually update the database by running the following:
sudo updatedb
Search Exact File Name
The basic syntax only allows you to search for files that contain the search term. If you want to get the file with the exact name, you can use the -r option and add dollar symbol ($) at the end of your search term, for example:
locate -r my-file$
Count the Number of Files
In order to tell how many files appear on your search result, insert -c after the locate command.
locate -c my-file
Instead of listing all the files, it will give you the total number of them.
Ignore Case Sensitive
Use -i on your linux locate command to ignore case sensitive files. For instance:
locate -i my-file
All of the files with this name will be shown, regardless of any uppercase or lowercase symbols found.
Show Existing Files
Just like we’ve mentioned, Linux locate command can even show you a deleted file if you haven’t updated the database. Thankfully, you can get around this problem by using -e option, like this:
locate -e my-file
By doing this, you will only get files that exist at the time you perform the locate command.
Disables Errors While Searching
-q option will prevent any errors from showing up when the search is being processed. To do this, simply enter:
locate -q my-file
Limit the Number of Search Results
If you want to limit the number of search results, -n <number> will do the trick. However, remember that you need to put the option at the end of the command line. Take a look at this example:
locate my-file n 10
The script will only display the first 10 files it discovers even when there are more.
Команды which, type и whereis
В предыдущем разделе я объяснил, почему команда может оказаться недоступной, если вы попытаетесь запустить ее. Тем не менее, существует несколько полезных утилит, помогающих выяснить, какая команда фактически запускается при наборе определенного имени команды.
Команда which
Для поиска в переменной PATH и выяснения того, какая команда будет запускаться (если будет) при вводе имени команды, используйте команду . В листинге 3 приведен пример поиска для команды .
Листинг 3. Использование команды which
ian@attic4:~> which fdisk
which: no fdisk in (/usr/lib64/mpi/gcc/openmpi/bin:/home/ian/bin:/usr/local/bin:/usr/bin:
/bin:/usr/bin/X11:/usr/X11R6/bin:/usr/games:/usr/lib64/jvm/jre/bin:/usr/lib/mit/bin:/usr/
lib/mit/sbin)
ian@attic4:~> export PATH=/sbin:$PATH
ian@attic4:~> which fdisk
/sbin/fdisk
Команда показывает первую найденную команду в вашей переменной PATH. Если вы хотите проверить существование нескольких совпадений, то добавьте опцию , как показано в листинге 4.
Листинг 4. Использование команды which для поиска нескольких совпадений
ian@attic4:~> which awk
/usr/bin/awk
ian@attic4:~> which -a awk
/usr/bin/awk
/bin/awk
/usr/bin/X11/awk
Здесь команда была обнаружена в трех местах: в директориях /usr/bin (основная системная директория, в которой хранятся команды), /bin (содержит команды, которые могут использоваться как администраторами, так и пользователями системы, и которые требуются при отсутствии других смонтированных файловых систем) и /usr/bin/X11 (содержит двоичные файлы для системы окон X Window).
Из другой статьи этой серии «Изучаем Linux 101: работа с жесткими и символическими ссылками» вы узнали, как убедиться в том, что на самом деле три этих файла представляют собой одну и ту же команду , как показано в листинге 5.
Листинг 5. Команды awk ведут к команде gawk
ian@attic4:~> ls -l $(which -a awk)
lrwxrwxrwx 1 root root 4 2010-02-09 00:46 /bin/awk -> gawk
lrwxrwxrwx 1 root root 8 2010-02-09 00:46 /usr/bin/awk -> /bin/awk
lrwxrwxrwx 1 root root 8 2010-02-09 00:46 /usr/bin/X11/awk -> /bin/awk
Команда type
Существует несколько команд, которые не может обнаружить команда , например, встроенные команды интерпретатора. Команда является встроенной командой, сообщающей о том, как переданная командная строка оценивается для выполнения. В листинге 6 используются команды и , которые показывают, что команда не является исполняемым файлом переменной PATH, а представляет собой встроенную команду интерпретатора.
Листинг 6. Использование команды type
ian@attic4:~> which type
which: no type in (/usr/lib64/mpi/gcc/openmpi/bin:/home/ian/bin:/usr/local/bin:/usr/bin:/
bin:/usr/bin/X11:/usr/X11R6/bin:/usr/games:/usr/lib64/jvm/jre/bin:/usr/lib/mit/bin:/usr/l
ib/mit/sbin)
ian@attic4:~> type type
type is a shell builtin
Команда whereis
Если вам нужна более подробная информация, а не просто местоположение программы, используйте команду . Например, можно искать man-страницы или другую информацию, как показано в листинге 7.
Listing 7. Using whereis to find man
pages
ian@attic4:~> whereis awk
awk: /bin/awk /usr/bin/awk /usr/lib64/awk /usr/bin/X11/awk /usr/share/awk
/usr/share/man/man1/awk.1.gz /usr/share/man/man1p/awk.1p.gz
Обратите внимание на то, что копия команды , расположенная в директории /sbin, не была найдена командой. Директории, используемые командой , фиксированы, поэтому вы не всегда можете найти то, что ищете
Команда также позволяет искать исходные файлы, указывать альтернативные пути поиска, а также искать необычные элементы. Чтобы узнать, как определить поведение команды или изменить используемые ей фиксированные пути, обратитесь к man-страницам.
Установка[править | править код]
Примечание: Плагин работает на версии Java не ниже 8 версии. При первом запуске плагина необходим доступ к Интернету, чтобы загрузить соответствующие библиотеки.
Установка на все необходимые сервера.править | править код
- Поместите плагин с расширением .jar в папку или (в зависимости от серверной платформы).
- Полностью перезапустите сервер (не используя /reload).
Основные настройки и настройка синхронизации.править | править код
Конфигурационные файлы плагина расположены в папке . Главным конфигурационным файлом является или (в зависимости от серверной платформы).
После того, как LuckPerms был установлен на все необходимые сервера, можно приступать к этапу настройки синхронизации. Для этого каждый сервер с установленным LuckPerms должен быть подключен к одной системе хранения информации. Это может быть: , , или . Само собой, LP должен быть подключен к одной единой базе данных
Выключите сервер, откройте основной файл конфигурации и обратить особое внимание на следующие параметры:
Этот параметр отвечает за название сервера. По умолчанию имеет значение . Этот параметр необходим для посерверной настройки прав.
Этот параметр отвечает за метод хранения конфигурации прав и групп. В нашем случае, он может иметь следующие значения, в зависимости от типа используемой системы хранения данных: , , или .
Не забудьте внести аутентификационные данные для подключения к БД в разделе .
«Messaging Service» — это функция LuckPerms, которая позволяет серверам отправлять запрос на другие серверы в сети при внесении изменений. Она также позволяет отправлять записи журнала по сети.
- Если вы используете несколько серверов, которые не подключены к одному прокси, но используют одну и ту же базу данных, установите для этого параметра значение .
- Если вы работаете в небольшой сети с одним прокси-сервером BungeeCord/Velocity, вам следует установить значение параметра на .
- Если вы используете прокси-сервер LilyPad, установите значение этого параметра на .
- Если вы используете сеть с несколькими прокси-серверами BungeeCord, рекомендуется установить сервер Redis и установите значение этого параметра на . Не забудьте внести аутентификационные данные для подключения к Redis в разделе .
How to Enter the Command
We will show you how to use the /locate command to find a mansion and then use the /tp command to teleport yourself to those coordinates.
1. Open the Chat Window
The easiest way to run a command in Minecraft is within the chat window. The game control to open the chat window depends on the version of Minecraft:
- For Java Edition (PC/Mac), press the T key to open the chat window.
- For Pocket Edition (PE), tap on the chat button at the top of the screen.
- For Xbox One, press the D-Pad (right) on the controller.
- For PS4, press the D-Pad (right) on the controller.
- For Nintendo Switch, press the right arrow button on the controller.
- For Windows 10 Edition, press the T key to open the chat window.
- For Education Edition, press the T key to open the chat window.
2. How to Find your Coordinates
You can easily find your current XYZ coordinates in Minecraft with the following /tp command:
/tp ~ ~ ~
Type the command in the chat window. As you are typing, you will see the command appear in the lower left corner of the game window. Press the Enter key to run the command.
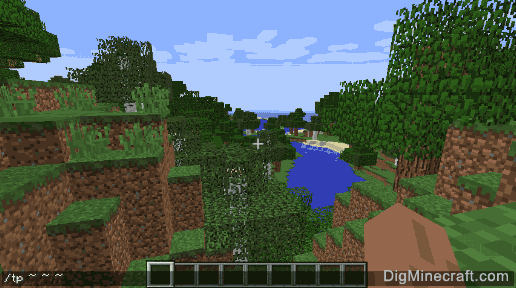
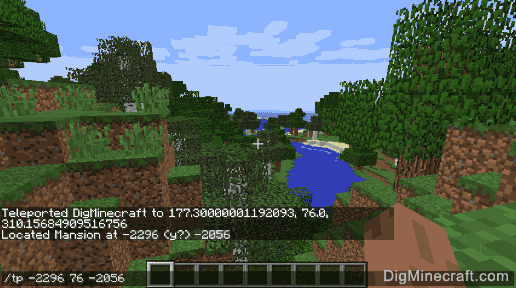
Since we are using the /tp command to teleport ourselves to our current location, Minecraft will display our current coordinates in the lower left corner of the game window.
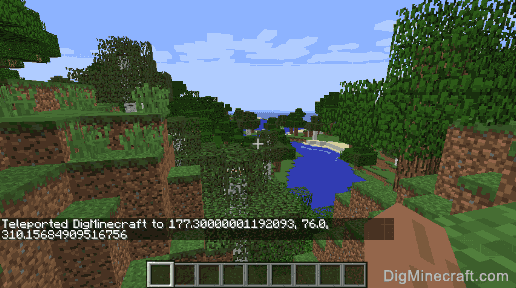
In this example, our current XYZ coordinates in the map are:
XYZ: (177,76,310)
For simplicity, we are going to round our coordinates, even though the /tp command shows the coordinates with decimal places.
TIP: Read our tutorial called Understanding the Coordinate System to learn about the XYZ coordinates in Minecraft.
3. Find a Woodland Mansion
Next, you can use the /locate command to find the coordinates of the nearest feature such as a Woodland Mansion. You can do this by entering the following command in Minecraft Java Edition (PC/Mac):
/locate Mansion
Type the command in the chat window and Press the Enter key to run the command.

After entering the /locate command, you should see the coordinates of the Woodland Mansion appear in the game.
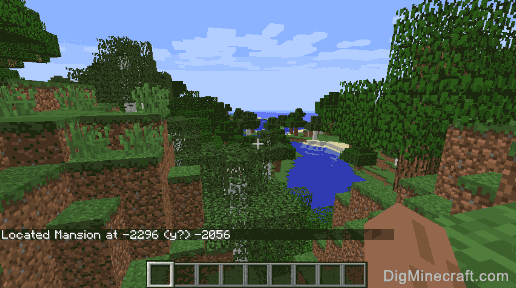
In this example, the /locate command output the following coordinates:
Located Mansion at -2296 (y?) -2056
So now we know that the X-coordinate for the Mansion is -2296, the Y-coordinate is unknown as specified by (y?) and the Z-coordinate is -2056.
4. Teleport to the Woodland Mansion
Now that you know the coordinates of the Woodland Mansion, you can either walk in the right direction until you find it or you can teleport there using the /tp command.
TIP: Make sure you are in Creative mode if you decide to teleport. Because you have to guess at the Y-coordinate when teleporting, you might teleport yourself high into the air or you might teleport yourself deep into the ground.
In this example, we are going to use the X-coordinate of -2296 and Z-coordinate of -2056 from the /locate command. And we are going to guess at the Y-coordinate and use our current Y-coordinate position of 76.
So we will teleport to the XYZ coordinate of (-2296,76,-2056) using the following /tp command:
/tp -2296 76 -2056
Now let’s see where we end up!!
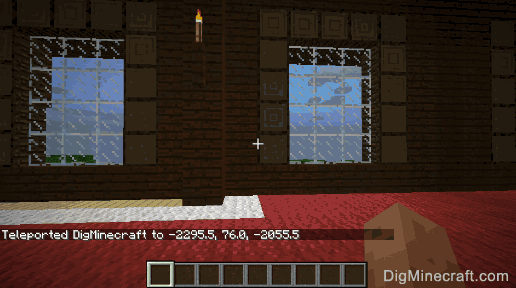
In this example, our coordinates worked out perfectly. We have teleported safely inside the Woodland Mansion.
Congratulations, you just learned how to use the /locate command in Minecraft!
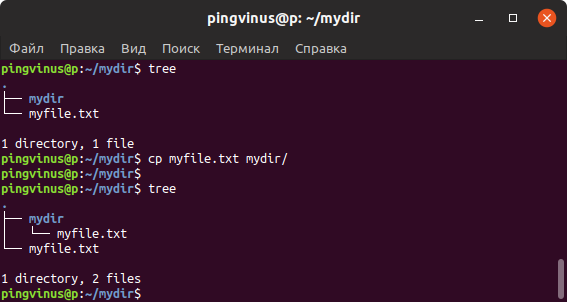
Поиск папки
На самом деле поиск папки в linux ничем не отличается от поиска файла, так как папка — это файл. Однако find дает нам возможность указать тип. Например, чтобы явно выполнить поиск только папок, имена которых содержат слово, например, mysql, выполните
Здесь ключ «-type» указывает на тип. На текущий момент времени find поддерживает следующие типы:
Подробнее о различных параметрах поиска find вы можете почитать, введя команду
Поиск текста в Linux при помощи утилиты grep
Да, grep действительно очень хорош, когда речь заходит о поиске текста в файлах в linux по паттерну. Сразу оговоримся, что искать текст мы будем в файлах в формате plain text — чистый текст, таких как конфигурационные файлы, сценарии командного интерпретатора (bash. python, php…) и др. Искать по файлам Word и Excel грепом эффективно вряд ли получится.
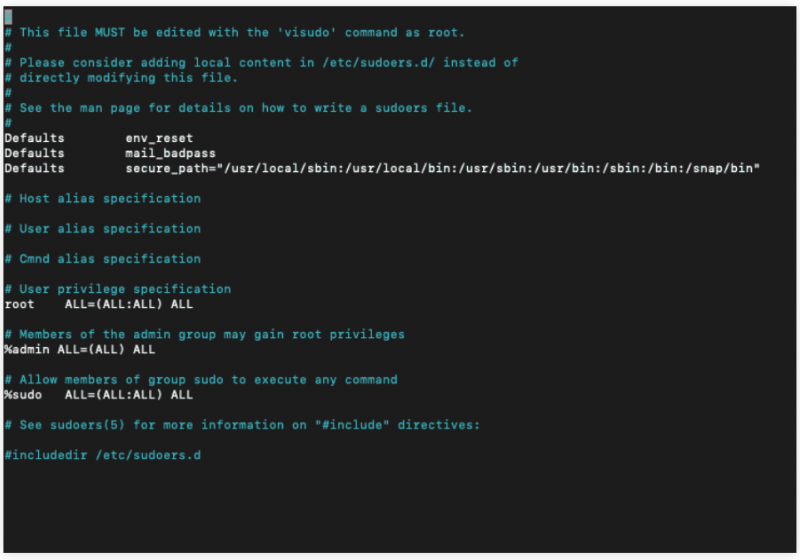
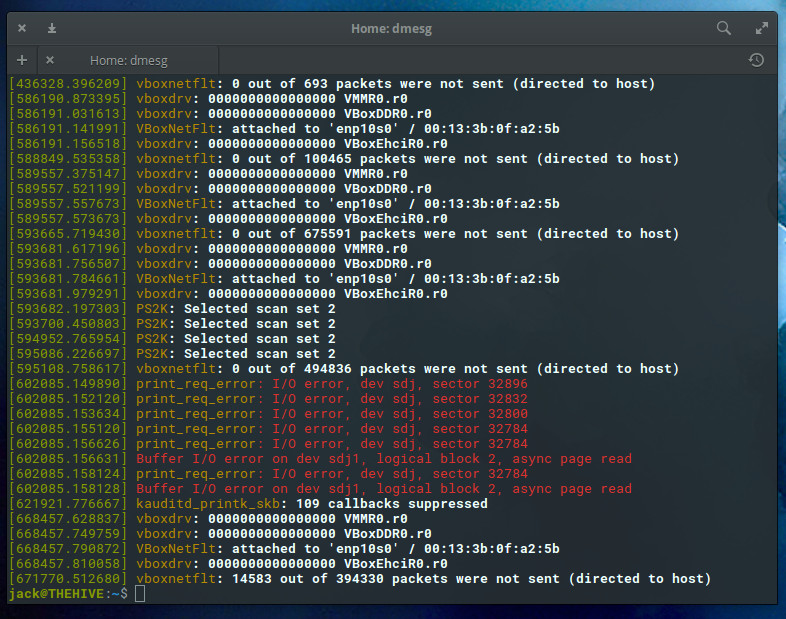
Итак, чтобы выполнить поиск строки по всем файлам в каталоге, например /etc следует ввести
Такая команда выведет имена всех файлов, в которых удастся найти заветные 4 буквы «root». Здесь ключ «-l» заставляет grep выводить только имена файлов. Т.е. если вы хотите увидить ещё и ту саму строку, где удалось найти запрашиваемое слово, то «-l» стоит не указывать. Ключ «-r» выполняет поиск не только по /etc, но и по всем файлам во всех подпапках
И наконец ключ «-i» говорит не принимать во внимание регистр, т.е. grep будет искать не только слово «root», но и «ROOT», и «rOOt»..
Вы поняли
Конечно, вмемогущий grep поддерживает регулярные выражения. Чтобы выполнить, например, поиск строки, явно начинающийся всё с того же слова, введите
Other Game Commands
You can use other commands and cheats in Minecraft such as:
How to Use the Ability Command
How to Use the Achievement Command
How to Use the Advancement Command
How to Use the AlwaysDay Command
How to Use the Attribute Command
How to Use the BlockData Command
How to Use the Bossbar Command
How to Use the ClassroomMode Command
How to Use the Clear Command
How to Use the Clone Command
How to Use the Code Command
How to Use the Connect Command
How to Use the Data Command
How to Use the DataPack Command
How to Use the DayLock Command
How to Use the Debug Command
How to Use the DefaultGameMode Command
How to Use the Difficulty Command
How to Use the Effect Command
How to Use the Enchant Command
How to Use the EntityData Command
How to Use the Execute Command
How to Use the Experience Command
How to Use the Fill Command
How to Use the Forceload Command
How to Use the Function Command
How to Use the GameMode Command
How to Use the Gamerule Command
How to Use the Give Command
How to Use the Help Command
How to Use the ImmutableWorld Command
How to Use the Kick Command
How to Use the Kill Command
How to Use the LocateBiome Command
How to Use the Me Command
How to Use the Mixer Command
How to Use the MobEvent Command
How to Use the Msg Command
How to Use the Particle Command
How to Use the PlaySound Command
How to Use the Publish Command
How to Use the Recipe Command
How to Use the Reload Command
How to Use the ReplaceItem Command
How to Use the Say Command
How to Use the Scoreboard Command
How to Use the Seed Command
How to Use the SetBlock Command
How to Use the SetMaxPlayers Command
How to Use the SetWorldSpawn Command
How to Use the Spawnpoint Command
How to Use the SpreadPlayers Command
How to Use the Stats Command
How to Use the StopSound Command
How to Use the Summon Command
How to Use the Tag Command
How to Use the TakePicture Command
How to Use the Team Command
How to Use the Teammsg Command
How to Use the Teleport Command
How to Use the Tell Command
How to Use the TellRaw Command
How to Use the TestFor Command
How to Use the TestForBlock Command
How to Use the TestForBlocks Command
How to Use the TickingArea Command
How to Use the Time Command
How to Use the Title Command
How to Use the TitleRaw Command
How to Use the Tm Command
How to Use the ToggleDownfall Command
How to Use the Tp Command
How to Use the Trigger Command
How to Use the W Command
How to Use the Wb Command
How to Use the Weather Command
How to Use the WorldBorder Command
How to Use the WorldBuilder Command
How to Use the WSServer Command
How to Use the Xp Command
How to Find your XYZ Coordinates
How to Keep Inventory when you Die
Описание[править | править код]
Храм состоит из трёх этажей, один из которых является цокольным. Всё здание в основном состоит из булыжника, замшелого булыжника и ступеней из булыжника; стены храма во многих местах (как внутри, так и снаружи) покрыты лианами. Храм в джунглях — единственное место в игре, где в натуральном виде генерируются красный камень, нити, раздатчики, натяжные датчики, липкие поршни, рычаги и повторители.
Надземные уровни храма не представляют особого интереса, а вот в подземном уровне расположены два сундука, в которых могут быть как полезные предметы (железные слитки, золотые слитки, иногда даже алмазы), так и бесполезные (кости, гнилая плоть). Проход к первому сундуку осложняют две ловушки — натяжные датчики, соединённые с покрытыми лианами раздатчиками
В раздатчиках лежат стрелы, поэтому идти к сундуку следует осторожно, обезвреживая растяжки ножницами. Второй сундук расположен в «тайной комнате», которая также находится на нижнем уровне, за стеной с рычагами
Для получения доступа к этой комнате необходимо подёргать рычаги в правильном порядке, вернуться на первый этаж и спуститься в образовавшееся отверстие, ведущее в «тайную комнату» со вторым сундуком, хотя можно просто разломать камень и забрать сундук.
| Правильный порядок воздействия на рычаги: |
|---|
| 3-1-1-3, считая от входа |
Possible locations[edit | edit source]
Aenigma Nebula
Afehirr Nebula
Alpha Centauri Sector Block
Alpha Trianguli Sector Block
Andoria
Arucanis Arm
Azlesa Expanse
Bajor
Battle Group Omega
Beta Ursae Sector Block
Betreka Nebula
B’Tran Cluster
Captain’s Table
Deep Space 9
Deep Space K-7
Defera
Delta Volanis Cluster
D’kel Star Cluster
Drozana
Earth Spacedock
Eridan Belt
Eridon Nebula
Eta Eridani Sector Block
First City
Gamma Orionis
Ganalda
Hromi Cluster
Iota Pavonis Sector Block
Khazan Cluster
Klingon Academy
New Romulus Command
Embassy
New Romulus
Nimbus
Omega Leonis Sector Block
Orellius Sector Block
Pi Canis Sector Block
Psi Velorum Sector Block
Qo’noS
Q’s Winter Wonderland
Regulus
Risa
Rolor Nebula
Romulus
Rura Penthe
Sirius
Sol
Sphere Allied Space
Sphere Contested Space
Sphere Undine Battlezone
39-Sierra
Starfleet Academy
Tau Dewa Sector Block
Tekara
T’Ong Nebula
Vulcan
Vyntadi
Wolf 359
Zenas Expanse
Zeta Andromedae
Inside the Celes Sector using the Science Officer Tab has yielded the assignment as of February 27, 2019.
Start a Discussion Discussions about Commands/List of Commands
-
14 messages
-
StarLightKR
Also help me please I knew this command ages ago but ever since the villager update my command blocks say minecraft:can_break cannot be upda… 2019-09-24T17:30:20Z
-
Firewolfxl5
ApplezForLife wrote:I know the command for /give so you can have a tool/block that can destroy or be placed on. For my examples, I am going to … 2019-10-07T02:11:21Z
-
-
MCPE /playsound Command List
8 messages
-
CityFan9000
Can you tell me the list of playsound commands?? 2017-08-11T15:49:28Z
-
NouelGaming
»’I have found a working list of the playsound sounds i have tested this and it works :)»… 2017-10-01T13:53:48Z
-
See more discussions >
Requirements
Seed
For technical reasons, you need to know the seed of your world to use Biome Finder, unless, of course, you want to find a seed for a new world. If you’re playing SSP, the app is able to fetch the seed from your savegame. Alternatively, you can use the /seed command ingame. In SMP, you can use the same command if you have sufficient rights. Otherwise, however, you’re dependent on the server owner, who started the world and has access to the savegame and config files.
Technical
This app uses some relatively new web technologies. As a result, some features may be disabled for older browsers. I recommend using the latest version of a major browser such as Chrome, Firefox, Edge or Safari.