Linux sh command
Содержание:
- Зачем Использовать Функции Bash?
- Types of Shell
- What Is Shell Scripting?
- Adding shell comments
- What are Shell Variables?
- Summary:
- 27.4. Переменные окружения
- What are Shell Variables?
- Примеры работы echo
- Notes
- Scope of Variables
- Опции sudo
- Как автоматизировать операции резервного копирования «по расписанию»
- Shell scripting on other operating systems
- For Loops
- Итоги и выводы
Зачем Использовать Функции Bash?
Функция Bash — это по сути набор команд, которые можно вызывать множество раз. Цель функции — помочь вам сделать ваши bash-скрипты более читабельными и избежать повторного написания одного и того же кода. Bash-функции могут:
- Устранить повторяющиеся задачи
- Сэкономить время
- Дать хорошо структурированную, модульную и отформатированную последовательность действий
- Предоставить возможность задавать динамические значения командам, используя аргументы командной строки
- Упростить сложные команды, заменив их на один работающий блок
- Создана единожды, функция может быть запущена неограниченное количество раз.
- Быть использованы для построения логических потоков
- Bash-функции могут быть выполнены при запуске сервера или добавлении запланированного cron-задания
- Команды могут быть отлажены
- Включать команды, которые вводятся в интерактивном режиме оболочки
Bash, безусловно, отличный инструмент, способный значительно облегчить рабочий процесс. Возможности его использования безграничны, поэтому в этом руководстве мы разберёмся только с основами. Итак, приготовитесь написать ваш первый скрипт!
Types of Shell
There are two main shells in Linux:
1. The Bourne Shell: The prompt for this shell is $ and its derivatives are listed below:
- POSIX shell also is known as sh
- Korn Shell also knew as sh
- Bourne Again SHell also knew as bash (most popular)
2. The C shell: The prompt for this shell is %, and its subcategories are:
- C shell also is known as csh
- Tops C shell also is known as tcsh
We will discuss bash shell based shell scripting in this tutorial.
What Is Shell Scripting?
SHELL SCRIPTING is writing a series of commands for the shell to execute. It can combine lengthy and repetitive sequences of commands into a single and simple script, which can be stored and executed anytime. This reduces the effort required by the end user.
Let us understand the steps in creating a Shell Script
- Create a file using a vi editor(or any other editor). Name script file with extension .sh
- Start the script with #! /bin/sh
- Write some code.
- Save the script file as filename.sh
- For executing the script type bash filename.sh
«#!» is an operator called shebang which directs the script to the interpreter location. So, if we use»#! /bin/sh» the script gets directed to the bourne-shell.
Let’s create a small script —
#!/bin/sh
ls
Let’s see the steps to create it —
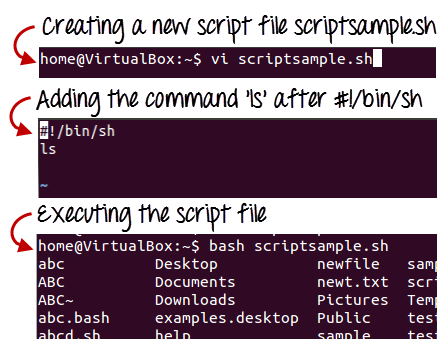
Command ‘ls’ is executed when we execute the scrip sample.sh file.
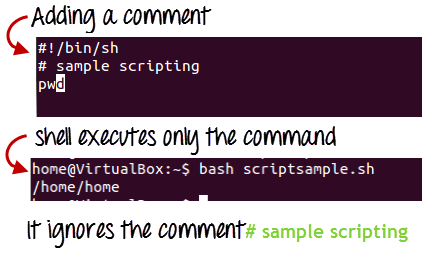
Adding shell comments
Commenting is important in any program. In Shell programming, the syntax to add a comment is
#comment
Let understand this with an example.
What are Shell Variables?
As discussed earlier, Variables store data in the form of characters and numbers. Similarly, Shell variables are used to store information and they can by the shell only.
For example, the following creates a shell variable and then prints it:
variable ="Hello"
echo $variable
Below is a small script which will use a variable.
#!/bin/sh
echo "what is your name?"
read name
echo "How do you do, $name?"
read remark
echo "I am $remark too!"
Let’s understand, the steps to create and execute the script
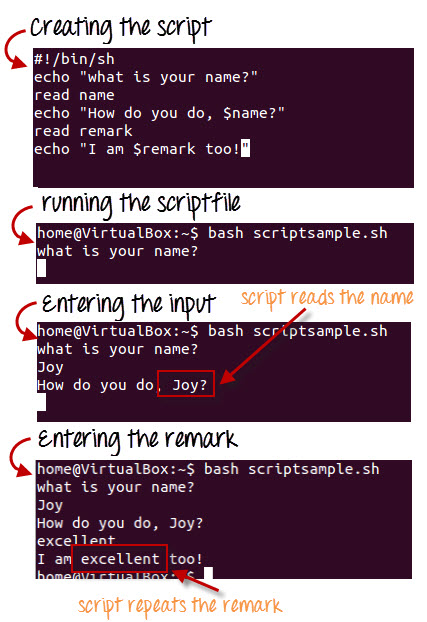
As you see, the program picked the value of the variable ‘name’ as Joy and ‘remark’ as excellent.
This is a simple script. You can develop advanced scripts which contain conditional statements, loops, and functions. Shell scripting will make your life easy and Linux administration a breeze.
Summary:
- Kernel is the nucleus of the operating systems, and it communicates between hardware and software
- Shell is a program which interprets user commands through CLI like Terminal
- The Bourne shell and the C shell are the most used shells in Linux
- Shell scripting is writing a series of command for the shell to execute
- Shell variables store the value of a string or a number for the shell to read
- Shell scripting can help you create complex programs containing conditional statements, loops, and functions
27.4. Переменные окружения
Мало чем отличаясь от старой технологии, новая имеет довольно большое количество переменных, которые могут быть использованы для указания путей к файлам или применяемых инструментов (если это необходимо). В файле описывается большинство из них. В этом разделе мы приведем два примера изменения переменных по умолчанию и сделаем это несколькоми способами.
27.4.1. Смена директории по умолчанию
Довольно много людей отслеживают ветку current и регулярно делают кросс-платформенную сборку для нескольких используемых архитектур. Логика этого довольно проста — как только появляется новая опция или поддержка нового устройства, находятся люди, которым необходимо использование этих нововведений. Отслеживая изменения и переодически проводя сборку, они должны иметь возможность создания релиза.
Разумно будет предположить, что если отслеживаются изменения и проводится сборка для нескольких архитектур, то стоит хранить различные сборки в разных местах. Есть два способа сделать это — использовать сценарий для установки DESTDIR, или вводить каталог назначения в интерактивном режиме. В любом случае, это делается точно также, как и определение любой другой переменной (в зависимости от Вашей оболочки, конечно).
Для оболочек bourne или korn:
Для c оболочек:
Довольно просто. Когда сборка будет выполнена, бинарники и файлы будут находится в .
27.4.2. Статическая сборка
Инструментарий NetBSD по умолчанию производит динамическую сборку. Многим пользователям все еще необходимо иметь возможность статической сборки. Хорошим примером статической компоновки может служить маленькая система, в которой не присутствуют библиотеки. Если машина, на которой будет производиться сборка, будет нуждаться в установке переменных, то самым простым будет внести изменения в .
Если вы хотите удостовериться, что сборка производится статически, то просто добавьте эту строку в :
What are Shell Variables?
As discussed earlier, Variables store data in the form of characters and numbers. Similarly, Shell variables are used to store information and they can by the shell only.
For example, the following creates a shell variable and then prints it:
variable ="Hello"
echo $variable
Below is a small script which will use a variable.
#!/bin/sh
echo "what is your name?"
read name
echo "How do you do, $name?"
read remark
echo "I am $remark too!"
Let’s understand, the steps to create and execute the script
As you see, the program picked the value of the variable ‘name’ as Joy and ‘remark’ as excellent.
This is a simple script. You can develop advanced scripts which contain conditional statements, loops, and functions. Shell scripting will make your life easy and Linux administration a breeze.
Примеры работы echo
Давайте рассмотрим как пользоваться echo. Сначала просто выведем строку на экран:
Также можно вывести значение переменной. Сначала объявим переменную:
Затем выведем ее значение:
Как уже говорилось, с помощью опции -e можно включить интерпретацию специальных последовательностей. Последовательность \b позволяет удалить предыдущий символ. Например, удалим все пробелы из строки:
Последовательность \n переводит курсор на новую строку:
С помощью \t вы можете добавить горизонтальные табуляции:
Можно совместить переводы строки и табуляции:
Точно так же можно применить вертикальную табуляцию:
С помощью последовательности \r можно удалить все символы до начала строки:
Последовательность -c позволяет убрать перевод на новую строку в конце сообщения:
Дальше — больше. Вы можете разукрасить вывод echo с помощью последовательностей управления цветом Bash. Для доступны такие цвета текста:
- \033[30m — чёрный;
- \033[31m — красный;
- \033[32m — зелёный;
- \033[33m — желтый;
- \033[34m — синий;
- \033[35m — фиолетовый;
- \033[36m — голубой;
- \033[37m — серый.
И такие цвета фона:
- \033[40m — чёрный;
- \033[41m — красный;
- \033[42m — зелёный;
- \033[43m — желтый;
- \033[44m — синий;
- \033[45m — фиолетовый;
- \033[46m — голубой;
- \033[47m — серый;
- \033[0m — сбросить все до значений по умолчанию.
Например. раскрасим нашу надпись в разные цвета:
С основными параметрами команды echo разобрались, теперь рассмотрим еще некоторые специальные символы bash. Вы можете вывести содержимое текущей папки просто подставив символ *:
Также можно вывести файлы определенного расширения:
Я уже говорил, что echo можно использовать для редактирования конфигурационных файлов. Вы можете использовать запись echo в файл linux, если он пуст:
Если файл не пуст, и вам необходимо добавить свою строчку в конец файла используйте символ перенаправления вывода >>:
Если строка содержит какие-либо специальные символы или может быть понята интерпретатором неоднозначно, следует заключить ее в кавычки.
Notes
For historical reasons, ^ is a synonym for | as pipeline separator. Its use in new applications is therefore discouraged.
If a command other than a simple-command (i.e. ‘for …’, ‘case …’, etc.) is redirected, it is executed in a subshell. If variable assignments must be visible in the parent shell after the input has been redirected, the exec special command can be used:
exec 5<&0 <input
while read line
do
        ...
        variable=value
        ...
done
exec <&5 5<&-
If parameters that have been inherited from the initial environment are modified, they must be explicitly exported to make the change visible to external commands, as described under » above.
The $IFS parameter is applied to any unquoted word. Thus:
IFS=X
echoXfoo
executes the ‘echo‘ command with the argument ‘foo‘. The command ‘set —‘ without further arguments is a no-op (no operation). The shift special command can be used to delete all positional parameters.
There is only one namespace for both functions and parameters. A function definition will delete a parameter with the same name and vice-versa.
Parameter assignments that precede a special command affect the shell itself; parameter assignments that precede the call of a function are ignored.
Scope of Variables
Programmers used to other languages may be surprised at the scope rules
for shell functions. Basically, there is no scoping, other than the
parameters (, , , etc).
Taking the following simple code segment:
#!/bin/sh

myfunc()
{
  echo "I was called as : $@"
  x=2
}

### Main script starts here

echo "Script was called with $@"
x=1
echo "x is $x"
myfunc 1 2 3
echo "x is $x"
Script was called with a b c
x is 1
I was called as : 1 2 3
x is 2
The parameters are changed within the function to reflect
how the function was called. The variable , however, is
effectively a global variable — changed it, and that
change is still effective when control returns to the main script.
A function will be called in a sub-shell if its output is piped somewhere
else — that is, «» will still say «x is 1» the second time around. This is because a new shell process is called to pipe . This can make debugging very frustrating; Astrid had a script which suddenly failed when the «» was added, and it is not immediately obvious why this must be. The has to be started up before the function to the left of the pipe; with the simple example of «», then has to be started first, with its then tied to the of once starts. In the shell script, the shell has already been started before we even knew we were going to pipe through , so the operating system has to start , then start a new shell to call . This is frustrating, but well worth being aware of.
Functions cannot change the values they have been called with, either — this
must be done by changing the variables themselves, not the parameters
as passed to the script.
An example shows this more clearly:
#!/bin/sh

myfunc()
{
  echo "\$1 is $1"
  echo "\$2 is $2"
  # cannot change $1 - we'd have to say:
  # 1="Goodbye Cruel"
  # which is not a valid syntax. However, we can
  # change $a:
  a="Goodbye Cruel"
}

### Main script starts here

a=Hello
b=World
myfunc $a $b
echo "a is $a"
echo "b is $b"
This rather cynical function changes $a, so the message «Hello World»
becomes «Goodbye Cruel World».
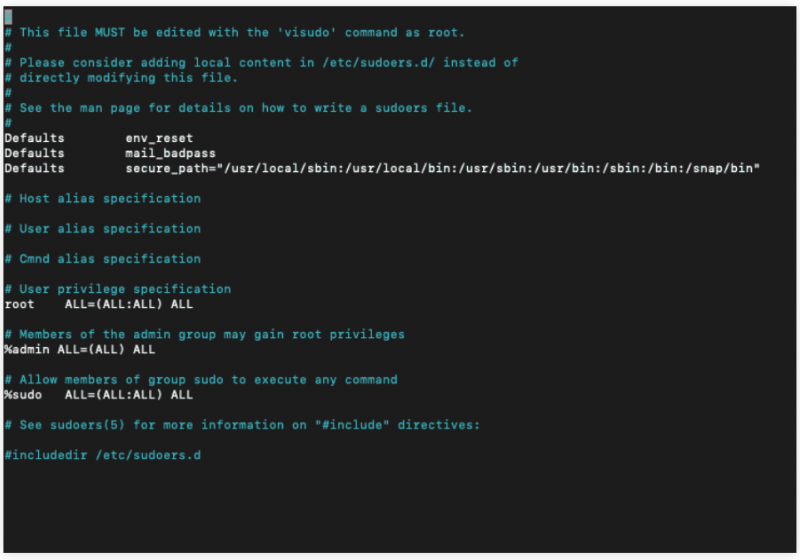
Опции sudo
- -A или —askpass — по умолчанию sudo спрашивает пароль пользователя в терминале. Если задана эта опция, утилита попробует использовать графическую утилиту для запроса пароля.
- -b или —background — запускает переданную программу в фоновом режиме;
- -C или —close-from — опции нужно передать число больше трёх. Она позволяет закрыть для программы все файловые дескрипторы, кроме стандартного ввода и вывода;
- -E или —preserve-env — позволяет передать переменные окружения текущего пользователя выполняемой программе. Также можно передать этой опции список переменных, которые нужно разрешить;
- -e или —edit — позволяет редактировать файл вместо запуска команды. Файл копируется во временный каталог, редактируется с помощью редактора, установленного в системе по умолчанию, и если были изменения, записывается обратно с теми самыми правами;
- -g — запустить команду с указанной группой вместо группы пользователя, от имени которого запускается программа;
- -h — выполнить команду от имени другого хоста;
- -H или —set-home — установить домашний каталог;
- -i или —login — позволяет авторизоваться в консоли от имени другого пользователя. Будет выбран его домашний каталог, а также загружены все переменные окружения;
- -k — по умолчанию, sudo сохраняет пароль и некоторое время после выполнения команды, вы можете выполнить ещё раз, без ввода пароля. Эта опция отключает такую возможность;
- -l или —list — позволяет вывести список доступных команд для удалённых пользователей;
- -n или —non-interactive — не интерактивный режим, если будет необходимо ввести пароль, программа выдаст ошибку;
- -p или —prompt — использовать своё приглашение для ввода пароля;
- -r или —role — выполнить программу с контекстом SELinux, у которого есть указанная роль;
- -S — использовать стандартный поток ошибок для запроса пароля;
- -s или —shell — позволяет запустить указанный командный интерпретатор;
- -U или —User — вместе с опцией -l позволяет посмотреть привилегии для пользователя;
- -T или —timeout — позволяет установить время выполнения команды, если время истечёт раньше, чем завершится команда, то она будет завершена принудительно;
- -u — позволяет указать, от имени какого пользователя нужно выполнять программу;
- -V — выводит версию утилиты;
- — — означает, что следующие опции обрабатывать не нужно.
Это основные опции, которые вы можете использовать. А теперь давайте перейдём к примерам использования команды.
Как автоматизировать операции резервного копирования «по расписанию»
Несколько слов об автоматизации резервного копирования. Для этой цели служит системный планировщик cron, который считывает рабочие инструкции из специального crontab-файла. Чтобы определить такие инструкции, необходимо создать и отредактировать свой crontab-файл при помощи команды:
crontab -e
Инструкции записываются в строго определённом формате (поля разделяются пробелами):
минуты часы день_месяца месяц день_недели команда
Один из вариантов расписания операций резервного копирования может выглядеть следующим образом:
30 23 10,20,30 * * /usr/local/bin/bckp
Это означает, что сценарий резервного копирования (следует указать полный путь к этому файлу) будет выполняться в 23:30 10-го, 20-го и 30-го числа каждого месяца независимо от дня недели. (Звёздочки обозначают весь допустимый диапазон значений, в данном случае: каждый месяц – в 4-м поле, любой день недели – в 5-м поле)
Если вы предпочитаете подводить итоги по неделям, а ваша система работает круглосуточно, то имеет смысл запланировать резервное копирование в часы с минимальной нагрузкой:
0 5 * * 3,5 /usr/local/bin/bckp
Здесь резервные копии будут создаваться в 5:00 по средам и пятницам в каждом месяце (звёздочка в 4-м поле), независимо от числа (звёздочка в 3-м поле).
Обо всех тонкостях составления расписания можно прочитать в руководстве man 5 crontab.
Shell scripting on other operating systems
Interoperability software such as Cygwin, the MKS Toolkit, Interix (which is available in the Microsoft Windows Services for UNIX), Hamilton C shell, UWIN (AT&T Unix for Windows) and others allow Unix shell programs to be run on machines running Windows NT and its successors, with some loss of functionality on the MS-DOS-Windows 95 branch, as well as earlier MKS Toolkit versions for OS/2. At least three DCL implementations for Windows type operating systems—in addition to XLNT, a multiple-use scripting language package which is used with the command shell, Windows Script Host and CGI programming—are available for these systems as well. Mac OS X and subsequent are Unix-like as well.
In addition to the aforementioned tools, some POSIX and OS/2 functionality can be used with the corresponding environmental subsystems of the Windows NT operating system series up to Windows 2000 as well. A third, 16-bit subsystem often called the MS-DOS subsystem uses the Command.com provided with these operating systems to run the aforementioned MS-DOS batch files.
The console alternatives 4DOS, 4OS2, FreeDOS, Peter Norton’s NDOS and 4NT / Take Command which add functionality to the Windows NT-style cmd.exe, MS-DOS/Windows 95 batch files (run by Command.com), OS/2’s cmd.exe, and 4NT respectively are similar to the shells that they enhance and are more integrated with the Windows Script Host, which comes with three pre-installed engines, VBScript, JScript, and VBA and to which numerous third-party engines can be added, with Rexx, Perl, Python, Ruby, and Tcl having pre-defined functions in 4NT and related programs. PC DOS is quite similar to MS-DOS, whilst DR DOS is more different. Earlier versions of Windows NT are able to run contemporary versions of 4OS2 by the OS/2 subsystem.
Scripting languages are, by definition, able to be extended; for example, a MS-DOS/Windows 95/98 and Windows NT type systems allows for shell/batch programs to call tools like KixTart, QBasic, various BASIC, Rexx, Perl, and Python implementations, the Windows Script Host and its installed engines. On Unix and other POSIX-compliant systems, awk and sed are used to extend the string and numeric processing ability of shell scripts. Tcl, Perl, Rexx, and Python have graphics toolkits and can be used to code functions and procedures for shell scripts which pose a speed bottleneck (C, Fortran, assembly language &c are much faster still) and to add functionality not available in the shell language such as sockets and other connectivity functions, heavy-duty text processing, working with numbers if the calling script does not have those abilities, self-writing and self-modifying code, techniques like recursion, direct memory access, various types of sorting and more, which are difficult or impossible in the main script, and so on. Visual Basic for Applications and VBScript can be used to control and communicate with such things as spreadsheets, databases, scriptable programs of all types, telecommunications software, development tools, graphics tools and other software which can be accessed through the Component Object Model.
For Loops
loops iterate through a set of values until the list is exhausted:
for.sh
#!/bin/sh
for i in 1 2 3 4 5
do
  echo "Looping ... number $i"
done
Try this code and see what it does.
Note that the values can be anything at all:
for2.sh
#!/bin/sh
for i in hello 1 * 2 goodbye
do
  echo "Looping ... i is set to $i"
done
This is well worth trying. Make sure that you understand what is happening
here. Try it without the and grasp the idea, then re-read
the Wildcards section and try it again with
the in place. Try it also in different directories, and with the surrounded by
double quotes, and try it preceded by a backslash ()
In case you don’t have access to a shell at the moment (it is very useful
to have a shell to hand whilst reading this tutorial), the results of the above two scripts are:
Looping .... number 1
Looping .... number 2
Looping .... number 3
Looping .... number 4
Looping .... number 5
and, for the second example:
Looping ... i is set to hello
Looping ... i is set to 1
Looping ... i is set to (name of first file in current directory)
    ... etc ...
Looping ... i is set to (name of last file in current directory)
Looping ... i is set to 2
Looping ... i is set to goodbye
So, as you can see, simply loops through whatever input it is given, until it runs out of input.
Итоги и выводы
Рассмотренный в данной статье сценарий резервного копирования обладает скромными функциональными свойствами. Но не в этом состояла его главная задача, а в том, чтобы читатель понял, что можно делать в командной строке, и не только скопировал и выполнил предложенный командный файл, а заинтересовался расширением его функций, занялся исследованием необъятных возможностей, предоставляемых командными оболочками. И если кто-то, прочитав эту статью, попробует усовершенствовать приведённый здесь код, или напишет собственный вариант, или реализует свою независимую идею, то я сочту, что основная цель достигнута.