Настройка linux-файрвола iptables: руководство для начинающих
Содержание:
- Step Four — Add Public Key Authentication (Recommended)
- Помощь в конфигурации: фильтрация пакетов щелчком кнопкой мыши
- Allow Connections to a Specific Network Interface
- Firestarter
- Deny Connections
- Step 1 — Using IPv6 with UFW (Optional)
- Базовая настройка
- Шаг 5 — Разрешение других соединений
- Step 5 — Allowing Other Connections
- Step 6 — Denying Connections
- Действия
- Шаг 6 — Разрешение других соединений
- Block an IP Address
- Service: Mail
- Service: PostgreSQL
- Passo 9 — Desabilitando ou redefinindo o UFW (opcional)
- Step Three — Root Privileges
- Passo 7 — Excluindo regras
- Passo 6 — Negando conexões
- Service: Web Server
- Deleting Rules
- Ubuntu.
- Creating IP Address Whitelist with UFW
- Step Six — Test Log In
Step Four — Add Public Key Authentication (Recommended)
The next step in securing your server is to set up public key authentication for your new user. Setting this up will increase the security of your server by requiring a private SSH key to log in.
Generate a Key Pair
If you do not already have an SSH key pair, which consists of a public and private key, you need to generate one. If you already have a key that you want to use, skip to the Copy the Public Key step.
To generate a new key pair, enter the following command at the terminal of your local machine (ie. your computer):
Assuming your local user is called “localuser”, you will see output that looks like the following:
Hit return to accept this file name and path (or enter a new name).
Next, you will be prompted for a passphrase to secure the key with. You may either enter a passphrase or leave the passphrase blank.
Note: If you leave the passphrase blank, you will be able to use the private key for authentication without entering a passphrase. If you enter a passphrase, you will need both the private key and the passphrase to log in. Securing your keys with passphrases is more secure, but both methods have their uses and are more secure than basic password authentication.
This generates a private key, , and a public key, , in the directory of the localuser’s home directory. Remember that the private key should not be shared with anyone who should not have access to your servers!
Copy the Public Key
After generating an SSH key pair, you will want to copy your public key to your new server. We will cover two easy ways to do this.
Note: The method will not work on DigitalOcean if an SSH key was selected during Droplet creation. This is because DigitalOcean disables password authentication if an SSH key is present, and the relies on password authentication to copy the key.
If you are using DigitalOcean and selected an SSH key during Droplet creation, use instead.
Option 1: Use ssh-copy-id
If your local machine has the script installed, you can use it to install your public key to any user that you have login credentials for.
Run the script by specifying the user and IP address of the server that you want to install the key on, like this:
After providing your password at the prompt, your public key will be added to the remote user’s file. The corresponding private key can now be used to log into the server.
Option 2: Manually Install the Key
Assuming you generated an SSH key pair using the previous step, use the following command at the terminal of your local machine to print your public key ():
This should print your public SSH key, which should look something like the following:
Select the public key, and copy it to your clipboard.
To enable the use of SSH key to authenticate as the new remote user, you must add the public key to a special file in the user’s home directory.
On the server, as the root user, enter the following command to temporarily switch to the new user (substitute your own user name):
Now you will be in your new user’s home directory.
Create a new directory called and restrict its permissions with the following commands:
Now open a file in called with a text editor. We will use to edit the file:
Now insert your public key (which should be in your clipboard) by pasting it into the editor.
Hit to exit the file, then to save the changes that you made, then to confirm the file name.
Now restrict the permissions of the authorized_keys file with this command:
Type this command once to return to the user:
Now your public key is installed, and you can use SSH keys to log in as your user.
To read more about how key authentication works, read this tutorial: How To Configure SSH Key-Based Authentication on a Linux Server.
Next, we’ll show you how to increase your server’s security by disabling password authentication.
Помощь в конфигурации: фильтрация пакетов щелчком кнопкой мыши
Следующем мы рассмотрим, как из бесчисленных команд iptables составить фильтр пакетов, имеющий форму сценария. Однако для создания такого сценария вам понадобится внимательно изучить соответствующий материал. Обычному пользователю Linux такие знания определенно не потребуются — во многих дистрибутивах система выполняет эту часть работы за пользователя: удобные конфигурационные инструменты позволяют создавать несложные фаерволы, просто щелкая кнопками мыши — часть этой работы выполняется уже в ходе установки системы.
Конфигурационные инструменты — это хорошая идея. Однако за совсем простой настройкой фильтра пакетов скрывается больше ноу-хау в фильтрации пакетов, чем вы можете себе представить (если не займетесь вопросом фильтрации пакетов совсем плотно). Часто результат бывает более эффективным, чем собственное решение.
Проблема заключается в самой реализации процесса: созданный таким образом фильтр пакетов, по существу, является «черным ящиком». Если и существует документация о том, как именно функционирует такой фильтр, то весьма скудная. Вы не знаете, от чего вас защищает такой фильтр, и не знаете, какие побочные эффекты он дает при работе. Может случиться так, что вы будете несколько дней ломать голову, почему же в сети не работает вывод на печать, и обнаружите, что
этого просто не допускает фильтр пакетов. В таком случае попытка соответствующим образом откорректировать фильтр пакетов, скорее всего, потерпит фиаско, так как фильтр недостаточно документирован, а конфигурация недостаточно гибка.
Allow Connections to a Specific Network Interface
If you want to create a firewall rule that only applies to a specific network interface, you can do so by specifying “allow in on” followed by the name of the network interface.
You may want to look up your network interfaces before continuing. To do so, use this command:
The highlighted output indicates the network interface names. They are typically named something like “eth0” or “eth1”.
So, if your server has a public network interface called , you could allow HTTP traffic (port 80) to it with this command:
Doing so would allow your server to receive HTTP requests from the public Internet.
Or, if you want your MySQL database server (port 3306) to listen for connections on the private network interface , for example, you could use this command:
This would allow other servers on your private network to connect to your MySQL database.
Firestarter
Это популярная, не зависящая от конкретного дистрибутива программа для конфигурации фаерволов. При первом запуске открывается ассистент для создания базовой конфигурации. Сначала выбирается интерфейс, через который все компьютеры соединяются с Интернетом. Благодаря флажку Запуск с выбором фаервола автоматически активизируется, как только устанавливается соединение с Интернетом. Если ваш компьютер обращается за сетевыми параметрами на DHCP-сервер, вам также потребуется установить флажок Получать IP-адрес от DHCP-сервера.
На втором этапе вы можете конфигурировать ваш компьютер как шлюз. При необходимости Firestarter одновременно может сконфигурировать DHCP-сервер dhcpd, но для этого предварительно требуется установить специальный пакет. Завершите работу ассистента, нажав кнопку Сохранить, но не Закончить, иначе отконфигурированные настройки будут сброшены. Фаервол сразу же становится активен и в дальнейшем автоматически запускается при включении компьютера или при установлении соединения с Интернетом. Теперь ни один компьютер, находящийся в локальной сети или в Интернете, не может начать обмен информацией с вашим компьютером. Часто эта настройка оказывается излишне жесткой. Потребуются дополнительные правила, которые позволят другим компьютерам обмениваться информацией с вашим.
Чтобы задать новые правила, выполните Система > Управление системой > Быстрый запуск, откройте вкладку Безопасность, выберите Правила для поступающего трафика и щелкните кнопкой мыши на области списка Разрешать подключения или Разрешать службу. Только теперь станет активной кнопка Добавить указание, которая открывает конфигурационное диалоговое окно. Новое правило активизируется нажатием кнопки Применить указание. Количество правил фильтра. Команда iptables -L | wc -l позволяет оценить, какое количество правил используется при работе активного в данный момент фаервола. Итоговое число позволяет судить о том, насколько сложен фаервол, но ничего не говорит о степени его надежности! Лучше всего полностью подавить весь сетевой трафик, а для этого обычно достаточно одного-двух правил.
Deny Connections
If you haven’t changed the default policy for incoming connections, UFW is configured to deny all incoming connections. Generally, this simplifies the process of creating a secure firewall policy by requiring you to create rules that explicitly allow specific ports and IP addresses through. However, sometimes you will want to deny specific connections based on the source IP address or subnet, perhaps because you know that your server is being attacked from there. Also, if you want change your default incoming policy to allow (which isn’t recommended in the interest of security), you would need to create deny rules for any services or IP addresses that you don’t want to allow connections for.
To write deny rules, you can use the commands that we described above except you need to replace “allow” with “deny”.
For example to deny HTTP connections, you could use this command:
Or if you want to deny all connections from you could use this command:
If you need help writing any other deny rules, just look at the previous allow rules and update them accordingly.
Now let’s take a look at how to delete rules.
Step 1 — Using IPv6 with UFW (Optional)
This tutorial is written with IPv4 in mind, but will work for IPv6 as well as long as you enable it. If your Ubuntu server has IPv6 enabled, ensure that UFW is configured to support IPv6 so that it will manage firewall rules for IPv6 in addition to IPv4. To do this, open the UFW configuration with or your favorite editor.
Then make sure the value of is . It should look like this:
/etc/default/ufw excerpt
Save and close the file. Now, when UFW is enabled, it will be configured to write both IPv4 and IPv6 firewall rules. However, before enabling UFW, we will want to ensure that your firewall is configured to allow you to connect via SSH. Let’s start with setting the default policies.
Базовая настройка
По умолчанию брандмауэр запрещает все входящие соединения и разрешает все исходящие. Такая политика идеальна с точки зрения безопасности (дальше вы поймете почему) — ведь если кто-то (и вы в том числе) захочет к нему подключиться, что у него это не получится. В то же время приложения на сервере смогут создавать исходящие соединения.
Рассмотрим две команды:
ufw default deny incoming
ufw default allow outgoing
Данные два правила как раз и задают политику по умолчанию — запрещаются все входящие соединения и разрешаются все исходящие.
Итак, все входящие соединения запрещены. Чтобы к серверу можно было «достучаться» по определенному порту, его нужно сначала открыть. UFW хорош тем, что вам даже не нужно помнить номер порта — нужно знать только название сервиса. Например, вот как можно разрешить подключение по SSH:
ufw allow ssh
При этом UFW сам создаст правило для порта 22 — именно этот порт используется для SSH. Брандмауэр знает порты и имена всех распространенных служб (http, ssh, ftp, sftp и т. д.).
Однако если вы перенастроили ssh на нестандартный порт из соображений той же безопасности, нужно явно указать номер порта:
ufw allow 3333
После разрешения ssh (это главное, чтобы сейчас файрвол нам не разорвал соединение) можно включить ufw командой:
ufw enable
Необходимо подтвердить запуск, ответив y:
Command may disrupt existing ssh connections. Proceed with operation (y|n)?
Посмотрите на следующий скриншот.
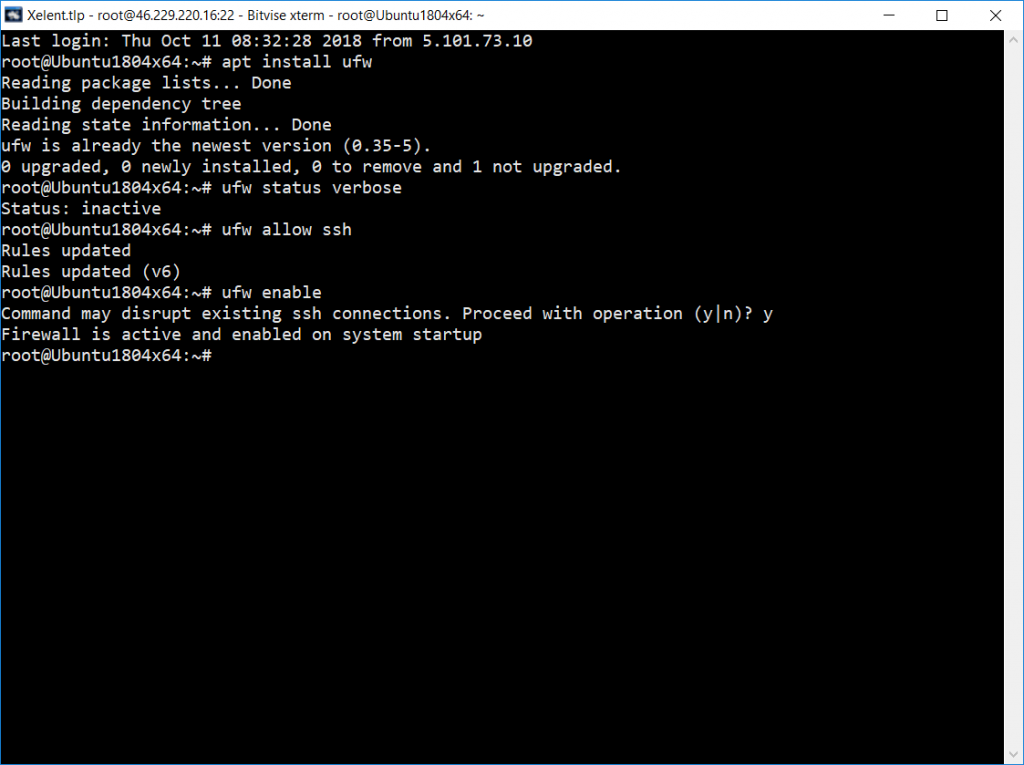
Базовая настройка выполнена
Посмотрим, что произошло. Сначала мы разрешили ssh, на что получили ответ, что правила обновлены:
Rules updated
Затем мы включаем файрвол и получаем сообщение, что он активен и будет запускаться при загрузке системы.
На этом базовая настройка выполнена — ssh успешно работает и мы можем приступить к дальнейшей настройке фильтра пакетов.
Если облака для вас
не просто теория
Широкий спектр услуг
по выделенным северам
и мультиклауд-решениям
Конфигурация VPS и бесплатный тест уже через 2 минуты
Сконфигурировать VPS
Организация вашей IT-инфраструктуры на основе мультиклауд-решения
Запросить КП
Шаг 5 — Разрешение других соединений
К этому моменту вы должны были разрешить все другие соединения, необходимые вашему серверу. Состав разрешаемых соединений должен соответствовать вашим конкретным потребностям. К счастью, вы уже знаете, как писать правила, разрешающие соединения по имени службы или номеру порта, поскольку мы уже делали это для SSH на порту . Также вы можете использовать это для следующих соединений:
- соединения HTTP на порту 80, которые используются веб-серверами без шифрования, с помощью команды или
- соединения HTTPS на порту 443, которые используются веб-серверами с шифрованием, с помощью команды или
Помимо указания порта или службы есть другие способы разрешить другие соединения.
Определенные диапазоны портов
С помощью UFW вы можете указывать диапазоны портов. Некоторые приложения используют для соединений не один порт, а несколько.
Например, чтобы разрешить соединения X11, которые используют порты -, нужно использовать следующие команды:
Когда вы указываете диапазоны портов с помощью UFW, вы должны указать протокол ( или ), к которому должны применяться эти правила. Мы не упоминали этого ранее, поскольку если протокол не указать, оба протокола будут разрешены, что подходит для большинства случаев.
Конкретные IP-адреса
При работе с UFW вы также можете указывать конкретные IP-адреса. Например, если вы хотите разрешить соединения с определенного IP-адреса, например с рабочего или домашнего адреса , вам нужно использовать опцию , а затем указать IP-адрес:
Также вы можете указать определенный порт, к которому IP-адресу разрешено подключаться. Для этого нужно добавить опцию , а затем указать номер порта. Например, если вы хотите разрешить IP-адресу подключаться к порту (SSH), нужно использовать следующую команду:
Подсети
Если вы хотите разрешить подсеть IP-адресов, вы можете указать маску сети с помощью нотации CIDR. Например, если вы хотите разрешить все IP-адреса в диапазоне от до , вы можете использовать следующую команду:
Также вы можете указывать порт назначения, к которому разрешено подключаться подсети . В качестве примера мы используем порт (SSH):
Подключения к определенному сетевому интерфейсу
Если вы хотите создать правило брандмауэра, применимое только к определенному сетевому интерфейсу, вы можете использовать для этого опцию «allow in on», а затем указать имя сетевого интерфейса.
Прежде чем продолжить, вам может понадобиться просмотреть сетевые интерфейсы. Для этого нужно использовать следующую команду:
В выделенной части результатов показаны имена сетевых интерфейсов. Обычно они носят имена вида или .
Если на вашем сервере имеется публичный сетевой интерфейс под названием , вы можете разрешить трафик HTTP (порт ) для этого интерфейса с помощью следующей команды:
Это позволит вашему серверу принимать запросы HTTP из публичной части интернета.
Если вы хотите использовать сервер базы данных MySQL (порт ) для прослушивания соединений на интерфейсе частной сети (например, ), вы можете использовать следующую команду:
Это позволит другим серверам в вашей частной сети подключаться к вашей базе данных MySQL.
Step 5 — Allowing Other Connections
At this point, you should allow all of the other connections that your server needs to respond to. The connections that you should allow depends on your specific needs. Luckily, you already know how to write rules that allow connections based on a service name or port; we already did this for SSH on port . You can also do this for:
- HTTP on port 80, which is what unencrypted web servers use, using or
- HTTPS on port 443, which is what encrypted web servers use, using or
There are several others ways to allow other connections, aside from specifying a port or known service.
Specific Port Ranges
You can specify port ranges with UFW. Some applications use multiple ports, instead of a single port.
For example, to allow X11 connections, which use ports -, use these commands:
When specifying port ranges with UFW, you must specify the protocol ( or ) that the rules should apply to. We haven’t mentioned this before because not specifying the protocol automatically allows both protocols, which is OK in most cases.
Specific IP Addresses
When working with UFW, you can also specify IP addresses. For example, if you want to allow connections from a specific IP address, such as a work or home IP address of , you need to specify , then the IP address:
You can also specify a specific port that the IP address is allowed to connect to by adding followed by the port number. For example, If you want to allow to connect to port (SSH), use this command:
Subnets
If you want to allow a subnet of IP addresses, you can do so using CIDR notation to specify a netmask. For example, if you want to allow all of the IP addresses ranging from to you could use this command:
Likewise, you may also specify the destination port that the subnet is allowed to connect to. Again, we’ll use port (SSH) as an example:
Connections to a Specific Network Interface
If you want to create a firewall rule that only applies to a specific network interface, you can do so by specifying “allow in on” followed by the name of the network interface.
You may want to look up your network interfaces before continuing. To do so, use this command:
The highlighted output indicates the network interface names. They are typically named something like or .
So, if your server has a public network interface called , you could allow HTTP traffic (port ) to it with this command:
Doing so would allow your server to receive HTTP requests from the public internet.
Or, if you want your MySQL database server (port ) to listen for connections on the private network interface , for example, you could use this command:
This would allow other servers on your private network to connect to your MySQL database.
Step 6 — Denying Connections
If you haven’t changed the default policy for incoming connections, UFW is configured to deny all incoming connections. Generally, this simplifies the process of creating a secure firewall policy by requiring you to create rules that explicitly allow specific ports and IP addresses through.
However, sometimes you will want to deny specific connections based on the source IP address or subnet, perhaps because you know that your server is being attacked from there. Also, if you want change your default incoming policy to allow (which isn’t recommended in the interest of security), you would need to create deny rules for any services or IP addresses that you don’t want to allow connections for.
To write deny rules, you can use the commands described above, replacing allow with deny.
For example, to deny HTTP connections, you could use this command:
Or if you want to deny all connections from you could use this command:
Now let’s take a look at how to delete rules.
Действия
За переадресацию пакетов отвечает ядро — независимо от того, приходят они с сетевого интерфейса или создаются на компьютере одной из локальных программ. Ядро может совершать на различных уровнях фильтрующей системы три разных действия.
Deny — переадресация пакетов отклоняется без запроса о подтверждении (можно сказать, что при этом пакет удаляется и больше не существует). Отправитель никогда не узнает, что произошло с его пакетом. Reject — переадресация пакетов отклоняется с запросом о подтверждении. С пакетом происходит то же, что и в первом случае, но отправитель с другим ICMP-пакетом получает уведомление о том, что его пакет не был принят.
Accept — пакет переадресовывается.
Шаг 6 — Разрешение других соединений
К этому моменту вы должны были разрешить все другие соединения, необходимые вашему серверу. Состав разрешаемых соединений должен соответствовать вашим конкретным потребностям. К счастью, вы уже знаете, как писать правила, разрешающие соединения по имени службы или номеру порта, поскольку мы уже делали это для SSH на порту . Также вы можете использовать это для следующих соединений:
- соединения HTTP на порту 80, которые используются веб-серверами без шифрования, с помощью команды или
- соединения HTTPS на порту 443, которые используются веб-серверами с шифрованием, с помощью команды или
Помимо указания порта или службы есть другие способы разрешить другие соединения.
Определенные диапазоны портов
С помощью UFW вы можете указывать диапазоны портов. Некоторые приложения используют для соединений не один порт, а несколько.
Например, чтобы разрешить соединения X11, которые используют порты -, нужно использовать следующие команды:
Когда вы указываете диапазоны портов с помощью UFW, вы должны указать протокол ( или ), к которому должны применяться эти правила. Мы не упоминали этого ранее, поскольку если протокол не указать, оба протокола будут разрешены, что подходит для большинства случаев.
Конкретные IP-адреса
При работе с UFW вы также можете указывать конкретные IP-адреса. Например, если вы хотите разрешить соединения с определенного IP-адреса, например с рабочего или домашнего адреса , вам нужно использовать опцию , а затем указать IP-адрес:
Также вы можете указать определенный порт, к которому IP-адресу разрешено подключаться. Для этого нужно добавить опцию , а затем указать номер порта. Например, если вы хотите разрешить IP-адресу подключаться к порту (SSH), нужно использовать следующую команду:
Подсети
Если вы хотите разрешить подсеть IP-адресов, вы можете указать маску сети с помощью нотации CIDR. Например, если вы хотите разрешить все IP-адреса в диапазоне от до , вы можете использовать следующую команду:
Также вы можете указывать порт назначения, к которому разрешено подключаться подсети . В качестве примера мы используем порт (SSH):
Подключения к определенному сетевому интерфейсу
Если вы хотите создать правило брандмауэра, применимое только к определенному сетевому интерфейсу, вы можете использовать для этого опцию «allow in on», а затем указать имя сетевого интерфейса.
Прежде чем продолжить, вам может понадобиться просмотреть сетевые интерфейсы. Для этого нужно использовать следующую команду:
В выделенной части результатов показаны имена сетевых интерфейсов. Обычно они носят имена вида или .
Если на вашем сервере имеется публичный сетевой интерфейс под названием вы можете разрешить трафик HTTP (порт ) для этого интерфейса с помощью следующей команды:
Это позволит вашему серверу принимать запросы HTTP из публичной части интернета.
Если вы хотите использовать сервер базы данных MySQL (порт ) для прослушивания соединений на интерфейсе частной сети (например, ), вы можете использовать следующую команду:
Это позволит другим серверам в вашей частной сети подключаться к вашей базе данных MySQL.
Block an IP Address
To block all network connections that originate from a specific IP address, for example, run this command:
In this example, specifies a source IP address of “15.15.15.51”. If you wish, a subnet, such as , may be specified here instead. The source IP address can be specified in any firewall rule, including an allow rule.
Block Connections to a Network Interface
To block connections from a specific IP address, e.g. , to a specific network interface, e.g. , use this command:
This is the same as the previous example, with the addition of . The network interface can be specified in any firewall rule, and is a great way to limit the rule to a particular network.
Service: Mail
Mail servers, such as Sendmail and Postfix, listen on a variety of ports depending on the protocols being used for mail delivery. If you are running a mail server, determine which protocols you are using and allow the appropriate types of traffic. We will also show you how to create a rule to block outgoing SMTP mail.
Block Outgoing SMTP Mail
If your server shouldn’t be sending outgoing mail, you may want to block that kind of traffic. To block outgoing SMTP mail, which uses port 25, run this command:
This configures your firewall to drop all outgoing traffic on port 25. If you need to reject a different service by its port number, instead of port 25, simply replace it.
Allow All Incoming SMTP
To allow your server to respond to SMTP connections, port 25, run this command:
Note: It is common for SMTP servers to use port 587 for outbound mail.
Service: PostgreSQL
PostgreSQL listens for client connections on port 5432. If your PostgreSQL database server is being used by a client on a remote server, you need to be sure to allow that traffic.
PostgreSQL from Specific IP Address or Subnet
To allow incoming PostgreSQL connections from a specific IP address or subnet, specify the source. For example, if you want to allow the entire subnet, run this command:
The second command, which allows the outgoing traffic of established PostgreSQL connections, is only necessary if the policy is not set to .
Allow PostgreSQL to Specific Network Interface
To allow PostgreSQL connections to a specific network interface—say you have a private network interface , for example—use this command:
The second command, which allows the outgoing traffic of established PostgreSQL connections, is only necessary if the policy is not set to .
Passo 9 — Desabilitando ou redefinindo o UFW (opcional)
Se você decidir que não quer usar o UFW, você pode desativá-lo com este comando:
Quaisquer regras que você tenha criado com o UFW já não estarão mais ativas. Você sempre poderá executar se precisar ativá-lo mais tarde.
Se você já tiver regras do UFW configuradas, mas decidir que quer começar novamente, você pode usar o comando de redefinição:
Isso irá desabilitar o UFW e excluir quaisquer regras que tiverem sido definidas anteriormente. Lembre-se de que as políticas padrão não irão voltar para suas configurações originais se, em algum momento, você as tiver alterado. Isso deve dar a você um novo começo com o UFW.
Step Three — Root Privileges
Now, we have a new user account with regular account privileges. However, we may sometimes need to do administrative tasks.
To avoid having to log out of our normal user and log back in as the root account, we can set up what is known as “superuser” or root privileges for our normal account. This will allow our normal user to run commands with administrative privileges by putting the word before each command.
To add these privileges to our new user, we need to add the new user to the “sudo” group. By default, on Ubuntu 16.04, users who belong to the “sudo” group are allowed to use the command.
As , run this command to add your new user to the sudo group (substitute the highlighted word with your new user):
Now your user can run commands with superuser privileges! For more information about how this works, check out this sudoers tutorial.
If you want to increase the security of your server, follow the rest of the steps in this tutorial.
Passo 7 — Excluindo regras
Saber como excluir regras do firewall é tão importante quanto saber como criá-las. Há duas maneiras diferentes para especificar quais regras excluir: pelo número da regra ou pela regra em si (semelhante ao modo como as regras foram especificadas quando foram criadas). Vamos começar com o método *excluir pelo número *da regra porque é mais fácil.
Pelo número da regra
Se você estiver usando o número da regra para excluir regras do firewall, a primeira coisa que você vai querer fazer é obter uma lista das regras do seu firewall. O comando status do UFW tem uma opção para mostrar números ao lado de cada regra, como demonstrado aqui:
Se decidirmos que queremos excluir a regra 2, aquela que permite conexões na porta 80 (HTTP), podemos especificar isso em um comando delete do UFW desta forma:
Isso mostraria um prompt de confirmação e então excluiria a regra 2, que permite conexões HTTP. Note que se você tivesse o IPv6 habilitado, você iria querer excluir a regra correspondente ao IPv6 também.
Pela regra
A alternativa para os números das regras é especificar a regra propriamente dita a ser excluída. Por exemplo, se quiser remover a regra , você pode escrever desta forma:
Você também poderia especificar a regra por , em vez de pelo nome do serviço:
Esse método irá excluir as regras do IPv4 e do IPv6, se houver.
Passo 6 — Negando conexões
Se você não tiver mudado a política padrão para conexões de entrada, o UFW está configurado para negar todas as conexões de entrada. Geralmente, isso simplifica o processo de criação de uma política de firewall segura ao exigir que você crie regras que permitam explicitamente portas e endereços IP específicos.
No entanto, algumas vezes você irá querer negar conexões específicas baseadas no endereço IP ou na sub-rede da origem, talvez porque você saiba que seu servidor está sendo atacado a partir daí. Além disso, se você quisesse alterar sua política de entrada padrão para permitir (allow) (o que não é recomendado), você precisaria criar regras para negar (deny) quaisquer serviços ou endereços IP para os quais você não quisesse permitir conexões.
Para escrever regras de deny, você pode usar os comandos descritos acima, substituindo allow por deny.
Por exemplo, para negar conexões HTTP, você pode usar este comando:
Ou se você quiser negar todas as conexões do endereço você pode usar este comando:
Agora, vamos ver como excluir regras.
Service: Web Server
Web servers, such as Apache and Nginx, typically listen for requests on port 80 and 443 for HTTP and HTTPS connections, respectively. If your default policy for incoming traffic is set to drop or deny, you will want to create rules that will allow your server to respond to those requests.
Allow All Incoming HTTP
To allow all incoming HTTP (port 80) connections run this command:
An alternative syntax is to specify the port number of the HTTP service:
Allow All Incoming HTTPS
To allow all incoming HTTPS (port 443) connections run this command:
An alternative syntax is to specify the port number of the HTTPS service:
Allow All Incoming HTTP and HTTPS
If you want to allow both HTTP and HTTPS traffic, you can create a single rule that allows both ports. To allow all incoming HTTP and HTTPS (port 443) connections run this command:
Note that you need to specify the protocol, with , when specifying multiple ports.
Deleting Rules
There are two options to delete rules. The most straightforward one is to use the following syntax:
sudo ufw delete allow ssh
As you can see, we use the command “delete” and input the rules you want to eliminate after that. Other examples include:
sudo ufw delete allow 80/tcp
or
sudo ufw delete allow 1000:2000/tcp
This can get tricky when you have rules that are long and complex.
A simpler, two-step alternative is to type:
sudo ufw status numbered
which will have UFW list out all the current rules in a numbered list. Then, we issue the command:
sudo ufw delete
where “” is the line number from the previous command.
Ubuntu.
В Ubuntu по умолчанию фаервол не создается, отсутствуют и соответствующие конфигурационные инструменты, но есть команда ufw («несложный фаервол»). Она позволяет задавать правила для фаервола с применением гораздо более простого синтаксиса, чем в iptables. Кроме того, предполагается, что в будущих версиях Ubuntu одновременно с установкой сетевых служб будут инсталлироваться соответствующие ufw-правила, обеспечивающие безопасность. Разумеется, до этого еще надо дожить: пока ufw применяется не так широко.
Если вам уже приходилось работать с фильтрами пакетов, то с ufw вы быстро добьетесь того, чего хотите. Кратко опишу синтаксис этой команды (более подробно этот вопрос рассмотрен в man ufw): ufw enable активизирует фаервол. В дальнейшем он будет автоматически активизироваться при каждом запуске компьютера. Команда ufw disable снова деактивизирует фаервол. Команда ufw default allow|deny указывает, как в принципе следует поступать со входящими пакетами: принимать или отклонять (как правило, действует параметр deny). Дополнительно, с помощью ufw allow|deny n или ufw allow|deny service вы определяете правила, которые будут действовать для отдельных портов или протоколов.
Все правила сохраняются в конфигурационных файлах в /etc/ufw. Команда ufw status выдает информацию о текущем состоянии фаервола.
Creating IP Address Whitelist with UFW
Now let’s say you run a OpenSSH server and you only want to allow certain IP address to log in to your server through SSH. You can use UFW to create an IP address whitelist. For example, I don’t have static IP address in my home, but I have set up several VPN servers on the cloud, so now I can configure UFW to allow inbound connection to port 22 from the IP address of my VPN server only.
First, add the IP address to the allow list.
sudo ufw insert 1 allow in from 12.34.56.78 to any port 22 proto tcp
Then you need to get the reference number of the allow SSH from anywhere rule and delete that rule.
sudo ufw status numbered

sudo ufw delete reference-number
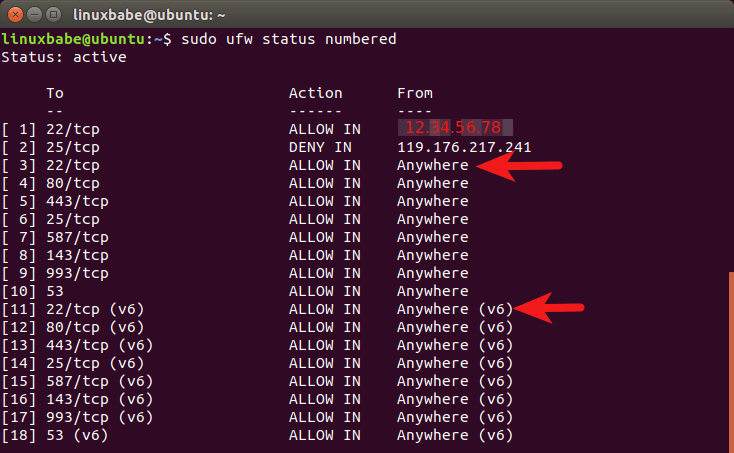
Note that you need to delete both the IPv4 and IPv6 rule. Also notice that if you delete the upper rule first, the reference number of the lower rule will change.
From here on out, only your IP address can access TCP port 22.
Step Six — Test Log In
Now, before you log out of the server, you should test your new configuration. Do not disconnect until you confirm that you can successfully log in via SSH.
In a new terminal on your local machine, log in to your server using the new account that we created. To do so, use this command (substitute your username and server IP address):
If you added public key authentication to your user, as described in steps four and five, your private key will be used as authentication. Otherwise, you will be prompted for your user’s password.
Note about key authentication: If you created your key pair with a passphrase, you will be prompted to enter the passphrase for your key. Otherwise, if your key pair is passphrase-less, you should be logged in to your server without a password.
Once authentication is provided to the server, you will be logged in as your new user.
Remember, if you need to run a command with root privileges, type “sudo” before it like this: