Начало работы с anaconda
Содержание:
- Advanced configuration
- Disallow soft-linking (allow_softlinks)
- Set a channel alias (channel_alias)
- Always add packages by default (create_default_packages)
- Track features (track_features)
- Disable updating of dependencies (update_dependencies)
- Disallow installation of specific packages (disallow)
- Add Anaconda.org token to automatically see private packages (add_anaconda_token)
- Specify environment directories (envs_dirs)
- Specify package directories (pkgs_dirs)
- Listing package dependencies
- Установка Anacoda в Ubuntu
- Пакетный менеджер conda
- Creating an environment with commands
- Поиск и установка приложений
- Installation
- Установка Anaconda
- Development
- Home tab
- Виртуальное окружение Conda
- Installing packages
- Configuration
- Segmentation fault on package import with macOS Python 3.7 intepreter
- The system cannot find the path specified on Windows
- Preventing packages from updating (pinning)
- Saving environment variables
Advanced configuration
Disallow soft-linking (allow_softlinks)
When is , conda uses hard-links when
possible and soft-links—symlinks—when hard-links are not
possible, such as when installing on a different file system
than the one that the package cache is on.
When is , conda still uses
hard-links when possible, but when it is not possible, conda
copies files. Individual packages can override this option,
specifying that certain files should never be soft-linked.
EXAMPLE:
allow_softlinks False
Set a channel alias (channel_alias)
Whenever you use the or flag to give conda a
channel name that is not a URL, conda prepends the
to the name that it was given. The default is
https://conda.anaconda.org.
If is set
to , then a user who runs the
command will install the
package some-package from https://my.anaconda.repo:8080/conda/conda-forge.
For example, the command:
conda install --channel asmeurer <package>
is the same as:
conda install --channel https//conda.anaconda.orgasmeurer <package>
You can set to your own repository.
EXAMPLE: To set to your repository at
https://your.repo.com:
channel_alias https://your.repo/
On Windows, you must include a slash («/») at the end of the URL:
EXAMPLE: https://your.repo/conda/
When set to your repository at
https://your.repo.com:
conda install --channel jsmith <package>
is the same as:
conda install --channel https//your.repo.comjsmith <package>
Always add packages by default (create_default_packages)
When creating new environments, add the specified packages by
default. The default packages are installed in every environment
you create. You can override this option at the command prompt
with the flag. The default is to not
include any packages.
EXAMPLE:
create_default_packages
  - pip
  - ipython
  - scipy=0.15.0
Track features (track_features)
Enable certain features to be tracked by default. The default is
to not track any features. This is similar to adding MKL to
the list.
EXAMPLE:
track_features
  - mkl
Disable updating of dependencies (update_dependencies)
By default, updates the given package to the
latest version and installs any dependencies necessary for
that package. However, if dependencies that satisfy the package’s
requirements are already installed, conda will not update those
packages to the latest version.
In this case, if you would prefer that conda update all dependencies
to the latest version that is compatible with the environment,
set to .
The default is .
EXAMPLE:
update_dependencies True
Note
Conda still ensures that dependency specifications are
satisfied. Thus, some dependencies may still be updated or,
conversely, this may prevent packages given at the command line
from being updated to their latest versions. You can always
specify versions at the command line to force conda to install a
given version, such as .
To avoid updating only specific packages in an environment, a
better option may be to pin them. For more information, see
.
Disallow installation of specific packages (disallow)
Disallow the installation of certain packages. The default is to
allow installation of all packages.
EXAMPLE:
disallow
  - anaconda
Add Anaconda.org token to automatically see private packages (add_anaconda_token)
When the channel alias is Anaconda.org or an Anaconda Server GUI,
you can set the system configuration so that users automatically
see private packages. Anaconda.org was formerly known as
binstar.org. This uses the Anaconda command-line client, which
you can install with , to
automatically add the token to the channel URLs.
The default is .
EXAMPLE:
add_anaconda_token False
Note
Even when set to , this setting is enabled only if
the Anaconda command-line client is installed and you are
logged in with the command.
Specify environment directories (envs_dirs)
Specify directories in which environments are located. If this
key is set, the root prefix is not used unless
explicitly included. This key also determines where the package
caches are located.
For each envs here, is used as the pkgs cache,
except for the standard directory in the root
directory, for which the normal is used.
EXAMPLE:
envs_dirs
  - ~/my-envs
  - /opt/anaconda/envs
The environment variable overwrites the setting:
-
For macOS and Linux:
-
For Windows:
Specify package directories (pkgs_dirs)
Specify directories in which packages are located. If this
key is set, the root prefix is not used unless
explicitly included.
If the key is not set, then is used
as the pkgs cache, except for the standard directory in the root
directory, for which the normal is used.
EXAMPLE:
pkgs_dirs
  - /opt/anaconda/pkgs
The environment variable overwrites the
setting:
-
For macOS and Linux:
-
For Windows:
Listing package dependencies
To find what packages are depending on a specific package in
your environment, there is not one specific conda command.
It requires a series of steps:
-
List the dependencies that a specific package requires to run:
-
Find your installation’s package cache directory:
-
Find package dependencies. By default, Anaconda/Miniconda stores packages in ~/anaconda/pkgs/ (or ~/opt/pkgs/ on macOS Catalina).
Each package has an index.json file which lists the package’s dependencies.
This file resides in ~anaconda/pkgs/package_name/info/index.json. -
Now you can find what packages depend on a specific package. Use grep to search all index.json files
as follows:
The result will be the full package path and version of anything containing the <package_name>.
Example:
Output from the above command:
Userstestuseranaconda3pkgsanaconda-4.3.-np111py36_0infoindex.json numpy 1.11.3 py36_0
Userstestuseranaconda3pkgsanaconda-4.3.-np111py36_0infoindex.json numpydoc 0.6. py36_0
Userstestuseranaconda3pkgsanaconda-4.3.-np111py36_0infoindex.json numpy 1.11.3 py36_0
Установка Anacoda в Ubuntu
1. Скачивание и установка программы
Сначала нужно скачать установщик платформы с официального сайта. На момент написания статьи самая свежая версия программы — 2019.03. Нажмите кнопку Download, а затем выберите операционную систему Linux:

Вы можете скачать программу прямо в браузере или скопировать ссылку для загрузки через wget. Например, для текущей версии команда будет выглядеть так:

Поскольку это достаточно большой файл, после завершения загрузки желательно проверить его по контрольной суме. Найти контрольную сумму загруженного файла можно командой:

Далее запустите полученный скрипт:
На первом шаге установки нажмите Enter, затем наберите yes, чтобы принять лицензионное соглашение:

Далее нужно выбрать папку, куда будет установлена программа:

Затем пойдёт установка Anaconda 3 Ubuntu. Процесс установки займёт некоторое время.

В конце установки программа предложит изменить ~/.bashrc таким образом, чтобы Сonda запускалась автоматически при запуске терминала. Если вы не сделали это во время установки, то это можно выполнить потом командой:
Затем выполните следующую команду, чтобы система перечитала настройки:
Теперь вы можете проверить, всё ли работает, выполнив такую команду:

На этом установка Anaconda Ubuntu завершена.
2. Обновление Anaconda
Обновление Anaconda тоже достаточно просто выполнить. Сначала нужно обновить инструмент conda. Для этого выполните:
На вопросы программы отвечайте y. Когда обновление завершится, можно обновить саму Anaconda 3:
Аналогично предыдущему пункту, нажмите y, чтобы продолжить обновление.
3. Окружения Conda
Как я уже сказал, Сonda — это пакетный менеджер, а также это менеджер окружений. Вы можете создать несколько окружений с разными версиями Python, а также с разными установленными в них библиотеками. Посмотреть список доступных окружений можно командой:

Для активации окружения используется команда activate. Например, сделаем активным окружение base:
Также вы можете создать новое окружение с другой версией Python. Например, сделаем окружение с Python 3.5:
Программа создаст окружение и сообщит, какие пакеты ей надо установить, соглашаемся на установку:

Затем активируем нужное окружение:

Чтобы деактивировать текущее окружение, используйте команду deactivate:
Чтобы удалить окружение ptn35env, нужно использовать не команду uninstall, а remove:
4. Установка пакетов Conda
Посмотреть список установленных пакетов можно командой list:

Чтобы найти нужный пакет, используйте search, например, ищем пакетный менеджер Python — pip:

А для установки пакета используйте install. Например, установим tensorflow:

Удалить пакет можно командой remove:
Пакетный менеджер conda
См.также
После установки дистрибутива Anaconda в командной строке (cmd.exe) должна
появится команда пакетного менеджера conda.
Проверим версию выполнив команду в терминале:
C\Users\user>conda --version
conda 4.3.30
Неплохо было бы обновится до последней версии, делается это командой update:
C:\Users\user>conda update conda
Fetching package metadata ...............
Solving package specifications: .

Package plan for installation in environment C:\Users\user\Anaconda3:

The following packages will be UPDATED:

    conda:   4.3.30-py36h404fb56_0 --> 4.5.11-py36_0
    pycosat: 0.6.1-py36_1          --> 0.6.3-py36hfa6e2cd_0

Proceed (/n)? y

pycosat-0.6.3- 100% |###############################| Time: 0:00:00   1.40 MB/s
conda-4.5.11-p 100% |###############################| Time: 0:00:00   5.15 MB/s
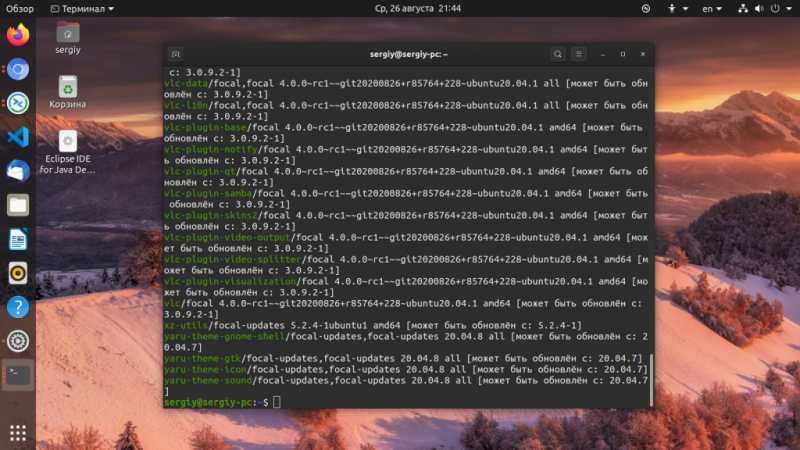
Anaconda дополнительно устанавливает множество различных python пакетов для
того, что бы узнать, что у нас установлено необходимо выполнить команду list:
Creating an environment with commands
Tip
By default, environments are installed into the
directory in your conda directory. See
or run for information on specifying
a different path.
Use the terminal or an Anaconda Prompt for the following steps:
-
To create an environment:
conda create --name myenv
Note
Replace with the environment name.
-
When conda asks you to proceed, type :
proceed (/n)?
-
To create an environment with a specific version of Python:
conda create -n myenv python=3.6
-
To create an environment with a specific package:
conda create -n myenv scipy
OR:
conda create -n myenv python
conda install -n myenv scipy
-
To create an environment with a specific version of a package:
conda create -n myenv scipy=.15.0
OR:
conda create -n myenv python
conda install -n myenv scipy=.15.0
-
To create an environment with a specific version of Python and
multiple packages:
To automatically install pip or another program every time a new
environment is created, add the default programs to the
section
of your configuration file. The default packages are
installed every time you create a new environment. If you do not
want the default packages installed in a particular environment,
use the flag:
conda create --no-default-packages -n myenv python
Поиск и установка приложений
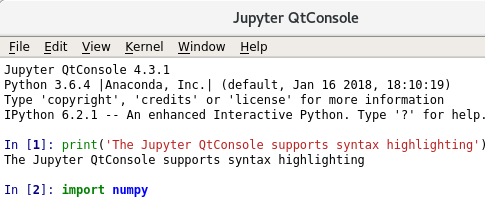
Запустив Navigator, я смог исследовать разнообразие приложений, поставляющихся с Anaconda Distribution. Согласно документации, версия Anaconda для Python 3.6 (64 бита) поддерживает 499 пакетов. Первым приложением, с которым я ознакомился, было Jupyter QtConsole. Его простой в использовании GUI поддерживает встроенные графики и подсветку синтаксиса.
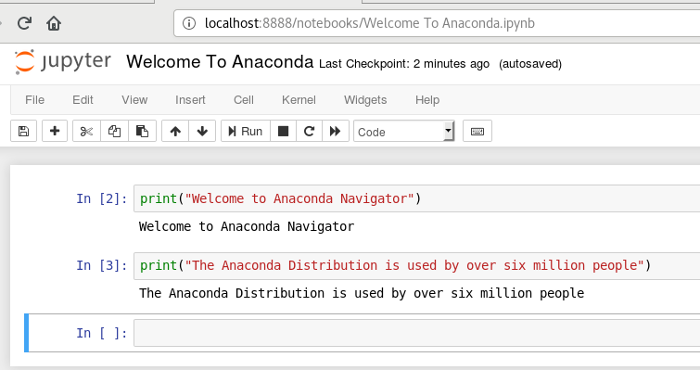
Jupyter Notebook уже включен в дистрибутив, поэтому в отдельной установке нет нужды (в отличие от других сред разработки Python, которыми мне приходилось пользоваться).
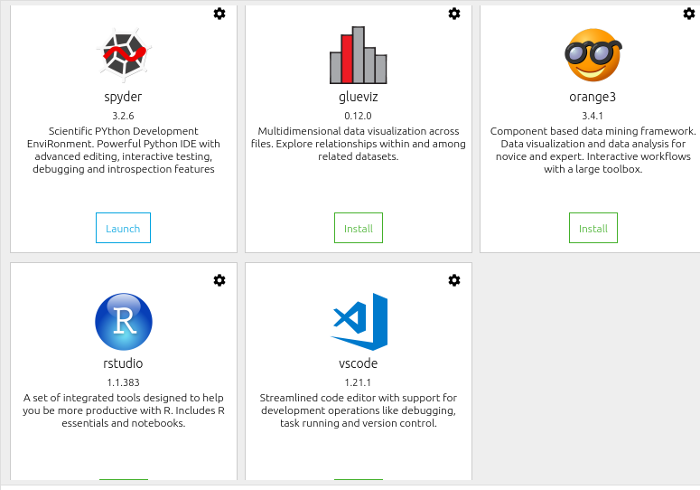
С RStudio я уже был знаком. Этот инструментарий не установлен по умолчанию, но добавляется одним кликом мыши, как и целый ряд других приложений: JupyterLab, Orange, Glue, Spyder и т.д.
Одно из преимуществ дистрибутива Anaconda – возможность настроить несколько сред разработки. Например, если я захочу создать среду c Python 2.7 вместо дефолтной версии Python 3.6, я введу в консоли:
$ conda create -n py27 python=2.7 anaconda
Conda позаботится об установке. Чтобы ее запустить, введите в терминале:
$ anaconda-navigator
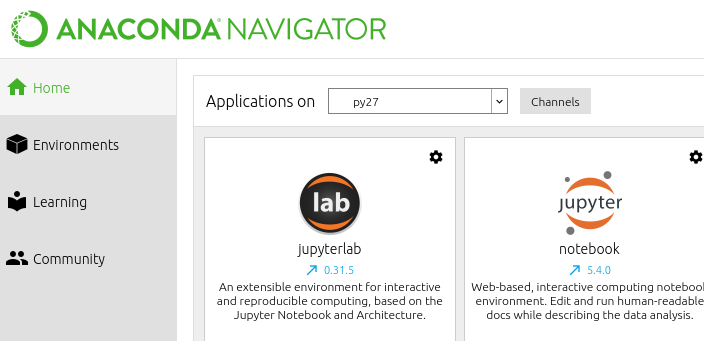
Выберите среду py27 из выпадающего списка «Приложения на» в Anaconda GUI.
Installation
For x86 systems.
-
In your browser, download the .
-
RECOMMENDED: Verify data integrity with SHA-256.
For more information on hashes, seeOpen a terminal and run the following:
sha256sum /path/filename
-
Enter the following to install Anaconda for Python 3.7:
bash ~/DownloadsAnaconda3-2020.02-Linux-x86_64.sh
OR Enter the following to install Anaconda for Python 2.7:
bash ~/DownloadsAnaconda2-2019.10-Linux-x86_64.sh
Note
Include the command regardless of whether or not you are
using Bash shell.Note
If you did not download to your Downloads directory, replace
with the path to the file you downloaded. -
The installer prompts “In order to continue the installation process,
please review the license agreement.” Click Enter to view license terms. -
Scroll to the bottom of the license terms and enter “Yes” to agree.
-
The installer prompts you to click Enter to accept the default install location,
CTRL-C to cancel the installation, or specify an alternate installation
directory. If you accept the default install location, the installer displays
“PREFIX=/home/<user>/anaconda<2 or 3>” and continues the installation.
It may take a few minutes to complete.Note
We recommend you accept the default install location. Do not choose the path as /usr for the
Anaconda/Miniconda installation. -
The installer prompts “Do you wish the installer to initialize Anaconda3
by running conda init?” We recommend “yes”.Note
If you enter “no”, then conda will not modify your shell scripts at all.
In order to initialize after the installation process is done, first run
and then run .
See . -
The installer finishes and displays “Thank you for installing Anaconda<2 or 3>!”
-
The installer provides a link to install PyCharm for Anaconda at
https://www.anaconda.com/pycharm. -
Close and open your terminal window for the installation to take
effect, or you can enter the command . -
To control whether or not each shell session has the base environment
activated or not, run . To run conda from anywhere without having the base environment
activated by default, use .
This only works if you have run first.Note
is available in conda versions 4.6.12 and later.
-
Note
If you install multiple versions of Anaconda, the system defaults to
the most current version as long as you haven’t altered the default install
path.
Установка Anaconda
Чтобы установить Anaconda на мой ноутбук (Linux, Core i3 с 4Гб RAM), я скачал установщик Anaconda 5.1 для Linux и запустил для файла проверку хеш-суммы :
$ md5sum Anaconda3-5.1.0-Linux-x86_64.sh
Дальше я последовал инструкциям в документации. Там предписывали запустить следующую bash-команду (даже если ваша командная оболочка — не Bash):
$ bash Anaconda3-5.1.0-Linux-x86_64.sh
Я в точности придерживался указаний, и процесс установки занял около 5 минут. Инсталлятор спросил, желаю ли я добавить путь к установленной Anaconda в переменную среды PATH в моем файле . Я согласился и перезапустил shell, чтобы применить изменения в .
После установки запустил Anaconda Navigator с помощью следующей команды:
$ anaconda-navigator
Каждый раз при запуске Anaconda Navigator проверяет наличие новых версий и предлагает их установить.
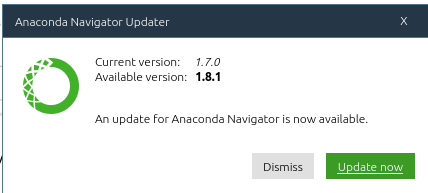
Anaconda успешно обновилась, возвращаться к командной строке не понадобилось. Первый запуск Anaconda был несколько медленным. Учитывая обновления, на то, чтобы приступить, ушло еще несколько минут. Обновления можно также запустить вручную при помощи следующей команды:
$ conda update anaconda-navigator
Development
-
Create and activate the testbed environment by running
source testbed/build.sh
This performs the following steps:
- Builds a new root conda environment in ,
or in if that environment variable is defined.
(Note that the default directory is at the same
level as your copy of the repository. This is because we do
not want to try to capture the entire testbed
into the build workspace.) - Installs conda-build and the necessary dependencies to
locally test the package - Installs the package in development mode
- Creates a set of environments that the test scripts
require to fully exercise the package. - Activates the environment, including a deliberate scrubbing
of variables and paths from your primary conda environment.
If the environment already exists, will
quickly exit, so it is safe to run it if you are not sure. - Builds a new root conda environment in ,
-
Run pytest to test the package.
pytest tests
-
The root environment of our testbed uses Python 3.7. If you would
like to test with a different Python version,
create a new child environment:conda create -n ptest python=... notebook pytest pytest-cov requests mock conda install backports.functools_lru_cache # python 2 only conda activate ptest pip install -e . python -m nb_conda_kernels.install --enable pytest tests
Home tab
The Home tab, shown in the image above, displays
all of the available applications that you can manage with Navigator.
The first time you open Navigator, the following popular graphical Python
applications are already installed or are available to install:
- JupyterLab
- Jupyter notebook
- Orange data visualization
- Spyder IDE
- Glueviz multidimensional data visualization
- R Studio IDE
- PyCharm
- VS Code
- Anaconda Prompt (Windows only)
- Anaconda PowerShell (Windows only)
You can also build your own Navigator applications.
In each application box, you can:
- Launch the application–Click its Launch button.
- Install an application–Click its Install button.
- Update, remove, or install a specific version of an application–Click
the gear icon in the top right corner of the application box.
Виртуальное окружение Conda
Conda позволяет создавать виртуальные окружения для изолированной разработки
программ. Делается это при помощи команды create:
C:\Users\user>conda create --name myenv sqlite
Solving environment: done

## Package Plan ##

  environment location: C:\Users\user\Anaconda3\envs\myenv

  added / updated specs:
    - sqlite


The following packages will be downloaded:

    package                    |            build
    ---------------------------|-----------------
    vc-14.1                    |       h0510ff6_4           6 KB
    sqlite-3.25.2              |       hfa6e2cd_0         897 KB
    vs2015_runtime-14.15.26706 |       h3a45250_0         2.1 MB
    ------------------------------------------------------------
                                           Total:         2.9 MB

The following NEW packages will be INSTALLED:

    sqlite:         3.25.2-hfa6e2cd_0
    vc:             14.1-h0510ff6_4
    vs2015_runtime: 14.15.26706-h3a45250_0

Proceed (/n)? y


Downloading and Extracting Packages
vc-14.1              | 6 KB      | ############################################################################ | 100%
sqlite-3.25.2        | 897 KB    | ############################################################################ | 100%
vs2015_runtime-14.15 | 2.1 MB    | ############################################################################ | 100%
Preparing transaction: done
Verifying transaction: done
Executing transaction: done
#
# To activate this environment, use:
# > activate myenv
#
# To deactivate an active environment, use:
# > deactivate
#
# * for power-users using bash, you must source
#


C:\Users\user>
Активация виртуального окружения осуществляется при помощи команды activate:
C:\Users\user>activate myenv

(myenv) C:\Users\user>conda list
# packages in environment at C:\Users\user\Anaconda3\envs\myenv:
#
# Name                    Version                   Build  Channel
sqlite                    3.25.2               hfa6e2cd_0
vc                        14.1                 h0510ff6_4
vs2015_runtime            14.15.26706          h3a45250_0
Installing packages
Use the terminal or an Anaconda Prompt for the following steps.
To install a specific package such as SciPy into an existing
environment «myenv»:
conda install --name myenv scipy
If you do not specify the environment name, which in this
example is done by , the package installs
into the current environment:
conda install scipy
To install a specific version of a package such as SciPy:
conda install scipy=.15.0
To install multiple packages at once, such as SciPy and cURL:
conda install scipy curl
Note
It is best to install all packages at once, so that all of
the dependencies are installed at the same time.
To install multiple packages at once and specify the version of
the package:
conda install scipy=.15.0 curl=7.26.0
To install a package for a specific Python version:
conda install scipy=.15.0 curl=7.26.0 -n py34_env
Configuration
This package introduces two additional configuration options:
-
: Whether to include only the kernels not visible from Jupyter normally or not (default: False except if is set)
-
: Regex to filter environment path matching it. Default: (i.e. no filter)
-
: Path to install conda kernel specs to if not . Default: (i.e. don’t install the conda environment as kernel specs for other Jupyter tools)
Possible values are:- (empty string): Install for all users
- : Install for the current user instead of system-wide
- : Install to Python’s sys.prefix
-
: Specify an install prefix for the kernelspec. The kernel specs will be
written in . Be careful that the PREFIX
may not be discoverable by Jupyter; set JUPYTER_DATA_DIR to force it or run
to get the list of data directories.
-
: String name format; = Language, = Kernel. Default:
In order to pass a configuration option in the command line use where regex is the regular expression for filtering envs «this|that|and|that» works.
To set it in jupyter config file, edit the jupyter configuration file (py or json) located in your
- for — add a line «c.CondaKernelSpecManager.env_filter = ‘regex'»
- for — add a json key
{
  "CondaKernelSpecManager": {
    "env_filter": "regex"
}
Segmentation fault on package import with macOS Python 3.7 intepreter
In CPython < 3.8, using to determine a linking command line to
compile an extension module will cause that extension module to segfault upon import.
does provide command-line flags but for the different purpose of
embedding a Python interpreter.
Cause
This is because of the command-line flags returned by . Before Python 3.8,
those are needed to embed the core Python interpreter into a different project altogether
and not those that should be used when linking a Python extension module.
Python modules should never link to the core Python interpreter library directly,
either statically at build time or dynamically at runtime. This is because the Python
executable itself provides all the necessary functions and symbols.
The system cannot find the path specified on Windows
Cause
PATH does not contain entries for all of the necessary conda directories.
PATH may have too many entries from 3rd party software adding itself to
PATH at install time, despite the user not needing to run the software via PATH lookup.
Solution
Strip PATH to have fewer entries and activate your environment.
If there’s some software that needs to be found on PATH (you run it via
the CLI), we recommend that you create your own batch files to set PATH
dynamically within a console session, rather than permanently modifying
PATH in the system settings.
For example, a new conda prompt batch file that first strips PATH, then
calls the correct activation procedure could look like:
set
PATH=”%SystemRoot%\system32;%SystemRoot%;%SystemRoot%\System32\Wbem;%SYSTEMROOT%\System32\WindowsPowerShell\v1.0\;<3rd-party-entries>”
call “<miniconda/anaconda root>\Scripts\activate”
If you need to run 3rd party software (software other than Windows
built-ins and Anaconda) from this custom conda prompt, then you should add
those entries (and only those strictly necessary) to the set PATH entry
above. Note that only the quotes wrapping the entire expression should be
there. That is how variables are properly set in batch scripts, and these
account for any spaces in any entries in PATH. No additional quotes should
be within the value assigned to PATH.
To make 3rd party software take precedence over the same-named programs
as supplied by conda, add it to PATH after activating conda:
set
“PATH=%SystemRoot%\system32;%SystemRoot%;%SystemRoot%\System32\Wbem;%SYSTEMROOT%\System32\WindowsPowerShell\v1.0\”
call “<miniconda/anaconda root>\Scripts\activate”
set “PATH=<3rd-party-entries>;%PATH%”
To make conda software take precedence, call the activation script last.
Because activation prepends the conda environment PATH entries,
they have priority.
set
PATH=”%SystemRoot%\system32;%SystemRoot%;%SystemRoot%\System32\Wbem;%SYSTEMROOT%\System32\WindowsPowerShell\v1.0\;<3rd-party-entries>”
call “<miniconda/anaconda root>\Scripts\activate”
Preventing packages from updating (pinning)
Pinning a package specification in an environment prevents
packages listed in the file from being updated.
In the environment’s directory, add a file
named that includes a list of the packages that you
do not want updated.
EXAMPLE: The file below forces NumPy to stay on the 1.7 series,
which is any version that starts with 1.7. This also forces SciPy to
stay at exactly version 0.14.2:
numpy 1.7.*
scipy ==0.14.2
With this file, keeps NumPy at
1.7.1, and causes an error.
Use the flag to override the update restriction on
a package. In the terminal or an Anaconda Prompt, run:
conda update numpy --no-pin
Saving environment variables
Conda environments can include saved environment variables.
Suppose you want an environment «analytics» to store both a
secret key needed to log in to a server and a path to a
configuration file. The sections below explain how to write a
script named to do this on and .
This type of script file can be part of a conda package, in
which case these environment variables become active when an
environment containing that package is activated.
You can name these scripts anything you like. However, multiple
packages may create script files, so be sure to use descriptive
names that are not used by other packages. One popular option is
to give the script a name in the form
, or on Windows,
.
Windows
-
Locate the directory for the conda environment in your
Anaconda Prompt by running in the command shell . -
Enter that directory and create these subdirectories and
files:cd %CONDA_PREFIX% mkdir .\etc\conda\activate.d mkdir .\etc\conda\deactivate.d type NUL > .\etc\conda\activate.d\env_vars.bat type NUL > .\etc\conda\deactivate.d\env_vars.bat
-
Edit as follows:
set MY_KEY='secret-key-value'
set MY_FILE=C\path\to\my\file
-
Edit as follows:
set MY_KEY=
set MY_FILE=
When you run , the environment variables
and are set to the values you wrote into the file.
When you run , those variables are erased.