Ошибка err_tunnel_connection_failed в chrome и яндекс браузере
Содержание:
How to Fix ERR PROXY CONNECTION FAILED
If you are looking for a solution to this problem. You are at the right place. Before going through actual methods, i suggest you check whether other devices on the same network experiencing the same issue or not. Because, Sometimes, It can be an issue of your ISP. In that case, Contact them to get help to get the solution for err_proxy_connection_failed error.
You also should check a few more things. Check if other browsers are working perfectly or not. Also, See chrome in guest mode. If you find, chrome is working fine in guest mode, then, disable all the extensions, clear cache and data. It will fix the problem.
By the way, To troubleshoot err proxy connection failed, just follow these methods.
1. Check Proxy Settings
— Advertisement —
To solve this issue in chrome, you should check your proxy server settings as the first solution. To do this, follow these instructions.
- At first, Press Win + I on the keyboard. It will open the Windows 10 settings window.
- Now, Go to Network & Internet > Proxy.
- Turn off everything except “Automatically detect settings.”
If you are not a Windows 10 user, you do following things.
- First of all, Press on Win + R on the keyboard, type inetcpl.cpl and press Enter.
- Then, Go to Connections tab and click on LAN Settings. It will open a new window.
- Now, Uncheck everything except “Automatically detect settings.”
After doing the above things, restart your computer. Hopefully, It will solve err proxy connection failed.
2. Reset TCP, Renew IP
It can be a handy solution to get rid of any connection related problems on your PC. To reset TCP/IP, Renew IP, you can execute some commands. Here are the instructions with all details.
- At first, Open Command Prompt as administrator. To do it, open start menu, type cmd, right click on the command prompt and choose Run as administrator.
- After that, type the following commands and hit enter for each.
— Advertisement —
netsh winsock reset
netsh int ip reset
ipconfig /release
ipconfig /flushdns
ipconfig /renew
After running these commands, you can restart Windows.
It may fix err proxy connection failed on Google Chrome.
3. Reset Internet Settings
To troubleshoot err_proxy_connection_failed, it is another excellent method. In some cases, resetting internet settings may help with solving this error. Here are the things, you will need to do.
- First of all, press Win + R, type inetcpl.cpl and hit enter. It will open “Internet Properties.”
- Now, Go to Advanced tab and click on Reset.
- Restart your PC.
Now see if it fixes your problem.
4. Disable Proxy from Windows Registry
This is another effective way to get rid of your problem. Before doing it, I recommend you to take a backup of the registry. Now, Follow these things.
- At first, Open RUN like before. Then, Type regedit and hit enter. It will open Windows Registry Editor.
- Then, Navigate to HKEY_CURRENT_USER > Software > Microsoft > Windows > Current Version > Internet settings.
- Now, Delete the following things.
Proxy Override Migrate Proxy Proxy Enable Proxy Server
Restart your PC. It should fix err proxy connection failed.
6. More Solutions to Solve ERR_PROXY_CONNECTION_FAILED
Generally, the first five methods work in almost every situation. But, If you still encounter the same problem, it may be due to any misconfiguration on your PC. So, I suggest you to check the following things.
- At first, Disable your third-party antivirus and firewall. It will help to understand if that was causing the problem. If yes, uninstall or modify relevant settings on it.
- Reset your router or modem and see if it helps.
- Scan your PC for malware with a good security program.
Hopefully, these tips will help you to troubleshoot err proxy connection failed error. You may have a better suggestion to share. I recommend you to let everyone know it in the comment box.
Hope something helps!
Как пользоваться прокси в Vray
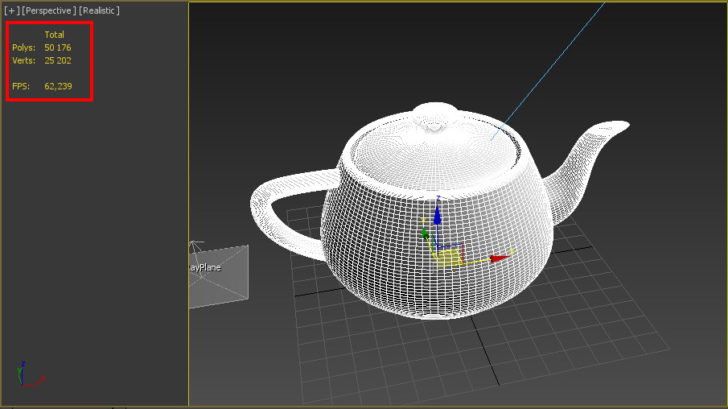
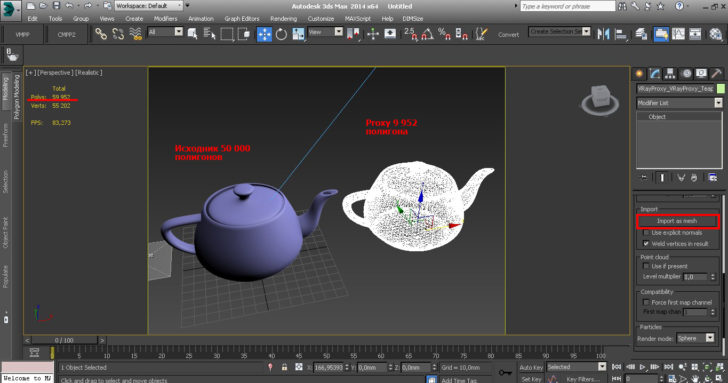
Итак, у нас есть сложный объект, грузящий сцену, с плотной сеткой и большим количеством деталей. Я покажу работу алгоритма на чайнике, который сейчас построен из 50 тысяч полигонов. Чтобы узнать их количество, я нажала горячую клавишу 7.
Как пользоваться вирей прокси далее рассказываю в пошаговой инструкции:
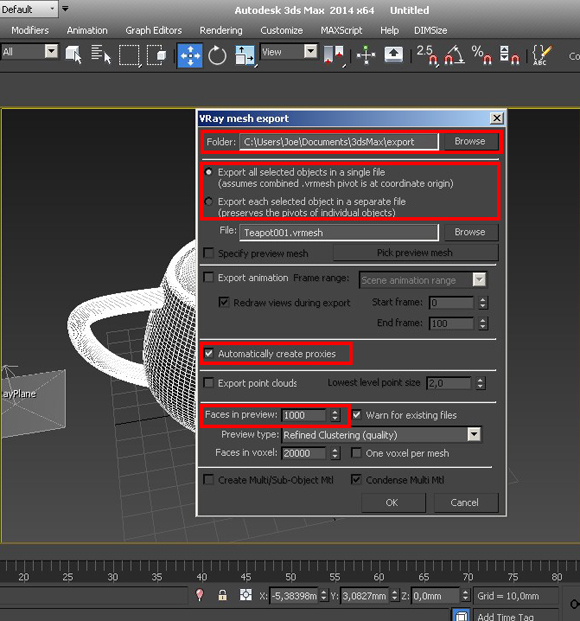
- Выделяем объект, кликаем на нем правой кнопкой мыши, выбираем в выпадающем меню V-Ray mesh export.
- Прописываем место сохранения в Folder.
- В появившемся окне выбираем Export all selected objects in a single file (экспортировать все выделенные файлы в один файл) или Export each selected object an separate files (экспортировать отдельными файлами). Я выбрала первый вариант.
- Ставим галочку напротив Automaticaly create proxies.
- В самом низу в окошко Faces in Preview вписываем количество полигонов, которые останутся в видовом окне. Жмем «Ок».
Вот такой результат у меня получился с 10 тыс. полигонами, прилагаю также рендер, чтобы вы убедились, что на итоговую картинку манипуляции не повлияли. Кстати, настройки вирей я брала отсюда.

Настройки
Теперь разберем некоторые настройки VRayProxy. Переходим в раздел Modify. Полезными будут параметры:
- Mesh File. Кнопочка Browse открывает месторасположение файла.
- Scale. Выполняет ту же функцию, что и Scale на панели самой программы.
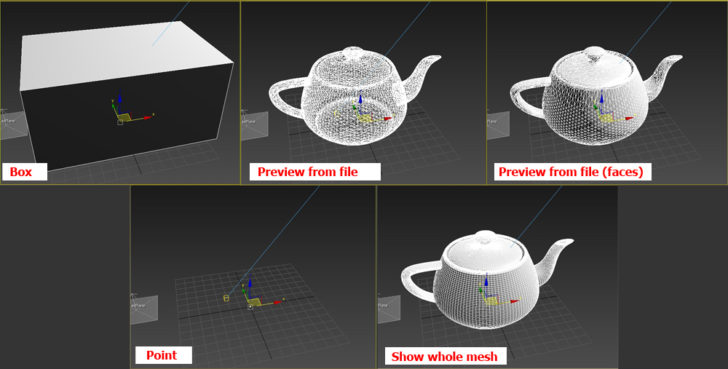
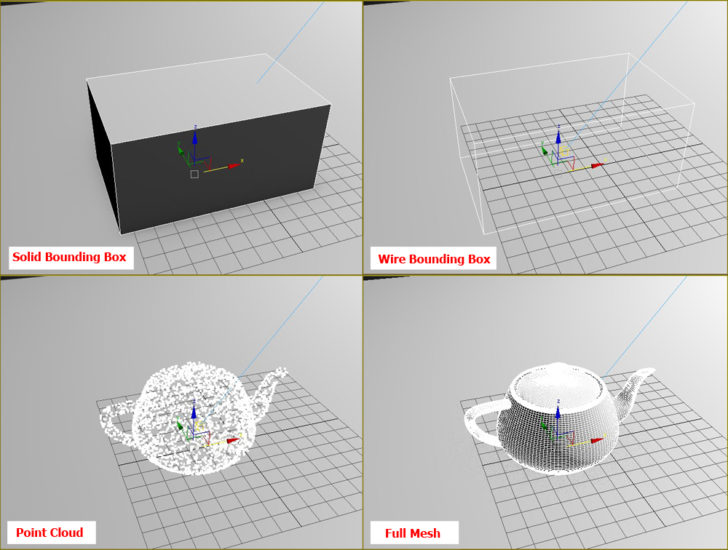
- Display. Позволяет переключаться между режимами отображения. Вместо чайника можно отображать: box (коробку), состоящую всего из 12 полигонов, preview from file (сетку упрощенной модели), preview from file (faces) (сетку с оболочкой), point (точку) или show whole mesh (оригинальную модель со всеми полигонами).
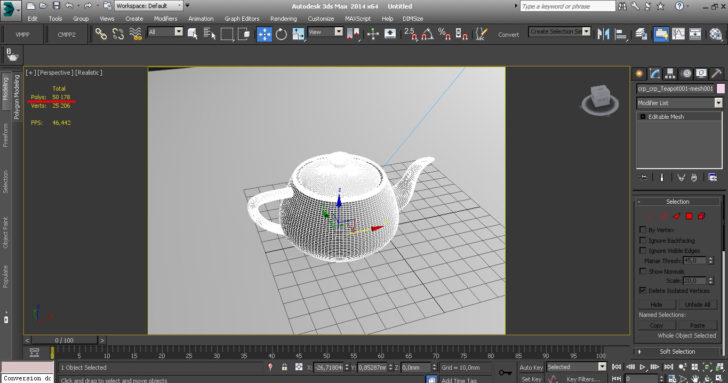
Кнопка Import as a Mesh позволяет импортировать исходный файл как Mesh. Текстуры при этом слетают, именно поэтому перед конвертацией в прокси, лучше отдельно сохранять итоговый вариант модели.
Как пользоваться прокси в Corona
Теперь расскажу, как пользоваться этой полезной функцией, если вы используете визуализатор Корона.
- Почему-то у новичков часто возникает вопрос, как вызвать окно corona proxy converter (corona proxy exporter). Так же, как и в Vray, просто щелкаем правой кнопкой мышки на объекте.
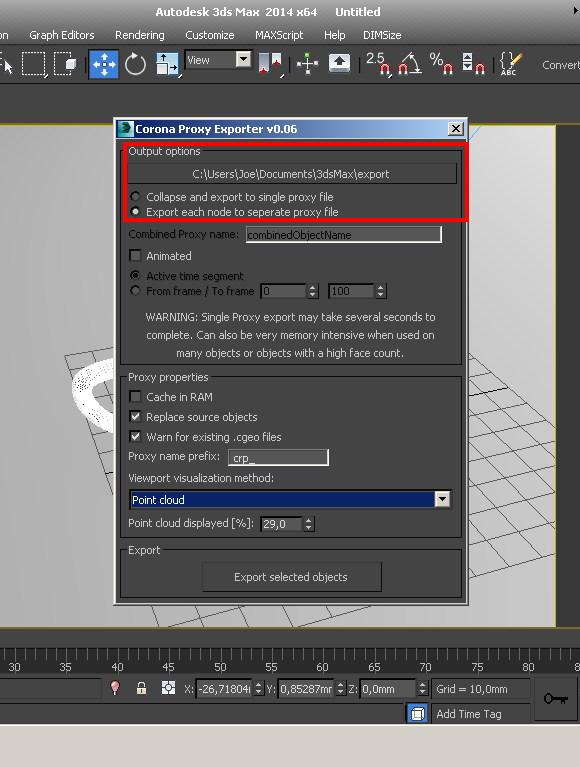
- В Output options можно выбрать, куда будут сохраняться proxies.
- Collapse and export to single proxy file и Export each node to separate proxy file отвечают соответственно за сохранение либо одним файлом, либо несколькими.
- Жмем Export selected objects и закрываем окно.
Настройки
Переходим в Modify. Тут все примерно также, как и в случае с VRay.
- Кнопка Pick from Scene позволяет выбрать файл для прокси из объектов сцены;
- Load from Scene создает прокси из стороннего файла;
- Vieport Display управляет режимами отображения: Solid Bounding Box (заполненная коробка), Wire Bounding Box (только грани коробки), Point Cloud (облако точек) и Full Mesh (полное отображение).
- В окошке Point Cloud Displayed можно задать, сколько точек будет отображаться.
Кнопка Duplicate to Mesh импортирует в сцену оригинальный объект в меше.
Автор урока: Алиса Куб
Как исправить: инструкция по устранению
Существует четыре основных вариантов действий в этой ситуации. Конечно, можно самостоятельно выстраивать их последовательность. Но мы рекомендуем следовать той, которая будет описана ниже. И, естественно, выполнять обязательную проверку результата после завершения каждого из этапов, чтобы не тратить время, если один из вариантов позволил избавиться от этого сбоя:
Деактивация настроек прокси
То есть, решение сводится к тому, чтобы попытаться получить доступ к требуемым сайтам, исключая применение прокси-серверов. Так сказать, отрезать одно звено в цепочке. Для этого необходимо выполнить следующие действия:
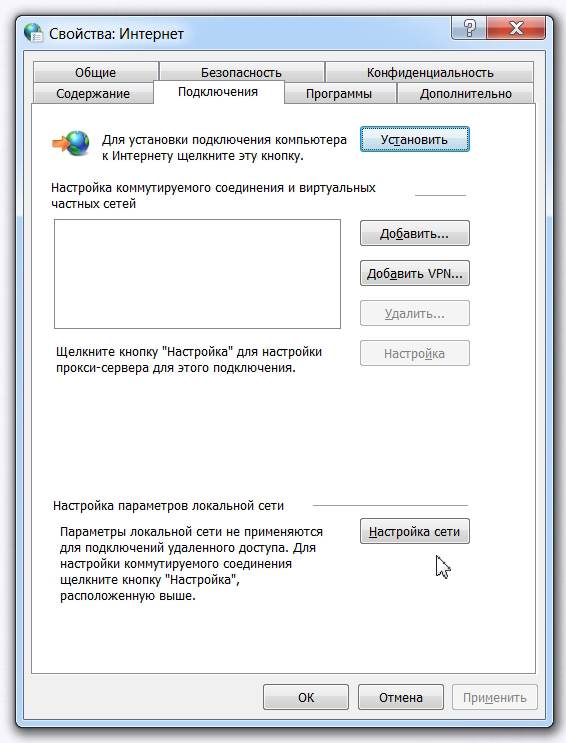
Остается только снять галочку рядом с пунктом, который подразумевает использование прокси-серверов.
Естественно, не забыть нажать на «ОК», чтобы изменения, внесенные только что, сохранились.
Сброс сетевых установок
Учитывая, что именно они могут оказаться первопричиной данной неприятности, не удивительно, что их откат до изначального состояния часто позволяет получить требуемый результат:
- Опять перейти к системной поисковой строке.
- Использовать запрос «cmd» – не забыть убрать кавычки.
- На предложенной ссылке кликнуть правой кнопочкой комп.мышки, чтобы появилась возможность запуска с правами администратора.
- Последовательно ввести четыре команды: «ipconfig /flushdns», «nbtstat –r», «netsh int ip reset», «netsh winsock reset».

Конечно же, убрав кавычки и не забываея сопровождать каждую из них нажатием клавиши ВВОД (Enter).
Перед проверкой обязательно выполнить перезапуск компьютерного оборудования!
Смена ДНС-серверов
Этот метод подразумевает переход на альтернативные ДНС-сервера, предлагаемые компанией ГУГЛ:
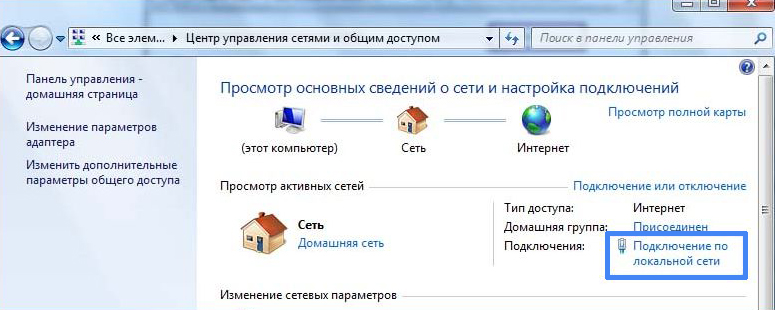
Обратить внимание на правую часть трея. Там есть иконка, похожая на изображение компьютера.
Воспользовавшись на ней ПКМ, перейти в «Центр управления сетями…».

В блоке «подключение и отключение» кликнуть по подключению по локалке.
- Активируется дополнительное окошко, где требуется осуществить переход через «Свойства» к протоколу Протокол Интернета версии 4 (TCP / IPv4) (здесь потребуется двойное нажатие).
- Во кладке «общие» сменить флажок на «Использовать следующие адреса…».
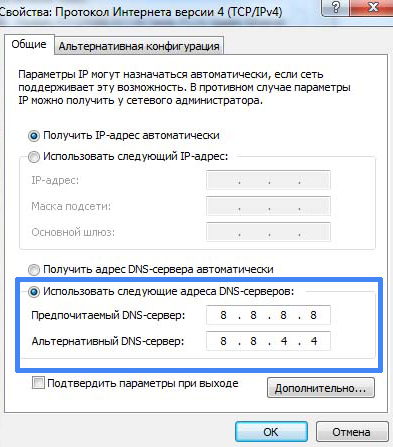
Вставить в первую строку 8.8.8.8, а во вторую – 8.8.4.4.
Не забыть нажать на «ОК», и обязательно – перезагрузить используемый интернет-браузер. Не обязательно перезапускать всю систему.
Чистка кэша
Вообще выполнять чистку кэша рекомендуется периодически. Особенно, при активных виртуальных путешествиях по Сети. Так как именно в этом месте скапливается разнообразный мусор, который может приводить к тому или иному сбою. В том числе и к возникновению этой ошибки.
В Гугл Хром процедура выглядит следующим образом:
- Активировать браузер и вставить в адресную строку chrome://settings. Естественно, нажать на Enter.
- Пролистать открывшееся таким образом окно параметров в его нижнюю часть, чтобы появилась возможность воспользоваться разделом «Дополнительно».
- Перейти в «Конфиденциальность и безопасность», в этом подразделе нажать на предложение, позволяющее выполнить очистку истории.
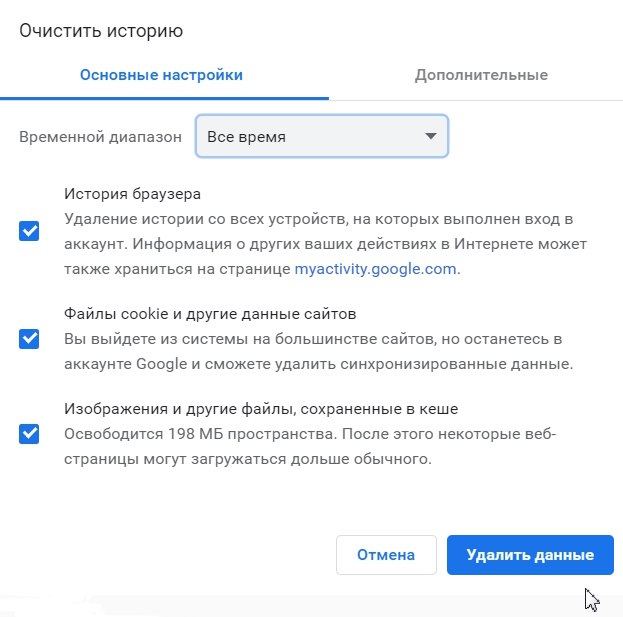
- Временной диапазон выставить на «Все время». Все пункты отметить галочками.
- Нажать на «Удалить данные».
После завершения процедуры очистки – перезапустить еще раз используемый веб-браузер.
How to Fix the “ERR_TUNNEL_CONNECTION_FAILED” Error
Then, I will introduce how to fix the “ERR_TUNNEL_CONNECTION_FAILED” error.
Fix 1: Set up Automatically Detect the Connection Settings
The first fix for you is to set up automatically detect the connection settings. The steps are as follows.
Step 1: Type Internet Options in the Search box to open it. Then navigate to the Connections tab.
Step 2: Under the Local Area Network (LAN) settings section, click the LAN settings button.
Step 3: Then uncheck the Use a proxy server for your LAN (These settings will not apply to dial-up or VPN connections) box.
Step 4: Click OK and then reboot the computer to make the changes.
Fix 2: Flush the DNS Resolver Cache
You can also try flushing the DNS resolver cache to fix ERR_TUNNEL_CONNECTION_FAILED Chrome. This post — How to Flush DNS Resolver Cache in Windows 10/8.1/7 may be the one you need.
Fix 3: Use a VPN Connection
Your computer’s login to the network may be blocking your access to the site. So, to fix this, you can try these VPN connection extensions from the Google Chrome extensions online store and check if you can access the site normally.
Fix 4: Clear Browser Data
Sometimes, the corrupted Chrome cache can cause the error. So, you can try clearing it to fix the error. Here is a guideline below for you.
Step 1: In the Chrome page, press Ctrl + Shift + Delete keys at the same time to open the Clear browsing data window.
Step 2: Go to the Advanced tab and select All time from the drop-down menu.
Step 3: Select the Browsing history, Download history, Cookies and other site data, and Cached images and files checkboxes.
Step 4: Click the Clear data button to apply this change.
Now, re-open your Google Chrome and check if this issue is resolved or not.
Fix 5: Remove Conflicting Browser Extensions
Extensions and toolbars installed on your browser are likely to conflict with your website loading. So, you need to remove or disable these extensions and toolbars to fix the “ERR_TUNNEL_CONNECTION_FAILED” error.
Fix 6: Reset Google Chrome Browser
If all of the fixes above are not working, you can try to reset Google Chrome browser to fix the “ERR_TUNNEL_CONNECTION_FAILED” error. Here is how to do that:
Step 1: Open Google Chrome, and then click the Customize and control Google Chrome button.
Step 2: Click Settings on the upper right corner of the main page to open the snapshot.
Step 3: Expand the Settings tab and click Advanced to open the drop-down menu.
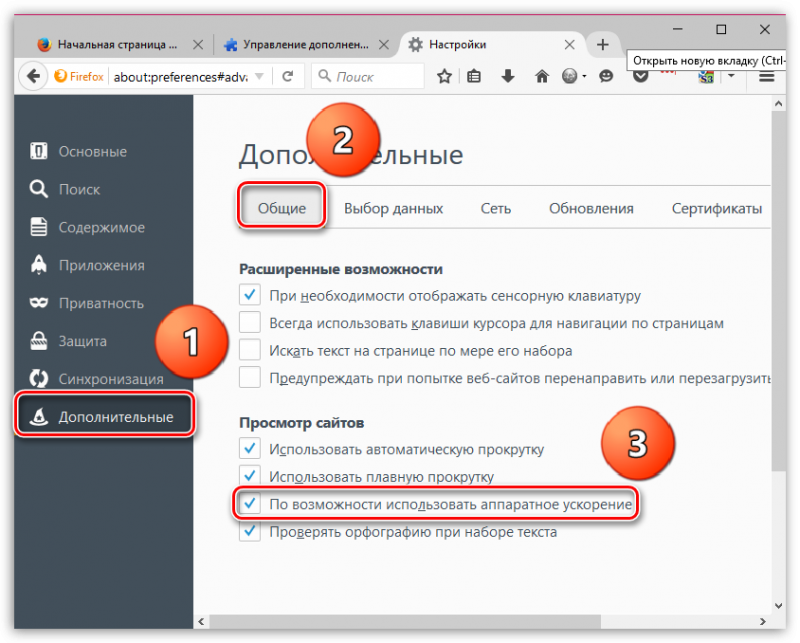
Step 4: Navigate to the System tab on the drop-down menu, and turn off the Use hardware acceleration when available setting.
After that, launch Google Chrome again and see if ERR_TUNNEL_CONNECTION_FAILED still persists.
How to Fix Err_Cache_Miss Error in Google Chrome (6 Tips)
How to fix Err_Cache_Miss error in Google Chrome? Check the 6 tips (with step-by-step guide) in this post.
Read More
»Usage
Usage:
API Options
-
— Path to a CA file to use for TLS when communicating with Consul.
This can also be specified via the environment variable. -
— Path to a directory of CA certificates to use for TLS when
communicating with Consul. This can also be specified via the
environment variable. -
— Path to a client cert file to use for TLS when
is enabled. This can also be specified via the
environment variable. -
— Path to a client key file to use for TLS when
is enabled. This can also be specified via the
environment variable. -
— Address of the Consul agent with the port. This can be
an IP address or DNS address, but it must include the port. This can also be
specified via the environment variable. In Consul 0.8 and
later, the default value is http://127.0.0.1:8500, and https can optionally be
used instead. The scheme can also be set to HTTPS by setting the environment
variable . This may be a unix domain socket using
if the that way. -
— The server name to use as the SNI host when
connecting via TLS. This can also be specified via the
environment variable. -
— ACL token to use in the request. This can also be specified
via the environment variable. If unspecified, the query
will default to the token of the Consul agent at the HTTP address. -
— File containing the ACL token to use in the request
instead of one specified via the argument or
environment variable. This can also be specified via the
environment variable.
-
— Name of the datacenter to query. If unspecified, the
query will default to the datacenter of the Consul agent at the HTTP address. -
— Permit any Consul server (non-leader) to respond to this request.
This allows for lower latency and higher throughput, but can result in stale
data. This option has no effect on non-read operations. The default value is
false.
Proxy Options
-
— The ID (not name if they differ) of the service instance
this proxy will represent. The target service doesn’t need to exist on the
local agent yet but a sidecar proxy
registration with
equal to the passed value must be present. If
multiple proxy registrations targeting the same local service instance are
present the command will error and should be used instead. -
— The proxy
service ID on the
local agent. This must already be present on the local agent. -
— Specifies the log level.
-
— Enable debugging via pprof. Providing a host:port (or just ‘:port’)
enables profiling HTTP endpoints on that address. -
— Name of the service this proxy is representing. This service
doesn’t need to actually exist in the Consul catalog, but proper ACL
permissions () are required. This and the remaining options can
be used to setup a proxy that is not registered already with local config
useful for development. -
— Upstream service to support connecting to. The format should be
‘name:addr’, such as ‘db:8181’. This will make ‘db’ available on port 8181.
When a regular TCP connection is made to port 8181, the proxy will service
discover «db» and establish a Connect mTLS connection identifying as
the value. This flag can be repeated multiple times. -
— Address to listen for inbound connections to the proxied service.
Must be specified with -service and -service-addr. If this isn’t specified,
an inbound listener is not started. -
— Address of the local service to proxy. Required for
. -
— Self-register with the local Consul agent, making this
proxy available as Connect-capable service in the catalog. This is only
useful with . -
— Optional ID suffix for the service when is set to
disambiguate the service ID. By default the service ID is
where is the value. In most cases it is now preferable
to use to
register a fully configured proxy instance rather than specify config and
registration via this command.