Ошибка java.net.connectexception: connection refused
Содержание:
- Настройки маршрутизатора и прошивка
- SELinux blocking SSH
- Using ssh -vvv to debug SSH connection & check logs
- Resolution
- How Do I Troubleshoot SSH Connectivity Errors?
- Start-to-end guide on setting up a CentOS server with Oracle VM:
- Firewall is blocking SSH port
- Причины
- Как исправить «Java.net.ConnectException: Connection timed out»
- SSH service is not working
- Что делать с ошибкой ERR_CONNECTION_REFUSED?
- 10.12 «Incorrect MAC received on packet» or «Incorrect CRC received on packet»
- Резюме
- 10.18 «Network error: Connection timed out»
- Why Does PuTTY Say Connection Refused?
- 10.9 «Server refused our key», «Server refused our public key», «Key refused»
- 10.2 «WARNING — POTENTIAL SECURITY BREACH!»
- Измените DNS-адреса, используемые вашей системой, на публичные от Гугл
- Пожалуйста, помогите c переводом:
- Backlog of connection requests (Flooding)
- Example
- 10.14 «PuTTY X11 proxy: various errors»
Настройки маршрутизатора и прошивка
Если роутер работает в режиме 24/7, то не стоит исключать наличие проблем на его стороне. Поэтому для исправления ошибки err connection refused попробуйте выполнить сброс настроек. За это отвечает специальная маленькая кнопка «reset», которая находится на устройстве, рядом с кнопкой выключения. Найдите и нажмите на нее.

Также скачайте последнюю версию прошивки для вашей модели устройства с официального сайта и перепрошейте его. Это делается в панели опций, в которую можно войти по адресу http://192.168.0.1/, указав логин и пароль.
Например, на роутере TP-Link TL-WR940N нужно войти в раздел «Системные инструменты», далее в «Обновление встроенного ПО», выбрать скачанный файл прошивки и нажать «Обновить».
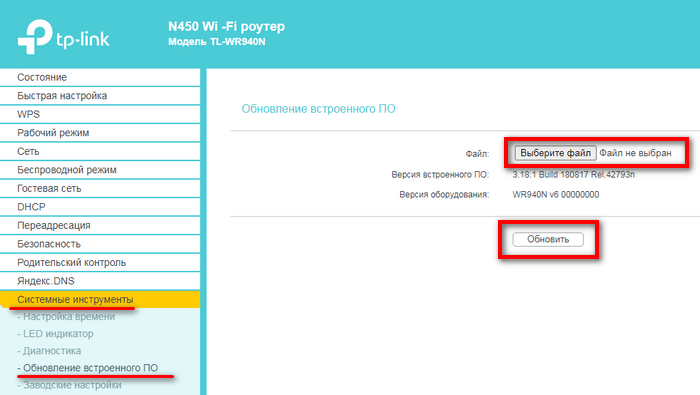
Местонахождения настроек зависит от производителя и модели устройства. Но принцип остается один.
SELinux blocking SSH
Some distributions, like Red Hat and those based on it, run SELinux (Security Enhanced Linux). SELinux should be automatically configured to listen on port 22 for SSH, and you can verify that with the following command:
$ semanage port -l | grep ssh
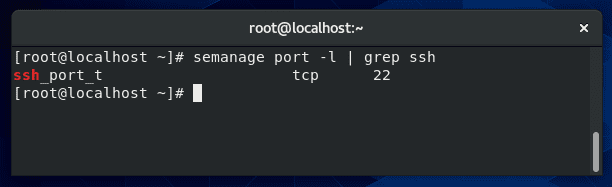
In the screenshot above, the semanage command shows us that it’s listening for incoming SSH connections on port 22 (the default port for SSH). You shouldn’t need to do any extra configuration to this unless you are trying to change the port that your system runs the SSH service on.
If you need to configure SELinux to listen for SSH on a different port, you can use this command:
$ semanage port -a -t ssh_port_t -p tcp 1234
Replace “1234” with the new port that you’ve configured SSH to run on.
Be sure to restart the SSH service after you’ve made these changes:
$ systemctl restart sshd
Using ssh -vvv to debug SSH connection & check logs
Getting a simple error like “connection refused” isn’t all that helpful in figuring out what the problem is. If you’d like to see more information about what is happening during the SSH connection attempt, you can use ssh -v.
$ ssh -v hostname
Or
$ ssh -vvv hostname
Putting three v’s in the command will further increase the verbosity.
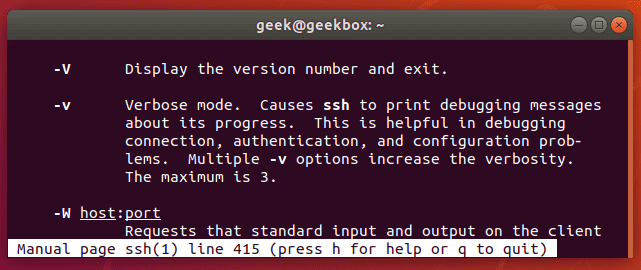
You’ll get a lot of output with the -vvv switch, but here’s a little sample of how some of it looks:
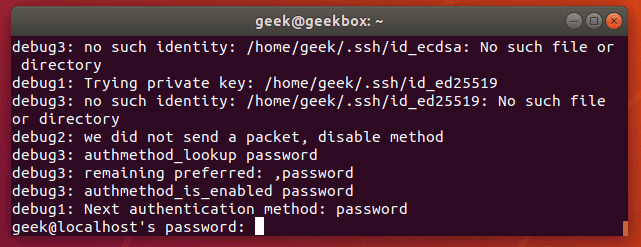
Hopefully, it will print an error that will give you a clue as to what needs to be fixed. If not, try googling the error you receive to see if there’s been a suggestion posted online.
I covered most causes for the SSH connection refused problem, and I hope you find the tutorial useful.
Keep coming back.
Resolution
Verify that there isn’t a firewall blocking the connection, that the SSH service is running on the instance, and that SSH tcp port 22 is in the listening state.
There are three methods for performing these tasks:
Method 1: Use AWS Systems Manager Session Manager
Note: Installation of the SSM Agent is required to use this method. For more information on Session Manager and a complete list of prerequisites, see Getting started with Session Manager.
1. Open the AWS Systems Manager console.
2. Start a session.
3. To disable firewalls and restart the SSH service, run the following commands.
Note: The preceding command flushes all main iptables rules, not just for port 22. After you regain access to your instance, review your firewall configuration (for example, ufw, firewalld, iptables).
4. Verify that the SSH tcp port (22) is in a listening state.
5. Terminate the session.
6. Connect to the instance using SSH.
Method 2: Run the AWSSupport-TroubleshootSSH automation document
AWSSupport-TroubleshootSSH automation document installs the Amazon EC2Rescue tool on the instance. Then this tool checks for and corrects some issues that cause remote connection errors when connecting to a Linux machine through SSH. For more information, see How can I use the AWSSupport-TroubleshootSSH Automation workflow to troubleshoot SSH connection issues?
Method 3: Use a user data script
Important
- This procedure requires a stop and start of your EC2 instance. Instance store data is lost when an instance is stopped and restarted. Be aware that if your instance is instance store-backed or has instance store volumes containing data, the data is lost when the instance is stopped. For more information, see .
- If your instance is part of an Amazon EC2 Auto Scaling group, or if your instance is launched by services that use AWS Auto Scaling, such as Amazon EMR, AWS CloudFormation, AWS Elastic Beanstalk, and so on, then stopping the instance could terminate the instance. Instance termination in this scenario depends on the for your Auto Scaling group. If your instance is part of an Auto Scaling group, then temporarily remove the instance from the Auto Scaling group before starting the resolution steps.
- Stopping and starting the instance changes the public IP address of your instance. It’s a best practice to use an Elastic IP address instead of a public IP address when routing external traffic to your instance.
1. View the . The following entry appears in the EC2 instance console logs if ufw is enabled.
2. Open the Amazon EC2 console.
3. Choose Instances from the navigation pane, and then select the instance you’re trying to connect to.
4. .
5. Choose Actions, Instance Settings, View/Change User Data.
6. Copy the following user data script into the View/Change User Data dialog box, and then choose Save.
Note: The preceding command flushes all main iptables rules, not just for port 22. After you regain access to the instance, review your firewall configuration (for example, ufw, firewalld, iptables).
7. Connect to the instance using SSH.
8. The preceding user data script is set to run on every reboot of the instance. After regaining access to your instance, remove the user data script.
To remove user data:
1. Complete steps 1–4 in the Method 3: Use a user data script section.
2. Delete the user data script in the View/Change User Data dialogue box.
How Do I Troubleshoot SSH Connectivity Errors?
When you’re experiencing an SSH connectivity error, there are a few steps you can take to troubleshoot it depending on the cause. Here are some tips for troubleshooting the reasons for a Connection refused error that we covered above:
- If your SSH service is down. Contact your hosting provider to see why your SSH service isn’t running. For localhost or dedicated servers, you can use the command to try to get it running again.
- If you entered the wrong credentials. Once you’ve double-checked the SSH port using the command, try connecting again with the correct details.
- If your SSH port is closed. This is usually a side effect of one of the two reasons listed below. Either install an SSH daemon on the server you want to connect to or change your firewall rules to accept connections to your SSH port.
- If SSH isn’t installed on your server. Install an SSH tool such as OpenSSH on the server you want to connect to using the command.
- If your firewall is blocking your SSH connection. blocking your SSH connection by changing the destination port’s settings to ACCEPT.
If you’re attempting to connect to your hosting provider’s server, it may be wiser to contact support than to try troubleshooting the problem yourself. Users on localhost or dedicated servers may be able to find further support on more advanced forums if none of the above solutions works.
Start-to-end guide on setting up a CentOS server with Oracle VM:
Part I – Virtual Machine Setup
- Install Oracle VM VirtualBox and the expansion pack here.
- Download the CentOS minimal installation here.
- For this tutorial, I’m using an Ubuntu client. The ISO for that can be found here.
- Create the CentOS server and your client virtual machines.
- Setup the CentOS VM.
a. Open Installation Destination and press Back.
b. Go to Network & Hostname if you want to change your hostname, which I recommend.
c. Feel free to configure items under Localization. Everything else is handled automatically by VirtualBox.
d. Press begin installation.
e. Create both a root account and a normal account. Make sure the latter has administrator rights.
f. Once the loading bar is full, press Reboot. - Setup your client VM.
a. Install VirtualBox guest additions.
Part II – Virtual Network Configuration
- In VirtualBox, press CTRL+W.
- Create a new host network.
a. If you receive an error, this is likely due to your host OS causing VirtualBox problems installing its drivers. You will need to fully uninstall VirtualBox and reinstall the latest version. Make sure to run the installation as admin. - Under the Adaptor tab, select “Configure Adapter Manually”
- For Windows, open the Command Prompt and type ipconfig.
- Scroll through the output until you find the name of the host-only network you just created. Use this IPv4 Address and Mask for the VirtualBox network configuration.
- Close the Host Network Manager.
- Open the settings of your client VM. Under Network, Enable Adapter 2, select Host-only Adapter and then the name is the name of your newly-created host-only network.
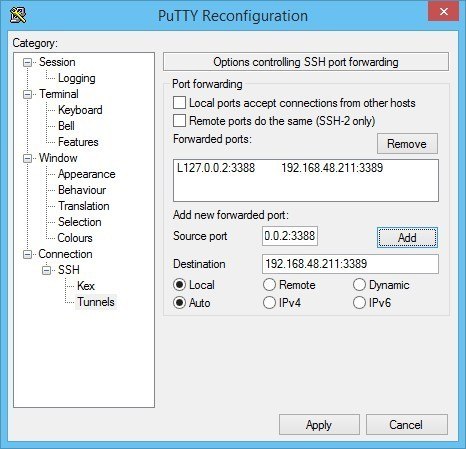
- Repeat the last step for your CentOS server VM. Additionally, go to Adapter 1’s Port Forwarding under the Advanced tab and create a new rule. Set both the host and guest ports to 22.
- Before closing the advanced settings, note the MAC address.
Part III – Server Configuration
- Launch your CentOS VM.
- Run , , and .
- Run .
- Hit enter over “Edit a connection.”
- You should see “enp03s” and a “Wired Connection 1”.
a. If you have two connection options but are unsure of which is which, go to edit one. If the device value matches the MAC address seen under Adapter 1 from Part II, then it’s your NAT connection, otherwise its your host-only connection. - Edit your Host-only connection:
a. Set IPv4 configuration to “manual.”
b. Show IPv4 configuration
c. In VirtualBox, press CTRL+W. Next to your Host-only network name, you should see and IP Address/Mask combination of the form “/.” On your server under IPv4 configuration, this is what you will type after pressing .
d. Go down and press OK. - Make sure “Automatically connect” is checked for both your Host-only and NAT connections.
- Navigate out of and .
Part IV – Client Configuration & Usage
- Boot your Client VM.
- (optional) Edit /etc/hosts to include the a line of the form:
Where serv_ip_addr is the ip address of your CentOS server (second output of in your CentOS terminal). This will allow you to use whatever you chose for interchangeably with the ip address of your server. I typically just set this to the hostname chosen in part II.
- If everything worked up to this point, you should be able to ssh into your CentOS server. If this is not the case, you may need to install and on your machines.
Part V – Serving Up Websites
Firewall is blocking SSH port
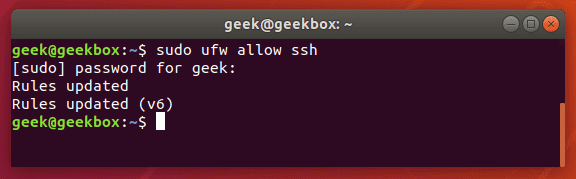
Another thing to check is your operating system’s firewall. Ubuntu and plenty of other distributions have ufw (uncomplicated firewall) installed by default, and it’s generally one of the most common ways to quickly issue firewall related commands to your system.
To allow SSH through your firewall via ufw, use this command:
$ sudo ufw allow ssh
Ufw is just a front-end for iptables firewall, so if you prefer to use an iptables command (or maybe you don’t even have ufw installed), here’s the iptables command to allow incoming SSH connections:
$ sudo iptables -A INPUT -p tcp --dport 22 -m conntrack --ctstate NEW,ESTABLISHED -j ACCEPT
If you are running firewalld and need to allow SSH connections, use this command:
$ firewall-cmd --zone=public --add-service=ssh
Причины

Отказ в соединении — это явный случай, когда клиент пытается подключиться через порт TCP, но не может это сделать. Вот некоторые из возможных причин, почему это происходит:
- Клиент и Сервер, один или оба из них не находятся в сети.
Да, возможно, что они не подключены к локальной сети, Интернету или любой другой сети.
- Сервер не работает.
Вторая наиболее распространенная причина — сервер не работает. Вы можете использовать следующие сетевые команды, например, ping, чтобы проверить, работает ли сервер.
- Сервер работает, но не видит порт, к которому клиент пытается подключиться.
Это еще одна распространенная причина возникновения «java.net.ConnectException: соединение отклонено», когда сервер работает, но видит другой порт. Трудно разобраться в этом случае, пока вы не проверите конфигурацию.
- Брандмауэр запрещает комбинацию хост-порт.
Почти каждая корпоративная сеть защищена. Если вы подключаетесь к сети других компаний, вам нужно убедиться, что они разрешают друг другу IP-адрес и номер порта.
- Неверная комбинация хост-портов.
Проверьте последнюю конфигурацию на стороне клиента и сервера, чтобы избежать исключения отказа в соединении.
- Неверный протокол в строке подключения.
TCP является базовым протоколом для многих высокоуровневых протоколов, включая HTTP, RMI и другие. Нужно убедиться, что вы передаете правильный протокол, какой сервер ожидает.
Если вам интересно узнать больше об этом, то изучите книгу по сетевым технологиям, такую как Java Network Programming (4-е дополнение), написанную Гарольдом Эллиоттом Расти.
Как исправить «Java.net.ConnectException: Connection timed out»
Существуют несколько способов избавиться от ошибки Java.net.ConnectException. Рассмотрим их по порядку:
- Перезагрузите ваш PC. В некоторых случаях данный простой метод позволял решить ошибку java.net.connectexception connection refused;
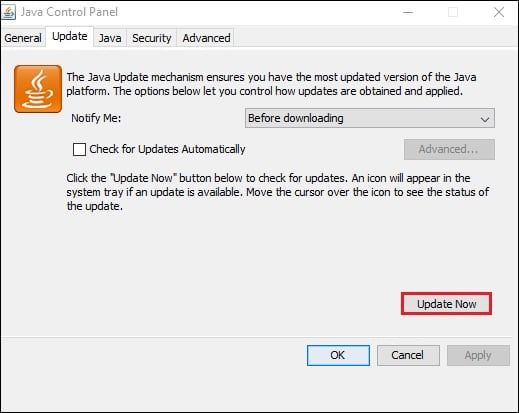
- Установите на ПК свежую версию «Java». Довольно частой причиной рассматриваемой проблемы является устаревшая версия «Java» на пользовательском ПК. Перейдите в Панель управления, затем в «Программы», там найдите «Java» и кликните на неё. После появления окна её настроек перейдите на вкладку «Update», нажмите там на кнопку «Update Now», и установите в системе требуемые обновления.
Данную процедуру необходимо провести как на вашей машине, так и на машине того пользователя, с которым вы собираетесь играть в «Майнкрафт» по сети;
Обновите вашу версию «Ява»
- Внесите «Майнкрафт» в исключения брандмауэра и антивируса на вашем ПК. Запустите Панель управления, перейдите в «Система и безопасность», там найдите «Брандмауэр Виндовс» и кликните на него. В открывшемся окне настроек брандмауэра слева сверху выберите опцию «Разрешения взаимодействия…».
В открывшемся окне разрешённых для внешнего подключения программ найдите программы с упоминанием «Java», и поставьте им галочки для разрешения подключения (поможет кнопка «Изменить параметры»). Нажимаем на «Ок» для сохранения результата, перезагружаемся и пробуем подключиться к серверу. С антивирусом необходимо проделать аналогичные операции, внеся «Java» и «Майнкрафт» в его исключения;
- Попробуйте альтернативный сервер. Если подключения к конкретному серверу невозможно, тогда вполне вероятно, что у него наблюдаются временные проблемы в работе. Рекомендую попробовать альтернативный сервер, или подождать некоторое время, пока работоспособность начального сервера восстановиться;
- Создайте сервер на другой машине. Если вы создаёте сервер, к которому подключается другой знакомый вам пользователь, тогда рекомендуется поменять базовый компьютер для создания сервера. То есть сервер должен создать уже другой пользователь, а вы подключитесь к нему. Часто это позволяло решить проблему net.ConnectException на пользовательском компьютере;
- Используйте статистический IP-адрес. Если у вас есть возможность, рекомендуется использовать официальный (белый) IP-адрес, полученный через провайдера (обычно данная услуга имеет платный характер);
- Избавьтесь от имеющихся модов к игре. Если вы используете какие-либо моды «Майнкрафт», рекомендуется удалить их, оставив само тело игры;
- Перезагрузите ваш роутер. Отключите ваш роутер, подождите полминуты, а затем включите его обратно;
- Обратитесь за консультацией к провайдеру. По различным причинам некоторые провайдеры блокируют доступ к некоторым серверам. Узнайте, не ваш ли это случай, и не является ли ваш провайдер причиной возникновения данной проблемы.
SSH service is not working
The most basic troubleshooting you can do is to first verify that SSH is installed on the system. There is a client version of SSH (used for remoting into other systems) and a server version (used for accepting incoming connections into the system).
To see if your SSH client is properly installed, just type “ssh” into the terminal.
$ ssh
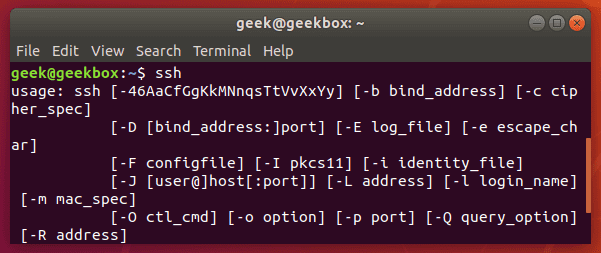
You’ll see some output like the screenshot above if you have the SSH client installed on your system.
To check if your system has the SSH server installed, try initiating a remote connection to the system itself:
$ ssh localhost
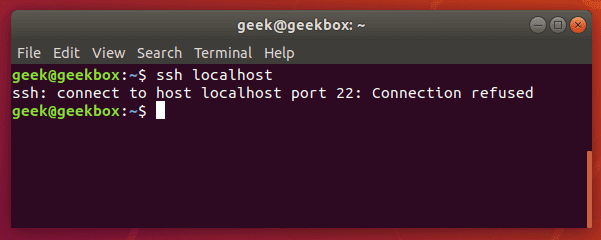
Trying to SSH into the localhost is a great way to see if your system is currently accepting connections.
Here we get the dreaded “connection refused” error message. This either means that the SSH server package isn’t installed on the system, or it could just mean that the service isn’t currently running.
Let’s try checking on the status of the SSH service:
$ systemctl status sshd
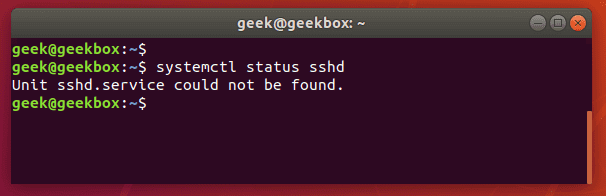
When checking on the status of the SSH daemon, the system informs us that the service could not be found. That means we need to install it.
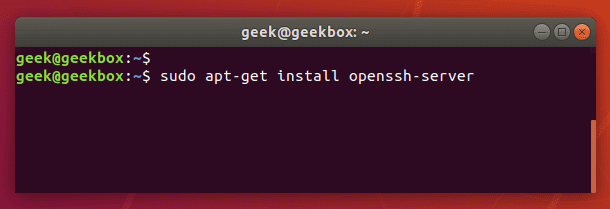
We’re using Ubuntu in this example, so we’re going to use apt-get to install the openssh-server package. You may have to use a slightly different command, depending on what distribution you’re using.
$ sudo apt-get install openssh-server
After the installation, the SSH service may start up automatically. To check if it’s running, check the status again:
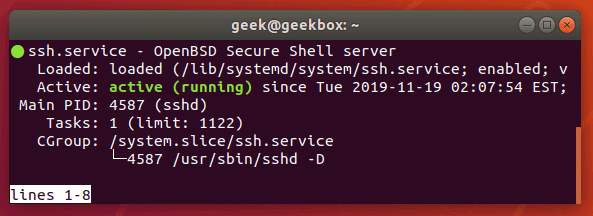
Systemctl shows us that the SSH service is now running (press ‘q’ to exit this screen and return to the terminal).
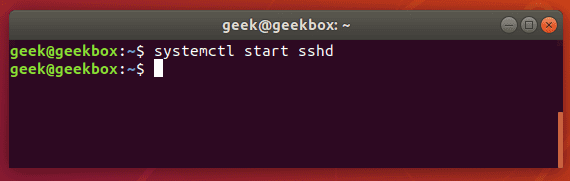
If the SSH daemon isn’t running on your system yet, you can start it with:
$ systemctl start sshd
Что делать с ошибкой ERR_CONNECTION_REFUSED?
Теперь рассмотрим что вы можете сделать в ситуации с ошибкой ERR_CONNECTION_REFUSED:
1. Проверьте доступность сайта. Узнайте у других людей, или воспользуйтесь браузером Tor, или анонимайзером. Для начинающих уточню, что последние два варианта позволяют обращаться к сайту с других IP-адресов (что это?), мало ли сайт недоступен из-за сети. Так же советую проверить корректность адреса сайта.
2. Попробуйте открыть сайт через время. Если вы точно знаете, что сайт должен открываться, то стоит попробовать открыть его через некий промежуток времени. Мало ли в сайте что-то делают и поэтому он недоступен или же, например, веб-ресурс борется с DDoS.
3. Сброс DNS-настроек. Нечасто, но бывает так, что в кэше DNS вашего компьютера для доменного имени сайта хранится некорректный IP-адрес. Простыми словами, браузер не может открыть сайт, так как обращается не по тому IP адресу.
Однако, положительный момент в том, что решить данную проблему может даже начинающий пользователь. Для этого нужно сделать две вещи: открыть командную строку Windows и выполнить команду «ipconfig /flushdns».
Примечание: Для общего развития, советую ознакомиться с обзором устройство DNS-сервера, в котором простыми словами «разжевываются» многие моменты.
4. Файл hosts. В операционной системе Windows существует возможность самостоятельно определять IP-адреса для доменных имен и делается это с помощью специального файла hosts. Поэтому будет не лишним проверить, а нет ли вашего сайта в этом файле (из-за чего может возникать ошибка ERR_CONNECTION_REFUSED).
5. Файрвол. Программы безопасности, такие как файрволы, позволяют защитить ваш компьютер от вирусов и прочих вредоносных гадостей (какие бывают?). Поэтому, в принципе, ошибка «Не удается получить доступ к сайту» может возникать из-за того, что средство безопасности принудительно закрыло соединение браузера. Например, если это некий вредоносный сайт. Однако, стоит понимать, что подобного рода проблемы так же могут возникать из-за пользовательских настроек. Например, когда-то давно добавили сайт в черный список (и, соответственно, как логичное продолжение, он не открывается в браузере). Поэтому стоит проверить настройки программ безопасности, при чем не обязательно только файрволов, это так же может касаться антивирусов.
6. Почистите реестр Windows. Это, в принципе, полезное действие, но, в плане проблем с доступом к сайтам, речь о том, что многие настройки операционной системы Windows хранятся в реестре. Поэтому проверить его будет не лишним.
7. Перезагрузите компьютер. Это один из тех забавных, но действительно помогающих методов. И это не шутка. Суть в двух вещах. Во-первых, операционные системы могут накапливать ошибки. Во-вторых, они обычно содержат в себе средства для автоматического исправления проблем. Поэтому, как бы это не казалось банальным или смешным, но не просто так опытные люди советуют начинать решение многих проблем с этого метода.
- Ошибка ERR_CONNECTION_TIMED_OUT: что делать?
- Ошибка DNS PROBE FINISHED NXDOMAIN как исправить?
10.12 «Incorrect MAC received on packet» or «Incorrect CRC received on packet»
This error occurs when PuTTY decrypts an SSH packet and its checksum is not correct. This probably means something has gone wrong in the encryption or decryption process. It’s difficult to tell from this error message whether the problem is in the client, in the server, or in between.
In particular, if the network is corrupting data at the TCP level, it may only be obvious with cryptographic protocols such as SSH, which explicitly check the integrity of the transferred data and complain loudly if the checks fail. Corruption of protocols without integrity protection (such as HTTP) will manifest in more subtle failures (such as misdisplayed text or images in a web browser) which may not be noticed.
Occasionally this has been caused by server bugs. An example is the bug described at , although you’re very unlikely to encounter that one these days.
In this context MAC stands for Message Authentication Code. It’s a cryptographic term, and it has nothing at all to do with Ethernet MAC (Media Access Control) addresses, or with the Apple computer.
Резюме
Хотя ошибки соединения бесконечно расстраивают, важно помнить, что они часто могут быть исправлены. Ваше первое действие — всегда проверять, связана ли проблема с самой веб-страницей. Если проблема связана с вашим собственным соединением, вам нужно будет немного поработать, чтобы решить проблему. Чтобы попытаться разрешить сообщение ERR_CONNECTION_REFUSED, вы можете:
Чтобы попытаться разрешить сообщение ERR_CONNECTION_REFUSED, вы можете:
- Проверьте, не опустилась ли сама страница.
- Перезагрузите ваш роутер.
- Очистите кеш вашего браузера.
- Оцените настройки прокси и отрегулируйте их по мере необходимости.
- Временно отключите антивирус и брандмауэр.
- Очистите кэш DNS.
- Измените свой адрес DNS.
- Отключите все устаревшие расширения Chrome.
- Переустановите браузер Chrome.
10.18 «Network error: Connection timed out»
This error means that the network connection PuTTY tried to make to your server received no response at all from the server. Usually this happens because the server machine is completely isolated from the network, or because it is turned off.
Check that you have correctly entered the host name or IP address of your server machine. If that fails, consult the administrator of your server.
Unix also generates this error when it tries to send data down a connection and contact with the server has been completely lost during a connection. (There is a delay of minutes before Unix gives up on receiving a reply from the server.) This can occur if you type things into PuTTY while the network is down, but it can also occur if PuTTY decides of its own accord to send data: due to a repeat key exchange in SSH-2 (see ) or due to keepalives ().
Why Does PuTTY Say Connection Refused?
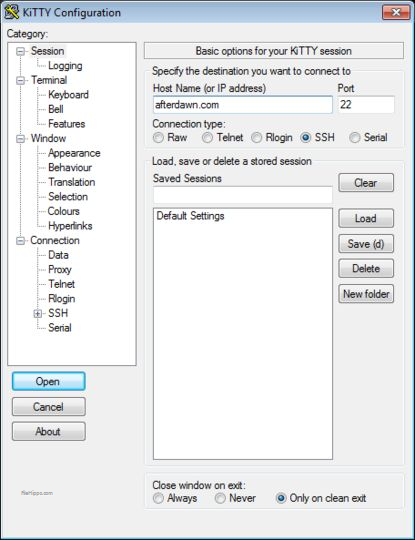
PuTTY is an SSH client. If you’re familiar with FTP, this platform is the equivalent to . In other words, PuTTY enables users to input their credentials and launch an SSH connection:

The PuTTY website
If you’re a PuTTY user and see the Connection refused error, the cause is likely one of those listed above.
This is an SSH connectivity error like any other, and the troubleshooting tips below should work whether you’re using PuTTY, Terminal, or any other program for connecting to your server with SSH.
We’ve taken our knowledge of effective website management at scale, and turned it into an ebook and video course. Click here to download the The 2020 Guide to Managing 40+ WordPress Sites!
10.9 «Server refused our key», «Server refused our public key», «Key refused»
Various forms of this error are printed in the PuTTY window, or written to the PuTTY Event Log (see ) when trying public-key authentication.
If you see one of these messages, it means that PuTTY has sent a public key to the server and offered to authenticate with it, and the server has refused to accept authentication. This usually means that the server is not configured to accept this key to authenticate this user.
This is almost certainly not a problem with PuTTY. If you see this type of message, the first thing you should do is check your server configuration carefully. Common errors include having the wrong permissions or ownership set on the public key or the user’s home directory on the server. Also, read the PuTTY Event Log; the server may have sent diagnostic messages explaining exactly what problem it had with your setup.
has some hints on server-side public key setup.
10.2 «WARNING — POTENTIAL SECURITY BREACH!»
This message, followed by «The server’s host key does not match the one PuTTY has cached in the registry», means that PuTTY has connected to the SSH server before, knows what its host key should be, but has found a different one.
This may mean that a malicious attacker has replaced your server with a different one, or has redirected your network connection to their own machine. On the other hand, it may simply mean that the administrator of your server has accidentally changed the key while upgrading the SSH software; this shouldn’t happen but it is unfortunately possible.
You should contact your server’s administrator and see whether they expect the host key to have changed. If so, verify the new host key in the same way as you would if it was new.
See for more information on host keys.
Измените DNS-адреса, используемые вашей системой, на публичные от Гугл
- Нажмите на кнопку «Пуск», в строке поиска введите ncpa.cpl, и нажмите ввод.
- В открывшемся списке сетевых подключений найдите своё интернет-подключение, наведите на него курсор, нажмите на правую клавишу мышки.
- В открывшемся меню выберите «Свойства».
- В открывшемся окне сетевых подключения находим протокол IPv4, выбираем его, и жмём на «Свойства».
- Внизу выберите опцию использования следующих адресов ДНС-серверов, и пропишите там следующие публичные адреса от Гугл:
8,8.8,8
8,8,4,4
Нажмите на «Ок», и перезагрузите ваш компьютер.
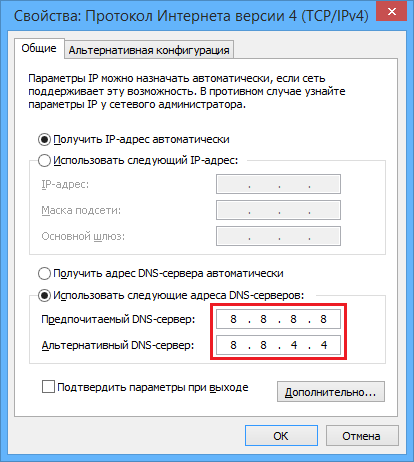
Используйте настройки публичных ДНС от Гугл
- Временно отключите ваш антивирус и брандмауэр, а затем попробуйте войти на нужный сайт. Если переход будет осуществлён корректно, тогда внесите указанный сайт в исключения вашего антивируса (брандмауэра);
- Перезагрузите ваш роутер (модем). Отключите его на минуту-две, затем включите обратно;
- Попробуйте запустить сайт с другого ПК с другим IP. Если проблема наблюдается и там, тогда, возможно, данный сайт «упал», и необходимо уведомить об этом веб-мастера данного ресурса;
- Очистите кэш и куки вашего браузера;
- Проверьте ваш ПК на наличие вирусных программ (к примеру, с помощью «Dr.Web CureIt!»);
-
Отключите использование прокси. Нажмите «Пуск», в строке поиска введите inetcpl.cpl, и нажмите ввод. В открывшихся свойствах сети перейдите на вкладку «Подключения», а затем нажмите на кнопку «Настройка сети». Здесь оставьте галочку на опции «Автоматическое определение параметров», все остальные галочки снимите. Нажмите на «Ок», и перезагрузите ваш ПК;
- NET::ERR_CERT_WEAK_SIGNATURE_ALGORITHM
- ERR_NAME_NOT_RESOLVED
- ERR_INTERNET_DISCONNECTED
Пожалуйста, помогите c переводом:
1. Lol when @hartdenton develops his coachella polaroids
2. Usting @melton as my bitch for gueen
3. Trying to pack for LA
4. Fresh nails wha dis
5. Me once my motor cycle license is done this summer
6. So cute
7. The detail. . . even down to my snake rings. . . Amazing!
Английский-Русский
Policy – Forestry Commission England continues to
take the lead on grey squirrel policy on behalf of Defra.
Английский-Русский
Giving a definition of the term “comedy”, one may face some difficulties as it’s one of the most complex categories of aesthetics. Comedy is historically volatile, it depends on the context and has a social nature. The laughter is not always a sight of comedy, and comedy is not always defined by laughter. It is circumstances, sharpening the contradictions and helping to reveal its social nature
Английский-Русский
Mendeleev was foreshadowed in his great generalization by De Chancourtois’s helix of elements of 1863, J.A.R. New-lands’s *law of octaves* (1864-5)-which uncovered periodicity in the 8th elements of his chemical groupings — and W. Odling’s work, which suggested that recurrent chemical properties in elements arranged according to atomic weight could not be accidental.
Английский-Русский
Backlog of connection requests (Flooding)
All of the connection attempts that have been made to your server are kept in a log file. Perusing this log file can be helpful when troubleshooting connection or user account issues, but you can also use it to determine if your server has been flooded with connection requests.
Check for failed login attempts with this command:
$ cat /var/log/auth.log | grep "Failed password"
If you have a server open to the internet on port 22, it’s going to be common to get at least a few connection attempts every 10 minutes or so, just because of bots constantly browsing the internet for weak servers to hack.
Here’s a look at the auth.log file of one of my public servers:
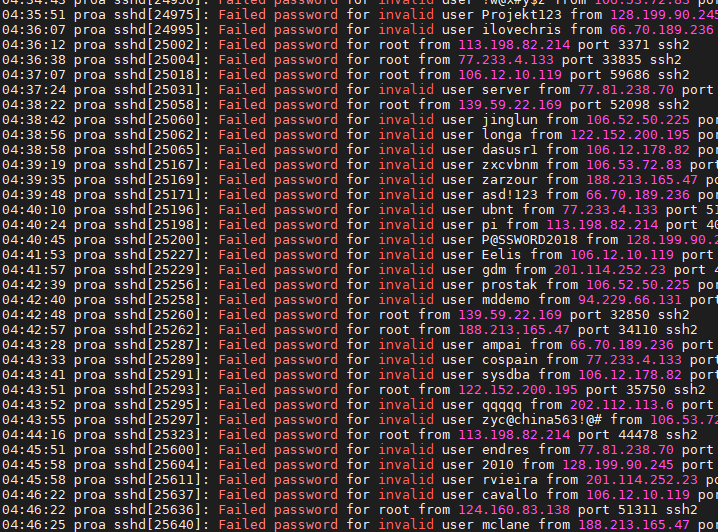
Nothing is alarming in this screenshot since the connection attempts are spaced out by at least a few seconds each time.
To harden your server from SSH brute force attacks, we’d recommend installing CSF Firewall. It’s configured by default to stop repeated SSH attempts from the same IP address. You can fine-tune these settings to your liking, but the default should suit most systems well:
$ vi /etc/csf/csf.conf
# Enable login failure detection of sshd connections
LF_SSHD = "5"

LF_SSHD_PERM = "1"
LF_SSHD set to “5” is the number of max failed connections before blocking the IP address.
LF_SSHD_PERM set to “1” makes this blocking permanent.
Another popular method for limiting these bogus connection attempts is to whitelist trusted IPs and block all others. This only works if the same IPs are always SSHing to your server. To achieve this with iptables, you would use this command:
$ sudo iptables -A INPUT -p tcp -s 10.1.1.1,10.1.1.2 --dport 22 -m conntrack --ctstate NEW,ESTABLISHED -j ACCEPT
This command will only allow SSH connections from 10.1.1.1 and 10.1.1.2. You can list as many IPs as you need in that command, or list an entire subnet, such as 10.1.1.0/24. Note that your input’s chain policy must be set to drop.
Example
A «Connection Refused» error will occur if your client sends a connection request to a remote server host, and the remote host responds to say that it refuses to accept the request. The «Connection Refused» error essentially means that the computer is not accepting connections to the requested IP address and port.
«Connection refused» can be caused by a firewall which is blocking connection requests. A firewall which is configured to block connections to a particular endpoint can be set to drop connection requests—in which case the client will never get a response and will eventually timeout. Or the firewall can respond to connection connection requests with a refusal response.
Aside from firewalls, in the case of SSH, «connection refused» has a few possible causes:
-
You could be using the wrong port number to connect. The standard port number for SSH is 22, but some people run the ssh service on a different port to deter unauthorized access attempts.
-
You could be trying to connect to the wrong computer. You may have mistyped the hostname or IP address. Or the computer may be using a dynamically-assigned address which has changed.
-
The ssh server process may not be running:
- It may not have been started yet if the system is in the process of starting.
- It may have been disabled; e.g. when the system is in single-user mode.
- It may have been misconfigured, causing it to fail to start.
- The computer may not have an SSH server set up. MS Windows systems typically don’t include an SSH server. On some Linux systems, the SSH server may be an optional component. OS X includes an SSH server, but it’s disabled by default.
-
The SSH server process may not be listening for connections on the specific IP interface which you’re trying to connect to. Most computers have at least two IP interfaces, a «localhost» interface and one or more network interfaces. Each active interface will have an IP address associated with it. An SSH server is typically configured to accept connections on any IP interface. But it can be configured to accept connections only on particular interfaces. In that case, the computer will refuse connections to an IP address which the SSH server isn’t listening to, even if the connection request has the correct port.
-
The server may have a backlog of connection requests to the same port. This is rare and unusual, but if the host is receiving connection requests faster than they can be handled, the host will eventually start rejecting new connection requests.
Note that, firewalls aside, «connection refused» means that you are communicating with the remote computer—it’s just not accepting your connection request.
Previous
Next
10.14 «PuTTY X11 proxy: various errors»
This family of errors are reported when PuTTY is doing X forwarding. They are sent back to the X application running on the SSH server, which will usually report the error to the user.
When PuTTY enables X forwarding (see ) it creates a virtual X display running on the SSH server. This display requires authentication to connect to it (this is how PuTTY prevents other users on your server machine from connecting through the PuTTY proxy to your real X display). PuTTY also sends the server the details it needs to enable clients to connect, and the server should put this mechanism in place automatically, so your X applications should just work.
A common reason why people see one of these messages is because they used SSH to log in as one user (let’s say «fred»), and then used the Unix command to become another user (typically «root»). The original user, «fred», has access to the X authentication data provided by the SSH server, and can run X applications which are forwarded over the SSH connection. However, the second user («root») does not automatically have the authentication data passed on to it, so attempting to run an X application as that user often fails with this error.
If this happens, it is not a problem with PuTTY. You need to arrange for your X authentication data to be passed from the user you logged in as to the user you used to become. How you do this depends on your particular system; in fact many modern versions of do it automatically.