Windows server 2012 r2 на русском
Содержание:
- Повышаем данный сервер до контроллера домена.
- Installing versions distributed as VHDs
- Установка роли сервера DHCP в Windows Server 2012 R2
- Copyright
- Upgrading to Windows Server 2012
- Выполнение обновленияTo perform the upgrade
- Windows Server 2012
- After your upgrade is done
- Upgrading to Windows Server 2016
- 许可证转换License Conversion
- Подготовка к обновлению на местеBefore you begin your in-place upgrade
- Обновление до Windows Server 2016Upgrading to Windows Server 2016
- Обновление Windows Server 2008 R2 или Windows Server 2008Upgrading from Windows Server 2008 R2 or Windows Server 2008
- Процедура настройки Server 2012
- Transition to Windows Server 2012 R2 Standard
Повышаем данный сервер до контроллера домена.
Для этого ищем вкладку Уведомления, после нажатия на нее, вы попадаете в консоль, которая предлагает выполнить текущую операцию. Кликните по компоненту «Повысить роль этого сервера до уровня контроллера домена»

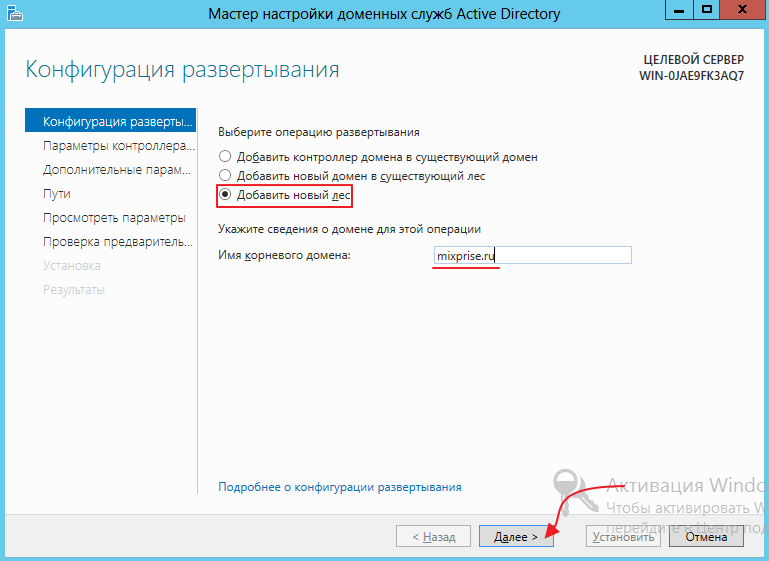
Первое что предложат сделать это выбрать в конфигурации развертывания действие, которое необходимо на текущем шаге настройки сервера.
В нашем случае необходимо «Добавить новый лес» и ввести «Имя корневого домена» После выполнения условий жмите «Далее»
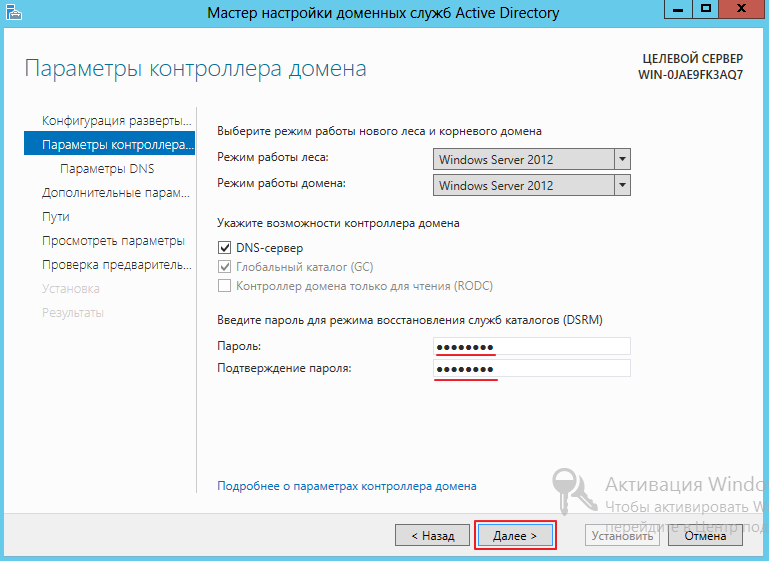
Выбираем функциональный уровень леса и домена, данная процедура нужна для того что бы корректно работали вместе несколько AD при миграции с одной версии на другую.
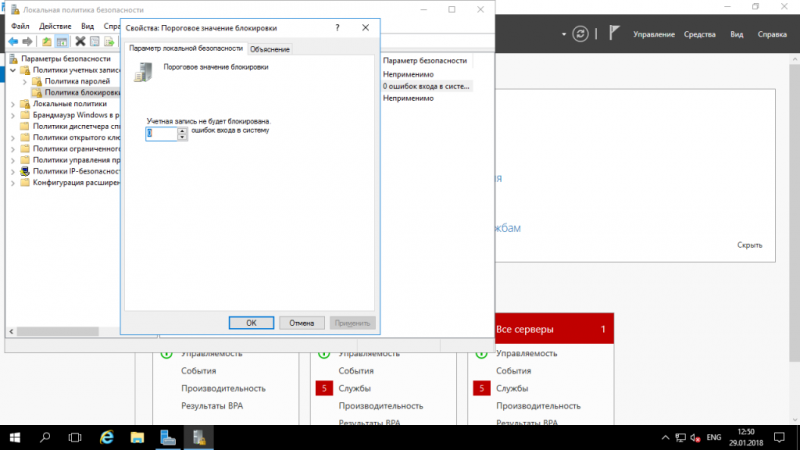
В окне для ввода пароля придумываем пароль, который должен отвечать требованиям по сложности, так как политика паролей еще не отключена, информация по отключению опции доступна в рублике Server 2012. А пока введите пароль типа 387453-K (обязательно латинскими буквами, присутствие верхнего регистра и знаков типа: дефис) для дальнейшего развертывания жмем «Далее»
В поле делегирования DNS, оставляем по дефолту и переходим к следующему пункту «Далее»

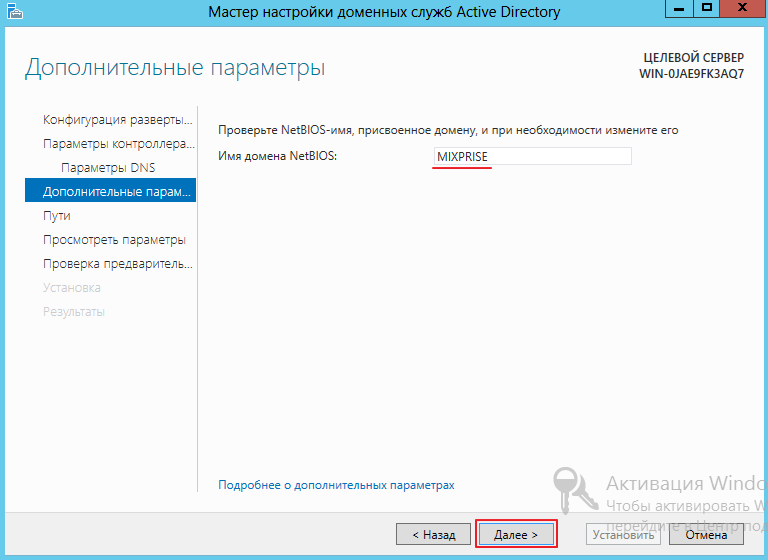
Следующим этапом проверяем имя NetBIOS и изменяем его если это необходимо, имя не столь важно для операционных систем сколько для приложений, которые необходимы для сетевого взаимодействия и могут видеть только NetBIOS имя, данную настройку я оставлю по умолчанию, кликаем «Далее»
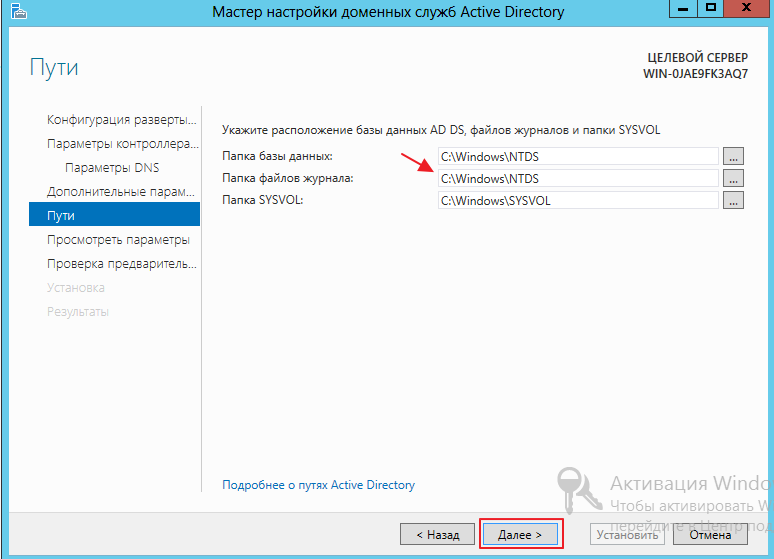
Следующий этап позволяет указать размещение баз данных для файлов, логов и каталогов, для продолжения жмем «Далее»
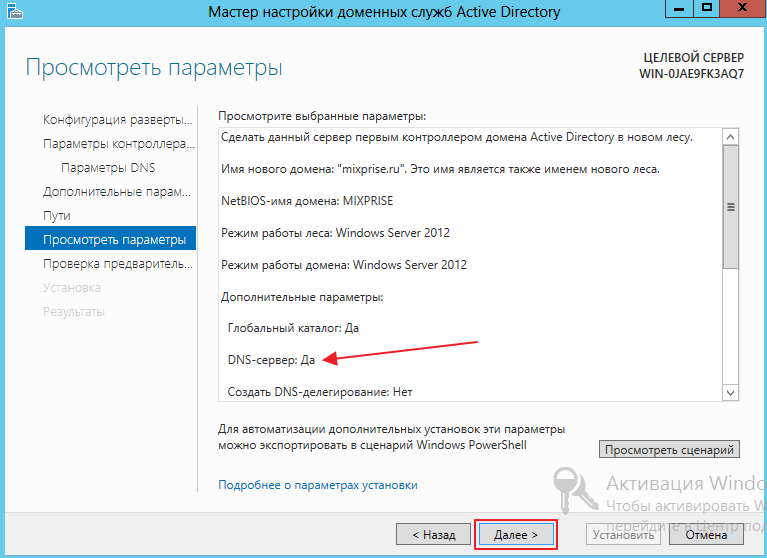
Проверяем корректность настроек, после чего переходим на следующий шаг нажав «Далее»
И вы попадете в место где происходит проверка дополнительных требований, при успешной конфигурации кликаем «Установить»
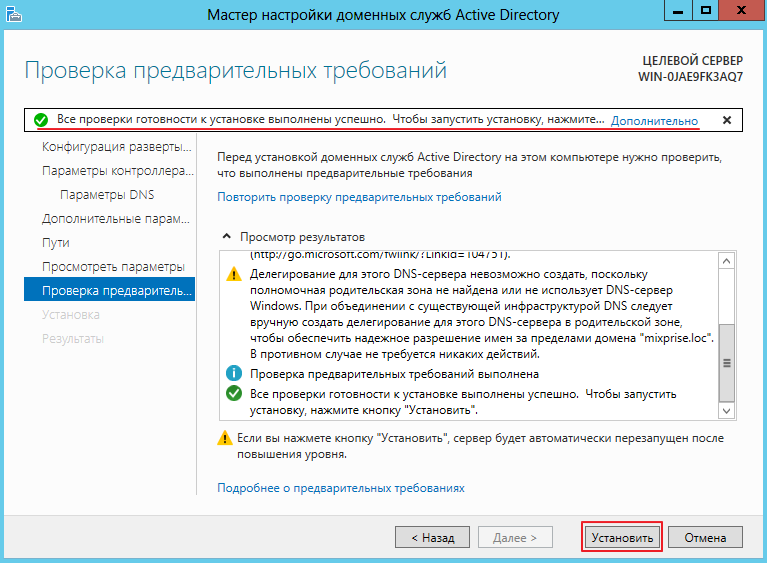
По требованию перезагружаем компьютер

После перезагрузки входим в систему под учетной записью администратора домена
Когда загрузится оснастка «Диспетчер серверов» мы увидим, что установлены AD DS и DNS. Кроме того, в инструментах появилось ряд новых компонентов, которые необходимы для администрирования

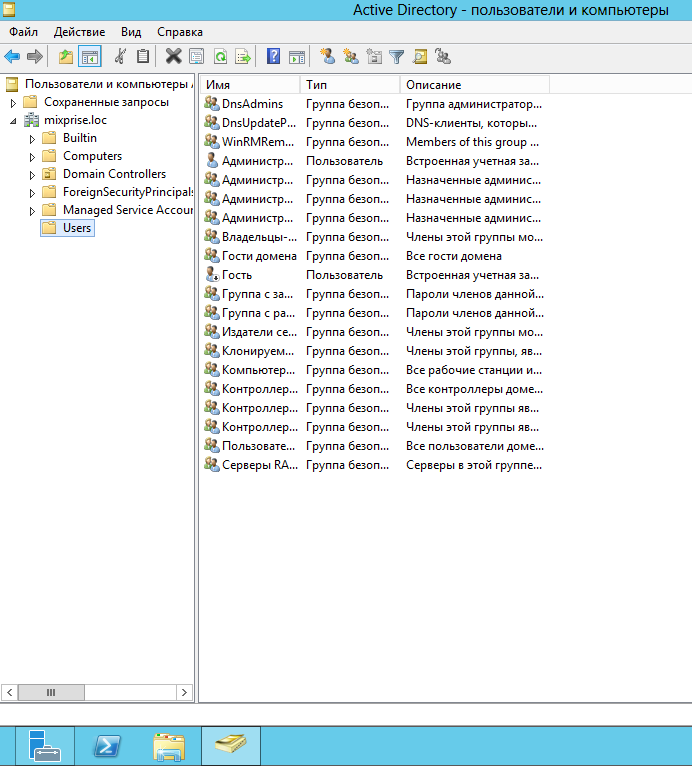
В частности, оснастка «Пользователи и компьютеры Active Directory» С помощью которой можем увидеть пользователей и группы пользователей созданных по умолчанию
Если у вас возникли вопросы по теме, пишите их в комментарии, подписывайтесь на рассылку, спасибо за прочтение!
Installing versions distributed as VHDs
In addition to the other distribution channels, Windows Server 2012 R2 is also available as a pre-configured virtual hard disk (VHD) file, which you can obtain from the TechNet Evaluation Center (https://technet.microsoft.com/evalcenter/dn205286.aspx). VHD files are available with Windows Server 2012 R2 pre-configured in either Server Core mode or Server with a GUI mode (though you can switch modes after installation at will). The resulting virtual machine has the following characteristics:
-
English only
-
2 GB RAM
-
1 CPU
-
80 GB hard drive
To use the VHD distribution, you must have a computer running Windows Server 2008 R2, Windows Server 2012, or Windows Server 2012 R2. The Hyper-V server role must be installed.
To install the VHD
-
Download the VHD file to a convenient location. A common location is C:\Users\Public\Documents\Hyper-V\Virtual hard disks, but any location you prefer will work.
-
Start Hyper-V Manager. On the Action menu, point to New, and then point to Virtual Machine.
-
Complete the New Virtual Machine wizard, and on the Connect Virtual Hard Disk page, choose Attach a virtual hard disk later.
-
After completing the New Virtual Machine wizard, check Hyper-V Manager to verify that the virtual machine was successfully created.
-
Right-click the new virtual machine and point to Settings. In the left pane, click IDE Controller 0. In the right pane, point to Hard Drive, and then Add. In the menu that opens, click Virtual Hard Disk and point to Browse…. Navigate to the location of the VHD you downloaded, select that file, and then click OK.
-
Configure the network adapter for the resulting virtual machine: right-click the virtual machine and select Settings. In the left pane, click Network Adapter. In the menu that appears, select one of the network adapters of the virtualization server, and then click OK.
-
Start the virtual machine.
Установка роли сервера DHCP в Windows Server 2012 R2
Перед тем как устанавливать роль DHCP сервера, необходимо выполнить предварительную подготовку, например, составить план добавления областей (подсеть, диапазон), какие ip исключить из раздачи, какие параметры необходимо раздавать, это для ускорения процесса установки и настройки, также необходимо задать статический ip адрес того сервера, на котором Вы собираетесь устанавливать роль сервера DHCP. Теперь переходим к практике.
Шаг 1
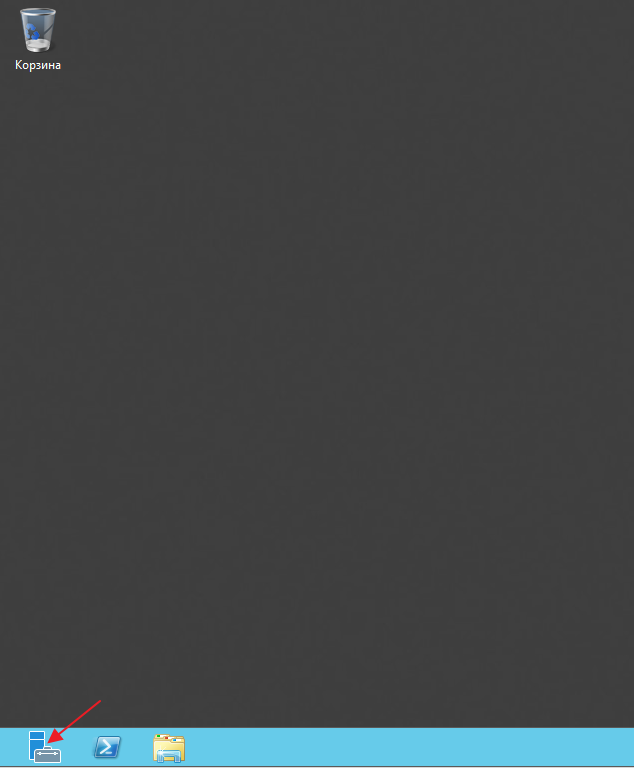
Открываем «Диспетчер серверов» в принципе он открывается при старте системы, но в случае если он закрыт, или Вы настроили сервер таким образом, чтобы диспетчер серверов при входе в систему не запускался, то нажимаем Пуск->Диспетчер серверов
Нажимаем «Добавить роль сервера», можно непосредственно через быстрый запуск, а можно через меню «Управление»
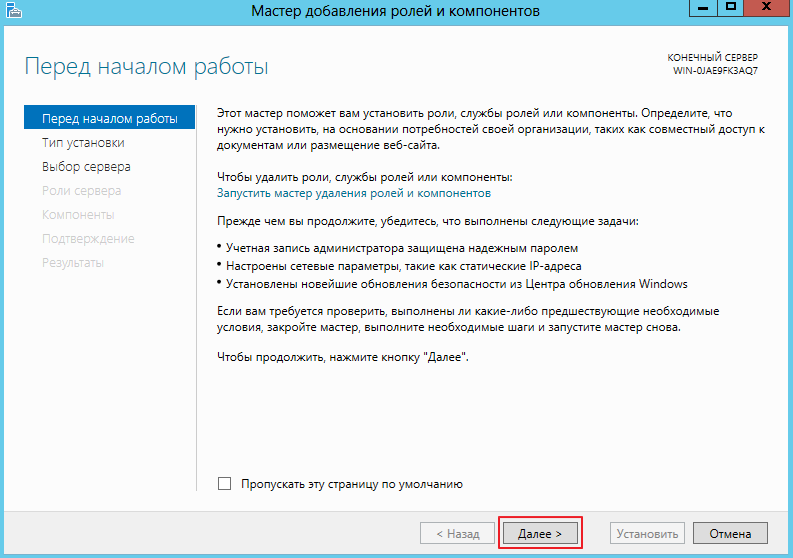
Далее нас встретит так сказать страница приветствия, мы жмем «Далее»
Далее уже по умолчанию выбран необходимый пункт, т.е. «Установка ролей или компонентов», жмем «Далее»
Шаг 5
Затем необходимо выбрать на какой сервер иди виртуальный жесткий диск, мы будем устанавливать DHCP сервер, в моем случае локально, т.е. этот же самый сервер, также хочу заметить, что ip адрес у моего тестового сервера 10.10.0.5 соответственно для примера я буду создавать область в этой же подсети, жмем «Далее»
Шаг 6
Далее необходимо выбрать какую роль мы собираемся устанавливать, мы соответственно выбираем DHCP сервер
После нажатия, откроется окно, в котором нам сразу предложат выбрать для установки средства администрирования DHCP сервера, мы соглашаемся, иначе, далее нам все равно придется это выбирать, если конечно мы хотим администрировать DHCP с этого компьютера, жмем «Добавить компоненты»
И снова жмем «Далее»
Шаг 7
Здесь нам предложат выбрать необходимые компоненты, если на прошлом шаге Вы выбрали «Добавить компоненты» то необходимые компоненты уже будут выбраны, если поискать в этих компонентах то мы это увидим, жмем «Далее»
Шаг 8
Здесь нас как раз предупреждают о том, что необходимо составить план настройки DHCP и задать хотя бы один статический адрес на данном компьютере, жмем «Далее»
Шаг 9
Затем мы должны будем подтвердить установку, и в случае необходимости поставить галочку «Автоматический перезапуск конечного сервера», но в данном случае это делать не обязательно, поэтому жмем «Установить»
И начнется установка, и продлится она буквально пару минут
Шаг 10
Установка завершена, и нам предложат выполнить предварительную настройку, она нужна, для того чтобы создать соответствующие группы для делегирования полномочий управления DHCP сервером, жмем «Завершение настройки DHCP»
Далее нажимаем «Фиксировать», уточню, что у меня это тестовый сервер и домен не развернут, поэтому после, у меня в локальных группах появятся соответствующие группы.
Затем нам сообщают, что группы созданы, и то, что необходимо перезапустить службы DHCP, жмем «Закрыть»
Copyright
This document is provided “as-is”. Information and views expressed in this document, including URL and other Internet Web site references, may change without notice.
This document does not provide you with any legal rights to any intellectual property in any Microsoft product. You may copy and use this document for your internal, reference purposes.
2013 Microsoft Corporation. All rights reserved.
Microsoft, Active Directory, Hyper-V, MS-DOS, Windows, Windows NT, Windows Server, and Windows Vista are either registered trademarks or trademarks of Microsoft Corporation in the United States and/or other countries.
This product contains graphics filter software; this software is based in part on the work of the Independent JPEG Group.
All other trademarks are property of their respective owners.
1.0
Upgrading to Windows Server 2012
For details, including important caveats and limitations on upgrade, and conversion of evaluation editions to retail, see Evaluation Versions and Upgrade Options for Windows Server 2012.
Quick reference table of supported upgrade paths from older Windows Server retail editions to Windows Server 2012 retail editions:
| If you are running: | You can upgrade to these editions: |
|---|---|
| Windows Server 2008 Standard with SP2 or Windows Server 2008 Enterprise with SP2 | Windows Server 2012 Standard, Windows Server 2012 Datacenter |
| Windows Server 2008 Datacenter with SP2 | Windows Server 2012 Datacenter |
| Windows Web Server 2008 | Windows Server 2012 Standard |
| Windows Server 2008 R2 Standard with SP1 or Windows Server 2008 R2 Enterprise with SP1 | Windows Server 2012 Standard, Windows Server 2012 Datacenter |
| Windows Server 2008 R2 Datacenter with SP1 | Windows Server 2012 Datacenter |
| Windows Web Server 2008 R2 | Windows Server 2012 Standard |
License conversion
You can convert Windows Server 2012 Standard (retail) to Windows Server 2012 Datacenter (retail).
You can convert Windows Server 2012 Essentials (retail) to Windows Server 2012 Standard (retail).
You can convert the evaluation version of Windows Server 2012 Standard to either Windows Server 2012 Standard (retail) or Datacenter (retail).
Выполнение обновленияTo perform the upgrade
-
Убедитесь, что значение BuildLabEx указывает, что используется Windows Server 2012 R2.Make sure the BuildLabEx value says you’re running Windows Server 2012 R2.
-
Найдите установочный носитель Windows Server 2019 и выберите setup.exe.Locate the Windows Server 2019 Setup media, and then select setup.exe.
-
Выберите Да, чтобы начать процесс установки.Select Yes to start the setup process.
-
Для устройств, подключенных к Интернету, выберите вариант Скачать обновления, драйверы и дополнительные компоненты (рекомендуется) , а затем щелкните Далее.For internet-connected devices, select the Download updates, drivers and optional features (recommended) option, and then select Next.
-
Программа установки проверяет конфигурацию устройства. Дождитесь ее завершения и щелкните Далее.Setup checks your device configuration, you must wait for it to finish, and then select Next.
-
В зависимости от канала распространения, из которого был получен носитель Windows Server (розничная, корпоративная, OEM, ODM и т. д.) и лицензия на сервер, может появиться запрос на ввод лицензионного ключа для продолжения.Depending on the distribution channel that you received Windows Server media from (Retail, Volume License, OEM, ODM, etc.) and the license for the server, you may be prompted to enter a licensing key to continue.
-
Выберите выпуск Windows Server 2019, который вы хотите установить, а затем щелкните Далее.Select the Windows Server 2019 edition you want to install, and then select Next.
-
Выберите Принимаю, чтобы подтвердить условия лицензионного соглашения, исходя из вашего канала распространения (например, розничная, корпоративная, OEM, ODM версия и т. д.).Select Accept to accept the terms of your licensing agreement, based on your distribution channel (such as, Retail, Volume License, OEM, ODM, and so on).
-
Программа установки предложит вам удалить модуль Microsoft Endpoint Protection через оснастку Установка и удаление программ.Setup will recommend that you remove Microsoft Endpoint Protection using Add/Remove programs.
Эта функция несовместима с Windows Server 2019.This feature isn’t compatible with Windows Server 2019.
-
Выберите Сохранить личные файлы и приложения, чтобы выполнить обновление на месте, а затем щелкните Далее.Select Keep personal files and apps to choose to do an in-place upgrade, and then select Next.
-
Когда программа установки завершит анализ устройства, она предложит перейти к обновлению, выбрав действие Установить.After Setup analyzes your device, it will prompt you to proceed with your upgrade by selecting Install.
Начнется обновление на месте, в котором отображается окно Обновление Windows с информацией о ходе выполнения.The in-place upgrade starts, showing you the Upgrading Windows screen with its progress. После завершения обновления сервер перезапустится.After the upgrade finishes, your server will restart.
Windows Server 2012
-
Installing Windows Server 2012
This document provides information about installing the Windows Server 2012 operating system, including any known issues that you might need to work around before starting an installation. It also provides information that you can use to troubleshoot problems that may occur during the installation. -
Release Notes: Important Issues in Windows Server 2012
These release notes address the most critical issues and information about the Windows Server 2012 operating system. For information about by-design changes, new features, and fixes in this release, see documentation and announcements from the specific feature teams. -
Evaluation Versions and Upgrade Options for Windows Server 2012
This document summarizes key information about evaluation versions of Windows Server 2012, including where to obtain them, the limits on their use, and how to convert them to full retail versions. It also summarizes the supported upgrade paths from previously licensed retail versions of Windows Server to Windows Server 2012. -
Windows Server Installation Options
This document summarizes the differences between the installation options available for Windows Server 2012, including the features that are installed with each option, the management options available after installation, and how to switch between the installation options during use. -
Server Core and Full Server Integration Overview
In Windows Server 2012, the Server Core installation option is no longer an irrevocable selection that is made during setup. An administrator now has the flexibility to change to a Server Core installation or a full, GUI-based installation as needed, after operating system installation is finished. -
Configure and Manage Server Core Installations
This collection of topics provides the information needed to install and deploy Server Core servers; install, manage, and uninstall server roles and features; and manage the server locally or remotely. It also includes a quick reference table of common tasks and the commands for accomplishing them locally on a Server Core server. -
Features Removed or Deprecated in Windows Server 2012
This is a list of features and functionalities in Windows Server 2012 that have either been removed from the product in the current release or are planned for potential removal in subsequent releases. The list is intended for IT pros who are updating operating systems in a commercial environment. -
Common Management Tasks and Navigation in Windows
Windows 8 and Windows Server 2012 feature the new Windows user interface. This topic helps you find and open common management tools, create shortcuts to frequently used programs, run programs with elevated user rights, and perform common tasks such as signing in and out, restarting, and shutting down computers that are running Windows Server 2012 and Windows 8.
After your upgrade is done
After your upgrade completes, you must make sure the upgrade to Windows Server 2019 was successful.
To make sure your upgrade was successful
-
Open the Registry Editor, go to the HKEY_LOCAL_MACHINE\SOFTWARE\Microsoft\WindowsNT\CurrentVersion hive, and view the ProductName. You should see your edition of Windows Server 2019, for example Windows Server 2019 Datacenter.
-
Make sure all of your applications are running and that your client connections to the applications are successful.
If you think something might have gone wrong during your upgrade, copy and zip the (usually ) directory and contact Microsoft support.
Upgrading to Windows Server 2016
For details, including important caveats and limitations on upgrade, license conversion between editions of Windows Server 2016, and conversion of evaluation editions to retail, see Supported Upgrade Paths for Windows Server 2016.
Note
Note: Upgrades that switch from a Server Core installation to a Server with a Desktop installation (or vice versa) are not supported. If the older operating system you are upgrading or converting is a Server Core installation, the result will still be a Server Core installation of the newer operating system.
Quick reference table of supported upgrade paths from older Windows Server retail editions to Windows Server 2016 retail editions:
| If you are running these versions and editions: | You can upgrade to these versions and editions: |
|---|---|
| Windows Server 2012 Standard | Windows Server 2016 Standard or Datacenter |
| Windows Server 2012 Datacenter | Windows Server 2016 Datacenter |
| Windows Server 2012 R2 Standard | Windows Server 2016 Standard or Datacenter |
| Windows Server 2012 R2 Datacenter | Windows Server 2016 Datacenter |
| Hyper-V Server 2012 R2 | Hyper-V Server 2016 (using Cluster OS Rolling Upgrade feature) |
| Windows Server 2012 R2 Essentials | Windows Server 2016 Essentials |
| Windows Storage Server 2012 Standard | Windows Storage Server 2016 Standard |
| Windows Storage Server 2012 Workgroup | Windows Storage Server 2016 Workgroup |
| Windows Storage Server 2012 R2 Standard | Windows Storage Server 2016 Standard |
| Windows Storage Server 2012 R2 Workgroup | Windows Storage Server 2016 Workgroup |
License conversion
You can convert Windows Server 2016 Standard (retail) to Windows Server 2016 Datacenter (retail).
You can convert Windows Server 2016 Essentials (retail) to Windows Server 2016 Standard (retail).
You can convert the evaluation version of Windows Server 2016 Standard to either Windows Server 2016 Standard (retail) or Datacenter (retail).
You can convert the evaluation version of Windows Server 2016 Datacenter to Windows Server 2016 Datacenter (retail).
许可证转换License Conversion
在某些操作系统发行版中,可以使用简单的命令和相应的许可证密钥,通过一个步骤将发行版的特定版本转换成同一发行版的另一个版本。In some operating system releases, you can convert a particular edition of the release to another edition of the same release in a single step with a simple command and the appropriate license key. 这称为许可证转换。This is called license conversion. 例如,如果服务器正在运行 Windows Server 2016 Standard,可以将其转换为 Windows Server 2016 Datacenter。For example, if your server is running Windows Server 2016 Standard, you can convert it to Windows Server 2016 Datacenter. 在某些 Windows Server 发行版中,还可使用相同的命令和相应的密钥在 OEM、批量许可和零售版本之间自由地转换。In some releases of Windows Server, you can also freely convert among OEM, volume-licensed, and retail versions with the same command and the appropriate key.
Подготовка к обновлению на местеBefore you begin your in-place upgrade
Перед началом обновления Windows Server рекомендуется выполнить сбор данных с устройств для диагностики и устранения неполадок.Before you start your Windows Server upgrade, we recommend that you collect some information from your devices, for diagnostic and troubleshooting purposes. Так как эти сведения предназначены для использования только в случае сбоя обновления, необходимо убедиться в том, что вы храните информацию в расположении, доступ к которому можно получить с вашего устройства.Because this information is intended for use only if your upgrade fails, you must make sure that you store the information somewhere that you can get to it off of your device.
Сбор данныхTo collect your info
-
Откройте командную строку, перейдите в , а затем введите systeminfo.exe.Open a command prompt, go to , and then type systeminfo.exe.
-
Скопируйте, вставьте и сохраните полученные сведения о системе в любом расположении на устройстве.Copy, paste, and store the resulting system information somewhere off of your device.
-
Введите ipconfig /all в командной строке, а затем скопируйте и вставьте полученные сведения о конфигурации в то же расположение, что и ранее.Type ipconfig /all into the command prompt, and then copy and paste the resulting configuration information into the same location as above.
-
Откройте редактор реестра, перейдите в куст HKEY_LOCAL_MACHINE\SOFTWARE\Microsoft\WindowsNT\CurrentVersion, а затем скопируйте и вставьте значения BuildLabEx (версия) и EditionID (выпуск) для Windows Server в то же расположение, что и выше.Open the Registry Editor, go to the HKEY_LOCAL_MACHINE\SOFTWARE\Microsoft\WindowsNT\CurrentVersion hive, and then copy and paste the Windows Server BuildLabEx (version) and EditionID (edition) into the same location as above.
После получения всех данных, относящихся к Windows Server, мы настоятельно рекомендуем создать резервную копию операционной системы, приложений и виртуальных машин.After you’ve collected all of your Windows Server-related information, we highly recommend that you backup your operating system, apps, and virtual machines. Кроме того, необходимо завершить работу, выполнить быструю миграцию или динамическую миграцию всех виртуальных машин, выполняющихся в данный момент на сервере.You must also Shut down, Quick migrate, or Live migrate any virtual machines currently running on the server. Во время обновления на месте виртуальные машины не могут работать.You can’t have any virtual machines running during the in-place upgrade.
Обновление до Windows Server 2016Upgrading to Windows Server 2016
Дополнительные сведения, в том числе важные замечания и ограничения, относящиеся к обновлению, преобразованию лицензий между выпусками Windows Server 2016 и преобразованию ознакомительных выпусков на розничные, приведены в разделе Параметры обновления и преобразования для Windows Server2016.For details, including important caveats and limitations on upgrade, license conversion between editions of Windows Server 2016, and conversion of evaluation editions to retail, see Supported Upgrade Paths for Windows Server 2016.
Примечание
Примечание. Обновления, переключающиеся с установки основных серверных компонентов на режим «Сервер с рабочим столом» (или наоборот), не поддерживаются.Note: Upgrades that switch from a Server Core installation to a Server with a Desktop installation (or vice versa) are not supported. Если более старая операционная система, которую вы обновляете или преобразовываете, является установкой Server Core, результатом по-прежнему будет установка Server Core более новой операционной системы.If the older operating system you are upgrading or converting is a Server Core installation, the result will still be a Server Core installation of the newer operating system.
Ниже приведена краткая справочная таблица поддерживаемых путей обновления более старых розничных выпусков Windows Server до розничных выпусков Windows Server 2016.Quick reference table of supported upgrade paths from older Windows Server retail editions to Windows Server 2016 retail editions:
| Если вы используете эти версии и выпуски:If you are running these versions and editions: | Доступно обновление до этих версий и выпусков:You can upgrade to these versions and editions: |
|---|---|
| Windows Server 2012 StandardWindows Server 2012 Standard | Windows Server 2016 Standard или DatacenterWindows Server 2016 Standard or Datacenter |
| Windows Server 2012 DatacenterWindows Server 2012 Datacenter | Windows Server 2016 DatacenterWindows Server 2016 Datacenter |
| Windows Server 2012 R2 StandardWindows Server 2012 R2 Standard | Windows Server 2016 Standard или DatacenterWindows Server 2016 Standard or Datacenter |
| Windows Server 2012 R2 DatacenterWindows Server 2012 R2 Datacenter | Windows Server 2016 DatacenterWindows Server 2016 Datacenter |
| Hyper-V Server 2012 R2Hyper-V Server 2012 R2 | Hyper-V Server 2016 (с использованием функции последовательного обновления ОС кластера)Hyper-V Server 2016 (using Cluster OS Rolling Upgrade feature) |
| Windows Server 2012 R2 EssentialsWindows Server 2012 R2 Essentials | Windows Server 2016 EssentialsWindows Server 2016 Essentials |
| Windows Storage Server 2012 StandardWindows Storage Server 2012 Standard | Windows Storage Server 2016 StandardWindows Storage Server 2016 Standard |
| Windows Storage Server 2012 WorkgroupWindows Storage Server 2012 Workgroup | Windows Storage Server 2016 WorkgroupWindows Storage Server 2016 Workgroup |
| Windows Storage Server 2012 R2 StandardWindows Storage Server 2012 R2 Standard | Windows Storage Server 2016 StandardWindows Storage Server 2016 Standard |
| Windows Storage Server 2012 R2 WorkgroupWindows Storage Server 2012 R2 Workgroup | Windows Storage Server 2016 WorkgroupWindows Storage Server 2016 Workgroup |
Преобразование лицензииLicense conversion
Вы можете перейти с Windows Server 2016 Standard (розничная версия) на Windows Server 2016 Datacenter (розничная версия).You can convert Windows Server 2016 Standard (retail) to Windows Server 2016 Datacenter (retail).
Вы можете перейти с Windows Server 2016 Essentials (розничная версия) на Windows Server 2016 Standard (розничная версия).You can convert Windows Server 2016 Essentials (retail) to Windows Server 2016 Standard (retail).
Вы можете перейти с ознакомительной версии Windows Server 2016 Standard, Windows Server 2016 Standard (розничная версия) либо Datacenter (розничная версия).You can convert the evaluation version of Windows Server 2016 Standard to either Windows Server 2016 Standard (retail) or Datacenter (retail).
Вы можете перейти с ознакомительной версии Windows Server 2016 Datacenter на Windows Server 2016 Datacenter (розничная версия).You can convert the evaluation version of Windows Server 2016 Datacenter to Windows Server 2016 Datacenter (retail).
Обновление Windows Server 2008 R2 или Windows Server 2008Upgrading from Windows Server 2008 R2 or Windows Server 2008
Как описано в разделе Обновление Windows Server 2008 и Windows Server 2008 R2, расширенная поддержка Windows Server 2008 R2 и Windows Server 2008 заканчивается в январе 2020 года.As described in Upgrade Windows Server 2008 and Windows Server 2008 R2, the extended support for Windows Server 2008 R2/Windows Server 2008 ends in January of 2020. Чтобы обеспечить отсутствие перерывов в поддержке, необходимо выполнить обновление до поддерживаемой версии Windows Server или осуществить повторное размещение в Azure, перейдя на специализированные виртуальные машины Windows Server 2008 R2.To ensure no gap in support, you need to upgrade to a supported version of Windows Server, or rehost in Azure by moving to specialized Windows Server 2008 R2 VMs. Ознакомьтесь с руководством по миграции для Windows Server, чтобы получить сведения и рекомендации по планированию миграции или обновления.Check out the Migration Guide for Windows Server for information and considerations for planning your migration/upgrade.
Для локальных серверов не предусмотрен прямой путь обновления Windows Server 2008 R2 до Windows Server 2016 или более поздней версии.For on-premises servers, there is no direct upgrade path from Windows Server 2008 R2 to Windows Server 2016 or later. Вместо этого сначала обновите их до Windows Server 2012 R2, а затем — .Instead, upgrade first to Windows Server 2012 R2, and then .
При планировании обновления учитывайте приведенные ниже рекомендации по промежуточному шагу обновления до Windows Server 2012 R2.As you are planning your upgrade, be aware of the following guidelines for the middle step of upgrading to Windows Server 2012 R2.
-
Невозможно выполнить обновление на месте 32-разрядной архитектуры до 64-разрядной архитектуры или сборки одного типа до сборки другого типа (например, сборки fre до chk).You can’t do an in-place upgrade from a 32-bit to 64-bit architectures or from one build type to another (fre to chk, for example).
-
Обновление на месте поддерживаются только для того же языка.In-place upgrades are only supported in the same language. Невозможно выполнить обновление с одного языка на другой.You can’t upgrade from one language to another.
-
Невозможно перейти с Windows Server 2008 с установленными основными серверными компонентами на Windows Server 2012 R2 с графическим пользовательским интерфейсом сервера (Windows Server с возможностями рабочего стола).You can’t migrate from a Windows Server 2008 server core installation to Windows Server 2012 R2 with the Server GUI (called «Server with Full Desktop» in Windows Server). Вы можете перейти с обновленной установки основных серверных компонентов на сервер с возможностями рабочего стола, но только в Windows Server 2012 R2.You can switch your upgraded server core installation to Server with Full Desktop, but only on Windows Server 2012 R2. Windows Server 2016 и более поздние версии не поддерживают переход с установки основных серверных компонентов на сервер с возможностями рабочего стола, поэтому его нужно выполнить перед обновлением до Windows Server 2016.Windows Server 2016 and later do not support switching from server core to Full Desktop, so make that switch before you upgrade to Windows Server 2016.
Процедура настройки Server 2012
Приложение: посмотрите что бы у вас корректно была настроена сетевая карта пример:

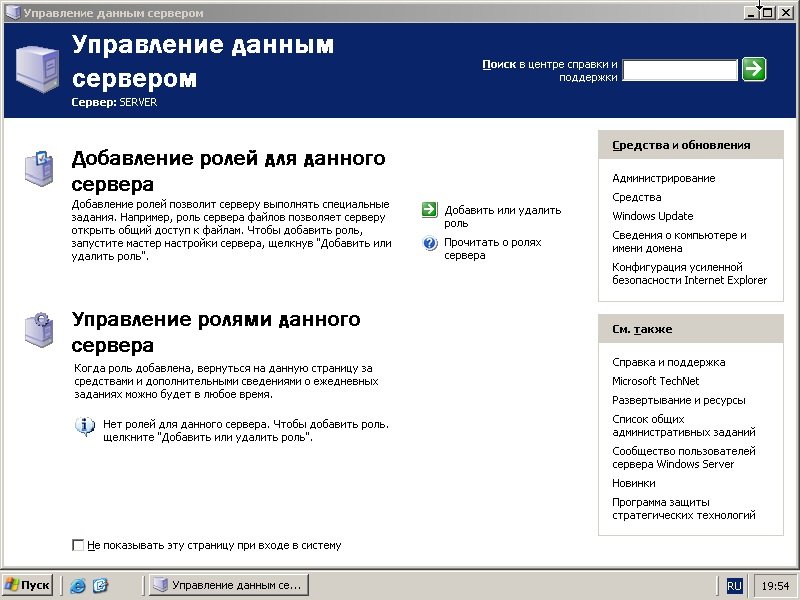
После того как вы загрузили Microsoft Windows Server 2012, открываем «Диспетчер серверов»
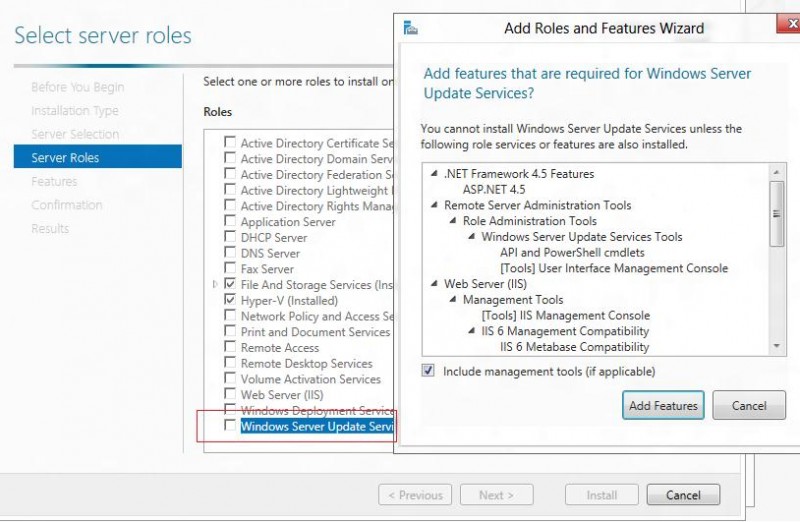
Выбираем пункт «Добавить роли и компоненты»

Перед началом работы, можете прочитать приведенную информацию, после чего перейти в следующий раздел кнопкой «Далее»
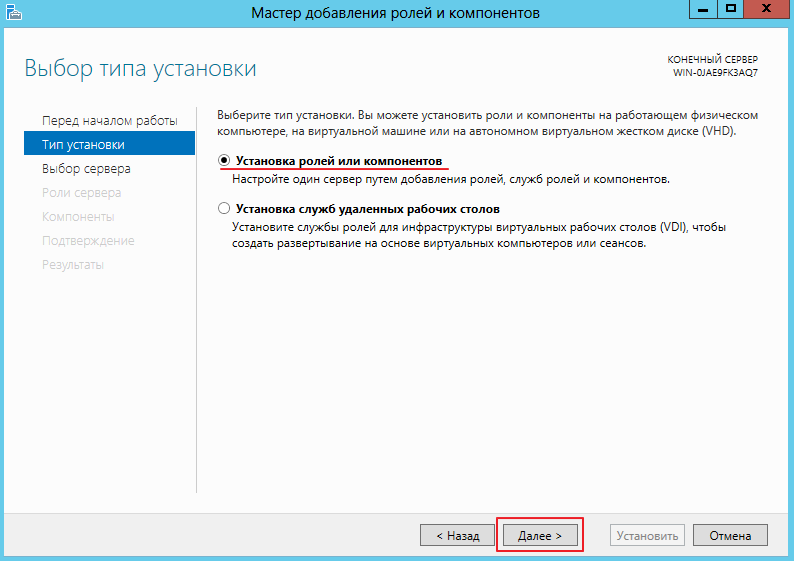
В разделе выбора типа установки, оставляем галочку «Установка ролей или компонентов» так как пока что служба удаленных рабочих столов нам не нужна, жмем «Далее»
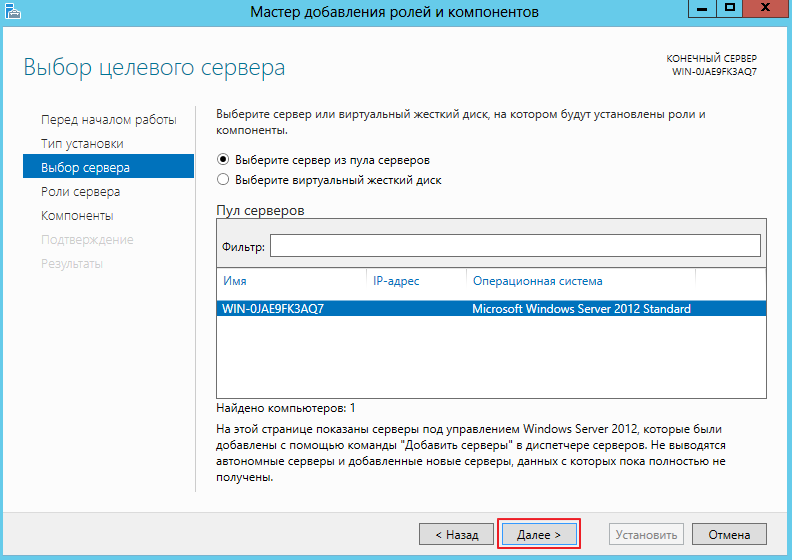
Выбираем тот сервер, к которому применяем изменения, здесь ничего пока не меняем и продолжаем «Далее»
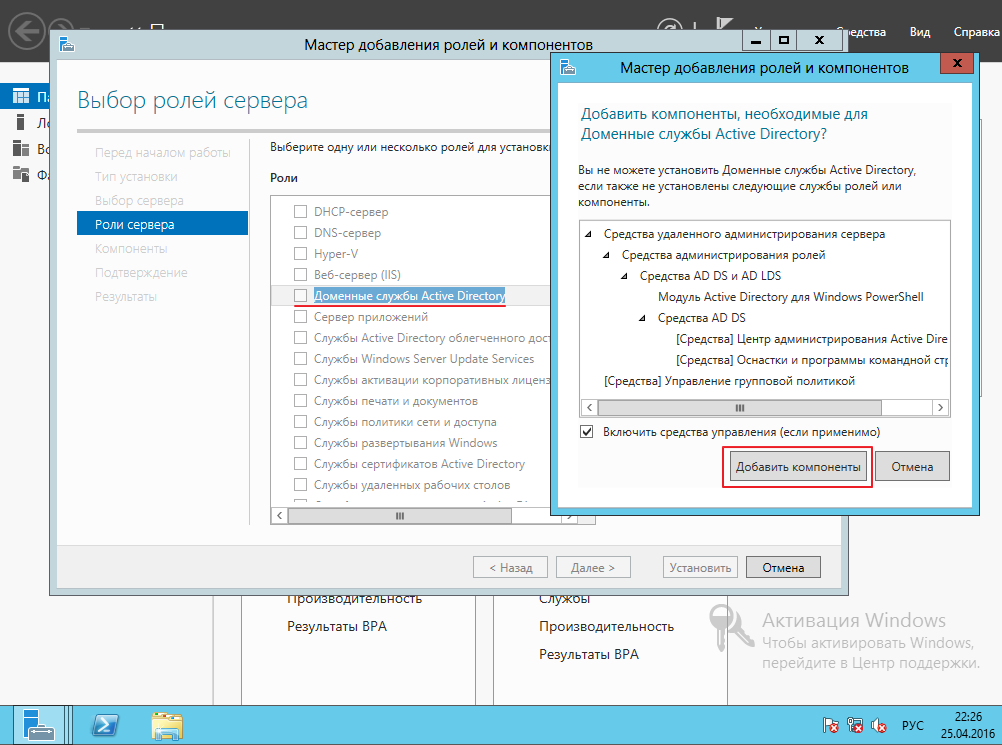
В появившимся мастере находим строку «Доменные службы Active Directory» выделяем ее, после открывшегося меню жмем «Добавить компоненты» для того что бы продолжить работу мастера нажмите «Далее»
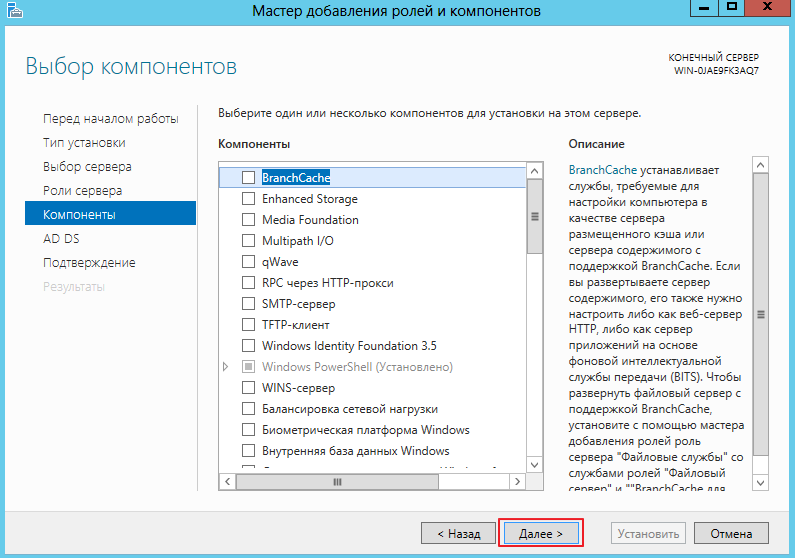
Нам предлагают выбрать какие-то дополнительные компоненты, пока оставляем все без изменений и продолжаем установку «Далее»
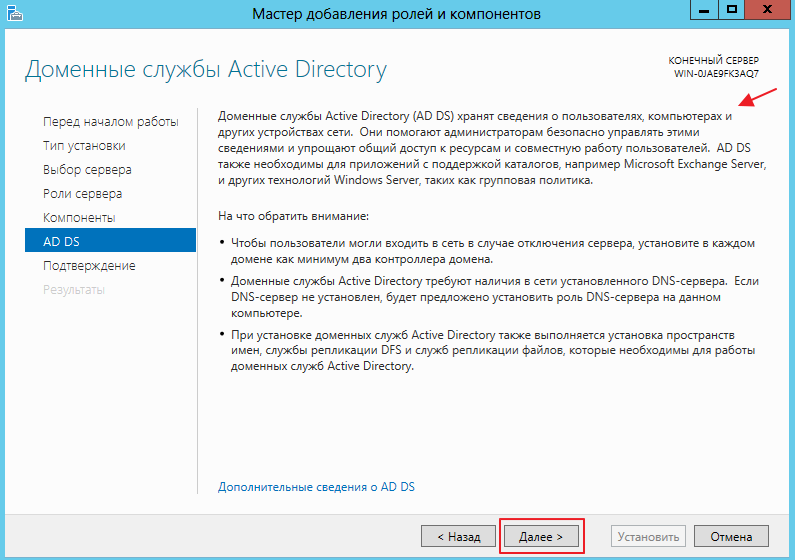
Вашему вниманию будет представлена краткая информация о том, что такое доменные службы, для чего они нужны и на что следует обратить внимание! После прочтения материала, переходим к следующему шагу «Далее»
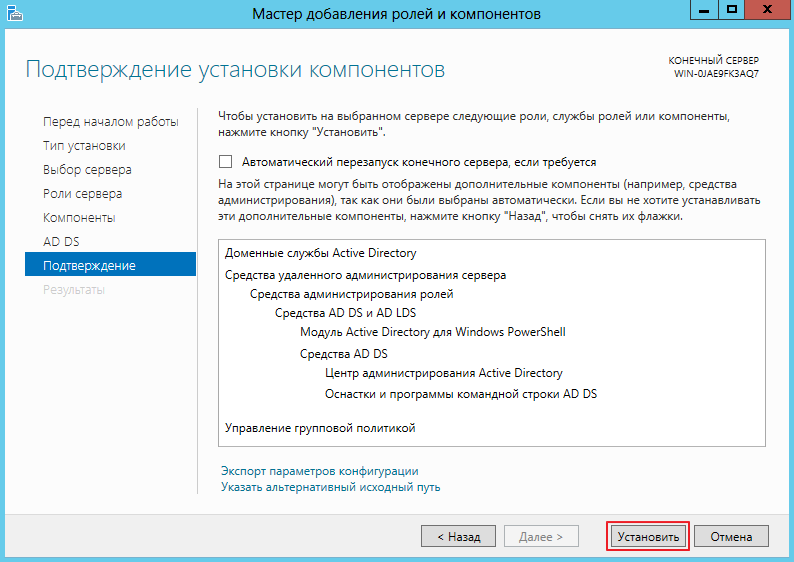
В поле подтверждения установки компонентов кликаем «Установить»
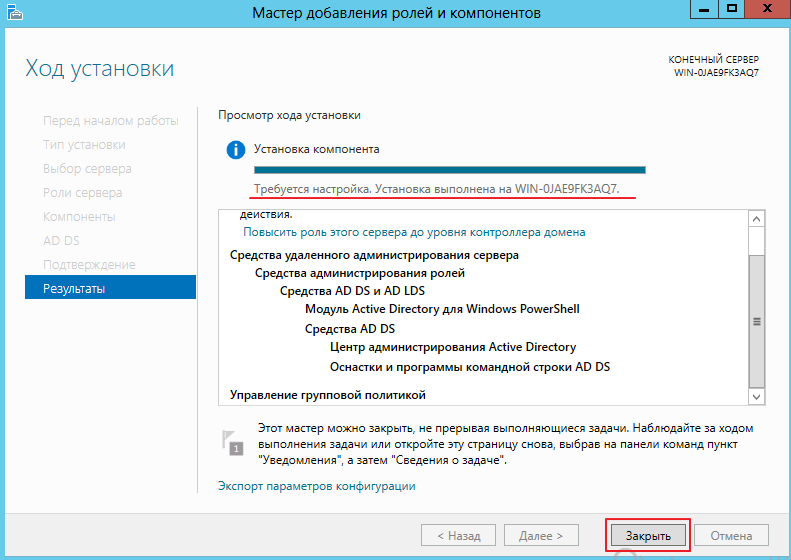
Установка занимает определенное время, и после того как она завершится получаем сообщение о том, что требуется дополнительная настройка, но так как инсталляция завершилась успешно, просто закройте окно!
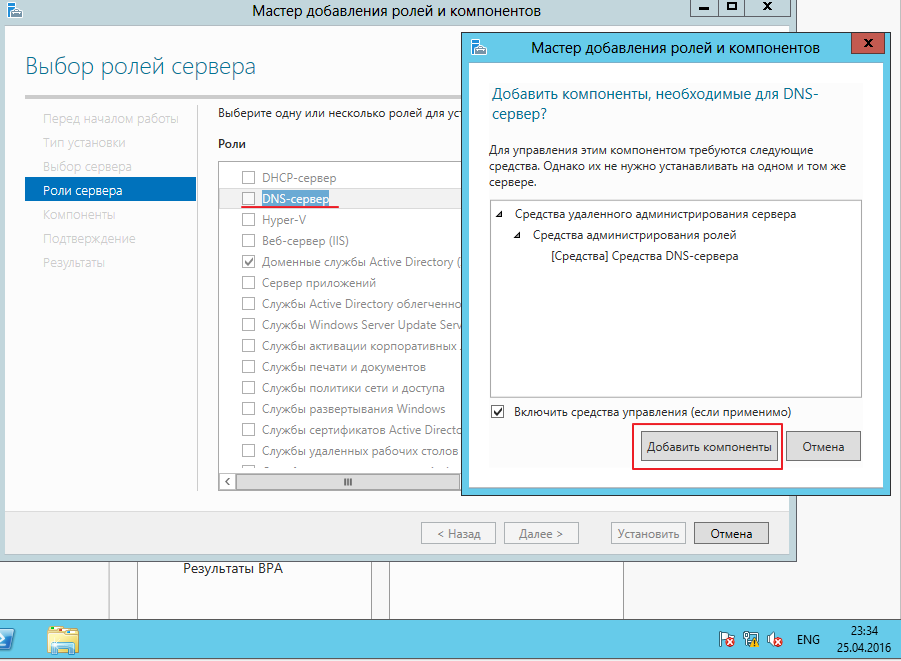
Для продолжения настройки, нужно добавит роль DNS.
Для этого вновь заходим в «Диспетчер серверов – Добавить роли и компоненты»
Как только вы дошли до вкладки «Роли сервера» найдите и добавьте роль DNS сервер путем «Добавления компонентов»
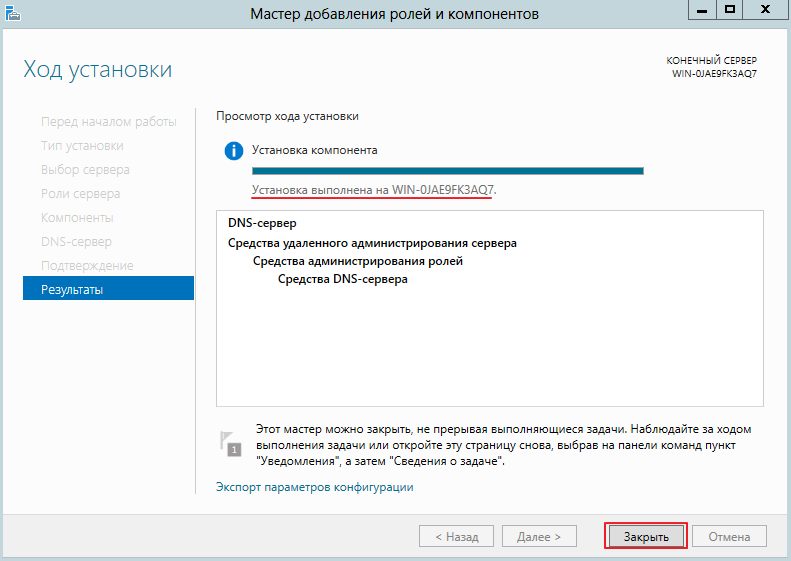
Соответственно для подтверждения установки компонентов жмем кнопку «Установить»
После выполненной установки закройте окно
Transition to Windows Server 2012 R2 Standard
After you have decided to transition from Windows Server Essentials to Windows Server 2012 R2 Standard, complete these two steps:
-
Purchase a license for Windows Server 2012 R2 Standard and the appropriate number of user and/or device client access licenses for your environment.
You can purchase a license for Windows Server 2012 R2 Standard from a Retail Outlet, a Distributor, or with the help of a Microsoft Partner.
Note
If you purchased Windows Server 2012 R2 Standard initially and exercised your downgrade rights to install one of your two virtual instances as Windows Server Essentials, you do not need to purchase anything additional.
If you purchase Windows Server 2012 R2 Standard through the Volume Licensing channel, you can download an ISO image and a product key for Windows Server 2012 R2 Standard from the Volume Licensing Service Center (VLSC).
If you purchase Windows Server 2012 R2 Standard from any other channel, you can download an ISO image and an evaluation product key for Windows Server Essentials from the TechNet Evaluation Center. Performing the transition as described in the next step will convert the evaluation product to a fully licensed and supported product.
-
Open Windows PowerShell as Administrator, and then run the following command:
dism /online /set-edition:ServerStandard /accepteula /productkey: Product Key (where Product Key is the product key for your copy of Windows Server 2012 R2 Standard).
The server restarts to finish the transition process.
After the transition, the Windows Server Essentials features remain on the server and are supported for up to 100 users and 200 devices.