Noobs
Содержание:
- Recommended software
- What is Debian?
- Подключение к Wi-Fi Raspberry Pi
- File manager
- Is it just the repository? Or, will you provide any customization?
- The new appearance
- How to get the new versions
- How do I mount directories from other Linux/Unix/BSD servers? How do I mount an NFS share?
- Screen blanking
- Installing to USB disk
- Troubleshooting
- No space left on device, but I have plenty of free space on my SD card. What do I do?
- How do I make a proper root account?
- Better handling of other usernames
- Закрываем всё ненужное с помощью iptables
- What can I do with PiServer?
- Using raspi-config
- Температура Raspberry Pi и троттлинг
- Updates
- How much of Debian wheezy armhf does Raspbian support?
- Other changes
Recommended software
Over the last few years, several third-party companies have generously offered to provide software for Pi users, in some cases giving free licenses for software that normally requires a license fee. We’ve always included these applications in our standard image, as people might never find out about them otherwise, but the applications perhaps aren’t all of interest to every user.
So to try and keep the size of the image down, and to avoid cluttering the menus with applications that not everyone wants, we’ve introduced a Recommended Software program which you can find in the Preferences menu.
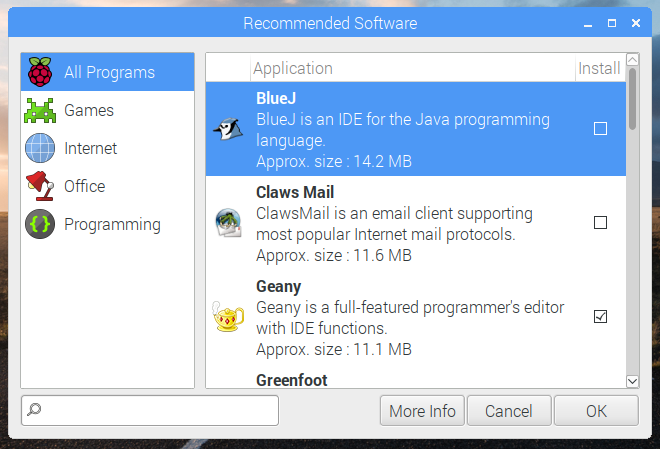
Think of this as our version of the Apple App Store, but with everything in it available for free! Installing a program is easy: just put a tick in the box to the right, and click “OK”. You can also uninstall some of the preinstalled programs: just untick the respective box and click “OK”. You can even reinstall them once you’ve realised you didn’t mean to uninstall them: just tick the box again and click — oh, you get the idea…
As we find new software that we recommend, or as more manufacturers offer us programs, we’ll add them to Recommended Software, so it’ll be kept up to date.
What is Debian?
Debian is a free operating system for your computer and includes the basic set of programs and utilities that make your computer run along with many thousands of other packages. Debian has a reputation within the Linux community for being very high-quality, stable and scalable. Debian also has an extensive and friendly user community that can help new users with support for practically any problem. This makes Debian an ideal operating system for the Raspberry Pi that will be used by children and many others using Linux for the first time.
Further information about what Debian is can be found here, here, and here.
Подключение к Wi-Fi Raspberry Pi
1. Графический интерфейс
Проще всего подключиться к сети Wi-Fi через графический интерфейс. Для этого просто щёлкните по значку сети в верхнем правом углу экрана и выберите нужную сеть, затем введите для неё пароль:

Готово. Теперь подключение к Wi-Fi Raspberry Pi настроено.
2. raspi-config
Подключится к Wi-Fi через терминал ненамного сложнее. Здесь нам понадобится утилита raspi-config. Запустите её из главного меню и выберите Network Options:

Затем выберите Wi-Fi:

Дальше вам нужно ввести SSID вашей сети:

А потом пароль к ней:

Настройка завершена. Если проводного подключения нет, то устройство должно подключится к этой сети. Если вы не знаете, какой SSID (имя) у вашей Wi-Fi сети, смотрите следующий пункт.
3. Добавление Wi-Fi сети вручную
Сначала нужно посмотреть доступные Wi-Fi сети. Для этого используйте команду:

Вам нужен параметр ESSID. Чтобы не хранить пароль к сети в открытом виде, воспользуемся утилитой wpa_passphrase для его шифрования:

Полученную конфигурацию сети нужно добавить в файл /etc/wpa_supplicant/wpa_supplicant.conf:
Далее попросить систему перечитать конфигурацию сетевых интерфейсов с помощью команды:

Убедится, что всё прошло успешно, вы можете, выполнив:

Если после слов inet addr содержится IP-адрес, значит вы подключены к этой сети. Если же нет, проверьте правильность ввода ESSID и пароля. Также можно попытаться получить IP-адрес командой:
Если вы хотите пользоваться 5ГГц Wi-Fi, то кроме всего этого вам нужно указать вашу страну в wpa_supplicant.conf:
Настройки Raspberry Pi Wi-Fi завершена. Теперь устройство будет автоматически подключаться к выбранной сети после загрузки.
File manager
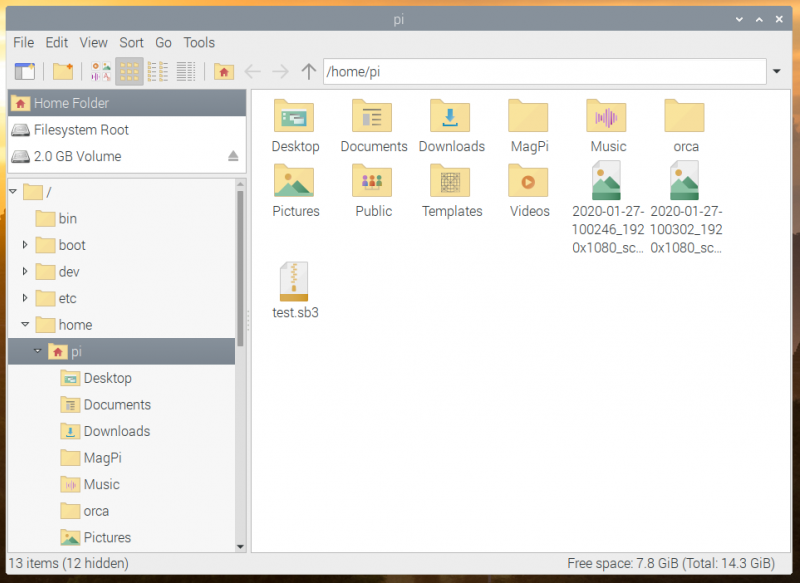
The file manager included as part of the LXDE desktop (on which our desktop is based) is a program called PCManFM, and it’s very feature-rich; there’s not much you can’t do in it. However, having used it for a few years, we felt that it was perhaps more complex than it needed to be — the sheer number of menu options and choices made some common operations more awkward than they needed to be. So to try to make file management easier, we have implemented a cut-down mode for the file manager.

Most of the changes are to do with the menus. We’ve removed a lot of options that most people are unlikely to change, and moved some other options into the Preferences screen rather than the menus. The two most common settings people tend to change — how icons are displayed and sorted — are now options on the toolbar and in a top-level menu rather than hidden away in submenus.
The sidebar now only shows a single hierarchical view of the file system, and we’ve tidied the toolbar and updated the icons to make them match our house style. We’ve removed the option for a tabbed interface, and we’ve stomped a few bugs as well.
One final change was to make it possible to rename a file just by clicking on its icon to highlight it, and then clicking on its name. This is the way renaming works on both Windows and macOS, and it’s always seemed slightly awkward that Unix desktop environments tend not to support it.
As with most of the other changes we’ve made to the desktop over the last few years, the intention is to make it simpler to use, and to ease the transition from non-Unix environments. But if you really don’t like what we’ve done and long for the old file manager, just untick the box for Display simplified user interface and menus in the Layout page of Preferences, and everything will be back the way it was!

Is it just the repository? Or, will you provide any customization?
In general, the Raspbian repository will be kept as close to Debian wheezy as possible with changes limited to those we deem essential so that a given package functions on Raspberry Pi hardware. This approach will appeal to fans of Debian who simply want the optimal Debian experience on Raspberry Pi hardware.
An area in the repository called «rpi» was created for Raspberry Pi specific packages but none have been placed in there yet due to a combination of lack of manpower and the need to coordinate with the raspberry Pi foundation. The raspberry Pi foundation have their own repository at http://archive.raspberrypi.org/debian/ which contains various packages they include in their images.
There is also a repository at http://archive.raspbian.org/mate which contains a raspbian build of the mate desktop environment (a fork of gnome 2).
The new appearance
There has been a definite trend in the design of most computer graphical user interfaces over recent years to simplify and declutter; to reduce the amount of decoration, so that a button becomes a plain box rather than something that resembles a physical button. You can see this in both desktop OSes like Windows, and in mobile OSes like iOS – so we decided it was time to do something similar.

The overall appearance of most of the interface elements has been simplified; we’ve reduced things like the curvature of corners and the shading gradients which were used to give a pseudo-3D effect to things like buttons. This “flatter” design looks cleaner and more modern, but it’s a bit of a juggling act; it’s very easy to go too far and to make things look totally flat and boring, so we’ve tried to avoid that. Eben and I have had a mild tussle over this – he wanted as much flatness as possible, and I wanted to retain at least a bit of curvature, so we’ve met somewhere in the middle and produced something we both like!
We’ve also changed the default desktop for a new one of Greg Annandale’s gorgeous photographs, and we’ve moved to a grey highlight colour.
(If you really don’t like the new appearance, it is easy enough to restore the former appearance – the old desktop picture is still installed, as is the old UI theme.)
How to get the new versions
New images for both Raspbian and Debian versions are available from the Downloads page.
It is possible to update existing installations of both Raspbian and Debian versions. For Raspbian, this is easy: just open a terminal window and enter
sudo apt-get update
sudo apt-get dist-upgrade
It is slightly more complex for the PC version, as the previous release was based around Debian Jessie. You will need to edit the files /etc/apt/sources.list and /etc/apt/sources.list.d/raspi.list, using sudo to do so. In both files, change every occurrence of the word “jessie” to “stretch”. When that’s done, do the following:
sudo apt-get update
sudo dpkg --force-depends -r libwebkitgtk-3.0-common
sudo apt-get -f install
sudo apt-get dist-upgrade
sudo apt-get install python3-thonny
sudo apt-get install sonic-pi=2.10.0~repack-rpt1+2
sudo apt-get install piserver
sudo apt-get install usbbootgui
At several points during the upgrade process, you will be asked if you want to keep the current version of a configuration file or to install the package maintainer’s version. In every case, keep the existing version, which is the default option. The update may take an hour or so, depending on your network connection.
As with all software updates, there is the possibility that something may go wrong during the process, which could lead to your operating system becoming corrupted. Therefore, we always recommend making a backup first.
First, you need a server that can use the Network File System (NFS). Let’s assume you have a server named adelaide at 192.168.222.34 and it has a share called public that you want to mount at /public on your Pi.
First, install the necessary packages. I use aptitude, but you can use apt-get instead if you prefer; just put apt-get where you see aptitude:
sudo aptitude install nfs-common portmap
(nfs-common may already be installed, but this will ensure that it installs if it isn’t already)
On the current version of Raspbian, rpcbind (part of the portmap package) does not start by default. This is presumably done to control memory consumption on our small systems. However, it isn’t very big and we need it to make an NFS mount. To enable it manually, so we can mount our directory immediately:
sudo service rpcbind start
To make rpcbind start automatically at boot:
sudo update-rc.d rpcbind enable
Now, let’s mount our share:
Make a directory for your mount. I want mine at /public, so:
mkdir /public
Mount manually to test (remember, my server is adelaide at 192.168.222.34 and the share is public):
mount -t nfs 192.168.222.34:/public /public
(my server share path) (where I want it mounted locally)
Now, to make it permanent, you need to edit /etc/fstab to make the directory mount at boot. I added a line to the end of /etc/fstab:
192.168.222.34:/public /public nfs rsize=8192,wsize=8192,timeo=14,intr 0 0
The rsize and wsize entries are not strictly necessary but I find they give me some extra speed.
There are ways you can refer to your server by name instead of by its IP address like we did above. Have a look at /etc/hosts for a starting point. The rest is left as an exercise for the reader.
Screen blanking
The option to disable the timeout which blanks the screen after a few minutes has been added to Raspberry Pi Configuration. To try and reduce clutter in this application, the options from the System tab are now split across two tabs; all display-related options, including screen blanking, are now on the new Display tab.
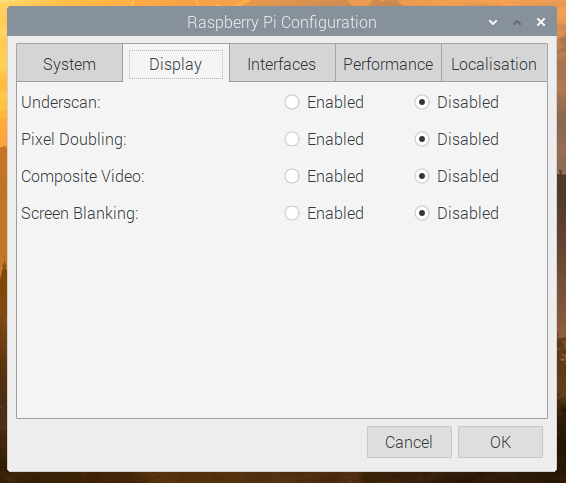
We’ve also been able to reinstate the pixel doubling option for Raspberry Pi 4; this was originally implemented in a manner incompatible with the KMS video driver used on Raspberry Pi 4, but we’ve now found a way to make it work with KMS. (The pixel doubling option is designed to make the Raspberry Pi’s screen easier to use for people with visual disabilities — it doubles the size of every pixel, scaling the entire screen by a factor of two.)
We’ve made one minor change to key shortcuts: in previous versions of Raspbian, the combination Ctrl-Alt-Delete launched the task manager. We felt it might be better to be consistent with the behaviour of Windows PCs since the dawn of time, so now Ctrl-Alt-Delete launches the shutdown options dialog. If you want to access the task manager with a key shortcut, you can now do so using Ctrl-Shift-Escape — also consistent with the behaviour of Windows.
There are also numerous other small bug fixes and robustness improvements across the board.
Installing to USB disk
It is also possible to use the installer to install Raspbian to external USB flash/hard drive. The external drive should be detected correctly by installer, but in this case you will have to prepare partitions manually. It is absolutely neccessary to keep RasPi boot partition on SD card, it has to be the first partition there, primary, bootable, FAT32 format. The installer will not allow you to mount this partition as /boot, though. Mount the FAT32 partition as /rpiboot instead, post-install script will rename it to /boot after installation automatically. Any other partitions can be placed to external drive. Remember the name of the root partition block device, you will need to edit cmdline.txt kernel options to point rootfs to this device after installation.
Troubleshooting
If anything goes wrong during installation, there are several ways to learn what is the problem. You can switch to another console by pressing Alt+F2 or Alt+F3. Current installation log is available at Alt+F4. Anytime installer waits for user input or keypress, you can also press Shift+F5. This will bring you to advanced installer menu.
When installer fails to install Raspbian and displays an error message, it is possible to save installation log for later examination. Go to advanced installer menu (Shift+F5), run shell and mount FAT32 partition: mount -t vfat /dev/mmcblk0p1 /mnt Leave shell and save installer logs to /mnt directory.
If installer finishes successfully, logs are stored to /var/log/installer.
No space left on device, but I have plenty of free space on my SD card. What do I do?
The first thing to check is that the partition actually fills the SD card. Most images are built with partitions sized to fit on relatively small cards. The Raspberry Pi foundation image contains a tool called raspi-config which contains an option to enlarge the root partition. Other setups may require other procedures to resize the partitions which are beyond the scope of this FAQ.
If there is plenty of space on the root partition then it may be a /tmp issue. On many Raspbian systems, for performance reasons, the /tmp directory is a RAM disk with limited memory. Installers for applications will sometimes fill up this temporary space and you may see messages such as the one below.
cp: writing `/tmp/tmp.XwAcjvnTkE/rfc5834.txt.gz': No space left on device
A way of working around this is to edit the file:
/etc/default/rcS
change the last line from
RAMTMP=yes
to
RAMTMP=no
and then reboot.
Then try reinstalling your package.
Change the line back to RAMTMP=yes when you have finished.
How do I make a proper root account?
Don’t do this unless you’re certain that you want and need a true root account. sudo will take care of root tasks for you nicely in almost all cases.
However, if you do want a root account so you can log in as root or su to a root account, just type:
sudo passwd
This will let you enter a password for the root account. Be careful to make it a secure one!
One other modification you should do, if you enable a root account, is to forbid root logins via ssh for security reasons. You can log in using a normal user account instead (such as pi), and use the su command to become root. To do this:
cd /etc/ssh
sudo nano sshd_config (you can do this as root too of course; just don’t type sudo in front of the command)
Find the line:
PermitRootLogin yes
Change yes to no. (If yours already says no then there is nothing to do.)
Save the config file, and to make it take effect:
sudo service ssh restart
Better handling of other usernames
The default user account in Raspbian has always been called ‘pi’, and a lot of the desktop applications assume that this is the current user. This has been changed for Stretch, so now applications like Raspberry Pi Configuration no longer assume this to be the case. This means, for example, that the option to automatically log in as the ‘pi’ user will now automatically log in with the name of the current user instead.
One other change is how sudo is handled. By default, the ‘pi’ user is set up with passwordless sudo access. We are no longer assuming this to be the case, so now desktop applications which require sudo access will prompt for the password rather than simply failing to work if a user without passwordless sudo uses them.
Закрываем всё ненужное с помощью iptables
Вначале поставим пакет , что обеспечит автоматическое поднятие правил после перезагрузки системы.
Вы можете править и системные скрипты, но учитывая что их расположение от дистрибутива к дистрибутиву постоянно меняется, я рекомендую использовать более универсальное решение.
apt install iptables-persistent
Пакет при установке задаст вопрос по-поводу сохранения текущих правил в конфиг. Отвечаем «Yes» на оба вопроса (IPv4 и IPv6).
Создадим удобный скрипт по-умолчанию закроет все входящие подлючения, кроме SSH по 22-му порту из вашей сети (при условии что она ) и полностью закроет все подключения по IPv6 (по-умолчанию они разрешены)
vi /etc/iptables.rules.sh
#!/bin/bash

/sbin/iptables -F
/sbin/iptables -X

/sbin/iptables -P INPUT DROP
/sbin/iptables -P OUTPUT ACCEPT
/sbin/iptables -P FORWARD DROP

/sbin/iptables -I INPUT 1 -i lo -p all -j ACCEPT
/sbin/iptables -I INPUT -s 127.0.0.1 -j ACCEPT

/sbin/iptables -A INPUT -m conntrack --ctstate ESTABLISHED,RELATED -j ACCEPT
/sbin/iptables -A INPUT -m state --state ESTABLISHED,RELATED -j ACCEPT

/sbin/iptables -A INPUT -p tcp --dport 22 -s 192.168.0.0/24 -j ACCEPT

/sbin/iptables-save > /etc/iptables/rules.v4

echo ""
/sbin/iptables -L -n --line-numbers

/sbin/ip6tables -F
/sbin/ip6tables -X

/sbin/ip6tables -P INPUT DROP
/sbin/ip6tables -P OUTPUT DROP
/sbin/ip6tables -P FORWARD DROP

/sbin/ip6tables-save > /etc/iptables/rules.v6

echo ""
echo ""
/sbin/ip6tables -L -n --line-numbers
Добавим право запуска и выполним его
chmod +x /etc/iptables.rules.sh
/etc/iptables.rules.sh
Chain INPUT (policy DROP)
num  target     prot opt source               destination
1    ACCEPT     all  --  127.0.0.1            0.0.0.0/0
2    ACCEPT     all  --  0.0.0.0/0            0.0.0.0/0
3    ACCEPT     all  --  0.0.0.0/0            0.0.0.0/0            ctstate RELATED,ESTABLISHED
4    ACCEPT     all  --  0.0.0.0/0            0.0.0.0/0            state RELATED,ESTABLISHED
5    ACCEPT     tcp  --  192.168.0.0/24       0.0.0.0/0            tcp dpt:22
6    DROP       all  --  0.0.0.0/0            0.0.0.0/0

Chain FORWARD (policy DROP)
num  target     prot opt source               destination

Chain OUTPUT (policy ACCEPT)
num  target     prot opt source               destination


Chain INPUT (policy DROP)
num  target     prot opt source               destination

Chain FORWARD (policy DROP)
num  target     prot opt source               destination

Chain OUTPUT (policy DROP)
num  target     prot opt source               destination
What can I do with PiServer?
Serve a whole classroom of Pis
In a classroom, PiServer allows all files for lessons or projects to be stored on a central x86-based computer. Each user can have their own account, and any files they create are also stored on the server. Moreover, the networked Pis doesn’t need to be connected to the internet. The teacher has centralised control over all Pis, and all Pis are user-agnostic, meaning there’s no need to match a person with a computer or an SD card.
Build a home server
PiServer could be used in the home to serve file systems for all Raspberry Pis around the house — either a single common Raspbian file system for all Pis or a different operating system for each. Hopefully, our extensive OS suppliers will provide suitable build files in future.
Use it as a controller for networked Pis
In an industrial scenario, it is possible to use PiServer to develop a network of Raspberry Pis (maybe even using Power over Ethernet (PoE)) such that the control software for each Pi is stored remotely on a server. This enables easy remote control and provisioning of the Pis from a central repository.
Using raspi-config
The quickest way to enable wireless networking is to use the command line tool.
Select the Localisation Options item from the menu, then the Change wireless country option. On a fresh install, for regulatory purposes, you will need to specify the country in which the device is being used. Then set the SSID of the network, and the passphrase for the network. If you do not know the SSID of the network you want to connect to, see the next section on how to list available networks prior to running .
Note that does not provide a complete set of options for setting up wireless networking; you may need to refer to the extra sections below for more details if fails to connect the Pi to your requested network.
Температура Raspberry Pi и троттлинг
Еще до покупки Raspberry Pi я читал про то, что малинка имеет некоторые проблемы, связанные с перегревом. Ничего странного в этом нет. У платы отсутствуют какие-либо встроенные средства отвода тепла, например, радиаторы или вентиляторы.
Однако, все не так страшно. В обычном режиме, когда открыт только рабочий стол, температура процессора у меня была около 55°C.
Если открыть несколько программ, включая браузер с проигрыванием ролика на YouTube и приложения LibreOffice, то температура возрастает до 60-65°C, что тоже абсолютно нормально
И что самое важное, она не продолжает расти, а остается на этом уровне
То есть при использовании малинки, скажем так, с рядовыми программами никаких проблем с перегревом я не наблюдал.
Но так как в мои планы входит создание из малинки медиа-центра, то я установил медиаплеер Kodi. И тут я уже ощутил нагрев платы. Когда Kodi запущен, температура поднимается уже выше 75°C. А вот это уже многовато. И в правом верхнем углу экрана начинает моргать красный значок градусника, что очень неприятно.
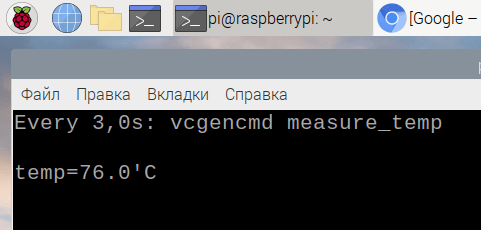
Помимо создания медиа-центра, я бы хотел запускать на малинке различные игры, то есть использовать ее, как игровую (ретро-)консоль. Очевидно, что нагрузка на процессор при таком использовании будет существенная и температура подскочит еще выше.
Для защиты от перегрева процессор в Raspberry Pi выполняет троттлинг, то есть начинает принудительно пропускать часть тактов, чтобы снизить нагрузку и в результате понизить температуру. При троттлинге снижается производительность и эффективность процессора. Все это приводит к замедлению работы системы. В играх это будет выражаться общими тормозами и снижением FPS.
Чтобы решить проблемы перегрева необходим хороший отвод тепла. Я не стал использовать маленькие радиаторы, которые положил продавец из Китая, так как читал, что никакого результата они все равно не дают. В следующем материале про Raspberry Pi я расскажу, как решил проблему перегрева.
Updates
Since the release, we’ve had a few small issues reported. Here’s an update on them:
- There is a bug in the Raspberry Pi Configuration window which means the “Set Keyboard…” button on the Localisation tab doesn’t work.
- There is an intermittent bug in the interaction between the RealVNC server application and the desktop – you might find that the taskbar sometimes vanishes when booting if the VNC server is enabled. This is intermittent, so rebooting a few times may help. If not, to get the taskbar to display, hit Ctrl-Alt-T to display a terminal window, and in the terminal enter ; you’ll need to leave that terminal open while running.
- There is a bug in the hardware video acceleration for the Chromium browser, which is causing crashes on some videos and animations.
Fixes for these three bugs are now available for download – to get them, do:
sudo apt-get update
sudo apt-get upgrade
Some users have also noticed that the Chinese and Japanese fonts are missing, resulting in garbled text when the locale is changed. This is due to a font package which was present in Jessie but not included in Stretch. A suitable alternative is the Droid fonts package – to install it, do:
How much of Debian wheezy armhf does Raspbian support?
We have built the vast majority of packages from debian wheezy, indeed there are now more binary package in Raspbian wheezy than there are in the armel and armhf ports of Raspbian (though part of this is that we haven’t been as agressive about removals as debian is).
Please feel free to get in touch through the forums if a package you require is missing. We can’t guarantee to provide it but we should at least be able to explain why it is not available and may be able to suggest alternatives.
Note that we don’t currently build binaries for contrib or non-free (though we do import architecture independent packages from those areas of the debian archive)
Other changes
We’ve been including the excellent Thonny Python development environment in Raspbian for some time now. In this release, it’s now our default Python editor, and to that end, we are no longer including IDLE by default. IDLE has always felt dated and not very pleasant to use, and Thonny is so much nicer that we’d strongly recommend moving to it, if you haven’t already!

(If you’d like an alternative to Thonny, the Mu Python IDE is also still available in Recommended Software.)
We’ve made some small tweaks to the taskbar. The ‘eject’ icon for removing USB devices is now only shown if you have devices to eject; it’s hidden the rest of the time. Similarly, if you are using one of the earlier Pis without Bluetooth support, the Bluetooth icon is now hidden rather than being greyed out. Also, the CPU activity gauge is no longer shown on the taskbar by default, because this has become less necessary on the more powerful recent Raspberry Pi models. If you’d still like to use it, you can add it back – right-click the taskbar and choose ‘Add / Remove Panel Items’. Press the ‘Add’ button and you’ll find it listed as ‘CPU Usage Monitor’. While you are in there, you’ll also find the new ‘CPU Temperature Monitor’, which you can add if you’re interested in knowing more about what the CPU is up to.
One program which is currently missing from Buster is Mathematica. Don’t worry – this is only a temporary removal! Wolfram are working on getting Mathematica to work properly with Buster, and as soon as it is ready, it’ll be available for installation from Recommended Software.
A few features of the old non-OpenGL video driver (such as pixel doubling and underscan) are not currently supported by the new OpenGL driver, so the settings for these are hidden in Raspberry Pi Configuration if the GL driver is in use. (The GL driver is the default on Raspberry Pi 4 – older Pis will still use the non-GL driver by default. Also, if using a Raspberry Pi 4 headless, we recommend switching back to the non-GL driver – choose ‘Legacy’ under the ‘GL Driver’ setting in ‘Advanced Options’ in raspi-config.)
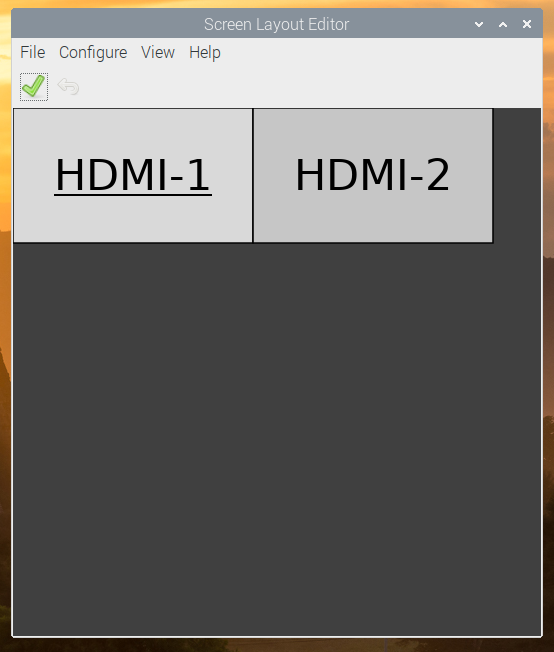
If the GL driver is in use, there’s a new ‘Screen Configuration’ tool – this enables you to set up the arrangement of multiple monitors on a Raspberry Pi 4. It can also be used to set custom monitor resolutions, which can be used to simulate the effect of pixel doubling.
Finally, there are a couple of new buttons in ‘Raspberry Pi Configuration’ which control video output options for Raspberry Pi 4. (These are not shown when running on earlier models of Raspberry Pi.) It is not possible on the Raspberry Pi 4 to have both analogue composite video (over the 3.5mm jack) and HDMI output simultaneously, so the analogue video output is disabled by default. 4Kp60 resolution over HDMI is also disabled by default, as this requires faster clock speeds resulting in a higher operating temperature and greater power consumption. The new buttons enable either of these options to be enabled as desired.