Разработка на raspberry pi
Содержание:
MATE Applications
It is important to note that many Gnome 2 core applications are rebranded for MATE, as per the licensing terms. Here is a list of common Gnome 2 applications under MATE:
- Nautilus is renamed caja
- Metacity is renamed marco
Other applications and core components prefixed with Gnome (such as Gnome Panel, Gnome Menus etc) have simply had the prefix renamed «MATE» and become MATE Panel and MATE Menus.
Not all of the Gnome 2 extra applications (built for GTK2) have been forked yet. The following extra applications are available in MATE:
- Totem (mate-video-player)
- Eye of GNOME (mate-image-viewer)
- Gedit (mate-text-editor)
- File Roller (mate-file-archiver)
- GNOME Panel applets (mate-applets)
- GNOME Terminal (mate-terminal)
Improving SSH security
SSH is a common way of accessing a Raspberry Pi remotely. By default, logging in with SSH requires a username/password pair, and there are ways to make this more secure. An even more secure method is to use key based authentication.
Improving username/password security
The most important thing to do is ensure you have a very robust password. If your Raspberry Pi is exposed to the internet, the password needs to be very secure. This will help to avoid dictionary attacks or the like.
You can also allow or deny specific users by altering the configuration.
Add, edit, or append to the end of the file the following line, which contains the usernames you wish to allow to log in:
You can also use to specifically stop some usernames from logging in:
After the change you will need to restart the service using or reboot so the changes take effect.
Using key-based authentication.
Key pairs are two cryptographically secure keys. One is private, and one is public. They can be used to authenticate a client to an SSH server (in this case the Raspberry Pi).
The client generates two keys, which are cryptographically linked to each other. The private key should never be released, but the public key can be freely shared. The SSH server takes a copy of the public key, and, when a link is requested, uses this key to send the client a challenge message, which the client will encrypt using the private key. If the server can use the public key to decrypt this message back to the original challenge message, then the identity of the client can be confirmed.
Generating a key pair in Linux is done using the command on the client; the keys are stored by default in the folder in the user’s home directory. The private key will be called and the associated public key will be called . The key will be 2048 bits long: breaking the encryption on a key of that length would take an extremely long time, so it is very secure. You can make longer keys if the situation demands it. Note that you should only do the generation process once: if repeated, it will overwrite any previous generated keys. Anything relying on those old keys will need to be updated to the new keys.
You will be prompted for a passphrase during key generation: this is an extra level of security. For the moment, leave this blank.
The public key now needs to be moved on to the server: see .
Finally, we need to disable password logins, so that all authentication is done by the key pairs.
There are three lines that need to be changed to , if they are not set that way already:
Save the file and either restart the ssh system with or reboot.
File manager changes
We previously made some significant changes to the PCmanFM file manager included as part of the Raspberry Pi Desktop; we added a cutdown mode which removes a lot of the less commonly used functions, and we set this as the default mode.
One of the things we removed for this mode is the Places view, an optional view for the left-hand pane of the window which provides direct access to a few specific locations in the file system. We felt that the directory browser was more useful, so we chose to show that instead. But one useful feature of Places is that it displays external devices, such as USB drives, and these are somewhat awkward to find in the file manager otherwise.
So for this release, the Places view has been reinstated, but rather than being a separate switchable view, it is a small panel at the top of the directory browser. This hopefully gives the best of both worlds: easy access to USB drives, and a directory view. You can customise what is shown in the Places view on the Layout page of the file manager Preferences dialogue, or you can turn it off completely if you’d rather just have the directory browser.

There are a few other small changes to the file manager: there is now a new folder icon on the taskbar, and the expanders in the directory browser (the little triangles next to directory names) are now only shown when a directory has subdirectories.
Finally, the folder and file icons used in the file manager have been replaced with some new, cleaner designs. These are designed to make it more obvious at a glance what sort of file an icon represents, and also to fit better with the slightly flatter GUI appearance we moved to for Buster.
MATE Themes
One of the nice things about MATE is that it can use the rich variety of Gnome 2 themes that are available all over the web to improve the look of the MATE Desktop. To demonstrate this, the Bisigi Project themes have been ported to MATE and are part of the MATE repository.
Go here to preview which themes are available and then use the following apt-get commands to install a specific theme. Remember to use apt-get update before attempting to install a theme to make sure your apt sources are current.
apt-get install airlines-theme
apt-get install aquadreams-theme
apt-get install balanzan-theme
apt-get install bamboo-zen-theme
apt-get install eco-theme
apt-get install ellanna-theme
apt-get install exotic-theme
apt-get install infinity-theme
apt-get install orange-theme
apt-get install showtime-theme
apt-get install split-theme
apt-get install step-into-freedom-theme
apt-get install tropical-theme
apt-get install ubuntu-sunrise-theme
apt-get install wild-shine-theme
Some of these themes include SVG files and other features that may slow down the MATE desktop. You’ll have to use your own judgement as to whether the improved eye candy with the overhead.
How to get Raspbian Stretch
As this is a major version upgrade, we recommend using a clean image; these are available from the Downloads page on our site as usual.
Upgrading an existing Jessie image is possible, but is not guaranteed to work in every circumstance. If you wish to try upgrading a Jessie image to Stretch, we strongly recommend taking a backup first – we can accept no responsibility for loss of data from a failed update.
To upgrade, first modify the files /etc/apt/sources.list and /etc/apt/sources.list.d/raspi.list. In both files, change every occurrence of the word ‘jessie’ to ‘stretch’. (Both files will require sudo to edit.)
Then open a terminal window and execute
sudo apt-get update
sudo apt-get -y dist-upgrade
Answer ‘yes’ to any prompts. There may also be a point at which the install pauses while a page of information is shown on the screen – hold the ‘space’ key to scroll through all of this and then hit ‘q’ to continue.
Finally, if you are not using PulseAudio for anything other than Bluetooth audio, remove it from the image by entering
sudo apt-get -y purge "pulseaudio*"
Начало работы с Raspberry Pi 4
Помимо самого микрокомпьютера для начала работы с ним потребуется:
- Хорошее охлаждение. Для Raspberry Pi 4 выпускается миниатюрный башенный кулер с тепловыми трубками и вентилятором, но это скорее экзотика, чем реальная необходимость. Для обзора я использовал металлический корпус, выступающий в роли радиатора. Покупал здесь.
- Кабель HDMI – micro HDMI (если планируется подключать монитор или телевизор). Вещь неходовая, практически наверняка у вас не окажется такого в хозяйстве. Для обзора я заказывал вот такой кабель, рекомендую.
- Хороший блок питания. Для своих одноплатных микрокомпьютеров я использую зарядную станцию AUKEY PA-T11.
- Надежный кабель USB Type-C. Даже самый качественный БП будет бесполезен, если использовать его в паре с некачественным кабелем питания, вызывающим просадки по силе тока. Конкретных рекомендаций не будет: просто не берите самые дешевые модели, кабели с магнитными коннекторами и кабели Xiaomi (их часто подделывают).
Корпус и охлаждение

Зная, что Raspberry Pi 4 окажется горячее предшествующих моделей, я сразу решил выбрать что-то надежное для пассивного охлаждения.
Идея с применением воздушного охлаждения для одноплатных компьютеров никогда не была мне по душе: одна из основных “фишек” таких устройств заключается в бесшумности их работы, а использование кулера эту бесшумность сразу убивает.
В итоге остановил свой выбор на рассеивающем тепло металлическом корпусе.

Корпус состоит из двух половин. На верхней части корпуса расположены три теплосъемника, которые будут прилегать к процессору, микросхеме памяти и контроллеру питания Raspberry Pi 4.

Для улучшения контакта с чипами перед сборкой на теплосъемники нужно поместить идущие в комплекте термопрокладки.

Размещаем в нижней половине корпуса микрокомпьютер…

…И накрываем его сверху второй половиной. Видны широкие щели – термопрокладки не дают половинкам корпуса схлопнуться, и это хорошо: значит теплосъемники не висят в воздухе, а действительно плотно прилегают к чипам Raspberry Pi.

Завинчиваем все 4 винта…

…И конструкция приобретает законченный вид. Щели исчезают после того как термопрокладки обминаются вокруг чипов.

А если потребуется доступ к GPIO? На этот случай на боку корпуса имеется прорезь, через которую можно как вывести наружу всю гребенку GPIO при помощи удлинительного шлейфа, так и подключить к GPIO нужные устройства при помощи отдельных проводов. Также имеются отверстия для протягивания шлейфа CSI и доступа к кардридеру без открывания корпуса.
Установка системы
Простую я написал еще в 2017 году и она до сих пор не утратила актуальности. Rasbian Jessie сменился на Raspbian Stretch, но описываемая последовательность действий по установке верна и сейчас.
Но недавно разработчики из Raspberry Pi Foundation выпустили утилиту Raspberry Pi Imager, благодаря которой и без того простой процесс установки системы на микрокомпьютеры линейки Raspberry Pi становится еще проще.
Поэтому дабы не повторяться я опишу новый, более быстрый способ.
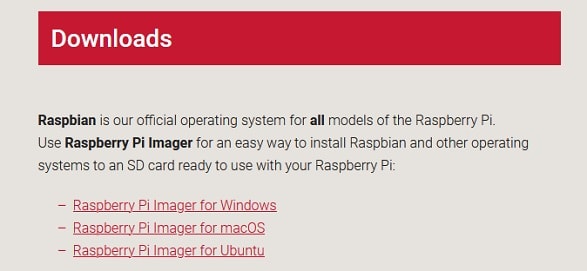
Шаг 1. Заходим на https://raspberrypi.org/downloads/ и скачиваем утилиту Raspberry Pi Imager для своей системы.

Шаг 2. Запускаем Raspberry Pi Imager.
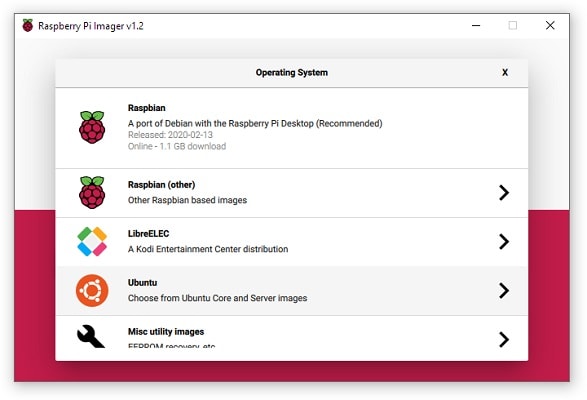
Шаг 3. Выбираем желаемый дистрибутив в меню Choose OS. Если планируется подключаться к Raspberry Pi по SSH, то нет смысла ставить системы с графическим интерфейсом – выбирайте Raspbian Lite или Ubuntu Server. Если хочется работать в графической оболочке, то следует выбирать между обычным Raspbian с графической оболочкой и Ubuntu Core. Если не устраивают предложенные варианты, то можно установить любую систему, самостоятельно указав путь к файлу с образом на своем компьютере.
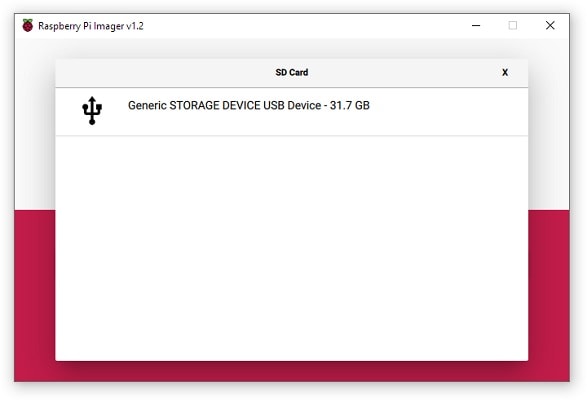
Шаг 4. Выбираем карту памяти для записи системы из меню Choose SD Card.
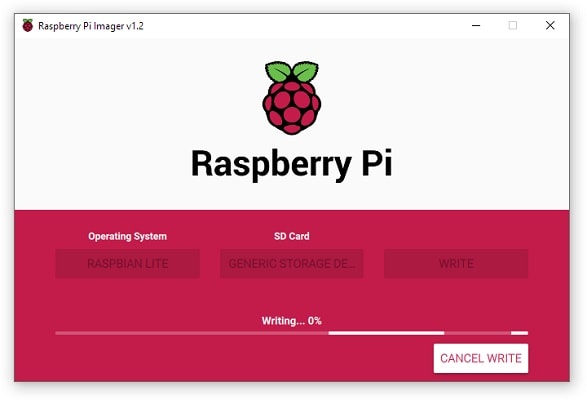
Шаг 5. Нажимаем Write и ждем окончания процесса. Утилита самостоятельно скачает нужный дистрибутив из интернета и запишет его на карту памяти.
После окончания записи остается только вставить карту памяти в микрокомпьютер и подать питание.
Обновление firmware
Сразу после установки системы я рекомендую обновить firmware. В свежих версиях прошивки улучшена энергоэффективность Raspberry Pi 4, что в свою очередь приводит к уменьшению тепловыделения.
Загрузка и установка обновленной прошивки осуществляется всего одной консольной командой:
sudo rpi-update
После того как утилита обновления прошивки закончит работать понадобится перезагрузиться.
Что я купил и первые впечатления
Какая же она маленькая
Так как до этого у меня никогда не было подобных устройств, то опишу свои первые впечатления.
Продается малинка в красной очень маленькой коробочке. Комплектация, можно сказать, нулевая. Внутри только сама плата и небольшая инструкция в виде свернутой в несколько раз бумажки с черно-белым текстом.

До покупки я знал, что малинка будет маленькой, но когда я впервые ее увидел, я был удивлен, насколько все-таки она маленькая. Даже просматривая различные обзоры с фотографиями, она всегда казалась мне больше, чем на самом деле.
Размеры платы 8,5см на 5,6см. То есть это чуть больше стандартной пластиковой карты.

Когда к плате подключено множество проводов, то выглядит это довольно необычно и напоминает паука.

Зачем я ее купил
Как я уже написал, сфер применения Raspberry Pi очень много. У меня было три основных цели. Во-первых, я уже очень давно хотел пощупать и вживую протестировать, что же такое Raspberry Pi. То есть, мне захотелось очередной игрушки. Во-вторых, я собираюсь использовать малинку в качестве медиа-центра, подключенного к телевизору. И в-третьих, хочется попробовать использовать малинку, как игровую ретро-консоль.
Исходя из этих требований, я купил модель с 4Gb оперативной памяти. На мой взгляд, меньший объем стоит покупать только если вы собираетесь использовать малинку для задач с малым потреблением ресурсов. Например, в качестве управляющего устройства (например, в робототехнике), или, например, в качестве торрент-качалки.
Что и где купил
Я покупал плату на Алиэкспрессе с доставкой из Китая. Ссылку давать не будут, их там легко найти. Отдельно в комментариях к заказу просил продавца получше упаковать посылку. Доставка заняла около 3 недель, посылка пришла без повреждений.
Обычно продавцы на Али предлагают готовые наборы, включающие саму плату и ряд аксессуаров. Я купил один из таких наборов. В него входило:
- Сама плата Raspberry Pi 4 Model B 4Gb.
- Блок питания с европейской вилкой. Если будете заказывать из Китая, то обязательно проверяйте какая вилка и указывайте желаемую в комментариях к заказу.
- Безымянная карта памяти microSDHC на 32Gb. Заявленный класс — 10.
- Кабель microHDMI-HDMI.
- Подобие корпуса из прозрачного пластика.
- Четыре крошечных радиатора.
Из набора я использовал только блок питания, саму плату и кабель HDMI. Безымянную карту памяти я протестировал, но в итоге остановился на той, которая у меня уже была от известного производителя (тоже 32Gb), к ней все-таки больше доверия. Корпус и радиаторы я пока не использовал.
Make sudo require a password
Placing in front of a command runs it as a superuser, and by default, that does not need a password. In general, this is not a problem. However, if your Pi is exposed to the internet and somehow becomes exploited (perhaps via a webpage exploit for example), the attacker will be able to change things that require superuser credentials, unless you have set to require a password.
To force to require a password, enter:
and change the entry (or whichever usernames have superuser rights) to:
Then save the file: it will be checked for any syntax errors. If no errors were detected, the file will be saved and you will be returned to the shell prompt. If errors were detected, you will be asked ‘what now?’ Press the ‘enter’ key on your keyboard: this will bring up a list of options. You will probably want to use ‘e’ for ‘(e)dit sudoers file again,’ so you can edit the file and fix the problem. Note that choosing option ‘Q’ will save the file with any syntax errors still in place, which makes it impossible for any user to use the sudo command.