Настройка sudo в linux
Содержание:
Why sudo?
Using sudo is better (safer) than opening a session as root for a number of reasons, including:
-
Nobody needs to know the root password (sudo prompts for the current user’s password). Extra privileges can be granted to individual users temporarily, and then taken away without the need for a password change.
-
It’s easy to run only the commands that require special privileges via sudo; the rest of the time, you work as an unprivileged user, which reduces the damage that mistakes can cause.
- Auditing/logging: when a sudo command is executed, the original username and the command are logged.
For the reasons above, switching to root using sudo -i (or sudo su) is usually deprecated because it cancels the above features.
Installation
| Use message digest functions from dev-libs/libgcrypt instead of sudo’s | |
| Add LDAP support (Lightweight Directory Access Protocol) | |
| Use message digest functions from dev-libs/libressl instead of sudo’s | |
| Add Native Language Support (using gettextGNU locale utilities) | |
| Let sudo print insults when the user types the wrong password | |
| Add support for PAM (Pluggable Authentication Modules)DANGEROUS to arbitrarily flip | |
| Add support for the Simple Authentication and Security Layer | |
| Replace PATH variable with compile time secure paths | |
| !!internal use only!! Security Enhanced Linux support, this must be set by the selinux profile or breakage will occur | |
| Allow sudo to send emails with sendmail | |
| Enable S/Key (Single use password) authentication support | |
| Add support for SSL/TLS connections (Secure Socket Layer / Transport Layer Security) | |
| Add System Security Services Daemon support |
Rolling out sudo commands
Rolling out sudo commands to remote hosts in an enterprise environment is best done
using a ssh script as root, and the keys should have been exchanged between the
hosts, for password-less logins. Let’s look at one example of how to do this. With
geographically remote machines, if you get a hardware issue of some sort (disk or
memory), the IBM engineer will be on-site to replace the failing hardware.
There will be occasions when they require the root password to carry out their
task. One procedure you might want to put in place is for the engineer to gain
access to root they must use sudo. Informing the engineer prior to the visit of
the password would be advantageous. demonstrates
one way you could roll out this configuration. Looking more closely at , use a for loop containing a list of hosts you are pushing
out to. (Generally, though, you would have these hosts in a text file and read
them in using a while loop.) Using the ‘here’ document method, make a backup copy
of sudoers, and an entry is then appended to sudoers, like so:
# -- ibmeng sudo root
ibmeng host1 = (root) NOPASSWD:ALL
Next, the user «ibmeng» is created, and the password is set for the user using
chpasswd. In this demonstration, it is ibmpw. A message is then
appended to their profile, informing the user how to sudo to root. So when the
engineer logs in, he is presented with the message:
IBM Engineer, to access root account type: sudo -u root su -
Of course the account for ibmeng would be locked after the visit.
Listing 2. dis_ibm
#!/bin/sh
# dis_ibm
dest_hosts='host1 host2 host3 host4'

for host in $dest_hosts
do
echo "doing "

$ssh -T -t -l root $host<<'mayday'
host=`hostname`
cp /etc/sudoers /etc/sudoers.bak

    if
    then
    echo "error: unable to cp sudoers file"
    exit 1
    fi
echo "# -- ibmeng sudo root\nibmeng $host = (root) NOPASSWD:ALL">>/etc/sudoers

mkuser su=false ibmeng
if
    then
    echo "ibmeng:ibmpw" | chpasswd -c
    else
    echo "error: unable to create user ibmeng and or passwd"
    exit 1
fi
    chuser gecos='IBM engineer acc' ibmeng
if [ -f /home/ibmeng/.profile ]
    then
    echo "echo \"IBM Engineer, to access root account type: sudo -u root su -"\"
>>/home/ibmeng/.profile
fi
mayday
done
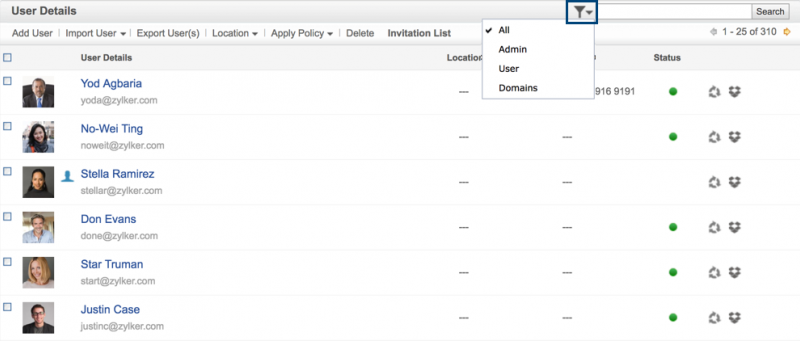
Users and sudo
Debian’s default configuration allows users in the sudo group to run any command via sudo.
Verifying sudo membership
Once logged in as a user, you can verify whether or not the user belongs to group=sudo using either the id or groups commands. E.g., a user with id=foo should see output from
$ groups
like
foo sudo
If sudo is not present in the output, the user does not belong to that group. Similarly, the more complex and variable output from command=id should look something like
uid=1001(foo) gid=1001(foo) groups=1001(foo),27(sudo)
Add existing user from commandline
To add an existing user with id=foo to group=sudo:
$ sudo adduser foo sudo
Alternatively, you can first get root (e.g., sudo su -) and then run the same commands without prefix=sudo:
# adduser foo
# adduser foo sudo
After being added to a new group the user must log out and then log back in again for the new group to take effect. Groups are only assigned to users at login time. A most common source of confusion is that people add themselves to a new group but then do not log out and back in again and then have problems because the group is not assigned; be sure to .
Creating users with sudo
You can also create new users with sudo membership:
Creating new user while installing OS
As of DebianSqueeze, if you give root an empty password during installation, sudo will be installed and the first user will be able to use it to gain root access (currently, the user will be added to the sudo group). The system will also configure gksu and aptitude to use sudo. You should still after logging in as the installed user.
Creating new user from commandline
A user which already has sudo can create another user (example id=foo) with sudo group membership from the commandline:
$ sudo adduser foo -G sudo
(or first get root as in previous section). You should then login as the new user and .
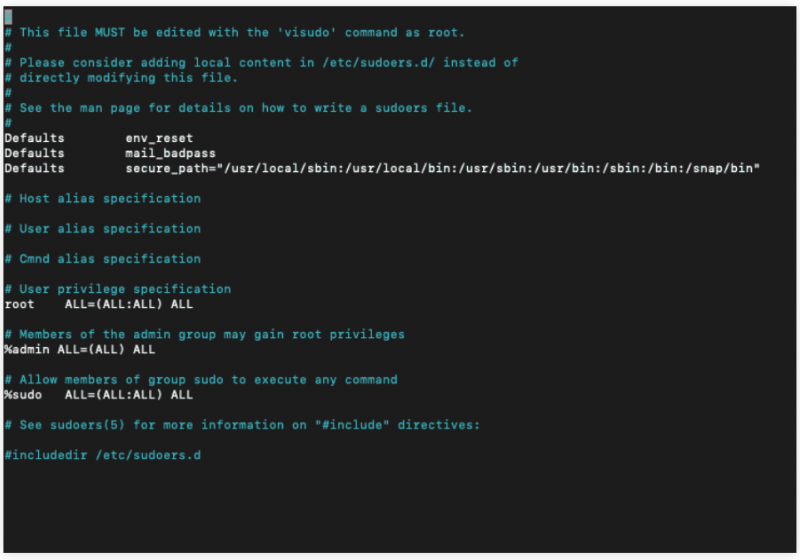
How To Set Up Custom Rules
Now that we have gotten familiar with the general syntax of the file, let’s create some new rules.
How To Create Aliases
The file can be organized more easily by grouping things with various kinds of “aliases”.
For instance, we can create three different groups of users, with overlapping membership:
/etc/sudoers
Group names must start with a capital letter. We can then allow members of to update the database by creating a rule like this:
/etc/sudoers
If we do not specify a user/group to run as, as above, defaults to the root user.
We can allow members of to shutdown and reboot the machine by creating a “command alias” and using that in a rule for :
/etc/sudoers
We create a command alias called that contains commands to power off and reboot the machine. We then allow the members of to execute these commands.
We can also create “Run as” aliases, which can replace the portion of the rule that specifies the user to execute the command as:
/etc/sudoers
This will allow anyone who is a member of to execute commands as the user or the user.
Just keep in mind that later rules will override earlier rules when there is a conflict between the two.
How To Lock Down Rules
There are a number of ways that you can achieve more control over how reacts to a call.
The command associated with the package is relatively harmless on a single-user system. If we want to allow users to execute it with root privileges without having to type a password, we can make a rule like this:
/etc/sudoers
is a “tag” that means no password will be requested. It has a companion command called , which is the default behavior. A tag is relevant for the rest of the rule unless overruled by its “twin” tag later down the line.
For instance, we can have a line like this:
/etc/sudoers
Another helpful tag is , which can be used to prevent some dangerous behavior in certain programs.
For example, some programs, like , can spawn other commands by typing this from within their interface:
This basically executes any command the user gives it with the same permissions that is running under, which can be quite dangerous.
To restrict this, we could use a line like this:
/etc/sudoers
Как восстановить доступ к Debian Linux в случае проблем с sudo или утратой root-пароля
В некоторых ситуациях может получиться так, что мы потеряем административный доступ к серверу на базе Debian GNU/Linux. Например, к такому исходу могут привести некорректные действия администратора по настройке механизма sudo (ошибки при правке файлов и/или ) и, как следствие, получение ошибки «Username is not in the sudoers file» при любых дальнейших попытках использования sudo. Иногда бывают ситуации, когда локальный доступ к серверу есть, а данные административной учётной записи недоступны и требуется восстановить административный доступ к серверу.
Загрузка в recovery mode
В типичных ситуациях в Linux имеется режим восстановления Recovery Mode, который, как правило, доступен из загрузчика ОС. В этом режиме наша Linux-система доступна в режиме супер-пользователя root, и мы можем исправить в ней имеющиеся у нас проблемы, например внести корректировки в файлы sudo или добавить/изменить учётные данные локального администратора.
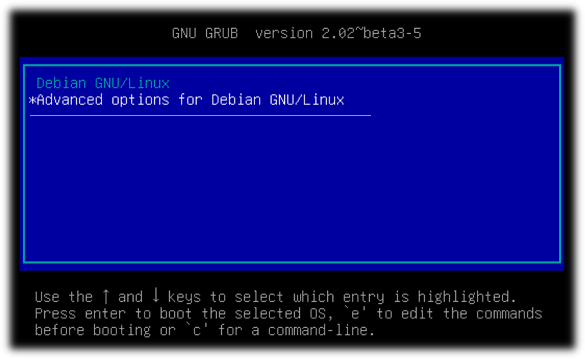
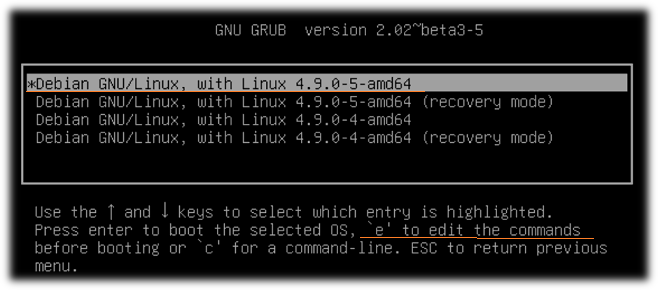
Для того, чтобы попасть в меню загрузки, в процессе запуска ОС Debian нажимаем кнопку Shift. В появившемся меню загрузчика GRUB выбираем расширенный режим загрузки:
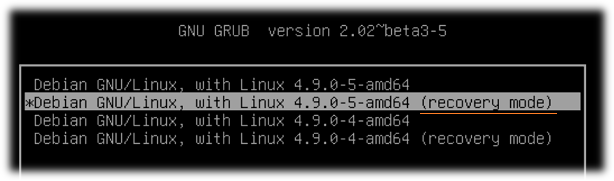
Затем выбираем интересующее нас ядро Linux в режиме recovery mode…
Однако в случае с Debian, где супер-пользователь root в конфигурации по умолчанию выключен, мы можем получить сообщение о невозможности загрузки консоли восстановления «Cannot open access to console, the root account is locked»:
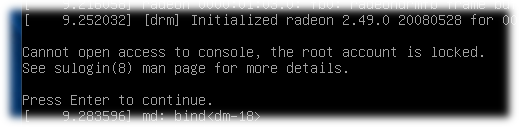
В таком случае мы можем прибегнуть к приёму изменения параметров загрузки ядра.
Нестандартная загрузка
В процессе загрузки в GRUB выбираем в списке ядер нужное нам ядро (режим recovery mode здесь уже не важен) и нажимаем «e» для редактирования параметров загрузки.
Находим строку начинающуюся с «linux …»
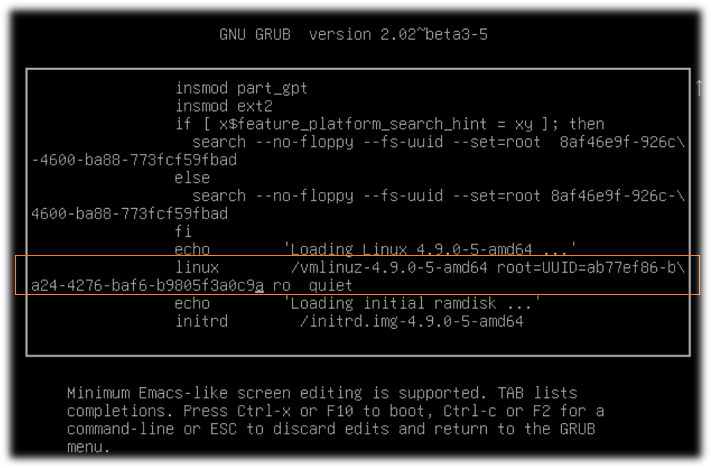
В конце строки меняем значение «» на «», а в самом конце строки дописываем вызов оболочки «».
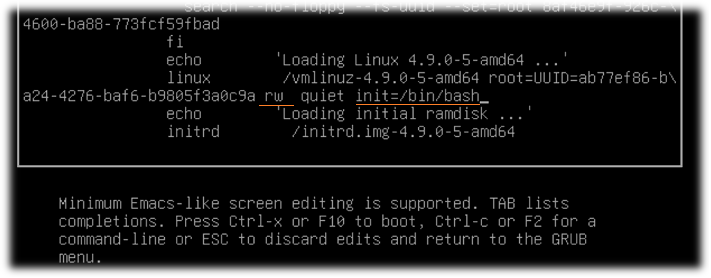
После чего для продолжения загрузки жмём F10
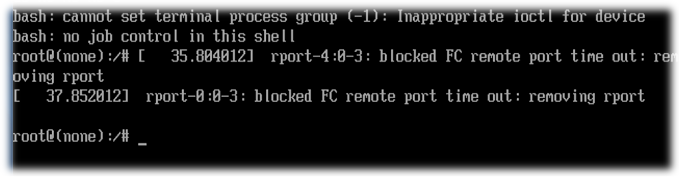
Теперь мы получили беспарольный root-доступ к нашему серверу. Здесь можно исправить имеющиеся у нас проблемы, например внести корректировки в файлы sudo. После внесения нужных правок система может быть загружена обычным образом (все сделанные нами ранее изменения в GRUB были временными).
Дополнительные источники информации:
- Ubuntu Wiki — Lost Password?
- How to Fix “Username is not in the sudoers file. This incident will be reported” in Ubuntu
Проверено на следующих конфигурациях:
| Версия ОС |
|---|
| Debian GNU/Linux Stretch 9.4 |
Автор первичной редакции:Алексей Максимов
Время публикации: 13.06.2018 15:45
Troubleshooting
SSH problem without TTY
This article or section is a candidate for merging with .
SSH does not allocate a tty by default when running a remote command. Without a allocated tty, sudo cannot prevent the password from being displayed. You can use ssh’s option to force it to allocate a tty.
The option only allows the user to run sudo if they have a tty.
# Disable "ssh hostname sudo <cmd>", because it will show the password in clear text. You have to run "ssh -t hostname sudo <cmd>".
#
#Defaults    requiretty
Permissive umask
This article or section is a candidate for merging with .
Sudo will union the user’s umask value with its own umask (which defaults to 0022). This prevents sudo from creating files with more open permissions than the user’s umask allows. While this is a sane default if no custom umask is in use, this can lead to situations where a utility run by sudo may create files with different permissions than if run by root directly. If errors arise from this, sudo provides a means to fix the umask, even if the desired umask is more permissive than the umask that the user has specified. Adding this (using ) will override sudo’s default behavior:
Defaults umask = 0022
Defaults umask_override
Those variables
As discussed earlier, sudo will strip out potentially dangerous system variables. To
check out what variables are kept and which ones are stripped, use sudo -V. The
output will give you a listing of preserved and stripped variables. Stripping out the
LIBPATH is clearly an inconvenience. There are a couple of ways around this—either write a
wrapper script or specify the environments on the command line. Looking at the wrapper
script solution first, suppose you have an application that stops or starts a
DB2
instance. You could create a bare-bones script that would keep the variables intact.
In , notice that you source the instance
profile, which in turn exports various LIBPATH and DB2 environment variables, keeping the environment variable intact, by using:
. /home/$inst/sqllib/db2profile
For completeness, the entries in sudoers to execute this is and not strip out any system environment variables are:
bravo     rs6000 = (dbinst4) NOPASSWD: /home/dbinst4/sqllib/adm/db2start
bravo     rs6000 = (dbinst4) NOPASSWD: /home/dbinst4/sqllib/adm/db2stop force
bravo     rs6000 = (dbinst4) NOPASSWD: /usr/local/bin/rc.db2 stop db2inst4
bravo     rs6000 = (dbinst4) NOPASSWD: /usr/local/bin/rc.db2 start db2inst4
Note in this example, user «bravo» can execute the above commands as user «dbinst4.»
Typically, the user would run:
sudo -u dbinst4 /usr/local/bin/rc.db2 stop db2inst4
sudo -u dbinst4 /usr/local/bin/rc.db2 start db2inst4
Listing 1. rc.db2
#!/bin/sh
# rc.db2
# stop/start db2 instances

# check to see if db2 inst is runningdb2_running(){state=`ps -ef |grep db2sysc
                    |grep -v grep| awk '$1=="'${inst}'" { print $1 }'`
if
then
    return 1
else
    return 0
fi}

usage ()

{
echo "`basename $0` start | stop <instance>"
}

# stop db2
stop_db2 ()
{
echo "stopping db2 instance as user $inst"
    if [ -f /home/$inst/sqllib/db2profile ]; then
        . /home/$inst/sqllib/db2profile
else
    echo "Cannot source DB2..exiting"
exit 1
fi
    /home/$inst/sqllib/adm/db2stop force
}

# start db2
start_db2 ()
{
echo "starting db2 instance as user $inst"
    if [ -f /home/$inst/sqllib/db2profile ]; then
        . /home/$inst/sqllib/db2profile
else
    echo "Cannot source DB2..exiting"
exit 1
fi
/home/$inst/sqllib/adm/db2start
}

# check we get 2 params
if
then
    usage
    exit 1
fi

inst=$2

case "$1" in
Start|start)
    if db2_running
        then
        echo "db2 instance $inst appears to be already running"
         exit 0
    else
        echo " instance not running as user $inst..attempting to start it"
        start_db2 $inst

        fi
        ;;
Stop|stop)
    if db2_running
        then
        echo "instance running as $inst..attempting to stop it"
        stop_db2 $inst
    else
        echo "db2 instance $inst appears to be not running anyway"
        exit 0
    fi
    ;;
*) usage
;;
esac
The other way to preserve system environment variables is to use the Defaults
!env_reset directive, like in sudoers:
Defaults !env_reset
Then from the command line, specify the environment variable name with its value:
$ sudo LIBPATH=″/usr/lib:/opt/db2_09_05/lib64″ -u delta /usr/local/bin/datapmp
If you do not put the !env_reset entry in, you will get the following error from sudo
when you try to run the command:
sudo: sorry, you are not allowed to set the following environment variables: LIBPATH
If you find that sudo is also stripping out other environment variables, you can
specify the variable name in sudoers so that sudo keeps those variables intact (with
the Defaults env_keep += directive). For instance, suppose sudo was stripping out the
application variables DSTAGE_SUP and DSTAGE_META from one of my suodo-ised scripts. To
preserve these variables, I could put the following entries in sudoers:
Defaults env_keep += "DSTAGE_SUP"
Defaults env_keep += "DSTAGE_META"
Notice that I give the variable name and not the variable value. The values are already
contained in my script like this:
export DSTAGE_SUP=/opt/dstage/dsengine; export DSTAGE_META=/opt/dstage/db2
Now when the sudo script is executed, the above environment variables are preserved.
Основные параметры
Алиас Defaults позволяет задать стандартные параметры для работы утилиты, их мы и рассмотрим в этом разделе. Начинается такой алиас со слова Defaults, дальше идет имя флага. Если перед именем есть символ !, это значит, что флаг нужно включить, в обратном случае выключить:
Отключаем введение при первом использовании:

Суперпользователь не может выполнять sudo:

Теперь если вы попытаетесь выполнить sudo sudo ничего не сработает:

Изменять домашнюю директорию для целевого пользователя, по умолчанию остается папка текущего пользователя в качестве домашней директории:

Сохранять список групп текущего пользователя:

Запрашивать пароль суперпользователя вместо пароля пользователя:


Дальше рассмотрим переменные, которым можно задать значения чтобы установить нужные настройки:
Задать количество попыток ввода пароля перед тем, как sudo прекратит работу, по умолчанию — 3:


Количество минут, которое пройдет перед тем, как sudo будет спрашивать пароль снова, по умолчанию 5. Если установить значение в 0, то пароль будет спрашиваться всегда, независимо от того как давно вы использовали утилиту:

Следующий параметр задает количество минут, пока sudo будет ожидать повторного ввода пароля при неправильном вводе:
Вы можете изменить сообщение, которое будет выводится при запросе пароля:

Можно указать другого пользователя, не root, от которого будут выполняться все команды, для этого используйте:
Вы можете записывать в лог все попытки подключения к sudo:

Затем пробуем проверить работу лога:

Это были все самые интересные параметры настройки работы sudo, которые могут вам понадобиться, дальше мы рассмотрим как задать права доступа sudo для пользователей.
Настройка пользователей sudo
Мы уже рассматривали выше синтаксис настройки действий для пользователей, здесь все сложнее чем с псевдонимами, но разобраться можно. Например, разрешим любому пользователю использовать sudo, от любого хоста и выполнять любые команды:

Такая команда очень небезопасна, она разрешает всем и все. Первое ALL — разрешить всем пользователям, второе ALL — для всех хостов, третье ALL — разрешить вход под любым пользователем и четвертое — разрешить выполнять любою команду. Но куда более часто используется другая конструкция:

Означает то же самое, что и предыдущее, только здесь мы разрешаем использовать sudo не всем пользователям, а только тем, которые состоят в группе wheel.
Тут мы уже ограничили возможный выбор пользователей только пользователем root. Также можно указать группу пользователя, от имени которого он может выполнять команды:

Это значит что можно выполнить команду от имени root или другого пользователя из группы admins. Еще мы можем указать команды, которые может выполнять пользователь. Например:

Пользователь может выполнять только команды mount и umount от имени суперпользователя. Теперь сделаем еще интереснее, пользователь может выполнять mount и umount без пароля, а все остальные команды с паролем:
Также можно ограничивать пользователям по хостах, например, разрешаем использование sudo только из host1:
Осталось еще рассмотреть как применять псевдонимы. Псевдонимы могут быть таких типов:
- User_Alias — псевдоним пользователей, которые будут использовать sudo;
- Runas_Alias — псевдоним пользователей, от имени которых будут выполняться команды;
- Host_Alias — псевдоним хоста;
- Cmnd_Alias — псевдоним команд;
Например, создадим четыре псевдонима и применим их в нашем правиле:
Далее применяем все это в правиле:
Это значит, что пользователи из списка Users смогут выполнять команды Cmds от имени пользователей Amdins на хостах Hosts.
Еще осталось сказать несколько слов о флагах. Флаг NOPASSWD говорит, что не нужно запрашивать пароль при выполнении этого правила. Например, разрешить всем пользователям выполнять команду mount с sudo без пароля:
Также можно запретить выполнять именно эту команду вообще с помощью флага NOEXEC:
Вы можете проверить правильно ли была проведена настройка файла /etc/sudores и посмотреть все созданные правила с помощью команды:

Здесь отображены все установленные флаги и настройки, а также полномочия данного пользователя.