Как расшифровать хэш алгоритм (md5, sha, ripemd, des и др.) с помощью hashcat
Содержание:
- Какие хэши можно перебрать?
- Rules used to reject plains
- What does Real c/s and GPU c/s mean ?
- Background
- Debugging rules
- Preparation
- How to show passwords (create a dictionary) in Hashcat without launching a cracking
- Extended Hardware-Management support
- Message pair table
- The hashcat GUI
- User-defined Charsets in Hashcat
- Default Values
Какие хэши можно перебрать?
Как я уже говорил, существует несколько алгоритмов хэширования, но сложность перебора каждого из них отличается. Каждый из алгоритмов может иметь коллизии. Это когда для одного хэша можно подобрать несколько различных исходных наборов данных. Самым небезопасным из популярных алгоритмов на данный момент считается md5. Было доказано, что в этом алгоритме можно найти множество коллизий, а это значит, что перебрать значение такого хэша будет намного проще. Алгоритм sha1 тоже имеет коллизии, но их намного сложнее найти, а значит перебор будет ненамного проще. Существования коллизий для Sha2 пока не доказано, но не исключено.
Программа hashcat поддерживает работу с такими алгоритмами хэширования: md5, md5crypt, sha1, sha2, sha256, md4, mysql, sha512, wpa, wpa2, grub2, android, sha256crypt, drupal7, scrypt, django и другими.
Rules used to reject plains
| Name | Function | Description | Example Rule | Note |
|---|---|---|---|---|
| Reject less | <N | Reject plains if their length is greater than N | <G | * |
| Reject greater | >N | Reject plains if their length is less than N | >8 | * |
| Reject equal | _N | Reject plains of length not equal to N | _7 | * |
| Reject contain | !X | Reject plains which contain char X | !z | |
| Reject not contain | /X | Reject plains which do not contain char X | /e | |
| Reject equal first | (X | Reject plains which do not start with X | (h | |
| Reject equal last | )X | Reject plains which do not end with X | )t | |
| Reject equal at | =NX | Reject plains which do not have char X at position N | =1a | * |
| Reject contains | %NX | Reject plains which contain char X less than N times | %2a | * |
| Reject contains | Q | Reject plains where the memory saved matches current word | rMrQ | e.g. for palindrome |
Note: Reject rules only work either with hashcat-legacy, or when using “-j” or “-k” with hashcat. They will not work as regular rules (in a rule file) with hashcat.
* Indicates that N starts at 0. For character positions other than 0-9 use A-Z (A=10)
What does Real c/s and GPU c/s mean ?
Real c/s is derived from dividing all tested passwords from zero to present from the moment oclHashcat-plus started. This is often a lower figure as it takes into account copying wordlists into GPU memory and also the PCI-Express overhead.
GPU c/s is derived from dividing the time for the last 32 kernel launches by the number of finished passwords from the previous 32 kernel launches. This figure is usually higher than Real c/s as there is no time lost copying the wordlist or PCI-Express overhead.
In general GPU c/s is a more accurate representation of oclHashcat-plus’s performance as wordlist loading is dependant on the I/O performance of the users computer.
Background
The main problem with the very first GPGPU based hashcat, the old oclHashcat version (0.26 etc), had to do with it’s architecture. It was designed for doing Combinator attack. That worked well with fast algorithms but in combination with slow (modern, highly iterated and salted) algorithms,that was an inefficient strategy.
As a consequence, people still used the CPU-based hashcat for serious hash-cracking. This is because it is possible to work with simple dictionary-based attacks. To be able to do dictionary-based attacks on a GPU, it was neccessary to deal with the architecture problem of oclHashcat first. The only solution was a complete new approach, therefore a new (but now deprecated) oclHashcat-plus was born.
While at it, the oclHashcat developers came up with a very specialized version of a GPU cracker, which focused and was limited to do mask attacks and bruteforce attacks, oclHashcat-lite. This tool was heavily used for competitions/benchmarks/pentesting and did focus on single hash cracking.
To allow users to be less limited (e.g. more hash types, not be able to use more than only mask attacks, multi hashes.. to name only some), oclHashcat-plus existed in parallel. The developers of the two oclHashcat suites had to adapt/maintain/update and improve both GPU crackers.
With oclHashcat version 1.00 (released on Friday December 6th 2013), the developers announced a fusioned version of oclHashcat (which is very different from the old oclHashcat suite) on which they worked heavily to get all (or most of the) benefits of oclHashcat-lite, while having all and more features of oclHashcat-plus. For some hash types the cracking speed was identical of the speed reached w/ the specialized oclHashcat-lite or sometimes even faster (during the process of fusioning the both programs, several ideas for optimization were found and implemented).
Notes about simple dictionary attack on GPU:
- Fast algorithms like MD4, MD5 or NTLM do work with simple dictionary attacks on a GPU, but this is not very efficient. It takes longer to transfer the wordlist data to GPU global memory rather than to just attack them on the CPU.
- Slow algorithms like md5crypt (1000 iterations), phpass (up to 8k iterations) or WPA/WPA2 (16k iterations) can efficiently run on a GPU. The reason for this is that they are designed to slow down cracking performance itself. In this case, and unlike the fast algorithms, the time to copy the wordlist to GPU global memory is of no consequence.
An additional major feature of oclHashcat is the GPU-based rule engine. With this it is possible to do Rule-based attack.
- Fast algorithms make use of the GPU-based rule engine to increase GPU utilization. Using this strategy, simple dictionary-based attacks become efficient on the GPU again. The rule-engine on a GPU is very fast. Depending on the rule itself, you can reach nearly the same speed as with a combinator attack in oclHashcat. This is an absolutely unique feature against all other hash crackers.
- Slow algorithms make use of the CPU-based rule engine to increase wordlist size. This way you can use even the very small dictionaries like “common4.txt” or “mil-dict.txt”. They are virtually expanded in memory by the CPU-based rule engine. This fits perfectly in the situation above in that the time to copy the wordlist to GPU global memory is of no consequence.
As a result, oclHashcat is a lot more like the original CPU-based hashcat.
The first official release was v1.00, released on Friday 6th December 2013.
For additional notes on older versions of the oclHashcat suite see either oclHashcat-plus or oclHashcat-lite.
Remember: with release 1.00, oclHashcat replaced oclHashcat-plus and oclHashcat-lite, i.e. it was a merged version (among others) of those two suites
Debugging rules
With hashcat we can debug our rules easily. That means we can verify that the rule we wrote actually does what we want it to do. All you need to use is the —stdout switch and omit the hashlist.
Here is an example:
Create simple dictionary:
$ echo WORd > word
Generate a simple rule. The “c” rule capitalizes the first letter and lower-cases the rest.
$ echo c > rule
And thats how we see the generated debug output:
$ ./hashcat-cli64.bin -r rule --stdout word
Word
This “feature” is also a very fast password candidate generator. That means that if we have some external program that supports reading from stdin we can feed it with our output.
Preparation
hashcat is very flexible, so I’ll cover three most common and basic scenarios:
-
Dictionary attack
-
Brute-Force attack
-
Rule-based attack
Dictionary attack
- Put it into the hashcat folder.
- Rename your converted capture file “capture.hccapx”.
- On Windows, create a batch file “attack.bat”, open it with a text editor, and paste the following:
hashcat.exe -m 2500 capture.hccapx rockyou.txt
pause
Execute the attack using the batch file, which should be changed to suit your needs.
Brute-Force Attack
- Rename your converted capture file “capture.hccapx”.
- Create a batch file “attack.bat”, open it with a text editor, and paste the following:
hashcat.exe -m 2500 -a3 capture.hccapx ?d?d?d?d?d?d?d?d
pause
This will pipe digits-only strings of length 8 to hashcat. Replace the ?d as needed.
It would be wise to first estimate the time it would take to process using a calculator.
TBD: add some example timeframes for common masks / common speed
Rule-based attack
This is similar to a Dictionary attack, but the commands look a bit different:
hashcat.exe -m 2500 -r rules/best64.rule capture.hccapx rockyou.txt
pause
This will mutate the RockYou wordlist with best 64 rules, which come with the hashcat distribution.
Change as necessary and remember, the time it will take the attack to finish will increase proportionally with the amount of rules.
How to show passwords (create a dictionary) in Hashcat without launching a cracking
After creating complex masks, especially with the use of custom character sets, we would like to check whether we did everything correctly. Also, thanks to the flexibility of the Hashcat syntax, it is convenient to use it for generating dictionaries by any criteria.
In order to only show passwords without starting cracking, the —stdout option is used. This option requires -a 3 (masd attack mode). Since cracking does not start in this case, you do not need to specify any hashes.
An example of generating passwords for the above-mentioned task (it is known that the first three characters in the password are numbers, not all, but only numbers from 0 to 4, the fourth character is only uppercase letters, and the fifth and sixth characters are the letters from a to h, as well as numbers from 5 to 9):
.\hashcat64.exe --stdout -a 3 -1 01234 -2 abcdefgh56789 ?1?1?1?u?2?2
Since many passwords will be created (more than half a million), instead of displaying on the screen, they can be saved to a file. To do this, after the main command, you need to put the symbol > (means redirecting the output to a file) and write the file name. For example, to save all passwords to the lab1.dic file, which will be created in the same folder as the executable hashcat64.exe:
.\hashcat64.exe --stdout -a 3 -1 01234 -2 abcdefgh56789 ?1?1?1?u?2?2 > lab1.dic
Extended Hardware-Management support
With the increased interest in power consumption per GPU, vendors started to add complicated clock speed changes from inside the driver and the GPU BIOS. The problem with that is, some of the settings are related to the workload, some to the power consumption, and some to temperature. This can increase the complexity of troubleshooting hashcat issues (for example, if you are trying to determine why cracking performance has rather suddenly and dramatically dropped.) To prevent users sending in invalid «bug» reports related to performance, I decided to add the clock and memory rate of the current GPU to the status display. The user will notice the clocks jumping around as the speeds jump around and hopefully realize that there’s something wrong with their setup.
Most of the time it’s a cooling issue. In the past oclHashcat already showed the temperature in the status display, but the problem is that current drivers may try to hold a target temperature by either increasing the fan speed or by decreasing the clock rate. The latter case will lead the user to the false assumption their setup is well cooled; the speed dropped over time but since the temperature was not going up, they did not make the link that the clocks have been decreased.
Switching from NVAPI to NVML will be a very important change for setups using NVidia GPU and Windows. NVidia is actually distributing a 64 bit bit .dll for NVML with their latest driver version and hashcat will find the .dll by checking the Windows registry. If it does not find it, you can also simply copy the nvml.dll into hashcat installation folder (though that should not be necessary). There’s another reason why we’ve switched to NVML. AMD users already had a workaround to disable the GPU bios trying to optimize power consumption. They simply switched on the flag which sets the maximum power the GPU can consume to 120%, the same way as you can do it by using e.g. MSI Afterburner. With hashcat, and because we’re using NVML now, this option is also available to NVidia users.
There is still a sole exception of the nvapi, i.e. the usage of NVAPI calls in : hashcat needs this NVAPI dependency to recognize the core clock throttling in case temperatures exceed the threshold and become too high/hot. This is a configurable setting in Windows (for example, this may be modified with Afterburner.)
Message pair table
The message_pair value describes which messages of the 4-way handshake were combined to form the .hccapx structure. It is always a pair of 2 messages: 1 from the AP (access point) and 1 from the STA (client).
Furthermore, the message_pair value also gives a hint from which of the 2 messages the EAPOL origins. This is interesting data, but not necessarily needed for hashcat to be able to crack the hash.
On the other hand, it could be very important to know if “only” message 1 and message 2 were captured or if for instance message 3 and/or message 4 were captured too. If message 3 and/or message 4 were captured it should be a hard evidence that the connection was established and that the password the client used was the correct one.
The following table lists all values currently allowed for the message_pair field:
| message_pair value | Messages of the handshake | Source of the EAPOL | AP message | STA message | Replay counter matching |
|---|---|---|---|---|---|
| M1 + M2 | M2 | M1 | M2 | Yes | |
| 1 | M1 + M4 | M4 | M1 | M4 | Yes |
| 2 | M2 + M3 | M2 | M3 | M2 | Yes |
| 3 | M2 + M3 | M3 | M3 | M2 | Yes |
| 4 | M3 + M4 | M3 | M3 | M4 | Yes |
| 5 | M3 + M4 | M4 | M3 | M4 | Yes |
| 128 | M1 + M2 | M2 | M1 | M2 | No |
| 129 | M1 + M4 | M4 | M1 | M4 | No |
| 130 | M2 + M3 | M2 | M3 | M2 | No |
| 131 | M2 + M3 | M3 | M3 | M2 | No |
| 132 | M3 + M4 | M3 | M3 | M4 | No |
| 133 | M3 + M4 | M4 | M3 | M4 | No |
Note: M1 means message 1 of the handshake, M2 means message 2 of the handshake, M3 means message 3 of the handshake and M4 means message 4 of the 4-way handshake
The hashcat GUI
To install the hashcat GUI, download the archive from the page to which the link above is linked.
Unzip the downloaded archive, it already includes:
- hashcat-utils-1.0
- cap2hccap
Requirements for the hashcat GUI:
- only Windows operating system
- dotNET Framework: v4
- hashcat version 3.00 or later
Hashcat you need to download separately, as shown above. Also you need to have the necessary drivers installed.
After you unpack the Hashcat GUI and Hashcat itself, you need to move the Hashcat folder to the Hashcat GUI folder. It should look like the following folder structure:

The folder with Hashcat-hashcat-4.1.0 is highlighted. Note that you do not need to rename the directory with a hashcat.
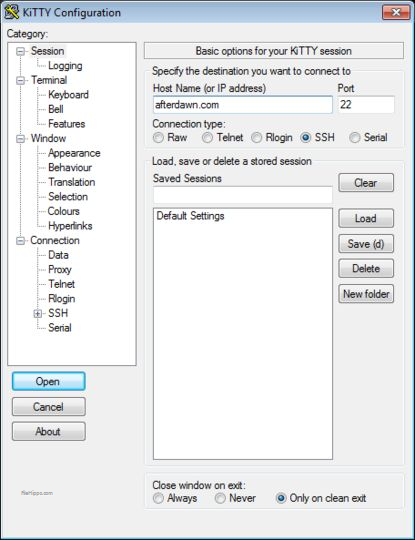
Double-click the HashcatGUI.exe file to start the program. Look at the Hashcat GUI:
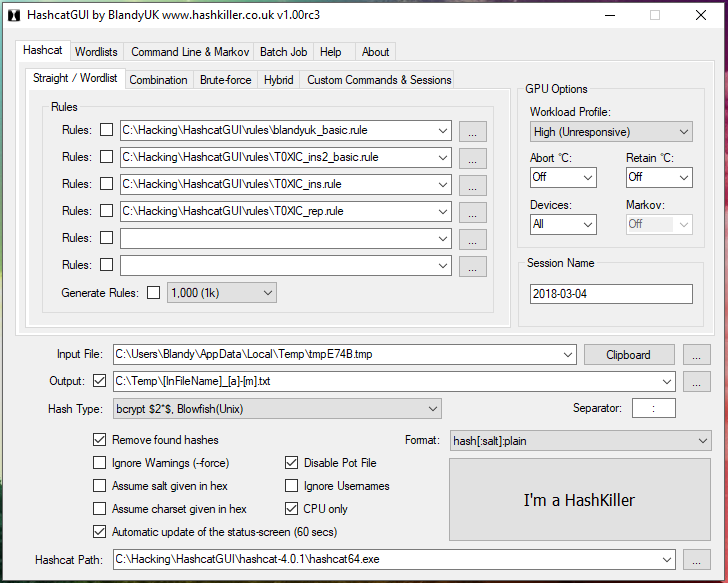
In my opinion, it is complicated. In my subjective sense, it is easier to achieve the desired result in the command line than in the graphical interface, in which, by the way, some features are missing.
Moreover, without understanding the concepts of Hashcat, it’s unlikely that you will be able to do something even in the graphical interface. Therefore, continue reading this article, and we will return to the graphical interface later on the pages of the miloserdov.org web-site.
User-defined Charsets in Hashcat
Above, already listed are built-in character sets, which are usually enough. However, you can specify up to four of your own custom sets.
Suppose we know that the first three characters in the password are digits, and not all, but only numbers from 0 to 4, the fourth character is only uppercase letters, and the fifth and sixth characters are the letters from a to h, as well as the numbers from 5 up to 9.
If in the mask for the first three characters we just indicate the numbers, then obviously not suitable candidates for passwords (containing in the first three positions the numbers that are not in the range from 0 to 4) will be also tested. We must exclude obviously inappropriate passwords. This can be done using custom character sets.
There are four user-defined character sets in total. They are specified in options and denoted by numbers. But in the options, a hyphen is placed before the digit (for example, the first user set is -1), and a question mark is placed in the mask before the digit (for example, the use of symbols from the first user set is ?1).
So, to solve the problem, we start by setting the required number of user sets in the options. These sets can consist of directly listed characters, you can also use built-in character sets, for example ?l or ?d or ?u (in any combination).
The first custom character set for our task (only numbers from 0 to 4):
-1 01234
The second user-defined character set (letters from a to h, as well as numbers from 5 to 9)
-2 abcdefgh56789
Let me remind you — custom character sets are written among the options (before the mask and before the hash).
Now create a mask (the first three characters in the password are numbers, not all, but only the numbers from 0 to 4, the fourth character is only uppercase letters, and the fifth and sixth characters are the letters from a to h, as well as the numbers from 5 to 9):
?1?1?1?u?2?2
We will disassemble the mask:- the first three characters are designated as ?1?1?1 (these are units, and not a lowercase letter L, they are digits ‘1’) are symbols from the first user set. Next goes ?u, this is a built-in character set, denoting only capital letters. The next two characters are designated as ?2?2, these are symbols from the second user set.
When specifying custom sets, you can use the notation of built-in character sets, for example:
-1 ?l?u
denotes the first user set consisting only of large and small Latin letters.
And
-1 ?l?u?d
means the first user set consisting only of large and small Latin letters, as well as numbers.
As already shown above, you can use custom and built-in character sets in any combination in the mask.
Default Values
– section needs update –
| Attribute | Value | Note |
|---|---|---|
| —version | false | |
| —help | false | |
| —eula | false | |
| —quiet | false | |
| —show | false | |
| —left | false | |
| —username | false | |
| —remove | false | |
| —force | false | |
| —outfile | NULL | |
| —outfile-format | 3 | |
| —runtime | ||
| —hex-salt | false | |
| —hex-charset | false | |
| —segment-size | 1 | |
| —gpu-async | false | |
| —gpu-devices | NULL | |
| —gpu-accel | * | |
| —gpu-loops | * | |
| —gpu-watchdog | 90 | |
| —rules-file | NULL | |
| —generate-rules | ||
| —generate-rules-func-min | 1 | |
| —generate-rules-func-max | 4 | |
| —hash-type | ||
| —increment | ||
| —increment-min | 1 | |
| —increment-max | 15 |
* Indicates that the value is dependent on the algorithm and GPU platform vendor (see below)