Как расшифровать файл с расширением vault после вируса шифровальщика
Содержание:
»Google Kubernetes Engine Cluster
-
Set your working directory to where the
folder is located.
-
Modify and provide GCP credentials:
and
.
Example:
-
Execute the Terraform commands to provision a new GKE cluster.
Pull necessary plugins.
Now, execute the command to build a new GKE cluster.
-
Connect to the GKE cluster.
-
Get the cluster information.
NOTE: If you don’t have the command line tool installed, follow
the online
documentation. -
Copy the Kubernetes master address ( in this example).
-
In the file, replace Line 48 to
point to the GKE cluster address rather than .
Also, replace Line 54 to point to the correct host address.Example ():
-
Set the working directory to where scripts are located ().
-
Create a service account, .
-
Update the service account with definition provided in the file.
-
Setup the Kubernetes auth method on the Vault server.
-
Resume and on.
The Problem with Sensitive Information
Before digging into Vault, let’s try to understand the problem it tries to solve: sensitive information management.
Most applications need access to sensitive data in order to work properly. For instance, an e-commerce application may have a username/password configured somewhere in order to connect to its database. It may also need API keys to integrate with other service providers, such as payment gateways, logistics, and other business partners.
Database credentials and API Keys are some examples of sensitive information that we need to store and make available to our applications in a secure way.
A simple solution is to store those credentials in a configuration file and read them at startup time. The problem with this approach is obvious, though. Whoever has access to this file share the same database privileges our application have – usually giving her full access to all stored data.
We can try to make things a bit harder by encrypting those files. This approach, however, will not add much in terms of overall security. Mainly, because our application must have access to the master key. Encryption, when used in this way, will only achieve a “false” sense of security.
Modern applications and cloud environments tend to add some extra complexity: distributed services, multiple databases, messaging systems and so on, all have sensitive information spread a bit everywhere, thus increasing the risk of a security breach.
So, what can we do? Let’s Vault it!
»Load Balancing
Load Balancing Using Consul Interface
Consul can provide load balancing capabilities through service discovery, but it
requires that any Vault clients are Consul aware. This means that a client can
either use Consul DNS or API interfaces to resolve the active Vault node. A
client might access Vault via a URL like the following:
This relies upon the operating system DNS resolution system, and the request
could be forwarded to Consul for the actual IP address response. The operation
can be completely transparent to legacy applications and would operate just as a
typical DNS resolution operation. See Consul DNS
forwarding for more information
Load Balancing Using External Load Balancer
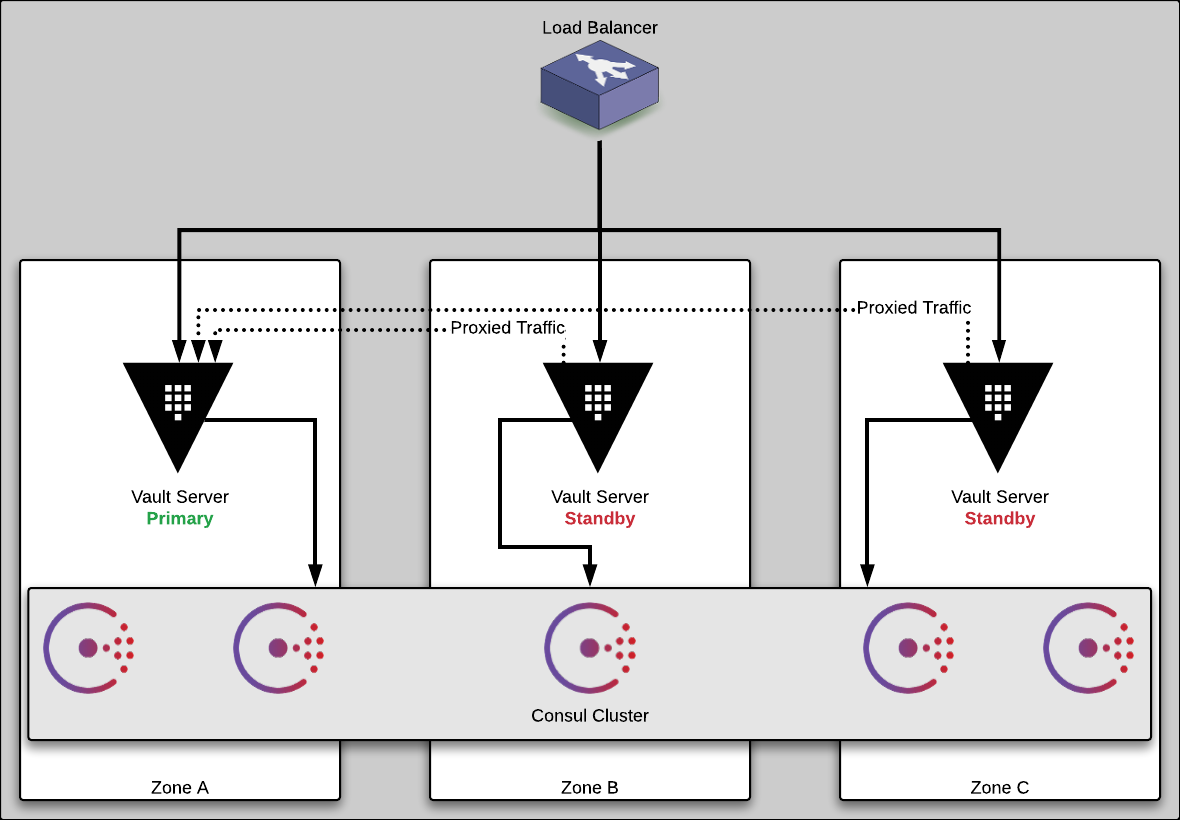
External load balancers are supported as an entry point to a Vault cluster. The
external load balancer should poll the
sys/health endpoint to
detect the active node and route traffic accordingly. The load balancer should
be configured to make an HTTP request for the following URL to each node in the
cluster to:
The active Vault node will respond with a 200 while the standby nodes will
return a 4xx response.
The following is a sample configuration block from HAProxy to illustrate:
Note that the above block could be generated by Consul (with consul-template)
when a software load balancer is used. This could be the case when the load
balancer is software like Nginx, HAProxy, or Apache.
Example Consul Template for the above HAProxy block:
Client IP Address Handling
There are two supported methods for handling client IP addressing behind a proxy
or load balancer;
and .
Both require a trusted load balancer and IP address to be listed as allowed
addresses to adhere to security best practices.
»Glossary
Vault Cluster
A Vault cluster is a set of Vault processes that together run a Vault service.
These Vault processes could be running on physical or virtual servers, or in
containers.
Consul storage backend cluster
HashiCorp recommends and supports Consul being used as the storage backend for
Vault. A Consul cluster is a set of Consul server processes that together run a
Consul service. These Consul processes could be running on physical or virtual
servers, or in containers.
Availability Zone
A single failure domain on a location level that hosts part of, or all of a
Vault cluster. The latency between availability zones should be < 8ms for a
round trip. A single Vault cluster may be spread across multiple availability
zones.
Examples of an availability zone in this context are:
- An isolated datacenter
- An isolated cage in a datacenter if it is isolated from other cages by all
other means (power, network, etc) - An availability zone in AWS, Azure or GCP
Region
A geographically separate collection of one or more availability zones. A region
would host one or more Vault clusters. There is no defined maximum latency
requirement between regions in Vault architecture. A single Vault cluster would
not be spread across multiple regions.
2: Создание unit-файла Vault
Systemd – это система инициализации Ubuntu, которая, среди прочего, управляет сервисами системы. Чтобы установить Vault в качестве системного сервиса, необходимо настроить:
- Системного пользователя, с помощью которого будет запускаться демон Vault.
- Каталог данных для хранения информации Vault.
- Конфигурационный файл Vault.
- Unit-файл systemd.
Примечание: В этом мануале используется бэкэнд для хранения зашифрованных данных в локальной файловой системе в /var/lib/vault. Это подходит для локальных или односерверных развертываний, которые не требуют репликации. Другие бэкэнды Vault, такие как бэкэнд Consul, будут хранить зашифрованные секретные данные в распределенном хранилище «ключ-значение».
Создайте пользователя vault:
Здесь в качестве домашнего каталога пользователя используется /var/lib/vault. Он также будет каталогом данных Vault. Также нужно настроить оболочку /bin/nologin для ограничения пользователя и настройки неинтерактивной системной учетной записи.
Передайте права на /var/lib/vault пользователю и группе vault.
Теперь нужно настроить конфигурационный файл Vault, /etc/vault.hcl. Он нужен для управления различными опциями Vault (например, здесь можно указать, где хранятся зашифрованные секретные данные). Создайте файл.
Вставьте в файл следующие строки:
Согласно этому конфигурационному файлу Vault хранит зашифрованные секреты в /var/lib/vault на диске и прослушивает соединения через HTTPS, используя сертификаты, созданные в мануале по Let’s Encrypt.
Сохраните и закройте файл, а затем ограничьте доступ к Vault, передав право на чтение пользователю vault.
Чтобы система systemd управляла демоном Vault, создайте unit-файл /etc/systemd/system/vault.service.
Скопируйте и вставьте в файл следующие строки. Это позволит Vault работать в фоновом режиме в качестве постоянного системного демона.
Полный список параметров unit-файла сервиса является довольно большим. Вот наиболее важные параметры конфигурации, которые следует учитывать в приведенном выше определении:
- ConditionFileNotEmpty подтверждает, что /etc/vault.hcl существует.
- User и Group управляют правами демона Vault.
- ExecStart указывает на исполняемый файл, который вы установили ранее, и определяет, как запустить сервис.
- ExecReload вызывается, когда Vault перезагружает конфигурационный файл (например, при запуске systemctl reload vault).
- позволяет автоматически запускать сервис во время загрузки, чтобы вам не пришлось этого делать вручную.
Vault нужны права на чтение сертификатов, созданных с помощью Certbot. По умолчанию эти сертификаты и закрытые ключи доступны только пользователю root. Чтобы сделать их доступными для Vault, но не открывать всем, создайте специальную группу pki для доступа к этим файлам, а затем добавьте в нее пользователя vault.
Сохраните и закройте файл.
Создайте группу pki:
Обновите права доступа к каталогам в /etc/letsencrypt, чтобы группа pki могла прочитать содержимое.
Затем добавьте пользователя vault в группу pki. Это предоставит Vault доступ к сертификатам, чтобы он мог безопасно обрабатывать запросы по HTTPS.
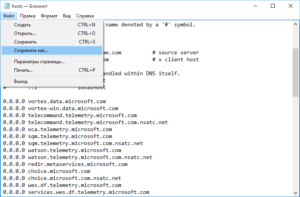
Теперь для удобства добавьте правило в /etc/hosts, чтобы направлять запросы Vault на localhost.
По умолчанию Vault будет слушать запросы только из интерфейса loopback (lo, или 127.0.0.1). Это делается, чтобы сервис не имел выхода в интернет до того, как он будет полностью защищен. Вы можете изменить это позже. На данный момент этот параметр позволит вам использовать команду vault и правильно разрешать имя домена, защищенное HTTPS.
Замените example.com в следующей команде своим доменом, на который вы получили сертификат Let’s Encrypt:
Это добавит строку 127.0.0.1 example.com в /etc/hosts, благодаря чему любые HTTP-запросы на example.com направляются на localhost.
Теперь можно запустить Vault и инициализировать хранилище конфиденциальных данных.
References
- ↑ The Courier: «Can you tell me what happened to the residents here?»Motor-Runner: «I guess it isn’t a secret. Yeah, the residents of the Vault are all dead. We killed them. Funny thing is, they just let us in. We didn’t have to force the doors or anything.(Motor-Runner’s dialogue)
- The Courier: «What can you tell me about what happened here?»Bryce Anders: «The Fiends killed everyone living here, and now they are squatting in their home.»(Bryce Anders’ dialogue)
- The Courier: «What is this place?»Bryce Anders: «This was Vault 3, but I’m sure you can tell that by all the 3s all over the damn place. Now it is a drug den for the goddamn Fiends.»(Bryce Anders’ dialogue)
- Fallout: New Vegas Official Game Guide Collector’s Edition p.316-318: « Vault 3Vault 3, which is now completely within South Vegas Ruins (AKA «Fiend Territory») was once an ordinary, happy vault. It wasn’t built above a sulfur cave, or to feature Vault-Tec «experiments» that could drive dwellers mad. In fact, the place was functioning normally until a slight water leak turned the lower chambers soggy and forced the inhabitants out to the surface, in search of humanity on the topside. Instead, they met the Fiends.»(Fallout: New Vegas Official Game Guide Collector’s Edition Tour of the Mojave Wasteland)
- The Courier: «What can you tell me about Vault 3?»Bryce Anders: «The inhabitants of the Vault were simple traders. They made a good living for themselves for a couple weeks. Then they caught the Fiends attention. I don’t think they set up any kind of security, stupid fucks. They all got themselves killed. «(Bryce Anders’ dialogue)
- The Courier: «Who are the Fiends?»The Courier: «The Fiends?»James Hsu: «As in chem fiends. Biggest gang of raiders I’ve ever seen. Nothing like addiction to swell your numbers. Psychotic, and completely unpredictable. They’ve set up shop in Vault 3 to the west. Every day they attack our positions and my men repel them. But every day there’s more of them and less of us. I sent one of my rangers after their leader to try and destabilize them. He didn’t return. Hell of a thing, losing a ranger. You come to depend on them. And they come through for you so often, you forget it can happen.»The Courier: «I’ll go to Vault 3 and see if I can find your ranger.»James Hsu: «That Vault is a hornet’s nest. If you have second thoughts, no one would think less of you for it. But if you can get him home, it’d mean a lot. Watch for civilians, too. The Fiends have been kidnapping locals. They just walk right into people’s homes in the middle of the day and take them. But the man you’re looking for is Bryce Anders. Anders was trying to find the leader, Motor-runner. You hear something like a chainsaw, you’ve found Motor-runner. Put a bullet in his head, and you’ll have some new friends around here.»(James Hsu’s dialogue)
- Lily Bowen: «My, my, this reminds me of when I was a girl. Right over there would have been where your grandpa and I had our first kiss!»(Lily Bowen’s dialogue)
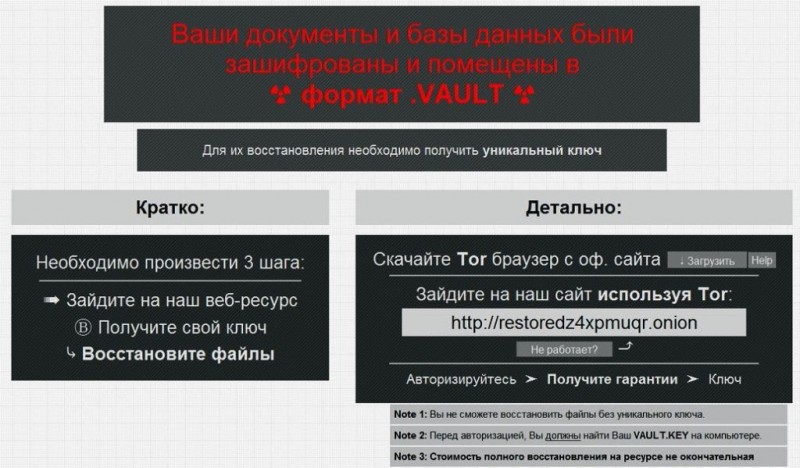
Вирус ставит расширение vault на doc, jpg, xls и других файлах
Что же конкретно делает с файлами вирус? На первый взгляд кажется, что он просто меняет расширение со стандартного на .vault. Когда я первый раз увидел работу этого virus-шифровальщика, я так и подумал, что это детская разводка. Переименовал обратно файл и очень удивился, когда он не открылся как полагается, а вместо положенного содержания открылась каша из непонятных символов. Тут я понял, то все не так просто, начал разбираться и искать информацию.
Вирус прошелся по всем популярным типам файлов — doc, docx, xls, xlsx, jpeg, pdf и другим. К стандартному имени файла прибавилось новое расширение .vault. Некоторым он шифрует и файлы с локальными базами 1С. У меня таких не было, так что сам лично я это не наблюдал. Простое переименовывание файла обратно, как вы понимаете, тут не помогает.
Так как процесс шифрования не мгновенный, может так получиться, что когда вы узнаете о том, что у вас шурует вирус на компьютере, часть файлов еще будет нормальная, а часть зараженная. Хорошо, если не тронутой останется большая часть. Но чаще всего на это рассчитывать не приходится.
Расскажу, что скрывается за сменой расширения. После шифрования, к примеру, файла file.doc рядом с ним вирус vault создает зашифрованный файл file.doc.gpg, затем зашифрованный file.doc.gpg перемещается на место исходного с новым именем file.doc, и только после этого переименовывается в file.doc.vault. Получается, что исходный файл не удаляется, а перезаписывается зашифрованным документом. После этого его невозможно восстановить стандартными средствами по восстановлению удаленных файлов. Вот часть кода, которая реализует подобный функционал:
dir /B "%1:"&& for /r "%1:" %%i in (*.xls *.doc) do (
echo "%%TeMp%%\svchost.exe" -r Cellar --yes -q --no-verbose --trust-model always --encrypt-files "%%i"^& move /y "%%i.gpg" "%%i"^& rename "%%i" "%%~nxi.vault">> "%temp%\cryptlist.lst"
echo %%i>> "%temp%\conf.list"
)
»Seal/Unseal
Every initialized Vault server starts in the sealed state. From
the configuration, Vault can access the physical storage, but it can’t
read any of it because it doesn’t know how to decrypt it. The process
of teaching Vault how to decrypt the data is known as unsealing the
Vault.
Unsealing has to happen every time Vault starts. It can be done via
the API and via the command line. To unseal the Vault, you
must have the threshold number of unseal keys. In the output above,
notice that the «key threshold» is 3. This means that to unseal
the Vault, you need 3 of the 5 keys that were generated.
Note: Vault does not store any of the unseal key shards. Vault
uses an algorithm known as
Shamir’s Secret Sharing
to split the master key into shards. Only with the threshold number of keys
can it be reconstructed and your data finally accessed.
Begin unsealing the Vault:
After pasting in a valid key and confirming, you see that Vault is still
sealed, but progress is made. Vault knows it has 1 key out of 3. Due to the
nature of the algorithm, Vault doesn’t know if it has the correct key until
the threshold is reached.
Also notice that the unseal process is stateful. You can go to another computer,
use , and as long as it’s pointing to the same server,
that other computer can continue the unseal process. This is incredibly
important to the design of the unseal process: multiple people with multiple
keys are required to unseal the Vault. The Vault can be unsealed from multiple
computers and the keys should never be together. A single malicious operator
does not have enough keys to be malicious.
Continue with to complete unsealing the Vault. To unseal
the vault you must use three different unseal keys, the same key repeated will
not work.
As you use keys, as long as they are correct, you should soon see
output like this:
When the value for changes to , the Vault is unsealed.
Feel free to play around with entering invalid keys, keys in different
orders, etc. in order to understand the unseal process.
Finally, authenticate as the initial root token (it was included in the output
with the unseal keys):
As a root user, you can reseal the Vault with . A single
operator is allowed to do this. This lets a single operator lock down the
Vault in an emergency without consulting other operators.
When the Vault is sealed again, it clears all of its state (including the
encryption key) from memory. The Vault is secure and locked down from access.
NOTE: Before continuing on to the Using the HTTP APIs with Authentication tutorial, type Ctrl+C to stop the server.
»Configuration
These are the currently-available general configuration option:
-
— Specifies the remote Vault server the Agent connects to.
-
— Specifies the method and other options used for Auto-Auth functionality.
-
— Specifies options used for Caching functionality.
-
— Specifies the addresses and ports on which the Agent will respond to requests.
-
— Path to the file in which the agent’s Process ID
(PID) should be stored -
— If set to , the agent will exit
with code after a single successful auth, where success means that a
token was retrieved and all sinks successfully wrote it -
— Specifies options used for templating Vault secrets to files.
vault Stanza
There can at most be one top level block and it has the following
configuration entries:
-
— The address of the Vault server. This should
be a complete URL such as . This value can be
overridden by setting the environment variable. -
— Path on the local disk to a single PEM-encoded
CA certificate to verify the Vault server’s SSL certificate. This value can
be overridden by setting the environment variable. -
— Path on the local disk to a directory of
PEM-encoded CA certificates to verify the Vault server’s SSL certificate.
This value can be overridden by setting the environment
variable. -
— Path on the local disk to a single
PEM-encoded CA certificate to use for TLS authentication to the Vault server.
This value can be overridden by setting the environment
variable. -
— Path on the local disk to a single
PEM-encoded private key matching the client certificate from .
This value can be overridden by setting the environment
variable. -
— Disable verification of TLS
certificates. Using this option is highly discouraged as it decreases the
security of data transmissions to and from the Vault server. This value can
be overridden by setting the environment variable. -
— Name to use as the SNI host when
connecting via TLS. This value can be overridden by setting the
environment variable.
listener Stanza
Agent supports one or more listener stanzas. In addition to
the standard listener configuration, an Agent’s listener configuration also
supports an additional optional entry:
require_request_header (bool: false) — Require that all incoming HTTP
requests on this listener must have an X-Vault-Request: true header entry.
Using this option offers an additional layer of protection from Server Side
Request Forgery attacks. Requests on the listener that do not have the proper
X-Vault-Request header will fail, with a HTTP response status code of 412: Precondition Failed.
»Deployment System Requirements
The following table provides guidelines for server sizing. Of particular note is
the strong recommendation to avoid non-fixed performance CPUs, or Burstable
CPU in AWS terms, such as T-series instances.
Sizing for Vault Servers
| Size | CPU | Memory | Disk | Typical Cloud Instance Types |
|---|---|---|---|---|
| Small | 2 core | 4-8 GB RAM | 25 GB | AWS: m5.large |
| Azure: Standard_D2_v3 | ||||
| GCE: n1-standard-2, n1-standard-4 | ||||
| Large | 4-8 core | 16-32 GB RAM | 50 GB | AWS: m5.xlarge, m5.2xlarge |
| Azure: Standard_D4_v3, Standard_D8_v3 | ||||
| GCE: n1-standard-8, n1-standard-16 |
Sizing for Consul Servers
| Size | CPU | Memory | Disk | Typical Cloud Instance Types |
|---|---|---|---|---|
| Small | 2 core | 8-16 GB RAM | 50 GB | AWS: m5.large, m5.xlarge |
| Azure: Standard_D2_v3, Standard_D4_v3 | ||||
| GCE: n1-standard-4, n1-standard-8 | ||||
| Large | 4-8 core | 32-64+ GB RAM | 100 GB | AWS: m5.2xlarge, m5.4xlarge |
| Azure: Standard_D4_v3, Standard_D8_v3 | ||||
| GCE: n1-standard-16, n1-standard-32 |
Hardware Considerations
The small size category would be appropriate for most initial production
deployments, or for development/testing environments.
The large size is for production environments where there is a consistent high
workload. That might be a large number of transactions, a large number of
secrets, or a combination of the two.
In general, processing requirements will be dependent on encryption workload and
messaging workload (operations per second, and types of operations). Memory
requirements will be dependent on the total size of secrets/keys stored in
memory and should be sized according to that data (as should the hard drive
storage). Vault itself has minimal storage requirements, but the underlying
storage backend should have a relatively high-performance hard disk subsystem.
If many secrets are being generated/rotated frequently, this information will
need to flush to disk often and can impact performance if slower hard drives are
used.
Consul servers function in this deployment is to serve as the storage backend
for Vault. This means that all content stored for persistence in Vault is
encrypted by Vault, and written to the storage backend at rest. This data is
written to the key-value store section of Consul’s Service Catalog, which is
required to be stored in its entirety in-memory on each Consul server. This
means that memory can be a constraint in scaling as more clients authenticate to
Vault, more secrets are persistently stored in Vault, and more temporary secrets
are leased from Vault. This also has the effect of requiring vertical scaling on
Consul server’s memory if additional space is required, as the entire Service
Catalog is stored in memory on each Consul server.
Furthermore, network throughput is a common consideration for Vault and Consul
servers. As both systems are HTTPS API driven, all incoming requests,
communications between Vault and Consul, underlying gossip communication between
Consul cluster members, communications with external systems (per auth or secret
engine configuration, and some audit logging configurations) and responses
consume network bandwidth.
Due to network performance considerations in Consul cluster operations,
replication of Vault datasets across network boundaries should be achieved
through Performance or DR Replication, rather than spreading the Consul cluster
across network and physical boundaries. If a single Consul cluster is spread
across network segments that are distant or inter-regional, this can cause
synchronization issues within the cluster or additional data transfer charges
in some cloud providers.
Vault Production Hardening Recommendations
provides guidance on best practices for a production hardened deployment of
Vault.
3: Инициализация Vault
При первом запуске Vault не будет инициализирован – то есть пока что он не будет готов к получению и хранению данных. Бэкэнд, который фактически хранит зашифрованные секретные данные, тоже не инициализирован. Запустите сервис Vault, чтобы инициализировать бэкэнд и запустить Vault.
Чтобы убедиться в том, что сервис успешно запустился, введите:
Результат этой команды включает несколько фрагментов информации о запущенном сервисе, например, идентификатор процесса и использование ресурсов. Убедитесь, что в выводе есть следующая строка, которая указывает, что сервис работает правильно.
Если сервис не активен, посмотрите на сопровождающие строки логов в конце вывода команды, чтобы понять, в чем проблема.
Затем установите переменную среды, чтобы сообщить команде vault, как подключиться к серверу Vault. На данный момент Vault прослушивает только локальный интерфейс loopback, поэтому установите в переменной VAULT_ADDR локальную конечную точку HTTPS.
Команда vault теперь может взаимодействовать с демоном
Обратите внимание, что вместо простого localhost или 127.0.0.1 необходимо указать имя хоста для проверки сертификата HTTPS
Убедитесь, что хранилище vault не было инициализировано.
Сервер должен вернуть ошибку 400, что говорит о том, что хранилище не инициализировано
Во время инициализации Vault будет отображать два фрагмента информации, которые не будут доступны в других точках:
- Исходный токен root: эквивалентен правам root на развертывание Vault, что позволяет управлять всеми политиками Vault, монтированием и т. д.
- Ключи разблокировки: используются для вскрытия Vault при запуске демона, что позволяет демону Vault расшифровывать хранилище секретных данных бэкэнда.
При инициализации Vault вы можете выбрать, сколько вам нужно ключей и сколько их нужно в момент вскрытия, чтобы успешно открыть Vault.
Обычно запрашивается три ключа вскрытия, два из которых используется непосредственно в момент вскрытия. Благодаря этому недостаточно взломать один ключ, чтобы вскрыть Vault.
Другими словами, для обеспечения доступности и готовности к использованию сервиса Vault при его запуске потребуется не менее двух ключей для вскрытия. До этого момента файлы с конфиденциальной информацией будут зашифрованными и недоступными.
Инициализируйте Vault с такими параметрами:
Сохраните токены для вкрытия и исходный токен root в безопасном месте. Например, можно сохранить один токен вскрытия в диспетчере паролей, второй на USB-накопителе, а третий в GPG-зашифрованном файле.
Теперь вы можете вскрыть хранилище с помощью токенов. Начните с одного ключа.
Команда запросит токен:
После ввода токена команда сообщит, что процесс вскрытия выполняется, но для его завершения требуется еще один токен.
Еще раз запустите команду unseal:
Введите второй токен:
Вывод команды указывает, что процесс вскрытия и завершен успешно.
Теперь хранилище Vault вскрыто и готово к использованию. Процесс вскрытия необходим после каждой загрузки или перезагрузки Vault.
Тем не менее, вскрытие не является частью обычного взаимодействия с Vault (как, например, чтение и запись значений), которое аутентифицируется токенами. На последнем этапе нужно создать токены доступа и политики для хранения секретных значений.