The dude/dude as a linux service
Содержание:
Notification tree structure
Device tree structure allows to create a logical child parent hierarchy in the
network, which later can be used for advanced notification delivering. Child — parent configuration can help you to avoid unnecessary notification message delivering.
In case when a network device A is located behind device B, and device A goes down, then The Dude would not be able to check both devices, and would mark these devices with status Down. The notification message would be delivered for each device.

To avoid such scenario, you can specify a parent device.

Now when the main device A goes down, The Dude will consider device B statuss as «unknown». This means that the notification message will be sent only about a device A.

Device tree structure will be shown under Devices => Tree tab.
RouterOS
The RouterOS tab shows devices that have been marked as RouterOS in the device settings. This tab is organized in the following subsections:
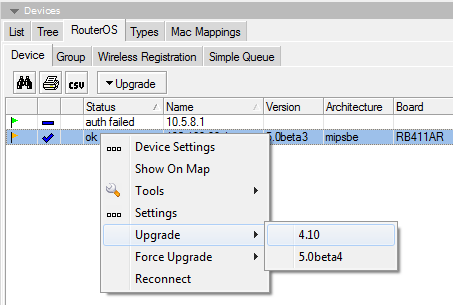
Device
Shows a list of RouterOS devices. The table includes additional information, authentication status, version, architecture, system hardware type, upgrade status and packages.
This pane is optimized for upgrading of RouterOS devices.
Upgrading RouterOS
- Upload RouterOS packages to the Dude Server. This can be done in the Files pane. Upload any types of packages and versions, The Dude can tell them apart
- Select the device you like to upgrade, and click the Upgrade button, or right-click the device and choose Upgrade
- The Dude will only show appropriate package types and versions in the Upgrade menu. Choose the preferred version to commence upgrade process
Force upgrade can be used if you have several builds of the same version and in which case Dude will think you already have upgraded.
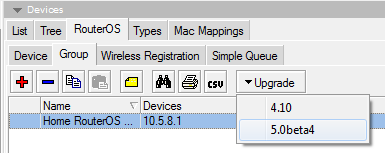
Group
It is possible to create Groups of RouterOS devices, to simplify the upgrade process. To avoid interruption of processes while one router is rebooted but others are still getting the package files, it is recommended to group devices by reachability or location.
That way, if uploading packages to 20 routers at the same time, the closest router will not be rebooted because of faster upload time, only to interrupt the rest of the 19 uploads.
To create a new RouterOS Device Group, click on the add button and select the RouterOS devices from the provided list.
Note: If there are no devices listed, make sure that your RouterOS devices are marked as RouterOS in the
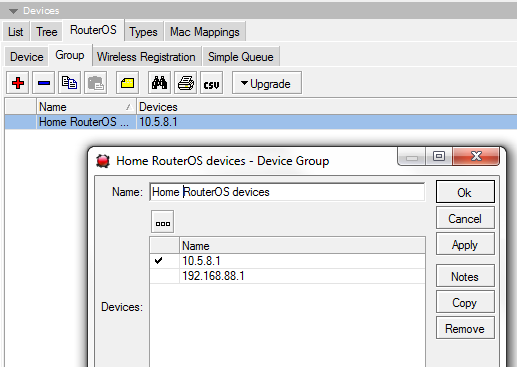
It is also possible to upgrade whole groups of devices by right click, or by selecting the particular group and then clicking the Upgrade button.
Note that The Dude will automatically choose the needed packages. The packages need to be in the Dude Files list. Of many versions are available, it will be shown as a choice.
Wireless Registration
The registration table shows all wireless devices that are connected to your RouterOS devices in a combined interface. The table shows the following information:
- Device — which device is the owner of the particular registration table entry
- Radio name — the name of the wireless device, as it was set in RouterOS wireless settings
- MAC — MAC address of the device that was connected to the particular Device
- AP — whether this device is a client or an AP
- WDS — whether WDS is used in this particular connection
- TX/RX Rate — Current datarate of the connection
- TX/RX Signal — Signal levels of the connection
- Comment — Comment
- Last IP — the last IP address which sent a packet to the device. Is not directly related to this entry, or the wireless connection

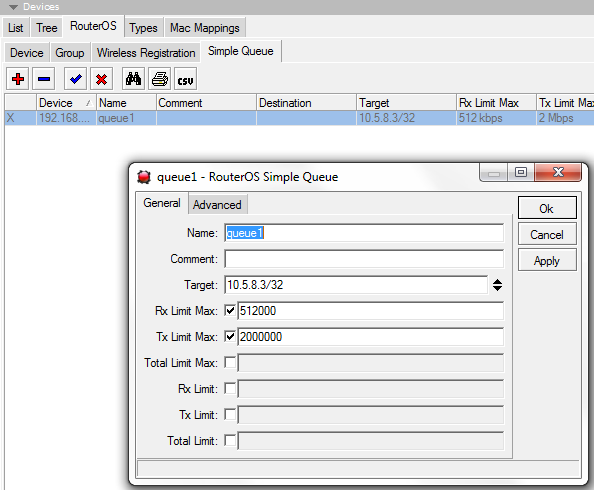
Simple Queue
Allows to view and edit simple queues in RouterOS. If your RouterOS devices contain simple queues, they will be displayed in this window. You can double-click a Queue and edit it’s basic values as seen in the image above. Clarification of the values can be read in the RouterOS .
Polling
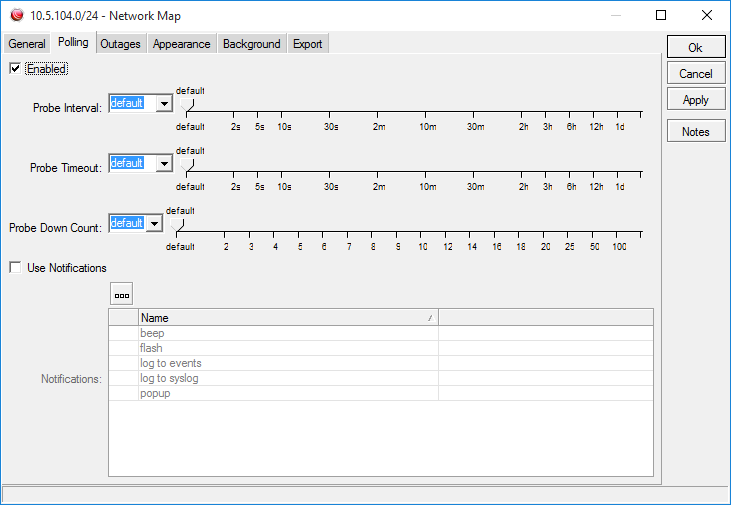
This tab allows you to configure polling times and timeouts specifically for this device. Device specific settings are always overriding general settings and map settings.

- Enabled — Whether to poll any services on this device
- Probe interval — How often should the services be polled, in seconds
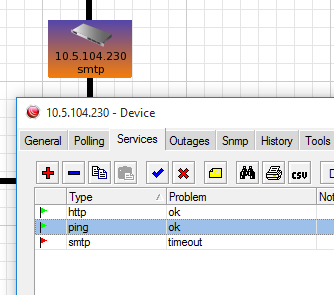
- Probe timeout — how much time should pass from start of a specific poll until the service is considered non responsive (timeout). When this state is reached, the device is still Green, but the individual Service will show Timeout and will turn Orange
- Probe down count — how many times should the poll fail until the service is considered down. When this state is reached, the Device icon will turn Orange, any specified Notifications will be run, and the individual Service will turn Red
- Use notifications — what action should The Dude take if one of the services reaches Probe down state. Notifications can be chosen from the predefined list, new notifications can be created in the Notifications pane, which is available in the main Menu pane, or in this same window by clicking the … button.
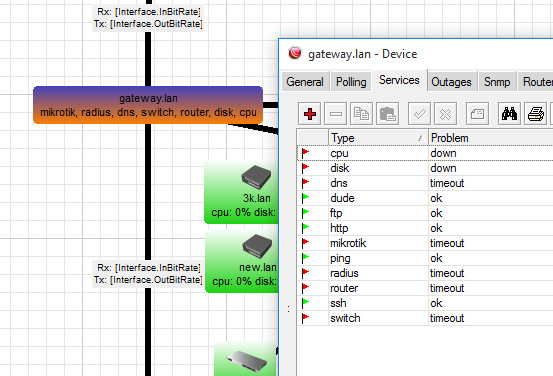
Example: In this case one service has reached «Probe down» state, as all the required polls ended with timeout. The service has turned red (down) but device icon is Orange, because other services are reachable.
Install Required Software
We are going to use Wine to run Dude windows executable (.exe) under Linux.
- Debian 6
It is already included in the official Debian repositories:
# apt-get install wine
- CentOS 5
You will need to add <RepoForge repository>:
# wget http://pkgs.repoforge.org/rpmforge-release/rpmforge-release-0.5.2-2.el5.rf.i386.rpm
# rpm -i rpmforge-release-0.5.2-2.el5.rf.i386.rpm
# yum update
Then install it just as any other package:
# yum install wine
Xvfb (X virtual framebuffer)
As you can imagine, we are going to need a GUI to install Dude. However, we usually don ‘t have one in server environments, unless
you have a desktop manager installed like Gnome, KDE, etc. I sometimes install fluxbox (a very small desktop environment) for
this purposes.
Well, this program will allow us to create a virtual (fake) X Server used to install Dude.
- Debian 6
# apt-get install xvfb
- CentOS 5
# yum install xorg-x11-server-Xvfb
X11VNC (X to VNC)
This will allow us to manage the virtual framebuffer display created with Xfvb from our desktop computer using VNC protocol.
- Debian 6
# apt-get install x11vnc
- CentOS 5
# yum install x11vnc
Settings
Polling
This tab allows you to configure polling times and timeouts specifically for this map. Map specific settings are always overriding general settings, but device specific settings take preference.
- Enabled — Whether to poll any services on this device
- Probe interval — How often should the services be polled, in seconds
- Probe timeout — how much time should pass from start of a specific poll until the service is considered non responsive (timeout). When this state is reached, the device is still Green, but the individual Service will show Timeout and will turn Orange
- Probe down count — how many times should the poll fail until the service is considered down. When this state is reached, the Device icon will turn Orange, any specified Notifications will be run, and the individual Service will turn Red
- Use notifications — what action should The Dude take if one of the services reaches Probe down state. Notifications can be chosen from the predefined list, new notifications can be created in the Notifications pane, which is available in the main Menu pane, or in this same window by clicking the … button.
Example: In this case several services has reached «Probe down» state, as all the required polls ended with timeout. The service has turned red (down) but device icon is Orange, because other services are reachable.
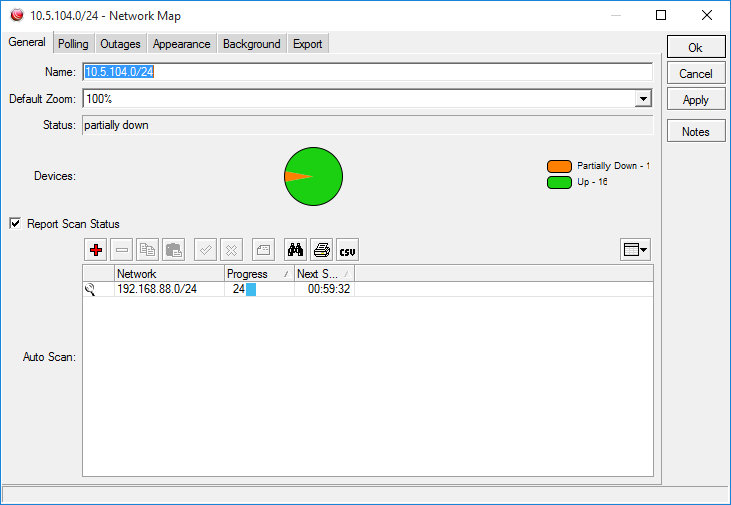
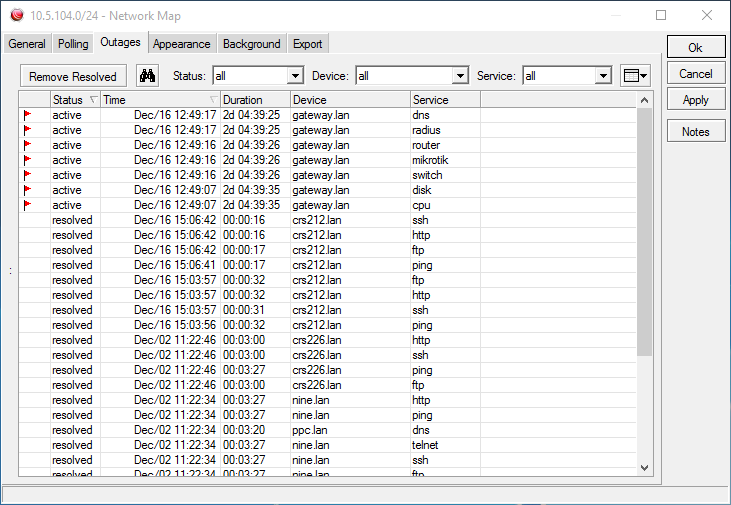
Shows current and past issues of the specific map. Can filter by Status, Device or Service.
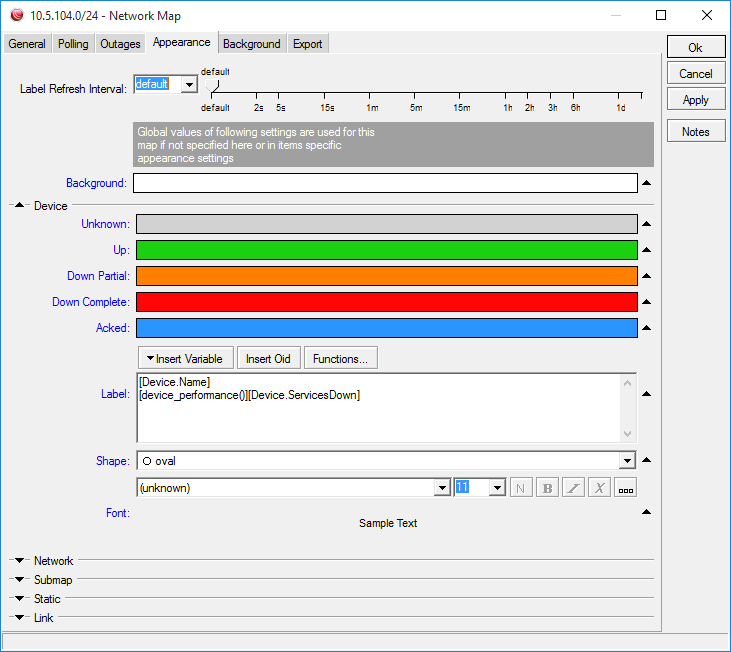
Appearance
In this tab you can configure colors and shapes of the map items, and the map itself.
Live data
It’s possible to display live data on each device label, these values can be collected using two methods: SNMP and RouterOS command output.
Example to get temperature from monitored device using a SNMP protocol, simply add this code to device => appearance => Label window:
If you want to get same value using a RouterOS command, use this code:
[ros_command(":put (.\" C\")")]
Codes can be combined with the custom text, for more informative look.
The result with a custom text will be displayed on the label:
Map specifics
Label refresh interval — How often should the labels be refreshed. Device settings take preference, if defaults used here, Global settings are used.
Background — Color of the map background of no image is used
Color and shape settings
You can configure the colors of various states for the following items: Devices, Networks, Submaps, Static items and Links
It’s also possible to choose the default shape for icons, and the thickness and type of link lines.
Background
This tab allows you to set an image as the map background. It’s possible to use scanned maps or screenshots of online maps for convenience.
It is possible to choose the scale of the image, and whether to repeat the image in x/y axis (tiling).
MAC mappings
This tab shows the MAC address and IP bindings that are learned from all your devices via SNMP and RouterOS ARP.
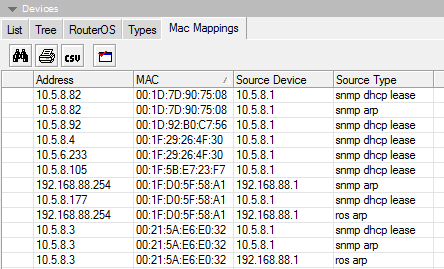
The Dude keeps a MAC — IP relations table internally, when it adds new devices. It also remembers where it got this information from. So if you enable MAC lookup in the device settings, the Dude will automatically update the device settings in case when something changes from the MAC mapping table.
See the Device settings page to see where to set up MAC lookup mode.
Basically this means that you can choose where the device is bound on the map — to a MAC address, or to an IP address. If you would replace the Ethernet card in this device, the MAC would change, but the IP would be the same. This setting decides how to treat such situation.
Подборки
Армейские ПесниКлассика пианиноМузыка из рекламыДетские песни из мультфильмовМузыка для аэробикиСборник песен 70х годовДля любимого человекаКлассика в современной обработкеКлубные миксы русских исполнителей3D ЗвукДальнобойщикиЗарубежный рэп для машиныТоповые Клубные ТрекиМощные БасыДискотека 2000Песни про папуХристианские ПесниЗимняя МузыкаМузыка Для МедитацииРусские Хиты 90ХГрустная МузыкаRomantic SaxophoneТанцевальный хип-хопНовогодние песниЗарубежные хиты 80 — 90Песни про покемонаРомантическая МузыкаМотивация для тренировокМузыка для сексаМузыка в машинуДля силовых тренировокПремия «Grammy 2017»
А помнишь, как всё начиналось
Стартовое видео было снято «по приколу» в 2009 году. Компания друзей била по баскетбольному кольцу на заднем дворе ранчо Тайлера Тони и разыгрывала между собой сэндвичи. Эти-то броски и попали сначала в камеру, а затем в ютуб. За неделю ролик набрал 200 000 просмотров, что, конечно, не могло не вдохновить его создателей. Сейчас у видео под названием Backyard Edition более 30 миллионов просмотров, и надо полагать, это ещё не предел.
Почти сразу Dude Perfect пообещали с каждых 100 000 просмотров делать благотворительные отчисления в организацию Compassion International, помогающую развиваться детям, которые растут в бедности. После этого с ними связался спортивно-новостной журнал E:60 и организовал съёмки на стадионе Kyle Field: Тони бросал баскетбольный мяч с 3-го яруса стадиона, и тот падал в кольцо быстрее чем за 3,9 секунды. А в копилку Dude Perfect таким образом упал первый мировой рекорд.
Реклама брендов в видео: RUFFLES; Dude Perfect 2
Вскоре команда представила публике свой талисман – панду, сопровождавшую ребят ещё во времена школьных соревнований. А также подписала контракт с агентством Whistle Sports и наняла профессиональных операторов и специалистов по монтажу. Whistle Sports, кстати, хоть и работает с Dude Perfect на протяжении долгих лет, однако проектом не владеет и даже не имеет эксклюзивных прав: предложения по съёмкам, в частности рекламным, можно подать напрямую Джеффу Тони, отцу одного из участников и по совместительству бизнес-менеджеру Dude Perfect.
RouterOS
This Tab is specific to RouterOS devices and allows you to configure RouterOS basic settings. Unlike the SNMP tab, this tab allows editing of settings, if the username and password were correcly provided in the General tab. This tab is only available if the device was marked as RouterOS in the General tab.

Allows configuration of the following settings:
- Interface
- IP
- Route
- ARP
- Package
- File
- Neighbor
- Registration table
- Simple Queue
- DHCP lease
See the respective RouterOS documentation sections to see how to configure these items. The configuration is just like in Winbox, in some cases more simplified (for example for Simple Queue).
Tools
Allows you to configure specific Tools to be available for this certain device, in addition to the default tools (FTP, Telnet, Winbox etc.) Once configured, the new tools will be available in the Map (Right click device) or by opening the Device settings in the Tools button.
Can be useful for executing custom programs and passing them variables, which can be practically anything the Dude knows about the device.
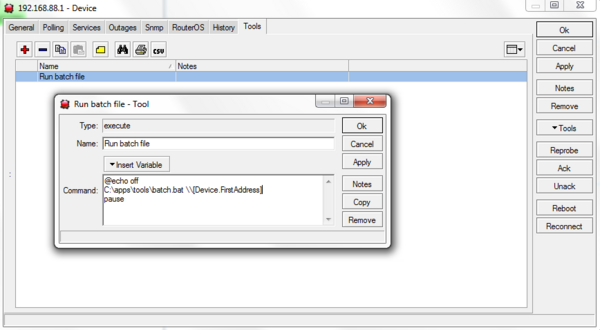
After you have configured the new tool in the Device specific settings window, the new Tool will become available inside the Device settings window «Tools» button, and also upon right click on the device. Only this specific device will have this tool available, if it was added in the device settings window. To add tools available for all devices, use the Tools Pane, available from the Main Menu pane.
Setting up the Dude Service
Create the file /etc/init.d/dude:
#!/bin/bash

### BEGIN INIT INFO
# Provides: dude
# Required-Start: $remote_fs $syslog
# Required-Stop: $remote_fs $syslog
# Default-Start: 2 3 4 5
# Default-Stop:
# Short-Description: Dude Server
### END INIT INFO

action=${1}

# ----------------------------------------------
# User Options
# ----------------------------------------------
xvfb_pidfile='/var/run/dude-xvfb.pid'
wine_pidfile='/var/run/dude-wine.pid'
virtual_display=':1'
dude_path='/srv/dude'
# ----------------------------------------------

export DISPLAY=$virtual_display
export WINEPREFIX=$dude_path

start ()
{
	echo -n 'Starting Dude virtual display: '
	Xvfb $virtual_display &> /dev/null &
	echo $! > $xvfb_pidfile
	echo 'ok'
	echo -n 'Starting Dude Server: '
	sleep 5
	wine 'c:\program files\dude\dude.exe' --server &> /dev/null &
	echo $! > $wine_pidfile
	echo 'ok'
}

stop ()
{
	echo -n 'Stopping Dude Server: '
	kill $(cat $wine_pidfile)
	rm -f $wine_pidfile
	sleep 5
	echo 'ok'
	echo -n 'Stopping Dude virtual display: '
	kill $(cat $xvfb_pidfile)
	rm -f $xvfb_pidfile
	echo 'ok'
}

case "$action" in
	start)
		start
	;;

	stop)
		stop
	;;

	*)
		echo "Usage: $0 {start|stop}"
	;;
esac

# -----------------------------------------------------------------------
Enable the service:
insserv dude
CentOS 5
Create the file /etc/init.d/dude:
#!/bin/bash

# chkconfig: - 50 20
# description: Dude Server

# processname: dude

action=${1}

. /etc/rc.d/init.d/functions

# ----------------------------------------------
# User Options
# ----------------------------------------------
xvfb_pidfile='/var/run/dude-xvfb.pid'
wine_pidfile='/var/run/dude-wine.pid'
virtual_display=':1'
dude_path='/srv/dude'
# ----------------------------------------------

export DISPLAY=$virtual_display
export WINEPREFIX=$dude_path

start ()
{
	echo -n 'Starting Dude virtual display:'
	Xvfb $virtual_display &> /dev/null &
	echo $! > $xvfb_pidfile
	success
	echo
	echo -n 'Starting Dude Server:'
	sleep 5
	wine 'c:\program files\dude\dude.exe' --server &> /dev/null &
	echo $! > $wine_pidfile
	success
	touch /var/lock/subsys/dude
	echo
}

stop ()
{
	echo -n 'Stopping Dude Server:'
	kill $(cat $wine_pidfile)
	rm -f $wine_pidfile
	sleep 5
	success
	echo
	echo -n 'Stopping Dude virtual display:'
	kill $(cat $xvfb_pidfile)
	rm -f $xvfb_pidfile
	success
	rm -f /var/lock/subsys/dude
	echo
}

case "$action" in
	start)
		start
	;;

	stop)
		stop
	;;

	*)
		echo "Usage: $0 {start|stop}"
	;;
esac

# -----------------------------------------------------------------------
Enable the service:
General
This window allows you to configure the most important settings of the device:
- Name — any name, for example Our main E-mail server
- Addresses — the IP addresses of the device. You can enter one, or use the arrows to add more fields
- DNS names — DNS names of the device, if any
- DNS lookup — How to perform automatic DNS lookup if needed
- DNS lookup interval — How often to check for DNS name changes
- MAC addresses — MAC address of the device
- MAC lookup — How to perform MAC address lookup if needed. See more about this in the .
- Type — selects what icon to use on the map. Some device (generic) is used by default
- Parents — Which device is the hierarchical parent of this one, builds reachability dependencies to avoid multiple notifications in case parent device fails (in which case child devices are also unreachable)
- Custom Fields — Any data can be used in the custom fields, like address, coordinates or contact info
- Agent — Agent to be used to reach and monitor this particular device. Agents are other Dude servers that have access to networks the current server can’t reach.
- SNMP profile — SNMP profile to be used for this device. Default selection between SNMP1 and 2, can add SNMPv3 by opening the Edit window.
- Username and Password — How to access the device from within the Tools menu (Winbox, Telnet, etc)
- Secure mode — Whether to use TLS secure connection for Winbox
- RouterOS — Whether to show RouterOS specific menus
- Dude server — If it’s another Dude server that could be used as an agent. Devices marked as Dude Servers also have a Dude tab in their settings, where you can directly view their maps, without disconnecting from the currently opened server.
Device specific actions
- Ack — This button acknowledges that a problem exists, and an administrator is working on it. This will stop any notifications from being sent. The device icon will turn Blue
- Unack — This button removes previously set Ack and reprobes the device, to check if the solution was effective. If the service is still down, the Device icon will again turn Red.
- Reprobe — Manually run poll for all the services sooner than the Probe Interval.
- Note — Possibility to add comments about the device
- Reconnect — For RouterOS devices, it’s possible to reconnect to reload settings
- Reboot — restarts the device physically
Adding new probes
There are several probe types, they are:
- DNS — Sends DNS resolve request with specified name to resolve, and optionally checks if response matches the specified IP addresses (at least one of them)
- Function — Performs custom functions to decide if service is up. If the device is up, can graph data of another function
- ICMP — Sends ICMP echo requests (pings) of specified packet size and TTL. Can try a number of times, and specify retry interval.
- Logic — Logic probe invokes other probes and performs logic operations based on results
- Random — Randomly decides if service is up, or not. Can specify up chance. Useful for testing.
- SNMP — Will query specified OID and service will be up, if a response is received and result of comparison is a logical true
- TCP — Generic TCP probe, can be used for various protocols. Can send and wait for specific responses
- UDP — Generic UDP probe, can be used for various protocols. Can send and wait for specific responses

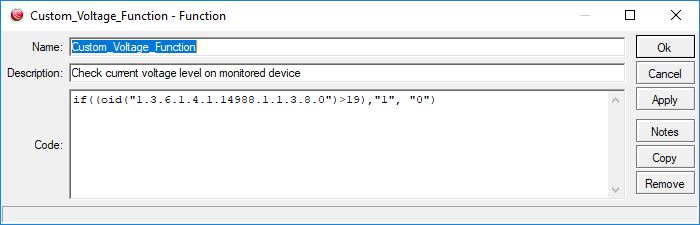
Custom function probe
This probe will check the voltage level of monitored device using an SNMP protocol, and trigger alert if voltage level drops below 20 V. To achieve this, follow these 2 steps:
1. Create a new function, which will check the current voltage level, and return 0 if the value drops below 20 V. Custom_Voltage_Function code example:
2. Create a new probe using this function, where the service will be considered up if the returned value is true (1):

Available:
The error will be trigered if the value is not empty:
Error:
The probe is ready, and can be used for device monitoring:

If you want to use a value from the probe to draw charts, just replace value field code with:
HTTP GET request probe
Dude server can be used to monitor the content of host HTTP responses, to determine if the specified server is responding required content:
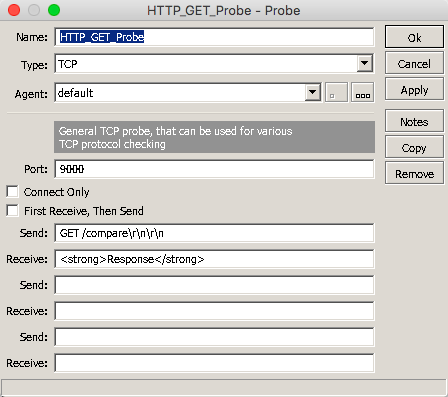
In this example, the probe will be sent to <MONITORED DEVICE>, using port 9000, and sending GET request on route «/compare». The probe will be considered successful only if response content will contain specified HTTP code, e.g.:
<strong>Response</strong>
If The Dude will not receive this content, the probe will be marked as down.
HTTP HEAD request probe
To reduce the load on the server, HEAD request can be used to probe HTML server, and compare response status code:
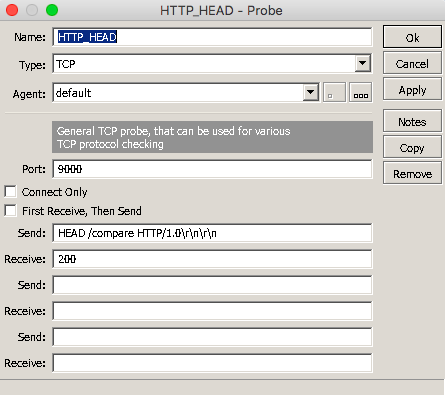
In this example, the probe will be sent to <MONITORED DEVICE>, using port 9000, and sending HEAD request on route «/compare».
The probe will be considered successful only when response header will contain specified status code: 200, if The Dude will receive any other code or timeout, the probe will be marked as down
Tools
Allows you to configure specific Tools to be available for this certain device, in addition to the default tools (FTP, Telnet, Winbox etc.) Once configured, the new tools will be available in the Map (Right click device) or by opening the Device settings in the Tools button.
Can be useful for executing custom programs and passing them variables, which can be practically anything the Dude knows about the device.

After you have configured the new tool in the Device specific settings window, the new Tool will become available inside the Device settings window «Tools» button, and also upon right click on the device. Only this specific device will have this tool available, if it was added in the device settings window. To add tools available for all devices, use the Tools Pane, available from the Main Menu pane.
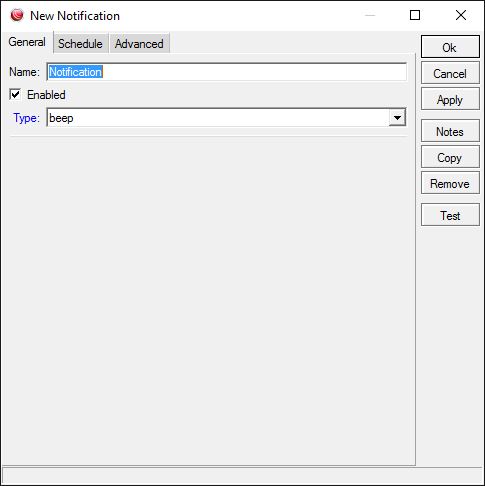
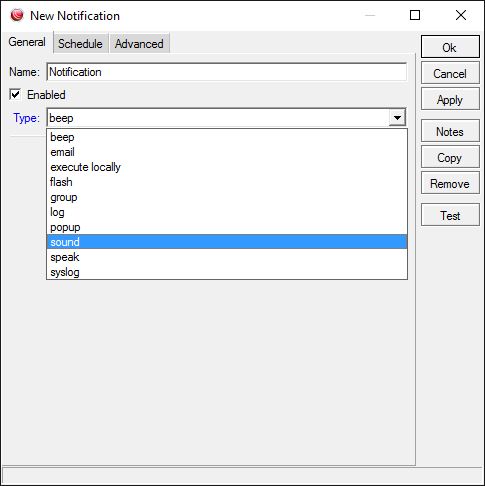
Notification types
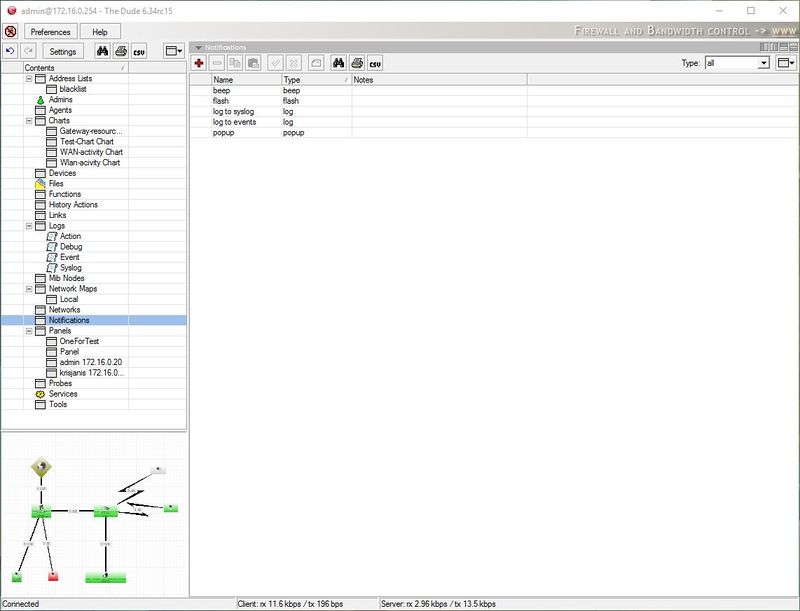
The Notifications pane configures any actions that can be taken when a device status changes. The predefined Notifications are the following:
- Beep — Makes a beeping sound from the PC speaker of the server PC
- Flash — Flashes the Dude taskbar menu
- Log to Events — Saves information to local Event log
- Log to Syslog — Saves information to Syslog
- Popup — Opens a small notification window
You can also add new Notifications, more types are available in the add dialog.
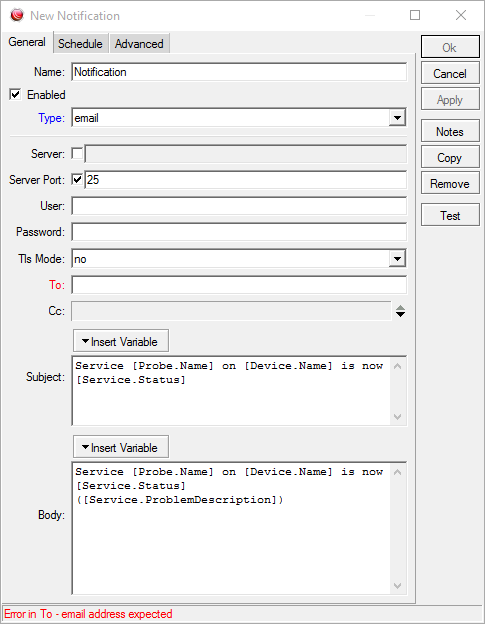
- Email — Sends email, need to specify Server address. Authentication not supported.
- Execute locally — Run command on the local Windows machine (where Dude viewer runs), can pass variables
- Execute on server — Executes ROS script on The Dude server host when notification is triggered. In «Command:» field you need to write script in RouterOS scripting syntax.
- Sound — Plays sound. Sound files can be uploaded and chosen here
- Group — Executes a group of actions
- Speak — Uses Windows speach ability to say the message in a computerised voice
- Log — Saves to local Dude Log file
- Syslog — Saves to remote Syslog server. Need to specity Syslog address
Each notification can be configured to run only at certain times of day. For example you might not want to play the siren sound at night, if your service is not that critical.
It is also possible to configure how many times a notification should be run, at what intervals and at what specific status changes.

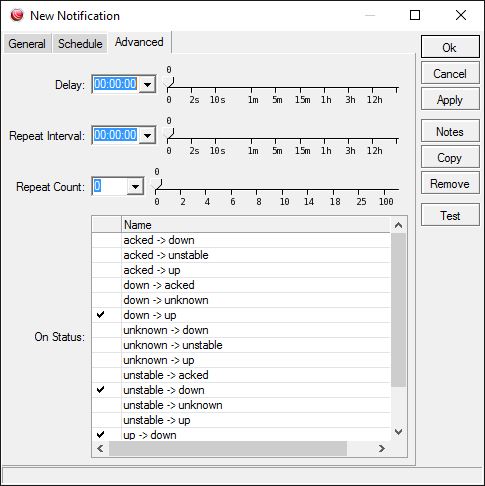
Note: If you would like different notification behaviors for different groups, create different notifications. For example, you might have Siren for Servers and Siren for Printers and one of them would repeat 3 times and the other would only run during daytime
On a device where you want to use this notification, enable it in Polling tab notifications section.

Types
It is possible to assign icons to your devices, based on the device type. Device types can be configured in this menu.
Each device can have required identification patterns, based on services The Dude discovered running on it. For example the predefined requirement for a «Mail server» device type is a running SMTP service. You can change the required services for existing devices, or add new devices with new requirements. These predefined requirements will be used when using the Device discovery
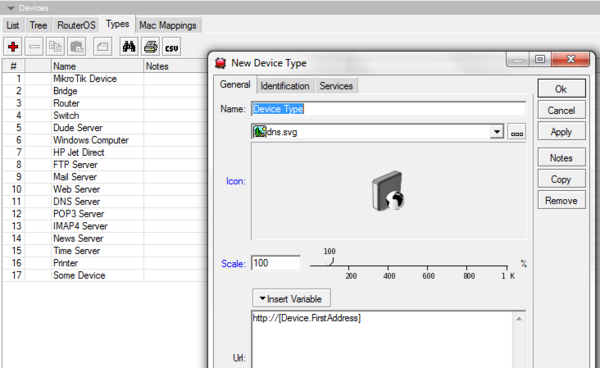
Adding a new Device Type
By clicking the add button in the Types tab of the Devices pane you can add new Device types. The add dialog contains the following fields:
- Name — the name of the new type
- Icon — the image of the device icon. Shows dropdown list from the Files section. Also shows icon preview.
- Scale — The icon for this particular type can be defined as smaller or larger than normal. Default value is 100%
- URL — The link to the HTTP webpage of this particular device, is used in the Web tool in the device right-click Tools menu. This setting allows any attributes and variables to be used, for example:
http:///cfg?user=&password=&process=login
In the Identification and Services tabs, you can set the Required, Allowed and Ignored services for this type of device. These settings will be used by default when adding a new device of this type, and when using the Device discovery
The Tools tab allows you to define device type specific
System requirements for server package
RouterOS:
v6.34rc13 or newer
Hardware:
- TILE devices;
- ARM devices;
- MMIPS devices;
- RouterOS x86 installations;
- RouterOS CHR environment
Note: Use of dude server package is not supported on other hardware.
Note: For models with 16MB on-board storage use of USB/μSD storage is required to run The Dude server on the device.
Note: Preferably you should use industrial grade mircoSD cards and USB drives as they have longer life cycle under applications that can write data to flash more frequently as The Dude server database in this case. For large network monitoring it is suggested to us highly reliable HDD/SSD drives.
Services
In this tab it is possible to configure services that should be monitored for this specific device. You can also automatically discover available services.

To add a new service, use the add item (plus) icon. To discover all services that respond to The Dude, use the Discover button.
Each service can have specific settings, which override the device settings, the map settings and the general settings. Double click to edit a certain service, or click Add item to add new service and set all the settings in the Add dialog.
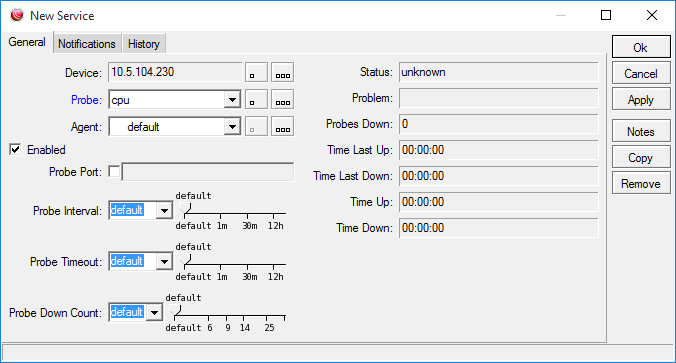
It is also possible to specifically set notification types for the individual service of the individual device in this window.
In the Outages tab you can see current and previous outages, their start times and durations. Note, that if the device is Acked, the Outage will still be visible as Active