Визуальные эффекты для видеороликов — resolume — arena 6.0.7 x64
Содержание:
- Troubleshooting
- Layer Transition
- Multiple computers synced via external protocol
- Stuff Happens
- Effect Clips
- Normal Quality vs High Quality
- Clip Properties
- Unregister
- Skype / Google Meet / Jitsi / Slack / Zoom(Windows only)
- Adding and Removing Layers
- Playback
- Routing
- Shortcut Target
- Sending OSC to Resolume
- Offline Registration
- Shortcut Groups
- One License, Many Machines
- Beats, Bars and Phrases
- Syncing with a DJ
- MIDI Preferences
Troubleshooting
Arena has a built-in Art-Net monitor. If you’re familiar with the Artnetominator, you’ll recognize its interface.
You access the monitor by folding it open with the arrow in the top right of the DMX Preference.
You will then see a list of 16 Subnets with 16 Universes each. This list will show you all activity on the currently selected adapter. Subnets with activity will show up in dark green. You can then select that Subnet to see the active Universes on that Subnet. These will also show up in dark green. In turn, you can select the Universe to see the data per channel. If you want to get right down to it, you can then see the history for each channel.

So in this example screenshot, we know that there is activity on Subnet 0 and 2. By clicking on Subnet 0, we see that there is data being sent on Universe 0, 2 and 4. By clicking on Subnet 2, we could see which Universes are being sent on that Subnet.
If there is no activity at all anywhere, there is something going wrong with your network setup or the source of the Art-Net.
If there is activity here, but Resolume is not responding, something is going wrong in Resolume. In that case, you’ll want to make sure your Lumiverses are set to the correct Subnet and Universe, and that you’ve configured your shortcuts correctly.
Layer Transition
Layer Transitions will let you add a transition when you trigger a new clip in a layer. This way you can smoothly blend from the old playing clip to the new one.
The auto layer transitions can be found by choosing View > Show Layer Transition Controls, and they will pop up to the left of the clip thumbnails.
Once visible, simply fade up the vertical slider to set a transition time between 0 and 10 seconds. If you like numbers as much as I do, you can also set the transition time precisely down to the millisecond in the Layer panel.
The transition mode will default to Alpha, which is a simple crossfade. If that’s too basic for you, you can choose all of the available blends and transitions instead. ‘Twitch’ is one of my favourites. Also, ‘Cube’ is amazing just for sheer corniness.
If you really can’t decide on a favourite transition, there is also a random option, giving you a different transition every time you trigger a new clip.
Multiple computers synced via external protocol
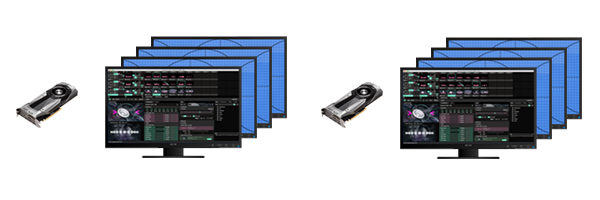
This can be a great solution, especially when scalability is required.
The downside is that this requires considerable tinkering, and is best achieved using 3rd party control tools. It’s not an «out-of-the-box» solution.
Keep in mind that using protocols such as SMPTE Timecode or OSC to sync the playhead of a clip on each computer, may not necessarily result in frame synced combined output. Each computer is running its own processes, so it maybe slightly quicker or slower in decoding the sync signal, fetching the pixel data from disk, or rendering and outputting the final result.
Especially when edge blending two computers together, or when seamlessly stitching them together in a single LED wall, there will be noticeable difference between frames.
Stuff Happens
We’re all humans dealing with technology. Knowing humans and knowing technology, one of the two will slip up eventually. Maybe both. Maybe you accidentally format the dongle. Maybe it starts making weird noises and smoke starts coming out of it. In short, stuff may happen. When stuff happens, it’s good to know we got your back.
Erase or Format
Should your dongle accidentally get erased or formatted, after you’ve already transferred the license on to it, don’t worry.
First, make sure that the dongle is formatted with MBR partition table, and FAT format, so it will work on both Mac and PC.
Then connect the computer to the Internet and start Resolume. Resolume will recognise the dongle, look up the license that’s associated with it and make everything right again.
After this, your dongle will be good as new and you can live Internet free again.
Damage
Should the dongle get damaged, have a technical malfunction or otherwise become unusable, please send it back to us. We’ll be happy to replace it, no questions asked. We really don’t need to know where it’s been. Contact us for the best way to send a return.
Effect Clips
Effects can also be added to an empty clip. When you do this, you will create an Effect Clip. If you’re used to working with Photoshop or After Effects, you’ll know this feature as Adjustment Layers.
Any effects applied on an Effect Clip will be applied to all the clips playing in the layers underneath it. This way you can very quickly create a sequence of different looks and effects, while still being able to swap out the footage on the fly.
Even better, this will allow you to assign MIDI or keyboard triggers to effects, or even fade from one effect to the other using the layer transitions.
Like Sources, Effect Clips can be assigned a duration as well, so you can use them with the Auto Pilot too.
Normal Quality vs High Quality
We advise to do all encoding at Normal Quality. Only if you notice a lot of banding on gradients, should you use the High Quality setting.
Expect file size to double when encoding to DXV3 HQ! With great power comes great responsibility, so don’t use High Quality as your default render setting. You’ll run out of disk space real quick. Only use it on files that have visible artefacts when you render them to Normal Quality.
There is no need to re-encode your entire DXV2 library. Especially do not re-encode your DXV2 files to DXV3 High Quality. Because you are rendering from a DXV2 source, any image artefacts are already rendered into the file. Your image quality will not be improved at all, the only thing you’ll get is bigger files that look exactly the same. And that’s not what you want.
Clip Properties
The clip properties give you important info about the clip. Geeky stuff like the codec and fps, but also useful stuff like the length and default BPM.
When you toggle down the individual audio and video properties, you get access to some more finetuning options.
Audio Properties
The audio properties are only visible if your clip has an audio track. Duh.

Use the X button to delete the audio track. You can use this to remove the audio track from a video if you do not need it.
Using the audio properties, you can set the volume for this clip individually. This is useful for balancing the volume of clips that will play on a layer. Also, you can pan this clip individually.
Video Properties

Tip! Drag a video clip from the browser over the blue video area. This allows you to replace the content, but keep any effects and parameter changes you had applied to the original!
Use this bad boy to resize the clip to the size of the current composition. This is great when your content isn’t at the right size already.
Clicking this multiple times will cycle through a few options available for scaling.
- Fill. This will make sure the clip fills the entire composition, while maintaining its aspect ratio. This will result in the sides or the top and bottom of the clip being cropped off.
- Fit. This will make sure your clip is completely visible, while maintaining its aspect ratio. This will result in black borders being visible on the sides or top and bottom.
- Stretch. This stretches the clip to the composition width and height, distorting the clip when necessary.
- Original. This returns the clip to its original size.
Click this to clear the video from the clip, leaving the audio intact.
Use the RGB toggles to subtract colour channels from the clip. Using combinations of these, you can quickly colorise a clip to the three primary Red, Green and Blue, as well as the secondary colours Cyan, Magenta and Yellow.
The A toggle can be used to disable transparency in a clip. This will only be available if your clip has an alpha channel in it.
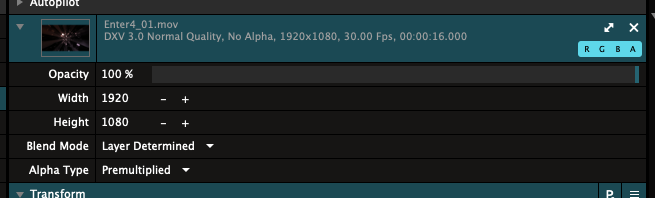
When you fold open the extended properties, you get access to Opacity, Width & Height, Blend Mode and Alpha Channel interpretation of a clip.
Blend Mode
This will let you set which blend mode this clip uses when it’s playing in a layer. This will override whatever blend mode you have selected on the layer, for as long as this clip is playing.
Alpha Type
Here you can tell how to interpret the alpha channel information in your clip. Resolume will default to «Premultiplied». This is the default setting that After Effects uses for exports with an alpha channel. So most of the time, you don’t even have to worry about this.
Are you seeing a weird halo around your edges? Then you probably want to switch to «Straight».
Unregister
When you need to re-install your operating system or when you have bought a new computer, make sure you remove your registration.
To remove your Resolume registration from a computer, go to the Register tab in the Preferences and click on the «Unregister» button. This will remove your serial number from the computer.
Sometimes computers get stolen or damaged. Also, we’re all humans and sometimes we tend to forget things. In short, stuff happens.
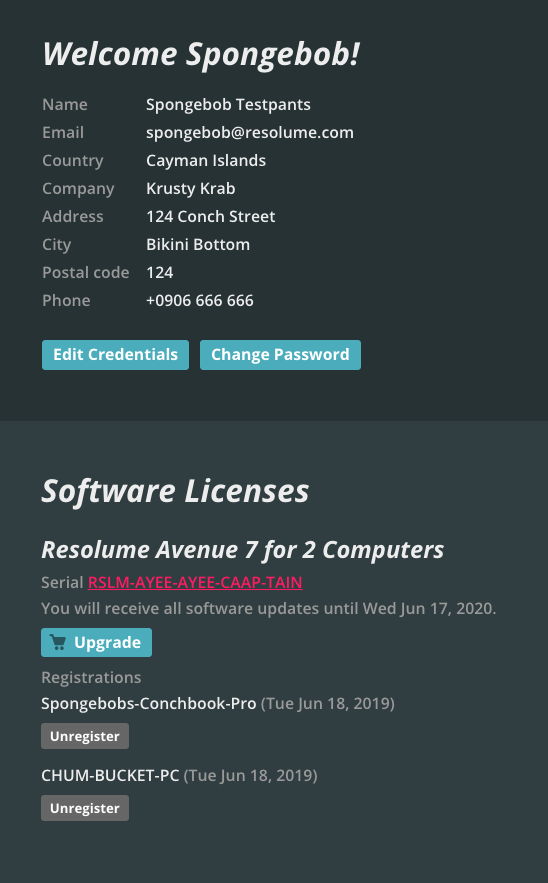
When stuff happens, don’t worry. You can still use Resolume. Just log in to your account in the shop.
You will see which computers your license is being used on. Simply hit the Unregister button beneath the computer you want gone, and poof, it’s gone.
If you need all those computers to stay licensed after all, you can also upgrade your license to more computers by hitting Upgrade.
Skype / Google Meet / Jitsi / Slack / Zoom(Windows only)
Why not make your conference calls a hell of a lot more funky with some sweet Resolume action? Most of these applications will not accept a NDI input, they only want webcams as inputs, so picky! Now we’ll have to cheat a little.
The solution is to create a virtual cam. For this we’ll use the Input. This will make your computer think that the Virtual Input is a webcam. Download and install the virtual input and run the Virtual Input application.
We found that desktop applications are more flexible with their inputs than their browser counterparts. So use the desktop version if possible.
Make sure your conference software is not running yet.
Next, open up Resolume and send your output over NDI.
Right click the NDI Virtual Input in your toolbar and select Resolume.
Now open your conference software of choice and find the setting where you can pick your camera and select NewTek NDI Video
Adding and Removing Layers
At this point, adding and removing layers to and from a group is very easy. You can simply drag them by the layer name handle, and either drop em in, or throw them out.
Keep in mind! A group can never be empty, as this would mean the group disappears and you could lose all its effects and settings. So when you drag the last layer out of the group, Resolume will create a new empty layer in its place.
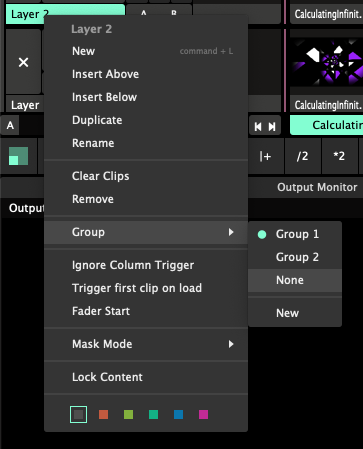 If you’re more of a menu type of person, you can also use the layer menu to move layers out of groups.
Group x — If another group is available, selecting it will move the selected layer there directly.
None — This will remove the selected layer from the group.
New — This will create a new group and put the selected layer in it.
You can create as many groups as you like.
Playback
Resolume provides loads of ways to control how videos behave.
The Transport section of the Clip tab is where we can change the speed and direction that clips play at.
Timeline
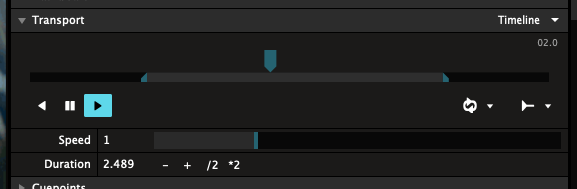
The first thing we will look at in the Transport section is the timeline itself. We can manipulate this directly by grabbing the blue pointer that moves along it and sliding it around. This gives an effect similar to DJ scratching.
In and Out Points
The smaller bar below the timeline is also useful. Grab and move the small blue pointers at its end to set the In and Out points of the clip. This is great for selecting parts of longer clips to use.
Tip! After setting in and out points, hold down Shift while dragging the range. This will let you move the range around, while keeping the length the same.
Time / Time Remaining
In the top right, you can see the clip’s current time. Clicking on this number will switch to show you the remaining time.
Speed
You have direct control over the Speed of the clip. You use the Speed slider to make the clip go faster or slower. This is great for ramping the playback speed up and down during your live show.
The Speed slider has a non-linear response. This is a fancy way of saying that you have more precision in the values between 0 and 2, where you most likely want to adjust the values more accurately. When you go towards 10, it ramps up more quickly because that’s when you probably want things to flyyyyyyy!
Duration
You can also get precise by setting the exact Duration of how long a clip should play. Let’s say you need a clip to last exactly 8 seconds. Simply enter 8 as the duration and Resolume will do the math for you and adjust the playback speed so the clip will last exactly 8 seconds. Regardless of how long or short it was originally.
Note that this doesn’t affect the Speed slider! So you still have the same range to improvise live over the new duration.
Gotcha! Note that when shortening the clip via the In and Out points, the Duration will be adjusted to match the new length. Vice versa, when you change the Duration directly, the In and Out points will not be adjusted. That might sound weird when you first read this. Just use it a few times, and you’ll see it makes the most sense from a practical point of view.
BPM Sync
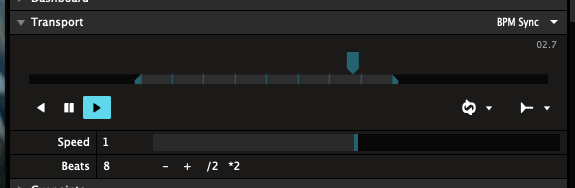
There is another very powerful way to control the speed of a clip. You can switch to it by the drop down at the top right of the Transport section. It’s called BPM Sync and it’s awesome.
By switching the transport mode to BPM Sync, Resolume will use the global BPM to control the speed of the clip. You can read all about BPM in its own chapter. For now, let’s assume you have Resolume running at the perfect BPM, perfectly in time with the DJ. Now all clips that have their transport mode set to BPM Sync will play at a speed that synchronises them with that BPM.
In order for BPM Synced clips to work right, you will need to set the number of beats that the clip spans in the Transport section. By default, Resolume will guess the right amount of beats for you based on the length of the clip. It will guess to the nearest power of 2, so it will set the clip to 1, 2, 4, 8, 16, 32, 64, 128 etc beats for you. Of course, you can click the number and change it, use the + and — buttons or use the *2 and /2 buttons to quickly multiply or divide the value by 2.
Speed

When in BPM Sync mode, you still have access to a Speed modifier. This is so you can ramp a clip up and down smoothly just like when set to Timeline. The only difference is that the BPM Sync Speed is quantised to multiples of 2. So you can ramp a clip from 0, 1/8, 1/4, 1/2, 1, 2, 4, 8 to 16 times as fast.
Because you got to stay locked to that beat, yo.
On Arena, videos can also be set to SMPTE or Denon. Those playmodes are useful for syncing to a DJ set or show moment. You can dive down the SMPTE rabbit hole here, while you can read more about Denon here.
Routing
The Video Router allows you take the output of a single layer or the layers below the router into another layer. On Arena, groups can also be used as input.
This can be useful for complex projection mapping setups or to simply display the same clip simultaneously with different effects.
The preview window output can be selected as an input as well.
Input Opacity / Bypass
The toggles for Input Bypass/Solo and Input Opacity are only functional when a specific layer or group is selected as input. They serve as a pre-fader / post fader switch.
For instance, when Input Opacity is disabled, the router will continue to show the input layer, even when the input layer’s opacity is faded down. This is useful to avoid rendering another pass of a layer on top of itself.
Shortcut Target
When you assign shortcuts to clip triggers or controls on the layer, clip or group panels, you’ll see this target option. The Target option lets Resolume know exactly how you want to apply the shortcut. There are three modes:
By Position
This target just applies the shortcut to whatever order the clips or layers are in. This is the default mode for shortcuts on the layer and group panels.
For instance, shortcuts for Layer Opacity default to By Position. Because you probably always want your first fader on your MIDI controller to control the first layer in your composition, regardless of how you re-order the layers afterwards.
This Clip, Layer or Group
This target applies the shortcut to this specific clip, layer or group, regardless of where you move it.
This way, you can assign a shortcut to always trigger a specific clip, like a color flash. It doesn’t matter whether that clip is in layer 1, column 1 or layer 27, column 95. It will always be triggered by that specific shortcut.
Beware! When you delete that specific clip, layer or group, of course the shortcut disappears with it!
Selected Clip, Layer or Group
This target applies the shortcut to whatever clip, layer or group is currently selected. This will always be the clip, layer or group that is currently shown in its respective panel. This is the default target for any shortcuts you apply on the clip panel.
Wait? What?
«Come on, Resolume! Why you gotta make this so difficult? I just want to set things up and be done with it. Ain’t nobody got time for this! Just tell me what to do already!»
If you’re unsure about what any of this means, just go with the ‘By Position’ target for all your shortcuts. It makes the most sense when working with a fixed controller layout.
The ‘Selected’ target is very powerful to optimise controller real estate, but you need to be aware of what you’re doing.
The ‘This’ target is usually only necessary to control a very specific thing on one particular show only.
Sending OSC to Resolume
Okay, so by now you probably understood the concept of how OSC works in Resolume. But how do you actually send OSC?
Good question! There are a looooot of applications that can send OSC.
A few of the more famous ones are TouchOSC and Lemur, that are both available for iOS and Android devices. Both TouchOSC and Lemur let you create your own custom interfaces, making them an ideal pairing with Resolume’s fixed addresses. It means anyone can load up an interface you’ve created, and it will work out of the box.
On OSX, there is the amazing Vezer. Vezer is wicked because it lets you create complex keyframe animation, which can then in turn be used to control every item of Resolume’s UI.
And Resolume power user Zoltan Palffy has created his own application which adds functionality to make Resolume more suited for theater show control.
OSC really shines when used in combination with a creative programming language. This will let you create your own logic or extract data from various processes, and pipe it to Resolume.
Processing, openFrameworks, Arduino, TouchDesigner, JUCE, Max/MSP and tons of others all have libraries to support sending and receiving OSC messages. You can use Max4Live to send OSC from Ableton Live. There’s even javascript libraries to send OSC right from the browser.
The options are pretty much endless. To get you started, here are two examples of how you could use OSC in TouchOSC and Processing.
Making Connections
OSC messages get sent over a network. If you want to use OSC between two computers, you first have to make sure they are connected to the same network. OSC messages are pretty small, so if you’re not sending 1000s of messages per second, a WIFI network can be fine.
Tip! The strength of a WIFI network goes down considerably when 5000 people start snapchatting during a party.
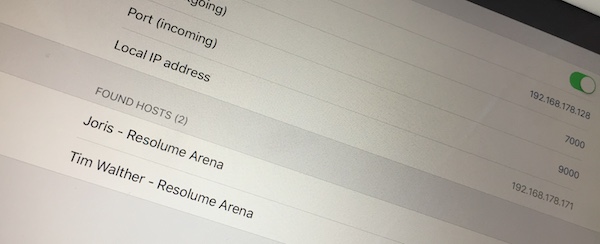 If you want to send OSC from one computer to another, the sender first needs to know where to send its messages. When you enable OSC input in Resolume, it will let other computers know where they can send their messages. It does this via a protocol called ZeroConf, also known as Bonjour on a Mac. If your sender application has support for this, Resolume will pop right up as a destination.
If your sender application doesn’t support ZeroConf/Bonjour, you will need to fill out the IP address and port number manually.
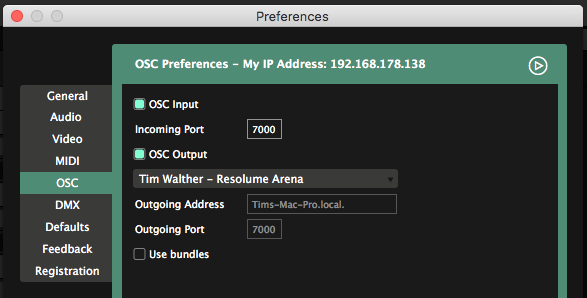
IP addresses are basically a string of numbers that let computers know where they can find each other. Resolume will let you know the IP address of the computer it’s running on in the top of the OSC Preferences.
Every application can specify the port number on which it would like to receive its OSC messages. By default, in Resolume this is port number 7000. You can change it to whatever you like.
The OSC Preferences tab has a fold out window to see the last 200 OSC messages that Resolume has received. This is a great way to check if you are actually receiving anything, and what the messages actually are.

Offline Registration
You can register Resolume without having an Internet connection on the machine you install it on.
To do this, select File > Preferences in Resolume and click the Registration tab. Once there, click the Offline Registration button and take a note of the ID Code that is shown.
You will now need to use a computer that does have an Internet connection to visit: resolume.com/register
On that webpage, you can enter your serial number and the ID Code that you just wrote down. The Resolume website will then generate a registration key file.
Transfer this file back to the computer that you have installed Resolume on.
Now select File > Preferences in Resolume and click the Registration tab. Click the ‘Offline Registration…’ button and then the ‘Load registration file…’ button. Select the file and Resolume will become fully registered.
Shortcut Groups
Shortcuts Groups are shortcuts applied to a group of Radio Buttons, or to a Dropdown. Not sure what Radio Buttons and Dropdowns are exactly? They’re explained in detail, with examples, on the Parameter page.
Shortcuts assigned to these type of control are special. A regular control usually has only two options, On or Off. Shortcut Groups have a lot more.
The Clip Direction controls have four options, Forward, Backward, Pause and Random. The Autopilot has four also. The Layer Blend Modes have so many options I lost count.
When assigning a DMX channel to a Shortcut Group, Resolume will distribute the values over the group. So if the group has four options, like Clip Direction, value 1-63 will set the clip to play backward, 64-128 will be forward, 128-191 will be pause and 191-255 will be random.
Clip Trigger
You can find a special Shortcut Group in front of the clip triggers. It’s revealed when you enter DMX shortcut mode. When you assign a shortcut to it, you can trigger all the clips in that layer with a single control. Assigning a DMX channel will let you trigger clip 1 through 255 by sending different values on that same channel.
Tip! This works on columns too.
One License, Many Machines
A multi-seat license will come with a single serial. This serial can be used to have more computers registered at the same time. So a Resolume license for 3 computers will come with a single serial. That serial can then be used to keep 3 computers registered simultaneously.
Similarly, when upgrading from Resolume for 1 computers to 2 or more, your serial number will be ‘expanded’ to be valid on 2 or more computers. It is not possible to split the license into several serial numbers.
+ 1 Backup
Every Resolume license gets one additional backup.
You can use it to always have a second computer registered and standing by. Or you can use it to register both your home studio render beast and use the backup for your live laptop. Or you can keep your second install unused and ready to go when your first computer catches fire. Whatever you prefer.
The ever important small print: when upgrading to a multi-seat license, you still get 1 backup.
So if you have Resolume for 2 computers, you can install it on 2 computers + 1 backup. Then on to 3 computers + 1 backup. Then 4 computers + 1 backup. Etc etc. You see where this is going. We all watched Sesame Street when we were kids, so you know how Count von Count counts.
The backup is there to tie you over in case of emergency. If your shows are that important that you need full redundancy, for all your machines, all the time, we kindly ask you to purchase a license for the required amount of computers.
Beats, Bars and Phrases
If this concept of BPM is really foreign to you, put on your favourite dance track. Wait for the part where the beat kicks in. Now you’ll hear this distinct pattern that the kick drum makes: dum-dum-dum-dum-dum-dum-dum-dum. You’re probably nodding your head along to it right now.
Every ‘dum’ that you hear is what we call a beat. Depending how fast the music is, you will have more or less of these in a minute. Hence the name BPM or Beats Per Minute.
Now in dance music, every 4 beats make up a ‘bar’. In turn, every 8 bars make up a ‘phrase’. For a more in-depth explanation of these concepts, check out the video below.
Okay, with that theory out of the way, let’s get back to Resolume! Resolume makes it easy to sync your content to the BPM that the DJ is currently playing. These BPM controls are so important to VJ’ing, you can find them on the toolbar in the center of the interface.

Syncing with a DJ
SMPTE can also be used to sync video to a track played by a DJ.
The hard part is actually sending the SMPTE.
There are automated solutions for this. Timecode Live, TC Supply and ProDJLink all provide a similar service and are used by the visual teams running the shows for Armin van Buuren and Hardwell, among others.
If you want to get DIY, the easiest way is to split the track. Put your music on the left channel and the SMPTE on the right channel. The music goes to the speakers on the left channel, the SMPTE goes to Resolume on the right.
Of course, this means you can only send a single mono channel to the speakers.
MIDI Preferences
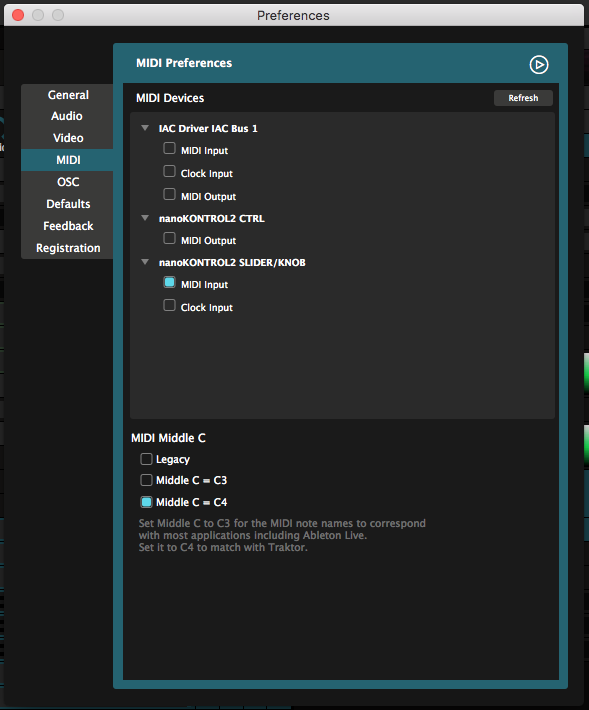
MIDI Devices
Here you can enable or disable MIDI input and output from and to devices. Check the Midi chapter for all about input, clock and output.
Middle C
This will let you decide which note is used to display the Middle C.
Behind the scenes, MIDI doesn’t actually use musical notes, just numbers. Middle C refers to note number 60. To make this more confusing, every application has a different idea on what musical note this actually represents.
Ableton Live uses C3, Traktor uses C4.
This doesn’t actually change anything in your MIDI shortcuts. It just changes how the the shortcut is displayed in Resolume. It makes sense that when you’re working with several applications, at least you’re using the same notation.