Osticket
Содержание:
Установка OsTicket на Ubuntu Server 16.04 TLS
sudo apt install apache2 -y
sudo apt install libapache2-mod-php php7-mysql php7-cgi php7-fpm php7-cli php7-curl php7-mcrypt php7-gd php7-imap php7-mbstring php7-xml php7-intl php7-ldap php-apcu -y
sudo apt install unzip mysql-client mysql-server
sudo mysql_secure_installation
Поддержи автора статьи, просмотри рекламу ↓↓↓
sudo mysql -u root -p
CREATE DATABASE osticket_db;
create user osticket@localhost identified by 'Password';
GRANT ALL PRIVILEGES ON osticket_db.* TO 'osticket'@'localhost' IDENTIFIED BY 'Password';
FLUSH PRIVILEGES;
exit;

sudo mkdir /var/www/osticket
cd /var/www/osticket
sudo wget http://osticket.com/sites/default/files/download/osTicket-v1.10.1.zip
sudo unzip osTicket-v1.10.1.zip
sudo cp upload/include/ost-sampleconfig.php upload/include/ost-config.php
sudo chown -R www-data:www-data /var/www/osticket
sudo chmod -R 777var/www/osticket

nano /etc/apache2/sites-enabled/osticket.conf
#Listen 80
<VirtualHost *:80>
    DocumentRoot "/var/www/osticket/upload"
    ServerName osticket.domain.name
Redirect permanent / https://ask.vist.od.ua/

</VirtualHost>
#Listen SSL
<VirtualHost *:443>
 SSLEngine on
 SSLCertificateFile /etc/apache2/ssl/fullchain.pem
 SSLCertificateKeyFile /etc/apache2/ssl/privkey.pem
    DocumentRoot "/var/www/osticket/upload"
    ServerName osticket.domain.name
</VirtualHost>

nano /etc/apache2/apache2.conf
Поддержи автора статьи, просмотри рекламу ↓↓↓
где-то в конце
ServerName 192.168.X.Y
ServerName osticket.domain.name

apache2ctl configtest
/etc/init.d/apache2 restart
На выходе получается красивая ссылка http://osticket.domain.com с переадресацией с http на https. SSL сертификат типа *.domain.com(ACME v2 wildcard от LetsEncrypt) был выписан ранее, для других сервисов. Внешним доступом занимается Nginx revers proxy(ссылка).
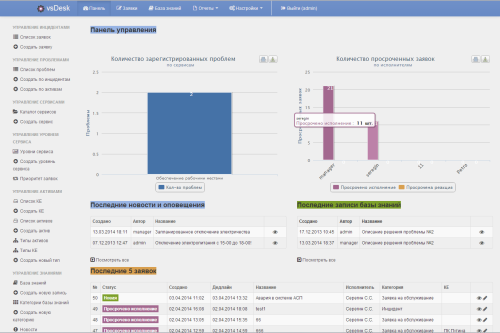
vsDesk
 Это Российская разработка, которая имеет как платную версию без ограничений, так и бесплатную с ограничениями. Сама система написана PHP с использованием Yii framework.
Что она умеет?
- Удобная система управления заявками
- Управление сервисами и уровнями сервиса (SLA)
- База активов и КЕ
- База знаний
- Русская и английская локализация
- Уведомления и комментарии к заявкам
- SMS уведомления (только платная версия)
- Автоматизированная обработка заявок и назначение наблюдателей (только платная версия)
- Управление проблемами (только платная версия)
- Статистика и отчеты (только платная версия)
- Шаблоны уведомлений, редактирование статусов и категорий (только платная версия)
- Переназначение исполнителей (только платная версия)
- Получение заявок по E-mail (только платная версия)
- Импорт из CSV (только платная версия)
- Настройка вида главной панели и дополнительные поля в заявке (только платная версия)
- Управление правами и ролями и интеграция с Active Directory (только платная версия)
- Резервное копирование, удаленная установка, возможность доработки (только платная версия)
Подробнее с vsDesk можно познакомиться по этому адресу: http://vsdesk.ru/
Кстати, отличный обзор на эту систему уже написан на хабре!
Upgrading
osTicket supports upgrading from 1.6-rc1 and later versions. As with any
upgrade, strongly consider a backup of your attachment files, database, and
osTicket codebase before embarking on an upgrade.
To trigger the update process, fetch the osTicket-1.7 tarball from either
the osTicket github page or from
the osTicket website. Extract the tarball into the folder of your osTicket
codebase. This can also be accomplished with the zip file, and a FTP client
can of course be used to upload the new source code to your server.
Any way you choose your adventure, when you have your codebase upgraded to
osTicket-1.7, visit the /scp page of you ticketing system. The upgrader will
be presented and will walk you through the rest of the process. (The couple
clicks needed to go through the process are pretty boring to describe).
WARNING: If you are upgrading from osTicket 1.6, please ensure that all
your files in your upload folder are both readable and writable to your
http server software. Unreadable files will not be migrated to the
database during the upgrade and will be effectively lost.
View the UPGRADING.txt file for other todo items to complete your upgrade.
Uploading Files
After you have successfully downloaded the osTicket package to your computer you will need to prepare the files to be uploaded to your web server, where the old version of osTicket is running — overwriting the existing files. This can be accomplished by decompressing the download and then using an FTP client to transfer files in upload directory/folder to your server, overwriting existing osTicket files. For user using control panels like CPanel or Plesk, you can utilize the systems file manager to upload the package to your server then simply extract the package while making sure the path hierarchy is maintained.
- Make sure you backup your site’s database and files PLEASE DO NOT SKIP
- Upgrader requires user with admin privileges
- It is recommended that you take the system offline during the upgrade
- Maintain the directory hierarchy to make sure files are overwritten
- Upload folder contains the osTicket files that need to be uploaded to your web server.
- Do not overwrite your ost-config.php file (in the include directory) or else you will lose your MySQL admin settings.
- Do not upload files in scripts folder. Only useful for remote piping
- For versions 1.6 RC1-RC2 Only: Once you’ve overwritten the files, rename config.php to ostconfig.php (config.php is found in root osTicket directory).
- For newer versions the config.php or ostconfig.php file should be renamed to ost-config.php and moved to the /include folder.
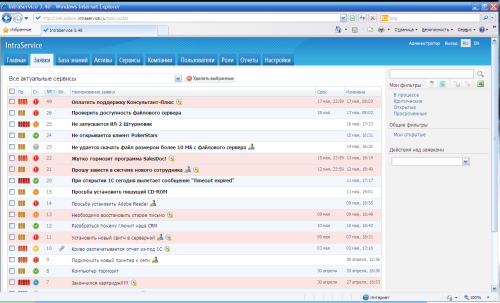
IntraService
IntraService — это Service Desk система с веб-интерфейсом. Российская разработка. Есть SaaS Версия.
Эта система умеет следующее:
- Служба Service Desk
- Прием заявок по электронной почте
- Прием заявок с помощью вашего сайта
- Прием заявок по телефону
- Интеграция с Active Directory
- Настраиваемые уведомления Email/SMS
- Гибкая система полномочий
- Многоязычный интерфейс
- Древовидная орг-структура
- Импорт пользователей из Excel
- Заявки и инциденты
- Удобный список заявок
- Карточка заявки
- Приоритеты заявок
- Категории заявок
- Назначение исполнителей
- Вложение файлов и скриншотов
- Срок исполнения
- Автоматическое закрытие заявок
- Настраиваемые бизнес-процессы
- Статусы заявки
- Фильтрация, сортировка
- Сохраненные фильтры
- Назначение наблюдателей
- Учет трудозатрат, выставление счетов
- Привязка активов
- Экспорт в Excel
- История изменений
- Управление уровнем сервиса
- Сервисная модель
- Пользователи сервиса
- Классы обслуживания
- Рабочие расписания
- Уведомления об истечении срока
- Эскалация заявок
- Отчеты
- Назначение подразделений на сервисы
- База знаний
- Древовидная структура
- Привязка разделов к сервисам
- HTML форматирование документов
- Полнотекстовый поиск
- Экспорт заявок в базу знаний
- Водяной знак для изображений
- Учет активов
Подробности о стоимости можно найти тут: http://intraservice.ru/buy/
Plugins
Installed into folder.
Core Plugins
Developed by osTicket core developers.
- Authentication :: CAS — Allows use of Client Access Server for authentication.
- Authentication :: LDAP and Active Directory — Allows use of LDAP server for authentication.
- Authentication :: Oauth — Allows use of an oauth service for authentication.
- Authentication :: HTTP Pass-Through — Allows the use of webserver/passthrough authentication.
- Storage :: Attachments in Amazon S3 — Allows attachments to be stored in AWS’s S3 instead of the database.
- Storage :: Attachments on the Filesystem — Allows attachments to be stored on the webserver’s filesystem instead of the database.
Community Plugins
Modifies how the software works, without changing it.
- Archiver — Archives tickets before delete, and allows for auto-pruning of old tickets.
- Attachment Preview — Allows files attached to tickets to be embedded in the thread.
- Autocloser — Automatically closes open tickets.
- Fetch Note — Automatically fetch additional note content on ticket creation.
- Field Radio Buttons — Enables the use of HTML form element Radio Buttons.
- File Drive — Integrate file sharing facilities like Google Drive, OneDrive, Dropbox
- Mentioner — Finds Staff mentions in a thread and add’s them as collaborators to the ticket.
- Multi LDAP Auth — Plugin for multiple LDAP servers authentication and LDAP Sync.
- Prevent Autoscroll — Stops the agent view from scrolling down to the last message in the thread.
- Rewriter — An osTicket plugin to rewrite incoming emails.
Third Party Integration Plugins
Helps osTicket talk to other systems.
- Jasper Reports — A Jasper Reports plugin for osTicket 1.9.
- Mattermost — A plugin to send notifications to a Mattermost channel.
- Magento Contact Integration — Plugin for Magento to send contact form details to osTicket via the API.
- OpenID for Microsoft — An osTicket plugin to enable authentication with Microsoft accounts.
- Trello — Integrates Trello with osTicket.
- Slack — Sends notifications of new and updated tickets to a Slack channel.
- Microsoft Teams — Sends notifications of new and updated tickets to a Microsoft Teams channel.
Всё начинается с тикета
OTRS Community Edition
Важно хранить все заявки (тикеты) и решения по ним, чтобы сформировать базу знаний, к которой вы сможете обращаться в процессе постоянной деятельности и давать доступ новичкам, чтобы они обучились работе с клиентами.
Работать с тикетами очень удобно, когда они доступны в отдельном интерфейсе, где к каждому инциденту привязана самая полная информация. С тикет-системой вам не нужно собирать по крупицам информацию о проблеме.
Вашим клиентам тоже понравится тикет-система, потому что работа с их заявками будет прозрачной, конечной и компетентной
В большей части систем (включая OTRS) можно размещать ссылку на web-кабинет клиента, где он сможет заводить тикеты и отслеживать их статус.
Наконец, если вы IT-компания или IT-аутсорсер, вам важно, чтобы тикет-система соответствовала базовым принципам ITSM — никто не говорит, что нужно упереться в принципы ITIL и не шевелиться, но определённые законы взаимодействия ресурсов, людей и технологий стоит соблюдать.
▍Необходимость использования тикет-системы по мере развития бизнеса
- Если ответы идут с одного email, то непонятно кто из сотрудников ответил и взял тикет в работу. Более того, иногда цепочка писем теряется и заявки остаются без внимания.
- Оценка качества работы поддержки: время первого ответа, время последнего ответа, среднее время закрытия заявки. Саппорт — это подразделение с жёсткими KPI, а они должны быть прежде всего измеримыми и объективными.
- Передача сопровождения клиента от одного сотрудника к другому может вызывать путаницу, также возникают проблемы для внутреннего консультирования между сотрудниками.
- Интеграция с Личным кабинетом на сайте компании слишком трудоемка. Если основной канал поддержки через email, то по сути есть только возможность забрать письма через IMAP (или POP) и отправить через SMTP. Все остальное (привязку заявок к пользователь, парсинг вложений и т. п.) нужно реализовывать своими силами — а это очень большой объем работы.
Deployment
osTicket now supports bleeding-edge installations. The easiest way to
install the software and track updates is to clone the public repository.
Create a folder on you web server (using whatever method makes sense for
you) and cd into it. Then clone the repository (the folder must be empty!):
And deploy the code into somewhere in your server’s www root folder, for
instance
Then you can configure your server if necessary to serve that folder, and
visit the page and install osTicket as usual. Go ahead and even delete
setup/ folder out of the deployment location when you’re finished. Then,
later, you can fetch updates and deploy them (from the folder where you
cloned the git repo into)
Upgrading
osTicket supports upgrading from 1.6-rc1 and later versions. As with any
upgrade, strongly consider a backup of your attachment files, database, and
osTicket codebase before embarking on an upgrade.
Any way you choose your adventure, when you have your codebase upgraded to
osTicket-1.7, visit the /scp page of you ticketing system. The upgrader will
be presented and will walk you through the rest of the process. (The couple
clicks needed to go through the process are pretty boring to describe).
Upgrading from v1.6
WARNING: If you are upgrading from osTicket 1.6, please ensure that all
your files in your upload folder are both readable and writable to your
http server software. Unreadable files will not be migrated to the
database during the upgrade and will be effectively lost.
After upgrading, we recommend migrating your attachments to the database or
to the new filesystem plugin. Use the command-line applet to perform
the migration.
View the UPGRADING.txt file for other todo items to complete your upgrade.
Running Upgrade Script
osTicket ships with web-based upgrade wizard to help guide you through the upgrade process. While the wizard provides step by step guide it is important and helpful to have general knowledge about Web servers, PHP and MySQL. Any errors at this stage, although unexpected, are fatal and might require restoring previous version.
To run the upgrade script, simply login to admin panel of your osTicket helpdesk. The upgrader is now a primary component of the osTicket, so upgrades are triggered automatically anytime you upload a new version which requires a database migration.
When you access the admin panel, the upgrade wizard will be presented and will automatically walk you through the database migration process. Your helpdesk will remain offline, and your staff will be unable to do anything in the staff panel until the database migration has completed.
Installation
osTicket now supports bleeding-edge installations. The easiest way to
install the software and track updates is to clone the public repository.
Create a folder on you web server (using whatever method makes sense for
you) and cd into it. Then clone the repository (the folder must be empty!):
osTicket uses the git flow development model, so you’ll need to switch to
the develop branch in order to see the bleeding-edge feature additions.
Follow the usual install instructions (beginning from Manual Installation
above), except, don’t delete the setup/ folder. For this reason, such an
installation is not recommended for a public-facing support system.
Адаптация для корпоративной работы. Подключение LDAP
Первым делом конечно же хотелось дружбы с LDAP. Настройки добавляются после установки соответствующего плагина:

и заполняются соответствующими значениями.
Дальнейшие настройки обусловлены функциональными потребностями: добавляются специалисты и пользователи, подключается почтовый ящик(все формы рассылок легко редактируются), создаются категории заявки с различными свойствами уведомлений(SLA, специалистов, отделов и тд).
Как это работает
- Сотрудник производственного цеха авторизируется через свою доменную учетную запись как пользователь.
- Выбирает категорию заявки, к примеру “Печать” и описывает свое обращение.
- Созданная заявка уведомляет специалиста через email о проблеме.
- Заявка берется в работу, решается и закрывается.
Фраза “пишите заявку” теперь можно использовать как автоответчик на большинство запросов. Система отлично адаптировалась во взаимоотношения с сотрудниками, кроме этого есть разные инструменты для отчетности(учёта рабочего времени).
Finishing Up
If the setup script has finished running with no errors, then congratulations osTicket is now installed. You can now log in with the username and password you created during the install process. After verifying that the installation completed correctly — your next step should be to fully configure your new support ticket system for use. But before you get to it please take a second to cleanup.
- Change permission of include/ost-config.php to remove write access
- Delete setup directory
- Enable the system
Once you have done the above, you can proceed with the next step, Post-Install Setup.
HAVING TROUBLE
Перейдём к сравнению
▍Участники
- OTRS Community Edition — ранее самая популярная open source тикет-система, которая с 7-ой версии перестала быть опенсорсом, обрела платную облачную версию, но при этом в полном соответствии с духом свободного программного обеспечения сохранила свободную версию OTRS Community Edition с открытым кодом на Perl. Вокруг этого ПО ходят довольно горячие дискуссии (и на Хабре тоже), кто-то считает OTRS единственной годной тикет-системой, кто-то полагает, что ничего хорошего ждать не стоит. Нам кажется, вторые — это те, кто плохо разобрался. OTRS действительно неплох — во всех версиях.
- Zendesk по праву считается стандартом тикет-систем, на него оглядываются, его копируют, им пользуются крупные корпорации. Это мощная и функциональная система, но у неё свой недостаток — она слишком дорогая, особенно для малого бизнеса.
- Freshdesk — ещё одна крепкая система, которая пользуется популярностью в том числе в России. В ней есть всё, что вам нужно от тикет-системы. Из недостатков — проблемы с локализацией и опять же высокая стоимость владения.
- Kayako — чуть менее популярная, но не менее функциональная система, чем две предыдущие. Её выделяет из остальных наличие разных фишечек, примочек, находочек. Так, если Zendesk и Freshdesk тяготеют к CRM-системам по масштабу и серьёзности подходов к бизнес-процессам, Kayako больше ориентировано на коммуникацию с клиентом, простоту взаимодействия и мобильность.
- Самостоятельно развернуть OTRS Community Edition и использовать её
- Приобрести подписку на какую-либо из тикет систем (Zendesk, Freshdesk или Kayako).
▍Стоимость
- Zendesk: 25$ * 5 = 125$ / месяц (19$ * 5 = 95$ / месяц при оплате за год)
- Freshdesk: 19$ * 5 = 95$ / месяц (15$ * 5 = 75$ / месяц при оплате за год)
- Kayako: 15$ * 5 = 75$ / месяц
Using Installation Script
Once all of the above steps are complete, you can complete the installation and basic setup in a web browser. You can invoke the installer by simply browsing the osTicket URL e.g . Alternatively you can enter the URL to it into your browser address bar e.g .
osTicket’s installation script will attempt to auto-detect paths and any permission issues. Please follow the instructions to finish up the installation process.
- If the script spots any configuration errors then it will not allow you to continue until the errors are corrected.
- If everything checks out, you will be presented with a form to fill in the required information.
- If any errors occurs, go back and check the data entered.
- On valid data the script will create and populate the database plus write a configuration file.