Munin — статистика сервера
Содержание:
- Настройка Munin в CentOS/RedHat/Fedora
- Step 5 — Enabling Extra Plugins
- Создание файла паролей для доступа к Munin
- 1: Установка Munin
- USE flags
- Integration with Nagios or Icinga
- Gentoo Linux exclusives
- 5: Дополнительные плагины
- Installation
- Что такое Munin?
- Muninインストール
- Munin公開用のnginx設定
- /var/run/munin/fcgi-html.sock failed 対応
- Доступ к Munin через Apache
- 8. Configure Munin
- Настройка Nginx для вывода статуса сервера, мониторинг Nginx
Настройка Munin в CentOS/RedHat/Fedora
По умолчанию Munin создает конфигурационный файл конфигурации Apache в файле /etc/httpd/conf.d/munin.conf. По этому, сейчас мы его немного отредактируем конфигурацию Munin и добавить следующее содержание в конфиг:
# vim /etc/httpd/conf.d/munin.conf
В самом верху я вставил следующие строки ( сразу после комментариев):
Alias /munin /var/www/html/munin
<Directory /var/www/html/munin>
Options FollowSymLinks
AllowOverride None
Order allow,deny
Allow from all
</Directory>
Нам нужно еще один конфиг поправить:
# vim /etc/munin/munin.conf
Добавьте/Измените, как показано ниже.
#Uncomment the following lines
dbdir /var/lib/munin
htmldir /var/www/html/munin
logdir /var/log/munin
rundir /var/run/munin


# a simple host tree. Set your system name

address 127.0.0.1
use_node_name yes
Сохраните и закройте файл.
Установить права собственности на Munin с помощью следующей команды:
# chown -R munin:munin /var/www/html/munin/
В файле можно изменить имя для веб-интерфейса ( по стандарту там написано Munin), но я изменил на свое:
# vim /etc/httpd/conf.d/munin.conf
и прописываем:
<directory /var/www/html/munin>
 AuthUserFile /etc/munin/munin-htpasswd
 AuthName "munin_admin"
 AuthType Basic
 require valid-user

 ExpiresActive On
 ExpiresDefault M310
</directory>
ScriptAlias /munin-cgi/munin-cgi-graph /var/www/cgi-bin/munin-cgi-graph
Создадим пользователя ( я его назвал munin_admin) и назначим эму пароль, для этого выполните:
# htpasswd -cm /etc/munin/munin-htpasswd munin_admin
Это нужно для того чтобы мы смогли войти на веб-интерфейс программы munin.
Осталось совсем немного, нам нужно перезапустить сервис с апачем и стартануть сам мунин ( так же по желанию можно добавить сервис в автозагрузку вашей ОС), для этого:
# /etc/init.d/munin-node start
# chkconfig munin-node on
# service httpd restart
Откройте следующий адрес в браузере, чтобы получить доступ к веб-интерфейсу Munin. Измените IP / домен согласно вашей установки.
У меня это выглядит так:http://78.140.189.243/munin/
После этого вас попросят ввести логин ( у меня это munin_admin) и пароль и вы попадете на веб-интерфейс программы munin.
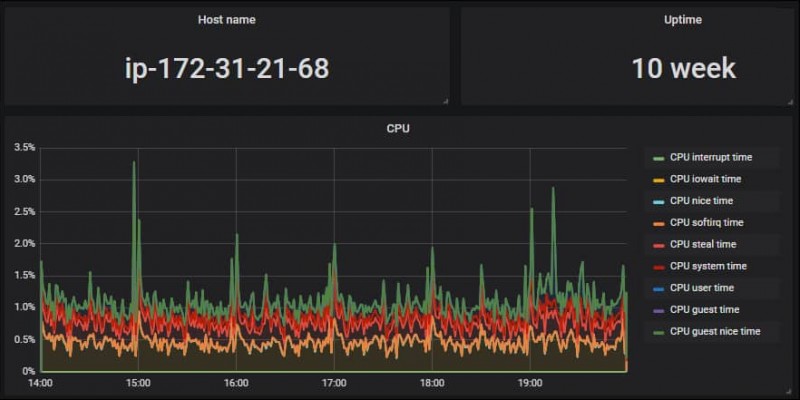
Это как выглядит моя панель Munin.

панель Munin
Можно нажать на ваш хост ( у меня это ИП адрес) и программа покажет много полезной информации. По умолчанию, существует пять категорий (плагины) слева, чтобы сделать легко понятным состояния системы для нашего мониторинга .
— диск (Disk);
— exim;
— Сеть (network)
— процессы (processes);
— Почта (sendmail);
— Система ( system).
У меня эти категории так как я установил на свою ВПСку VestaCP, и панель выкачала и установила за меня всю необходимые программы. У вас может немного отличаться. Нечего собственно сложного в этом нет, все интуитивно понятно. На этом установка и настройка Munin в CentOS/RedHat/Fedora завершена, но не полностью, сейчас я покажу как можно добавить нового клиента для мониторинга в Munin.
Step 5 — Enabling Extra Plugins
Munin monitors a system using plugin scripts, and by default, about a dozen set of plugins are installed and active. A complete list of available plugins are in the directory. To see which plugins can be used on your system, Munin provides the following command:
The output should be of this sort:
A plugin with a yes in the Used column means just what it indicates, while one with a yes in the Suggestions column means it can be used. One with a no on both columns means it is not in use and cannot be used on the system. Finally, if a plugin has a no in the Used column and a yes in the Suggestions, then it is not being used but can be enabled and used on the system.
On the Munin master and node, you can also see a list of installed plugins in the directory.
A package should have been installed when you installed Munin. If it was not, do so using.
To enable an available plugin that’s not currently in use, create a symbolic link for it from the directory to the directory.
For example, to enable the Fail2ban plugin, first install Fail2ban:
Then, create the symlink that enables the Munin plugin:
Restart Munin:
Wait a few minutes, reload the web interface, and you should see graphs for Fail2ban under the title Hosts blacklisted by fail2ban under the network category for the Munin master.
Создание файла паролей для доступа к Munin
Создаем файлик, где будут располагаться пользователи, для которых будет открыт доступ к графикам производительности:
|
1 |
$<span class=»keyword»>sudo<span>htpasswd-cetcmunin.passwd shorrty |
Добавляем еще одного пользователя:
|
1 |
$<span class=»keyword»>sudo<span>htpasswdetcmunin.passwd kev |
Теперь можно пробовать смотреть на графики мониторинга Munin по следующему адресу http://server.ip/munin/
Ощибки, возникающие в процессе …
не пускает в папку сайта (You don’t have permission to access /munin on this server) –
Немного ссылок по теме:Установка и настройка munin под nginx на Debian LinuxМониторинг состояния серверов с помощью MuninHow to add Nginx status and request plugins to muninNginx requests, memory usage and connections statistics with MuninМониторинг сервера и клиентов с помощью Munin.
1: Установка Munin
Munin можно установить при помощи apt-get. После загрузки утилиты остается выполнить всего несколько действий, чтобы получить все необходимые графики. Начальная конфигурация выполняется на сервере мониторинга.
Итак, установите munin на сервер. Пакет munin содержит все серверные и клиентские компоненты, нужные для мониторинга машины, на которой установлена программа. Кроме того, серверные компоненты можно использовать для отслеживания поведения нескольких серверов.
Для установки всех этих компонентов используйте следующую команду:
После установки нужно внести несколько изменений для корректной работы утилиты.
USE flags
The USE flags for Munin are handled in a peculiar way: most of the flags are related to the node, rather than the master (with a few, more or less obvious, exceptions), and are designed to bring in the required dependencies. When the flags are disabled, the plugins are not removed from the package, which means that it’s sufficient to just merge the dependencies to get them working, instead of rebuilding Munin. This has been decided because the plugins are generally static, for what concern dependencies.
A notable exception is the USE flag that actually does remove some plugins. The reason is simply that for the plugins to work, you need a JAR library that is part of Munin, and is thus only built with the flag enabled, so you’d still be rebuilding the package to enable or disable it.
USE flags for
net-analyzer/munin
Munin Server Monitoring Tool
| Add Apache2 support | |
| Install the packages required for monitoring Asterisk. Disabling the flag does not remove any plugin files. | |
| Install the CGI-compatible scripts for on-the-fly generation of web pages and graphs. This is only meaningful if the minimal USE flag is disabled. | |
| Install dev-perl/Net-IP, dev-perl/HTTP-Date and net-misc/dhcp to monitor DHCP lease usage. This only works if the server is on the same system as the node, so the server is also brought in. Disabling the flag does not remove any plugin file. | |
| Build and install a local copy of the HTML documentation for the whole software. This requires dev-python/sphinx to process the documentation sources. | |
| Install dev-perl/libwww-perl required for monitoring HTTP-based services such as Apache and nginx. Disabling the flag does not remove any plugin file. | |
| Install sys-apps/ipmitool required for monitoring IPMI sensors. Disabling the flag does not remove any plugin file. | |
| Add support for IPv6 in munin-node. IPv6 support for the master is always enabled, but the node requires a newer version of dev-perl/Net-Server, capable of listening to IPv6 sockets. | |
| Install the packages required for monitoring IRC. Disabling the flag does not remove any plugin files. | |
| Build the Java-based plugins to monitor JMX-compatible applications. Disabling the flag removes the jmx monitoring plugins. | |
| Add LDAP support (Lightweight Directory Access Protocol) | |
| Install the packages required for memcached monitoring. Disabling the flag does not remove any plugin files. | |
| Only install munin-node and its plugins. This excludes the scripts to generate the web pages and the graphs. | |
| Install the packages required for monitoring MySQL. Disabling the flag does not remove any plugin files. | |
| Install the packages required for monitoring PostgreSQL. Disabling the flag does not remove any plugin files. | |
| !!internal use only!! Security Enhanced Linux support, this must be set by the selinux profile or breakage will occur | |
| Add support for SSL/TLS connections (Secure Socket Layer / Transport Layer Security) | |
| Configure the node by default to log on syslog. This requires the presence of virtual/perl-Sys-Syslog. As of version 2.0.2, the master scripts only log to file, and not to syslog. | |
| Enable dependencies and/or preparations necessary to run tests (usually controlled by FEATURES=test but can be toggled independently) |
Integration with Nagios or Icinga
Nagios/Icinga host side
Make sure that nsca is installed in full:
FILE
net-analyzer/nsca -minimal
The package will install configuration files for both Nagios and Icinga, with the default users and paths as the two packages install by default. To select one or the other, you have to change /etc/conf.d/nsca. The default configurations should be fine for everybody, with the exception at most of the server address.
FILE
CFGFILE=/etc/icinga/nsca.cfg
# CFGFILE=/etc/nagios/nsca.cfg
CODE
define service{
  use local-service
  name munin-service
  register 0
  active_checks_enabled 0
  passive_checks_enabled 1
  parallelize_check 1
  event_handler_enabled 1
  is_volatile 1
  check_command check_dummy!0
}

define service {
  use munin-service
  name munin-diskusage
  register 0
  service_description Disk usage in percent
}
(This is a template-based service, which makes it very simple to add further service checks using Munin’s alerts.)
Gentoo Linux exclusives
There are a few things in Munin that are only available with the Gentoo Linux ebuilds, either because they fit better our design or because upstream is not ready (yet) for them.
In particular as of August 2012, the IPMI plugin shipping with Munin 2.0 and later is not the official one shipped by upstream, but a new one, developed by Flameeyes and based off FreeIPMI. The reason of this change is that the previous plugin, using ipmitool, would time out on most HP and SuperMicro servers when fetching sensors’ data.
The new plugin is not available in the official Munin package because it requires a fairly recent FreeIPMI version (much newer than the latest available for Debian and Fedora) even to get near the feature list of the original plugin, while it requires an unreleased, or patched, version to surpass the original plugin. In Portage this is mandated by depending on version 1.1.6-r1 or later (which has been patched to support outputting thresholds, otherwise available only on 1.2.x series).
This IPMI plugin is also able to monitor foreign hosts, and is backward compatible with both ipmi_ and ipmi_sensor_. Finally, it does not require the use of gawk but works with any POSIX-compatible awk implementation.
5: Дополнительные плагины
Munin отслеживает систему при помощи скриптов плагинов; по умолчанию установлено и доступно около десяти наборов плагинов. Полный список доступных плагинов можно найти в /usr/share/munin/plugins. Чтобы узнать, какие плагины можно использовать в данной системе, используйте следующую команду:
Munin выведет на экран список доступных плагинов:
Если в столбце Suggestions содержится yes, то такой плагин можно использовать. Если в столбце Used находится yes, то такой плагин уже используется. Если оба столбца содержат no, то такой плагин не используется и его нельзя использовать в данной системе.
На сервере и клиенте Munin список доступных плагинов можно найти в каталоге /etc/munin/plugins.
Пакет munin-plugins-extra должен был установиться во время установки Munin. Если это не так, установите его сейчас:
Чтобы включить доступный плагин, который ещё не используется, создайте символьную ссылку из каталога /usr/share/munin/plugins в каталог /etc/munin/plugin.
К примеру, чтобы включить плагин для Fail2ban, сначала установите Fail2ban:
Затем создайте символьную ссылку, которая включит плагин:
Перезапустите Munin.
Подождите несколько минут, перезапустите веб-интерфейс. После этого на экране появятся графики для Fail2ban в категории Network под названием Hosts blacklisted by fail2ban на сервере Munin master.
Installation
1.1 Install EPEL Repository
All files required for installation of Munin are contained in the EPEL repository. The EPEL repository provides easy to install packages for commonly used software.
# yum install epel-release
If this command does not work, perhaps because the CentOS Extras repository is disabled, the section below provides manual installation instructions based on your distribution version.
CentOS and Red Hat Enterprise Linux 5.x
# wget https://dl.fedoraproject.org/pub/epel/epel-release-latest-5.noarch.rpm sudo rpm -Uvh epel-release-5*.rpm
CentOS and Red Hat Enterprise Linux 6.x
# wget https://dl.fedoraproject.org/pub/epel/epel-release-latest-6.noarch.rpm sudo rpm -Uvh epel-release-6*.rpm
CentOS and Red Hat Enterprise Linux 7.x
# wget https://dl.fedoraproject.org/pub/epel/epel-release-latest-7.noarch.rpm sudo rpm -Uvh epel-release-7*.rpm
If you receive a message when trying to download the package, the version number might have changed. You can access the latest version of the RPM installer from the Fedora EPEL wiki page. The wiki page also includes additional instructions for Red Hat Network subscribers who are installing the EPEL repository.
Note: There is no need for Fedora users to install the EPEL repository. Munin is already included in Fedora and can be installed using yum (see step 1.2).
1.2 Installation Munin and Munin Node
- Munin is the daemon service aggregating all data, which is then pulled to the daemon. It then uses RRDtool to log and generate updated graphs and it renders all webpages. It runs only on your host server.
- Munin Node collects data on your servers. It needs to be installed and configured on each server you wish to monitor.
Before we begin, first ensure that your server is up-to-date:
# yum update
You are now ready to issue the command to install both Munin and Munin Node on your server. This command also installs all dependencies, such as RRDTool that are required by Munin.
# yum install munin munin-node
Munin node will have to be installed on each server you wish to monitor. Follow the above steps, but only install the munin-node service on each server you wish to monitor:
# yum install munin-node
Now create the system startup links for Munin and startup the Munin daemon for the first time:
CentOS 7
# systemctl enable munin-node.service
# systemctl start munin-node.service
Note: Munin requires a working web server on the host server, such as Apache or Nginx to render and display its statistics pages.
# yum remove munin-node
Что такое Munin?
Munin – это разработанная по принципу «включай и работай» (plug and play) полезная утилита, которая предоставляет визуальный способ мониторинга виртуального выделенного сервера. В данном руководстве продемонстрирован процесс установки Munin на сервер Ubuntu 12.04 с помощью менеджера apt-get.
Кроме установки и настройки инструмента данное руководство также охватывает добавление опций конфигурации, которые позволят Munin контролировать удаленный сервер.
Что значит красный?
Строки кода, выделенные красным, пользователь должен отредактировать или ввести самостоятельно. Остальной код можно просто скопировать и вставить.
Требования
Для начала убедитесь, что на сервере, который нужно мониторить, установлен apache2. Для этого просто запросите номер версии apache:
Если же apache еще не установлен, используйте команду:
Muninインストール
「Munin」でサーバ監視を行うために必要なパッケージをインストールしていきます。
# yum --enablerepo=epel install munin munin-nginx spawn-fcgi
Munin用ディレクトリ作成
インストールが完了しましたら、まず「Munin」が生成するグラフ画像やhtml等のデータを格納するディレクトリを作成します。
今回は「nginx」のバーチャルホスト機能を使用して「Munin」を公開していくので、「munin.server-memo.net」用のドキュメントルート「/usr/share/nginx/html/munin」を作成して、その中に「Munin」が生成するデータを格納するディレクトリとして「munin」というディレクトリを作成するという構成にします。
ちょっとわかりづらいかもしれませんが、実際は下記のような感じでディレクトリを作成する形になります。
# mkdir -p /usr/share/nginx/html/munin/munin
# chown munin:munin /usr/share/nginx/html/munin/munin
ディレクトリの作成場所については特に決まりはありませんので、「nginx」で公開することを考慮した上でお好きな場所に作成してください。
監視サーバ設定
監視サーバの設定ファイルは「/etc/munin/munin.conf」ですので、バックアップを行ってから編集作業を行っていきます。
# cp -p /etc/munin/munin.conf /etc/munin/munin.conf_yyyymmdd
# vi /etc/munin/munin.conf
設定内容
今回は下記の項目について設定を行っていきます。
- 生成データ格納フォルダの変更(htmldir)
- グラフの動的生成(graph_strategy,html_strategy)
生成データ格納フォルダの変更
先ほど「Munin」が生成するデータを格納するためのディレクトリを作成しましたので、そこにデータをその都度生成する方式に設定を行います。
#htmldir /var/www/html/munin
変更後
htmldir /usr/share/nginx/html/munin/munin
グラフ・htmlの動的生成
初期設定では、グラフ画像やhtmlデータの作成は「cron」に登録されたジョブが実行されるたびに、監視対象として登録されているすべてのサーバ分のデータが生成されていきます。
この場合、監視対象が増えていくとそれに比例して生成されるデータの数が増えていき、その分多くのサーバリソースが必要となり監視サーバの負荷が増えていってしまいます。
そのため、ブラウザから確認する度にグラフ等を動的生成し、必要な分だけのデータを生成させるという方法に設定することで、監視サーバの負荷を減らしていきます。
graph_strategy cron
html_strategy cron
変更後
graph_strategy cgi
html_strategy cgi
グラフとhtmlを動的生成に変更したので、それぞれを生成するためのアプリケーションの起動および自動起動設定を行います。
「munin-fcgi-html」がhtml生成用で「munin-fcgi-graph」がグラフ生成用となります。
# systemctl start munin-fcgi-html
# systemctl start munin-fcgi-graph
# systemctl enable munin-fcgi-html
# systemctl enable munin-fcgi-graph
「Munin」がインストールされると、「/etc/cron.d/munin」ファイルが作成されて、「cron」により実行されるジョブとして登録されます。
そのため、特に自動起動の設定を行わなくてもインストール直後から「Munin」の監視サーバは動作を開始します。
「/etc/cron.d/munin」の初期設定では、5分毎に監視対象のサーバにインストールされているエージェント(munin-node)と通信することで、監視対象のデータを収集しグラフなどを生成していきます。
監視エージェント(munin-node)設定
監視サーバの設定が完了しましたので、つぎは監視サーバから監視されるために必要なエージェントである「munin-node」の設定を行っていきます。
# cp -p /etc/munin/munin-node.conf /etc/munin/munin-node.conf_yyyymmdd
# vi /etc/munin/munin-node.conf
設定内容
とりあえずホスト名の設定を行うだけで最低限の監視は可能となりますので、まずはそこだけ設定を行い「Munin」で正常に監視できるかどうかの確認を行っていきます。
変更後
host_name munin.server-memo.net
この状態では初期設定されている項目のみしか監視できませんが、正常に「Munin」で監視が行えることが確認できましたら、その後必要に応じて監視するサーバを追加したり、監視項目(プラグイン)を増やしていきましょう。
「munin-node」の設定が完了しましたら、起動と自動起動の設定を行います。
「munin-node」は監視サーバとは異なり「cron」から呼び出されるわけではありませんので、通常のパッケージと同じように「systemctl」を使用して、起動と自動起動の設定を行う必要があります。
Munin公開用のnginx設定
最後に「Munin」の監視結果を「nginx」で公開させるための設定を行っていきます。
「Munin」公開用の設定ファイルのひな型は、「munin-nginx」をインストールすることで「/etc/nginx/conf.d/munin.conf」として作成されていますので、このファイルを使って設定を行っていきます。
# cp -p /etc/nginx/conf.d/munin.conf /etc/nginx/conf.d/munin.conf_yyyymmdd
# vi /etc/nginx/conf.d/munin.conf
「/etc/nginx/conf.d/munin.conf」は、「nginx」のバーチャルホスト設定を使用した想定の設定ファイルとなっていますので、すでに「nginx」をwebサーバとして運用している場合は、必要な部分をコピーするなりして設定を行ってください。
最低限の設定項目として下記の2項目を設定していきます。
- バーチャルホストのサーバ名とドキュメントルート設定
- dynazoomのバグ対策
バーチャルホストのサーバ名とドキュメントルート設定
サーバ名を「munin.server-memo.net」に設定し、「Munin」をインストールした際に作成したディレクトリをドキュメントルートとして設定していきます。
変更後
    listen       80;
    server_name  munin.server-memo.net;

    location / {
        root   /usr/share/nginx/html/munin;
        index  index.html index.htm;
    }
dynazoomのバグ対策
2016.09.20現在、CentOS7環境のepelで提供される「Munin」(バージョン2.0.25)には、グラフを拡大させるズーミング機能にバグがあるらしく、正常にグラフが表示されたりされなかったりしてしまいます。
色々調査をしてみると、グラフをクリックしてズームさせるためのリンクURLが下記の2パターンでランダムに変わってしまうという現象が発生していました。
ズーミング機能が正常に動作する場合のURLパターン
Muninをトップ画面にアクセスするためのURLのすぐ後に「static/dynazoom.html」と続く場合は、ズーミング機能が正常に動作してクリックしたグラフが正常に表示されます。
http://munin.server-memo.net/munin/static/dynazoom.html?cgiurl_graph=/...
正常にグラフの拡大画像が表示されています。

ズーミング機能が動作しない(グラフが表示されない)場合のURLパターン
Muninをトップ画面にアクセスするためのURLのすぐ後に「グループ名/ホスト名/static/dynazoom.html」といったようなURLが続く場合は、ズーミング機能が正常に動作せずにグラフが表示されません。
http://munin.server-memo.net/munin/localhost/localhost/static/dynazoom.html?cgiurl_graph=/...
グラフの拡大画像は表示されていません。

対処方法
原因不明でしばらく途方に暮れていたのですが、Muninのgithubで同じような現象に悩んで相談されている方の情報を見つけることができました。
内容を確認してみると、原因はバグっぽいようなことが書いてあって、対応としてはnginxのrewrite機能を使って対処すれば良いみたいだったので試してみました。
「group\.name」と「hostname」の部分は、環境にあわせて変更する必要があります。
rewrite ^(.*)/group\.name/hostname.*(/static/.*)$ $1$2;
今回の場合は「http://munin.server-memo.net/munin/localhost/localhost/static/dynazoom.html?cgiurl_graph=/…」の「localhost/localhost」部分が邪魔なので「server_name」の下に、下記の記述を追加します。
rewrite ^(.*)/localhost/localhost.*(/static/.*)$ $1$2;
ちなみに、監視サーバ増えるたびに同様の設定を追加する必要があるので、その場合は「localhost/localhost.*」の部分を適宜変更してください。
/etc/nginx/conf.d/munin.conf
下記が全部の設定を行ったあとの設定ファイルとなります。
server {
    # Example configuration! Change this to suit your needs.
    # Access munin at http://localhost/munin/
    # NOTE - Do not remove this file, otherwise munin package upgrade
    # recreates this.

    listen       80;
    server_name  munin.server-memo.net;
    rewrite ^(.*)/localhost/localhost.*(/static/.*)$ $1$2;

    location / {
        root   /usr/share/nginx/html/munin;
        index  index.html index.htm;
    }

    # redirect server error pages to the static page /40x.html
    #
    error_page  404              /404.html;
    location = /40x.html {
        root   /usr/share/nginx/html;
    }

    # redirect server error pages to the static page /50x.html
    #
    error_page   500 502 503 504  /50x.html;
    location = /50x.html {
        root   /usr/share/nginx/html;
    }

    location ^~ /munin-cgi/munin-cgi-graph/ {
        access_log off;
        fastcgi_split_path_info ^(/munin-cgi/munin-cgi-graph)(.*);
        fastcgi_param PATH_INFO $fastcgi_path_info;
        fastcgi_pass unix:/var/run/munin/fcgi-graph.sock;
        include fastcgi_params;
    }

    location /munin/static/ {
        alias /etc/munin/static/;
    }

    location /munin/ {
        fastcgi_split_path_info ^(/munin)(.*);
        fastcgi_param PATH_INFO $fastcgi_path_info;
        fastcgi_pass unix:/var/run/munin/fcgi-html.sock;
        include fastcgi_params;
    }

}
# systemctl restart nginx
/var/run/munin/fcgi-html.sock failed 対応
(2017.05.25追記)「munin」を新規インストールしてみると、上記の手順通りだと下記のエラーが発生してWebブラウザでアクセスすることが出来ませんでした。
| 2017/05/25 08:00:03 2841#2841: *1 connect() to unix:/var/run/munin/fcgi-html.sock failed (13: Permission denied) while connecting to upstream, client: 192.168.1.74, server: test3.server-memo.net, request: “GET /munin/ HTTP/1.1”, upstream: “fastcgi://unix:/var/run/munin/fcgi-html.sock:”, host: “test.server-memo.net” |
エラー内容が「Permission denied」という事なので、該当ソケットを確認してみると「munin」ユーザが所有者になっていることが確認できました。
# ls -la /var/run/munin/fcgi-html.sock
srwxr-xr-x 1 munin munin 0  5月 25 07:55 /var/run/munin/fcgi-html.sock

# ls -la /var/run/munin/fcgi-graph.sock
srwxr-xr-x 1 munin munin 0  5月 25 07:55 /var/run/munin/fcgi-graph.sock
このソケットは「nginx」ユーザが所有者である必要があるため「Permission denied」が発生したのでしょう。
そこで「munin-fcgi-html」「fcgi-graph」の自動起動用設定ファイルを調査して、どのようにソケットを作成しているのかを確認してみることにします。
設定ファイル
- /usr/lib/systemd/system/munin-fcgi-html.service
- /usr/lib/systemd/system/munin-fcgi-graph.service
それぞれの設定内容を確認すると、ソケットを作成する際に「nginx」ユーザでソケット作成するという設定(-U nginx)が抜けていたのでそれを追加していきます。
munin-fcgi-html.service編集
# cd /usr/lib/systemd/system
# cp -p munin-fcgi-html.service munin-fcgi-html.service_yyyymmdd
# vi munin-fcgi-html.service
編集前
ExecStart=/usr/bin/spawn-fcgi -s /run/munin/fcgi-html.sock -u munin -g munin /var/www/cgi-bin/munin-cgi-html -P /run/munin/fcgi-html.pid
編集後
-U nginxを追加
ExecStart=/usr/bin/spawn-fcgi -s /run/munin/fcgi-html.sock -U nginx -u munin -g munin /var/www/cgi-bin/munin-cgi-html -P /run/munin/fcgi-html.pid
munin-fcgi-graph.service編集
# cp -p munin-fcgi-graph.service munin-fcgi-graph.service_yyyymmdd
# vi munin-fcgi-graph.service
編集前
ExecStart=/usr/bin/spawn-fcgi -s /run/munin/fcgi-graph.sock -u munin -g munin /var/www/cgi-bin/munin-cgi-graph -P /run/munin/fcgi-graph.pid
編集後
-U nginxを追加
ExecStart=/usr/bin/spawn-fcgi -s /run/munin/fcgi-graph.sock -U nginx -u munin -g munin /var/www/cgi-bin/munin-cgi-graph -P /run/munin/fcgi-graph.pid
※以前は「-U nginx」は最初から設定されていたんですが、パッケージ更新の際に変更になったみたいです。パッケージ更新時のバグかな…
systemdのUnit設定ファイルを変更したので、daemon-reloadで再読み込みさせます。
# systemctl daemon-reload
ソケット再作成
サービスを再起動させてソケットを再作成させます。
# systemctl restart munin-fcgi-html.service
# systemctl restart munin-fcgi-graph.service
ソケットの確認
念のため再作成されたソケットを確認して「nginx」ユーザが所有者であることを確認しておきましょう。
# ls -la /var/run/munin/fcgi-*.sock
srwxr-xr-x 1 nginx nginx 0  5月 25 12:23 /var/run/munin/fcgi-graph.sock
srwxr-xr-x 1 nginx nginx 0  5月 25 12:22 /var/run/munin/fcgi-html.sock
これでwebブラウザからアクセスが出来るようになっているはずですので、実際にアクセスして動作確認を行ってみたください。
Доступ к Munin через Apache
Открываем файл редактирование хоста по умолчанию:
|
1 |
$<span class=»keyword»>sudo<span>vimetcapache2sites-enabled<span class=»number»>000<span>-default |
И редактируем его, чтобы получилось приблизительно следующая картина:
|
1 |
<span class=»tag»><VirtualHost*8080><span> <span class=»comment»># …</span> <span class=»keyword»>DocumentRoot<span>varwww <span class=»tag»><Directory><span> <span class=»keyword»>Options<span>FollowSymLinks <span class=»keyword»>AllowOverride<span>None <span class=»tag»><Directory><span> <span class=»tag»><Directoryvarwww><span> <span class=»keyword»>Options<span>Indexes FollowSymLinks MultiViews <span class=»keyword»>AllowOverride<span>None <span class=»keyword»>Order<span><span class=»keyword»>allow<span>,<span class=»keyword»>deny<span> <span class=»keyword»>allow<span>from all <span class=»tag»><Directory><span> <span class=»tag»><Locationmunin><span> <span class=»keyword»>AuthType<span>Basic <span class=»keyword»>AuthName<span><span class=»string»>»Subversion Repository»<span> <span class=»keyword»>AuthUserFile<span>etcmunin.passwd <span class=»keyword»>Require<span>valid-<span class=»keyword»>user<span> <span class=»tag»><Location><span> <span class=»comment»># …</span> <span class=»tag»><VirtualHost><span> |
И рестартуем apache2:
|
1 |
$<span class=»keyword»>sudo<span>etcinit.dapache2 restart |
8. Configure Munin
Using the htpasswd utility we will create a username and password for basic authentication, thus password protecting Munin. Enter the following command:
# htpasswd /etc/munin/munin-htpasswd admin
When prompted as shown below, enter the password for the admin user:
New password:
Re-type new password:
Adding password for user admin
Add your server hostname to the munin-node.conf file. Open it with a text editor of your choice. We are using nano:
# nano /etc/munin/munin-node.conf
You can add the host_name line at the end of the file. For example:
host_name vps.rosehosting.com
Save and close the file.
Настройка Nginx для вывода статуса сервера, мониторинг Nginx
Для того, чтобы мониторинг nginx был возможен, необходимо добавить следующую конфигурацию: /etc/nginx/sites-enabled/MUNIN.cfg
|
1 |
server{ listen localhost; locationnginx_status{ stub_status on; access_log off; allow192.168.1.024; allow127.0.0.1; deny all; } } |
Добавляем строчки /etc/munin/munin-node.conf имя proxy должно совпадать с именем в файле /etc/munin/munin.conf
|
1 |
host_name proxy allow^127\.\.\.1$ allow^192\.168\.1\.9$ |
Перезагружаем сервер:
|
1 |
$<span class=»keyword»>sudo<span>etcinit.dnginx restart |
|
1 |
$telnet localhost<span class=»number»>80<span> Trying<span class=»number»>127.0<span>.<span class=»number»>0.1<span>… Connected tolocalhost. Escape character is’^]’. <span class=»comment»># пишем</span> GETnginx_status <span class=»comment»># должны получить</span> Active connectionsX server accepts handled requests XXX ReadingXWritingXWaitingX |
Все. Nginx готов, чтобы его мониторили.