How to enable persistent logging in systemd-journald without reboot
Содержание:
- Основные сведения[править]
- Perform systemd-journald logrotate for Journal Files
- Persist Your Logs
- Настройка сервера
- Journal Maintenance
- Límite del tamaño de journal
- Компоненты systemd
- Setting the System Time
- Основные настройки[править]
- Journal size limit
- Output Formats
- By User
- Filtering by Message Interest
- Active Process Monitoring
- Фильтрация вывода
Основные сведения[править]
Ключи journalctlправить
Получить актуальные ключи команды:
journalctl --help
Чтение всех логов:
journalctl -b
Если был крах системы, можно ввести параметр -1 и посмотреть логи с предыдущего запуска системы (-2 логи сеанса за два сеанса до текущего и т.д.) :
journalctl -b -1
Показывать записи журнала с момента запуска системы с расшифровкой ошибок:
journalctl -xb
Показать самые последние записи журнала, и продолжать печатать новые записи, при добавлении их в журнал:
journalctl -f
Вывод лога в текстовый файлправить
Если вам нужно вывести лог в текстовый файл (например, чтобы сообщить разработчикам об ошибке), используйте конструкцию
'команда' > 'путь к текстовому файлу'
Пример:
journalctl -b > /home/user/debug.log
Фильтрация по дате и времениправить
Для фильтрации по дате и времени важны два ключа
—since — вывод от такого-то момента времени
—until — вывод до такого-то момента времени
в качестве значений для этих ключей могут использоваться:
— Формат YYYY-MM-DD HH:MM:SS
journalctl --since "2017-05-05 00:01" --until "2017-05-06 01:40"
— Слова «yesterday», «today», «tomorrow», «now»:
journalctl --since "yesterday" --until "2017-05-06 01:40"
— Удобочитаемые выражения вида:
journalctl --since "10 hours ago"
journalctl --since "1 minute ago"
journalctl --since "50 minute ago" --until "5 minute ago"
Примерыправить
Показать все сообщения за последние 20 минут:
journalctl --since "20 min ago"
Просмотреть все сообщения начиная с 20 июля 2015 года 17:15:
journalctl --since "2015-07-20 17:15:00"
Просмотреть все сообщения начиная со вчерашнего дня:
journalctl --since "yesterday"
Просмотреть все сообщения с 9:00 до настоящего времени:
journalctl --since "09:00" --until "now"
Просмотреть все сообщения с 9:00 до прошлого часа:
journalctl --since "10:00" --until "1 hour ago"
journalctl -af
Просмотр сообщений ядра :
journalctl -k
Все сообщение конкретной утилиты, например, systemd:
journalctl /usr/lib/systemd/systemd
Все сообщения конкретного процесса:
journalctl _PID=1
Все сообщения конкретного приложения или службы:
journalctl -u netcfg
Все сообщения процессов, запущенных от имени конкретного пользователя:
journalctl _UID=33
Журналправить
strings /mnt/arch/var/log/journal/af4967d77fba44c6b093d0e9862f6ddd/system.journal | grep -i сообщение
Если же имеется файл журнала, например, с другого компьютера и systemd установлен (должно быть достаточно пакета journalctl из Sisyphus), то посмотреть его содержимое проще:
из директории
journalctl -D /mnt/arch/var/log/journal/af4967d77fba44c6b093d0e9862f6ddd
из файла
journalctl --file /mnt/arch/var/log/journal/af4967d77fba44c6b093d0e9862f6ddd/system.journal
Недавние событияправить
$ journalctl -n
По умолчанию на консоль выводится информация о последних 10 событиях. С опцией -n можно указать необходимое число событий:
$ journalctl -n 20
Perform systemd-journald logrotate for Journal Files
logrotate for journal log files will be performed based on below values
SystemMaxUse=
SystemKeepFree=
RuntimeMaxUse=
RuntimeKeepFree=
MaxFileSec=
Here,
- control how much disk space the journal may use up at maximum after which systemd-journald logrotate will be performed for journal files. This defaults to 10% of the total Physical Memory allotted to the node
- control how much disk space systemd-journald shall leave free for other uses after which systemd-journald logrotate will be performed for journal files. This default to 15% of the total Physical Memory allotted to the node
logrotate will respect both limits and use the smaller of the two values.
- If the file system is nearly full and either or are violated when is started, the limit will be raised to the percentage that is actually free.
- This means that if there was enough free space before and journal files were created, and subsequently something else causes the file system to fill up, will stop using more space, but it will not be removing existing files to reduce the footprint again, either i.e. no systemd-journald logrotate will be performed
- Also note that only archived files are deleted by system-journald logrotate to reduce the space occupied by journal files. This means that, in effect, there might still be more space used than or limit after a vacuuming operation is complete by systemd-journald logrotate for journal log files.
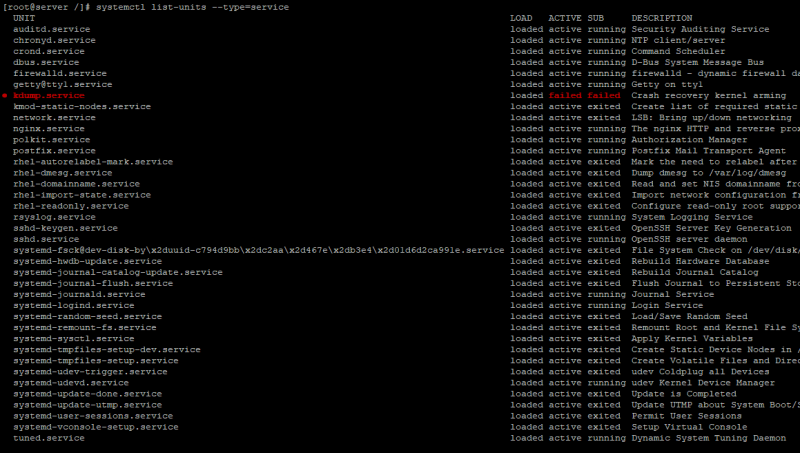
If we check the status of , then we can see it reports that the logs have been rotated
# systemctl status systemd-journald
● systemd-journald.service - Journal Service
   Loaded: loaded (/usr/lib/systemd/system/systemd-journald.service; static; vendor preset: disabled)
   Active: active (running) since Thu 2019-09-05 15:03:38 IST; 19h ago
     Docs: man:systemd-journald.service(8)
           man:journald.conf(5)
 Main PID: 29141 (systemd-journal)
   Status: "Processing requests..."
   CGroup: /system.slice/systemd-journald.service
           └─29141 /usr/lib/systemd/systemd-journald
Warning: Journal has been rotated since unit was started. Log output is incomplete or unavailable.
Lastly I hope the this article on systemd-journald on Linux was helpful and I was able to give you some insight on how logging works with Journal in RHEL 7 along with systemd-journald logrotate. So, let me know your suggestions and feedback using the comment section.
Persist Your Logs
systemd-journald can be configured to persist your systemd logs on disk, and it also provides controls to manage the total size of your archived logs. These settings are defined in .
To start persisting your logs, uncomment the line in and set its value to . Your archived logs will be held in . If this directory does not already exist in your file system, systemd-journald will create it.
After updating your , load the change:
Control the Size of Your Logs’ Disk Usage
The following settings in control how large your logs’ size can grow to when persisted on disk:
| Setting | Description |
|---|---|
| SystemMaxUse | The total maximum disk space that can be used for your logs. |
| SystemKeepFree | The minimum amount of disk space that should be kept free for uses outside of systemd-journald’s logging functions. |
| SystemMaxFileSize | The maximum size of an individual journal file. |
| SystemMaxFiles | The maximum number of journal files that can be kept on disk. |
systemd-journald will respect both and , and it will set your journals’ disk usage to meet whichever setting results in a smaller size.
To view your default limits, run:
You should see a line similar to the following which describes the current limits in place:
Manually Clean Up Archived Logs
journalctl offers functions for immediately removing archived journals on disk. Run with the option to remove archived journal files until the total size of your journals is less than the specified amount. For example, the following command will reduce the size of your journals to 2GiB:
Run with the option to remove archived journal files with dates older than the specified relative time. For example, the following command will remove journals older than one year:
Run with the option to remove archived journal files until the specified number of files remains. For example, the following command removes all but the 10 most recent journal files:
Настройка сервера
На сервере необходимо настроить систему безопасности и запуск journal-remote.
Брандмауэр
При использовании брандмауэра, необходимо открыть TCP-порты 19531 и 19532.
1. Если используем firewalld:
firewall-cmd —permanent —add-port={19531,19532}/tcp
firewall-cmd —reload
2. Если используем iptables:
iptables -A INPUT -p tcp —dport 19531:19532 -j ACCEPT
SELinux
Если в нашей системе используется SELinux либо его корректно настраиваем, либо отключаем командами:
setenforce 0
sed -i ‘s/^SELINUX=.*/SELINUX=disabled/g’ /etc/selinux/config
Запуск journal-remote
Для запуска серверной части необходимо стартовать компонент сбора логов — systemd-journal-remote. Но при попытке это сделать, мы получим ошибку, так как необходимо подготовить сервер к запуску.
Создаем каталог для хранения логов:
mkdir -p /var/log/journal/remote
Задаем владельца для созданного каталога:
chown systemd-journal-remote:systemd-journal-remote /var/log/journal/remote
Создаем каталоги для хранения сертификатов безопасности (если их нет):
mkdir /etc/ssl/{private,certs,ca}
Генерируем ключ центра сертификации (CA):
openssl genrsa -out /etc/ssl/ca/trusted.key 4096
Создаем сертификат центра сертификации:
openssl req -x509 -new -nodes -key /etc/ssl/ca/trusted.key -sha256 -days 1825 -out /etc/ssl/ca/trusted.pem -subj «/C=RU/ST=SPb/L=SPb/O=Global Security/OU=IT Department/CN=journal-server.local»
* где journal-server.local — имя (hostname) нашего journal сервера.
Генерируем приватный ключ для нашего сервера journal:
openssl genrsa -out /etc/ssl/private/journal-remote.pem 2048
Создаем файл запроса сертификата:
openssl req -new -key /etc/ssl/private/journal-remote.pem -out /etc/ssl/certs/journal-remote.csr -subj «/C=RU/ST=SPb/L=SPb/O=Global Security/OU=IT Department/CN=journal-server.local»
* где journal-server.local — имя (hostname) нашего journal сервера.
Наконец, создаем сертификат для journald на основе запроса и CA:
openssl x509 -req -in /etc/ssl/certs/journal-remote.csr -CA /etc/ssl/ca/trusted.pem -CAkey /etc/ssl/ca/trusted.key -CAcreateserial -out /etc/ssl/certs/journal-remote.pem -days 1825 -sha256
Наконец, разрешаем запуск systemd-journal-remote и стартуем его:
systemctl enable systemd-journal-remote
systemctl start systemd-journal-remote
Проверим, что сервис стартанул:
systemctl status systemd-journal-remote
* если возникли проблемы, то анализируем лог /var/log/messages (RPM) или /var/log/syslog (deb).
Journal Maintenance
You may be wondering about the cost is of storing all of the data we’ve seen so far. Furthermore, you may be interesting in cleaning up some older logs and freeing up space.
Deleting Old Logs
If you wish to shrink your journal, you can do that in two different ways (available with version 218 and later).
If you use the option, you can shrink your journal by indicating a size. This will remove old entries until the total journal space taken up on disk is at the requested size:
Another way that you can shrink the journal is providing a cutoff time with the option. Any entries beyond that time are deleted. This allows you to keep the entries that have been created after a specific time.
For instance, to keep entries from the last year, you can type:
Limiting Journal Expansion
You can configure your server to place limits on how much space the journal can take up. This can be done by editing the file.
The following items can be used to limit the journal growth:
- : Specifies the maximum disk space that can be used by the journal in persistent storage.
- : Specifies the amount of space that the journal should leave free when adding journal entries to persistent storage.
- : Controls how large individual journal files can grow to in persistent storage before being rotated.
- : Specifies the maximum disk space that can be used in volatile storage (within the filesystem).
- : Specifies the amount of space to be set aside for other uses when writing data to volatile storage (within the filesystem).
- : Specifies the amount of space that an individual journal file can take up in volatile storage (within the filesystem) before being rotated.
By setting these values, you can control how consumes and preserves space on your server. Keep in mind that and will target archived files to reach stated limits. This is important to remember when interpreting file counts after a vacuuming operation.
Límite del tamaño de journal
Si journal se ha creado como permanente (no volátil), el límite de su tamaño se establece con un valor predeterminado correspondiente al 10% del tamaño del sistema de archivos pero limitado a 4 GiB. Por ejemplo, con alojado en una partición raíz de 20 GiB, esto permitiría almacenar hasta 2 GiB de datos en journal. En una de 50 GiB, tendría un máximo de 4 GiB.
El tamaño máximo del journal permanente puede ser controlado descomentando y modificando la correspondiente línea:
/etc/systemd/journald.conf
SystemMaxUse=50M
También es posible utilizar el mecanismo de sobrescribir la configuración con fragmentos insertados en lugar de editar el archivo de configuración global. En este caso, no olvide colocar el reemplazo debajo del encabezado de :
/etc/systemd/journald.conf.d/00-journal-size.conf
SystemMaxUse=50M
el servicio después de cambiar esta configuración para aplicar inmediatamente el nuevo límite.
Vea para más información.
Компоненты systemd
Некоторые (не все) составные части systemd:
- systemd-boot — простой для UEFI;
- systemd-firstboot — инициализация системных настроек при первой загрузке;
- systemd-homed — переносимые аккаунты пользователей;
- systemd-networkd — управление сетевыми настройками;
- systemd-nspawn — приложение для контейнеризации процессов;
- systemd-resolved — разрешение сетевых имён;
- systemd-timesyncd — синхронизация системных часов по сети;
- systemd/Журнал — системные логи;
- systemd/Tаймеры — таймеры для управления событиями и службами, альтернатива cron.
systemd.mount — монтирование
systemd полностью отвечает за монтирование разделов и файловых систем, описанных в файле . преобразует записи из в юниты systemd; это выполняется при каждой загрузке системы, а также при перезагрузке конфигурации системного менеджера.
systemd расширяет возможности fstab и предлагает дополнительные опции монтирования. Они могут влиять на зависимости юнита монтирования: например, могут гарантировать, что монтирование выполняется только после подключения к сети или после монтирования другого раздела. Полный список опций монтирования systemd (обычно они имеют префикс ) описан в .
Примером этих опций может быть т.н. автомонтирование (здесь имеется в виду не автоматическое монтирование во время загрузки, а монтирование при появлении запроса от устройства). Подробнее смотрите .
Автомонтирование разделов GPT
Для автомонтирования разделов и их PARTUUID должен совпадать с хэш-суммой SHA256 HMAC, вычисленной на основании UUID типа раздела. В качестве ключа хэша используется machine ID. Необходимый PARTUUID можно получить командой:
$ systemd-id128 -u --app-specific=UUID_типа_раздела machine-id
Примечание: Утилита считывает machine ID из файла , поэтому вычислить PARTUUID до установки системы невозможно.
Автомонтирование любого раздела можно отключить, если изменить его или задать параметр раздела «do not automount». Подробнее смотрите .
systemd-sysvcompat
Пакет (зависимость пакета ) содержит традиционный бинарный файл init. В системах под управлением systemd файл представляет собой лишь символическую ссылку на исполняемый файл .
Кроме того, в этом пакете находится 6 команд SysVinit — , , , , и . Эти команды являются символическими ссылками на файл , и их действие обусловлено логикой systemd. В разделе говорилось о командах , , и , в разделе — о и .
systemd-tmpfiles — временные файлы
Утилита systemd-tmpfiles создает, удаляет и очищает непостоянные и временные файлы и каталоги. Она читает конфигурационные файлы из и , чтобы понять, что необходимо делать. Конфигурационные файлы в первом каталоге имеют приоритет над теми, что расположены во втором.
Конфигурационные файлы обычно предоставляются вместе с файлами служб и имеют названия вида . Например, демон Samba предполагает, что существует каталог с корректными правами доступа. Поэтому пакет поставляется в следующей конфигурации:
/usr/lib/tmpfiles.d/samba.conf
D /run/samba 0755 root root
Конфигурационные файлы также могут использоваться для записи значений при старте системы. Например, если вы используете для отключения пробуждения от устройств USB при помощи , вместо этого вы можете использовать следующий tmpfile:
/etc/tmpfiles.d/disable-usb-wake.conf
#    Path                  Mode UID  GID  Age Argument
w    /proc/acpi/wakeup     -    -    -    -   USBE
Подробнее смотрите и .
Примечание: Этот способ может не сработать для установки опций в , поскольку служба systemd-tmpfiles-setup может запуститься до того, как будут загружены соответствующие модули устройств. В этом случае при помощи команды вы можете проверить, имеет ли модуль параметр для установки необходимой опции, и установить эту опцию в в каталоге . В противном случае для установки верных атрибутов сразу при появлении устройства придется написать .
Setting the System Time
One of the benefits of using a binary journal for logging is the ability to view log records in UTC or local time at will. By default, will display results in local time.
Because of this, before we get started with the journal, we will make sure the timezone is set up correctly. The suite actually comes with a tool called that can help with this.
First, see what timezones are available with the option:
This will list the timezones available on your system. When you find the one that matches the location of your server, you can set it by using the option:
To ensure that your machine is using the correct time now, use the command alone, or with the option. The display will be the same:
The first line should display the correct time.
Основные настройки[править]
Файл настройки находится в /etc/systemd/journald.conf и состоит из следующих секций:
-
Storage= Указывает, где хранить журнал. Доступны следующие параметры:
- volatile Журнал хранится в оперативной памяти, т.е. в каталоге /run/log/journal.
- persistent Данные хранятся на диске, т.е. в каталоге /var/log/journal
- auto используется по-умолчанию
- none Журнал не ведётся
Compress= Принимает значения «yes» или «no». Если включена (по-умолчанию) сообщения перед записью в журнал, будут сжиматься.
Seal= Принимает значения «yes» или «no». Если включена (по-умолчанию) будет включена защита Forward Secure Sealing (FSS), которая позволяет накладывать криптографические отпечатки на журнал системных логов.
-
SplitMode= Определяет доступ к журналу пользователям. Доступны следующие параметры:
- uid Все пользователи получают доступ к чтению системного журнала. Используется по-умочанию.
- login Каждый пользователь может читать только сообщения, относящиеся к его сеансу.
- none Пользователи не имеют доступа к системному журналу.
SyncIntervalSec= Таймаут, после которого происходит синхронизация и запись журнала на диск. Относится только к уровням ERR, WARNING, NOTICE, INFO, DEBUG. Сообщения уровня CRIT, ALERT, EMERG записываются сразу на диск.
RateLimitInterval= и RateLimitBurst= Настройки ограничения скорости генерации сообщений для каждой службы. Если в интервале времени, определяемого RateLimitInterval=, больше сообщений, чем указано в RateLimitBurst= регистрируются службой, все дальнейшие сообщения в интервале отбрасываются, пока интервал не закончится.При этом генерируется сообщение о количестве отброшенных сообщений. По умолчанию 1000 сообщений за 30 секунд. Единицы измерения: «s», «min», «h», «ms», «us». Чтобы выключить ограничение скорости, установите значения в 0.
MaxRetentionSec= Максимальное время хранения записей журнала. Единицы измерения: year, month, week, day, h или m
MaxFileSec= Максимальное время хранения записей в одном файле журнала, после которого он переводится в следующий.
ForwardToSyslog=, ForwardToKMsg=, ForwardToConsole=, ForwardToWall= Определяют куда направлять сообщения: в традиционный системный журнал Syslog, в буфер журнала ядра (kmsg), на системную консоль, или на стену, чтобы было видно всем зарегистрированным пользователям. Эти опции принимают логические аргументы. Если переадресация на Syslog включен, но Syslog демон не работает, соответствующий параметр не имеет никакого эффекта. По умолчанию, только стена включена. Эти параметры могут быть переопределены во время загрузки с параметрами командной строки ядра systemd.journald.forward_to_syslog =, systemd.journald.forward_to_kmsg =, systemd.journald.forward_to_console = и systemd.journald.forward_to_wall =. При пересылке в консоль, должен быть установлен TTYPath =, как будет описано ниже.
TTYPath= Назначает консоль TTY, для вывода сообщений, если установлен параметр ForwardToConsole=yes. По-умолчанию, используется /dev/console. Для того, чтобы вывести на 12 консоль, устанавливаем TTYPath=/dev/tty12. Для того, чтобы вывести на последовательный порт, устанавливаем TTYPath=/dev/ttySX, где X номер com-порта.
MaxLevelStore=, MaxLevelSyslog=, MaxLevelKMsg=, MaxLevelConsole=, MaxLevelWall= Определяет максимальный уровень сообщений который сохраняется в журнал, выводится на традиционный системный журнал Syslog, буфер журнала ядра (kmsg), консоль или стену. Значения: emerg, alert, crit, err, warning, notice, info, debug или цифры от 0 до 7 (соответствуют уровням).
Journal size limit
If the journal is persistent (non-volatile), its size limit is set to a default value of 10% of the size of the underlying file system but capped at 4 GiB. For example, with located on a 20 GiB partition, journal data may take up to 2 GiB. On a 50 GiB partition, it would max at 4 GiB.
The maximum size of the persistent journal can be controlled by uncommenting and changing the following:
/etc/systemd/journald.conf
SystemMaxUse=50M
It is also possible to use the drop-in snippets configuration override mechanism rather than editing the global configuration file. In this case, place the overrides under the header:
/etc/systemd/journald.conf.d/00-journal-size.conf
SystemMaxUse=50M
Restart the after changing this setting to apply the new limit.
See for more info.
Per unit size limit
Edit the unit file for the service you wish to configure (for example sshd) and add in the section.
Then create by copying . After that, edit and adjust to your liking.
Restarting the service should automatically start the new journal service . The logs from the namespaced service can be viewed with .
See for details about journal namespaces.
Output Formats
The parameter enables us to format the output of journalctl query. (or if we are using the long form parameter name) can take a few values.
- show each journal entry in json format in one long line. This is useful when sending logs to a log centralization or analysis service, since it makes them easier to parse.
- will show each log entry in easy-to-read json format.
- will show very detailed information for each journal record with all fields listed.
- shows messages in very short form, without any date/time or source server names.
- shortis the default output format. It shows messages in syslog style.
- is similar to short, but the time stamp second value is shown with precision. This can be useful when you are looking at error messages generated from more than one source, which apparently are throwing error messages at the same time and you want to go to the granular level.
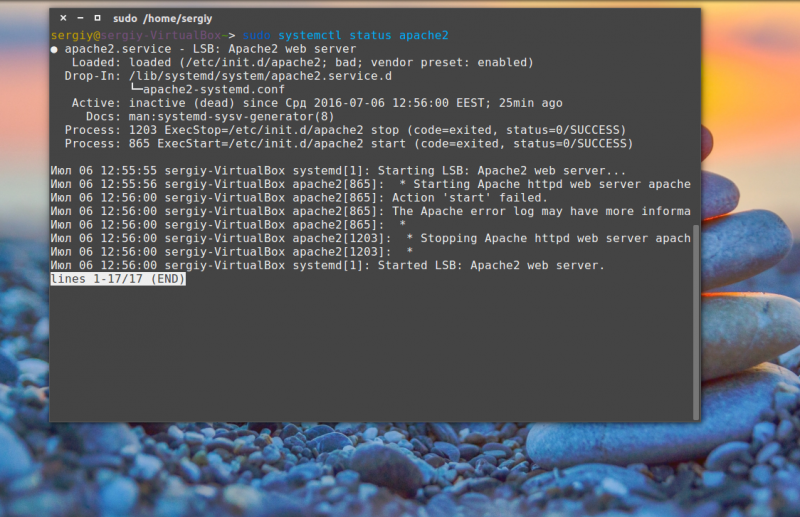
For example, the following command prints logs from the Apache web server in json-pretty format.
$ journalctl -u apache2.service -r -o json-pretty
Here’s a sample of the output. You can see a number of important fields including the user, group, syslog facility, and even the code location that generated the message (if available).
{

"__CURSOR" : "s=c4ee459c883148549d114c566bc0b979;i=12b782;b=6c92864cbcc64a5fabebe04147953894;m=42d22604a2;t=58bc87981a1f5;x=8daf632187

"__REALTIME_TIMESTAMP" : "1561068031812085",

"__MONOTONIC_TIMESTAMP" : "286993548450",

"_BOOT_ID" : "6c92864cbcc64a5fabebe04147953894",

"SYSLOG_FACILITY" : "3",

"_UID" : "0",

"_GID" : "0",

...

"UNIT" : "apache2.service",

"CODE_LINE" : "2039",

"CODE_FUNCTION" : "unit_notify",

"MESSAGE" : "apache2.service: Unit entered failed state.",

"_SOURCE_REALTIME_TIMESTAMP" : "1561068031809136"

}
By User
To find all messages related to a particular user, use the UID for that user. In the following example, we are finding the UID of the user mysql.
$ id mysql
This returns a line like this.
uid=108(mysql) gid=116(mysql) groups=116(mysql)
And then we are querying the journal for all messages logged by that user.
# journalctl _UID=108
This shows logs generated by processes running under the mysql user.
-- Logs begin at Thu 2015-06-25 00:34:38 EDT, end at Sun 2015-06-28 23:16:08 EDT. --

Jun 25 00:53:21 test-ubuntu15 mysqld_safe: 150625 00:53:21 mysqld_safe Can't log to error log and syslog at the same time.  Remove all --log-error configuration options for --syslog to take effect.

Jun 25 00:53:21 test-ubuntu15 mysqld_safe: 150625 00:53:21 mysqld_safe Logging to '/var/log/mysql/error.log'.

Jun 25 00:53:21 test-ubuntu15 mysqld_safe: 150625 00:53:21 mysqld_safe Starting mysqld daemon with databases from /var/lib/mysql

Jun 27 21:41:26 test-ubuntu15 mysqld_safe: Could not open required defaults file: /etc/mysql/debian.cnf

Jun 27 21:41:26 test-ubuntu15 mysqld_safe: Fatal error in defaults handling. Program aborted

Jun 27 21:41:26 test-ubuntu15 mysqld_safe: 150627 21:41:26 mysqld_safe mysqld from pid file /var/run/mysqld/mysqld.pid ended


<b>-- Reboot --</b>

Jun 27 21:41:33 test-ubuntu15 mysqld_safe: 150627 21:41:33 mysqld_safe Can't log to error log and syslog at the same time.  Remove all --log-error configuration options for --syslog to take effect.

Jun 27 21:41:33 test-ubuntu15 mysqld_safe: 150627 21:41:33 mysqld_safe Logging to '/var/log/mysql/error.log'.

Jun 27 21:41:33 test-ubuntu15 mysqld_safe: 150627 21:41:33 mysqld_safe Starting mysqld daemon with databases from /var/lib/mysql
Filtering by Message Interest
We learned above some ways that you can filter the journal data using time constraints. In this section we’ll discuss how to filter based on what service or component you are interested in. The journal provides a variety of ways of doing this.
By Unit
Perhaps the most useful way of filtering is by the unit you are interested in. We can use the option to filter in this way.
For instance, to see all of the logs from an Nginx unit on our system, we can type:
Typically, you would probably want to filter by time as well in order to display the lines you are interested in. For instance, to check on how the service is running today, you can type:
This type of focus becomes extremely helpful when you take advantage of the journal’s ability to interleave records from various units. For instance, if your Nginx process is connected to a PHP-FPM unit to process dynamic content, you can merge the entries from both in chronological order by specifying both units:
This can make it much easier to spot the interactions between different programs and debug systems instead of individual processes.
By Process, User, or Group ID
Some services spawn a variety of child processes to do work. If you have scouted out the exact PID of the process you are interested in, you can filter by that as well.
To do this we can filter by specifying the field. For instance if the PID we’re interested in is 8088, we could type:
At other times, you may wish to show all of the entries logged from a specific user or group. This can be done with the or filters. For instance, if your web server runs under the user, you can find the user ID by typing:
Afterwards, you can use the ID that was returned to filter the journal results:
The journal has many fields that can be used for filtering. Some of those are passed from the process being logged and some are applied by using information it gathers from the system at the time of the log.
The leading underscore indicates that the field is of the latter type. The journal automatically records and indexes the PID of the process that is logging for later filtering. You can find out about all of the available journal fields by typing:
We will be discussing some of these in this guide. For now though, we will go over one more useful option having to do with filtering by these fields. The option can be used to show all of the available values for a given journal field.
For instance, to see which group IDs the journal has entries for, you can type:
This will show you all of the values that the journal has stored for the group ID field. This can help you construct your filters.
By Component Path
We can also filter by providing a path location.
If the path leads to an executable, will display all of the entries that involve the executable in question. For instance, to find those entries that involve the executable, you can type:
Usually, if a unit is available for the executable, that method is cleaner and provides better info (entries from associated child processes, etc). Sometimes, however, this is not possible.
Displaying Kernel Messages
Kernel messages, those usually found in output, can be retrieved from the journal as well.
To display only these messages, we can add the or flags to our command:
By default, this will display the kernel messages from the current boot. You can specify an alternative boot using the normal boot selection flags discussed previously. For instance, to get the messages from five boots ago, you could type:
By Priority
One filter that system administrators often are interested in is the message priority. While it is often useful to log information at a very verbose level, when actually digesting the available information, low priority logs can be distracting and confusing.
You can use to display only messages of a specified priority or above by using the option. This allows you to filter out lower priority messages.
For instance, to show only entries logged at the error level or above, you can type:
This will show you all messages marked as error, critical, alert, or emergency. The journal implements the standard message levels. You can use either the priority name or its corresponding numeric value. In order of highest to lowest priority, these are:
- 0: emerg
- 1: alert
- 2: crit
- 3: err
- 4: warning
- 5: notice
- 6: info
- 7: debug
The above numbers or names can be used interchangeably with the option. Selecting a priority will display messages marked at the specified level and those above it.
Active Process Monitoring
The command imitates how many administrators use for monitoring active or recent activity. This functionality is built into , allowing you to access these features without having to pipe to another tool.
Displaying Recent Logs
To display a set amount of records, you can use the option, which works exactly as .
By default, it will display the most recent 10 entries:
You can specify the number of entries you’d like to see with a number after the :
Following Logs
To actively follow the logs as they are being written, you can use the flag. Again, this works as you might expect if you have experience using :
Фильтрация вывода
journalctl позволяет фильтровать вывод по определённым полям. Если должно быть отображено большое количество сообщений или необходима фильтрация большого промежутка времени, то вывод команды может занять значительное время.
Примеры:
Совет: По умолчанию journalctl отсекает части строк, которые не вписываются в экран по ширине, хотя иногда перенос строк может оказаться более предпочтительным. Управление этой возможностью производится посредством переменной окружения , в которой содержатся опции, передаваемые в (программу постраничного просмотра, используемую по умолчанию). По умолчанию переменная имеет значение (для получения дополнительной информации смотрите и ).
Если убрать опцию , будет достигнут требуемый результат. Например, запустите journalctl, как показано здесь:
$ SYSTEMD_LESS=FRXMK journalctl
Для использования такого поведения по умолчанию, переменную из файла или .
Совет: Несмотря на то, что журнал хранится в двоичном формате, содержимое сообщений не изменяется. Это означает, что их можно просматривать при помощи strings, например, для восстановления системы в окружении без systemd. Пример команды:
$ strings /mnt/arch/var/log/journal/af4967d77fba44c6b093d0e9862f6ddd/system.journal | grep -i message