Git tag
Содержание:
- Подмодули
- Branching and Merging
- git push — вносим изменения в удаленный репозиторий
- Tagging
- Get a tag
- Общее
- Разное
- Автокомплит Git-команд в bash
- Не отслеживать файл (без удаления)
- Обновить все субмодули
- Retrieve the commit hash of the initial revision
- Adding a project to repo using subtree
- Get latest changes in your repo for a linked project using subtree
- Ignore one file on commit (e.g. Changelog)
- Поиск коммита с багом при помощи бинарного поиска
- Log
- Create a tag object
- Show how many lines does an author contribute
- Tagging Old Commits
- How to Update Tags In Git?
- git pull force
- Data Assurance
- Detached HEADS
- Distributed
- Прочие команды и необходимые возможности
- Серверные команды репозитория
- Tagging
Подмодули
Клонирование репозитория с подмодулями
При клонировании репозитория вам необходимо инициализировать и обновить подмодули:
Запуск данной команды эквивалентен запуску команды:
после обычного клонирования репозитория
Обновление подмодулей
Подмодуль ссылается на конкретную коммит в другом репозитории. Чтобы получить
точное состояние всех подмодулей необходимо запустить:
Для получения состояния последнего коммита всех подмодулей необходимо выполнить
следующую команду:
или использовать аргументы по умолчанию команды git pull:
Эта команда просто обновляет локальную рабочую копию. При запуске команды git status
каталоги подмодулей будут показаны изменёнными. Чтобы обновить репозиторий необходимо
зафиксировать изменения:
Для получения состояние последнего коммита конкретного подмодуля необходимо использовать команду:
Добавление подмодулей
В текущий проект можно включить другой репозиторий Git в качестве папки, отслеживаемый Git:
После этого необходимо добавить и зафиксировать новый файл .gitmodules. В нём описано
какие подмодули следует клонировать при запуске команды git submodule update
Branching and Merging
The Git feature that really makes it stand apart from nearly every other SCM out there is its branching model.
Git allows and encourages you to have multiple local branches that can be entirely independent of each other. The creation, merging, and deletion of those lines of development takes seconds.
This means that you can do things like:
- Frictionless Context Switching. Create a branch to try out an idea, commit a few times, switch back to where you branched from, apply a patch, switch back to where you are experimenting, and merge it in.
- Role-Based Codelines. Have a branch that always contains only what goes to production, another that you merge work into for testing, and several smaller ones for day to day work.
- Feature Based Workflow. Create new branches for each new feature you’re working on so you can seamlessly switch back and forth between them, then delete each branch when that feature gets merged into your main line.
- Disposable Experimentation. Create a branch to experiment in, realize it’s not going to work, and just delete it — abandoning the work—with nobody else ever seeing it (even if you’ve pushed other branches in the meantime).

Notably, when you push to a remote repository, you do not have to push all of your branches. You can choose to share just one of your branches, a few of them, or all of them. This tends to free people to try new ideas without worrying about having to plan how and when they are going to merge it in or share it with others.
There are ways to accomplish some of this with other systems, but the work involved is much more difficult and error-prone. Git makes this process incredibly easy and it changes the way most developers work when they learn it.
git push — вносим изменения в удаленный репозиторий
После проведения работы в экспериментальной ветке, слияния с основной, необходимо
обновить удаленный репозиторий (удаленную ветку). Для этого используется команда
git push.
Отправляет свои изменения в удаленную ветку, созданную при клонировании по
умолчанию:
Отправляет изменения из ветки master в ветку experimental удаленного репозитория:
В удаленном репозитории origin удаляет ветку experimental:
Отправляет в удаленную ветку master репозитория origin (синоним репозитория по
умолчанию) ветки локальной ветки master:
Отправляет метки в удаленную ветку master репозитария origin:
Изменяет указатель для удаленной ветке master репозитория origin (master будет
такой же как и develop):
Добавляет ветку test в удаленный репозиторий origin, указывающую на коммит ветки
develop:
Tagging
Like most VCSs, Git has the ability to tag specific points in history as being important.
Typically people use this functionality to mark release points (v1.0, and so on).
In this section, you’ll learn how to list the available tags, how to create new tags, and what the different types of tags are.
Listing Your Tags
Listing the available tags in Git is straightforward.
Just type :
This command lists the tags in alphabetical order; the order in which they appear has no real importance.
You can also search for tags with a particular pattern.
The Git source repo, for instance, contains more than 500 tags.
If you’re only interested in looking at the 1.8.5 series, you can run this:
Creating Tags
Git uses two main types of tags: lightweight and annotated.
A lightweight tag is very much like a branch that doesn’t change – it’s just a pointer to a specific commit.
Annotated Tags
Creating an annotated tag in Git is simple.
The easiest way is to specify when you run the command:
The specifies a tagging message, which is stored with the tag.
If you don’t specify a message for an annotated tag, Git launches your editor so you can type it in.
You can see the tag data along with the commit that was tagged by using the command:
That shows the tagger information, the date the commit was tagged, and the annotation message before showing the commit information.
Lightweight Tags
Another way to tag commits is with a lightweight tag.
This is basically the commit checksum stored in a file – no other information is kept.
To create a lightweight tag, don’t supply the , , or option:
This time, if you run on the tag, you don’t see the extra tag information.
The command just shows the commit:
Tagging Later
You can also tag commits after you’ve moved past them.
Suppose your commit history looks like this:
Now, suppose you forgot to tag the project at v1.2, which was at the “updated rakefile” commit.
You can add it after the fact.
To tag that commit, you specify the commit checksum (or part of it) at the end of the command:
You can see that you’ve tagged the commit:
Sharing Tags
By default, the command doesn’t transfer tags to remote servers.
You will have to explicitly push tags to a shared server after you have created them.
This process is just like sharing remote branches – you can run .
If you have a lot of tags that you want to push up at once, you can also use the option to the command.
This will transfer all of your tags to the remote server that are not already there.
Now, when someone else clones or pulls from your repository, they will get all your tags as well.
Checking out Tags
You can’t really check out a tag in Git, since they can’t be moved around.
If you want to put a version of your repository in your working directory that looks like a specific tag, you can create a new branch at a specific tag:
Of course if you do this and do a commit, your branch will be slightly different than your tag since it will move forward with your new changes, so do be careful.
prev | next
Get a tag
Signature verification object
The response will include a object that describes the result of verifying the commit’s signature. The following fields are included in the object:
| Name | Type | Description |
|---|---|---|
| Indicates whether GitHub considers the signature in this commit to be verified. | ||
| The reason for value. Possible values and their meanings are enumerated in table below. | ||
| The signature that was extracted from the commit. | ||
| The value that was signed. |
These are the possible values for in the object:
| Value | Description |
|---|---|
| The key that made the signature is expired. | |
| The «signing» flag is not among the usage flags in the GPG key that made the signature. | |
| There was an error communicating with the signature verification service. | |
| The signature verification service is currently unavailable. | |
| The object does not include a signature. | |
| A non-PGP signature was found in the commit. | |
| No user was associated with the email address in the commit. | |
| The email address in the commit was associated with a user, but the email address is not verified on her/his account. | |
| The email address in the commit is not included in the identities of the PGP key that made the signature. | |
| The key that made the signature has not been registered with any user’s account. | |
| There was an error parsing the signature. | |
| The signature could not be cryptographically verified using the key whose key-id was found in the signature. | |
| None of the above errors applied, so the signature is considered to be verified. |
Общее
Git — система контроля версий (файлов). Что-то вроде возможности сохраняться в компьютерных играх (в Git эквивалент игрового сохранения — коммит)
Важно: добавление файлов к «сохранению» двухступенчатое: сначала добавляем файл в индекс (), потом «сохраняем» ()
Любой файл в директории существующего репозитория может находиться или не находиться под версионным контролем (отслеживаемые и неотслеживаемые).
Отслеживаемые файлы могут быть в 3-х состояниях: неизменённые, изменённые, проиндексированные (готовые к коммиту).
Ключ к пониманию
Ключ к пониманию концепции git — знание о «трех деревьях»:
- Рабочая директория — файловая система проекта (те файлы, с которыми вы работаете).
- Индекс — список отслеживаемых git-ом файлов и директорий, промежуточное хранилище изменений (редактирование, удаление отслеживаемых файлов).
- Директория — все данные контроля версий этого проекта (вся история разработки: коммиты, ветки, теги и пр.).
Коммит — «сохранение» (хранит набор изменений, сделанный в рабочей директории с момента предыдущего коммита). Коммит неизменен, его нельзя отредактировать.
У всех коммитов (кроме самого первого) есть один или более родительских коммитов, поскольку коммиты хранят изменения от предыдущих состояний.
Простейший цикл работ
- Редактирование, добавление, удаление файлов (собственно, работа).
- Индексация/добавление файлов в индекс (указание для git какие изменения нужно будет закоммитить).
- Коммит (фиксация изменений).
- Возврат к шагу 1 или отход ко сну.
Указатели
- — указатель на текущий коммит или на текущую ветку (то есть, в любом случае, на коммит). Указывает на родителя коммита, который будет создан следующим.
- — указатель на коммит, с которого вы только что переместили (командой , например).
- Ветка (, etc.) — указатель на коммит. При добавлении коммита, указатель ветки перемещается с родительского коммита на новый.
- Теги — простые указатели на коммиты. Не перемещаются.
Перед началом работы нужно выполнить некоторые настройки:
Если вы в Windows:
Длинный вывод в консоли: Vim
Если нужно что-то написать, нажмите i — это переход в режим вставки текста. Если нужно сохранить изменения, перейдите в командный режим и наберите :w.
# Нажатия кнопок
ESC     — переход в командный режим
i       — переход в режим редактирования текста
ZQ (зажат Shift, поочередное нажатие) — выход без сохранения
ZZ (зажат Shift, поочередное нажатие) — сохранить и выйти
```bash
# Нажатия кнопок
ESC     — переход в командный режим
i       — переход в режим редактирования текста
ZQ (зажат Shift, поочередное нажатие) — выход без сохранения
ZZ (зажат Shift, поочередное нажатие) — сохранить и выйти

# Ввод в командном режиме
:q!             — выйти без сохранения
:wq             — сохранить файл и выйти
:w filename.txt — сохранить файл как filename.txt
Разное
git fetch -p
Alternatives:
git remote prune origin
git fetch origin pull/<id>/head:<branch-name>
Alternatives:
git pull origin pull/<id>/head:<branch-name>
git remote
Alternatives:
git remote show
Автокомплит Git-команд в bash
curl http://git.io/vfhol > ~/.git-completion.bash && echo '[ -f ~/.git-completion.bash ] && . ~/.git-completion.bash' >> ~/.bashrc
Не отслеживать файл (без удаления)
Удаляет файл из git, сохраняя при этом его локальную копию
git rm --cached <file_path>
Alternatives:
git rm --cached -r <directory_path>
Обновить все субмодули
git submodule foreach git pull
Alternatives:
git submodule update --init --recursive
git submodule update --remote
Alternatives:
git cherry -v master <branch-to-be-merged>
Retrieve the commit hash of the initial revision
git rev-list --reverse HEAD | head -1
Alternatives:
git rev-list --max-parents=0 HEAD
git log --pretty=oneline | tail -1 | cut -c 1-40
git log --pretty=oneline --reverse | head -1 | cut -c 1-40
Adding a project to repo using subtree
git subtree add --prefix=<directory_name>/<project_name> --squash git@github.com:<username>/<project_name>.git master
Get latest changes in your repo for a linked project using subtree
git subtree pull --prefix=<directory_name>/<project_name> --squash git@github.com:<username>/<project_name>.git master
Ignore one file on commit (e.g. Changelog)
git update-index --assume-unchanged Changelog; git commit -a; git update-index --no-assume-unchanged Changelog
Поиск коммита с багом при помощи бинарного поиска
git bisect start                    # Search start
git bisect bad                      # Set point to bad commit
git bisect good v2.6.13-rc2         # Set point to good commit|tag
git bisect bad                      # Say current state is bad
git bisect good                     # Say current state is good
git bisect reset                    # Finish search
Также можно выполнить команду с флагом для того, чтобы показывать автора и время коммита
git blame <file-name>
Log
git log --no-merges --raw --since='2 weeks ago'
Alternatives:
git whatchanged --since='2 weeks ago'
git log --branches --not --remotes
Alternatives:
git log @{u}..
git cherry -v
Показать количество строк, которое добавил/удалил пользователь
git log --author='Your Name Here' --pretty=tformat: --numstat | gawk '{ add += <!-- @doxie.inject start -->; subs += <!-- @doxie.inject end -->; loc += <!-- @doxie.inject start --> - <!-- @doxie.inject end --> } END { printf "added lines: %s removed lines: %s total lines: %s
", add, subs, loc }' -
Alternatives:
git log --author='Your Name Here' --pretty=tformat: --numstat | awk '{ add += <!-- @doxie.inject start -->; subs += <!-- @doxie.inject end -->; loc += <!-- @doxie.inject start --> - <!-- @doxie.inject end --> } END { printf "added lines: %s, removed lines: %s, total lines: %s
", add, subs, loc }' - # on Mac OSX
git log --pretty=oneline --graph --decorate --all
Alternatives:
gitk --all
Create a tag object
Note that creating a tag object does not create the reference that
makes a tag in Git. If you want to create an annotated tag in Git,
you have to do this call to create the tag object, and then
the reference.
If you want to create a lightweight tag, you only have to
the tag reference — this call
would be unnecessary.
Parameters
| Name | Type | Description |
|---|---|---|
| Required. The tag’s name. This is typically a version (e.g., «v0.0.1»). | ||
| Required. The tag message. | ||
| Required. The SHA of the git object this is tagging. | ||
| Required. The type of the object we’re tagging. Normally this is a but it can also be a or a . | ||
| An object with information about the individual creating the tag. |
The object contains the following keys:
| Name | Type | Description |
|---|---|---|
| The name of the author of the tag | ||
| The email of the author of the tag | ||
| When this object was tagged. This is a timestamp in ISO 8601 format: . |
Signature verification object
The response will include a object that describes the result of verifying the commit’s signature. The following fields are included in the object:
| Name | Type | Description |
|---|---|---|
| Indicates whether GitHub considers the signature in this commit to be verified. | ||
| The reason for value. Possible values and their meanings are enumerated in table below. | ||
| The signature that was extracted from the commit. | ||
| The value that was signed. |
These are the possible values for in the object:
| Value | Description |
|---|---|
| The key that made the signature is expired. | |
| The «signing» flag is not among the usage flags in the GPG key that made the signature. | |
| There was an error communicating with the signature verification service. | |
| The signature verification service is currently unavailable. | |
| The object does not include a signature. | |
| A non-PGP signature was found in the commit. | |
| No user was associated with the email address in the commit. | |
| The email address in the commit was associated with a user, but the email address is not verified on her/his account. | |
| The email address in the commit is not included in the identities of the PGP key that made the signature. | |
| The key that made the signature has not been registered with any user’s account. | |
| There was an error parsing the signature. | |
| The signature could not be cryptographically verified using the key whose key-id was found in the signature. | |
| None of the above errors applied, so the signature is considered to be verified. |
git log --author='_Your_Name_Here_' --pretty=tformat: --numstat | gawk '{ add += <!-- @doxie.inject start -->; subs += <!-- @doxie.inject end -->; loc += <!-- @doxie.inject start --> - <!-- @doxie.inject end --> } END { printf "added lines: %s removed lines: %s total lines: %s
", add, subs, loc }' -
Alternatives:
git log --author='_Your_Name_Here_' --pretty=tformat: --numstat | awk '{ add += <!-- @doxie.inject start -->; subs += <!-- @doxie.inject end -->; loc += <!-- @doxie.inject start --> - <!-- @doxie.inject end --> } END { printf "added lines: %s, removed lines: %s, total lines: %s
", add, subs, loc }' - # on Mac OSX
Tagging Old Commits
The previous tagging examples have demonstrated operations on implicit commits. By default, will create a tag on the commit that is referencing. Alternatively can be passed as a ref to a specific commit. This will tag the passed commit instead of defaulting to To gather a list of older commits execute the command.
Executing will output a list of commits. In this example we will pick the top most commit for the new tag. We will need to reference to the commit SHA hash to pass to Git:
Executing the above invocation will create a new annotated commit identified as for the commit we selected in the previous example.
How to Update Tags In Git?
While working in a project in Git, we often have to delete and update stuff. We are required to delete/update branches or delete/update files etc. Similar to this, sometimes, we are required to update the tags in Git. Updating a tag will take your tag to another commit. For example, we can update the tag v1.1 to another commit depicting that the stable Version1.1. of the software is till the new commit now. There can be any number of reasons to perform the update. This section will walk you through the steps of updating the tags in the local machine and reflecting those changes to your remote repository. We will make use of Git for both of these operations.
How to Update Tags In Git In Local Repository?
To update your tags in the local repository, create a new commit above the tagged commit. For example, see in the below image:
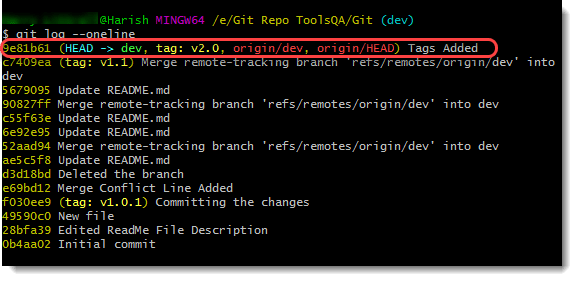
The commit with the tag v2.0 is the last commit. There is no commit above that, and the HEAD points to the same commit as we see. Let’s make some changes to the ReadME file and commit them with a commit message (Refer First Commit In Git).
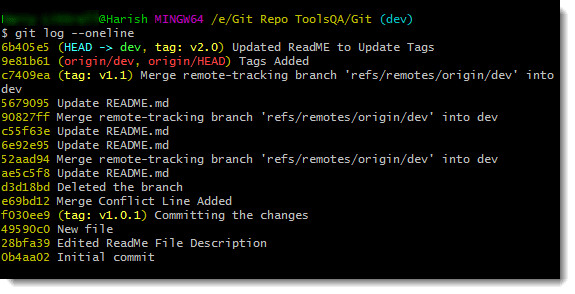
Once you finish this, the Git log will look like this:
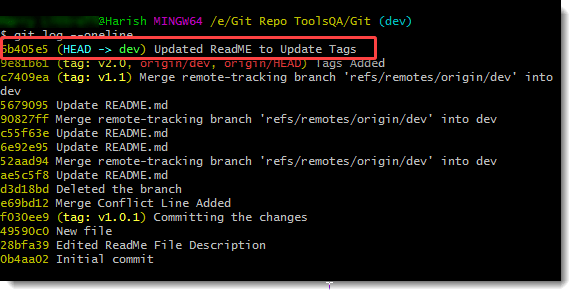
So, we intend to update the tag v2.0 from 9e81b61 to 6b405e5.
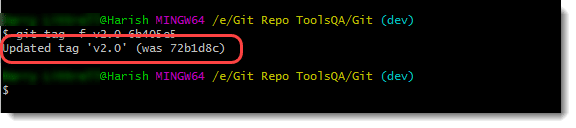
To achieve this objective, execute the following command.
git tag -f <tag_name_to_update> <hash_code_new_commit>
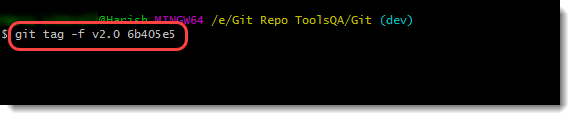
Note: The <hash_code> option can be left blank, which will update the tag to the HEAD pointing commit automatically. Moreover, for any other commit, you need to use the hash code.
Execute the command to update the tag successfully.
Cross-check by showing the Git Log once again.
Great! Our local repository is updated. Let’s now update our remote repository.
How to Update Tags In Git In Remote Repository?
Similar to deletion, we need to update our operation of updating to the remote repository. As we pushed our creation of tags (Tags In Git), let’s see if the same command works or not.
git push origin v2.0
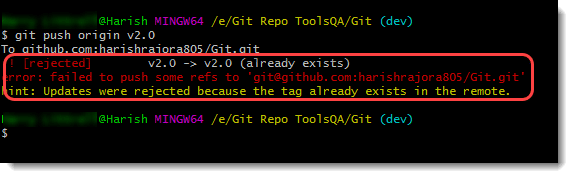
The response constitutes of three lines.
- ! : This denotes the overall result of the command execution.
- error: Failed to push some refs: This line shows that some of the references were unable to be synchronized with the remote repository.
- hint: Updates rejected as tag already exists: This line helps us analyze that the command we are using is for newly created tags only.
Therefore, we need some other method to force our way onto the remote repository.
To push the updated tag onto the remote repository forcefully, execute the following command:
git push –force origin v2.0

Note: Instead of going this way, you can also achieve the same results by first deleting the commit and then creating a new tag (with the same name) with the intended commit. After this, pushing the tag to the remote repository will do the needful.
Moreover, the change in hash code denotes that we have successfully updated the tag in our remote repository.
We can confirm this by looking over at the remote repository (verifying the hash codes).
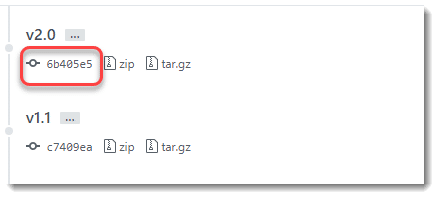
There you go. We have our updated tag on the remote repository as well.
To conclude, tags are very crucial in project development involving Git. They help us in labeling the various points in the development/production and release cycles. Additionally, through this label, it becomes easier for us to know at which point stands the different releases of the project. While this covers the part of Git, tags can reveal much more information on . In other words, they take a special place inside the GitHub components. I am excited to show you all this in GitHub. I hope you are too!!
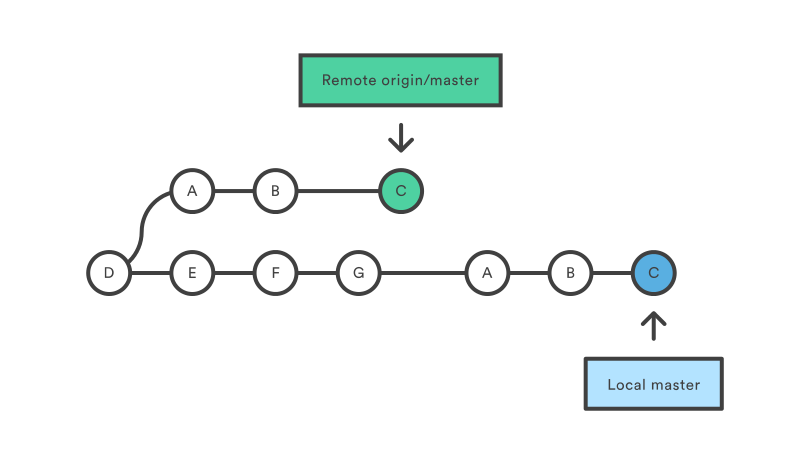
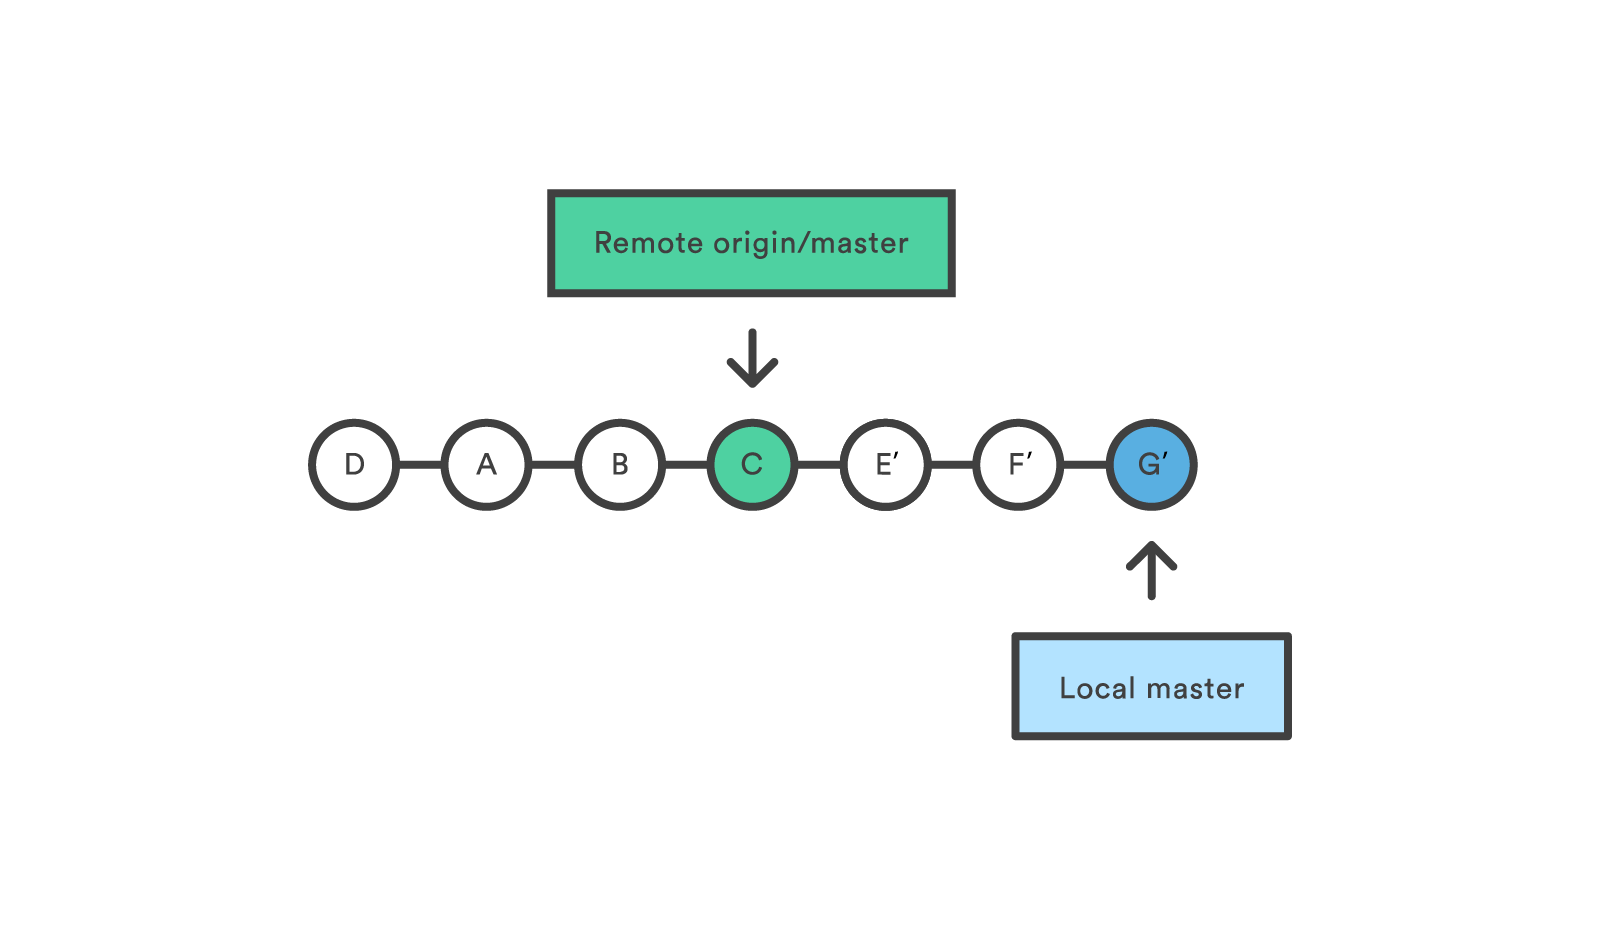
git pull force
Насильно выполнить git pull нельзя. Она не перезапишет локальные изменения, если есть конфликт. Конфликт все равно придется разрешать.
Если же требуется получить данные из удаленной ветки, перезаписав локальные изменения, то делается это в два этапа. Сначала обновить локальную копию удаленного репозитория:
git fetch --all
Далее, допустим надо перезаписать содержимое текущей ветки данными из ветки master репозитория origin:
git reset --hard origin/master
Если надо перезаписать содержимое текущей ветки данными из другой ветки dev репозитория origin:
git reset --hard origin/dev
Но будьте внимательны с опцией –hard, она действительно затирает коммиты текущей ветки безвозвратно. Если надо их сохранить, то перед выполнением команды создайте новую ветку – в нее все сохранится:
git branch new-branch-to-save-current-commits
git fetch --all
git reset --hard origin/dev
Что еще интересно: коммиты reset –hard затирает, а если в папке были просто неотслеживаемые файлы, то они не будут затронуты.
Data Assurance
The data model that Git uses ensures the cryptographic integrity of every bit
of your project. Every file and commit is checksummed and retrieved by its
checksum when checked back out. It’s impossible to get anything out of Git
other than the exact bits you put in.

It is also impossible to change any file, date, commit message, or any other
data in a Git repository without changing the IDs of everything after it.
This means that if you have a commit ID, you can be assured not only that
your project is exactly the same as when it was committed, but
that nothing in its history was changed.
Most centralized version control systems provide no such integrity by default.
Detached HEADS
Now that we’ve seen the three main uses of on branches, it’s important to discuss the state. Remember that the is Git’s way of referring to the current snapshot. Internally, the command simply updates the to point to either the specified branch or commit. When it points to a branch, Git doesn’t complain, but when you check out a commit, it switches into a state.
This is a warning telling you that everything you’re doing is “detached” from the rest of your project’s development. If you were to start developing a feature while in a detached state, there would be no branch allowing you to get back to it. When you inevitably check out another branch (e.g., to merge your feature in), there would be no way to reference your feature:
The point is, your development should always take place on a branch—never on a detached . This makes sure you always have a reference to your new commits. However, if you’re just looking at an old commit, it doesn’t really matter if you’re in a detached state or not.
Distributed
One of the nicest features of any Distributed SCM, Git included, is that it’s distributed. This means that instead of doing a «checkout» of the current tip of the source code, you do a «clone» of the entire repository.
Multiple Backups
This means that even if you’re using a centralized workflow, every user essentially has a full backup of the main server. Each of these copies could be pushed up to replace the main server in the event of a crash or corruption. In effect, there is no single point of failure with Git unless there is only a single copy of the repository.
Any Workflow
Because of Git’s distributed nature and superb branching system, an almost endless number of workflows can be implemented with relative ease.
Subversion-Style Workflow
A centralized workflow is very common, especially from people transitioning from a centralized system. Git will not allow you to push if someone has pushed since the last time you fetched, so a centralized model where all developers push to the same server works just fine.

Integration Manager Workflow
Another common Git workflow involves an integration manager — a single person who commits to the ‘blessed’ repository. A number of developers then clone from that repository, push to their own independent repositories, and ask the integrator to pull in their changes. This is the type of development model often seen with open source or GitHub repositories.

Dictator and Lieutenants Workflow
For more massive projects, a development workflow like that of the Linux kernel is often effective.
In this model, some people (‘lieutenants’) are in charge of a specific subsystem of the project and they merge in all changes related to that subsystem. Another integrator (the ‘dictator’) can pull changes from only his/her lieutenants and then push to the ‘blessed’ repository that everyone then clones from again.

Прочие команды и необходимые возможности
Хэш — уникальная идентификация объектов
В git для идентификации любых объектов используется уникальный (то есть с
огромной вероятностью уникальный) хэш из 40 символов, который определяется
хэшируюшей функцией на основе содержимого объекта. Объекты — это все: коммиты,
файлы, тэги, деревья. Поскольку хэш уникален для содержимого, например, файла,
то и сравнивать такие файлы очень легко — достаточно просто сравнить две строки
в сорок символов.
Больше всего нас интересует тот факт, что хэши идентифицируют коммиты. В этом
смысле хэш — продвинутый аналог ревизий Subversion. Несколько примеров
использования хэшей в качестве способа адресации.
Ищет разницу текущего состояния проекта и коммита за номером… сами видите,
каким:
То же самое, но оставляем только шесть первых символов. Git поймет, о каком
коммите идет речь, если не существует другого коммита с таким началом хэша:
Иногда хватает и четырех символов:
Читает лог с коммита по коммит:
Разумеется, человеку пользоваться хэшами не так удобно, как машине, именно
поэтому были введены другие объекты — тэги.
git tag — тэги как способ пометить уникальный коммит
Тэг (tag) — это объект, связанный с коммитом; хранящий ссылку на сам коммит,
имя автора, собственное имя и некоторый комментарий. Кроме того, разработчик
может оставлять на таких тегах собственную цифровую подпись.
Кроме этого в git представленные так называемые «легковесные тэги» (lightweight
tags), состоящие только из имени и ссылки на коммит. Такие тэги, как правило,
используются для упрощения навигации по дереву истории; создать их очень легко.
Создаёт «легковесный» тэг, связанный с последним коммитом; если тэг уже есть,
то еще один создан не будет:
Помечает определенный коммит:
Удаляет тег:
Перечисляет тэги:
Создаёт тэг для последнего коммита, заменяет существующий, если таковой уже был:
После создания тэга его имя можно использовать вместо хэша в любых командах
вроде git diff, git log и так далее:
Обычные тэги имеет смысл использовать для приложения к коммиту какой-либо
информации, вроде номера версии и комментария к нему. Иными словами, если в
комментарии к коммиту пишешь «исправил такой-то баг», то в комментарии к тэгу по
имени «v1.0» будет что-то вроде «стабильная версия, готовая к использованию».
Создаёт обычный тэг для последнего коммита; будет вызван текстовый редактор для
составления комментария:
Создаёт обычный тэг, сразу указав в качестве аргумента комментарий:
Команды перечисления, удаления, перезаписи для обычных тэгов не отличаются от
команд для «легковесных» тэгов.
Относительная адресация
Вместо ревизий и тэгов в качестве имени коммита можно опираться на еще один
механизм — относительную адресацию. Например, можно обратиться прямо к предку
последнего коммита ветки master:
Если после «птички» поставить цифру, то можно адресоваться по нескольким предкам
коммитов слияния:
Ищет изменения по сравнению со вторым предком последнего коммита в master; HEAD
здесь — указатель на последний коммит активной ветки.
Аналогично, тильдой можно просто указывать, насколько глубоко в историю ветки
нужно погрузиться.
Что привнес «дедушка» нынешнего коммита:
То же самое:
Обозначения можно объединять, чтобы добраться до нужного коммита:
Файл .gitignore — объясняем git, какие файлы следует игнорировать
Иногда по директориям проекта встречаются файлы, которые не хочется постоянно
видеть в сводке git status. Например, вспомогательные файлы текстовых редакторов,
временные файлы и прочий мусор.
Заставить git status игнорировать определенные файлы можно, создав в корне или
глубже по дереву (если ограничения должны быть только в определенных директория)
файл .gitignore. В этих файлах можно описывать шаблоны игнорируемых файлов
определенного формата.
Пример содержимого такого файла:
Существуют и другие способы указания игнорируемых файлов, о которых можно узнать
из справки git help gitignore.
Серверные команды репозитория
Команда создания вспомогательных файлов для dumb-сервера в $GIT_DIR/info и
$GIT_OBJECT_DIRECTORY/info каталогах, чтобы помочь клиентам узнать, какие ссылки
и пакеты есть на сервере:
Проверяет сколько объектов будет потеряно и объём освобождаемого места при
перепаковке репозитория:
Переупаковывает локальный репозиторий:
Tagging
Like most VCSs, Git has the ability to tag specific points in history as being important.
Typically people use this functionality to mark release points (v1.0, and so on).
In this section, you’ll learn how to list the available tags, how to create new tags, and what the different types of tags are.
Listing Your Tags
Listing the available tags in Git is straightforward.
Just type (with optional or ):
This command lists the tags in alphabetical order; the order in which they appear has no real importance.
You can also search for tags that match a particular pattern.
The Git source repo, for instance, contains more than 500 tags.
If you’re only interested in looking at the 1.8.5 series, you can run this:
| Note |
Listing tag wildcards requires or option If you want just the entire list of tags, running the command implicitly assumes you want a listing and provides one; the use of or in this case is optional. If, however, you’re supplying a wildcard pattern to match tag names, the use of or is mandatory. |
Creating Tags
Git supports two types of tags: lightweight and annotated.
A lightweight tag is very much like a branch that doesn’t change — it’s just a pointer to a specific commit.
Annotated Tags
Creating an annotated tag in Git is simple.
The easiest way is to specify when you run the command:
The specifies a tagging message, which is stored with the tag.
If you don’t specify a message for an annotated tag, Git launches your editor so you can type it in.
You can see the tag data along with the commit that was tagged by using the command:
That shows the tagger information, the date the commit was tagged, and the annotation message before showing the commit information.
Lightweight Tags
Another way to tag commits is with a lightweight tag.
This is basically the commit checksum stored in a file — no other information is kept.
To create a lightweight tag, don’t supply any of the , , or options, just provide a tag name:
This time, if you run on the tag, you don’t see the extra tag information.
The command just shows the commit:
Tagging Later
You can also tag commits after you’ve moved past them.
Suppose your commit history looks like this:
Now, suppose you forgot to tag the project at v1.2, which was at the “updated rakefile” commit.
You can add it after the fact.
To tag that commit, you specify the commit checksum (or part of it) at the end of the command:
You can see that you’ve tagged the commit:
Sharing Tags
By default, the command doesn’t transfer tags to remote servers.
You will have to explicitly push tags to a shared server after you have created them.
This process is just like sharing remote branches — you can run .
If you have a lot of tags that you want to push up at once, you can also use the option to the command.
This will transfer all of your tags to the remote server that are not already there.
Now, when someone else clones or pulls from your repository, they will get all your tags as well.
Checking out Tags
If you want to view the versions of files a tag is pointing to, you can do a git checkout, though this puts your repository in “detached HEAD” state, which has some ill side effects:
In “detached HEAD” state, if you make changes and then create a commit, the tag will stay the same, but your new commit won’t belong to any branch and will be unreachable, except for by the exact commit hash. Thus, if you need to make changes — say you’re fixing a bug on an older version, for instance — you will generally want to create a branch:
If you do this and make a commit, your branch will be slightly different than your tag since it will move forward with your new changes, so do be careful.
prev | next