Svn commands cheat sheet
Содержание:
- Введение
- Использование систем контроля версий Получение справочной информации Subversion (SVN)
- Краткая инструкция по работе с SVN (Subversion) для пользователей
- Description
- Examples
- Authors
- What’s New in Syncro SVN Client 10.1
- FAQ
- CentOS-6-amd64
- Usage
- Версионирование в дизайне: как не потеряться в тысяче макетов
Введение
Данное руководство написано для практического ознакомления с популярной сегодня системой контроля версий Subversion, также известной как SVN. Пользователи Linux смогут повторить все описанные в статье эксперименты на своём компьютере. Пользователи других операционных систем должны будут внести некоторые поправки.
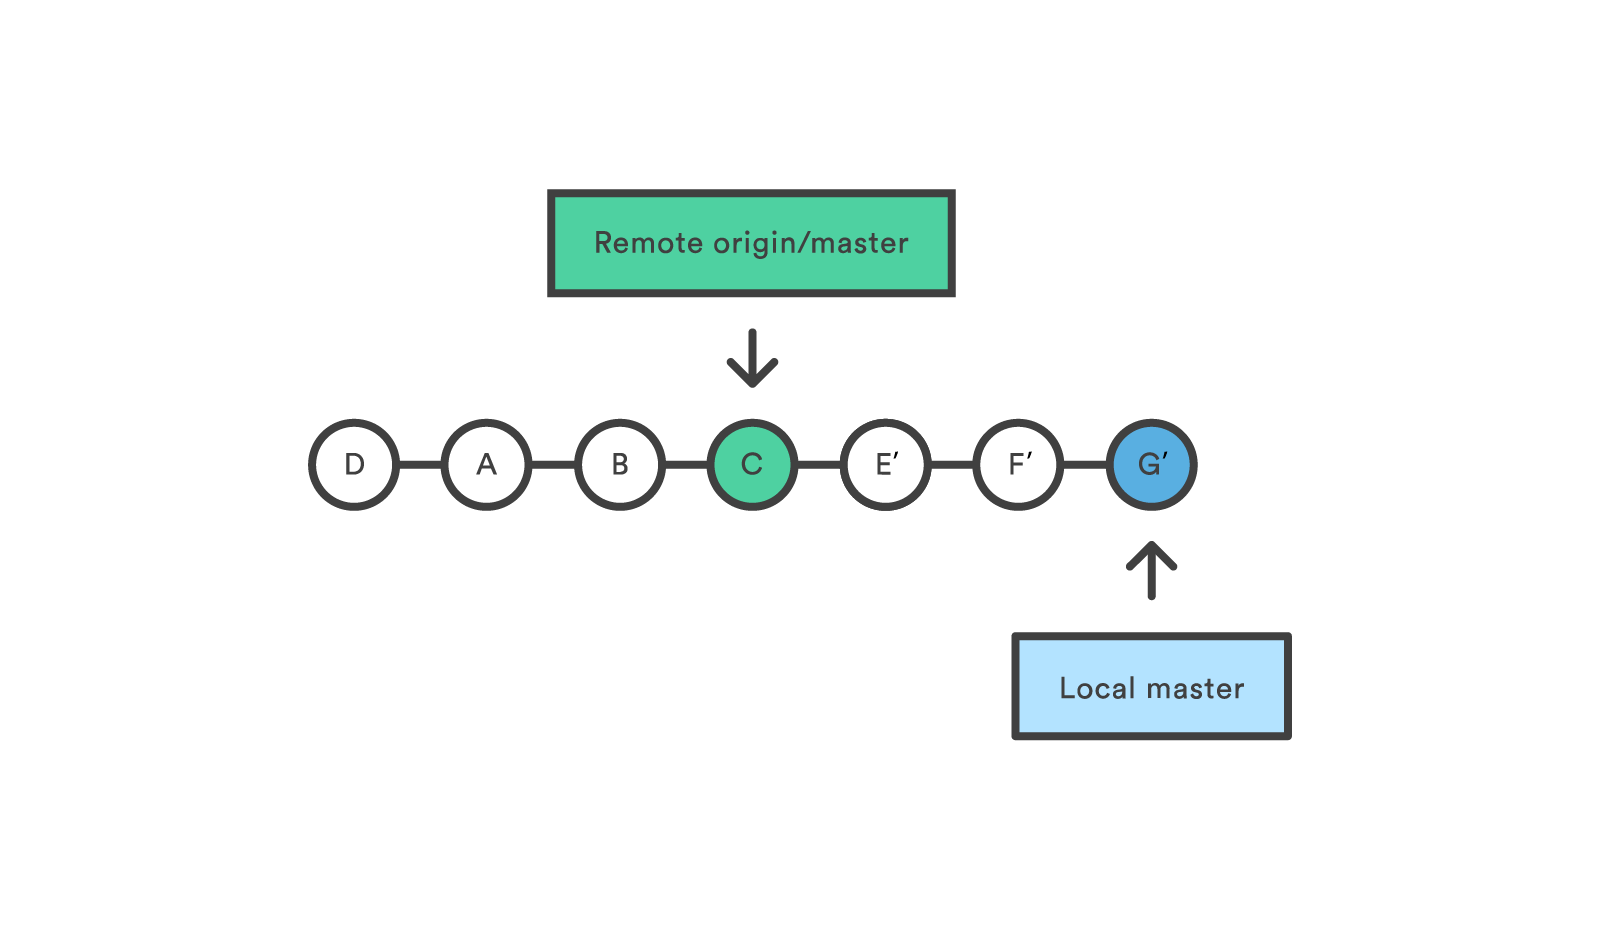
Одной из отличительных черт данного руководства является проведение сравнений и аналогий между SVN и Git. Git был разработан несколько позже SVN, и был ориентирован на очень специфический проект — разработка ядра Linux, которая ведется очень большим кругом разработчиков разбросанных по всему миру. Архитектура и реализация Git оказалась привлекательной для ведения других программных проектов и сегодня, наверное, именно SVN и Git являются самыми популярными системами контроля версий. SVN и Git сильно отличаются по своим базовым идеям, и выбор между использованием SVN или Git должен опираться на понимание этих различий
В рамках данного руководства, мы будем не только изучать SVN и Git, но и акцентировать внимание на отличительных особенностях этих систем, что, кроме прочего, должно усилить продуктивность изучения — знакомство с тем, что и как может быть сделано по-другому, упростит запоминание материала
Последний раздел посвящён специальным возможностям системы Git по трансформациям между своим локальным репозиторием и центральным репозиторием SVN. Многим будет интересно знать, что с центральным репозиторием SVN можно работать средствами Git. Такая синхронизация разноархитектурных репозиториев, доступная благодаря возможностям Git, поможет вам увидеть преимущества и недостатки разных подходов.
Примечание Данное руководство написано в контексте использования операционной системы Linux. Для других операционных систем необходимо вносить соответствующие коррективы.
Использование систем контроля версий Получение справочной информации Subversion (SVN)
Справочная информация по командам svn может быть получена обращением к самой утилите svn через команду svn help. Введя эту команду в консоли, вы получите полный список всех команд поддерживаемых текущей версией утилиты svn. Для получения информации по конкретной команде надо добавить ее после help. Например:
Subversion (SVN)
Продумаем размещение и выберем имя для директории будущего репозитория SVN. При этом подумайте о правах доступа, если репозиторий будет разделяемый. Для простоты я
сделаю репозиторий в своем домашнем каталоге /home/knz с именем 0-svn-repository. Имя начинающееся с нуля предоставит дополнительный приоритет для данной директории для
многих типов сортировок при выводе списка директорий и такая директория не затеряется в окружении многих других директорий домашнего каталога.
Находясь в домашней директории выполним команду.
svnadmin create 0-svn-repository
Репозиторий создан. Пустой репозиторий имеет нулевой номер ревизии. Теперь в него можно добавлять проекты для управления. Дальнейшая последовательность действий может быть такая.
- Создадим где-нибудь начальный оригинал будущего проекта.
- Выполним импорт этого оригинала проекта в репозиторий SVN с помощью команды svn import.
- Оригинал проекта теперь стратегического смысла не имеет и его можно удалить.
- Создаем рабочую копию проекта из репозитория SVN с помощью команды svn checkout.
- Работаем с рабочей копией, вносим в нее изменения. Чтобы зафиксировать изменения необходимо передать их в репозиторий SVN с помощью команды svn commit. При
этом, в репозитории проекта, будет создана очередная по счету ревизия.
Игнорирование файлов SVN
Сделать файл list с именами или масками, разделённые переводом строки
$ svn propset ‘svn:ignore’ -F list
Краткая инструкция по работе с SVN (Subversion) для пользователей
Недавно коллеги допекли, и я написал для них следующий узелок по работе с SVN и описал несколько полезных фишек.
SVN — свободная централизованная система управления версиями. Суть системы такова, что все файлы хранятся на сервере, а клиенты подключаются к серверу, скачивают актуальное состояние файлов, вносят правки и отсылают изменения обратно на сервер, чтобы другие клиенты могли работать уже и с их правками.
Для работы с SVN необходимо знать адрес репозитория (места хранения файлов), имя входа и пароль и иметь клиентскую программу.
Наиболее распространенной клиентской программой для работы с SVN является TortoiseSVN. Скачать ее можно на данной странице http://tortoisesvn.net/downloads
Важно, чтобы разрядность устанавливаемой версии программы совпадала с разрядностью операционной системы
Рассмотрим простейший рабочий цикл …
Этапы работы с репозиторием SVN
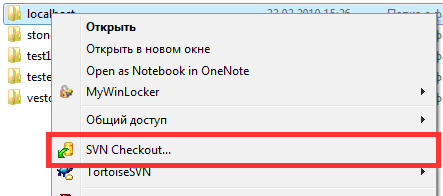
1) Создание локальной рабочей копии (checkout).
Необходимо создать простую папку, и в ее контекстном меню выбрать пункт «SVN Checkout…»
Далее в появившемся окне указать путь к svn-репозиторию в поле «URL of repository» и нажать на ОК.
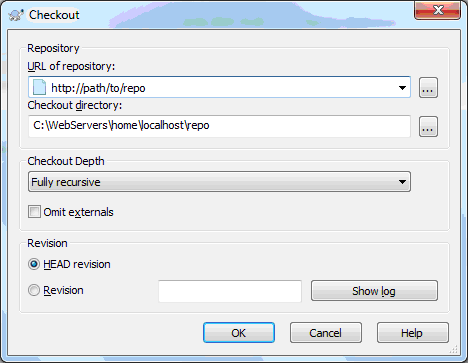
А в появившемся окне авторизации ввести свои учетные данные.
После того как будет выполнено создание рабочей копии, значок папки с репозиторием станет выделен зеленой галкой .
2) Изменения файлов и директорий в рабочей копии.
В изменении файлов SVN никак не задействован — изменения производятся программами, предназначенными для этого: текстовые редакторы, средства разработки и т.п.
Для файловых операций, если нужно удалить, переименовать, переместить или скопировать файл или директорию в рабочей копии, необходимо использовать средства SVN (команды delete, move, copy) доступные через пункт «TortoiseSVN» контекстного меню соответствующего объекта (файла или папки).
Любые локальные изменения, если они признаны неудачными, можно откатить через подпункт контекстного меню Revert.
После того, как в папке с локальной рабочей копией были выполнены какие-то изменения, ее иконка приобретает вид . Следовательно необходимо слить внесенные изменения на сервер (commit).
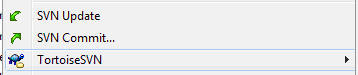
3) Слияние изменений (update)
Прежде чем выполнять отправку измененных данных на сервер необходимо выполнить слияние изменений, выполненных другими пользователями, со своей рабочей копией через пункт контекстного меню SVN Update для головной папки.
4) Фиксация изменений (commit)
Для отправки внесенных изменений на сервер необходимо в контекстном меню папки с рабочей копией выбрать пункт «SVN Commit…», после чего перед пользователем отобразится окно с внесенными им изменениями.
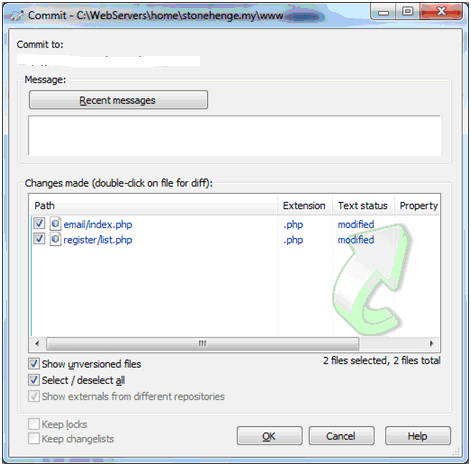
В списке измененных файлов галочки должны стоять только возле тех файлов, изменения по которым планируется отправлять на сервер.
В контекстном меню по каждому элементу списка можно выбрать пункт «Compare with base» и увидеть все внесенные изменения.
Временные файлы типа dcu, ~pas, dof, tmp и т.д. класть в репозиторий не нужно!
5) Регулярное обновление рабочей копии
Для поддержания актуального состояния своей рабочей копии необходимо регулярно выполнять ее обновление последними зафиксированными изменениями других пользователей через пункт контекстного меню «SVN Update».
Дополнительные полезные svn-фишки
1) Разрешение конфликтов (resolve conflicts)
Бываю ситуации, когда несколько человек правят один и тот же файл в одном месте. Но после того как первый из них выполнил commit своих изменений на сервер, то все остальные при попытке выполнить update актуальных данных к сервера получают уведомление о конфликте серверных изменений с локальными (эти файлы в окне update выделены красным цветом и возле них написано слово «Conflicted»).
Для разрешения конфликта необходимо в этом окне вызвать контекстное меню на конфликтном файле и выбрать один из вариантов:
— Resolve conflict using ‘mine’ (затереть серверные правки локальными);
— Resolve conflict using ‘theire’ (затереть локальные правки серверными);
— Edit conflicts (открывается окно для ручной корректировки конфликта).
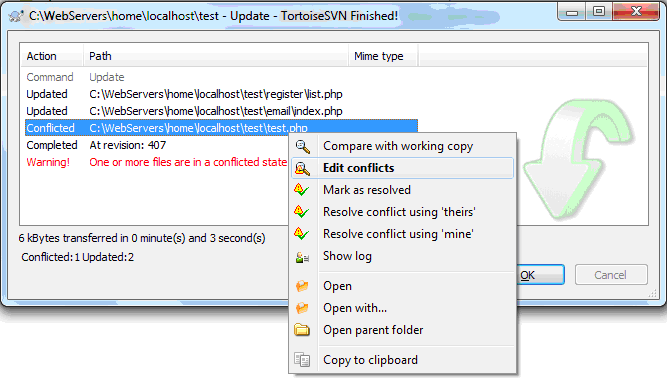
После разрешения конфликта возле файла должна появится надпись «Resolved».
2) Задание глобального паттерна исключений (global ignore pattern)
Чтобы в окне коммита не появлялись временные файла необходимо задать глобальный паттерн исключений, который доступен через контекстное меню на папке с рабочей копией в пункте «Settings». В строке паттерна через пробел нужно ввести типы файлов, которые не должны подпадать под коммит.

3) Переход на другой сервер (relocate)
Если сервер с репозиторием был перемещен в другое место, но необходимо выполнить операцию Relocate, через одноименный пункт контекстного меню по папке с рабочей копией, и в открывшемся окне указать новый путь к репозиторию.
Description
Print the status of working copy files and
directories. With no arguments, it prints only locally
modified items (no repository access). With
(), it
adds working revision and server out-of-date information.
With (), it
prints full revision information on every item.
With (), it
prints only summary information about locally modified
items.
The first seven columns in the output are each one
character wide, and each column gives you information
about a different aspect of each working copy item.
The first column indicates that an item
was added, deleted, or otherwise changed:
-
No modifications.
-
Item is scheduled for addition.
-
Item is scheduled for deletion.
-
Item has been modified.
-
Item has been replaced in your working copy.
This means the file was scheduled for deletion, and
then a new file with the same name was scheduled for
addition in its place. -
The contents (as opposed to the properties) of
the item conflict with updates received from the
repository. -
Item is present because of an externals definition.
-
Item is being ignored (e.g., with the
property). -
Item is not under version control.
-
Item is missing (e.g., you moved or deleted it
without using svn). This also
indicates that a directory is incomplete (a checkout
or update was interrupted). -
Item is versioned as one kind of object (file,
directory, link), but has been replaced by a different
kind of object.
The second column tells the status of a file’s or
directory’s properties:
-
No modifications.
-
Properties for this item have been
modified. -
Properties for this item are in conflict with
property updates received from the
repository.
The third column is populated only if the
working copy directory is locked (see
the section called “Sometimes You Just Need to Clean Up”):
-
Item is not locked.
-
Item is locked.
The fourth column is populated only if the item is
scheduled for addition-with-history:
-
No history scheduled with commit.
-
History scheduled with commit.
The fifth column is populated only if the item is
switched relative to its parent (see the section called “Traversing Branches”):
-
Item is a child of its parent directory.
-
Item is switched.
The sixth column is populated with lock information:
-
When
() is used, this means the file is not
locked. If
() is not
used, this merely means that the file is not locked
in this working copy. -
File is locked in this working copy.
-
File is locked either by another user or in
another working copy. This appears only when() is used.
-
File was locked in this working copy, but the
lock has been “stolen” and is invalid.
The file is currently locked in the repository. This
appears only when
() is used. -
File was locked in this working copy, but the
lock has been “broken” and is invalid.
The file is no longer locked. This appears only
when
() is used.
The seventh column is populated only if the item is
the victim of a tree conflict:
-
Item is not the victim of a tree conflict.
-
Item is the victim of a tree conflict.
The eighth column is always blank.
The out-of-date information appears in the ninth
column (only if you pass the
()
option):
-
The item in your working copy is up to date.
-
A newer revision of the item exists on the
server.
The remaining fields are variable width and delimited
by spaces. The working revision is the next field if
the ()
or () option
is passed.
If the
() option is passed, the last committed
revision and last committed author are displayed
next.
Examples
This is the easiest way to find out what changes you
have made to your working copy:
If you want to find out what files in your working
copy are out of date, pass
the ()
option (this will not make any
changes to your working copy). Here you can see that
has changed in the
repository since we last updated our working
copy:
| Note | |
|---|---|
|
() only places |
The most information you can get out of
the status subcommand is as follows:
Lastly, you can get svn status
output in XML format with the
option:
For many more examples of svn status,
see .
Authors
To convert all your svn authors to git format, create a file somewhere on your
system with the list of conversions to make, one per line, for example:
Then pass an authors option to svn2git pointing to your file:
Alternatively, you can place the authors file into and
svn2git will load it out of there. This allows you to build up one authors
file for all your projects and have it loaded for each repository that you
migrate.
If you need a jump start on figuring out what users made changes in your
svn repositories the following command sequence might help. It grabs all
the logs from the svn repository, pulls out all the names from the commits,
sorts them, and then reduces the list to only unique names. So, in the end
it outputs a list of usernames of the people that made commits to the svn
repository which name on its own line. This would allow you to easily
redirect the output of this command sequence to and have
a very good starting point for your mapping.
Or, for a remote URL:
What’s New in Syncro SVN Client 10.1
April 8, 2015
Improved Patch Generation
Completely revamped the Create Patch operation to now
include additional patch types and options. It is now easier to create various types of
patches, particularly creating a patch with local modifications. Also, the action can
now be invoked for items from additional locations, such as the Repositories
view.
Pre-Merge Checks
The Merge wizard now includes a pre-merge checks stage that
validates the working copy to help you identify possible issues that could prevent the
operation from working as expected, and also proposes tips for solving
them.
Updated the Export Operation
The Export operation has been updated with new options and
was extended to additional views (History, Directory Change Set, and Revision Graph
views).
Improvements to Multiple Operations
The Import, Share Project,
Switch, and Show Annotation operations have been
updated to include the complete list of options for the corresponding SVN
commands.
Complete SVN Information
The Show SVN Information action now displays complete
information about items under version control, and for working copy items, it includes
detailed status information. This feature is also now available in other views (History,
Directory Change Sets, and Revision Graph views).
Other Improvements and Bug Fixes
Other various improvements and bug fixes include the following:
- Custom keywords are now supported.
- Improved performance for Revert and Delete
operations in the Working Copy view. - Improved operation behavior when reverting changes from the History
view. - Easy access to URLs that are defined in the Repositories view from various
dialog boxes. - Improved support for peg revisions.
- Fixed issues with regards to svn:// protocol
compliance. - Fixed encoding issues in the Create Patch and
Show Annotation operations. - Fixed line ending and keyword related issues in the Export
operation.
See more
FAQ
-
Why don’t the tags show up in the master branch?
The tags won’t show up in the master branch because the tags are actually
tied to the commits that were created in svn when the user made the tag.
Those commits are the first (head) commit of branch in svn that is
associated with that tag. If you want to see all the branches and tags
and their relationships in gitk you can run the following: gitk —allFor further details please refer to FAQ #2.
-
Why don’t you reference the parent of the tag commits instead?
In svn you are forced to create what are known in git as annotated tags.
It just so happens that svn annotated tags allow you to commit change
sets along with the tagging action. This means that the svn annotated tag
is a bit more complex then just an annotated tag it is a commit which is
treated as an annotated tag. Hence, for there to be a true 1-to-1 mapping
between git and svn we have to transfer over the svn commit which acts as
an annotated tag and then tag that commit in git using an annotated tag.If we were to reference the parent of this svn tagged commit there could
potentially be situations where a developer would checkout a tag in git
and the resulting code base would be different than if they checked out
that very same tag in the original svn repo. This is only due to the fact
that the svn tags allow changesets in them, making them not just annotated
tags.
CentOS-6-amd64
Установка apache
yum install httpd
Сделаем, чтоб он запускался при загрузке системы
chkconfig httpd on
Запускаем
service httpd status
Установка и настройка SVN
Установка:
yum install mod_dav_svn subversion
Создадим директорию, которая и будет репозиторием
mkdir -p /svn/repo && cd /svn/repo
В ней создадим репозитарий myrepo и выставим правильного владельца его директории
svnadmin create myrepo
chown -R apache.apache myrepo
Настраиваем веб-сервер для работы с svn. В файле /etc/httpd/conf.d/subversion.conf должно содержаться следующее:
LoadModule dav_svn_module     modules/mod_dav_svn.so
LoadModule authz_svn_module   modules/mod_authz_svn.so

<Location /myrepo>
DAV svn
SVNPath /svn/repo/myrepo
AuthType Basic
AuthName "Authorization Realm"
AuthUserFile /etc/svn-auth
Require valid-user
#   </LimitExcept>
</Location>
Создаем файл web-авторизации и задаем пользователя и пароль:
htpasswd -mbc /etc/svn-auth svn-adm ВАШ_ПАРОЛЬ_ТУТ
Проверяем — IP-адрес_сервера/myrepo набираем в браузере
Если не можете подключиться из браузера по адресу IP-адрес_сервера/myrepo, то проверьте iptables
iptables -nL
возможно увидите правила:
Chain INPUT (policy ACCEPT)
target     prot opt source               destination
ACCEPT     all  --  0.0.0.0/0            0.0.0.0/0           state RELATED,ESTABLISHED
ACCEPT     icmp --  0.0.0.0/0            0.0.0.0/0
ACCEPT     all  --  0.0.0.0/0            0.0.0.0/0
ACCEPT     tcp  --  0.0.0.0/0            0.0.0.0/0           state NEW tcp dpt:22
REJECT     all  --  0.0.0.0/0            0.0.0.0/0           reject-with icmp-host-prohibited

Chain FORWARD (policy ACCEPT)
target     prot opt source               destination
REJECT     all  --  0.0.0.0/0            0.0.0.0/0           reject-with icmp-host-prohibited

Chain OUTPUT (policy ACCEPT)
target     prot opt source               destination
сбросьте их:
iptables -F
Полезная информация и примеры для работы с SVN в CentOS здесь
Usage
Initial Conversion
There are several ways you can create a git repo from an existing
svn repo. The differentiating factor is the svn repo layout. Below is an
enumerated listing of the varying supported layouts and the proper way to
create a git repo from a svn repo in the specified layout.
-
The svn repo is in the standard layout of (trunk, branches, tags) at the
root level of the repo. -
The svn repo is NOT in standard layout and has only a trunk and tags at the
root level of the repo. -
The svn repo is NOT in standard layout and has only a trunk at the root
level of the repo. -
The svn repo is NOT in standard layout and has no trunk, branches, or tags
at the root level of the repo. Instead the root level of the repo is
equivalent to the trunk and there are no tags or branches. -
The svn repo is in the standard layout but you want to exclude the massive
doc directory and the backup files you once accidently added. -
The svn repo actually tracks several projects and you only want to migrate
one of them. -
The svn repo is password protected.
If this doesn’t cooperate and you need to specify a password on the command-line:
-
You need to migrate starting at a specific svn revision number.
-
You need to migrate starting at a specific svn revision number, ending at a specific revision number.
-
Include metadata (git-svn-id) in git logs.
Repository Updates
As of svn2git 2.0 there is a new feature to pull in the latest changes from SVN into your
git repository created with svn2git. This is a one way sync, but allows you to use svn2git
as a mirroring tool for your SVN repositories.
The command to call is:
Версионирование в дизайне: как не потеряться в тысяче макетов
— Коллеги, файл project_lastVersion точно финальный? Или project_lastVersion_1?
— …
Знакомая ситуация? Мне так точно, особенно когда работаешь в команде с другими дизайнерами. Обычно приходится создать несколько разных версий файлов, количество которых зависит от проекта, правок и других факторов, и головная боль заключается в том, чтобы разобраться во всех этих версиях.
В статье я расскажу о наиболее актуальных и используемых вариантах контроля версий, а именно: Zeplin (+ Sketch), Figma, Abstract (+ Sketch), то есть опишу функции и особенности этих инструментов, относящиеся именно к версионированию.