Er diagrams
Содержание:
Базовое использование приложения
Создание соединения с базой данных
DBeaver предоставляет вспомогательное окно для создания соединений, которое автоматически появляется при запуске программы в первый раз. В остальных случаях, его можно открыть самостоятельно, совершив следующую последовательность действий:
- Кликните на кнопку New Connection Wizard на панели инструментов навигатора баз данных.
- В открывшемся окне выберите Database connection.
- Выберите подходящий тип БД (рисунок 6).
- Заполните небходимые поля конфигурации (рисунки 7 и 8).
В параметрах соединения можно указывать переменные окружения системы, а также следующий список:
| Имя | Значение |
|---|---|
| ${host} | Имя хоста |
| ${port} | Номер порта |
| ${database} | Имя базы данных |
| ${server} | Имя сервера |
| ${url} | URL соединения |
| ${user} | Имя пользователя |
| ${password} | Пароль пользователя |
Подтверждение соединения с базой данных
В приложении есть инструмент (рисунок 9) для проверки соединения с БД и переподключения в случае его отсутствия. Для использования этой функции нужно кликнуть на кнопку Invalidate/Reconnect в панели инструментов.
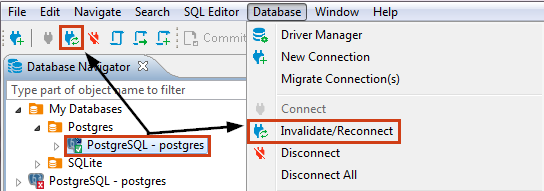
Рисунок 9 – Подтверждение соединения
Просмотр плана выполнения запроса
Если драйвер БД поддерживает визуализацию плана выполнения, то можно открыть её нажатием сочетания клавиш . Команда генерирует дерево выполнения запроса и позволяет определить, насколько запрос оптимален (рисунок 10):

Рисунок 10 – Окно плана выполнения запроса
Можно выделять строки плана, чтобы увидеть детали на панели ниже и в окне справа.
В корпоративной версии доступная продвинутая визуализация (рисунок 11). Она показывает наиболее дорогие этапы выполнения. Можно скрыть все нерелевантные этапы, смотреть детали этапов, использовать горизонтальную или вертикальную вёрстку, экспортировать в изображение или сохранить в JSON виде.

Рисунок 11 – Граф плана исполнения запроса
Редактор объектов базы данных
Редактор объектов (или метаданных) доступен для множества объектов БД, таких как таблицы, виды и схемы. Чтобы открыть редактор объекта:
- Сделайте дабл-клик на объект
- Кликните на объект базы данных и нажмите или
У редактора есть три вкладки (рисунок 12):
- Свойства есть у всех объектов
- Данные отображаются для таблиц и видов, используются редактором данных
- Диаграмма отношений сущностей отображается для таблиц и схем

Рисунок 12 – Редактор объектов
Путь объекта показывает цепь всех его родительских объектов. Они кликабельны — клик открывает либо родительские объекты, либо окно редактора.
Использование программы
Запускаем бинарный файл «dbeaver», после того как программа загрузится будет предложено создать новое подключение к нужной вам базе данных.
Вот как выглядит DBeaver при работе с базой данных в Linux:

Все окна можно расположить в удобном вам порядке, для этого нужно их перетащить в нужную вам позицию. На примере ниже я немного сделал реорганизацию окон и в автоматическом режиме сгенерировал при помощи DBeaver диаграмму для базы данных «wordpress»:

Для выполнения запросов нужно выбрать активную БД и вызвать редактор SQL-кода, ввести нужный запрос и клацнуть иконку «Execute statement» на панели инструментов или нажать сочетание клавиш Ctrl+Enter:

Немного поигравшись с интерфейсом вы быстро разберетесь что и к чему.
Install:
Windows installer – run installer executable. It will automatically upgrade version (if needed). Installer doesn’t change any system settings or Java installation. Included JDK will be accessible only for DBeaver.MacOS PKG – just run it and follow installer pages. JDK 11 is included (and will be accessible only for DBeaver).MacOS DMG – just run it and drag-n-drop DBeaver into Applications. Make sure you have Java installed. On reinstall do the same (your settings won’t be lost).Debian package – run . Then execute “dbeaver &”.RPM package – run . Then execute “dbeaver &”. Note: to upgrade use “-Uvh” parameter.ZIP archive – extract archive and run “dbeaver” executable. Do not extract archive over previous version (remove previous version before install). Java must be installed separately.
Upgrade – don’t be afraid to remove previous DBeaver version – your settings won’t be lost. All settings are kept in the separate folder (DBeaverData in user home)
Java notes: if you use Windows or MacOS installer then you don’t need to install Java. Otherwise you will need to setup Java separately. Java 1.8+ must be the default Java version. To validate this run “java -version” in terminal window.
Debian repository:
wget -O - https://dbeaver.io/debs/dbeaver.gpg.key | sudo apt-key add -
echo "deb https://dbeaver.io/debs/dbeaver-ce /" | sudo tee /etc/apt/sources.list.d/dbeaver.list
sudo apt-get update && sudo apt-get install dbeaver-ce
Ubuntu PPA:
You can use PPA repository to easily install/upgrade DBeaver on Debian Linuxes. Mostly it is the same as regular Debian repo but it is hosted on Launchpad.
sudo add-apt-repository ppa:serge-rider/dbeaver-ce
sudo apt-get update
sudo apt-get install dbeaver-ce
История
DBeaver изначально был «домашним» проектом. Основной идеей была поддержка принципов свободного ПО с удобным интерфесом, включающем в себя возможность выполнения задач, часто встающих перед пользователями БД. В сентябре 2010 года состоялось несколько публичных бета-тестов, а в 2011 был выложен первый релиз.
В этом же году был запущен веб-сайт проекта, создан форум (позднее стал использоваться GitHub). В 2012 выпущен плагин для IDE Eclipse — это привело к тому, что DBeaver стал одним из самых популярных плагинов.
В 2017 поменялась лицензия — стала использоваться Apache License. Также, корпоративная версия стала распространяться на коммерческой основе.
DBeaver 7.1.5
- Data transfer:
- Import from multiple CSV files was added
- Import from files into new tables
- Data import preview dialog was added
- Target table create/alter DDL now supports database-specific options
- Virtual columns are ignored in SQL INSERTs export
- Problem with data transfer wizard and Darkest Dark theme was fixed
- Problem with timestamp format for CSV/XLSX export was fixed
- Case sensitive table/column names resolution was fixed
- Database navigator:
- Statistics render was fixed for MacOS and Linux
- Database size statistics was added for PostgreSQL, MySQL, SQL Server, DB2
- Team work:
- Problem with empty Git Repositories view was fixed
- Git integration was added in project navigator view
- PostgreSQL:
- Native client version was upgraded to version 12 (Windows)
- Check constraints read was fixed (PG 12+)
- SQL results limit was fixed (for queries with LIMIT/OFFSET/FETCH clauses)
- Object DDL generator was improved (comments, permissions)
- Support of case insensitive full-text search was added
- Table partitions statistics was added
- Oracle:
- TNS names search was fixed
- Connection info was fixed for TNS/custom URL connections
- Variables are now supported in custom JDBC URL (thanks to @insightfuls)
- MysQL:
- Problem with check constraints read was fixed
- Table copy was fixed (bug with redundant indexes was resolved)
- Redshift: problem with read-only resultsets was fixed
- Snowflake: SQL dialect support was fixed ($$ comments)
- A large number of minor UI improvements and bugfixes
Posted in Releases
Особенности DBeaver
Из основных особенностей прграммы можно выделить:
- Удобный структурированный интерфейс, основан на OpenSource фреймворке c большой подборкой мощных плагинов;
- Небольшой вес — 50Мб;
- Свободное программное обеспечение;
- Мультиплатформенность (работает под Linux, MacOS, Windows, Solaris, AIX, HPUX);
- Поддержка большого количества разных Баз Данных;
- Умеет делать тунеллирование через SSH (встроенный функционал, очень удобно);
Список поддерживаемых баз данных:
- MySQL
- Oracle
- PostgreSQL
- IBM DB2
- Microsoft SQL Server
- Sybase
- ODBC
- Java DB (Derby)
- Firebird (Interbase)
- HSQLDB
- SQLite
- Mimer
- H2
- IBM Informix
- SAP MAX DB
- Cache
- Ingres
- Linter
- Teradata
- Vertica
- MongoDB
- Cassandra
- Любой JDBC совместимый источник
Небольшой список того что умеет DBeaver:
- Обзор и правка метаданных: таблички, колонки, ключи, индексы
- Выполнение SQL запросов и скриптов
- Подсветка синтаксиса для SQL (специфичная для разных типов БД)
- Функция авто-дополнения в SQL редакторе
- Просмотр и редактирование данных в таблицах
- Поддержка BLOB/CLOB (просмотр и редактирование)
- Экспорт данных (таблици, результаты запросов)
- Менеджмент транзакций
- Поиск объектов в базе данных (таблици, колонки, процедуры и т.п.)
- Генерация диаграмм для структур БД
- Закладки для запросов и объектов в БД
- Менеджмент удаленных и локальных подключений
- Экспорт и Импорт в/из БД/файл
- Поиск данных в базе
- И многие другие возможности…
datagrip
IDE для баз. Несмотря на то, что продукт относительно свежий, он уже используется повсеместно. В основном за счет того, что сразу встроен в мегапопулярные продукты от компании JetBrains: IntelliJ IDEA, PyCharm, PhpStorm и т.д.
Собственно, эта его встроенность одновременно является и главной киллер-фичей продукта: вы редактируете, например, php-код, в котором есть строка с sql-запросом, и внезапно понимаете, что IDE вам подсказывает (прямо в вашем коде) синтаксис SQL, названия таблиц и их полей, подчеркивает красненьким, если что-то написано не так, форматирует SQL и многое-многое другое. Конечно, в этом же IDE можно делать и то, что умеют другие GUI для баз: просматривать списки таблиц и других сущностей, отдельно делать запросы, экспорт таблиц в разные форматы и многое другое.
Из особенностей я бы отметил следующие вещи:
- можно выделить несколько insert’ов и нажать «Edit as table» (см. картинку). После чего отредактировать это в удобном табличном виде вместо sql-синтаксиса, причем там же можно добавлять строки, колонки, экспортировать в csv и т.д.
- Можно сравнивать результаты двух запросов. Это полезно, когда пытаешься упростить сложный запрос, и при этом ничего не сломать.
- встроенность в код проработана не до конца. К примеру, при переименовывании в каком-либо интерфейсе колонки таблицы, IDE не находит нужные строки с SQL в коде (при этом автокомплит в этих строках работал), и наоборот, находит какую-то чушь.
- Визуальной разработки не очень много. Т.е. вы можете сделать таблицу, но view уже не можете. Если таблица содержит какие-то id с foreign key (допустим, ссылка на некий словарь), хотелось бы при в вводе данных в таблицу выбирать значения из словаря, а не вбивать айдишки.
- Если посмотреть таблицу в какой-нибудь из схем, то Datagrip посылает запрос set search_path = имясхемы, что приводит к плохим последствиям, если используется pgbouncer (а он используется почти всегда в случае с php или когда много серверов), так что для dev-разработки лучше использовать разные подключения: для работы кода — через pgbouncer, для ide — напрямую к базе.
Datagrip активно развивается, в частности, исправлены некоторые раздражающие баги с подсветкой синтаксиса.
В целом хороший современный инструмент, рекомендую.
Adjusting Query Settings
Visual Query Builder also allows setting query conditions and adjust representation of query results by means of Query Settings Editor.
To open Query Settings Editor use Visual builder query settings button in the vertical tool bar on the left.
Query Settings window contains five tabs described below.
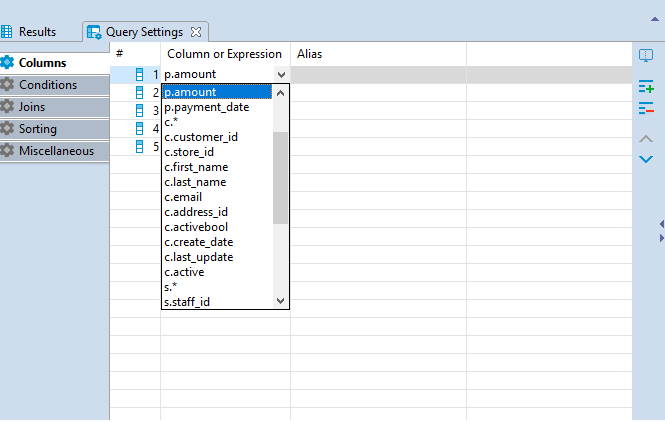
Columns

Columns tab of the Query Settings Editor contains all the columns you added by selecting column names in Visual Builder main window. In this tab you can add and remove columns using Add and Remove buttons correspondingly.
To add a column, press Add button and a new instance will be added to the table. Click on the first cell in Column or Expression column and select a column from the list of available columns displayed in the dropdown list appeared.
To remove a column, click on the row containing its name and press the Remove button on the right.
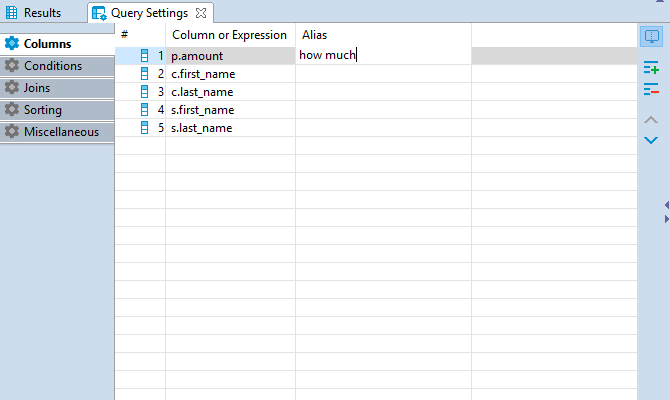
To change the display order of columns in the result table use Move Up/Down buttons .
You can also define a user-friendly name of the column to be displayed in the result table. To set a user-friendly name click on a cell in Alias column and insert the name. The change will be immediately displayed in the SQL script area.
Conditions
Conditions tab is used for managing query conditional expressions.

To add a new conditional expression use the Add button on the right — a new instance will be added and the default conditional expression WHERE will be added to the SQL script area automatically. This default conditional expression can be then adjusted to the one you need:
Left Operand setting defines the left operand of the conditional expression. To set the left operand, click the cell in the Left Operand column and a drop down list of all available columns will be displayed. Select a column you want to use as the left operand in your conditional expression or insert a digit.
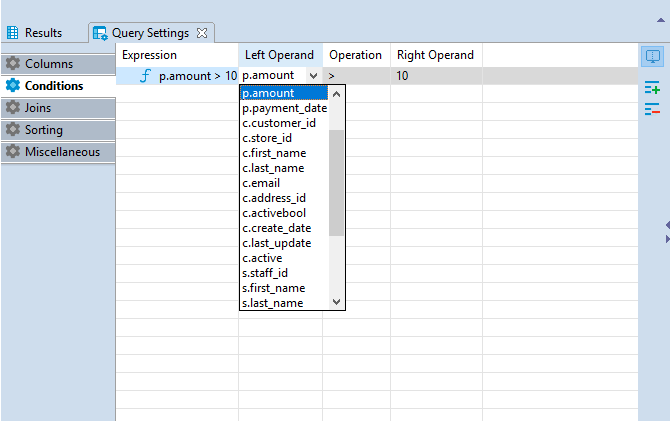
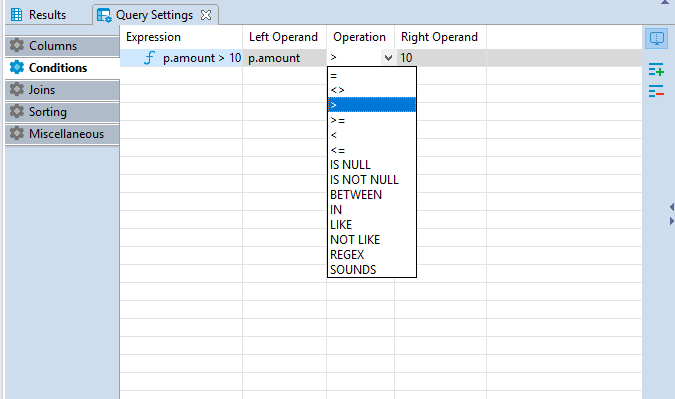
Operation setting defines the comparison rule between the left and the right operands of the conditional expression. To set a comparison rule, click the cell in the Operation column and select the rule you need from the drop down list appeared.
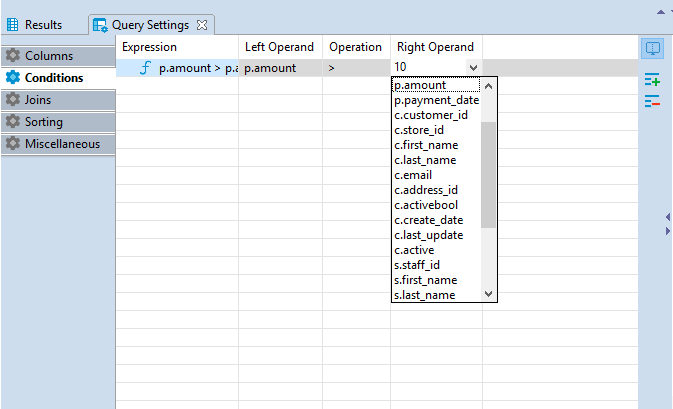
Right Operand setting defines the right operand of the conditional expression. To set the right operand, click the cell in the Right Operand column and a drop down list of all available columns will be displayed. Select a column you want to use as the left operand in your conditional expression or insert a digit.
To remove a conditional expression, click on the row containing the expression and press the Remove button on the right.
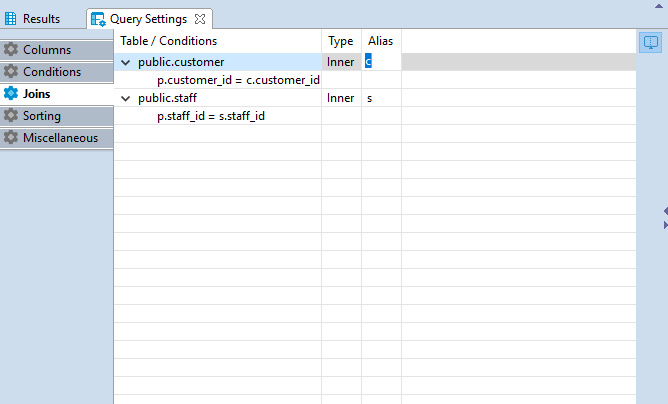
Joins
All the joins existing between the tables in Visual Query Builder main window are displayed in the Joins tab of Query Settings Editor.

Joins cannot be added or removed by means of Query Settings Editor, however, the following join settings can be adjusted here:
Type — defines the type of the join. Click the cell in the Type column — a drop down with available join types will be displayed. Select the required option from the list by clicking on it.
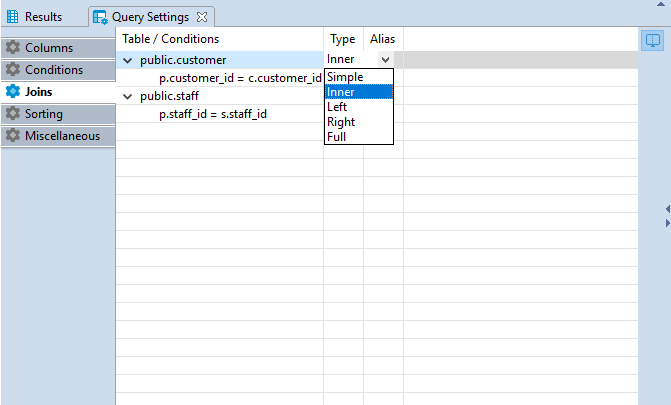
Alias — defines a user friendly name of the join. To define this setting click on the cell in Alias column and input the name.
Sorting
In Sorting tab you can set the order of rows in the result table.

To add a new sorting condition press the Add button on the right and the default conditional expression ORDER BY will be added to the SQL script area automatically. This default conditional expression can be then adjusted to the one you need:
Once a new condition is added, click the first cell in Conditions or Expressions column and a drop down list of all available columns will appear. Select the required column by clicking on its name.
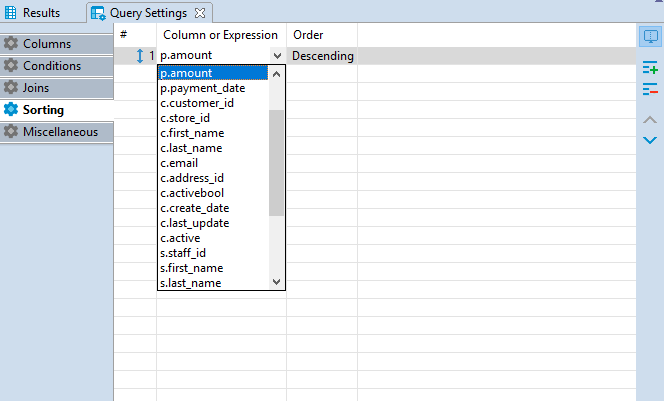
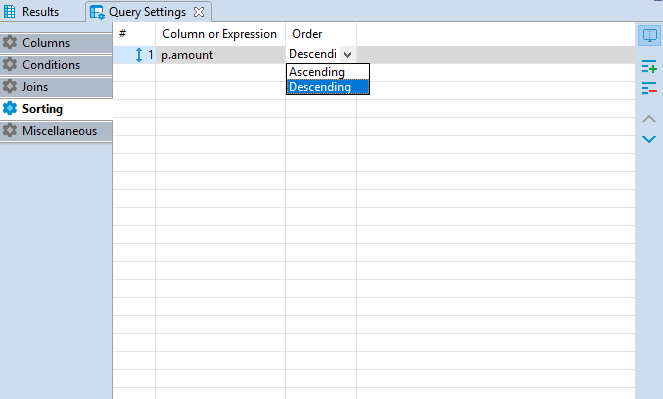
In Order column you can define whether the rows of the selected column should be sorted in ascending or descending order in the result table. To set the order, click the cell in Order column and select the required option from.The order by command will be added to the script.
To remove a condition use the Remove button on the right.
Miscellaneous
In Miscellaneous tab it is possible to autosave on SQL-editor switch by selecting the Autosave on SQL-editor switch check-box.

Introduction
DBeaver is a free, open source and well-known database management tool that can be used for developers, SQL programmers, database administrators and analysts. It is a multi-platform database tool that supports any database which has JDBC driver, which will make your life easier if you work with different types of databases. You can build SQL queries, edit and transfer data, view trees of objects, monitor database connection sessions and much more using DBeaver.
In this tutorial, we will learn how to install and configure Dbeaver on an Alibaba Cloud Elastic Compute Service (ECS) Ubuntu 18.04 server.
DBeaver 6.3.3
- Tasks:
- SQL script execute task was added
- Variables support was added
- Grouping of tasks by project/type was added
- Active database/schema now saved for custom SQL queries
- Target table mapping was fixed for database-to-database data transfer
- Data viewer:
- Column filter UI was improved (multi-value select, value search)
- Null XML columns support was fixed
- Column value transformations and coloring was fixed
- Context menu was improved (layout was change, missing commands were added)
- Problem with missing toolbar actions was fixed
- Hex editor coloring was improved, dark theme support was added
- SQL editor:
- Auto-complete now respects active schema
- Database output read was fixed (async mode)
- Hyperlinks and object navigation were fixed
- Aliases generation algorithm was improved
- PostgreSQL:
- Database restore task was fixed (target database)
- SQL parser was fixed (BEGIN/END keywords)
- Oracle: procedures/views source code editor was fixed
- MySQL: database restore log level config was fixed
- Netezza: views and procedures source extraction was fixed
- Hive: view editor was fixed
- Neo4j: arrays support was fixed, SQL parser was fixed
- Metadata editor: current database detection was fixed
- Tooltips for database navigator were improved
- Variables in connection parameters now enabled by default
- Connection type permissions save was fixed
- Dark theme support was improved in the main toolbar and in different dialogs
- SSH agents support was fixed (now we use ssh-agent on Linux)
- SSH + private key + password: configuration dialog was fixed
- A lot of minor bugfixes
Posted in Releases
Installation
As the first step, you need to install the plugin_debugger extension in your PostgreSQL database. It is free and open source. You can download the source code here. And you can find the installation README file here.
To install the debugger plugin:
- Copy this directory to contrib/ in your PostgreSQL source tree.
- Run make; make install.
- Edit your postgresql.conf file and modify the shared_preload_libraries config option to look like the following: shared_preload_libraries = ‘$libdir/plugin_debugger’.
- Restart PostgreSQL for the new setting to take effect.
- Run the following command in the database or databases that you wish to debug functions in:CREATE EXTENSION pldbgapi;
NOTE: On server versions older than 9.1, instead of running the command, you need to run the pldbgapi—1.0.sql script directly using psql.
If you use binary builds from pgdg, you can use repository for your Linux distribution. For more information, please see (https://www.postgresql.org/download/).
After installing the plugin on the database server, you need to install the debug plugin from either a marketplace or P2 repository, see this article for more information.
You can find a detailed DBeaverCE Debug plugin installation guide from Jkiss P2 repository here.
How to start debug with local breakpoint
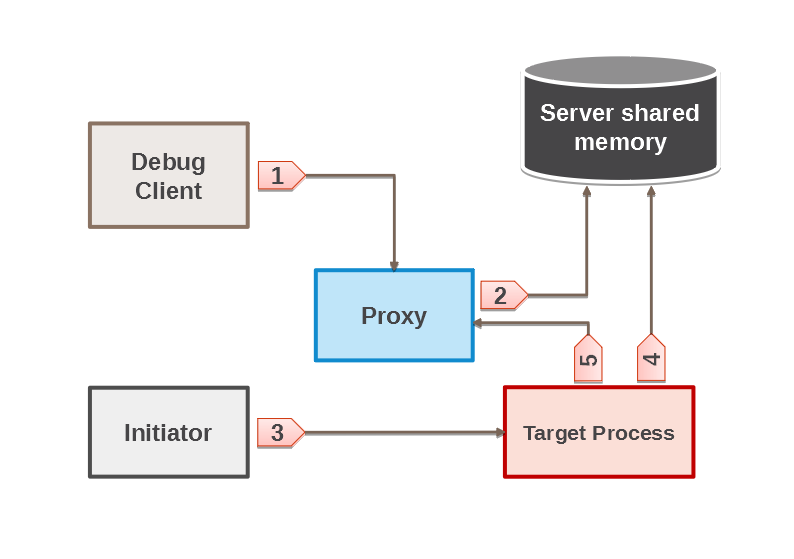
For local breakpoints, stop will be done only for server process launched by the initiator. All other processes will run procedure/function as usual. When you create or run a previously defined debugging session in DBeaver with local breakpoint, the following steps take place:
- DBeaver creates initiator session and local breakpoint.
- DBeaver runs procedure\function (with parameters specified) selected for debugging in the initiator session.
- The server process reaches breakpoint and displays NOTICE to initiator, in which the PORT is reported for PLDBGBREAK:XX debugging. Then the process opens the socket and becomes blocked, waiting for PROXY connection. If Debug Client cannot get PORT name from the process being debugged, an error message appears.
- Debug Client creates a session, then tries to establish connection with the debugged process, using PORT from step 3 provided by the initiator. The connection is established via API call attach_to_port. If the connection cannot be established, the Error rcv port number message appears.
- PROXY receives PORT from the client, then establishes connection to the process, and returns the session identifier to the client. After that, using the identificator, one can:
- Send debugging commands to the process;
- Receive responses from the process;
- Translate responses to the client.

How to start debug with global breakpoint
Whenever the breakpoint is global, stop will be done for any server process launched by anyone. No modifications or additional calls from the debugged process are required. When you create a session with a global breakpoint, the following steps take place:
- The client creates a session and then establishes a connection with PROXY (receiving session). After that, the client creates a global breakpoint for the selected function, and then becomes blocked via the pldbg_wait_for_target API call waiting for the server process.
- PROXY receives the global control point from the client and adds global control point to the shared memory, if the point of this type has not been added before.
- The initiator creates a connection and runs the selected procedure.
- On each executed line, the target process checks if the global breakpoint with corresponding conditions exists, and becomes blocked if the breakpoint exists and conditions are met.
- The target process establishes a connection with PROXY and reports that the breakpoint is reached.
- Afterwards, the process becomes blocked and waits for PROXY (client) commands. The process will be implementing commands unless the procedure finishes or an exception is thrown.
DBeaver 6.3.4
- Active database/schema selector behavior was significantly improved
- Smart commit mode was enhanced:
- Switching to auto-commit after the end of transaction
- Smart commit for table editors
- Transactions preference page was added
- Data transfer:
- CSV export parameters (quote mode) were added
- Add/remove table to existing data transfer task was fixed
- SQL editor:
- “Select all rows” query generation was fixed
- Read data in console now uses correct default schema
- Data viewer:
- Show boolean values as checkboxes (configurable)
- Row colors customization was fixed
- Connection editor:
- Multiple connection editor dialogs can be opened now
- Extra variables were introduced, config UI was improved
- Apache Phoenix:
- Driver version was updated
- Schema-less tables read was fixed
- Index create support was added
- SQL autocomplete was fixed
- Exasol: metadata editor was significantly improved
- Neo4j: complex data types (structs/arrays) support was fixed
- Snowflake: index editor was fixed, view editor was fixed
- PostgreSQL:
- Backup for selected tables was fixed
- Execute script on the selected database was fixed
- Greenplum 6.x: table DDL was fixed
- Oracle: PL/SQL parser was fixed (code blocks)
- A lot of minor bugfixes
Posted in Releases
DBeaver 6.3.0
- SSH Agent support was added (pageant and ssh-agent)
- Disconnect project/folder/all actions were reworked
- Problem with connection properties save was fixed
- Connection properties dialogs UI was improved (test connection, password save, pref page search)
- Task management UI was improved (task create/save actions in data transfer wizard)
- ER diagrams: dummy errors are now suppressed (now they present in log file only)
- Legacy Eclipse plugins installation support was added (with hold update site format)
- Dark theme support was significantly improved
- Auto-commit mode behavior change:
- Toolbar toggle now affects current connection only
- Mode change affects active DBeaver session only
- Data export:
- Export from SQL script now supports commands (@set and others)
- Saved settings loading was fixed
- XLSX exporter now respects export configuration
- Data editor:
- Fetch size can be changed before query execute
- Spatial viewer now supports different pluggable tiles (mapbox, osm, etc)
- Wrong date/time format now treated as error
- SQL Editor: editor layout now saved between DBeaver sessions
- Object editor (tables, views, etc) now checks for object name duplicates
- Oracle: now we use full type name presentation by default
- PostgreSQL: support of extra type aliases and array data types was added
- CockroachDB: native CDB data types were added
- Impala: active schema change support was added
- A lot of minor UI/DB-specific bug fixes
Posted in Releases
Creating Visual Query
Start creating a query from selecting query data source: drag-and-drop tables you want to work with from the Database Navigator pane into the Visual Query Builder area. All the connections existing between the tables will be shown automatically.
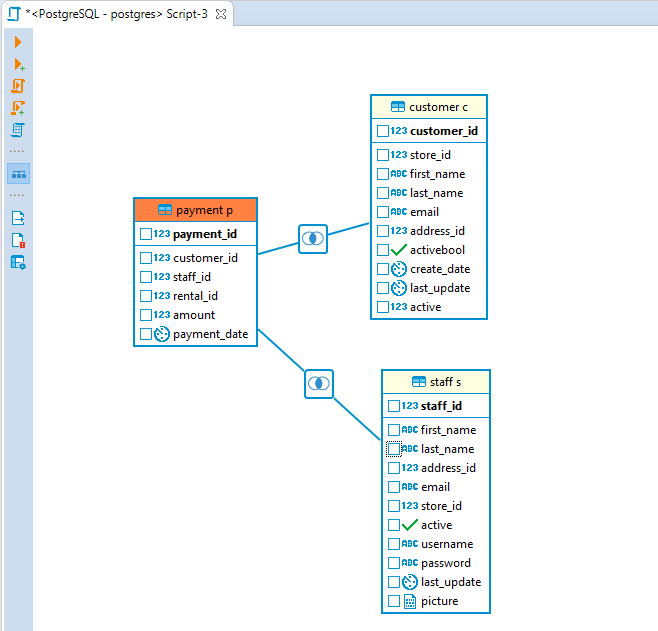
To create a new join between the tables press the left mouse button when the cursor is over the column of one table, holding the right mouse button pressed drag the cursor to the column of another table and release the right mouse button. The connection between the selected columns of the tables will be created visually and in the SQL script a new join will be added.
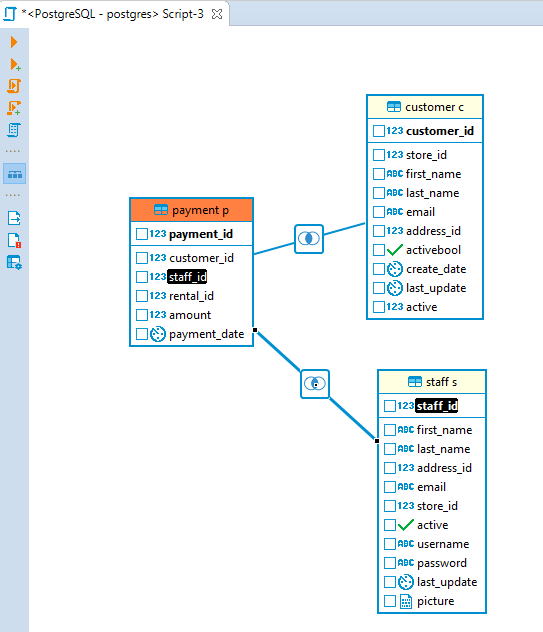
To remove a join between the tables click on it. The connection will be highlighted. Then, pressDelete or use the Delete option in the context menu. The visual connection will be removed and the corresponding join will be automatically removed from the SQL script area.
To build a SELECT query you need to select columns in the tables you added. To select a column click the check-box next to its name — the column will be added to the Columns tab of the Query Settings Editor and SELECT query will be added to the SQL script area automatically.


