Краткое руководство по tensorflow
Содержание:
- pip パッケージをビルドする
- Tested build configurations
- Install the Profiler and GPU prerequisites
- Docker Linux builds
- GPU による高速化
- Режим обучения eager training
- Setup for Windows
- Build the pip package
- Построение сложных моделей
- Build using the MSYS shell
- Hardware requirements
- Setup for Windows
- Загружаем датасет Fashion MNIST
- Configure the build
- Windows でのセットアップ
- Package location
pip パッケージをビルドする
TensorFlow 2.x
tensorflow:master リポジトリがデフォルトで 2.x をビルドするようにアップデートされました。
Bazel をインストールし、 を使用して TensorFlow パッケージを作成します。
bazel build //tensorflow/tools/pip_package:build_pip_package
TensorFlow 1.x
マスターから TensorFlow の 1.x バージョンをビルドするには、 を使用して TensorFlow 1.x パッケージを作成します。
bazel build --config=v1 //tensorflow/tools/pip_package:build_pip_package
CPU のみ
CPU のみに対応する TensorFlow パッケージのビルダーを、 を使用して作成します。
bazel build --config=opt //tensorflow/tools/pip_package:build_pip_package
GPU サポート
GPU に対応する TensorFlow パッケージのビルダーを作成するには、以下を使用します。
bazel build --config=opt --config=cuda --define=no_tensorflow_py_deps=true //tensorflow/tools/pip_package:build_pip_package
Bazel ビルドのオプション
ビルドの際にこのオプションを使用して、パッケージの作成時の問題(tensorflow:issue#22390)を回避します。
--define=no_tensorflow_py_deps=true
については、Bazel コマンドライン リファレンスをご覧ください。
ソースから TensorFlow をビルドすると、大量の RAM が使用される可能性があります。メモリの制約があるシステムでは、Bazel の RAM 使用量を で制限してください。
GPU サポートを含めてビルドする場合は、 を追加して、nvcc 警告メッセージを非表示にします。
パッケージをビルドする
コマンドを実行すると という名前の実行可能ファイルが作成されます。これは パッケージをビルドするプログラムです。たとえば、次のように実行すると、 パッケージが ディレクトリ内にビルドされます。
bazel-bin\tensorflow\tools\pip_package\build_pip_package C:/tmp/tensorflow_pkg
CUDA 構成と非 CUDA 構成の両方を同じソースツリー下にビルドすることも可能ですが、同じソースツリー内のこの 2 つの構成間を切り替える際には、 を実行することをおすすめします。
pip3 install C:/tmp/tensorflow_pkg/tensorflow-version-cp36-cp36m-win_amd64.whl
Tested build configurations
CPU
| Version | Python version | Compiler | Build tools |
|---|---|---|---|
| tensorflow-2.3.0 | 3.5-3.8 | MSVC 2019 | Bazel 3.1.0 |
| tensorflow-2.2.0 | 3.5-3.8 | MSVC 2019 | Bazel 2.0.0 |
| tensorflow-2.1.0 | 3.5-3.7 | MSVC 2019 | Bazel 0.27.1-0.29.1 |
| tensorflow-2.0.0 | 3.5-3.7 | MSVC 2017 | Bazel 0.26.1 |
| tensorflow-1.15.0 | 3.5-3.7 | MSVC 2017 | Bazel 0.26.1 |
| tensorflow-1.14.0 | 3.5-3.7 | MSVC 2017 | Bazel 0.24.1-0.25.2 |
| tensorflow-1.13.0 | 3.5-3.7 | MSVC 2015 update 3 | Bazel 0.19.0-0.21.0 |
| tensorflow-1.12.0 | 3.5-3.6 | MSVC 2015 update 3 | Bazel 0.15.0 |
| tensorflow-1.11.0 | 3.5-3.6 | MSVC 2015 update 3 | Bazel 0.15.0 |
| tensorflow-1.10.0 | 3.5-3.6 | MSVC 2015 update 3 | Cmake v3.6.3 |
| tensorflow-1.9.0 | 3.5-3.6 | MSVC 2015 update 3 | Cmake v3.6.3 |
| tensorflow-1.8.0 | 3.5-3.6 | MSVC 2015 update 3 | Cmake v3.6.3 |
| tensorflow-1.7.0 | 3.5-3.6 | MSVC 2015 update 3 | Cmake v3.6.3 |
| tensorflow-1.6.0 | 3.5-3.6 | MSVC 2015 update 3 | Cmake v3.6.3 |
| tensorflow-1.5.0 | 3.5-3.6 | MSVC 2015 update 3 | Cmake v3.6.3 |
| tensorflow-1.4.0 | 3.5-3.6 | MSVC 2015 update 3 | Cmake v3.6.3 |
| tensorflow-1.3.0 | 3.5-3.6 | MSVC 2015 update 3 | Cmake v3.6.3 |
| tensorflow-1.2.0 | 3.5-3.6 | MSVC 2015 update 3 | Cmake v3.6.3 |
| tensorflow-1.1.0 | 3.5 | MSVC 2015 update 3 | Cmake v3.6.3 |
| tensorflow-1.0.0 | 3.5 | MSVC 2015 update 3 | Cmake v3.6.3 |
GPU
| Version | Python version | Compiler | Build tools | cuDNN | CUDA |
|---|---|---|---|---|---|
| tensorflow_gpu-2.3.0 | 3.5-3.8 | MSVC 2019 | Bazel 3.1.0 | 7.4 | 10.1 |
| tensorflow_gpu-2.2.0 | 3.5-3.8 | MSVC 2019 | Bazel 2.0.0 | 7.4 | 10.1 |
| tensorflow_gpu-2.1.0 | 3.5-3.7 | MSVC 2019 | Bazel 0.27.1-0.29.1 | 7.4 | 10.1 |
| tensorflow_gpu-2.0.0 | 3.5-3.7 | MSVC 2017 | Bazel 0.26.1 | 7.4 | 10 |
| tensorflow_gpu-1.15.0 | 3.5-3.7 | MSVC 2017 | Bazel 0.26.1 | 7.4 | 10 |
| tensorflow_gpu-1.14.0 | 3.5-3.7 | MSVC 2017 | Bazel 0.24.1-0.25.2 | 7.4 | 10 |
| tensorflow_gpu-1.13.0 | 3.5-3.7 | MSVC 2015 update 3 | Bazel 0.19.0-0.21.0 | 7.4 | 10 |
| tensorflow_gpu-1.12.0 | 3.5-3.6 | MSVC 2015 update 3 | Bazel 0.15.0 | 7 | 9 |
| tensorflow_gpu-1.11.0 | 3.5-3.6 | MSVC 2015 update 3 | Bazel 0.15.0 | 7 | 9 |
| tensorflow_gpu-1.10.0 | 3.5-3.6 | MSVC 2015 update 3 | Cmake v3.6.3 | 7 | 9 |
| tensorflow_gpu-1.9.0 | 3.5-3.6 | MSVC 2015 update 3 | Cmake v3.6.3 | 7 | 9 |
| tensorflow_gpu-1.8.0 | 3.5-3.6 | MSVC 2015 update 3 | Cmake v3.6.3 | 7 | 9 |
| tensorflow_gpu-1.7.0 | 3.5-3.6 | MSVC 2015 update 3 | Cmake v3.6.3 | 7 | 9 |
| tensorflow_gpu-1.6.0 | 3.5-3.6 | MSVC 2015 update 3 | Cmake v3.6.3 | 7 | 9 |
| tensorflow_gpu-1.5.0 | 3.5-3.6 | MSVC 2015 update 3 | Cmake v3.6.3 | 7 | 9 |
| tensorflow_gpu-1.4.0 | 3.5-3.6 | MSVC 2015 update 3 | Cmake v3.6.3 | 6 | 8 |
| tensorflow_gpu-1.3.0 | 3.5-3.6 | MSVC 2015 update 3 | Cmake v3.6.3 | 6 | 8 |
| tensorflow_gpu-1.2.0 | 3.5-3.6 | MSVC 2015 update 3 | Cmake v3.6.3 | 5.1 | 8 |
| tensorflow_gpu-1.1.0 | 3.5 | MSVC 2015 update 3 | Cmake v3.6.3 | 5.1 | 8 |
| tensorflow_gpu-1.0.0 | 3.5 | MSVC 2015 update 3 | Cmake v3.6.3 | 5.1 | 8 |
Install the Profiler and GPU prerequisites
Install the Profiler by downloading and running the
script from the GitHub repository.
To profile on the GPU, you must:
-
or newer. CUDA Toolkit 10.1 supports only single GPU profiling. To profile
multiple GPUs, see . Ensure
that the CUDA driver version you install is at least 440.33 for Linux or
441.22 for Windows. - Ensure CUPTI exists on the path:
If you don’t have CUPTI on the path, prepend its installation directory to the
environment variable by running:
Run the command above again to verify that the CUPTI library is
found.
Profile multiple GPUs
TensorFlow currently supports multiple GPU profiling only for single host
systems. Multiple GPU profiling for multi-host systems is currently not
supported. Install CUDA Toolkit 10.2 or later to profile multiple GPUs. As
TensorFlow supports CUDA Toolkit versions only up to 10.1 , create symbolic
links to and .
To profile multi-worker GPU configurations, profile individual workers
independently.
Resolve privilege issues
When you run profiling with CUDA Toolkit 10.1 in a Docker environment or on
Linux, you may encounter issues related to insufficient CUPTI privileges
(). See the
NVIDIA Developer Docs
to learn more about how you can resolve these issues on Linux.
To resolve CUPTI privilege issues in a Docker environment, run
Docker Linux builds
TensorFlow’s Docker development images are an easy way to set up an environment
to build Linux packages from source. These images already contain the source
code and dependencies required to build TensorFlow. See the TensorFlow
Docker guide for installation and the
list of available image tags.
CPU-only
The following example uses the image to build a CPU-only package from the latest TensorFlow source code. See the
Docker guide for available TensorFlow tags.
Download the latest development image and start a Docker container that we’ll
use to build the pip package:
The above command starts a shell in the directory—the
root of the source tree. It mounts the host’s current directory in the container’s
directory, and passes the host user’s information to the container through
an environmental variable (used to set permissions—Docker can make this tricky).
Alternatively, to build a host copy of TensorFlow within a container, mount the
host source tree at the container’s directory:
docker run -it -w /tensorflow -v /path/to/tensorflow:/tensorflow -v $PWD:/mnt \
    -e HOST_PERMS="$(id -u):$(id -g)" tensorflow/tensorflow:devel bash
With the source tree set up, build the TensorFlow package within the container’s
virtual environment:
- Configure the build—this prompts the user to answer build configuration questions.
- Build the tool used to create the pip package.
- Run the tool to create the pip package.
- Adjust the ownership permissions of the file for outside the container.
Install and verify the package within the container:
On your host machine, the TensorFlow pip package is in the current directory
(with host user permissions):
GPU support
Docker is the easiest way to build GPU support for TensorFlow since the host
machine only requires the
(the NVIDIA CUDA Toolkit doesn’t have to be installed). See the
GPU support guide and the TensorFlow Docker guide
to set up nvidia-docker (Linux only).
The following example downloads the TensorFlow image
and uses to run the GPU-enabled container. This development image
is configured to build a pip package with GPU support:
Then, within the container’s virtual environment, build the TensorFlow package
with GPU support:
Install and verify the package within the container and check for a GPU:
GPU による高速化
TensorFlow の演算の多くは、GPU を計算に使用することで高速化されます。TensorFlow は演算に注釈をつけなくとも、自動的に GPU と CPU のどちらかを選択し、必要であればテンソルを GPU メモリと CPU メモリの間でコピーして実行します。演算で生成されたテンソルは通常演算を実行したデバイスのメモリに置かれます。例を見てみましょう。
利用できるGPUはあるか:
True
テンソルはGPU #0にあるか:
True
デバイス名
プロパティにより、そのテンソルの内容を保持しているデバイスの完全な名前文字列を得ることができます。この名前には、プログラムを実行中のホストのネットワークアドレスや、ホスト上のデバイスについての詳細がエンコードされています。この情報は、TensorFlow プログラムの分散実行に必要なものです。テンソルがホスト上の 番目のGPUにある場合、文字列の最後は となります。
明示的デバイス配置
TensorFlowでいう配置は、個々の演算を実行するためにどのようにデバイスにアサイン(配置)されるかを指します。前述のとおり、明示的な示唆がなければ、TensorFlow は演算を実行するデバイスを自動的に決め、必要であればテンソルをそのデバイスにコピーします。しかし、 コンテキストマネジャーを使うことで、TensorFlow の演算を特定のデバイスに配置することができます。例を見てみましょう。
On CPU:
10 loops: 108.40ms
On GPU:
10 loops: 314.93ms
Режим обучения eager training
Вычисление градиентов
Автоматическое дифференцирование
полезно для реализации алгоритмов машинного обучения, таких как
обратное распространение для обучения
нейронных сетей. Во время eager execution, используйте чтобы отслеживать
операции для последующего вычисления градиента.
Вы можете использовать для обучения и/или вычисления градиентов в eager. Это особенно полезно для сложных тренировочных циклов.
Поскольку во время каждого вызова могут выполняться разные операции, все
операции прямого прохода записываются на «ленту». Чтобы вычислить градиент, проиграйте
ленту назад, а затем сбросьте. A Конкретный может вычислить
только один градиент; последующие вызовы выдадут runtime error.
tf.Tensor(], shape=(1, 1), dtype=float32)
Обучение модели
В следующем примере создается многослойная модель, которая классифицирует стандартные
рукописные цифры MNIST. В примере демонстрируется оптимизатор и API слоев для построения
обучаемых графов в среде eager execution.
Downloading data from https://storage.googleapis.com/tensorflow/tf-keras-datasets/mnist.npz
11493376/11490434  - 0s 0us/step
Даже без обучения вызовем модель и проверим выходные данные в eager execution:
Logits: ]
Хотя у моделей keras есть встроенный цикл обучения (использование метода ), иногда вам нужна большая кастомизация. Вот пример цикла обучения реализованного с eager:
Замечание: Используйте функцию assert в чтобы проверить выполнение условия. Это работает в eager и graph execution.
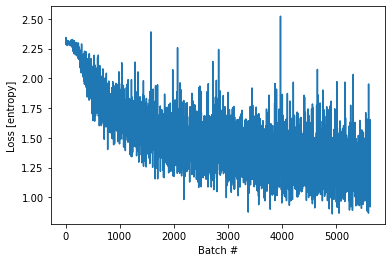
Epoch 0 finished
Epoch 1 finished
Epoch 2 finished
Text(0, 0.5, 'Loss ')
Переменные и оптимизаторы
Объекты хранят изменяемые значения типа , доступные во время
обучения, чтобы упростить автомматическое дифференцирование.
Наборы переменных могут быть инкапсулированы в слои или модели вместе с методами которые работают на них. См. Кастомные слои и модели Keras для подробностей. Основная разница между слоями и моделями это то, что модели добавляют методы такие, как , и .
Например приведенный выше пример автоматического дифференцирования может быть
переписан так:
Далее:
- Создание модели.
- Производные функции потерь относительно параметров модели.
- Стратегия обновления переменных, основанная на производных.
Initial loss: 68.803
Loss at step 000: 66.113
Loss at step 020: 29.973
Loss at step 040: 13.887
Loss at step 060: 6.727
Loss at step 080: 3.540
Loss at step 100: 2.121
Loss at step 120: 1.489
Loss at step 140: 1.208
Loss at step 160: 1.083
Loss at step 180: 1.027
Loss at step 200: 1.002
Loss at step 220: 0.991
Loss at step 240: 0.987
Loss at step 260: 0.984
Loss at step 280: 0.983
Final loss: 0.983
W = 3.0419273376464844, B = 2.0271525382995605
Примечание: Переменные хранятся до тех пор, пока не будет удалена последняя ссылка
на объект python, с которой удалится и переменная.
Объектно-ориентированное сохранение
включает в себя удобный метод позволяющий вам легко создавать чекпоинт:
Используя вы можете получить полный контроль над процессом.
Этот раздел является сокращенной версией руководства чекпоинтов обучения.
'./ckpt/-1'
<tf.Variable 'Variable:0' shape=() dtype=float32, numpy=2.0>
Чтобы сохранять и загружать модели хранит внутреннее состояние объектов,
не требуя скрытых переменных. Чтобы записать состояние модели ,
и глобальный шаг передайте их в :
<tensorflow.python.training.tracking.util.CheckpointLoadStatus at 0x7f6948585860>
Замечание: Во многих обучающих циклах переменные создаются после вызова . Эти переменные будут восстановлены сразу же после создания и проверки того, что контрольная точка была загружена полностью. Подробнее см. руководство по чекпоинтам обучения.
Oбъектно-ориентированные метрики
хранятся как объекты. Обновите метрику передав новые данные в
вызываемый объект, и получите результат, используя метод ,
например:
<tf.Tensor: shape=(), dtype=float32, numpy=5.5>
Сводки и TensorBoard
TensorBoard это инструмент визуализации для
понимания, отладки и оптимизации процесса обучения модели. Он использует
события summary которые записываются во время работы программы.
Вы можете использовать чтобы писать сводку переменной в eager execution.
Например, чтобы записать сводные данные каждые 100 шагов обучения:
events.out.tfevents.1596241063.kokoro-gcp-ubuntu-prod-1362344790.17812.619697.v2
Setup for Windows
Install the following build tools to configure your Windows development
environment.
Install Python and the TensorFlow package dependencies
Install a
Python 3.5.x or Python 3.6.x 64-bit release for Windows.
Select pip as an optional feature and add it to your environmental variable.
Install the TensorFlow pip package dependencies:
The dependencies are listed in the
file under .
Install Bazel
, the build tool used to compile
TensorFlow. For Bazel version, see the
for Windows.
Configure Bazel to
.
Add the location of the Bazel executable to your environment variable.
Install MSYS2
Install MSYS2 for the bin tools needed to
build TensorFlow. If MSYS2 is installed to , add
to your environment variable. Then, using ,
run:
pacman -S git patch unzip
Install Visual C++ Build Tools 2019
Install the Visual C++ build tools 2019. This comes with Visual Studio 2019
but can be installed separately:
- Go to the
Visual Studio downloads, - Select Redistributables and Build Tools,
- Download and install:
- Microsoft Visual C++ 2019 Redistributable
- Microsoft Build Tools 2019
Download the TensorFlow source code
Use Git to clone the
TensorFlow repository
( is installed with MSYS2):
The repo defaults to the development branch. You can also checkout a
release branch
to build:
git checkout branch_name # r1.9, r1.10, etc.
Build the pip package
TensorFlow 2.x
tensorflow:master repo has been updated to build 2.x by default.
Install Bazel and use
to create the TensorFlow package.
bazel build //tensorflow/tools/pip_package:build_pip_package
TensorFlow 1.x
To build the 1.x version of TensorFlow from master, use
to create a TensorFlow 1.x package.
bazel build --config=v1 //tensorflow/tools/pip_package:build_pip_package
CPU-only
Use to make the TensorFlow package builder with CPU-only support:
bazel build --config=opt //tensorflow/tools/pip_package:build_pip_package
GPU support
To make the TensorFlow package builder with GPU support:
bazel build --config=opt --config=cuda --define=no_tensorflow_py_deps=true //tensorflow/tools/pip_package:build_pip_package
Bazel build options
Use this option when building to avoid issue with package creation:
tensorflow:issue#22390
--define=no_tensorflow_py_deps=true
See the Bazel command-line reference
for
.
Building TensorFlow from source can use a lot of RAM. If your system is
memory-constrained, limit Bazel’s RAM usage with: .
If building with GPU support, add
to suppress nvcc warning messages.
Build the package
The command creates an executable named —this
is the program that builds the package. For example, the following builds a
package in the directory:
bazel-bin\tensorflow\tools\pip_package\build_pip_package C:/tmp/tensorflow_pkg
Although it is possible to build both CUDA and non-CUDA configs under the
same source tree, we recommend running when switching between
these two configurations in the same source tree.
Install the package
The filename of the generated file depends on the TensorFlow version and
your platform. Use to install the package, for example:
pip3 install C:/tmp/tensorflow_pkg/tensorflow-version-cp36-cp36m-win_amd64.whl
Построение сложных моделей
The Functional API
Модель это простой стек слоев с помощью которого
нельзя представить произвольную модель. Используйте
Keras functional API
для построения сложных топологий моделей, таких как:
- Модели с несколькими входами,
- Модели с несколькими выходами,
- Модели с общими слоями (один и тот же слой вызывается несколько раз),
- Модели с непоследовательными потоками данных (напр. остаточные связи).
Построение модели с functional API работает следующим образом:
- Экземпляр слоя является вызываемым и возвращает тензор.
-
Входные и выходные тензоры используются для определения экземпляра
- Эта модель обучается точно так же как и модель.
Следующий пример использует functional API для построения простой, полносвязной
сети:
Создайте экземпляр модели с данными входами и выходами.
Epoch 1/5
32/32  - 0s 2ms/step - loss: 13.4113 - accuracy: 0.0920
Epoch 2/5
32/32  - 0s 3ms/step - loss: 25.1610 - accuracy: 0.0950
Epoch 3/5
32/32  - 0s 2ms/step - loss: 47.3648 - accuracy: 0.1010
Epoch 4/5
32/32  - 0s 2ms/step - loss: 75.6122 - accuracy: 0.0970
Epoch 5/5
32/32  - 0s 2ms/step - loss: 110.2536 - accuracy: 0.1020

<tensorflow.python.keras.callbacks.History at 0x7f334c232cf8>
Сабклассинг моделей
Создайте полностью настраиваемую модель с помощью сабклассинга и определения
вашего собственного прямого распространения. Создайте слои в методе и установите их как
атрибуты экземпляра класса. Определите прямое распространение в методе .
Сабклассинг модели особенно полезен когда включен
eager execution, поскольку он позволяет написать
прямое распространение императивно.
Примечание: если вам нужно чтобы ваша модель всегда выполнялась императивно, вы можете установить когда вызываете конструктор .
Следующий пример показывает сабклассированную использующую пользовательское прямое
распространение, которое не обязательно выполнять императивно:
Создайте экземпляр класса новой модели:
Epoch 1/5
32/32  - 0s 2ms/step - loss: 11.5958 - accuracy: 0.0960
Epoch 2/5
32/32  - 0s 2ms/step - loss: 11.5665 - accuracy: 0.1070
Epoch 3/5
32/32  - 0s 2ms/step - loss: 11.5604 - accuracy: 0.1080
Epoch 4/5
32/32  - 0s 2ms/step - loss: 11.5558 - accuracy: 0.1070
Epoch 5/5
32/32  - 0s 2ms/step - loss: 11.5529 - accuracy: 0.1040

<tensorflow.python.keras.callbacks.History at 0x7f334c0fa7f0>
Пользовательские слои
Создайте пользовательский слой сабклассингом и реализацией
следующих методов:
- : Опционально определите подслои которые будут использоваться в этом слое.
-
: Создайте веса слоя. Добавьте веса при помощи метода
. - : Определите прямое распространение.
- Опционально, слой может быть сериализован реализацией метода
и метода класса .
Ниже пример пользовательского слоя который осуществляет умножение матрицы () поданной на вход
с матрицей ядра:
Создайте модель с использованием вашего пользовательского слоя:
Epoch 1/5
32/32  - 0s 2ms/step - loss: 11.5635 - accuracy: 0.1050
Epoch 2/5
32/32  - 0s 2ms/step - loss: 11.5632 - accuracy: 0.1080
Epoch 3/5
32/32  - 0s 2ms/step - loss: 11.5628 - accuracy: 0.1050
Epoch 4/5
32/32  - 0s 2ms/step - loss: 11.5632 - accuracy: 0.1110
Epoch 5/5
32/32  - 0s 2ms/step - loss: 11.5633 - accuracy: 0.1050

<tensorflow.python.keras.callbacks.History at 0x7f3340344780>
Узнайте больше о создании новых слоев и моделей с нуля с помощью сабклассинга в Руководстве написания слоев и моделей с нуля.
Build using the MSYS shell
TensorFlow can also be built using the MSYS shell. Make the changes listed
below, then follow the previous instructions for the Windows native command line
().
Disable MSYS path conversion
MSYS automatically converts arguments that look like Unix paths to Windows
paths, and this doesn’t work with . (The label is
considered a Unix absolute path since it starts with a slash.)
Set your PATH
Add the Bazel and Python installation directories to your environmental
variable. If Bazel is installed to , and Python to
, set your with:
# Use Unix-style with ':' as separator
For GPU support, add the CUDA and cuDNN bin directories to your :
Hardware requirements
The following GPU-enabled devices are supported:
- NVIDIA GPU card with CUDA architectures 3.5, 3.7, 5.2, 6.0, 6.1, 7.0 and
higher than 7.0. See the list of
CUDA-enabled
GPU cards. - On systems with NVIDIA Ampere GPUs (CUDA architecture 8.0) or newer,
kernels are JIT-compiled from PTX and TensorFlow can take over 30 minutes to
start up. This overhead can be limited to the first start up by increasing
the default JIT cache size with: »
(see
JIT
Caching for details). - For GPUs with unsupported CUDA architectures, or to avoid JIT compilation
from PTX, or to use different versions of the NVIDIA libraries, see the
Linux build from source guide. - Packages do not contain PTX code except for the latest supported CUDA
architecture; therefore, TensorFlow fails to load on older GPUs when
is set. (See
for details.)
Setup for Windows
Install the following build tools to configure your Windows development
environment.
Install Python and the TensorFlow package dependencies
Install a
Python 3.5.x or Python 3.6.x 64-bit release for Windows.
Select pip as an optional feature and add it to your environmental variable.
Install the TensorFlow pip package dependencies:
The dependencies are listed in the
file under .
Install Bazel
, the build tool used to compile
TensorFlow. For Bazel version, see the
for Windows.
Configure Bazel to
.
Add the location of the Bazel executable to your environment variable.
Install MSYS2
Install MSYS2 for the bin tools needed to
build TensorFlow. If MSYS2 is installed to , add
to your environment variable. Then, using ,
run:
pacman -S git patch unzip
Install Visual C++ Build Tools 2019
Install the Visual C++ build tools 2019. This comes with Visual Studio 2019
but can be installed separately:
- Go to the
Visual Studio downloads, - Select Redistributables and Build Tools,
- Download and install:
- Microsoft Visual C++ 2019 Redistributable
- Microsoft Build Tools 2019
Download the TensorFlow source code
Use Git to clone the
TensorFlow repository
( is installed with MSYS2):
The repo defaults to the development branch. You can also checkout a
release branch
to build:
git checkout branch_name # r1.9, r1.10, etc.
Загружаем датасет Fashion MNIST
Это руководство использует датасет Fashion MNIST который содержит 70,000 монохромных изображений в 10 категориях. На каждом изображении содержится по одному предмету одежды в низком разрешении (28 на 28 пикселей):
| Figure 1. Образцы Fashion-MNIST (Zalando, лицензия MIT). |
Fashion MNIST предназначен для замены классического датасета MNIST который часто используют как «Hello, World» программ машинного обучения для компьютерного зрения. Датасет MNIST содержит изображения рукописных цифр (0, 1, 2, и т.д.) в формате идентичном формату изображений одежды которыми мы будем пользоваться здесь.
Это руководство для разнообразия использует Fashion MNIST, и еще потому, что это проблема немного сложнее чем обычный MNIST. Оба датасета относительно малы, и используются для проверки корректности работы алгоритма. Это хорошие отправные точки для тестирования и отладки кода.
Мы используем 60,000 изображений для обучения нейросети и 10,000 изображений чтобы проверить, насколько правильно сеть обучилась их классифицировать. Вы можете получить доступ к Fashion MNIST прямо из TensorFlow. Импортируйте и загрузите данные Fashion MNIST прямо из TensorFlow:
Downloading data from https://storage.googleapis.com/tensorflow/tf-keras-datasets/train-labels-idx1-ubyte.gz
32768/29515  - 0s 0us/step
Downloading data from https://storage.googleapis.com/tensorflow/tf-keras-datasets/train-images-idx3-ubyte.gz
26427392/26421880  - 0s 0us/step
Downloading data from https://storage.googleapis.com/tensorflow/tf-keras-datasets/t10k-labels-idx1-ubyte.gz
8192/5148  - 0s 0us/step
Downloading data from https://storage.googleapis.com/tensorflow/tf-keras-datasets/t10k-images-idx3-ubyte.gz
4423680/4422102  - 0s 0us/step
Загрузка датасета возвращает четыре массива NumPy:
- Массивы и являются тренировочным сетом — данными, на которых модель будет обучаться.
- Модель тестируется на проверочном сете, а именно массивах и .
Изображения являются 28х28 массивами NumPy, где значение пикселей варьируется от 0 до 255. Метки (labels) — это массив целых чисел от 0 до 9. Они соответствуют классам одежды изображенной на картинках:
| Label | Class |
|---|---|
| T-shirt/top | |
| 1 | Trouser |
| 2 | Pullover |
| 3 | Dress |
| 4 | Coat |
| 5 | Sandal |
| 6 | Shirt |
| 7 | Sneaker |
| 8 | Bag |
| 9 | Ankle boot |
Каждому изображению соответствует единственная метка. Так как названия классов не включены в датасет, сохраним их тут для дальнейшего использования при построении изображений:
Configure the build
Configure your system build by running the at the root of your
TensorFlow source tree. This script prompts you for the location of TensorFlow
dependencies and asks for additional build configuration options (compiler
flags, for example).
./configure
GPU support
For GPU support, set during configuration and specify the
versions of CUDA and cuDNN. If your system has multiple versions of CUDA or
cuDNN installed, explicitly set the version instead of relying on the default.
creates symbolic links to your system’s CUDA libraries—so if you
update your CUDA library paths, this configuration step must be run again before
building.
Optimizations
For compilation optimization flags, the default () optimizes the
generated code for your machine’s CPU type. However, if building TensorFlow for a
different CPU type, consider a more specific optimization flag. See the
GCC manual
for examples.
Preconfigured configurations
There are some preconfigured build configs available that can be added to the
command, for example:
- —Support for the Intel MKL-DNN.
- —Configuration for a mostly static, monolithic build.
- —Build TensorFlow 1.x instead of 2.x.
Windows でのセットアップ
Windows での開発環境を構成するために、以下のビルドツールをインストールします。
Python と TensorFlow パッケージの依存関係をインストールする
Windows 用の Python 3.5.x または Python 3.6.x の 64 ビット版をインストールします。
オプション機能として pip を選択し、 環境変数に追加します。
TensorFlow の pip パッケージの依存関係をインストールします。
依存関係のリストは、 内の ファイルにあります。
Bazel をインストールする
TensorFlow のコンパイルに使用するビルドツールである します。Bazel のバージョンについては、Windows 用のをご覧ください。
Bazel で するように構成します。
Bazel 実行可能ファイルの場所を 環境変数に追加します。
MSYS2 をインストールする
TensorFlow のビルドに必要な bin ツール用に MSYS2 をインストールします。MSYS2 が にインストールされている場合は、 を 環境変数に追加します。次に、 を使用して、以下のコマンドを実行します。
pacman -S git patch unzip
Visual C++ Build Tools 2019 をインストールする
Visual C++ Build Tools 2019 をインストールします。これは Visual Studio 2019 に付属していますが、別々にインストールすることもできます。
- Visual Studio のダウンロード サイトに移動します。
- を選択します。
- 以下をダウンロードしてインストールします。
- Microsoft Visual C++ 2019 再頒布可能ファイル
- Microsoft Build Tools 2019
TensorFlow のソースコードをダウンロードする
Git を使用して TensorFlow リポジトリのクローンを作成します( は MSYS2 でインストールされます)。
リポジトリのデフォルトは 開発ブランチです。リリース ブランチをチェックアウトしてビルドすることもできます。
git checkout branch_name # r1.9, r1.10, etc.
Package location
A few installation mechanisms require the URL of the TensorFlow Python package.
The value you specify depends on your Python version.
| Version | URL |
|---|---|
| Linux | |
| Python 3.5 GPU support | https://storage.googleapis.com/tensorflow/linux/gpu/tensorflow_gpu-2.3.0-cp35-cp35m-manylinux2010_x86_64.whl |
| Python 3.5 CPU-only | https://storage.googleapis.com/tensorflow/linux/cpu/tensorflow_cpu-2.3.0-cp35-cp35m-manylinux2010_x86_64.whl |
| Python 3.6 GPU support | https://storage.googleapis.com/tensorflow/linux/gpu/tensorflow_gpu-2.3.0-cp36-cp36m-manylinux2010_x86_64.whl |
| Python 3.6 CPU-only | https://storage.googleapis.com/tensorflow/linux/cpu/tensorflow_cpu-2.3.0-cp36-cp36m-manylinux2010_x86_64.whl |
| Python 3.7 GPU support | https://storage.googleapis.com/tensorflow/linux/gpu/tensorflow_gpu-2.3.0-cp37-cp37m-manylinux2010_x86_64.whl |
| Python 3.7 CPU-only | https://storage.googleapis.com/tensorflow/linux/cpu/tensorflow_cpu-2.3.0-cp37-cp37m-manylinux2010_x86_64.whl |
| Python 3.8 GPU support | https://storage.googleapis.com/tensorflow/linux/gpu/tensorflow_gpu-2.3.0-cp38-cp38-manylinux2010_x86_64.whl |
| Python 3.8 CPU-only | https://storage.googleapis.com/tensorflow/linux/cpu/tensorflow_cpu-2.3.0-cp38-cp38-manylinux2010_x86_64.whl |
| macOS (CPU-only) | |
| Python 3.5 | https://storage.googleapis.com/tensorflow/mac/cpu/tensorflow-2.3.0-cp35-cp35m-macosx_10_6_intel.whl |
| Python 3.6 | https://storage.googleapis.com/tensorflow/mac/cpu/tensorflow-2.3.0-cp36-cp36m-macosx_10_9_x86_64.whl |
| Python 3.7 | https://storage.googleapis.com/tensorflow/mac/cpu/tensorflow-2.3.0-cp37-cp37m-macosx_10_9_x86_64.whl |
| Python 3.8 | https://storage.googleapis.com/tensorflow/mac/cpu/tensorflow-2.3.0-cp38-cp38-macosx_10_14_x86_64.whl |
| Windows | |
| Python 3.5 GPU support | https://storage.googleapis.com/tensorflow/windows/gpu/tensorflow_gpu-2.3.0-cp35-cp35m-win_amd64.whl |
| Python 3.5 CPU-only | https://storage.googleapis.com/tensorflow/windows/cpu/tensorflow_cpu-2.3.0-cp35-cp35m-win_amd64.whl |
| Python 3.6 GPU support | https://storage.googleapis.com/tensorflow/windows/gpu/tensorflow_gpu-2.3.0-cp36-cp36m-win_amd64.whl |
| Python 3.6 CPU-only | https://storage.googleapis.com/tensorflow/windows/cpu/tensorflow_cpu-2.3.0-cp36-cp36m-win_amd64.whl |
| Python 3.7 GPU support | https://storage.googleapis.com/tensorflow/windows/gpu/tensorflow_gpu-2.3.0-cp37-cp37m-win_amd64.whl |
| Python 3.7 CPU-only | https://storage.googleapis.com/tensorflow/windows/cpu/tensorflow_cpu-2.3.0-cp37-cp37m-win_amd64.whl |
| Python 3.8 GPU support | https://storage.googleapis.com/tensorflow/windows/gpu/tensorflow_gpu-2.3.0-cp38-cp38-win_amd64.whl |
| Python 3.8 CPU-only | https://storage.googleapis.com/tensorflow/windows/cpu/tensorflow_cpu-2.3.0-cp38-cp38-win_amd64.whl |
| Raspberry PI (CPU-only) | |
| Python 3, Pi0 or Pi1 | https://storage.googleapis.com/tensorflow/raspberrypi/tensorflow-2.3.0-cp35-none-linux_armv6l.whl |
| Python 3, Pi2 or Pi3 | https://storage.googleapis.com/tensorflow/raspberrypi/tensorflow-2.3.0-cp35-none-linux_armv7l.whl |