Библиотека для парсинга сайта scrapy
Содержание:
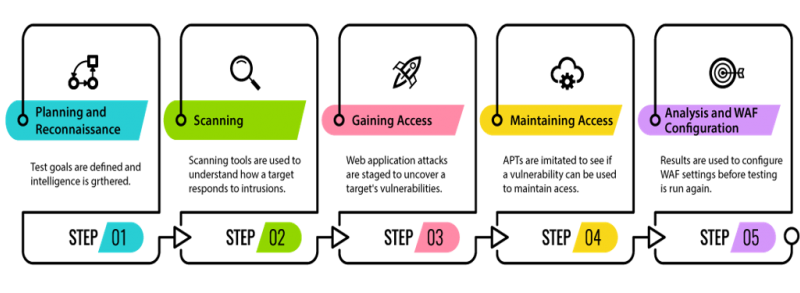
- Step 1 — Creating a Basic Scraper
- Создание рисунка в Pillow
- Slides
- A Scrappy has to be:
- Установка и создание проекта
- Overview of Scrapy
- ImageFont — Пишем текст на изображение используя Pillow
- Usage (command line tool)
- Открытие изображения в Python с Pillow
- Изменение размера изображения в Pillow resize()
- Создаем черно-белое изображение GrayScale в Pillow
- Оболочка Scrapy Shell в командной строке
- Использование фильтров в Pillow
- Получение информации об изображении через Pillow
- Step 3 — Crawling Multiple Pages
- Usage (API)
- Конвертирование из JPG в PNG пример Pillow
- Запуск
- Немного о формате
- Conclusion
- scrapyd-client
- Применение в повседневной жизни. Что пригодилось больше всего.
Step 1 — Creating a Basic Scraper
Scraping is a two step process:
- You systematically find and download web pages.
- You take those web pages and extract information from them.
Both of those steps can be implemented in a number of ways in many languages.
You can build a scraper from scratch using modules or libraries provided by your programming language, but then you have to deal with some potential headaches as your scraper grows more complex. For example, you’ll need to handle concurrency so you can crawl more than one page at a time. You’ll probably want to figure out how to transform your scraped data into different formats like CSV, XML, or JSON. And you’ll sometimes have to deal with sites that require specific settings and access patterns.
You’ll have better luck if you build your scraper on top of an existing library that handles those issues for you. For this tutorial, we’re going to use Python and Scrapy to build our scraper.
Scrapy is one of the most popular and powerful Python scraping libraries; it takes a “batteries included” approach to scraping, meaning that it handles a lot of the common functionality that all scrapers need so developers don’t have to reinvent the wheel each time. It makes scraping a quick and fun process!
Scrapy, like most Python packages, is on PyPI (also known as ). PyPI, the Python Package Index, is a community-owned repository of all published Python software.
If you have a Python installation like the one outlined in the prerequisite for this tutorial, you already have installed on your machine, so you can install Scrapy with the following command:
If you run into any issues with the installation, or you want to install Scrapy without using , check out the official installation docs.
With Scrapy installed, let’s create a new folder for our project. You can do this in the terminal by running:
Now, navigate into the new directory you just created:
Then create a new Python file for our scraper called . We’ll place all of our code in this file for this tutorial. You can create this file in the terminal with the command, like this:
Or you can create the file using your text editor or graphical file manager.
We’ll start by making a very basic scraper that uses Scrapy as its foundation. To do that, we’ll create a Python class that subclasses , a basic spider class provided by Scrapy. This class will have two required attributes:
- — just a name for the spider.
- — a list of URLs that you start to crawl from. We’ll start with one URL.
Open the file in your text editor and add this code to create the basic spider:
scraper.py
Let’s break this down line by line:
First, we import so that we can use the classes that the package provides.
Next, we take the class provided by Scrapy and make a subclass out of it called . Think of a subclass as a more specialized form of its parent class. The subclass has methods and behaviors that define how to follow URLs and extract data from the pages it finds, but it doesn’t know where to look or what data to look for. By subclassing it, we can give it that information.
Then we give the spider the name .
Finally, we give our scraper a single URL to start from: http://brickset.com/sets/year-2016. If you open that URL in your browser, it will take you to a search results page, showing the first of many pages containing LEGO sets.
Now let’s test out the scraper. You typically run Python files by running a command like . However, Scrapy comes with its own command line interface to streamline the process of starting a scraper. Start your scraper with the following command:
You’ll see something like this:
That’s a lot of output, so let’s break it down.
- The scraper initialized and loaded additional components and extensions it needed to handle reading data from URLs.
- It used the URL we provided in the list and grabbed the HTML, just like your web browser would do.
- It passed that HTML to the method, which doesn’t do anything by default. Since we never wrote our own method, the spider just finishes without doing any work.
Now let’s pull some data from the page.
Создание рисунка в Pillow
У Pillow есть базовые возможности для создания 2D графики. Модуль предоставляет простую 2D графику для объектов . Мы можем создавать новые изображения, аннотации к ним, ретушировать существующие фото, а также сразу генерировать графику для веб.
Python
from PIL import Image, ImageDraw
# Создаем белый квадрат
img = Image.new(‘RGBA’, (200, 200), ‘white’)
idraw = ImageDraw.Draw(img)
idraw.rectangle((10, 10, 100, 100), fill=’blue’)
img.save(‘rectangle.png’)
|
1 |
fromPIL importImage,ImageDraw img=Image.new(‘RGBA’,(200,200),’white’) idraw=ImageDraw.Draw(img) idraw.rectangle((10,10,100,100),fill=’blue’) img.save(‘rectangle.png’) |
В примере создается новое изображение, на котором нарисован голубой прямоугольник поверх белого фона.
Python
img = Image.new(‘RGBA’, (200, 200), ‘white’)
| 1 | img=Image.new(‘RGBA’,(200,200),’white’) |
Создается новое изображение, у которого режим «RGBA», размер 200х200 и белый фон.
Python
idraw = ImageDraw.Draw(img)
| 1 | idraw=ImageDraw.Draw(img) |
Из картинки создается объект . Теперь на нем можно что-то нарисовать.
Python
idraw.rectangle((10, 10, 100, 100), fill=’blue’)
| 1 | idraw.rectangle((10,10,100,100),fill=’blue’) |
С помощью метода на площади созданного изображения мы нарисовали голубой прямоугольник.
Slides
Web Crawling & Metadata Extraction in Python
by Andrew Montalenti
(in English, October 2012)
Crawling the web for fun and profit
by Federico Feroldi
(in English, May 2010)
Scrapy for dummies
by Chandler Huang
(in English, May 2010)
Web scraping 1 2-3 with python + scrapy (Summer BarCampHK 2012 version)
by Sammy Fung
(in English, July 2012)
When big data meet python
by Jimmy Lai
(in English, COSCUP 2011)
How to scrape any website’s content using Scrapy
by Anton Rifco
(in English, July 2013)
Scrapy workshop
by Daniel Bertinat
(in Spanish, November 2012)
Scrapy — an agile framework for web spider development
by Pablo Hoffman
(in Spanish, 2011)
Scrapy+WebKit+MySQL+Redis integration
by zenyuhao
(in Chinese, March 2011)
Scrapy in five minutes
by Tiago de Assis Gonçalves
(in Portuguese, October 2013)
A Scrappy has to be:
- Unintentionally hated by the audience: If this character is supposed to be hated due to being a villain, idiot, or Jerkass, they’re a Hate Sink. They can be well received by adding to the enjoyability of the work, if only for the satisfaction of them getting karma.Examples While such characters can overlap with The Scrappy, they have to be hated for different reasons than intended that detract from the work’s enjoyability.Examples A character’s story should be concluded, seeing if they were supposed to be hated or get due karma, before judging them as a Scrappy or not.
Advertisement:
Hated by the majority of the audience: If they have about as many fans as detractors, even if the latter are more obvious, that’s a Base-Breaking Character. Examples of Americans Hate Tingle and Germans Love David Hasselhoff similarly don’t count, as they have fans somewhere. Someone not personally liking a character is not this (unless it’s a Show Within a Show example). For a character to truly be considered a Scrappy, even the Silent Majority has to dislike this character.
A single hated character: The Scrappy, as an Audience Reaction, only applies to individual characters. Hated works or products do not count. Groups don’t count either as they are not characters, and each character could vary in individual popularity (unless said group is small enough that all of its members can feasibly be judged Scrappies on their own).
Advertisement:
Hated for narrative reasons: They’re hated for the perception of being poorly written or detracting from the narrative. If the character is hated for gameplay reasons as opposed to narrative or character writing, that’s a Tier-Induced Scrappy. If the character is hated because people hate the actor portraying the character, that’s X-Pac Heat.
Hated by the fans of the work: They have to be hated by people who unironically enjoy the work otherwise. Hated by those who dislike the work to begin with don’t count.Examples
Consistently hated: If a otherwise well-received character does something objectionable that’s temporary or minor compared to their liked portrayals, or is likable depending on who’s writing them, they normally have enough fans not to count as Scrappies.
Not all Scrappies are doomed to their status. If the writers notice what’s happening, they may change the character in order to make sure they are no longer hated, give them a tragic death scene, simply send them away, turn them into a villain in a reboot or adaptation and have the more popular characters beat them up, or at the very least show that the other characters are as annoyed by them as the fans are. In a few rare cases, a Scrappy will be replaced with a Replacement Scrappy; in this case, fans may be so irritated by the new character that they will retroactively find virtues to the old Scrappy.
This is an Audience Reaction, more based on the fandom than the character itself. The visceral response to The Scrappy can baffle other fans who don’t take the character as seriously, or even sympathize with him or her.
As a result, dear reader, tread carefully: fans aren’t necessarily always right. The catharsis from violently cutting into a character with a grating voice or an irritating tic may be cathartic for some, and extremely disturbing for others. This is a place to document a phenomenon, not to argue a character’s merits, lack thereof, or vent.
Please only post examples of the fandom hating a character; posting Personal Scrappies could get messy, especially if the Scrappy is in at the center of a Fandom Rivalry. Die for Our Ship entries should also be placed on that page only, though someone could be a Scrappy because of that reason.
If the majority of the characters are scrappies (especially the main characters) then expect the audience to utter the Eight Deadly Words.
Contrast Ensemble Dark Horse, an unexpectedly popular (minor or secondary) character, and Unpopular Popular Character, a character hated or disliked In-Universe but loved by the fandom. Compare and contrast Base-Breaking Character, where one part of the fandom thinks a character is the scrappy but at least a sizable chunk like them. If the scrappy dies or suffers in some painful way where the audience actually starts to sympathize with the character, then it becomes Alas, Poor Scrappy. Not to be confused with Cute Bruiser which is the original meaning of the word scrappy.
No Real Life Examples, Please! The real world isnt a story with characters that could potentially make it worse. We also ask that you wait 6 months after a character is introduced or becomes hated before adding a character as an entry, to cut down on kneejerk reactions.
Установка и создание проекта
Для начала установим scrapy. Он тянет довольно много сторонних зависимостей:
После этого создадим проект:
И ниже он предлагает создать первого паука:
В итоге в каталоге spiders появился первый алгоритм паука с вот таким содержимым:
У каждого такого паука есть имя, по которому мы будем его запускать, список доменов, на которые можно переходить и стартовый url.
Для запуска перейдём в каталог с scrapy.cfg и выполним . Предлагаю полностью разобрать вывод, т.к. в нём представлен функционал, который уже идёт “из коробки”. Первым делом — версии пакетов и текущие настройки. По умолчанию Scrapy учитывает файл из-за настройки :
Во-первых, это , которые вешаются на внутренние события Scrapy и позволяют дополнять поведение по умолчанию. Например, сбор статистики и потребление памяти:
Во-вторых, список мидлварей, которые обеспечивают некоторые базовые вещи. Делятся на 2 типа: при скачивании и при обходе. Например, RedirectMiddleware выполняет расшифровку редиректов, а RetryMiddleware — повтор запроса в случае окончания таймаута. Вы можете дописать свои для установки JWT токена или эмуляции разных User-Agent, а ненужные — отключить. Кстати, по умолчанию в новом проекте создаётся пустой файл , в котором описаны методы для переопределения.
В-третьих, пайплайны, которые необходимы для обработки данных и модификации их в более удобный формат. Это уже специфичная для каждого проекта вещь, так что по умолчанию тут пустой список.
И вот после всех настроек Scrapy наконец запустился:
Первым запрашивается robots.txt. Scrapy настолько умный, что следует подсказкам для ботов в этом файле. В данном случае это нам не мешает, но отключить использование можно указав в settings.py . Я специально обратился к http версии сайта, чтобы показать, что всякие редиректы тоже успешно расшифровываются.
Overview of Scrapy
Scrapy is a Python framework for large scale web scraping. It gives you all the tools you need to efficiently extract data from websites, process them as you want, and store them in your preferred structure and format.
As diverse the internet is, there is no “one size fits all” approach in extracting data from websites. Many a time ad hoc approaches are taken and if you start writing code for every little task you perform, you will eventually end up creating your own scraping framework. Scrapy is that framework.
Note: There are no specific prerequisites of this article, a basic knowledge of HTML and CSS is preferred. If you still think you need a refresher, do a quick read of this article.
ImageFont — Пишем текст на изображение используя Pillow
В следующем коде показано, как в Python можно написать текст на изображении с помощью Pillow.
На сайте есть отдельная статья по нанесению водяного знака на изображение:
- Как ставить водяные знаки на изображениях при помощи Python
Python
from PIL import Image, ImageDraw, ImageFont
import sys
try:
tatras = Image.open(«tatras.jpg»)
except:
print(«Unable to load image»)
sys.exit(1)
idraw = ImageDraw.Draw(tatras)
text = «High Tatras»
font = ImageFont.truetype(«arial.ttf», size=18)
idraw.text((10, 10), text, font=font)
tatras.save(‘tatras_watermarked.png’)
|
1 |
fromPIL importImage,ImageDraw,ImageFont importsys try tatras=Image.open(«tatras.jpg») except print(«Unable to load image») sys.exit(1) idraw=ImageDraw.Draw(tatras) text=»High Tatras» font=ImageFont.truetype(«arial.ttf»,size=18) idraw.text((10,10),text,font=font) tatras.save(‘tatras_watermarked.png’) |
Для создания рисунка используется модуль .
Python
font = ImageFont.truetype(«arial.ttf», size=18)
| 1 | font=ImageFont.truetype(«arial.ttf»,size=18) |
Создается шрифт Arial с размером 18.
Python
idraw.text((10, 10), text, font=font)
| 1 | idraw.text((10,10),text,font=font) |
Сам текст наносится через метод . По умолчанию цвет шрифта белый.

Usage (command line tool)
There is also a simple script to create and manage Scrapely scrapers.
It supports a command-line interface, and an interactive prompt. All commands
supported on interactive prompt are also supported in the command-line
interface.
To enter the interactive prompt type the following without arguments:
python -m scrapely.tool myscraper.json
Example:
$ python -m scrapely.tool myscraper.json
scrapely> help

Documented commands (type help <topic>):
========================================
a  al  s  ta  td  tl

scrapely>
To create a scraper and add a template:
scrapely> ta http://pypi.python.org/pypi/w3lib/1.1
 http://pypi.python.org/pypi/w3lib/1.1
This is equivalent as typing the following in one command:
python -m scrapely.tool myscraper.json ta http://pypi.python.org/pypi/w3lib/1.1
To list available templates from a scraper:
scrapely> tl
 http://pypi.python.org/pypi/w3lib/1.1
To add a new annotation, you usually test the selection criteria first:
scrapely> t 0 w3lib 1.1
 u'<h1>w3lib 1.1</h1>'
 u'<title>Python Package Index : w3lib 1.1</title>'
You can also quote the text, if you need to specify an arbitrary number of
spaces, for example:
scrapely> t 0 "w3lib 1.1"
You can refine by position. To take the one in position :
scrapely> a 0 w3lib 1.1 -n 0
 u'<h1>w3lib 1.1</h1>'
To annotate some fields on the template:
scrapely> a 0 w3lib 1.1 -n 0 -f name
 (name) u'<h1>w3lib 1.1</h1>'
scrapely> a 0 Scrapy project -n 0 -f author
 u'<span>Scrapy project</span>'
To list annotations on a template:
scrapely> al 0
 (name) u'<h1>w3lib 1.1</h1>'
 (author) u'<span>Scrapy project</span>'
To scrape another similar page with the already added templates:
scrapely> s http://pypi.python.org/pypi/Django/1.3
, u'name': }]
Открытие изображения в Python с Pillow
Через Pillow можно легко открыть изображение и отобразить его на экране через внешнюю программу. Взглянем на пример:
Python
from PIL import Image
image = Image.open(‘jelly.jpg’)
image.show()
|
1 |
fromPIL importImage image=Image.open(‘jelly.jpg’) image.show() |
Метод в основном используется для отладки. В примере импортируется модуль Image и открывается указанное изображение. На Unix метод открытия сохраняет изображения во временном PPM файле и открывает его через утилиту . К примеру, на установленной у меня системе Linux картинка открывается через ImageMagick. На Windows изображение сохранится во временной файле BMP и откроется через простую программу вроде Paint.
Изменение размера изображения в Pillow resize()
Можно изменить длину и ширину изображения при помощи метода . В данном примере будут показаны три примера изменения размера:
- Изменение размера изображения имея ширину и высоту;
- Изменение ширины с учетом пропорций для высоты;
- Изменение высоты пропорционально ширине.
Изменение размера изображения имея ширину и высоту
Python
from PIL import Image
# Меняем размер изображения на новый.
tatras = Image.open(«tatras.jpg»)
tatras = tatras.resize((100, 100), Image.ANTIALIAS)
|
1 |
fromPIL importImage tatras=Image.open(«tatras.jpg») tatras=tatras.resize((100,100),Image.ANTIALIAS) |
Изменение ширины с учетом пропорций для новой высоты изображения
Python
from PIL import Image
tatras = Image.open(«tatras.jpg»)
new_width = 680 # ширина
new_height = int(new_width * height / width)
tatras = tatras.resize((new_width, new_height), Image.ANTIALIAS)
tatras.show()
|
1 |
fromPIL importImage tatras=Image.open(«tatras.jpg») new_width=680# ширина new_height=int(new_width*heightwidth) tatras=tatras.resize((new_width,new_height),Image.ANTIALIAS) tatras.show() |
Изменение высоты изображения, пропорционально обновляем и ширину
Python
from PIL import Image
tatras = Image.open(«tatras.jpg»)
new_height = 680 # Высота
new_width = int(new_height * width / height)
tatras = tatras.resize((new_width, new_height), Image.ANTIALIAS)
tatras.show()
|
1 |
fromPIL importImage tatras=Image.open(«tatras.jpg») new_height=680# Высота new_width=int(new_height*widthheight) tatras=tatras.resize((new_width,new_height),Image.ANTIALIAS) tatras.show() |
Заключение
С пакетом Pillow вы можете сделать гораздо больше, чем описано в этой короткой статье. Pillow поддерживает преобразования и улучшение изображений, возможность печати фото и многое другое. Я настоятельно рекомендую прочитать документацию Pillow, чтобы получить полное представление обо всем, что вы можете сделать.
Создаем черно-белое изображение GrayScale в Pillow
С помощью метода можно сделать оригинальное изображение черно-белым.
Python
from PIL import Image
import sys
try:
tatras = Image.open(«tatras.jpg»)
except IOError:
print(«Unable to load image»)
sys.exit(1)
grayscale = tatras.convert(‘L’)
grayscale.show()
|
1 |
fromPIL importImage importsys try tatras=Image.open(«tatras.jpg») exceptIOError print(«Unable to load image») sys.exit(1) grayscale=tatras.convert(‘L’) grayscale.show() |
Программа читает изображение и трансформирует его в черно-белое. За это отвечает следующая строка:
Python
grayscale = tatras.convert(‘L’)
| 1 | grayscale=tatras.convert(‘L’) |
Первый параметр метода является модом. Мод представляет черно-белый вариант.
Оболочка Scrapy Shell в командной строке
Scrapy поставляется со встроенной оболочкой, что помогает отладить код скрапинга в режиме реального времени. С ним можно быстро протестировать XPath-выражения или CSS селекторы. Это очень крутой инструмент для написания веб скраперов, и я всегда им пользуюсь!
Можно настроить Scrapy Shell на использование другой консоли вместо стандартной консоли Python как IPython. У вас появится возможность автозаполнения и другие приятные бонусы вроде цветного вывода.
Для его использования в оболочке Scrapy Shell нужно добавить следующую строку в файл :
Shell
shell = ipython
| 1 | shell=ipython |
После завершения конфигурации можно использовать оболочку Scrapy:
Shell
$ scrapy shell —nolog
Available Scrapy objects:
scrapy scrapy module (contains scrapy.Request, scrapy.Selector, etc)
crawler <scrapy.crawler.Crawler object at 0x108147eb8>
item {}
settings <scrapy.settings.Settings object at 0x108d10978>
Useful shortcuts:
fetch(url) Fetch URL and update local objects (by default, redirects are followed)
fetch(req) Fetch a scrapy.Request and update local objects
shelp() Shell help (print this help)
view(response) View response in a browser
In :
|
1 |
$scrapy shell—nolog sAvailable Scrapy objects sscrapy scrapy module(contains scrapy.Request,scrapy.Selector,etc) scrawler<scrapy.crawler.Crawlerobjectat0x108147eb8> sitem{} ssettings<scrapy.settings.Settingsobjectat0x108d10978> sUseful shortcuts sfetch(url,redirect=True)Fetch URL andupdate local objects(by default,redirects are followed) sfetch(req)Fetchascrapy.Requestandupdate local objects sshelp()Shell help(print thishelp) sview(response)View response inabrowser In1 |
Можно начать выборку URL следующим простым действием:
Python
fetch(‘https://clever-lichterman-044f16.netlify.com/products/taba-cream.1/’)
| 1 | fetch(‘https://clever-lichterman-044f16.netlify.com/products/taba-cream.1/’) |
Она начнется с загрузки файла
Python
DEBUG: Crawled (404) <GET https://clever-lichterman-044f16.netlify.com/robots.txt> (referer: None)
| 1 | scrapy.core.engineDEBUGCrawled(404)<GET httpsclever-lichterman-044f16.netlify.comrobots.txt>(refererNone) |
В данном случае нет никакого , поэтому мы получаем код. Если бы у нас был файл , по умолчанию Scrapy придерживался бы правил.
Можно отключить такое поведение, изменив boolean параметр в :
Python
ROBOTSTXT_OBEY = True
| 1 | ROBOTSTXT_OBEY=True |
После этого у вас должен появится лог подобного рода:
Python
DEBUG: Crawled (200) <GET https://clever-lichterman-044f16.netlify.com/products/taba-cream.1/> (referer: None)
| 1 | scrapy.core.engineDEBUGCrawled(200)<GET httpsclever-lichterman-044f16.netlify.comproductstaba-cream.1>(refererNone) |
Теперь можно увидеть объект ответа, заголовки ответа и попробовать различные XPath выражения и CSS селекторы, чтобы извлечь нужные данные.
Увидеть ответ прямо в браузере, можно использовав данную функцию:
Python
view(response)
| 1 | view(response) |
Оболочка Scrapy похожа на обычную оболочку Python, поэтому не бойтесь загружать в нее свои любимые скрипты или функции.
Использование фильтров в Pillow
Оригинальное изображение с медузой
Pillow позволяет использовать множество различных фильтров для обработки изображения. Они являются частью модуля ImageFilter. Давайте рассмотрим несколько примеров использования метода :
Python
from PIL import ImageFilter
from PIL import Image
image = Image.open(‘jelly.jpg’)
blurred_jelly = image.filter(ImageFilter.BLUR)
blurred_jelly.save(‘/path/to/photos/blurry_jelly.png’)
|
1 |
fromPIL importImageFilter fromPIL importImage image=Image.open(‘jelly.jpg’) blurred_jelly=image.filter(ImageFilter.BLUR) blurred_jelly.save(‘/path/to/photos/blurry_jelly.png’) |
Программа берет определенное изображение, создает на его основе размытую картинку, используя , и сохраняет полученный результат на диск с помощью метода . Итоговое фото со слегка размытой медузой:
Размытая картинка с медузой
Однако в подобающем большинстве случаев размывать изображение нет нужды, наоборот — требуется увеличить резкость. Pillow меняет резкость картинки следующим образом:
Python
from PIL import ImageFilter
from PIL import Image
image = Image.open(‘/path/to/photos/jelly.jpg’)
blurred_jelly = image.filter(ImageFilter.SHARPEN)
blurred_jelly.save(‘/path/to/photos/sharper_jelly.png’)
|
1 |
fromPIL importImageFilter fromPIL importImage image=Image.open(‘/path/to/photos/jelly.jpg’) blurred_jelly=image.filter(ImageFilter.SHARPEN) blurred_jelly.save(‘/path/to/photos/sharper_jelly.png’) |
Результат после запуска кода выше:
Картинка с медузой после применения фильтра резкости
Кроме того, для увеличения резкости фотографий в Python можно использовать модуль ImageEnhance.
Можно использовать и другие фильтры — , , , и так далее. В коде для одного изображения также можно одновременно использовать несколько фильтров.
Для сравнения эффектов от использования фильтров можете скачать изображения, которые были представлены в примерах выше.
Получение информации об изображении через Pillow
С помощью Pillow также можно получить подробную информацию об изображении. Рассмотрим небольшой пример:
Python
>>> from PIL import Image
>>> image = Image.open(‘jelly.jpg’)
>>> r, g, b = image.split()
>>> histogram = image.histogram()
>>> exif = image._getexif()
exif
{256: 1935,
257: 3411,
271: u’Panasonic’,
272: u’DMC-LX7′,
274: 1,
282: (180, 1),
283: (180, 1),
296: 2,
305: u’PaintShop Pro 14.00\x00\x00\x00\x00\x00\x00\x00\x00\x00\x00\x00\x00\x00\x00\x00\x00\x00\x00\x00\x00′,
306: u’2016:08:21 07:54:57′,
36867: u’2016:08:21 07:54:57′,
36868: u’2016:08:21 07:54:57′,
37121: ‘\x01\x02\x03\x00’,
37122: (4, 1),
37381: (124, 128),
37383: 5,
37384: 0,
37385: 16,
37386: (47, 10),
40960: ‘0100’,
40961: 1,
40962: 3968,
40963: 2232,
41495: 2,
41728: ‘\x03’,
41729: ‘\x01’,
41985: 0,
41986: 0,
41987: 0,
41988: (0, 10),
41989: 24,
41990: 0,
41991: 0,
41992: 0,
41993: 0,
41994: 0}
|
1 |
>>>fromPIL importImage >>>image=Image.open(‘jelly.jpg’) >>>r,g,b=image.split() >>>histogram=image.histogram() 384761,489777,557209,405004,220701,154786,55807,35806,21901,16242 >>>exif=image._getexif() exif {2561935, 2573411, 271u’Panasonic’, 272u’DMC-LX7′, 2741, 282(180,1), 283(180,1), 2962, 305u’PaintShop Pro 14.00\x00\x00\x00\x00\x00\x00\x00\x00\x00\x00\x00\x00\x00\x00\x00\x00\x00\x00\x00\x00′, 306u’2016:08:21 07:54:57′, 36867u’2016:08:21 07:54:57′, 36868u’2016:08:21 07:54:57′, 37121’\x01\x02\x03\x00′, 37122(4,1), 37381(124,128), 373835, 37384, 3738516, 37386(47,10), 40960’0100′, 409611, 409623968, 409632232, 414952, 41728’\x03′, 41729’\x01′, 41985, 41986, 41987, 41988(,10), 4198924, 41990, 41991, 41992, 41993, 41994} |
В данном примере показано, как извлечь значение RGB (red, green, blue) изображения. Также показано, как получить гистограмму изображения
Обратите внимание, что здесь вывод немного урезан, изначально он был намного больше. Вы можете построить график гистограммы, используя другой пакет Python — matplotlib
Приведенный выше пример демонстрирует, как извлечь информацию EXIF из изображения. Опять же, здесь вывод этого метода несколько сокращен, поскольку он содержит слишком много информации, которая не имеет особого значения для статьи.
Step 3 — Crawling Multiple Pages
We’ve successfully extracted data from that initial page, but we’re not progressing past it to see the rest of the results. The whole point of a spider is to detect and traverse links to other pages and grab data from those pages too.
You’ll notice that the top and bottom of each page has a little right carat () that links to the next page of results. Here’s the HTML for that:
As you can see, there’s a tag with the class of , and inside that tag, there’s an tag with a link to the next page. All we have to do is tell the scraper to follow that link if it exists.
Modify your code as follows:
scraper.py
First, we define a selector for the “next page” link, extract the first match, and check if it exists. The is a value that we return saying “Hey, crawl this page”, and says “once you’ve gotten the HTML from this page, pass it back to this method so we can parse it, extract the data, and find the next page.“
This means that once we go to the next page, we’ll look for a link to the next page there, and on that page we’ll look for a link to the next page, and so on, until we don’t find a link for the next page. This is the key piece of web scraping: finding and following links. In this example, it’s very linear; one page has a link to the next page until we’ve hit the last page, But you could follow links to tags, or other search results, or any other URL you’d like.
Now, if you save your code and run the spider again you’ll see that it doesn’t just stop once it iterates through the first page of sets. It keeps on going through all 779 matches on 23 pages! In the grand scheme of things it’s not a huge chunk of data, but now you know the process by which you automatically find new pages to scrape.
Here’s our completed code for this tutorial, using Python-specific highlighting:
scraper.py
Usage (API)
Scrapely has a powerful API, including a template format that can be edited
externally, that you can use to build very capable scrapers.
What follows is a quick example of the simplest possible usage, that you can
run in a Python shell.
Start by importing and instantiating the Scraper class:
>>> from scrapely import Scraper
>>> s = Scraper()
Then, proceed to train the scraper by adding some page and the data you expect
to scrape from there (note that all keys and values in the data you pass must
be strings):
>>> url1 = 'http://pypi.python.org/pypi/w3lib/1.1'
>>> data = {'name': 'w3lib 1.1', 'author': 'Scrapy project', 'description': 'Library of web-related functions'}
>>> s.train(url1, data)
Finally, tell the scraper to scrape any other similar page and it will return
the results:
>>> url2 = 'http://pypi.python.org/pypi/Django/1.3'
>>> s.scrape(url2)
,
  u'description': ,
  u'name': }]
That’s it! No xpaths, regular expressions, or hacky python code.
Конвертирование из JPG в PNG пример Pillow
В Python Pillow метод позволяет конвертировать изображение в другой формат.
Python
from PIL import Image
import sys
try:
tatras = Image.open(«tatras.jpg»)
except IOError:
print(«Unable to load image»)
sys.exit(1)
tatras.save(‘tatras.png’, ‘png’)
|
1 |
fromPIL importImage importsys try tatras=Image.open(«tatras.jpg») exceptIOError print(«Unable to load image») sys.exit(1) tatras.save(‘tatras.png’,’png’) |
Программа считывает изображение JPG и конвертирует его в PNG формат. Это делает в следующей строчке:
Python
tatras.save(‘tatras.png’, ‘png’)
| 1 | tatras.save(‘tatras.png’,’png’) |
Второй параметр метода нужен для уточнения итогового формата изображения.
Запуск
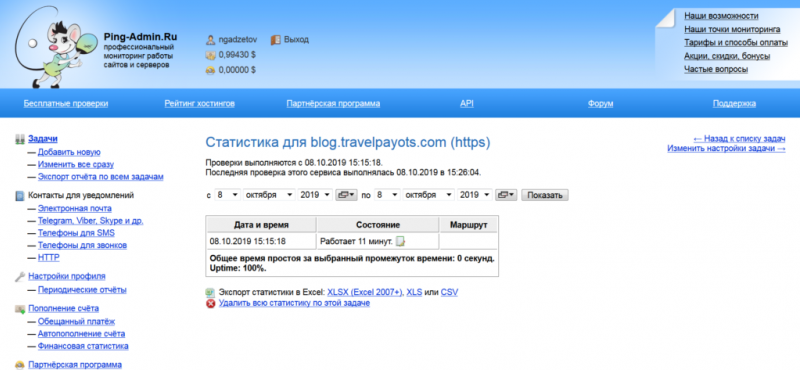
Исходный код можно взять тут, для запуска перейдите в папку с проектом и наберите в консоли
scrapy crawl abitur —set FEED_URI=scraped_data.csv —set FEED_FORMAT=csv
| 1 | scrapy crawl abitur—set FEED_URI=scraped_data.csv—set FEED_FORMAT=csv |
Вкратце, я все описал, но это лишь малая часть возможностей Scrapy:
- поиск и извлечение данных их HTML и XML
- преобразование данных перед экспортом
- экспорт в форматы JSON, CSV, XML
- скачивание файлов
- расширение фреймворка собственными middlewares, pipelines
- выполнение POST запросов, поддержка куков и сессий, аутентификации
- подмена user-agent
- shell консоль для отладки
- система логирования
- мониторинг через Web-интерфейс
- управление через Telnet-консоль
Рабочий пример выложил на GitHub.
Собираем данные с помощью Scrapy / Python /
Немного о формате
Для себя я выделяю два принципа извлечения и анализа данных: frontend, backend.
Frontend. В данном случае мы непосредственно получаем информацию из конечного HTML файла, собранного на сервере веб-приложения. У данного способа есть свои плюсы и минусы: мы всегда получаем информацию, которая уже точно загружена на сайт, но теряем производительность, так как иногда нам нужно узнавать об обновлениях сайта как можно быстрее.
Backend. В данном случае мы получаем информацию от backend api веб-приложения в формате json или xml. Сразу хочу сказать, что не у всех сайтов возможно получить доступ к api, иногда даже невозможно, если анализировать только сайт и приходится анализировать протокол мобильного приложения. Однако если у нас получается найти способы и точки для обращения к api веб-приложения, то мы получаем структурированную информацию и хорошую производительность нашего скрапера.
Conclusion
In this tutorial you built a fully-functional spider that extracts data from web pages in less than thirty lines of code. That’s a great start, but there’s a lot of fun things you can do with this spider. Here are some ways you could expand the code you’ve written. They’ll give you some practice scraping data.
- Right now we’re only parsing results from 2016, as you might have guessed from the part of — how would you crawl results from other years?
- There’s a retail price included on most sets. How do you extract the data from that cell? How would you get a raw number out of it? Hint: you’ll find the data in a just like the number of pieces and minifigs.
- Most of the results have tags that specify semantic data about the sets or their context. How do we crawl these, given that there are multiple tags for a single set?
That should be enough to get you thinking and experimenting. If you need more information on Scrapy, check out Scrapy’s official docs. For more information on working with data from the web, see our tutorial on «How To Scrape Web Pages with Beautiful Soup and Python 3”.
scrapyd-client
For a reference on each subcommand invoke .
projects
Lists all projects of a Scrapyd instance:
# lists all projects on the default target
scrapyd-client projects
# lists all projects from a custom URL
scrapyd-client -t http://scrapyd.example.net projects
schedule
Schedules one or more spiders to be executed:
# schedules any spider
scrapyd-client schedule
# schedules all spiders from the 'knowledge' project
scrapyd-client schedule -p knowledge \*
# schedules any spider from any project whose name ends with '_daily'
scrapyd-client schedule -p \* *_daily
spiders
Lists spiders of one or more projects:
# lists all spiders
scrapyd-client spiders
# lists all spiders from the 'knowledge' project
scrapyd-client spiders -p knowledge
Применение в повседневной жизни. Что пригодилось больше всего.
Ну а теперь немного впечатлений об использовании протокола AMQP в повседневной жизни.
Самой востребованной функцией явилась публикация сообщения. Права доступа конкретного пользователя не всегда позволяют использовать веб-интерфейс, хотя порой для тестирования того или иного сервиса это просто необходимо. Тут на помощь и проходит AMQP и авторизация от имени сервиса использующего этот канал.
Второй по популярности стала возможность считывания сообщений из временной очереди. Такая возможность полезна при настройке новых маршрутов и потоков сообщений, а также при предотвращении аварий.
Остальные возможности так же нашли применение в тех или иных задачах.